2016 MITSUBISHI OUTLANDER III radio controls
[x] Cancel search: radio controlsPage 281 of 464

Bluetooth® 2.0 interface (if so equipped)
Features and controls 5-205
5
N00565401070
For the operation of a music player connected via Bluetooth®, refer to the following sec-tions. [For vehicles equi
pped with the AM/FM
radio/CD player] Refer to “Listen to Bl
uetooth Audio” on page
7-41. [For vehicles equippe
d with the Mitsubishi
Multi-Communication System (MMCS)] Refer to the separate owner’s manual. [For vehicles equipped with the DISPLAYAUDIO] Refer to the separate owner’s manual.
N00565501097
You can make or re
ceive hands-free calls
using a Bluetooth
® compatible cellular phone
connected to the Bluetooth
® 2.0 interface.
You can also use the phonebooks in the Blue- tooth
® 2.0 interface to make calls without
dialing telephone numbers. To make a call P.5-205 Send function P.5-207
Receiving calls P.5-207 Mute function P.5-207Switching between hand
s-free mode and pri-
vate mode P.5-207
N00565601098
You can make a call in the following 3 ways using the Bluetooth
® 2.0 interface:
By saying a telephone number By using the Bluetooth
® 2.0 interface’s
phonebook By redialing a
telephone number
You can make a call
by saying the telephone
number.
1. Press the SPEECH button (except for vehicles with Mitsubishi Multi-Commu-nication System) or PICK-UP button (for vehicles with Mitsubishi Multi-Commu- nication System).2. Say “Dial.” 3. After the voice gui
de says “Number
please,” say the
telephone number.
4. The voice guide wi
ll say “Dialing
® 2.0 interface will then
make the call. When the confirmation function is on, thesystem will confirm
the telephone number
again. To continue with that number, answer “Yes.” To change the telephone number, answer “No.” The system will say “Number please” then say
the telephone number
again.
Operating a music player con- nected via Bluetooth
®
How to make or receive hands-free calls
NOTE
Hands-free calls may not
operate correctly
when you place or receive the call directly from your cellular phone, instead of using the Bluetooth
® 2.0 interface.
To m a k e a c a l l
Making a call by us
ing the telephone
number
NOTE
In the case of English,
the system will recog-
nise both “zero” and “oh”
(Letter “o”) for the
number “0.” The Bluetooth
® 2.0 interface supports num-
bers (0 to 9) and characters (+, # and
*).
The maximum supported telephone number length is as follows: • International telephone
number: + and tele-
phone numbers (to 18 digits).
BK0223400US.book 205 ページ 2015年2月13日 金曜日 午後12時15分
Page 283 of 464

Bluetooth® 2.0 interface (if so equipped)
Features and controls 5-207
5
You can redial the last
number called, based
on the history of dialed calls in the paired cel-lular phone. Use the following procedure to redial. 1. Press the SPEECH button (except for vehicles with Mitsubishi Multi-Commu- nication System) or PICK-UP button (forvehicles with Mitsubishi Multi-Commu- nication System). 2. Say “Redial.”
N00565700018
During a call, press the SPEECH button toenter voice recognitio
n mode, then say
“
a call you need to sim-
ulate the pressing of a phone button as a
response to an automated system, press the SPEECH button and speak “1 2 3 4 poundsend” and the 1234# will be sent via your cel- lular phone.
N00565801045
If an incoming phone call is received whilethe ignition switch or
the operation mode is in
ON or ACC, the audio sy
stem will be auto-
matically turned on and switched to the incoming call, even when the audio systemwas originally off. The voice guide a
nnouncement for the
incoming call will be output from the frontpassenger’s seat speaker. If the CD player or radio was playing when the incoming call was received, the audio sys-tem will mute the sound from the CD player or radio and output onl
y the incoming call.
To receive the call, press the PICK-UP buttonon the steering wheel control switch. When the call is over, the audio system will return to its previous state.
N00565900010
At any time during a ca
ll, you can mute the
vehicle microphone.
Pressing the SPEECH button and then saying “Mute” during a call will turn ON the mutefunction and mute the microphone. Saying “Mute off” in the same way will turn off the mute function and cancel the mute onthe microphone.
N00566600014
The Bluetooth
® 2.0 interface can switch
between hands-free m
ode (hands-free calls)
and private mode (calls
using cellular phone).
If you press the SPEECH button and say“Transfer call” duri
ng a hands-free call, you
can stop the hands-free m
ode and talk in pri-
vate mode. To return to hands-free mode, press the SPEECH button again and say “Transfer call.”
N00566000018
The Bluetooth
® 2.0 interface has 2 types of
unique phonebooks that are different from thephonebook stored in the cellular phone. They are the vehicle phonebook and the mobile phonebook.
NOTE
When the confirmation function is on, the system will check if
the name and location of
the receiver are correct. If the name is cor-rect, answer “Yes.” To change the name
or location to call,
answer “No.” The system will return to Step3.
RedialingSend function
Receiving calls
Mute function
Switching between hands-free mode and private mode
Phonebook function
BK0223400US.book 207 ページ 2015年2月13日 金曜日 午後12時15分
Page 290 of 464
Bluetooth® 2.0 interface (if so equipped) 5-214 Features and controls
5
5. The voice guide will say “Importing the contact list from the mobile phonebook.This may take several minutes to com- plete. Would you li
ke to continue?”
Answer “Yes,” transferring to the mobilephonebook the phonebook stored in the cellular phone will start. Answer “No,” the system will return tothe main menu.
6. When the transfer is complete, the voice guide will say “Import complete” andthen the system will return to the main menu.
N00566301092
MODEL: MMC FCC ID: CB2MDGMY10IC: 279B-MDGMY10 Your Bluetooth
® 2.0 interface operates on a
radio frequency subject to Federal Communi- cations Commission (FCC)
Rules (For vehi-
cles sold in U.S.A.
) and Industry Canada
Rules (For vehicles so
ld in Canada). This
device complies with Part 15 of the FCCRules and RSS-210 of the Industry Canada Rules. Operation is subject to the following two conditions: This device may not
cause harmful inter-
ference. This device must ac
cept any interference
received, including interference that maycause undesired operation.
The term “IC:” before
the radio certification
number only signifies th
at Industry Canada
technical specifications were met. The antenna used for this transmitter must not be co-located or operating in conjunctionwith any other antenna
or transmitter. End-
users and installers must be provided with installation instructions
and transmitter oper-
ating conditions for sa
tisfying RF exposure
compliance. FCC Notice: This equipment has been tested and found to comply with the limits for a Class B digital device, pursuant to part 15 ofthe FCC Rules. These limits are designed to provide reasonable prot
ection against harmful
interference in a residential installation.This equipment generate
s, use and can radiate
radio frequency energy a
nd, if not installed
and used in accordance with the instructions,may cause harmful interf
erence to radio com-
munications. However, there is no guarantee that interfer-ence will not occur in a particular installation. If this equipment does
cause harmful interfer-
ence to radio or tele
vision reception, which
can be determined by turning the equipment off and on, the user is encouraged to try to correct the interference by one or more of thefollowing measures: Reorient or relocate the receiving antenna. Increase the separation between the equipment and receiver.
NOTE
The transfer may take some time to complete depending on the number of contacts. If the Bluetooth
® 2.0 interface could not be
connected to the Bluetooth
® compatible cel-
lular phone, the voice gui
de will sa
y “Unable
to transfer contact list from phone” and thenthe system will return to the main menu. If you press the HANG-UP button or press and hold the SPEECH button during the data transfer, the transfer will be cancelled and the system will return to the main menu. If an error occurs during the data transfer, all transfer will be canc
elled and the voice guide
will say “Unable to complete the phonebook import” and then the system will return to the main menu. If there are no contacts in the phonebook, the voice guide will say
“There are no contacts
on the connected phone.”
General information
CAUTION Changes or modifica
tions made to this
equipment not expressly approved by the manufacturer may void the FCC authoriza- tion to operate this equipment.
BK0223400US.book 214 ページ 2015年2月13日 金曜日 午後12時15分
Page 291 of 464
USB input terminal (if so equipped)
Features and controls 5-215
5
Connect the equipment into an outlet on a circuit different from that to which thereceiver is connected. Consult the dealer or an experienced radio/TV technician for help.
ICES Notice: This Class B digital apparatus complies with Canadian ICES-003.
N00566401080
N00566701100
You can connect your USB memory device or iPod
* to play music files stored in the USB
memory device or iPod. This section explains how to connect and remove a USB memory device or iPod.See the following sect
ion for details on how
to play music files. Refer to “Listen to an iPod” on page 7-33. Refer to “Listen to Audio Files on a USB Device” on page 7-35. Refer to “To play iPod/USB memory devicetracks via voice ope
ration” on page 7-38.
* : “iPod” is a registered trademark of Apple Inc. in the United Stat
es and other countries.
N00566801114
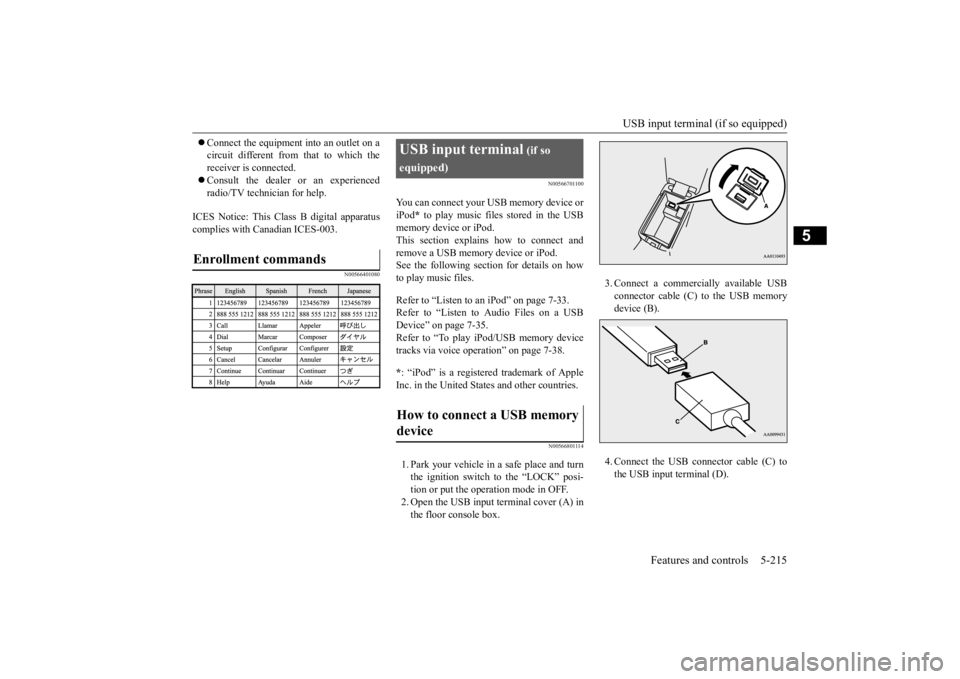
1. Park your vehicle in a safe place and turn the ignition switch to the “LOCK” posi- tion or put the operation mode in OFF. 2. Open the USB input terminal cover (A) inthe floor console box.
Enrollment commands
USB input terminal
(if so
equipped)How to connect a USB memory device
3. Connect a commercia
lly available USB
connector cable (C) to the USB memorydevice (B). 4. Connect the USB connector cable (C) to the USB input terminal (D).
BK0223400US.book 215 ページ 2015年2月13日 金曜日 午後12時15分
Page 293 of 464
USB input terminal (if so equipped)
Features and controls 5-217
5
5. To remove the Dock connector, turn the ignition switch to the “LOCK” position orput the operation mode in OFF first and perform the installation steps in reverse.
N00567001041
For details about the
types of connectable
devices and supported fi
le specifications,
refer to the following pages and manuals. [For vehicles equipped with the AM/FM radio/CD player] Refer to “Listen to an iPod” on page 7-33, “Listen to Audio File
s on a USB Device” on
page 7-35 and “Audio Files (MP3/WMA/AAC)” on page 7-20. [For vehicles equipped with the Mitsubishi Multi-Communication
System (MMCS)]
Refer to the separate owner’s manual. [For vehicles equipped with the DISPLAY AUDIO] Refer to the separate owner’s manual.
For details about the types of connectable devices and supported fi
le specifications,
refer to the following section.
N00567101130
Devices of the follow
ing types can be con-
nected. For these connectable de
vice types, “iPod*,”
“iPod classic*,” “iPo
d nano*,” “iPod touch*”
and “iPhone*,” refer to the following web- site: [For vehicles sold in U.S.A.]You can access the Mitsubishi Motors North America website. [For vehicles sold in Canada and Mexico]
You can access the Mi
tsubishi Motors web-
site. Please read and agree to the “Warningabout Links to the Web Sites of Other Com- panies”. The websites
mentioned above may
connect you to websites
other than the Mit-
subishi Motors website. http://www.mitsubishi-
motors.com/en/prod-
ucts/index.html * : “iPod,” “iPod classi
c,” “iPod nano,” “iPod
touch,” and “iPhone” are registered trade- marks of Apple Inc. in the United States and other countries.
Types of connectable devices and supported file specifica-tions
Except for vehicles equipped with the Bluetooth
® 2.0 interface
For vehicles equipped with the Blue- tooth
® 2.0 interface
Device types
Model name
Condition
USB memory device
Storage capac- ity of 256 Mbytes or more
Models other than USB memory devices and iPods
Digital audio player support-ing mass stor- age class
NOTE
Depending on the type of the USB memory device or other devi
ce connected, the con-
nected device may not
function properly or
the available functi
ons may be limited.
It is recommended to use an iPod with firm- ware updated to th
e latest version.
You can charge your iP
od by connecting it to
the USB input terminal
when the ignition
switch or the operation mode is in ON or ACC. Do not keep your USB memory device or iPod in your vehicle. It is recommended that you back up the files in case of data damage.
BK0223400US.book 217 ページ 2015年2月13日 金曜日 午後12時15分
Page 296 of 464
HomeLink® Wireless Control System (if so equipped) 5-220 Features and controls
5
N00554301040
HomeLink
® Wireless Contro
l System is a
registered trademark of Gentex Corporation. HomeLink
® provides a convenient way to
replace up to 3 hand-held radio-frequency (RF) transmitters used to activate devices such as gate operators
, garage door openers,
entry door locks, security systems, even home lighting. Additional HomeLink
® information
can be found at www.homelink.com,www.youtube.com/HomeLinkGentex, or by calling the toll-free HomeLink
®-Hotline at 1-
800-355-3515.HomeLink
® Wireless Con-
trol System
(if so equipped)
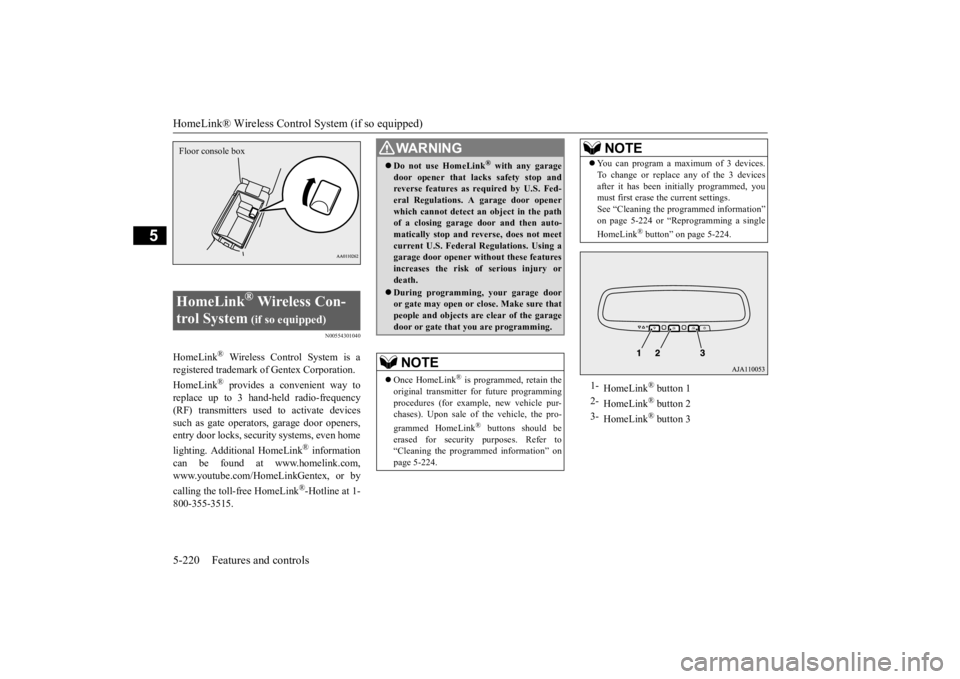
Floor console box
WA R N I N G Do not use HomeLink
® with any garage
door opener that lacks safety stop and reverse features as required by U.S. Fed- eral Regulations.
A garage door opener
which cannot detect an object in the path of a closing garage d
oor and then auto-
matically stop and reverse, does not meetcurrent U.S. Federal Regulations. Using a garage door opener wi
thout these features
increases the risk of serious injury ordeath. During programming, your garage door or gate may open or close. Make sure that people and objects are clear of the garage door or gate that
you are programming.
NOTE
Once HomeLink
® is programmed, retain the
original transmitter for future programming procedures (for example, new vehicle pur- chases). Upon sale of the vehicle, the pro- grammed HomeLink
® buttons should be
erased for security purposes. Refer to “Cleaning the progra
mmed information” on
page 5-224.
You can program a maximum of 3 devices. To change or replace
any of the 3 devices
after it has been in
itially programmed, you
must first erase the current settings. See “Cleaning the programmed information” on page 5-224 or “Reprogramming a single HomeLink
® button” on page 5-224.
1-
HomeLink
® button 1
2-
HomeLink
® button 2
3-
HomeLink
® button 3
NOTE
BK0223400US.book 220 ページ 2015年2月13日 金曜日 午後12時15分
Page 297 of 464
HomeLink® Wireless Control System (if so equipped)
Features and controls 5-221
5
N00584600029
Some garage door openers manufactured after 1995 have “rolli
ng code protection”.
To program a garage door opener equipped with “rolli
ng code protection”;
you will need to access the garage dooropener motor to press the motor’s “Learn” or “Smart” buttons. For convenience, use a ladder and another person to assist you. It is recommended that a new battery be placed in the hand-held transmitter of the device being programmed to HomeLink
®
for quicker training and accurate trans- mission of the radio-frequency signal.
N00584700020
To program HomeLink
® to operate a garage
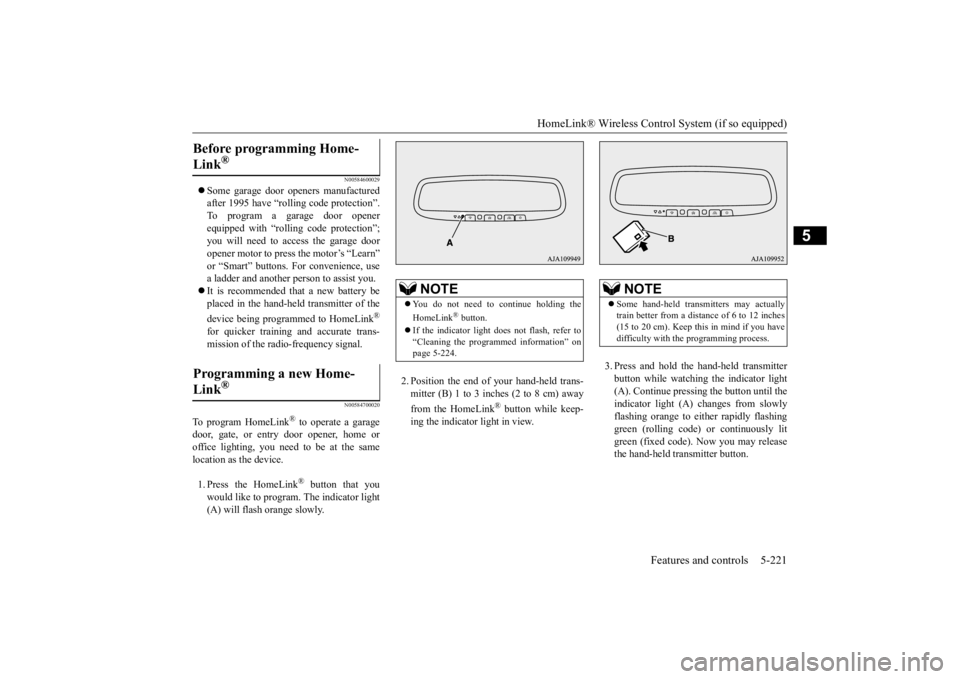
door, gate, or entry door opener, home or office lighting, you need to be at the same location as the device. 1. Press the HomeLink
® button that you
would like to program. The indicator light (A) will flash orange slowly.
2. Position the end of your hand-held trans- mitter (B) 1 to 3 inches (2 to 8 cm) away from the HomeLink
® button while keep-
ing the indicator light in view.
3. Press and hold the hand-held transmitter button while watching
the indicator light
(A). Continue pressing the button until the indicator light (A)
changes from slowly
flashing orange to either rapidly flashinggreen (rolling code) or continuously lit green (fixed code). Now you may release the hand-held transmitter button.
Before programming Home- Link
®
Programming a new Home-Link
®
NOTE
You do not need to continue holding the HomeLink
® button.
If the indicator light doe
s not flash, refer to
“Cleaning the programmed information” on page 5-224.
NOTE
Some hand-held transmitters may actually train better from a distance of 6 to 12 inches(15 to 20 cm). Keep this in mind if you have difficulty with th
e programming process.
BK0223400US.book 221 ページ 2015年2月13日 金曜日 午後12時15分
Page 298 of 464

HomeLink® Wireless Control System (if so equipped) 5-222 Features and controls
5
4. Press the HomeLink
® button that was just
programmed and observe the indicator light.• If the indicator light continuously illumi- nates green, programming is complete and your device shoul
d operate when the
HomeLink
® button is pressed and
released. • If the indicator light rapidly flashes green, firmly press, hold for 2 seconds and release the programmed HomeLink
®
button. Repeat the
“press/hold/release”
sequence a second tim
e, and, depending
on the brand of the garage door opener(or other rolling code equipped device), repeat this sequence a third time to com- plete the programming
process. At this
point if your device operates, program- ming is complete.
• If the device does not operate, continue with “Programming a new HomeLink
®”
steps 5 to 7 to complete the program- ming of a rolling code equipped device.
5. At the garage door opener receiver(motor-head unit) in the garage, locate the “Learn” or “Smart” but
ton. This can usu-
ally be found where the hanging antennawire is attached to the motor-head unit (see the garage
door opener manual to
identify the “Learn” button.) 6. Firmly press and release the “Learn” or “Smart” button. (The name and color ofthe button may vary by manufacturer.) There are typically 30 seconds to initiate step 7.7. Return to the vehicle and firmly press, hold for 2 seconds and release the pro- grammed HomeLink
® button. Repeat the
“press/hold/release”
sequence a second
time, and, depending
on the brand of the
garage door opener (or other rolling codeequipped device), repe
at this sequence a
third time to complete the programming process. HomeLink
® should now activate your
rolling code e
quipped device.
N00584800021
Canadian radio-frequenc
y laws require trans-
mitter signals to “time-out” (or quit) afterseveral seconds of tr
ansmission - which may
not be long enough for HomeLink
® to pick
up the signal during programming. Similar to this Canadian law, some U.S. gate operators are designed to “time-
out” in the same man-
ner. The indicator LED on the hand-held transmit- ter will go off when the device times out indi-cating that it has fi
nished transmitting.
If you live in Canada or you are having diffi- culties programming a gate operator orgarage door opener by using the “Program- ming” procedures, replace “Programming a new HomeLink
®” step 3 with the following:
NOTE
Some devices may requi
re you to replace this
“Programming a new HomeLink
®” step 3
with procedures noted in the “Gate operator / Canadian programming”
section. If the indi-
cator light does not ch
ange to rapidly flash-
ing green or continuously lit green after performing these step
s, contact HomeLink
®
at www.homelink.com
NOTE
In the event that there are still programming difficulties or questi
ons, additional Home-
Link
® information and programming videos
can be found online at www.homelink.com,www.youtube.com/HomeL
inkGentex, or by
calling the HomeLink
® Hotline.
Gate operator/Canadian pro- gramming
BK0223400US.book 222 ページ 2015年2月13日 金曜日 午後12時15分