2016 MITSUBISHI OUTLANDER III oil type
[x] Cancel search: oil typePage 9 of 464

2-1
2
If this warning light comes on or
flashes while you’re driving...
Quick index
N00200702234
If this warning light comes on
or flashes while you’re driving...
NOTE
For information regarding warning
displays in the multi-information display (Color
liquid crystal display
type), refer to “Mult
i-information display” on
page 5-128. These warning lights will co
me on for a few seconds for a bulb check when the i
gnition switch is
first turned to “ON” or the op
eration mode is put in ON.
Wa rn in g l ig h t s
Do this
Ref. Page
Charging system warning light
Park your vehicle in a safe
place and stop the engine.
Contact your Mitsubishi Motors dealer or a re
pair facility of your choice for assis-
tance.
P. 5-174
Oil pressure warning light
(Vehicles equipped with mono-color
liquid crystal display)
Park your vehicle in a safe
place and stop the engine, then check the engine oil
level. If the light comes on while the engine oil le
vel is normal, have the system checked
at an authorized Mitsubishi
Motors dealer or a repair fa
cility of your choice as soon
as possible.
P. 5-174
or
Brake warning light
If this light comes on while driving, check to see that the parking brake is fully released. If this light stays on after
releasing the parking brake,
immediately stop and check
the brake fluid level. If the brake fluid level is correct, there
may be a system malfunction. Avoid hard
braking and high speed, and contact an au
thorized Mitsubishi Mo
tors dealer or a
repair facility of your
choice for assistance.
P. 5-173
BK0223400US.book 1 ページ 2015年2月13日 金曜日 午後12時15分
Page 164 of 464
Cautions on the handling of 4-wheel drive vehicles 5-88 Features and controls
5
N00530801214
Since the driving torque can be applied to the four wheels, the driving performance of the vehicle when operating in 4-wheel drive is greatly affected by the condition of the tires. Pay close attention to the tires. Install only the specified tires on all wheels. Refer to “Tires and wheels” onpage 11-7. Be sure all four tires and wheels are the same size and type.When it is necessary to replace any of the tires or wheels, replace all four. All tires should be ro
tated before the wear
difference between the front and rear tires is recognizable.
Good vehicle performance cannot be expected if there is a difference in wearbetween tires. Refer to “Tire rotation” on page 9-20. Check the tire inflation pressure regularly.Cautions on the handling of 4-wheel drive vehicles Tires and wheels
CAUTION Always use tires of th
e same size, type, and
brand that have no wear differences. Usingtires of different size, type, brands or degreeof wear, will increase the differential oil tem- perature and result in
possible damage to the
driving system. Further, the drive train willbe subject to excessi
ve loading, possibly
leading to oil leakage,
component seizure, or
other serious failures.
To w i n g
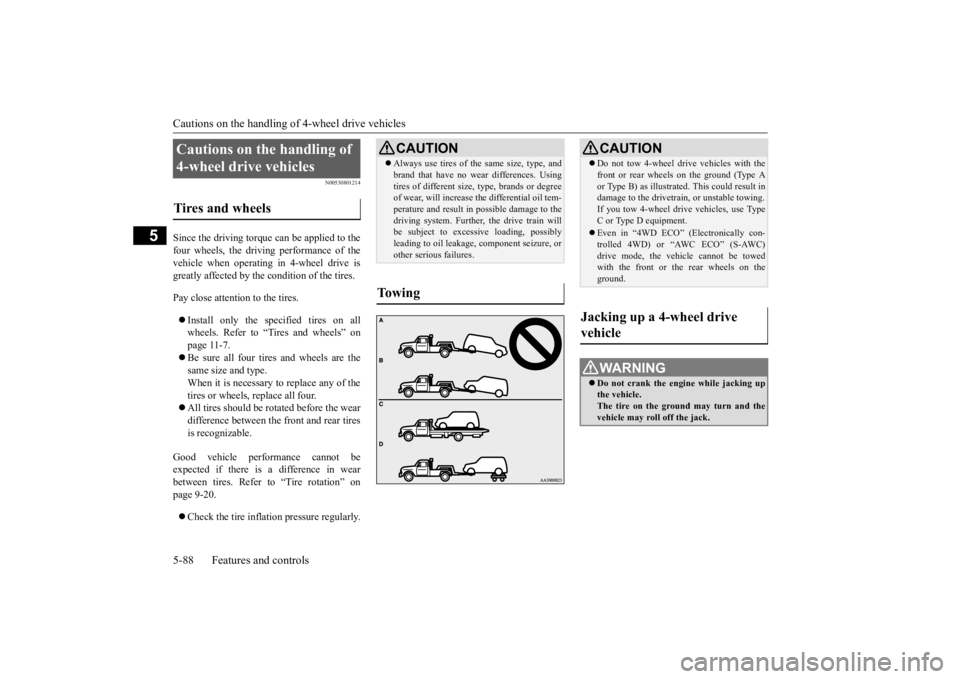
CAUTION Do not tow 4-wheel drive vehicles with the front or rear wheels on the ground (Type Aor Type B) as illustrate
d. This could result in
damage to the drivetrain, or unstable towing. If you tow 4-wheel drive vehicles, use Type C or Type D equipment. Even in “4WD ECO” (Electronically con- trolled 4WD) or “AWC ECO” (S-AWC)drive mode, the vehicle cannot be towed with the front or the rear wheels on the ground.
Jacking up a 4-wheel drive vehicle
WA R N I N G Do not crank the engine while jacking up the vehicle.The tire on the ground may turn and the vehicle may roll off the jack.
BK0223400US.book 88 ページ 2015年2月13日 金曜日 午後12時15分
Page 237 of 464
Indicator light, warning light, and information screen display list (multi information display - Type 1)
Features and controls 5-161
5
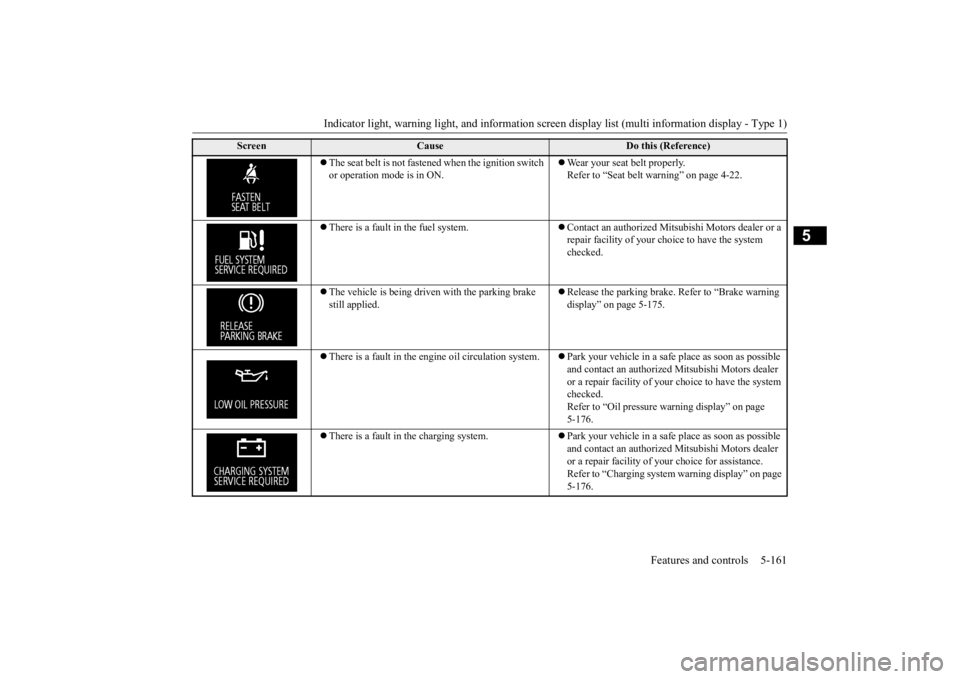
The seat belt is not fastened when the ignition switch or operation mode is in ON.
Wear your seat belt properly. Refer to “Seat belt warning” on page 4-22.
There is a fault in the fuel system.
Contact an authorized Mitsubishi Motors dealer or a repair facility of your choi
ce to have the system
checked.
The vehicle is being driven with the parking brake still applied.
Release the parking brake.
Refer to “Brake warning
display” on page 5-175.
There is a fault in the engi
ne oil circul
ation system.
Park your vehicle in a safe
place as soon as possible
and contact an authorized
Mitsubishi Motors dealer
or a repair facility of your
choice to have the system
checked.Refer to “Oil pressure
warning display” on page
5-176.
There is a fault in the charging system.
Park your vehicle in a safe
place as soon as possible
and contact an authorized
Mitsubishi Motors dealer
or a repair facility of your
choice for assistance.
Refer to “Charging system
warning display” on page
5-176.
Screen
Cause
Do this (Reference)
BK0223400US.book 161 ページ 2015年2月13日 金曜日 午後12時15分
Page 247 of 464
Indicator and warning light package (multi information display - Type 2)
Features and controls 5-171
5
N00519801891
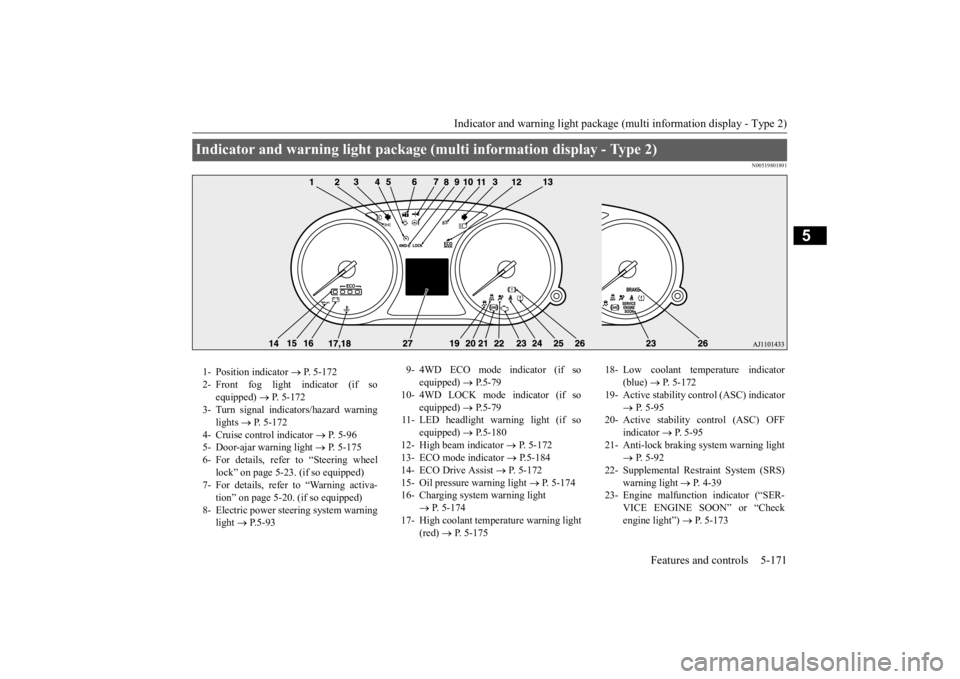
Indicator and warning light package (mu
lti information display - Type 2)
1- Position indicator
P. 5-172
2- Front fog light indicator (if so
equipped)
P. 5-172
3- Turn signal indicators/hazard warning
lights
P. 5-172
4- Cruise control indicator
P. 5-96
5- Door-ajar warning light
P. 5-175
6- For details, refer to “Steering wheel
lock” on page 5-23. (if so equipped)
7- For details, refer to “Warning activa-
tion” on page 5-20. (if so equipped)
8- Electric power stee
ring system warning
light
P. 5 - 9 3
9- 4WD ECO mode indicator (if so
equipped)
P.5-79
10- 4WD LOCK mode indicator (if so
equipped)
P.5-79
11- LED headlight warning light (if so
equipped)
P.5-180
12- High beam indicator
P. 5-172
13- ECO mode indicator
P.5-184
14- ECO Drive Assist
P. 5-172
15- Oil pressure warning light
P. 5-174
16- Charging system warning light
P. 5-174
17- High coolant temperature warning light
(red)
P. 5-175
18- Low coolant temp
erature indicator
(blue)
P. 5-172
19- Active stability control (ASC) indicator
P. 5-95
20- Active stability control (ASC) OFF
indicator
P. 5-95
21- Anti-lock braking system warning light
P. 5-92
22- Supplemental Restra
int System (SRS)
warning light
P. 4 - 3 9
23- Engine malfuncti
on indicator (“SER-
VICE ENGINE SOON” or “Check engine light”)
P. 5-173
BK0223400US.book 171 ページ 2015年2月13日 金曜日 午後12時15分
Page 250 of 464
Warning lights 5-174 Features and controls
5
N00520601323
This light comes on in the event of a malfunc- tion in the charging system or when the igni-tion switch is turned to the “ON” position (engine off) or the operation mode is put in ON. On vehicle equipped with the multiinformation display - Type 1, a warning is also displayed in the multi information dis- play. When the engine is started, the lightshould go out. Check to make sure that the light has gone out before driving.
N00520701278
This light comes on when the engine oil pres- sure is below normal. If the light stays onwhile driving, stop the
engine as soon as pos-
sible. Do not run the engine until the cause of the low oil pressure is corrected.
CAUTION Driving for a long time with the engine mal- function indicator on
may cause more dam-
age to the emission control system. Thiscould also affect fuel economy and drivabil- ity. If this indicator does not come on when the ignition switch is turned to the “ON” posi- tion or the operation mode
is put in ON, have
the system checked at an authorized Mitsubi- shi Motors dealer or a repair facility of your choice. If the engine malfuncti
on indicator comes on
while the engine is running, avoid driving athigh speeds. During vehicle operation
with the indicator
on, the vehicle may not
accelerate when you
depress the accelerator pedal. When the vehicle is stat
ionary with the indi-
cator on, you must depress the brake pedalmore firmly than usual since the engine idling speed is higher than usual and a vehi- cle with an automatic transaxle or CVT has astronger tendency to creep forward.
NOTE
Do not disconnect the ba
ttery cable when the
engine malfunction i
ndicator (“SERVICE
ENGINE SOON” or “Che
ck engine light”) is
on. The engine electronic control module stores critical OBD information (especially exhaustemission data), which ma
y be lost if the bat-
tery cable is disconne
cted while the engine
malfunction indicator is
on. This will make it
difficult to diagnose the cause of future prob- lems.
Charging system warning light
CAUTION If the warning light stays on while the engine is running, park your ve
hicle in a safe place
as soon as possible and
contact an authorized
Mitsubishi Motors dealer
or a repair facility
of your choice to have the system checked.
Oil pressure warning light (Vehicle equipped with the multi information display - Type 2)
CAUTION If this light comes on when the engine oil level is not low, have
your vehicle checked at
an authorized Mitsubish
i Motors dealer or a
repair facility
of your choice.
This warning light does not show the amount of oil in the crankcase. This can only bedetermined by checking th
e oil level with the
dipstick with the engine turned off.
BK0223400US.book 174 ページ 2015年2月13日 金曜日 午後12時15分
Page 252 of 464
Information screen display (Vehicle equipped with the multi information display - Type 1) 5-176 Features and controls
5
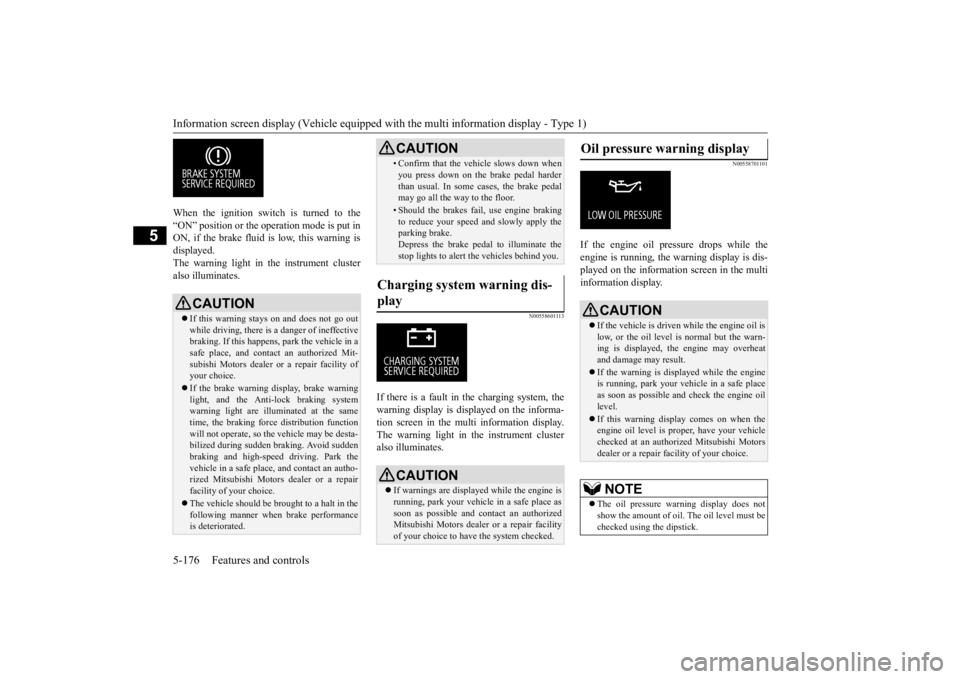
When the ignition switch is turned to the “ON” position or the ope
ration mode is put in
ON, if the brake fluid is
low, this warning is
displayed. The warning light in the instrument cluster also illuminates.
N00558601113
If there is a fault in the charging system, the warning display is di
splayed on the informa-
tion screen in the multi information display. The warning light in th
e instrument cluster
also illuminates.
N00558701101
If the engine oil pressure drops while the engine is running, the
warning display is dis-
played on the information screen in the multi information display.
CAUTION If this warning stays on and does not go out while driving, there is
a danger of ineffective
braking. If this happens
, park the vehicle in a
safe place, and contac
t an authorized Mit-
subishi Motors dealer or a repair facility ofyour choice. If the brake warning display, brake warning light, and the Anti-lock braking system warning light are illu
minated at the same
time, the braking forc
e distribution function
will not operate, so th
e vehicle may be desta-
bilized during sudden br
aking. Avoid sudden
braking and high-speed driving. Park thevehicle in a safe place,
and contact an autho-
rized Mitsubishi Motors
dealer or a repair
facility of your choice. The vehicle should be brought to a halt in the following manner when
brake performance
is deteriorated.
• Confirm that the vehicle slows down whenyou press down on the brake pedal harderthan usual. In some cases, the brake pedalmay go all the way to the floor.• Should the brakes fail, use engine brakingto reduce your speed and slowly apply the parking brake. Depress the brake pedal to illuminate thestop lights to alert th
e vehicles behind you.
Charging system warning dis- play
CAUTION If warnings are displa
yed while the engine is
running, park your vehicl
e in a safe place as
soon as possible and c
ontact an authorized
Mitsubishi Motors dealer
or a repair facility
of your choice to have the system checked.CAUTION
Oil pressure warning display
CAUTION If the vehicle is driven while the engine oil is low, or the oil level is normal but the warn-ing is displayed, th
e engine may overheat
and damage may result. If the warning is displayed while the engine is running, park your ve
hicle in a safe place
as soon as possible and check the engine oillevel. If this warning display comes on when the engine oil level is pr
oper, have your vehicle
checked at an authorized Mitsubishi Motors dealer or a repair fa
cility of your choice.
NOTE
The oil pressure wa
rning display does not
show the amount of oil. The oil level must bechecked using the dipstick.
BK0223400US.book 176 ページ 2015年2月13日 金曜日 午後12時15分
Page 325 of 464
Trailer towing
Driving safety 6-13
6
Tongue loads can be adjusted by proper dis- tribution of the load in the trailer. This can bechecked by separately
weighing the loaded
trailer and then the tongue. The GAWRs are printed on the certification label which is riveted on the door sill on the driver’s side. Refer to “Vehicle labeling” on page 11-2. Choose a proper hitch and ball, and make sure it is installed at a height that is compati- ble with the trailer.Use a good equalizing hitch which uniformly distributes the trailer tongue load throughout the frame.
A safety chain must al
ways be used between
the towing vehicle and the trailer. Leave suf-ficient slack in the chain for turns. The chain should cross under the trailer tongue to pre- vent the tongue from dropping to the groundin case it becomes damaged or separated. For correct safety chai
n procedures, consult
your authorized Mitsub
ishi Motors dealer.
Your vehicle will need service more often when you’re towing a trailer. Refer to “WAR-RANTY AND MAINTENANCE MAN- UAL”. Especially important in trailer operation are manual transaxle oil, automatictransaxle fluid, engine oi
l, rear axle oil, belt,
cooling system and brake system. Each of these is covered in this manual. For details, please refer to the “Vehicle care and maintenance” section.Check periodically to see that all hitch nuts and bolts are tight. Mitsubishi Motors recommends that any trailer having a total we
ight of 1,250 lbs (567
kg) or more (2400 models), 1,400 lbs (635kg) or more (3000 mode
ls) be equipped with
its own electric or surge-type brakes. If you choose electric br
akes, be sure they are
electrically actuated. Do not attempt to tapinto your vehicle’s hydraulic system. No mat- ter how successful it
may seem, any attempt
to attach trailer brakes to your vehicle’shydraulic system will lower braking effec- tiveness and create a potential hazard.
Gross axle weight rating (GAWR) Trailer hitches
WA R N I N G If you make any holes in the body of your vehicle for installing
a trailer hitch, be
sure to seal the holes later when youremove the hitch. If
you don’t seal them,
deadly carbon monoxide (CO) from your exhaust can enter your vehicle. Refer to“Exhaust system” on page 9-24.
NOTE
Mitsubishi Motors recommends that sway control be used whenever you are towing, toimprove towing stability.For further informati
on, please contact your
authorized Mitsubishi Motors dealer.
Safety chains
CAUTION Never tow a trailer wi
thout using a safety
chain securely attached to both the trailer and the vehicle. If the
coupling unit or hitch
ball experiences a probl
em, the trailer may
separate from
your vehicle.
Maintenance when trailer tow- ing Trailer brakes
BK0223400US.book 13 ページ 2015年2月13日 金曜日 午後12時15分
Page 392 of 464
How to change a tire 8-10 For emergencies
8
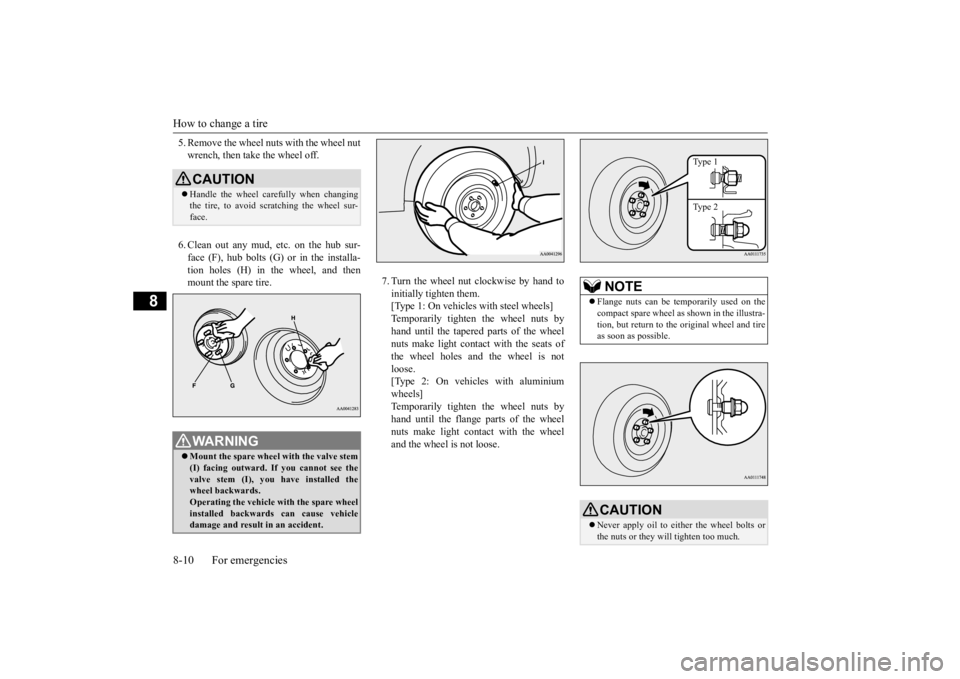
5. Remove the wheel nuts with the wheel nut wrench, then take the wheel off. 6. Clean out any mud, etc. on the hub sur- face (F), hub bolts (G)
or in the installa-
tion holes (H) in the wheel, and then mount the spare tire.
7. Turn the wheel nut clockwise by hand to initially tighten them. [Type 1: On vehicles
with steel wheels]
Temporarily tighten the wheel nuts by hand until the tapered parts of the wheel nuts make light contac
t with the seats of
the wheel holes and the wheel is not loose. [Type 2: On vehicles with aluminiumwheels] Temporarily tighten the wheel nuts by hand until the flange parts of the wheelnuts make light cont
act with the wheel
and the wheel is not loose.
CAUTION Handle the wheel carefully when changing the tire, to avoid scratching the wheel sur- face.WA R N I N G Mount the spare wheel with the valve stem (I) facing outward. If
you cannot see the
valve stem (I), you
have installed the
wheel backwards.Operating the vehicle with the spare wheel installed backwards can cause vehicle damage and result
in an ac
cident.
NOTE
Flange nuts can be te
mporarily used on the
compact spare wheel as shown in the illustra- tion, but return to the original wheel and tire as soon as possible.CAUTION Never apply oil to either the wheel bolts or the nuts or they will tighten too much.
Type 1 Type 2
BK0223400US.book 10 ページ 2015年2月13日 金曜日 午後12時15分