2016 MINI Hardtop 4 Door headlight bulb
[x] Cancel search: headlight bulbPage 54 of 251

Releasing
Raise lever slightly, press the button and guide
the lever down.
Turn signal, high beams,
headlight flasher
Turn signal
Turn signal in exterior mirror When driving and during operation of the turn
signals or hazard warning system, do not fold in
the exterior mirrors, so that the signal lights on
the exterior mirror are easy to see.
Using turn signals
Press the lever beyond the resistance point.
The turn signal lever returns into is starting po‐
sition after actuation.
To switch off manually, slightly tap the lever to
the resistance point.
Triple turn signal activation
Slightly tap lever.
The turn signal flashes three times.
The function can be activated or deactivated.
Set via radio.1. Press button.2. "Settings"3."Lighting"4."Triple turn signal"
Settings are stored for the profile currently
used.
Signaling briefly Press the lever to the resistance point and hold
it there for as long as you want the turn signal
to flash.
Malfunction
Unusually rapid flashing of the indicator lamp
indicates that a turn signal bulb has failed.
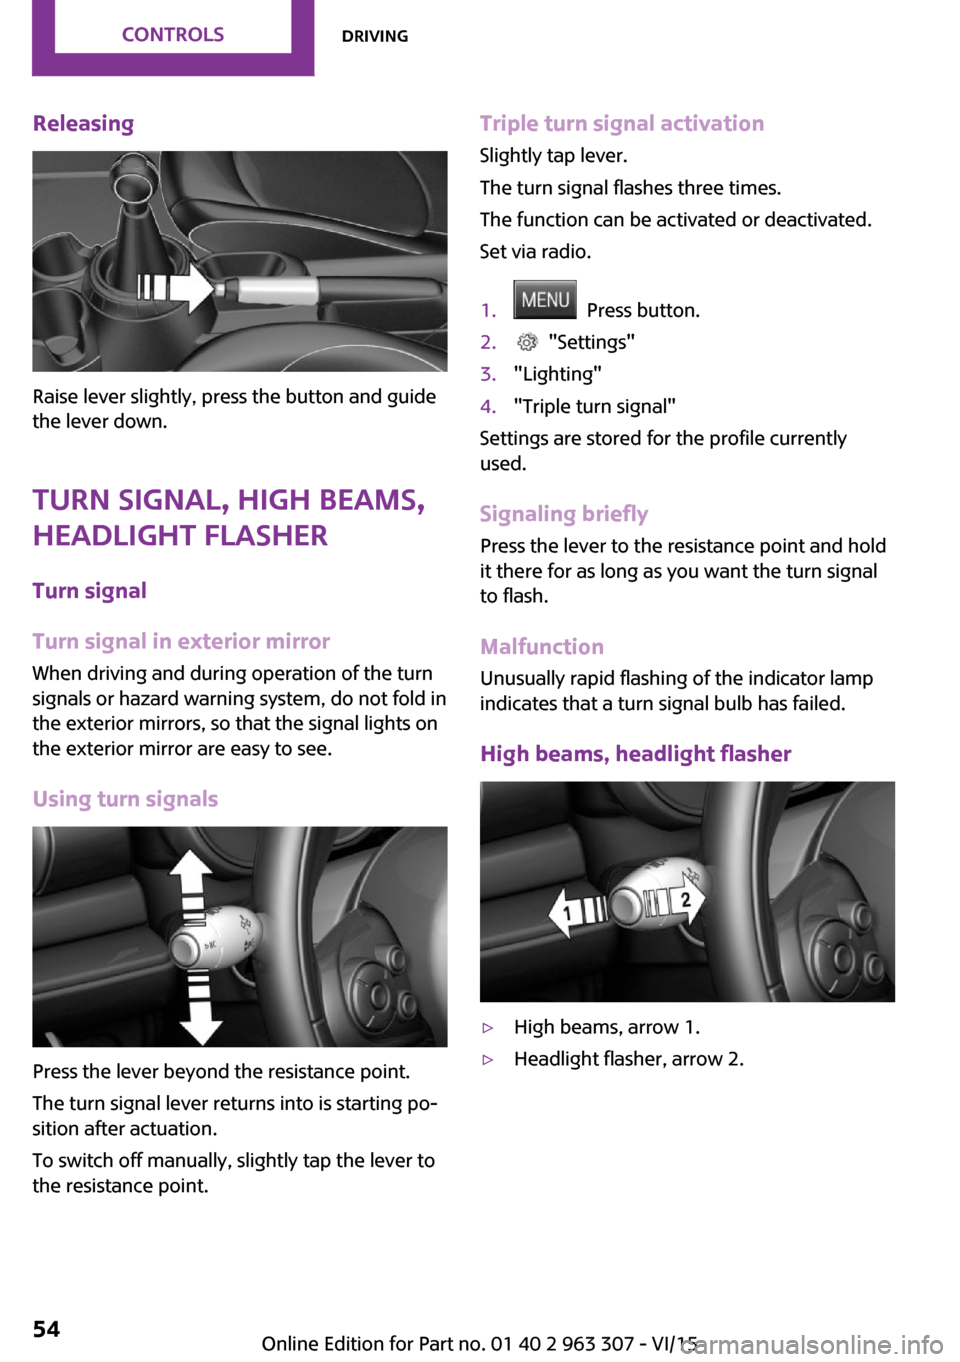
High beams, headlight flasher
▷High beams, arrow 1.▷Headlight flasher, arrow 2.Seite 54CONTROLSDriving54
Online Edition for Part no. 01 40 2 963 307 - VI/15
Page 65 of 251

DSC Dynamic Stability Control is deactivated
or DTC Dynamic Traction Control is activated
Dynamic Stability Control DSC is
switched off or Dynamic Traction Con‐
trol DTC is switched on.
For additional information, refer to Dynamic
Stability Control DSC, refer to page 97, and
Dynamic Traction Control DTC, refer to
page 98.
Flat Tire Monitor FTM The Flat Tire Monitor signals a loss of
tire inflation pressure in a tire.
Reduce your speed and stop cautiously.
Avoid sudden braking and steering maneuvers.
For additional information, refer to Flat Tire
Monitor, refer to page 88.
Tire Pressure Monitor TPM Illuminated: the Tire Pressure Monitor
signals a loss of tire inflation pressure in
a tire.
Reduce your speed and stop cautiously. Avoid
sudden braking and steering maneuvers.
Flashing and then continuously illuminated: no
flat tire or loss of tire inflation pressure can be
detected.▷Interference through systems or devices
with the same radio frequency: After leav‐
ing the area of the interference, the system
automatically becomes active again.▷TPM could not conclude the reset: perform
the reset of the system again.▷A wheel without TPM electronics is
mounted: Have it checked by a dealer’s
service center or another qualified service
center or repair shop as needed.▷Malfunction: Have system checked by a
dealer’s service center or another qualified
service center or repair shop.For additional information, refer to Tire Pres‐
sure Monitor, refer to page 84.
Steering system Steering system in some cases not
working.
Have steering system checked immedi‐
ately by a dealer’s service center or another
qualified service center or repair shop.
Engine functions Have vehicle checked immediately by a
dealer’s service center or another quali‐
fied service center or repair shop.
For additional information, refer to On-board
Diagnostics socket, refer to page 201.
Green lights
Turn signal Turn signal switched on.
Unusually rapid flashing of the indicator
lamp indicates that a turn signal bulb
has failed.
For additional information, refer to Turn signal, refer to page 54.
Parking lights, headlight control Parking lights or headlights are acti‐
vated.
For additional information, refer to
Parking lights/low beams, headlight control, re‐
fer to page 76.
Front fog lights Front fog lights are activated.
For additional information, refer to
Front fog lights, refer to page 79.Seite 65DisplaysCONTROLS65
Online Edition for Part no. 01 40 2 963 307 - VI/15
Page 203 of 251

Then pull the wiper blade free from the
holder of the wiper arm, arrow 2.4.Insert and latch a new wiper blade in re‐
verse order.5.Fold down the wipers.
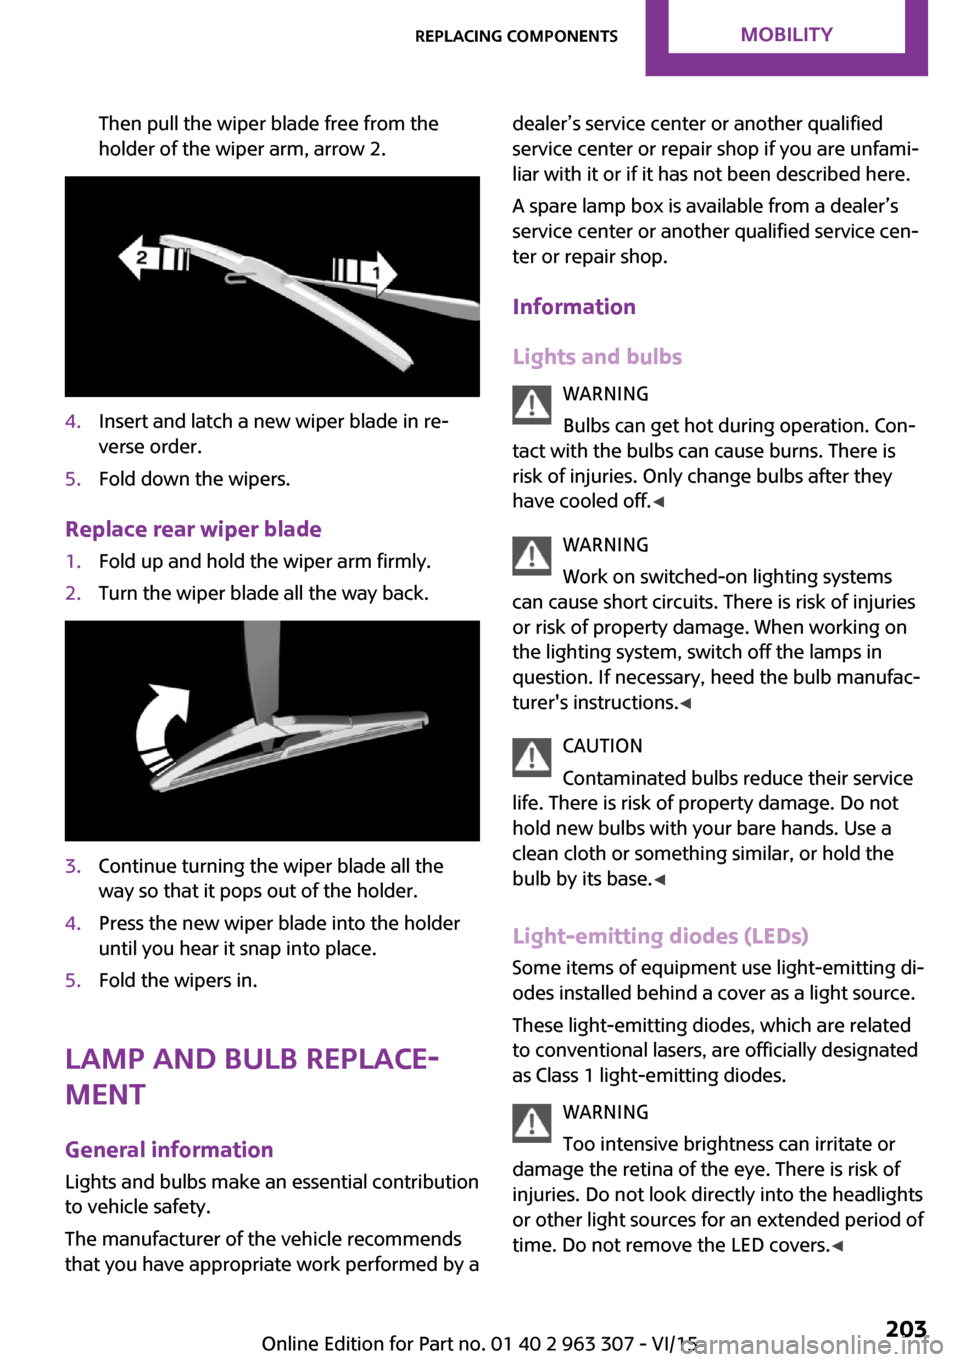
Replace rear wiper blade
1.Fold up and hold the wiper arm firmly.2.Turn the wiper blade all the way back.3.Continue turning the wiper blade all the
way so that it pops out of the holder.4.Press the new wiper blade into the holder
until you hear it snap into place.5.Fold the wipers in.
Lamp and bulb replace‐
ment
General information Lights and bulbs make an essential contribution
to vehicle safety.
The manufacturer of the vehicle recommends
that you have appropriate work performed by a
dealer’s service center or another qualified
service center or repair shop if you are unfami‐
liar with it or if it has not been described here.
A spare lamp box is available from a dealer’s
service center or another qualified service cen‐
ter or repair shop.
Information
Lights and bulbs WARNING
Bulbs can get hot during operation. Con‐
tact with the bulbs can cause burns. There is
risk of injuries. Only change bulbs after they
have cooled off. ◀
WARNING
Work on switched-on lighting systems
can cause short circuits. There is risk of injuries
or risk of property damage. When working on
the lighting system, switch off the lamps in
question. If necessary, heed the bulb manufac‐
turer's instructions. ◀
CAUTION
Contaminated bulbs reduce their service
life. There is risk of property damage. Do not
hold new bulbs with your bare hands. Use a
clean cloth or something similar, or hold the
bulb by its base. ◀
Light-emitting diodes (LEDs)
Some items of equipment use light-emitting di‐
odes installed behind a cover as a light source.
These light-emitting diodes, which are related
to conventional lasers, are officially designated
as Class 1 light-emitting diodes.
WARNING
Too intensive brightness can irritate or
damage the retina of the eye. There is risk of
injuries. Do not look directly into the headlights
or other light sources for an extended period of
time. Do not remove the LED covers. ◀Seite 203Replacing componentsMOBILITY203
Online Edition for Part no. 01 40 2 963 307 - VI/15
Page 204 of 251

Headlight glass
Condensation can form on the inside of the ex‐
ternal lights in cool or humid weather. When
driving with the lights switched on, the conden‐
sation evaporates after a short time. The head‐
light glass does not need to be changed.
If despite driving with the lights switched on,
increasing humidity forms, e. g. water droplets
in the lamp, the manufacturer of your vehicle
recommends having it checked by a dealer’s
service center or another qualified service cen‐
ter or repair shop.
Front lights, bulb replacement
Overview Halogen headlights1Low beams/high beams2Turn signalLED headlights1Daytime running lights2Low beams/high beams3Turn signal
Bug light
1Parking lights2Daytime running lights3Fog lights
LED bug light
1Parking lights2Fog lightsSeite 204MOBILITYReplacing components204
Online Edition for Part no. 01 40 2 963 307 - VI/15
Page 205 of 251

LED low beams/LED high beamsFollow the general instructions on lights and
bulbs, refer to page 203.
The lights feature LED technology. Contact a
dealer’s service center or another qualified
service center or repair shop in the event of a
malfunction.
Halogen low beams/halogen high
beams
Follow the general instructions on lights and
bulbs, refer to page 203.
Bulbs: H41.Open the hood, refer to page 194.2.Turn the lid counterclockwise, arrow, and
remove.3.Pull off the connector.4.Unclip spring clip, arrow, and fold down.5.Remove the bulb from the headlight hous‐
ing.6.Insert the new bulb and install the cover in
the reverse order.Turn signal
Follow the general instructions on lights and
bulbs, refer to page 203.
Bulbs: PW24W
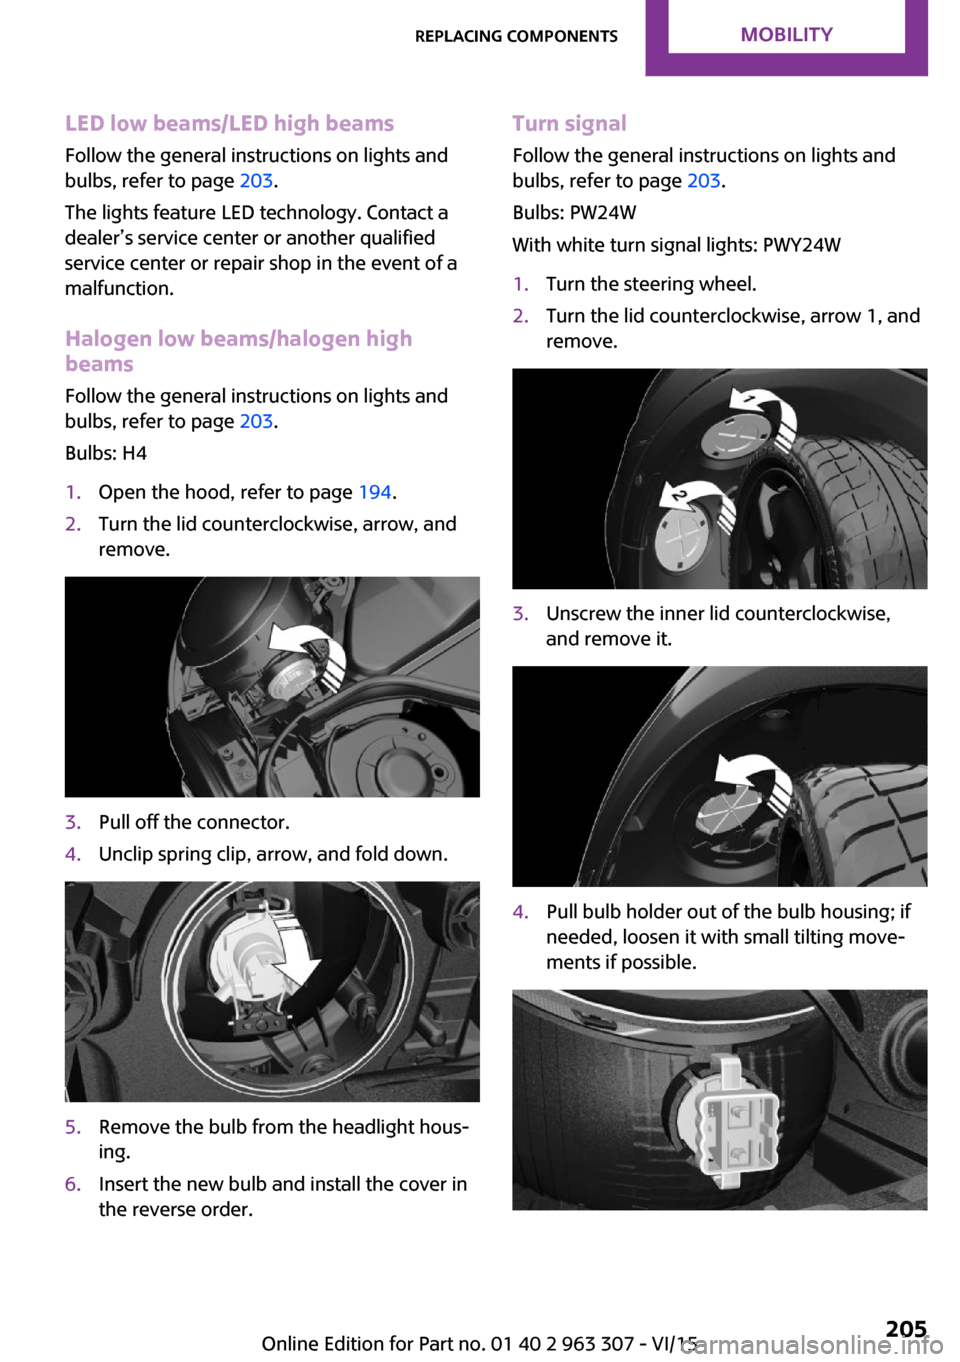
With white turn signal lights: PWY24W1.Turn the steering wheel.2.Turn the lid counterclockwise, arrow 1, and
remove.3.Unscrew the inner lid counterclockwise,
and remove it.4.Pull bulb holder out of the bulb housing; if
needed, loosen it with small tilting move‐
ments if possible.Seite 205Replacing componentsMOBILITY205
Online Edition for Part no. 01 40 2 963 307 - VI/15
Page 206 of 251

5.Pull the bulb out of the fixture.6.Insert the new bulb and install the cover in
the reverse order.
LED parking lights/LED fog lights
Follow the general instructions on lights and
bulbs, refer to page 203.
The lights feature LED technology. Contact a
dealer’s service center or another qualified
service center or repair shop in the event of a
malfunction.
Parking lights/fog lights/daytime
running lights
Follow the general instructions on lights and
bulbs, refer to page 203.
Bulbs:
▷Parking lights for halogen headlights: W5W
Parking lights for LED headlights: W5W NBV▷Daytime running light: PSX24W▷Fog lamp: H8
Replacing the bulbs
1.Turn the steering wheel.2.Turn the lid counterclockwise, arrow 2, and
remove.3.Remove the corresponding connector.4.Remove the bulb holder.▷Turn the parking light bulb holder coun‐
ter-clockwise, arrow 1, and remove.▷Press together the upper and lower
locking of the daytime running lightsbulb holder, arrow 2, and remove the
bulb holder.
For better accessibility, if needed, re‐
move the bulb of the fog lamp before‐
hand.▷Turn the fog light bulb holder counter-
clockwise, arrow 3, and remove.5.Pull the bulb out of the fixture.6.Insert the new bulb and install the cover in
the reverse order.
The daytime running lights bulb holder en‐
gages audibly, first below, then above.
Tail lights, bulb replacement
Overview
Vehicles with a rear fog lamp
1Side tail lights2Rear fog lamp3License plate lamp4Center brake lampSeite 206MOBILITYReplacing components206
Online Edition for Part no. 01 40 2 963 307 - VI/15
Page 242 of 251

Everything from A to ZIndexA
ABS, Antilock Brake Sys‐ tem 97
Acceleration Assistant, refer to Launch Control 61
ACC, see camera-based cruise control 101
Activated-charcoal filter 120
Active Cruise Control, see camera-based cruise con‐
trol 101
Additives, oil 197
Adjustments, seats/head re‐ straints 36
Adjustments, steering wheel 44
After washing vehicle 221
Airbags 81
Airbags, indicator/warning light 82
Air circulation, refer to Recir‐ culated-air mode 119
Air circulation, see Recircu‐ lated-air mode 116
Air conditioner 115
Air, dehumidifying, see Cool‐ ing function 116, 118
Air distribution, manual 116, 119
Air flow, air conditioner 116
Air flow, automatic climate control 119
Air pressure, tires 178
Air vents, refer to Ventila‐ tion 120
Alarm system 30
Alarm triggering 30
Alarm, unintentional 31
All around the center con‐ sole 16 All around the roofliner 17
All around the steering wheel 14
All-season tires, see Winter tires 187
Alternating-code hand-held transmitter 122
Alternative oil types 197
Antifreeze, washer fluid 57
Antilock Brake System, ABS 97
Anti-slip control, see DSC 97
Apple iPod/iPhone 157
Approved axle load 227
Ash tray 125
Assistance when driving off 100
Assist system, see Intelligent Safety 90
AUTO intensity 118
Automatic car wash 220
Automatic climate con‐ trol 117
Automatic Curb Monitor 42
Automatic deactivation, Front- seat passenger airbags 83
Automatic headlight con‐ trol 77
Automatic locking 30
Automatic recirculated-air control 119
Automatic transmission with Steptronic 58
AUTO program, automatic cli‐ mate control 118
AUTO program, intensity 118
Auto Start/Stop function 51
AUX-IN port 156
Average fuel consumption 71
Average speed 72
Axle loads, weights 227 B
Backrest curvature, refer to Lumbar support 37
Balance 150
Band-aids, see First-aid kit 214
Bar for tow-starting/ towing 217
Bass 150
Battery replacement, vehicle battery 212
Battery, vehicle 212
Belts, safety belts 38
Beverage holder, cu‐ pholder 130
Bluetooth, refer to Hands-free system 164
Bonus range, GREEN mode 144
Bottle holder, see Cu‐ pholder 130
Brake assistant 97
Brake discs, break-in 136
Brake pads, break-in 136
Braking, hints 137
Breakdown assistance 214
Break-in 136
Bug light 204
Bulb replacement 203
Bulb replacement, front 204
Bulb replacement, rear 206
Bulb replacement, side 209
Bulbs and lights 203
Button, Start/Stop 49
Bypassing, see Jump-start‐ ing 214 Seite 242REFERENCEEverything from A to Z242
Online Edition for Part no. 01 40 2 963 307 - VI/15
Page 246 of 251

J
Jacking points for the vehicle jack 210
Joystick, Steptronic transmis‐ sion 58
Jump-starting 214
K
Key/remote control 22
Keyless Go, see Comfort Ac‐ cess 28
Key Memory, see Personal Profile 24
Kickdown, Steptronic trans‐ mission 58
Knee airbag 82
L
Label on recommended tires 186
Lamp replacement 203
Lamp replacement, front 204
Lamp replacement, rear 206
Lamp replacement, side 209
Language, setting 72
Lashing eyes, securing cargo 140
LATCH child restraint sys‐ tem 47
Launch Control 61
Leather, care 221
LED bug light 204
LED headlights 204
LED ring, central instrument cluster 73
LEDs, light-emitting di‐ odes 203
License Texts and Certifica‐ tions 235
Light 76
Light-alloy wheels, care 222
Light-emitting diodes, LEDs 203 Lighter 125
Lighting 76
Lights and bulbs 203
Light switch 76
Load 140
Loading 139
Lock, door 26
Locking/unlocking via door lock 26
Locking/unlocking with re‐ mote control 24
Locking, automatic 30
Locking, settings 29
Lock, power window 33
Locks, doors, and windows 48
Low beams 76
Low beams, automatic, see High-beam Assistant 78
Lower back support, mechani‐ cal 37
Luggage rack, refer to Roof- mounted luggage rack 140
Lumbar support, mechani‐ cal 37
M
Maintenance 200
Maintenance require‐ ments 200
Maintenance, service require‐ ments 68
Maintenance system, MINI 200
Make-up mirror 125
Malfunction displays, see Check Control 63
Manual air distribu‐ tion 116, 119
Manual air flow 116, 119
Manual mode, transmis‐ sion 59
Manual operation, door lock 26
Manual operation, exterior mirrors 42 Manual operation, fuel filler
flap 174
Manual operation, Park Dis‐ tance Control PDC 110
Manual transmission 58
Manufacturer of the MINI 7
Marking, run-flat tires 187
Master key, see Remote con‐ trol 22
Maximum cooling 118
Maximum speed, display 69
Maximum speed, winter tires 187
Medical kit 214
Menu in instrument cluster 70
Messages, see Check Con‐ trol 63
Microfilter 117, 120
MID - program, driving dy‐ namics 99
MINI maintenance sys‐ tem 200
Minimum tread, tires 185
Mirrors 42
Mobile communication devi‐ ces in the vehicle 137
Mobile phone 164
Mobility System 188
Mode, GREEN Mode 143
Modifications, technical, refer to Own Safety 7
Moisture in headlight 204
Mounting of child restraint systems 46
Multifunction steering wheel, buttons 14
N
Neck restraints, front, see Head restraints 40
Neck restraints, rear, see Head restraints 41
New wheels and tires 186
Nylon rope for tow-starting/ towing 217 Seite 246REFERENCEEverything from A to Z246
Online Edition for Part no. 01 40 2 963 307 - VI/15