2016 MINI Hardtop 4 Door inflation pressure
[x] Cancel search: inflation pressurePage 190 of 251

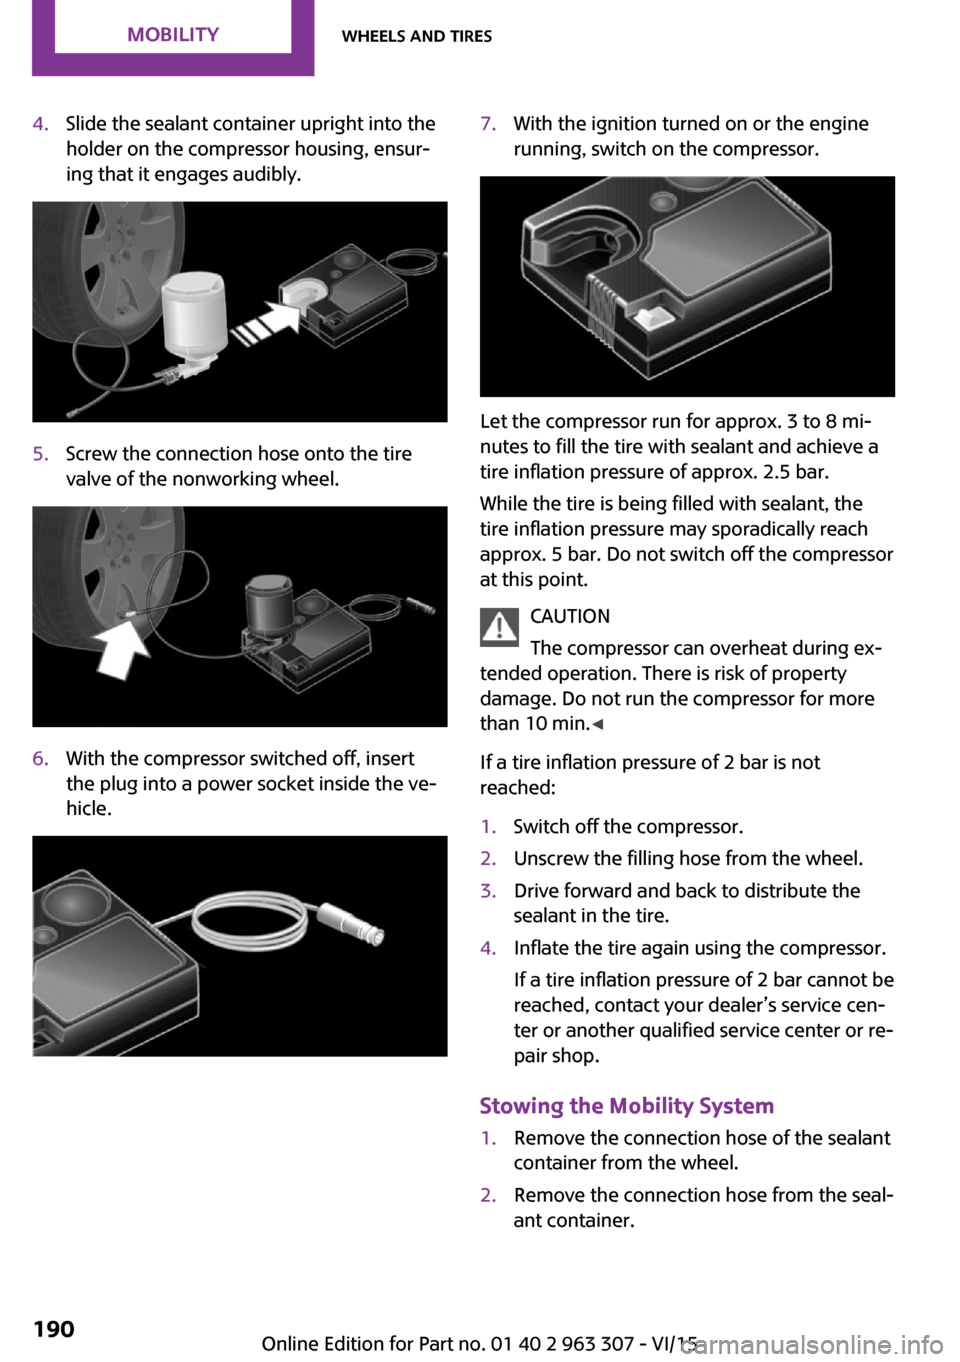
4.Slide the sealant container upright into the
holder on the compressor housing, ensur‐
ing that it engages audibly.5.Screw the connection hose onto the tire
valve of the nonworking wheel.6.With the compressor switched off, insert
the plug into a power socket inside the ve‐
hicle.7.With the ignition turned on or the engine
running, switch on the compressor.
Let the compressor run for approx. 3 to 8 mi‐
nutes to fill the tire with sealant and achieve a
tire inflation pressure of approx. 2.5 bar.
While the tire is being filled with sealant, the
tire inflation pressure may sporadically reach
approx. 5 bar. Do not switch off the compressor
at this point.
CAUTION
The compressor can overheat during ex‐
tended operation. There is risk of property
damage. Do not run the compressor for more
than 10 min. ◀
If a tire inflation pressure of 2 bar is not
reached:
1.Switch off the compressor.2.Unscrew the filling hose from the wheel.3.Drive forward and back to distribute the
sealant in the tire.4.Inflate the tire again using the compressor.
If a tire inflation pressure of 2 bar cannot be
reached, contact your dealer’s service cen‐
ter or another qualified service center or re‐
pair shop.
Stowing the Mobility System
1.Remove the connection hose of the sealant
container from the wheel.2.Remove the connection hose from the seal‐
ant container.Seite 190MOBILITYWheels and tires190
Online Edition for Part no. 01 40 2 963 307 - VI/15
Page 191 of 251

3.Wrap the empty sealant container and con‐
nection hose in suitable material to avoid
dirtying the trunk.4.Stow the Mobility System back in the vehi‐
cle.
Distributing the sealant
Immediately drive approx. 5 mls/10 km/h to
ensure that the sealant is evenly distributed in the tire.
Do not exceed a speed of 50 mph/80 km/h.
If possible, do not drive at speeds less than
12 mph/20 km/h.
To correct the tire inflation pressure
1.Stop at a suitable location.2.Screw the connection hose onto the tire
valve stem.3.Attach the connection hose directly to the
compressor.4.Insert the connector into a power socket in‐
side the vehicle.5.Correct the tire inflation pressure to 2.5 bar.▷Increase pressure: with the ignition
turned on or the engine running, switch
on the compressor.▷To reduce the pressure: press the but‐
ton on the compressor.
Continuing the trip
Do not exceed the maximum permissible speed
of 50 mph/80 km/h.
Reinitialize the Flat Tire Monitor, refer to
page 88.
Reinitialize the Tire Pressure Monitor, refer to
page 84.
Replace the nonworking tire and the sealant
container of the Mobility System as soon as
possible.
Snow chains Fine-link snow chains
The manufacturer of your vehicle recommends use of fine-link snow chains. Certain types of
fine-link snow chains have been tested by the
manufacturer of the vehicle and recommended
as road-safe and suitable.
Information regarding suitable snow chains is
available from a dealer’s service center or an‐ other qualified service center or repair shop.
Seite 191Wheels and tiresMOBILITY191
Online Edition for Part no. 01 40 2 963 307 - VI/15
Page 212 of 251

3.Check tire inflation pressure at the next op‐
portunity and correct as needed.4.Reinitialize the Flat Tire Monitor, refer to
page 88.
Reinitialize the Tire Pressure Monitor, refer
to page 85.5.Check to make sure the lug bolts are tight
with a calibrated torque wrench.
Driving with emergency wheel
WARNING
The emergency wheel has particular di‐
mensions. When driving with an emergency wheel, changed driving properties may occur at
higher speeds, e.g. reduced lane stability when
braking, longer braking distance and changed
self-steering properties in the limit area. There
is risk of an accident. Drive moderately and do
not exceed a speed of 50 mph/80 km/h. ◀
After the trip with emergency wheel
Have the following work performed by a deal‐
er's service center or another qualified service
center or repair shop.
1.Replace the damaged tires as soon as pos‐
sible.2.Replace the emergency wheel with a new
wheel.3.Have the tray with the emergency wheel
installed.
Vehicle battery
Maintenance
The battery is maintenance-free.
The added amount of acid is sufficient for the
service life of the battery.
More information about the battery can be re‐
quested from a dealer’s service center or an‐
other qualified service center or repair shop.
Battery replacement
CAUTION
Vehicle batteries that are not compatible
can damage vehicle systems and impair vehicle
functions.There is risk of property damage. In‐ formation on the compatible vehicle batteries is
available at your dealer's service center. ◀
After a battery replacement, the manufacturer
of your vehicle recommends that the vehicle
battery be registered on the vehicle by a
dealer’s service center or another qualified
service center or repair shop to ensure that all
comfort features are fully available and that
any Check Control messages of these comfort
features are no longer displayed.
Charging the battery
General information Make sure that the battery is always sufficiently
charged to guarantee that the battery remains
usable for its full service life.
The battery may need to be charged in the fol‐
lowing cases:▷When making frequent short-distance
drives.▷If the vehicle is not used for prolonged peri‐
ods, longer than a month.▷Steptronic transmission: when parked for
long periods of time in selector lever posi‐
tion D, R or N.
Information
CAUTION
Battery chargers for the vehicle battery
can work with high voltages and currents, which means that the 12V on-board network
can be overloaded or damaged. There is risk of
property damage. Only connect battery charg‐
ers for the vehicle battery to the starting aid
terminals in the engine compartment. ◀
Seite 212MOBILITYReplacing components212
Online Edition for Part no. 01 40 2 963 307 - VI/15
Page 245 of 251

Front-seat passenger airbags,automatic deactivation 83
Front-seat passenger airbags, indicator lamp 83
FTM Flat Tire Monitor 88
Fuel 176
Fuel consumption, see Aver‐ age fuel consumption 71
Fuel filler flap 174
Fuel gauge 67
Fuel lid 174
Fuel quality 176
Fuel recommendation 176
Fuel, tank capacity 230
Fuse 213
G Garage door opener, see Uni‐ versal Integrated Remote
Control 121
Gasoline 176
Gear change, Steptronic trans‐ mission 58
Gear shift indicator 68
General driving notes 136
Glare shield 125
Glass sunroof, refer to Panor‐ amic glass sunroof 33
Glove compartment 129
Gong, volume equaliza‐ tion 150
GREEN mode 143
GREEN mode, bonus range 144
GREEN mode indicator 143
GREEN - program, driving dy‐ namics 99
GREEN tip 145
Gross vehicle weight, ap‐ proved 227
Ground clearance 138
H Halogen headlights 204 Handbrake, refer to parking
brake 53
Hand-held transmitter, alter‐ nating code 122
Hands-free system 164
Hazard warning flashers 214
HD Radio 153
Head airbag 81
Headlight control, auto‐ matic 77
Headlight courtesy delay fea‐ ture 77
Headlight flasher 54
Headlight glass 204
Headlights, care 221
Head restraints 36
Head restraints, front 40
Head restraints, rear 41
Heavy cargo, stowing 140
High-beam Assistant 78
High beams 54
High beams/low beams, see High-beam Assistant 78
Hills 138
Hill start assistant, see Drive- off assistant 100
Holder for beverages 130
Homepage 6
Hood 194
Horn 14
Hot exhaust system 137
Hydroplaning 137
I
Ice warning, see External tem‐ perature warning 67
Icy roads, see External tem‐ perature warning 67
Identification marks, tires 184
Identification number, see ve‐ hicle identification number 9
Ignition key, see Remote con‐ trol 22
Ignition off 49
Ignition on 49 Illuminated ring, central in‐
strument cluster 73
Indication of a flat tire 85, 88
Indicator lamp, see Check Control 63
Individual air distribu‐ tion 116, 119
Individual settings, see Per‐ sonal Profile 24
Inflation pressure, tires 178
Inflation pressure warning, tires 88
Info display, refer to On-Board computer 71
Information 6
Initialize, Tire Pressure Moni‐ tor TPM 85
Initializing, Flat Tire Monitor FTM 88
Instrument cluster 62
Instrument cluster, electronic displays 63
Instrument lighting 79
Integrated key 22
Intelligent Safety 90
Intensity, AUTO program 118
Interior equipment 121
Interior lights 80
Interior lights during unlock‐ ing 24
Interior lights with the vehicle locked 25
Interior motion sensor 31
Interior rearview mirror, auto‐ matic dimming feature 43
Interior rearview mirror, com‐ pass 123
Interior rearview mirror, man‐ ually dimmable 43
Internet site 6
Interval display, service re‐ quirements 68
Interval mode 55 Seite 245Everything from A to ZREFERENCE245
Online Edition for Part no. 01 40 2 963 307 - VI/15
Page 249 of 251

Tire damage 186
Tire identification marks 184
Tire inflation pressure 178
Tire inflation pressure moni‐ tor, refer to FTM 88
Tire Pressure Monitor TPM 84
Tires, changing 186
Tire sealant 188
Tires, everything on wheels and tires 178
Tires, run-flat tires 187
Tire tread 185
Tools 202
Total vehicle weight 227
Tow fitting 218
Towing 216
Tow-starting 216
TPM Tire Pressure Monitor 84
Traction control 98
TRACTION drive mode, driving dynamics 98
Transmission lock, releasing manually 60
Transmission, manual trans‐ mission 58
Transmission, see Steptronic transmission 58
Transporting children safely 45
Tread, tires 185
Treble 150
Triple turn signal activa‐ tion 54
Trip odometer 67
Trip recorder, see Trip odome‐ ter 67
Turn signal, front 204
Turn signal, side 209
Turn signals, operation 54
Turn signals, rear, bulb re‐ placement 206
U
Unintentional alarm 31
Units 72 Units, setting 72
Universal remote control 121
Unlock button, Steptronic transmission 59
Unlocking/locking via door lock 26
Unlocking/locking with re‐ mote control 24
Unlocking, settings 29
Updates made after the edito‐ rial deadline 7
Upholstery care 222
USB audio interface 157
USB interface 126
V
Vanity mirror 125
Vehicle battery 212
Vehicle battery, replacing 212
Vehicle, break-in 136
Vehicle care 221
Vehicle features and op‐ tions 6
Vehicle identification num‐ ber 9
Vehicle jack 210
Vehicle paint 221
Vehicle storage 223
Vehicle wash 220
Ventilation 120
VIN, see vehicle identification number 9
W Warning and indicator lamps, see Check Control 63
Warning displays, see Check Control 63
Warning messages, see Check Control 63
Warning triangle 214
Warranty 7
Washer fluid 57
Washing, vehicle 220 Water on roads 137
Weights 227
Welcome lamps during un‐ locking 24
Welcome lights 77
Wheels, changing 186
Wheels, everything on wheels and tires 178
Wheels, Flat Tire Monitor FTM 88
Wheels, Tire Pressure Monitor TPM 84
Window defroster, rear 117, 119
Windows, powered 31
Windshield cleaning sys‐ tem 55
Windshield de‐ froster 117, 119
Windshield washer fluid 57
Windshield wipers, fold-out position 57
Windshield wipers, see wiper system 55
Winter storage, care 223
Winter tires, suitable tires 187
Winter tires, tread 185
Wiper blades, replacing 202
Wiper fluid 57
Wiper system 55
Wood, care 222
Wrench 202 Seite 249Everything from A to ZREFERENCE249
Online Edition for Part no. 01 40 2 963 307 - VI/15