2016 MINI Countryman Page 25
[x] Cancel search: Page 25Page 115 of 223
CAUTION
Objects in unpaved areas, e.g. stones or
branches, can damage the vehicle. There is risk
of property damage. Do not drive on unpaved
terrain. ◀
For your own safety and the safety of passen‐
gers and the vehicle, adhere to the following
points:▷Familiarize yourself with the vehicle before
driving; never take risks.▷Adjust speeds according to road conditions.
The steeper and rougher the road surface
is, the lower the speed should be.▷When driving on steep uphill and downhill
grades: the engine oil and coolant should
be filled nearly to the MAX mark.▷Watch for stones, holes, and other obsta‐
cles and drive around these where possible.▷On bumps and rough roads, avoid contact
between the vehicle body and the ground.
The maximum ground clearance is 6 in‐
ches/15 cm and may vary with the loaded
cargo.▷When driving through water, do not exceed
the maximum water height of 12 in‐
ches/30 cm and drive at walking speed.▷After driving through water, press on the
brake pedal several times at low speeds to
dry the brakes.▷Depending on the prevailing terrain, acti‐
vate Dynamic Traction Control DTC briefly,
refer to page 85.▷When the wheels spin, accelerate to enable
the driving stability control systems to dis‐
tribute the drive force to the individual
wheels.
After driving on poor roads
Adhere to the following points to ensure vehi‐
cle safety:
▷Remove excessive accumulations of dirt
and mud from the vehicle body.▷Clear mud, snow, ice, etc., from the wheels
and tires and check for damage.Seite 115Things to remember when drivingDRIVING TIPS115
Online Edition for Part no. 01 40 2 964 433 - VI/15
Page 117 of 223
available cargo and luggage load capacity
calculated in Step 4.6.If your vehicle will be towing a trailer, load
from your trailer will be transfered to your
vehicle. Consult the manual for transporting
a trailer to determine how this may reduce
the available cargo and luggage load ca‐
pacity of your vehicle.
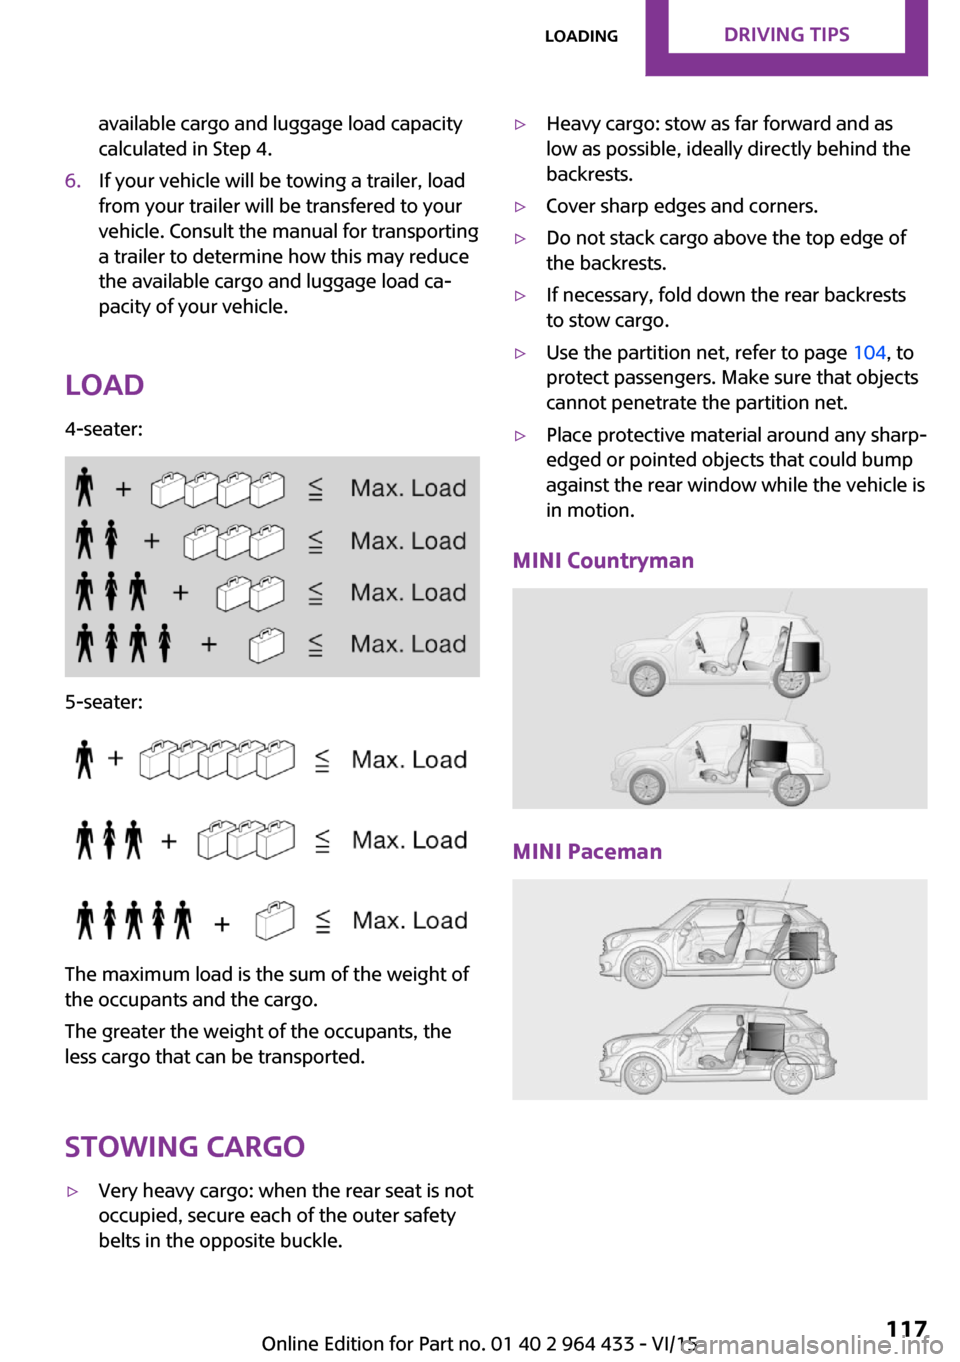
Load
4-seater:
5-seater:
The maximum load is the sum of the weight of
the occupants and the cargo.
The greater the weight of the occupants, the
less cargo that can be transported.
Stowing cargo
▷Very heavy cargo: when the rear seat is not
occupied, secure each of the outer safety
belts in the opposite buckle.▷Heavy cargo: stow as far forward and as
low as possible, ideally directly behind the
backrests.▷Cover sharp edges and corners.▷Do not stack cargo above the top edge of
the backrests.▷If necessary, fold down the rear backrests
to stow cargo.▷Use the partition net, refer to page 104, to
protect passengers. Make sure that objects
cannot penetrate the partition net.▷Place protective material around any sharp-
edged or pointed objects that could bump
against the rear window while the vehicle is
in motion.
MINI Countryman
MINI Paceman
Seite 117LoadingDRIVING TIPS117
Online Edition for Part no. 01 40 2 964 433 - VI/15
Page 118 of 223
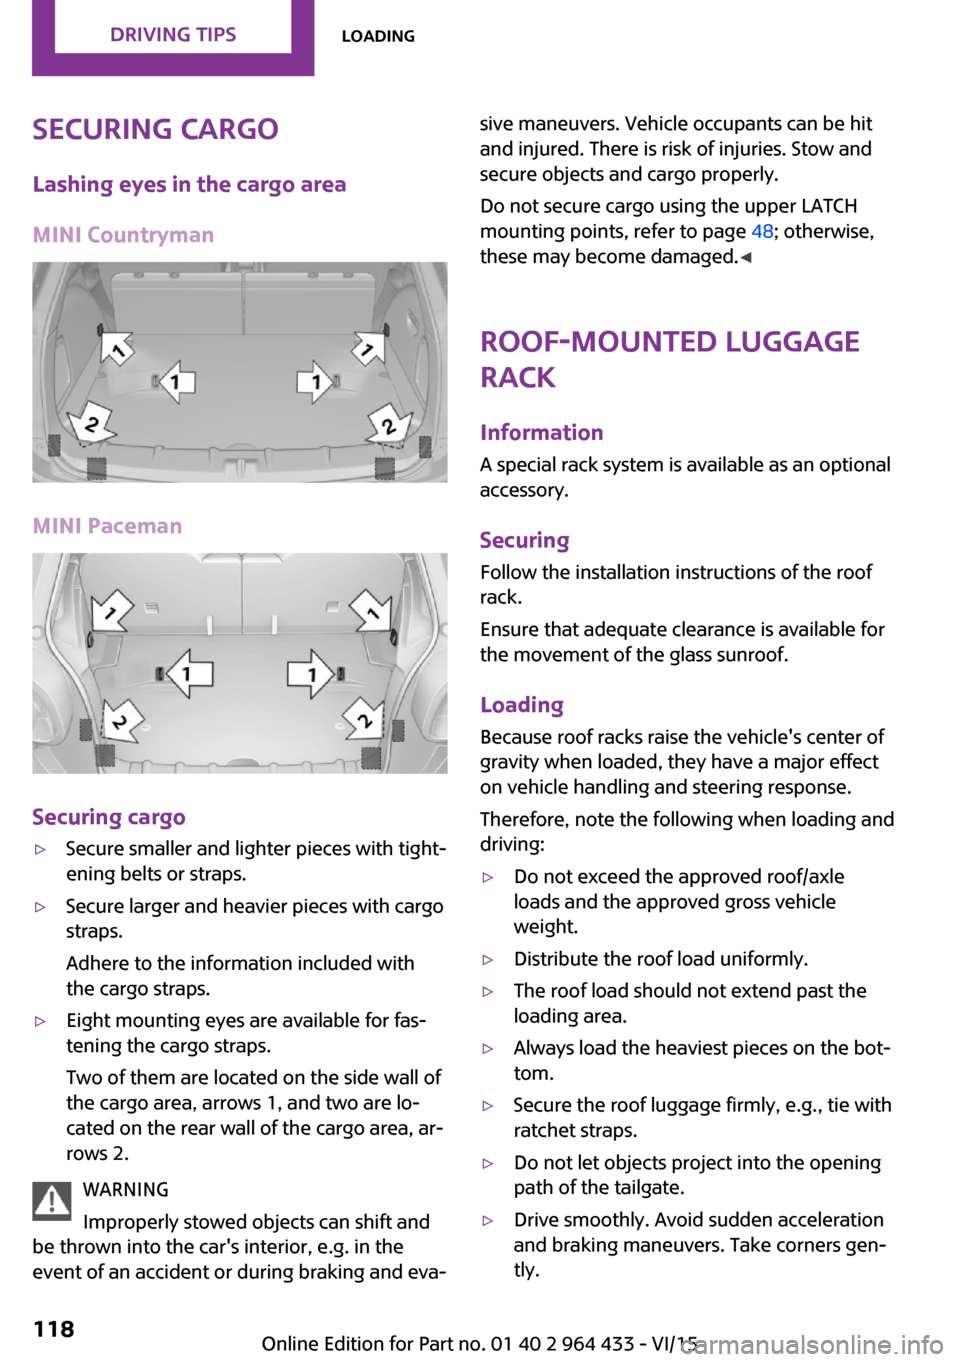
Securing cargoLashing eyes in the cargo area
MINI Countryman
MINI Paceman
Securing cargo
▷Secure smaller and lighter pieces with tight‐
ening belts or straps.▷Secure larger and heavier pieces with cargo
straps.
Adhere to the information included with
the cargo straps.▷Eight mounting eyes are available for fas‐
tening the cargo straps.
Two of them are located on the side wall of
the cargo area, arrows 1, and two are lo‐
cated on the rear wall of the cargo area, ar‐
rows 2.
WARNING
Improperly stowed objects can shift and
be thrown into the car's interior, e.g. in the
event of an accident or during braking and eva‐
sive maneuvers. Vehicle occupants can be hit
and injured. There is risk of injuries. Stow and
secure objects and cargo properly.
Do not secure cargo using the upper LATCH
mounting points, refer to page 48; otherwise,
these may become damaged. ◀
Roof-mounted luggage
rack
InformationA special rack system is available as an optional
accessory.
Securing
Follow the installation instructions of the roof
rack.
Ensure that adequate clearance is available for
the movement of the glass sunroof.
Loading Because roof racks raise the vehicle's center ofgravity when loaded, they have a major effect
on vehicle handling and steering response.
Therefore, note the following when loading and driving:▷Do not exceed the approved roof/axle
loads and the approved gross vehicle
weight.▷Distribute the roof load uniformly.▷The roof load should not extend past the
loading area.▷Always load the heaviest pieces on the bot‐
tom.▷Secure the roof luggage firmly, e.g., tie with
ratchet straps.▷Do not let objects project into the opening
path of the tailgate.▷Drive smoothly. Avoid sudden acceleration
and braking maneuvers. Take corners gen‐
tly.Seite 118DRIVING TIPSLoading118
Online Edition for Part no. 01 40 2 964 433 - VI/15
Page 120 of 223

Saving fuelVehicle features and op‐tions
This chapter describes all standard, country-
specific and optional features offered with the
series. It also describes features that are not necessarily available in your car, e. g., due to
the selected options or country versions. This
also applies to safety-related functions and sys‐
tems.
When using the features and systems described
here, adhere to local regulations.
General information
Your vehicle contains advanced technology for
the reduction of fuel consumption and emis‐
sions.
Fuel consumption depends on a number of dif‐
ferent factors. The implementation of certain
measures, driving style and regular mainte‐
nance can have an influence on fuel consump‐
tion and on the environmental impact.
Remove unnecessary
cargo
Additional weight increases fuel consumption.
Remove attached partsfollowing use
Remove unneeded auxiliary mirrors, roof or
rear luggage racks after use.
Attached parts on the vehicle impair the aero‐
dynamics and increase the fuel consumption.Close both windows
Open windows causes higher air resistance and
thus increases fuel consumption.
Check the tire inflation
pressure regularly
Check and, if necessary, correct the tire infla‐
tion pressure, refer to page 154, at least twice
a month and before starting on a long trip.
Low tire inflation pressure increases rolling re‐
sistance and thus raises fuel consumption and
tire wear.
Drive away without de‐lay
Do not wait for the engine to warm-up while
the vehicle remains stationary. Start driving right away, but at moderate engine speeds.
This is the fastest way for the cold engine to
reach its operating temperature.
Look well ahead when
driving
Avoid unnecessary acceleration and braking. To
achieve this, maintain a suitable distance to the
vehicle driving ahead of you.
Driving smoothly and looking ahead reduces
fuel consumption.
Avoid high engine speeds
Use 1st gear to get the vehicle in motion. Be‐
ginning with 2nd gear, accelerate rapidly. WhenSeite 120DRIVING TIPSSaving fuel120
Online Edition for Part no. 01 40 2 964 433 - VI/15
Page 121 of 223

accelerating, shift up before reaching high en‐
gine speeds.
When you reach the desired speed, shift into
the highest applicable gear and drive with the
engine speed as low as possible and at a con‐
stant speed.
As a rule: driving at low engine speeds lowers
fuel consumption and reduces wear.
Use coasting conditions When approaching a red light, take your foot
off the accelerator and coast to a halt in the
highest applicable gear.
On a downhill slope, take your foot off the ac‐
celerator and coast in a suitable gear.
The flow of fuel is interrupted while coasting.
Switch off the engine
during longer stops
Switch off the engine during longer stops, e.g.,
at traffic lights, railroad crossings or in traffic
congestion.
Fuel savings are already achieved after the en‐
gine is turned off for as little as 4 seconds.
Switch off any functions
that are not currently
needed
Functions such as seat heating and the rear
window defroster require a lot of energy and
consume additional fuel, especially in city and
stop-and-go traffic.
Therefore, switch off these functions if they are
not actually needed.Have maintenance car‐
ried out
Have vehicles maintained regularly to achieve
optimal vehicle efficiency and service life. MINI
recommends that maintenance work be per‐
formed by a MINI dealer’s service center.
For information on the MINI Maintenance Sys‐
tem, refer to page 172.Seite 121Saving fuelDRIVING TIPS121
Online Edition for Part no. 01 40 2 964 433 - VI/15
Page 127 of 223
Setting the units of measure of the
computer and the language1.Switch on the radio ready state or the igni‐
tion.2. Press the button.3."CONFIG"4.▷"DIST": change the unit of measure for
the range.▷"LANG": select the language of the dis‐
play texts.▷"CONSMP": change the unit of measure
for the average fuel consumption.▷"TEMP": change the unit of measure for
the external temperature.5.Highlight the desired menu item and press
the button.6.Create the desired setting.
Computer
The following vehicle information can be call up
via the computer:
▷Average fuel consumption▷Average speed▷Range
Displaying information
1.Switch on the radio ready state or the igni‐
tion.2. Press the button.3."COMP"
Average fuel consumption
The average fuel consumption is calculated for
the time during which the engine is running.
To start calculation of the average fuel con‐
sumption:
1."CONSMP"2."RESET"The previous display is set to zero and the sys‐
tem begins recalculating the average fuel con‐
sumption.
Average speed
The average speed is calculated for the time
during which the engine is running.
To start calculation of the average speed:1."SPEED"2."RESET"
Estimated range
"RANGE"
The display shows the estimated distance that
can be still be driven on the remaining fuel,
taking into consideration the driving style over
the last 18 miles/30 km.
Radio
Listening to the radio
The radio is designed for reception in the FM
and AM wavebands.
1.Switch on the radio, refer to page 125.2. Press this button if necessary.3."TUNER"4."FM" or"AM"
Press the corresponding button repeatedly
until the desired waveband is displayed.▷FM: FM1, FM2, FMA▷AM: AM, AMA
Selecting a station
Settings are stored for the remote control cur‐
rently in use.
Next station
Press the button.
Seite 127Radio MINI Boost CDENTERTAINMENT127
Online Edition for Part no. 01 40 2 964 433 - VI/15
Page 133 of 223

▷Recommendation: use medium tone and
volume settings on the audio device. The
tone depends on the quality of the audio
files.
Connecting
The AUX-IN port is in the center
console.
Connect the headphone connec‐
tor or line-out connector of the
device to the AUX-IN port.
Ensure that the connector is inserted all the
way into the AUX-IN port.
Playback
1.Connect the audio device, switch it on and
select a track on the audio device.2. Press the button.3."AUX"
Volume
The volume of the sound output is dependent
on the audio device. If this volume differs
markedly from the volume of the other audio
sources, it is advisable to adjust the volumes.
Adjusting the volume
1. Press the button.2."AUX"3."Vol-AUX"4.Connect the audio device, switch it on and
select a track on the audio device.
USB audio interface
Overview
It is possible to connect external audio devices.
The sound is output on the vehicle loudspeak‐
ers.
Connectors for external devices
▷Connection via USB audio interface: Apple
iPod/iPhone, USB devices, e.g., MP3 play‐
ers, USB flash drives, or mobile phones that
are supported by the USB audio interface.▷External audio devices, e.g. MP3 player:
connection via AUX-IN socket.▷Connection via snap-in adapter, refer to
page 145, when equipped with the music
interface for smartphones: Apple iPhone or
mobile phones.
Playback is only possible if no audio device
is connected to the analog AUX-IN port.
Due to the large number of different audio de‐
vices available on the market, it cannot be en‐
sured that every audio device/mobile phone is
operable on the vehicle. Further information is
available at www.mini.com/connectivity or
from a dealer’s service center or another quali‐
fied service center or repair shop.
Audio files
Standard audio files can be played back:
▷MP3.▷WMA.▷WAV (PCM).▷AAC, M4A.▷Playback lists: M3U, WPL, PLS.Seite 133Radio MINI Boost CDENTERTAINMENT133
Online Edition for Part no. 01 40 2 964 433 - VI/15
Page 139 of 223
4▷Turn: highlight the menu item on the
display or set the value.▷Press: select the highlighted menu item
or store the setting.5Open the main menu.6On/off, volume control.
Menu navigation
Selecting menu items
There are two ways to select a menu item on
the display.
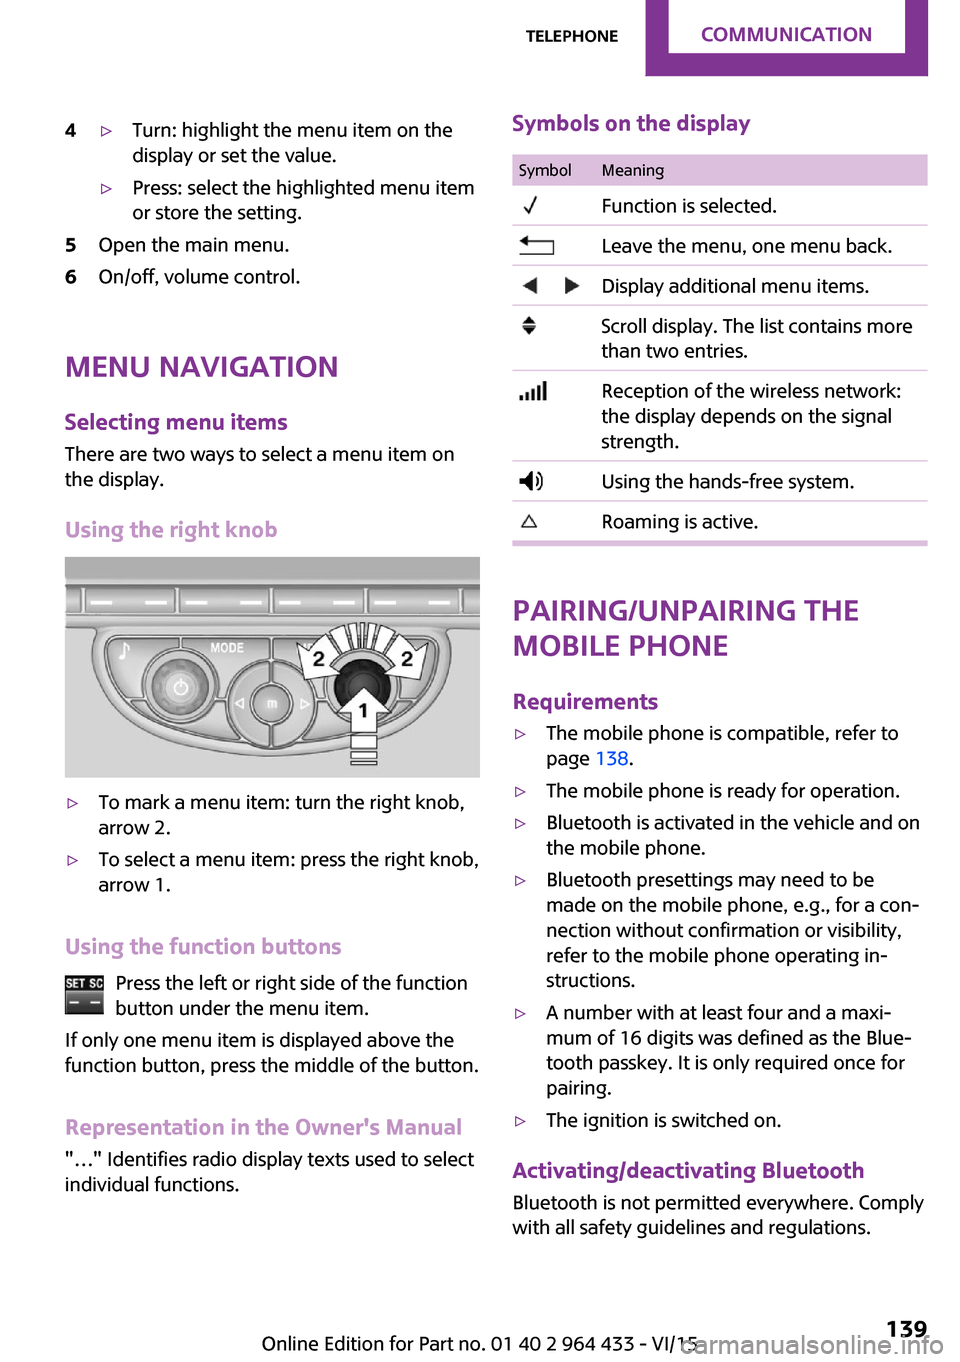
Using the right knob
▷To mark a menu item: turn the right knob,
arrow 2.▷To select a menu item: press the right knob,
arrow 1.
Using the function buttons
Press the left or right side of the functionbutton under the menu item.
If only one menu item is displayed above the
function button, press the middle of the button.
Representation in the Owner's Manual
"…" Identifies radio display texts used to select
individual functions.
Symbols on the displaySymbolMeaning Function is selected. Leave the menu, one menu back. Display additional menu items. Scroll display. The list contains more
than two entries. Reception of the wireless network:
the display depends on the signal
strength. Using the hands-free system. Roaming is active.
Pairing/unpairing the
mobile phone
Requirements
▷The mobile phone is compatible, refer to
page 138.▷The mobile phone is ready for operation.▷Bluetooth is activated in the vehicle and on
the mobile phone.▷Bluetooth presettings may need to be
made on the mobile phone, e.g., for a con‐
nection without confirmation or visibility,
refer to the mobile phone operating in‐
structions.▷A number with at least four and a maxi‐
mum of 16 digits was defined as the Blue‐
tooth passkey. It is only required once for
pairing.▷The ignition is switched on.
Activating/deactivating Bluetooth
Bluetooth is not permitted everywhere. Comply
with all safety guidelines and regulations.
Seite 139TelephoneCOMMUNICATION139
Online Edition for Part no. 01 40 2 964 433 - VI/15