2016 MERCEDES-BENZ SL-CLASS ROADSTER trunk
[x] Cancel search: trunkPage 519 of 614
!Only close the trunk once the roof is low-
ered completely. Otherwise, you could
damage the roof.
If you close the trunk lid before the roof is
lowered completely, the loading aid switch
lights up and a warning tone sounds.
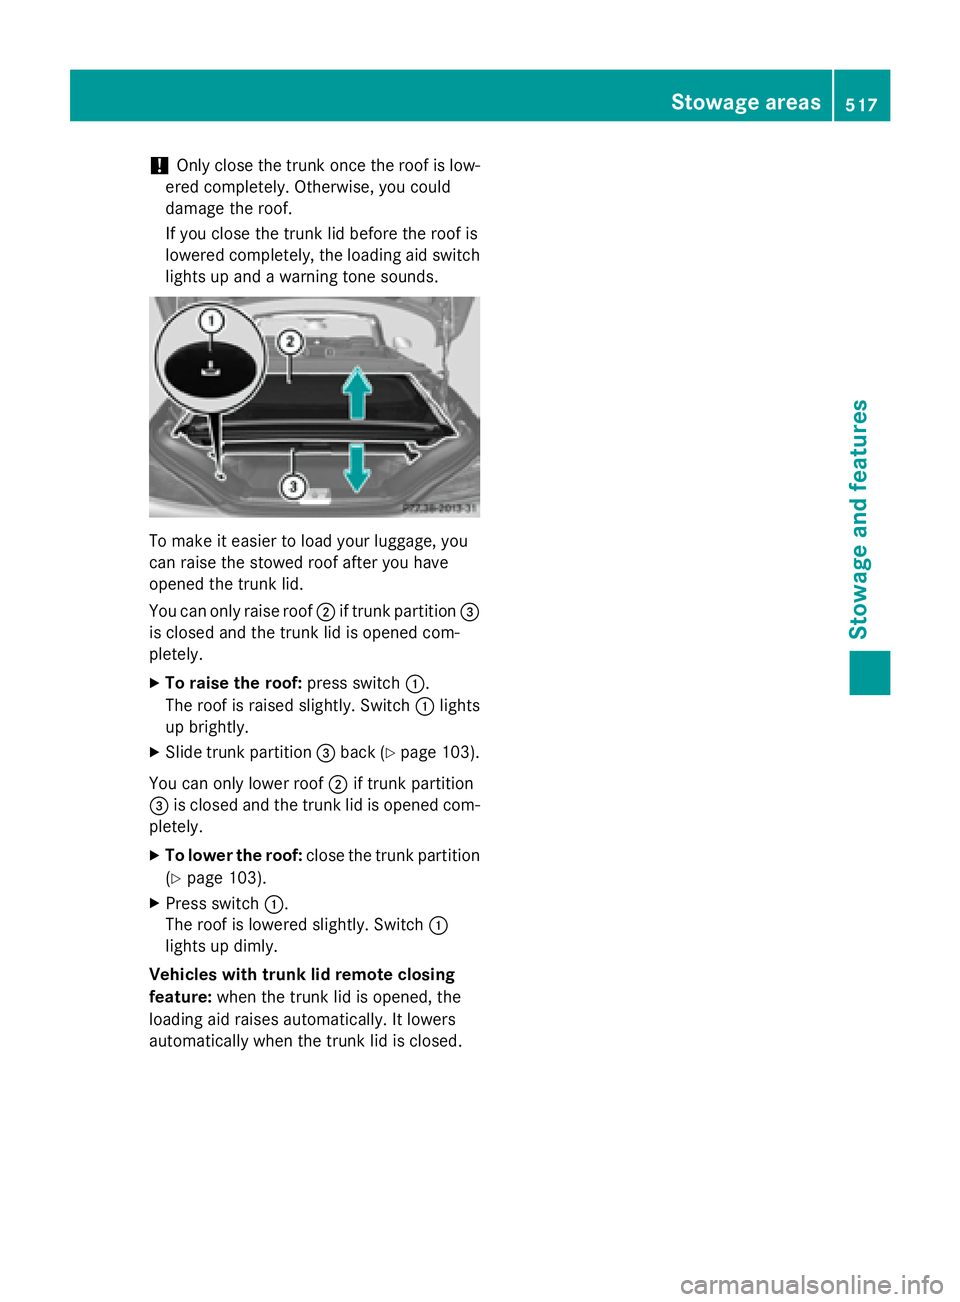
To make it easier to load your luggage, you
can raise the stowed roof after you have
opened the trunk lid.
You can only raise roof ;if trunk partition =
is closed and the trunk lid is opened com-
pletely.
XTo raise the roof: press switch:.
The roof is raised slightly. Switch :lights
up brightly.
XSlide trunk partition =back (Ypage 103).
You can only lower roof ;if trunk partition
= is closed and the trunk lid is opened com-
pletely.
XTo lower the roof: close the trunk partition
(
Ypage 103).
XPress switch :.
The roof is lowered slightly. Switch :
lights up dimly.
Vehicles with trunk lid remote closing
feature: when the trunk lid is opened, the
loading aid raises automatically. It lowers
automatically when the trunk lid is closed.
Stowage areas517
Stowage and features
Z
Page 520 of 614
Problems with the loading aid
ProblemPossible causes/consequences andMSolutions
It is no longer possible
to lower the stowed
roof in the trunk using
the loading aid.You cannot close the trunk any more.
XCall a qualified specialist workshop.
Stowage well under the trunk floor
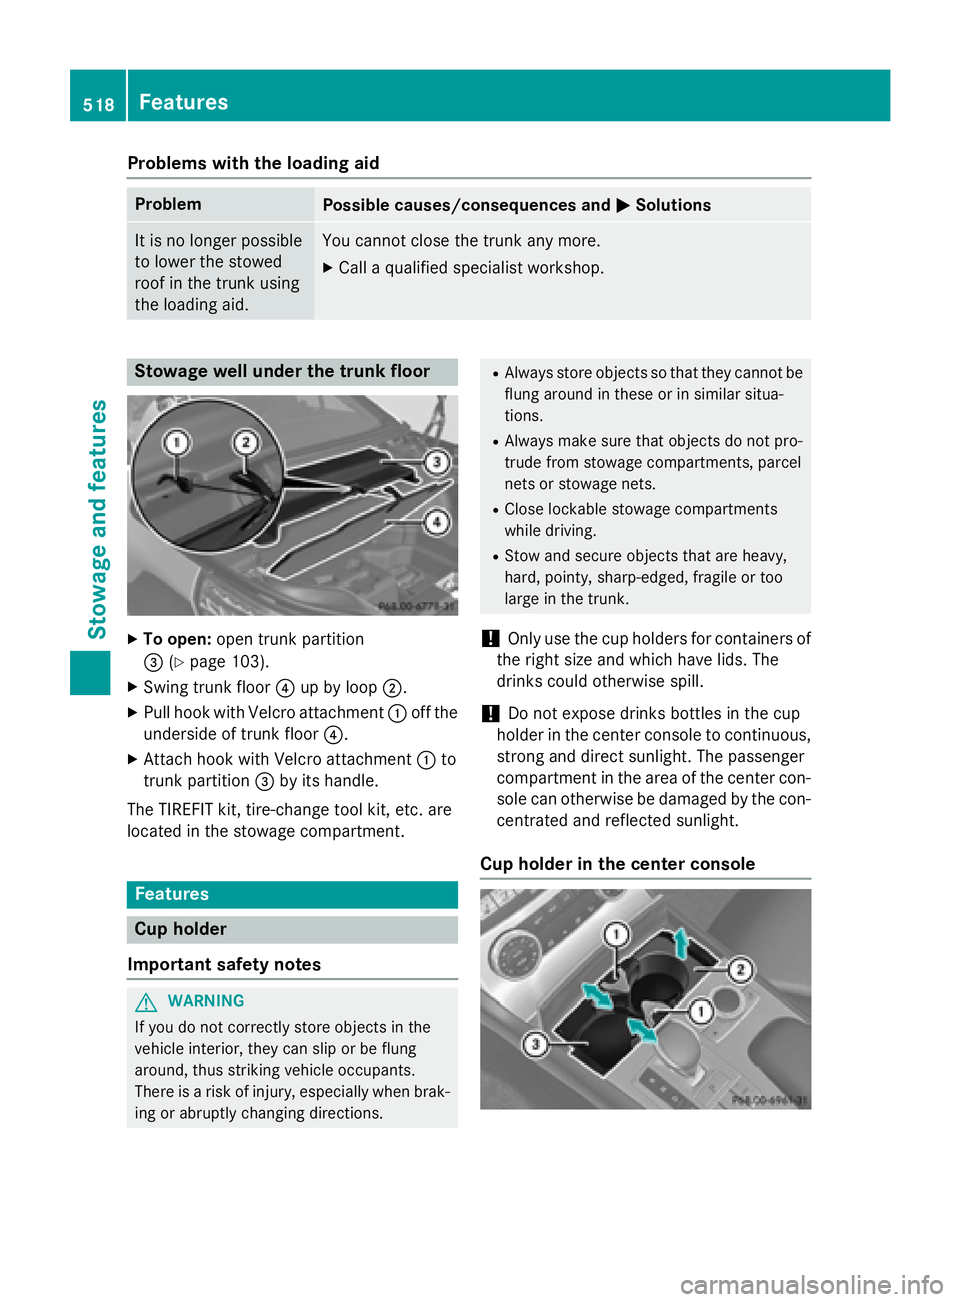
XTo open:open trunk partition
= (
Ypage 103).
XSwing trunk floor ?up by loop ;.
XPull hook with Velcro attachment :off the
underside of trunk floor ?.
XAttach hook with Velcro attachment :to
trunk partition =by its handle.
The TIREFIT kit, tire-change tool kit, etc. are
located in the stowage compartment.
Features
Cup holder
Important safety notes
GWARNING
If you do not correctly store objects in the
vehicle interior, they can slip or be flung
around, thus striking vehicle occupants.
There is a risk of injury, especially when brak- ing or abruptly changing directions.
RAlways store objects so that they cannot be
flung around in these or in similar situa-
tions.
RAlways make sure that objects do not pro-
trude from stowage compartments, parcel
nets or stowage nets.
RClose lockable stowage compartments
while driving.
RStow and secure objects that are heavy,
hard, pointy, sharp-edged, fragile or too
large in the trunk.
!Only use the cup holders for containers of
the right size and which have lids. The
drinks could otherwise spill.
!Do not expose drinks bottles in the cup
holder in the center console to continuous,
strong and direct sunlight. The passenger
compartment in the area of the center con- sole can otherwise be damaged by the con-
centrated and reflected sunlight.
Cup holder in the center console
518Features
Stowage and features
Page 523 of 614
The sockets can be used for accessories with
a maximum draw of 180 W (15 A). Accesso-
ries include such items as chargers for mobile
phones.
If you use the sockets for long periods when
the engine is switched off, the battery may
discharge.
iAn emergency cut-out ensures that the
on-board voltage does not drop too low. If
the on-board voltage is too low, the power
to the sockets is automatically cut. This
ensures that there is sufficient power to
start the engine.
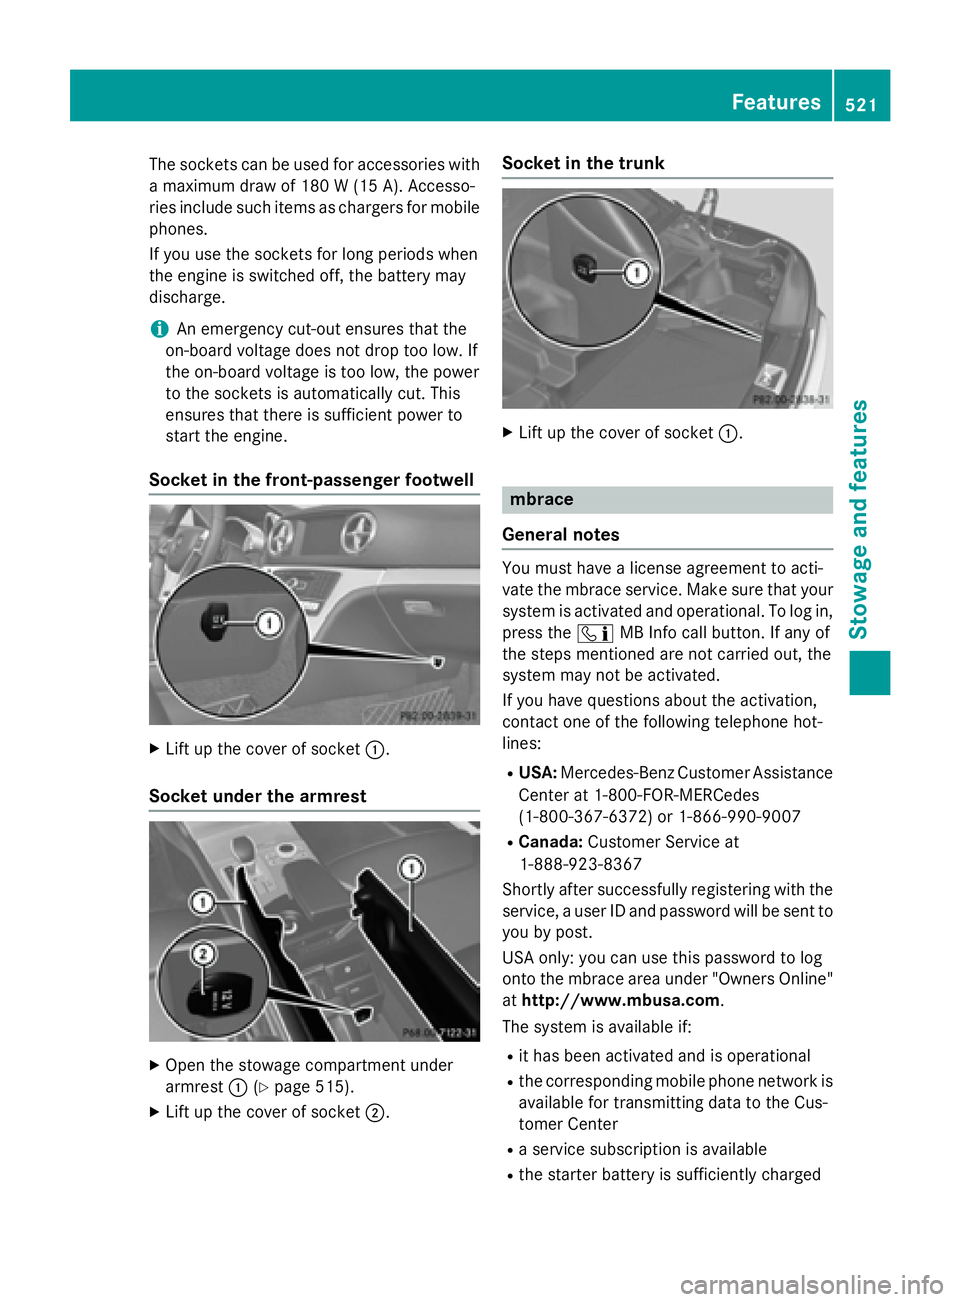
Socket in the front-passenger footwell
XLift up the cover of socket :.
Socket under the armrest
XOpen the stowage compartment under
armrest:(
Ypage 515).
XLift up the cover of socket ;.
Socket in the trunk
XLift up the cover of socket :.
mbrace
General notes
You must have a license agreement to acti-
vate the mbrace service. Make sure that your system is activated and operational. To log in,
press the ïMB Info call button. If any of
the steps mentioned are not carried out, the
system may not be activated.
If you have questions about the activation,
contact one of the following telephone hot-
lines:
RUSA: Mercedes-Benz Customer Assistance
Center at 1-800-FOR-MERCedes
(1-800-367-6372) or 1-866-990-9007
RCanada: Customer Service at
1-888-923-8367
Shortly after successfully registering with the
service, a user ID and password will be sent to
you by post.
USA only: you can use this password to log
onto the mbrace area under "Owners Online"
at http://www.mbusa.com.
The system is available if:
Rit has been activated and is operational
Rthe corresponding mobile phone network is available for transmitting data to the Cus-
tomer Center
Ra service subscription is available
Rthe starter battery is sufficiently charged
Features521
Stowage and features
Z
Page 544 of 614
should drive for a few minutes after clean-
ing. Braking heats the brake discs and the
brake pads/linings, thus drying them. The
vehicle can then be parked.
Regular care of your vehicle is a condition for
retaining the quality in the long term.
Use care products and cleaning agents rec-
ommended and approved by Mercedes-Benz.
Washing the vehicle and cleaning the
paintwork
Automatic car wash
GWARNING
Braking efficiency is reduced after washing
the vehicle. There is a risk of an accident.
After the vehicle has been washed, brake
carefully while paying attention to the traffic
conditions until full braking power is restored.
!If DISTRONIC PLUS or the HOLD function
is activated, the vehicle brakes automati-
cally in certain situations.
To prevent damage to the vehicle, deacti-
vate DISTRONIC PLUS and the HOLD func-
tion in the following or other similar situa-
tions:
Rwhen towing the vehicle
Rin the car wash
!It is preferable to use car washes with
adjustable high-pressure pre-cleaning that
corresponds to the specification for the
Cabriolet program. In car washes that use
high water pressures, there is a risk that a
small amount of water may leak into the
vehicle.
!Vehicles with HANDS-FREE ACCESS: if a
SmartKey with KEYLESS-GO is within the
detection range of the KEYLESS-GO
antenna, the following situations could lead
to the unintentional opening of the trunk
lid:
Rusing a car wash
Rusing a power washer
Make sure that the SmartKey is at least
6.5 ft (2 m) away from the vehicle.
!Never clean your vehicle in a Touchless
Automatic Car Wash as these use special
cleaning agents. These cleaning agents can
damage the paintwork or plastic parts.
If you have your vehicle cleaned in a high-
pressure automatic car wash, small
amounts of water may enter the vehicle.
!Make sure that the automatic transmis-
sion is in position Nwhen washing your
vehicle in a tow-through car wash. The vehi-
cle could be damaged if the transmission is
in another position.
!Make sure that:
Rthe side windows and the roof are com-
pletely closed
Rthe climate control blower is switched off
Rthe windshield wiper switch is at position
0
The vehicle could otherwise be damaged.
You can wash the vehicle in an automatic car wash from the very start.
If the vehicle is very dirty, pre-wash it before
cleaning it in an automatic car wash.
After using an automatic car wash, wipe off
wax from the windshield and the wiper
blades. This will prevent smears and reduce
wiping noises caused by residue on the wind-
shield.
Washing by hand
In some countries, washing by hand is only
allowed at specially equipped washing bays.
542Care
Maintenance and care
Page 545 of 614
Observe the legal requirements in all coun-
tries concerned.
XDo not use hot water and do not wash the
vehicle in direct sunlight.
XUse a soft sponge to clean.
XUse a mild cleaning agent, such as a car
shampoo approved by Mercedes-Benz.
XThoroughly hose down the vehicle with a
gentle jet of water.
XDo not point the water jet directly towardsthe air inlet.
XUse plenty of water and rinse out the
sponge frequently.
XRinse the vehicle with clean water and dry
thoroughly with a chamois.
XDo not let the cleaning agent dry on the
paintwork.
When using the vehicle in winter, remove all
traces of road salt deposits carefully and as
soon as possible.
Power washers
GWARNING
The water jet from a circular jet nozzle (dirt
blasters) can cause invisible exterior damage
to the tires or chassis components. Compo-
nents damaged in this way may fail unexpect-
edly. There is a risk of an accident.
Do not use power washers with circular jet
nozzles to clean the vehicle. Have damaged
tires or chassis components replaced imme-
diately.
!Always maintain a distance of at least
11.8 in (30 cm) between the vehicle and the
power washer nozzle. Information about
the correct distance is available from the
equipment manufacturer.
Move the power washer nozzle around
when cleaning your vehicle.
Do not aim directly at any of the following:
Rtires
Rdoor gaps, roof gaps, joints, etc.
Relectrical components
Rbattery
Rconnectors
Rlights
Rseals
Rtrim
Rventilation slots
Damaged seals or electrical components
can lead to leaks or failures.
!Vehicles with HANDS-FREE ACCESS: if a
SmartKey with KEYLESS-GO is within the
detection range of the KEYLESS-GO
antenna, the following situations could lead
to the unintentional opening of the trunk
lid:
Rusing a car wash
Rusing a power washer
Make sure that the SmartKey is at least
6.5 ft (2 m) away from the vehicle.
!Mille Miglia special model: parts of your
vehicle are covered with a decorative foil.
Maintain a distance of at least 70 cm
between the foil-wrapped parts of the vehi-
cle and the nozzle of the power washer.
Information about the correct distance is
available from the equipment manufac-
turer.
Move the power washer nozzle around
when cleaning your vehicle.
Cleaning the paintwork
!Do not affix:
Rstickers
Rfilms
Rmagnetic plates or similar items
to painted surfaces. You could otherwise
damage the paintwork.
Scratches, corrosive deposits, areas affected
by corrosion and damage caused by inade-
quate care cannot always be completely
repaired. In such cases, visit a qualified spe-
cialist workshop.
Care543
Maintenance and care
Z
Page 552 of 614
Useful information
i
This Operator's Manual describes all
models and all standard and optional equip-
ment of your vehicle available at the time of
publication of the Operator's Manual.
Country-specific differences are possible.
Please note that your vehicle may not be
equipped with all features described. This
also applies to safety-related systems and
functions.
iRead the information on qualified special-
ist workshops (
Ypage 34).
Where will I find...?
Vehicle tool kit
General notes
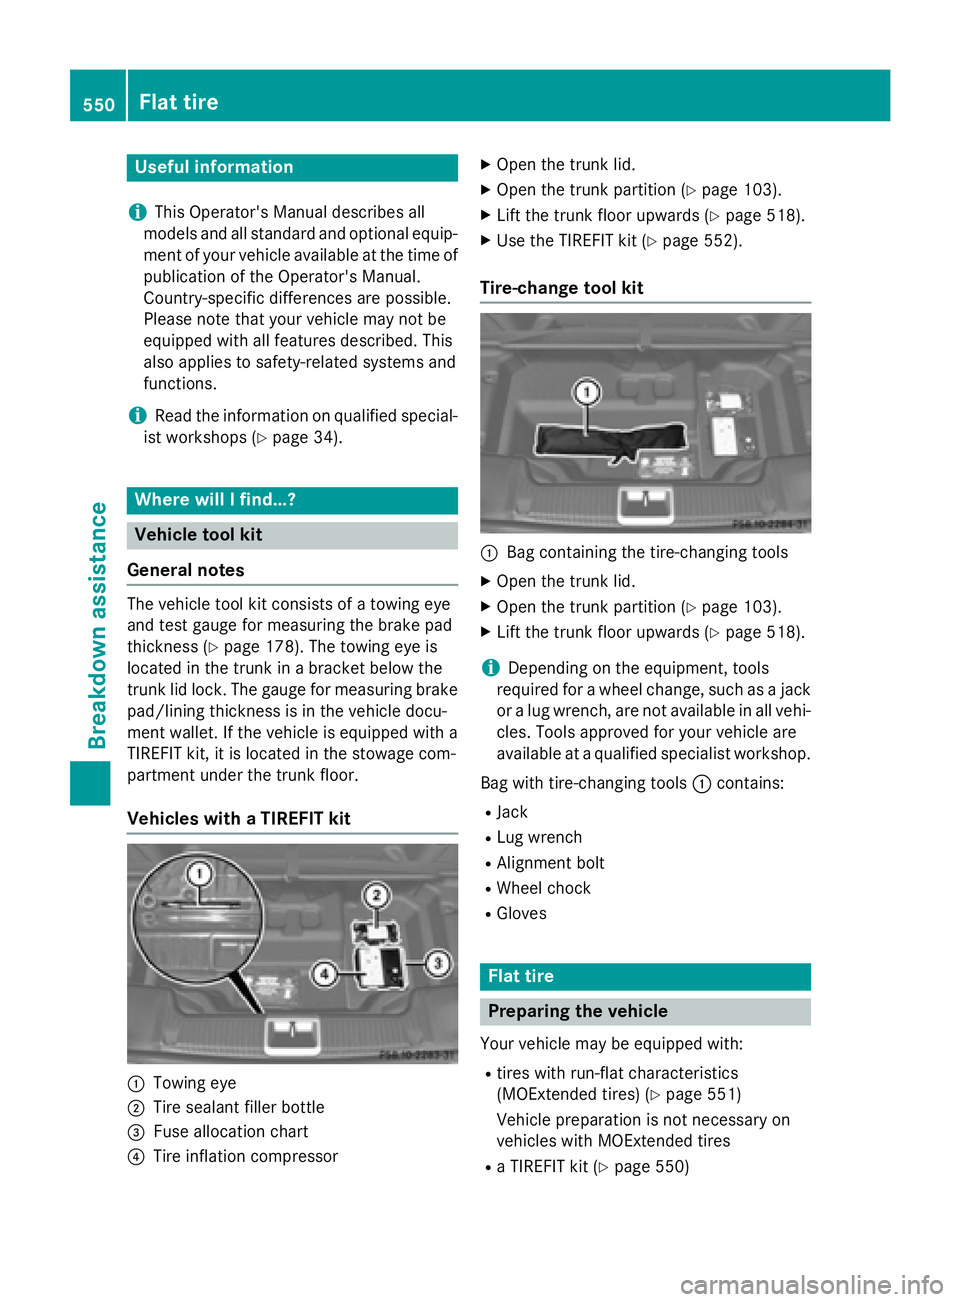
The vehicle tool kit consists of a towing eye
and test gauge for measuring the brake pad
thickness (
Ypage 178). The towing eye is
located in the trunk in a bracket below the
trunk lid lock. The gauge for measuring brake
pad/lining thickness is in the vehicle docu-
ment wallet. If the vehicle is equipped with a
TIREFIT kit, it is located in the stowage com-
partment under the trunk floor.
Vehicles with a TIREFIT kit
:Towing eye
;Tire sealant filler bottle
=Fuse allocation chart
?Tire inflation compressor
XOpen the trunk lid.
XOpen the trunk partition (Ypage 103).
XLift the trunk floor upwards (Ypage 518).
XUse the TIREFIT kit (Ypage 552).
Tire-change tool kit
:Bag containing the tire-changing tools
XOpen the trunk lid.
XOpen the trunk partition (Ypage 103).
XLift the trunk floor upwards (Ypage 518).
iDepending on the equipment, tools
required for a wheel change, such as a jack or a lug wrench, are not available in all vehi-
cles. Tools approved for your vehicle are
available at a qualified specialist workshop.
Bag with tire-changing tools :contains:
RJack
RLug wrench
RAlignment bolt
RWheel chock
RGloves
Flat tire
Preparing the vehicle
Your vehicle may be equipped with:
Rtires with run-flat characteristics
(MOExtended tires) (
Ypage 551)
Vehicle preparation is not necessary on
vehicles with MOExtended tires
Ra TIREFIT kit (Ypage 550)
550Flat tire
Breakdown assistance
Page 555 of 614
!Do not operate the tire inflation compres-
sor for longer than eight minutes at a time
without a break. It may otherwise overheat.
The tire inflation compressor can be oper-
ated again once it has cooled down.
Comply with the manufacturer’s safety
instructions on the sticker on the tire inflation
compressor.
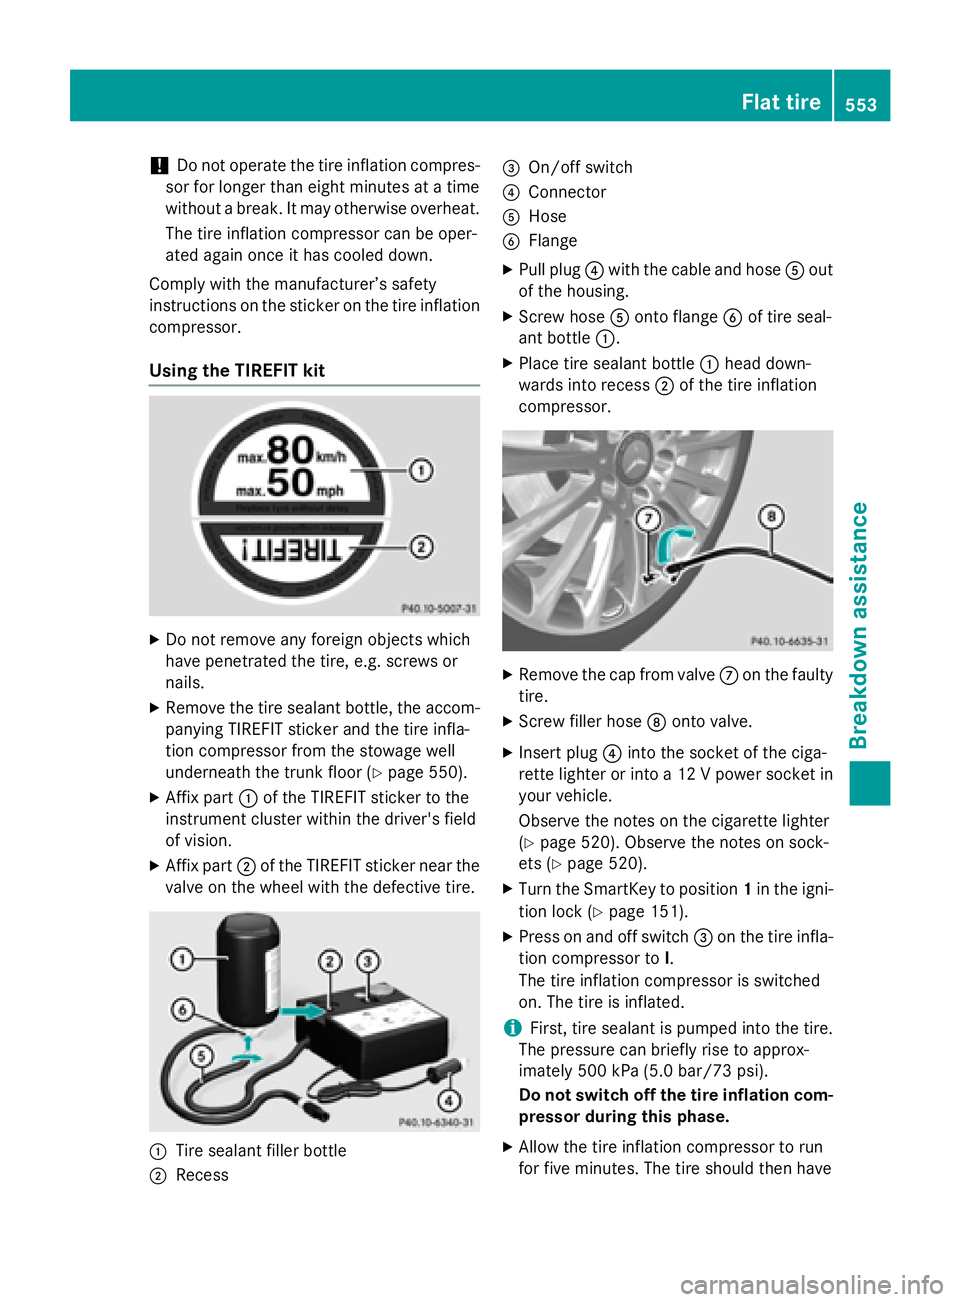
Using the TIREFIT kit
XDo not remove any foreign objects which
have penetrated the tire, e.g. screws or
nails.
XRemove the tire sealant bottle, the accom-
panying TIREFIT sticker and the tire infla-
tion compressor from the stowage well
underneath the trunk floor (
Ypage 550).
XAffix part :of the TIREFIT sticker to the
instrument cluster within the driver's field
of vision.
XAffix part ;of the TIREFIT sticker near the
valve on the wheel with the defective tire.
:Tire sealant filler bottle
;Recess
=On/off switch
?Connector
AHose
BFlange
XPull plug ?with the cable and hose Aout
of the housing.
XScrew hose Aonto flange Bof tire seal-
ant bottle :.
XPlace tire sealant bottle :head down-
wards into recess ;of the tire inflation
compressor.
XRemove the cap from valve Con the faulty
tire.
XScrew filler hose Donto valve.
XInsert plug ?into the socket of the ciga-
rette lighter or into a 12 V power socket in
your vehicle.
Observe the notes on the cigarette lighter
(
Ypage 520). Observe the notes on sock-
ets (
Ypage 520).
XTurn the SmartKey to position 1in the igni-
tion lock (
Ypage 151).
XPress on and off switch =on the tire infla-
tion compressor to I.
The tire inflation compressor is switched
on. The tire is inflated.
iFirst, tire sealant is pumped into the tire.
The pressure can briefly rise to approx-
imately 500 kPa (5.0 bar/73 psi).
Do not switch off the tire inflation com-
pressor during this phase.
XAllow the tire inflation compressor to run
for five minutes. The tire should then have
Flat tire553
Breakdown assistance
Z
Page 566 of 614
The vehicle/trailer combination may oth-
erwise swerve or even roll over.
Transporting the vehicle
!
You may only secure the vehicle by the
wheels, not by parts of the vehicle such as axle or steering components. Otherwise,
the vehicle could be damaged.
The towing eye can be used to pull the vehicle
onto a trailer or transporter for transporting
purposes.
XTurn the SmartKey to position 2in the igni-
tion lock.
XShift the transmission to position N.
As soon as the vehicle has been loaded:
XPrevent the vehicle from rolling away by
applying the electric parking brake.
XShift the transmission to position P.
XTurn the SmartKey to position0in the igni-
tion lock and remove it.
XSecure the vehicle.
Tow-starting (emergency engine
starting)
!
Vehicles with automatic transmission
must not be tow-started. You could other-
wise damage the automatic transmission.
You can find information on "Jump-starting" at
(
Ypage 559).
Fuses
Important safety notes
GWARNING
If you manipulate or bridge a faulty fuse or if
you replace it with a fuse with a higher amper- age, the electric cables could be overloaded.
This could result in a fire. There is a risk of an
accident and injury.
Always replace faulty fuses with the specifiednew fuses having the correct amperage.
!Only use fuses that have been approved
for Mercedes-Benz vehicles and which
have the correct fuse rating for the system
concerned. Otherwise, components or sys-
tems could be damaged.
The fuses in your vehicle serve to close down
faulty circuits. If a fuse blows, all the compo-
nents on the circuit and their functions stop
operating.
Blown fuses must be replaced with fuses of
the same rating, which you can recognize by
the color and value. The fuse ratings are listed
in the fuse allocation chart.
If a newly inserted fuse also blows, have the
cause traced and rectified at a qualified spe-
cialist workshop, e.g. an authorized
Mercedes-Benz Center.
Before changing a fuse
XSecure the vehicle against rolling away
(
Ypage 171).
XSwitch off all electrical consumers.
XTurn the SmartKey to position 0in the igni-
tion lock and remove it (
Ypage 151).
or
XOn vehicles with KEYLESS-GO, make sure
the ignition is switched off (
Ypage 152).
All indicator lamps in the instrument cluster
must be off.
The fuses are located in various fuse boxes:
RFuse box in the engine compartment on the right-hand side of the vehicle, when viewed
in the direction of travel
RDashboard fuse box
RFuse box in the rear compartment on the
right-hand side of the vehicle, when viewedin the direction of travel
The fuse allocation chart is located in the
vehicle tool kit in the stowage compartment
under the trunk floor (
Ypage 550).
564Fuses
Breakdown assistance