2016 MERCEDES-BENZ SL-CLASS ROADSTER warning
[x] Cancel search: warningPage 192 of 614
DISTRONIC PLUS is automatically deactiva-
ted if:
Ryou engage the electric parking brake or if
the vehicle is automatically secured with
the electric parking brake
Ryou are driving slower than 15 mph
(25 km/h) and there is no vehicle in front,
or if the vehicle in front is no longer detec-
ted
RESP®intervenes or you deactivate ESP®
Rthe transmission is in theP,R or Nposition
Ryou pull the cruise control lever towards
you in order to pull away and the front-
passenger door is open
Rthe vehicle has skidded
If DISTRONIC PLUS is deactivated, you will
hear a warning tone. You will see the
DISTRONIC PLUS Off
message in the multi-
function display for approximately five sec-
onds.
Tips for driving with DISTRONIC PLUS
General notes
The following contains descriptions of certain road and traffic conditions in which you must
be particularly attentive. In such situations,
brake if necessary. DISTRONIC PLUS is then
deactivated.
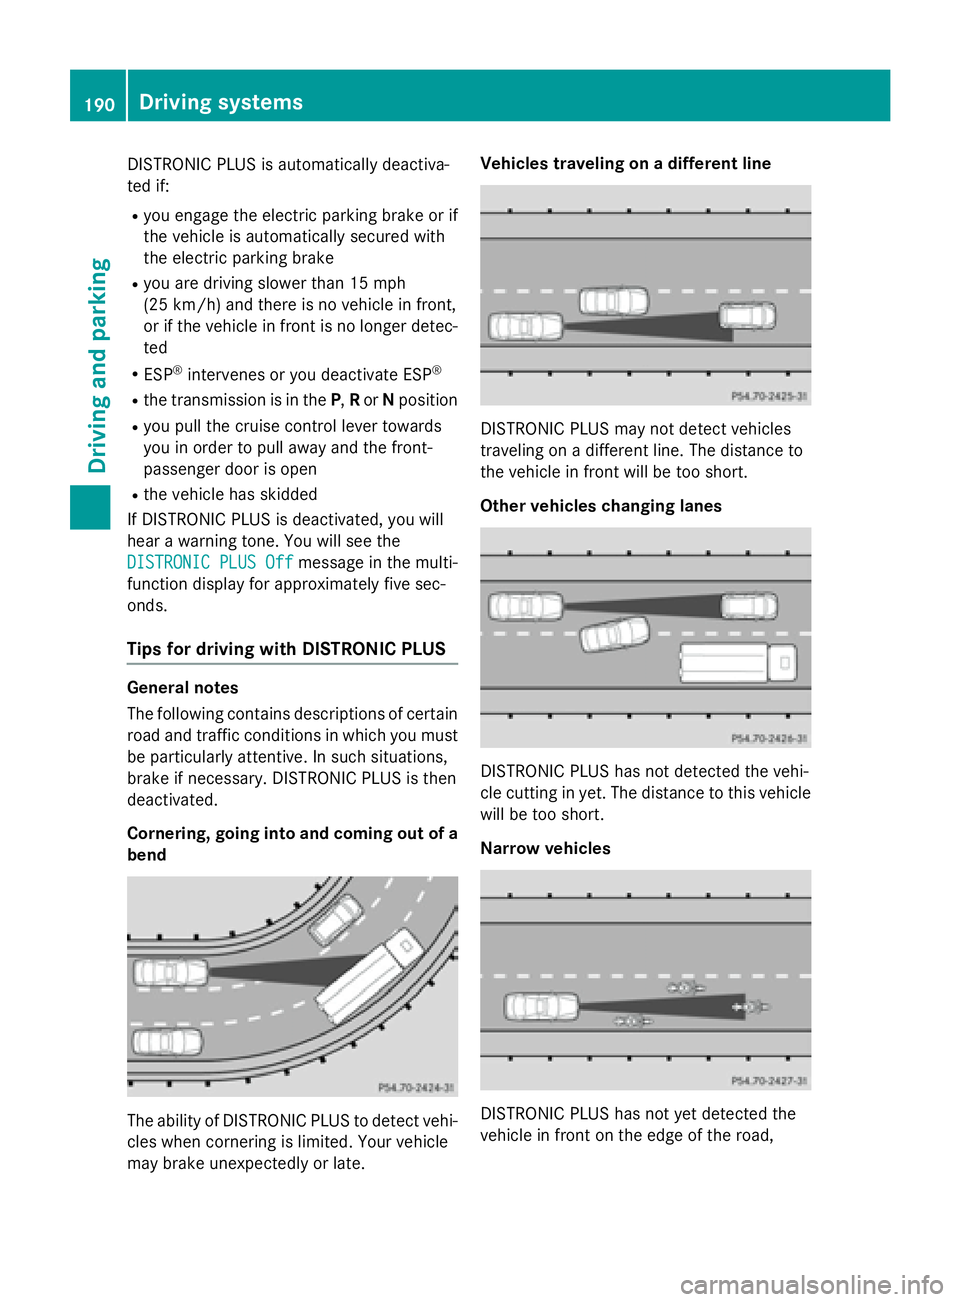
Cornering, going into and coming out of a
bend
The ability of DISTRONIC PLUS to detect vehi-
cles when cornering is limited. Your vehicle
may brake unexpectedly or late. Vehicles traveling on a different line
DISTRONIC PLUS may not detect vehicles
traveling on a different line. The distance to
the vehicle in front will be too short.
Other vehicles changing lanes
DISTRONIC PLUS has not detected the vehi-
cle cutting in yet. The distance to this vehicle
will be too short.
Narrow vehicles
DISTRONIC PLUS has not yet detected the
vehicle in front on the edge of the road,
190Driving system
s
Driving an d parking
Page 193 of 614
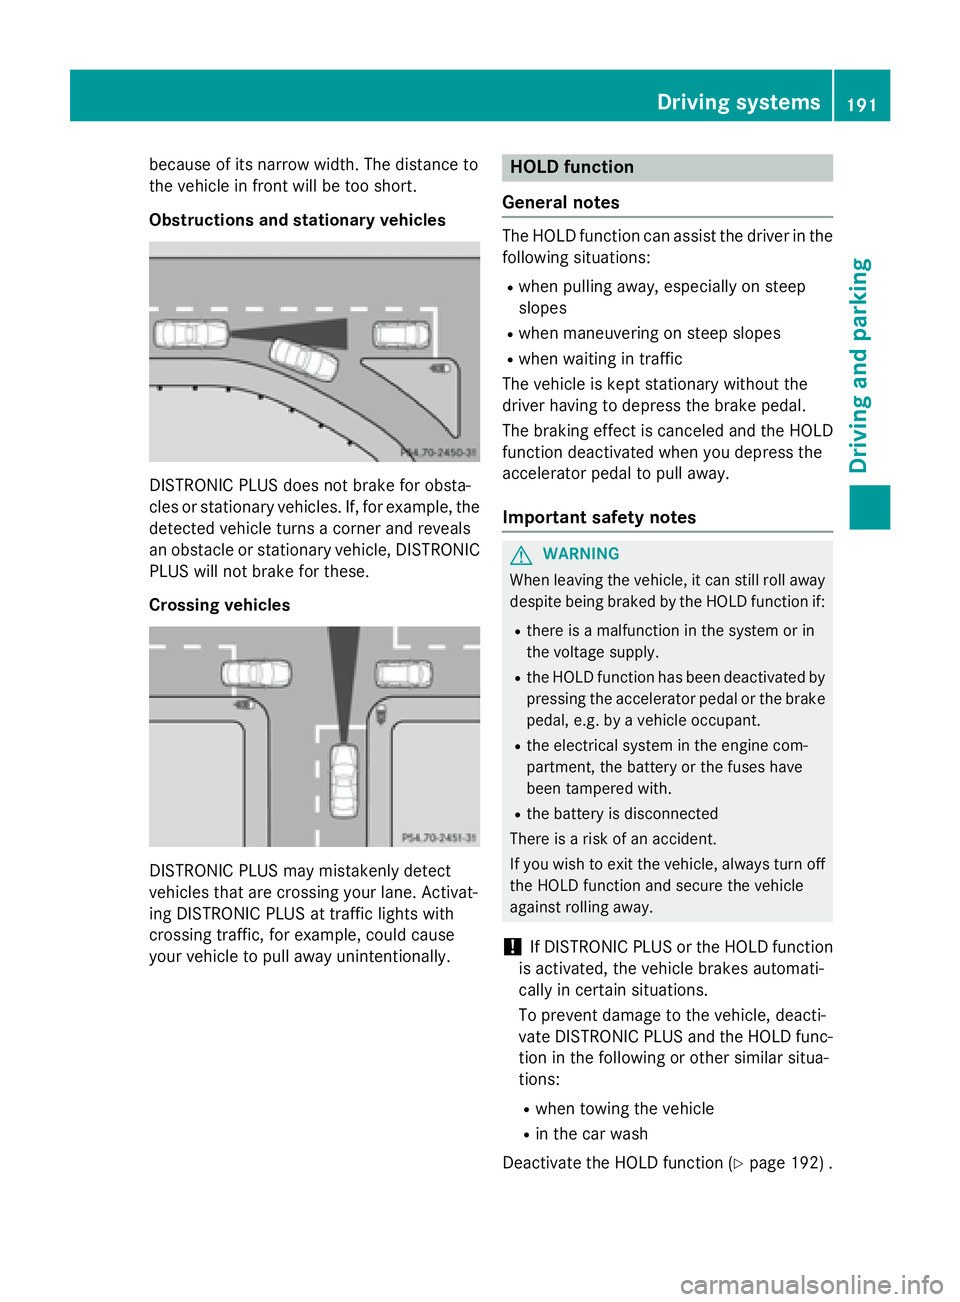
because of its narrow width. The distance to
the vehicle in front will be too short.
Obstructions and stationary vehicles
DISTRONIC PLUS does not brake for obsta-
cles or stationary vehicles. If, for example, the
detected vehicle turns a corner and reveals
an obstacle or stationary vehicle, DISTRONIC
PLUS will not brake for these.
Crossing vehicles
DISTRONIC PLUS may mistakenly detect
vehicles that are crossing your lane. Activat-
ing DISTRONIC PLUS at traffic lights with
crossing traffic, for example, could cause
your vehicle to pull away unintentionally.
HOLD function
General notes
The HOLD function can assist the driver in the
following situations:
Rwhen pulling away, especially on steep
slopes
Rwhen maneuvering on steep slopes
Rwhen waiting in traffic
The vehicle is kept stationary without the
driver having to depress the brake pedal.
The braking effect is canceled and the HOLD
function deactivated when you depress the
accelerator pedal to pull away.
Important safety notes
GWARNING
When leaving the vehicle, it can still roll away despite being braked by the HOLD function if:
Rthere is a malfunction in the system or in
the voltage supply.
Rthe HOLD function has been deactivated by
pressing the accelerator pedal or the brake
pedal, e.g. by a vehicle occupant.
Rthe electrical system in the engine com-
partment, the battery or the fuses have
been tampered with.
Rthe battery is disconnected
There is a risk of an accident.
If you wish to exit the vehicle, always turn off the HOLD function and secure the vehicle
against rolling away.
!If DISTRONIC PLUS or the HOLD function
is activated, the vehicle brakes automati-
cally in certain situations.
To prevent damage to the vehicle, deacti-
vate DISTRONIC PLUS and the HOLD func-
tion in the following or other similar situa-
tions:
Rwhen towing the vehicle
Rin the car wash
Deactivate the HOLD function (
Ypage 192) .
Driving systems191
Driving and parking
Z
Page 196 of 614
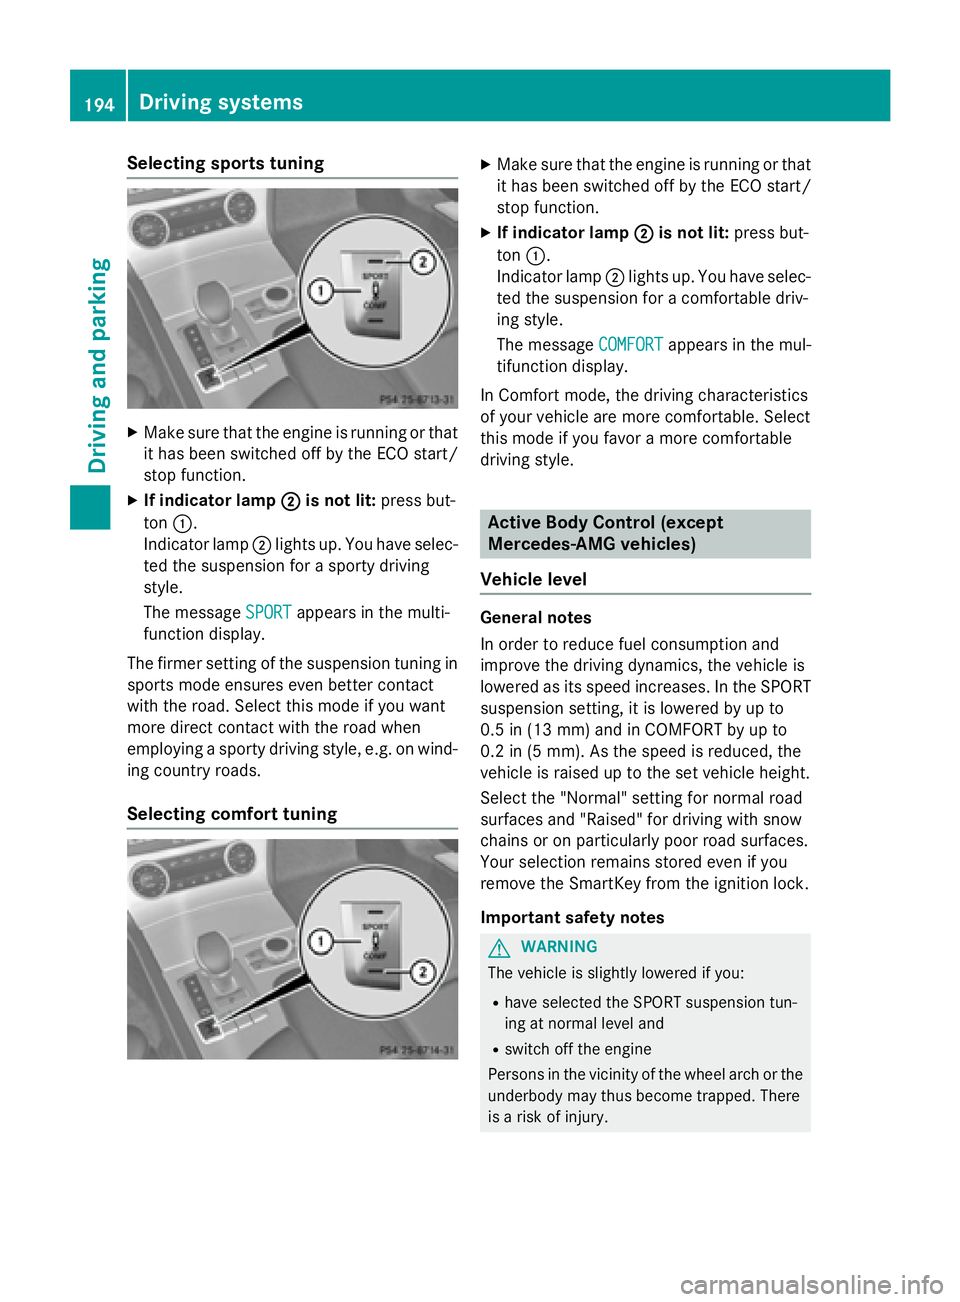
Selecting sports tuning
XMake sure that the engine is running or that
it has been switched off by the ECO start/
stop function.
XIf indicator lamp;is not lit:press but-
ton :.
Indicator lamp ;lights up. You have selec-
ted the suspension for a sporty driving
style.
The message SPORT
appears in the multi-
function display.
The firmer setting of the suspension tuning in sports mode ensures even better contact
with the road. Select this mode if you want
more direct contact with the road when
employing a sporty driving style, e.g. on wind-
ing country roads.
Selecting comfort tuning
XMake sure that the engine is running or that
it has been switched off by the ECO start/
stop function.
XIf indicator lamp ;is not lit:press but-
ton :.
Indicator lamp ;lights up. You have selec-
ted the suspension for a comfortable driv-
ing style.
The message COMFORT
appears in the mul-
tifunction display.
In Comfort mode, the driving characteristics
of your vehicle are more comfortable. Select
this mode if you favor a more comfortable
driving style.
Active Body Control (except
Mercedes-AMG vehicles)
Vehicle level
General notes
In order to reduce fuel consumption and
improve the driving dynamics, the vehicle is
lowered as its speed increases. In the SPORT
suspension setting, it is lowered by up to
0.5 in (13 mm) and in COMFORT by up to
0.2 in (5 mm). As the speed is reduced, the
vehicle is raised up to the set vehicle height.
Select the "Normal" setting for normal road
surfaces and "Raised" for driving with snow
chains or on particularly poor road surfaces.
Your selection remains stored even if you
remove the SmartKey from the ignition lock.
Important safety notes
GWARNING
The vehicle is slightly lowered if you:
Rhave selected the SPORT suspension tun-
ing at normal level and
Rswitch off the engine
Persons in the vicinity of the wheel arch or the underbody may thus become trapped. There
is a risk of injury.
194Driving systems
Driving and parking
Page 199 of 614
Active Body Control(Mercedes-AMG
vehicles)
Vehicle level
Genera lnotes
In order to reduce fuel consumption and
improve th edriving dynamics, th evehicl eis
lowered as it sspee dincreases. In th eSP ORT
suspension setting ,it is lowered by up to
0. 5in (13 mm) and in COMF ORTby up to
0. 2in (5 mm). As th espee dis reduced, th e
vehicl eis raised up to th eset vehicl eheight .
Selec tth e"Normal" setting for normal road
surfaces and "Raised "for driving wit hsnow
chain sor on particularly poor road surfaces.
Important safety notes
The vehicl eis slightly lowered when th e
engin eis switched off .
GWARNING
When th evehicl eis bein glowered, people
could become trapped if their limb sare
between th evehicl ebody and th ewheels or
underneat hth evehicle. There is aris kof
injury.
Mak esur eno on eis underneat hth evehicl eor
in th eimmediat evicinity of th ewhee larches
when th evehicl eis bein glowered.
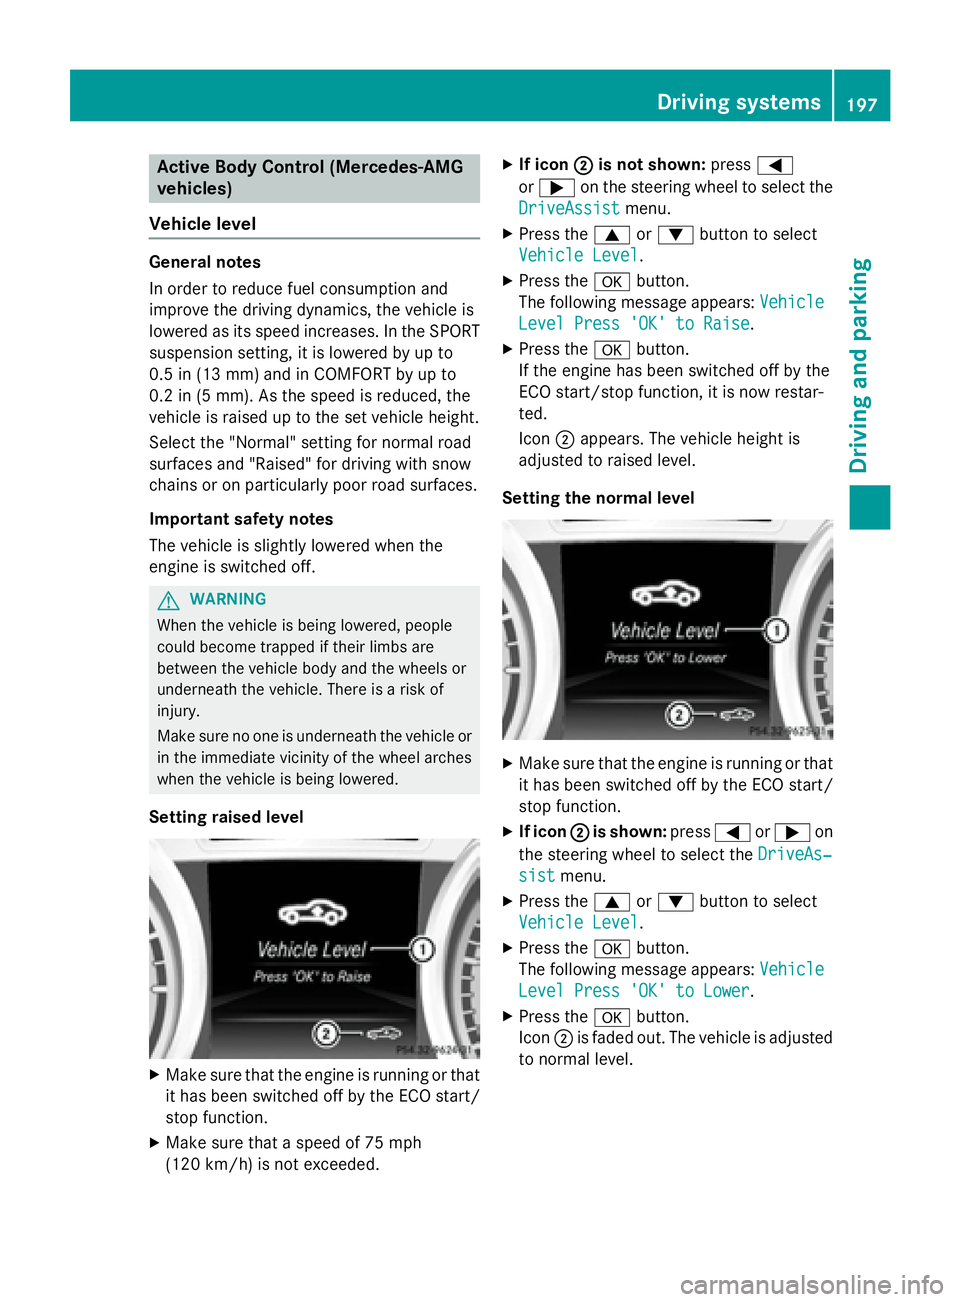
Setting raised level
XMak esur ethat th eengin eis runnin gor that
it has been switched off by th eECO start /
stop function .
XMakesur ethat aspee dof 75 mph
(12 0km/ h)is not exceeded.
XIf icon ;is not shown: press=
or ; on the steering wheel to select the
DriveAssist
menu.
XPress the 9or: button to select
Vehicle Level
.
XPress the abutton.
The following message appears: Vehicle
Level Press 'OK' to Raise.
XPress theabutton.
If the engine has been switched off by the
ECO start/stop function, it is now restar-
ted.
Icon ;appears. The vehicle height is
adjusted to raised level.
Setting the normal level
XMake sure that the engine is running or that it has been switched off by the ECO start/
stop function.
XIf icon ;is shown: press=or; on
the steering wheel to select the DriveAs‐
sistmenu.
XPress the9or: button to select
Vehicle Level
.
XPress the abutton.
The following message appears: Vehicle
Level Press 'OK' to Lower.
XPress theabutton.
Icon ;is faded out. The vehicle is adjusted
to normal level.
Driving systems197
Driving and parking
Z
Page 202 of 614

Side view
Top view
The sensors must be free from dirt, ice or
slush. They can otherwise not function cor-
rectly. Clean the sensors regularly, taking
care not to scratch or damage them
(
Ypage 546).
Front sensors
CenterApprox. 40 in (approx.
100 cm)
CornersApprox. 24 in (approx.
60 cm)
Rear sensors
CenterApprox. 48 in (approx.
120 cm)
CornersApprox. 32 in (approx.
80 cm)
Minimum distance
CenterApprox. 8 in (approx.
20 cm)
CornersApprox. 6 in (approx.
15 cm)
If there is an obstacle within this range, the
relevant warning displays light up and a warn-
ing tone sounds. If the distance falls below
the minimum, the distance may no longer be
shown.
Warning displays
Warning display for the front area
:
Segments on the left-hand side of the
vehicle
;Segments on the right-hand side of the
vehicle
=Segments showing operational readiness
The warning displays show the distance
between the sensors and the obstacle. The
warning display for the front area is located
on the dashboard above the center air vents.
The warning display for the rear area is loca-
ted on the cover behind the seats in the rear
compartment.
The warning display for each side of the vehi- cle is divided into five yellow and two red seg-
ments. PARKTRONIC is operational if yellow
segments showing operational readiness =
light up.
The selected transmission position and the
direction in which the vehicle is rolling deter-
200Driving systems
Driving and parking
Page 203 of 614
mine which warning display is active when the
engine is running.
Transmission
positionWarning display
DFront area activated
R,Nor the vehicle
is rolling back-
wardsRear and front areas
activated
PNo areas activated
One or more segments light up as the vehicle
approaches an obstacle, depending on the
vehicle's distance from the obstacle.
From the:
Rsixth segment onwards, you will hear an
intermittent warning tone for approx-
imately two seconds.
Rseventh segment onwards, you will hear a
warning tone for approximately two sec-
onds. This indicates that you have now
reached the minimum distance.
Deactivating/activating PARKTRONIC
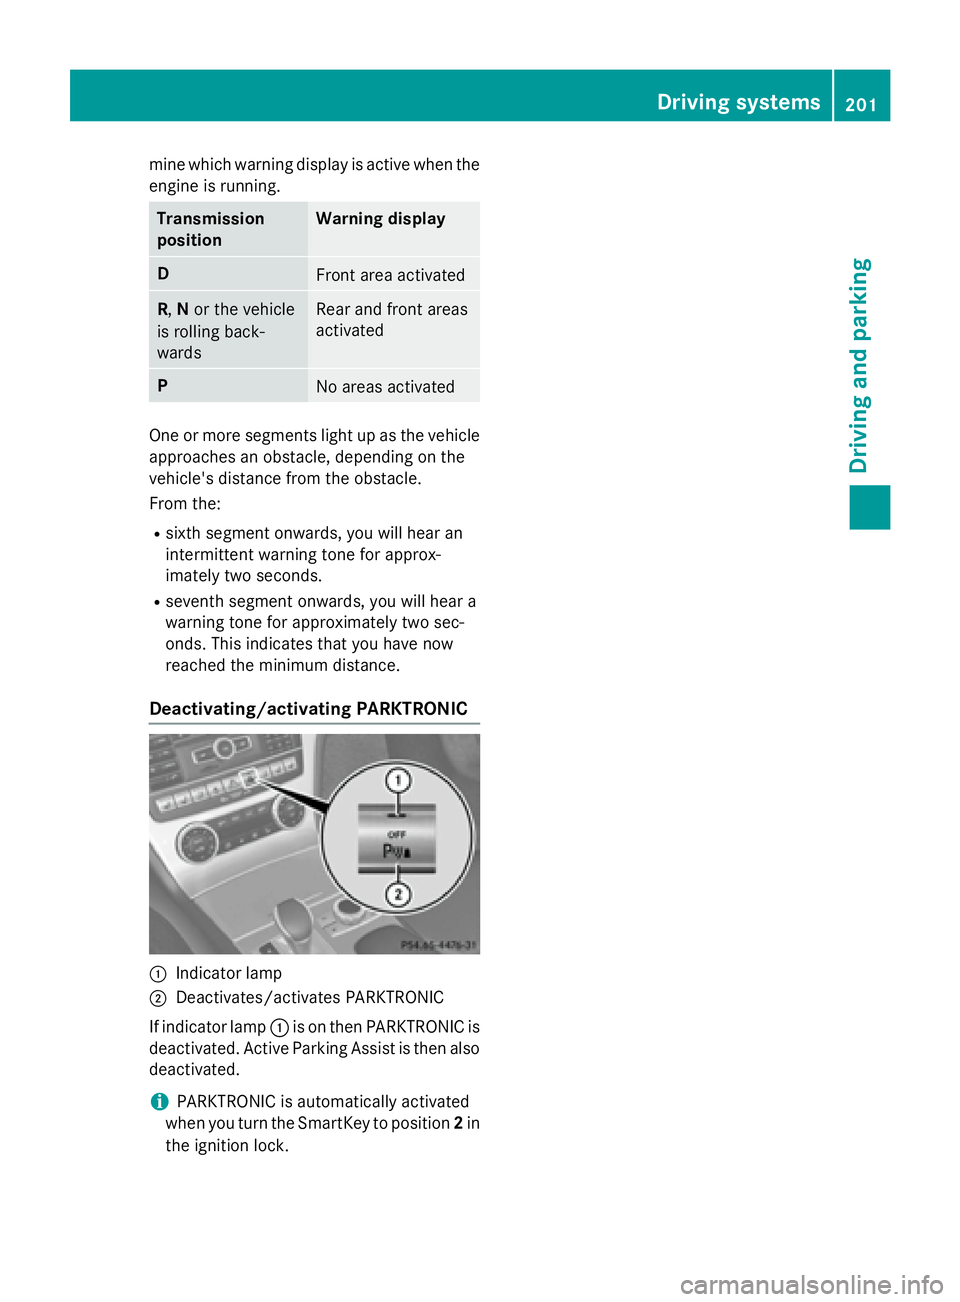
:Indicator lamp
;Deactivates/activates PARKTRONIC
If indicator lamp :is on then PARKTRONIC is
deactivated. Active Parking Assist is then also
deactivated.
iPARKTRONIC is automatically activated
when you turn the SmartKey to position 2in
the ignition lock.
Driving systems201
Driving and parking
Z
Page 204 of 614

Problems with PARKTRONIC
ProblemPossible causes/consequences andMSolutions
Only the red segments
in the PARKTRONIC
warning displays are lit.
You also hear a warning
tone for approximately
two seconds.
PARKTRONIC is deacti-
vated after approx-
imately five seconds,
and the indicator lamp
in the PARKTRONIC
button lights up.PARKTRONIC has malfunctioned and has switched off.
XIf problems persist, have PARKTRONIC checked at a qualified
specialist workshop.
Only the red segments
in the PARKTRONIC
warning displays are lit.
PARKTRONIC is deacti-
vated after approx-
imately five seconds.The PARKTRONIC sensors are dirty or there is interference.
XClean the PARKTRONIC sensors (Ypage 546).
XSwitch the ignition back on.
The problem may be caused by an external source of radio or
ultrasound waves.
XSee if PARKTRONIC functions in a different location.
Active Parking Assist
General notes
Active Parking Assist is an electronic parking
aid with ultrasound. Ultrasound is used to
measure the road on both sides of the vehicle.
A suitable parking space is indicated by the
parking symbol. Active steering intervention
can assist you during parking.
You may also use PARKTRONIC (
Ypage 199).
When PARKTRONIC is switched off, Active
Parking Assist is also unavailable.
Use Active Parking Assist for parking spaces:
Rthat are parallel to the direction of travel
Rthat are on straight roads, not bends
Rthat are on the same level as the road, e.g.
not on the pavement
Important safety notes
Active Parking Assist is merely an aid. It is not
a replacement for your attention to your
immediate surroundings. You are always
responsible for safe maneuvering, parking
and exiting a parking space. When maneu-
vering, parking or pulling out of a parking
space, make sure that there are no persons,
animals or objects in the area in which you are
maneuvering.
GWARNING
The vehicle swings out when parking and in
doing so could cross into the opposite lane.
This could result in a collision with another
road user. There is a risk of an accident.
Pay attention to other road users when park-
ing. Stop the vehicle if necessary or cancel the Active Parking Assist parking procedure.
202Driving systems
Driving and parking
Page 205 of 614
!If unavoidable, you should drive over
obstacles such as curbs slowly and not at a
sharp angle. Otherwise, you may damage
the wheels or tires.
Active Parking Assist may possibly indicate
parking spaces which are not suitable for
parking, for example:
Rwhere parking or stopping is prohibited
Rin front of driveways or entrances and exits
Ron unsuitable surfaces
Parking tips:
ROn narrow roads, drive as close to the park-
ing space as possible.
RParking spaces that are littered or over-
grown might be identified or measured
incorrectly.
RParking spaces that are partially occupied
by trailer drawbars might not be identified
as such or be measured incorrectly.
RSnowfall or heavy rain may lead to a parking
space being measured inaccurately.
RPay attention to the PARKTRONIC
(
Ypage 200) warning messages during the
parking procedure.
RYou can intervene in the steering procedure
to correct it at any time. Active Parking
Assist will then be canceled.
RWhen transporting a load which protrudes
from your vehicle, you should not use
Active Parking Assist.
RNever use Active Parking Assist when snow
chains are installed.
RMake sure that the tire pressures are
always correct. This has a direct influence
on the parking characteristics of the vehi-
cle.
Parking
Important safety notes
Objects located above the height range of
Active Parking Assist will not be detected
when the parking space is measured. These
are not taken into account when the parking procedure is calculated, e.g. overhanging
loads, tail sections or loading ramps of goods
vehicles. In some circumstances, Active Park-
ing Assist may therefore guide you into the
parking space too early.
GWARNING
If there are objects above the detection range, Active Parking Assist may turn prematurely.
You may cause a collision as a result. There is
a risk of an accident.
If there are objects above the detection range,
stop and deactivate Active Parking Assist.
GWARNING
Active Parking Assist merely aids you by inter- vening actively in the steering. If you do not
brake there is a risk of an accident.
Always apply the brakes yourself when
maneuvering and parking.
Detecting parking spaces
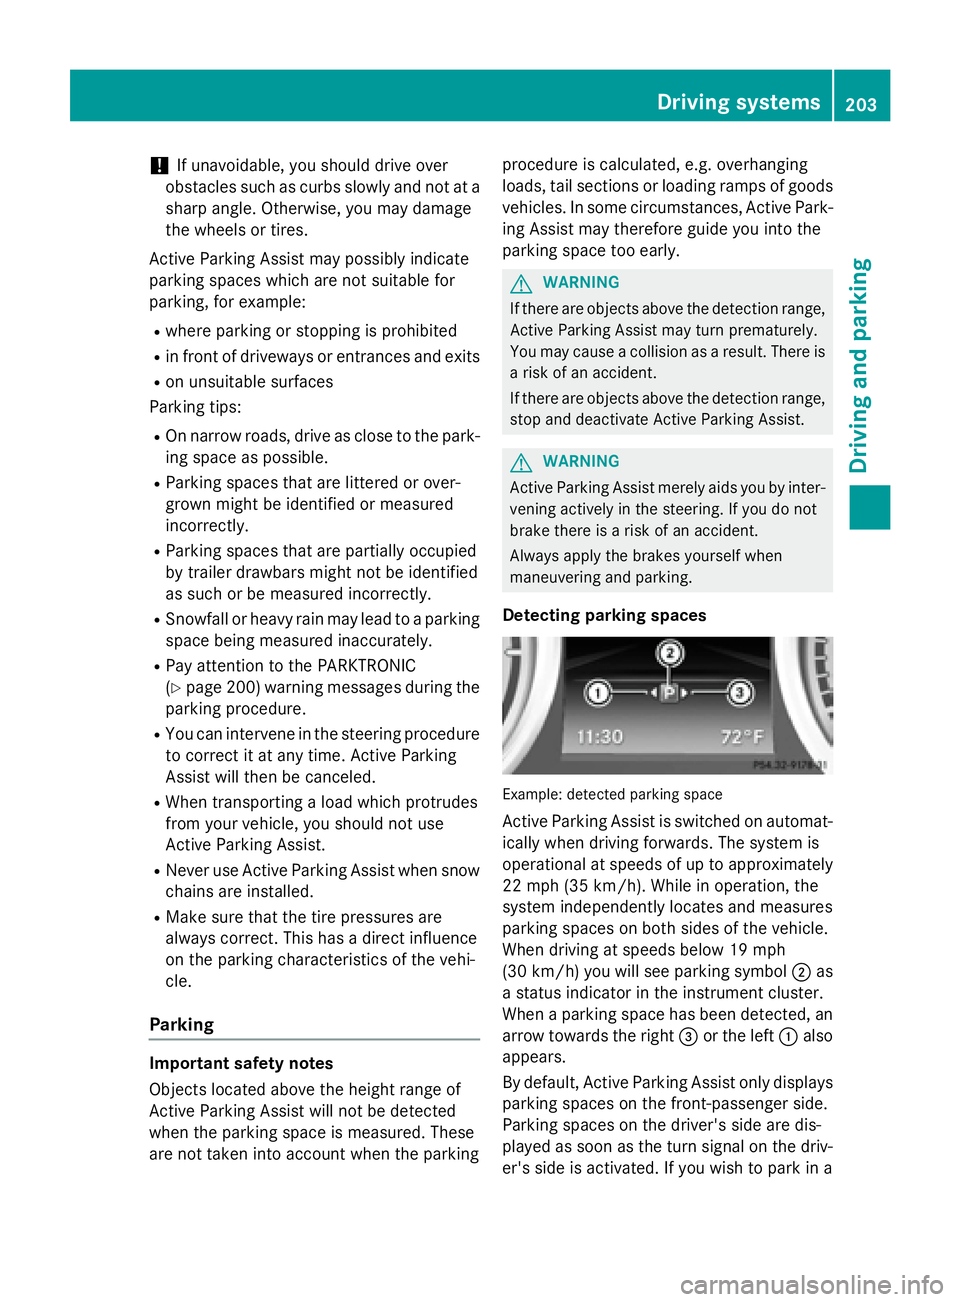
Example: detected parking space
Active Parking Assist is switched on automat-ically when driving forwards. The system is
operational at speeds of up to approximately
22 mph (35 km/h). While in operation, the
system independently locates and measures
parking spaces on both sides of the vehicle.
When driving at speeds below 19 mph
(30 km/h) you will see parking symbol ;as
a status indicator in the instrument cluster.
When a parking space has been detected, an
arrow towards the right =or the left :also
appears.
By default, Active Parking Assist only displays
parking spaces on the front-passenger side.
Parking spaces on the driver's side are dis-
played as soon as the turn signal on the driv-
er's side is activated. If you wish to park in a
Driving systems203
Driving and parking
Z