2016 MERCEDES-BENZ S-COUPE bulb
[x] Cancel search: bulbPage 14 of 410
Start/Stop button .......................... 151
KEYLESS-GO
Convenience closing feature ............ 99
Deactivation ..................................... 83
General notes .................................. 83
Locking ............................................ 83
Start function ................................... 84
Unlocking ......................................... 83
Kickdown
Driving tips .................................... 162
Knee bag .............................................. 52
L
Lamps
see Warning and indicator lamps
Lane Keeping Assist
see Active Lane Keeping Assist
LATCH-type (ISOFIX) child seat
anchors ................................................ 65
License plate lamp (display mes-
sage) ................................................... 266
Light function, active
Display message ............................ 267
Light sensor (display message) ....... 267
Lights
Adaptive Highbeam Assist PLUS .... 127
Automatic headlamp mode ............ 124
Cornering light function ................. 127
Fogged up headlamps .................... 129
General notes ................................ 124
Hazard warning lamps ................... 126
High beam flasher .......................... 126
High-beam headlamps ................... 126
Light switch ................................... 124
Low-beam headlamps .................... 125
Parking lamps ................................ 125
Setting exterior lighting ................. 124
Standing lamps .............................. 125
Switching the daytime running
lamps on/off (on-board com-
puter) ............................................. 248
Switching the spotlight on/off ....... 247
Turn signals ................................... 126
see Interior lighting
see Replacing bulbs
Loading guidelines ............................ 300 Locking
see Central locking
Locking (doors)
Automatic ........................................ 90
Emergency locking ........................... 91
From inside (central locking but-
ton) .................................................. 89
Locking centrally
see Central locking
Low-beam headlamps
Display message ............................ 265
Switching on/off ........................... 125
Lumbar support
Adjusting the 4-way lumbar sup-
port ................................................ 111
M
M+S tires ............................................ 364
Magic Body Control ........................... 194
MAGIC SKY CONTROL ....................... 103
Malfunction message
see Display messages
Matte finish (cleaning instruc-
tions) .................................................. 334
MBC
see Magic Body Control
mbrace
Call priority .................................... 313
Display message ............................ 259
Downloading destinations
(COMAND) ..................................... 313
Downloading routes ....................... 316
Emergency call .............................. 310
General notes ................................ 309
Geo fencing ................................... 317
Locating a stolen vehicle ............... 315
MB info call button ........................ 312
Remote fault diagnosis .................. 315
Remote vehicle locking .................. 315
Roadside Assistance button .......... 311
Search & Send ............................... 314
Self-test ......................................... 310
Speed alert .................................... 316
System .......................................... 309
Triggering the vehicle alarm ........... 317
Vehicle remote unlocking .............. 314
12Index
Page 18 of 410
Refuelingprocess .......................... 16 8
see Fue l
Remote contro l
Garag edoo ropener ...................... .317
Programming (garage door
opener) .......................................... 318
Replacing bulbs
General notes ................................ 130
Reporting safety defects .................... 27
Rescue card ......................................... 28
Reserve (fuel tank)
see Fuel
Reserve fuel
Display message ............................ 271
Warning lamp ................................. 293
Residual heat (climate control) ........143
Restraint system
Display message ............................ 262
Introduction ..................................... 44
Warning lamp ................................. 292
Warning lamp (function) ................... 45
Reversing feature
Roller sunblind ............................... 101
Side windows ................................... 98
Trunk lid ...........................................9 2
Reversing lamps (display mes-
sage) ................................................... 267
ROAD SURFACE SCAN ....................... 196
Roadside Assistance (breakdown) .... 24
Roller sunblind
Panorama roof ............................... 101
Rear window .................................. 306
Roller sunblind for the panorama
roof
Opening and closing ...................... 102
Operating ....................................... 101
Resetting ....................................... 102
Roof lining and carpets (cleaning
guidelines) ......................................... 339
Roof load (maximum) ........................ 406
S
Safety
Children in the vehicle ..................... 62
see Occupant safety
see Operating safety Safety system
see Driving safety systems
SD memory card
Selecting ........................................ 240
Seat
Adjusting the front-passenger
seat from the driver's seat ............. 108
Seat belts
Adjusting the driver's and front-
passenger seat belt ......................... 50
Cleaning ......................................... 339
Correct usage .................................. 47
Fastening ......................................... 48
Important safety guidelines ............. 46
Introduction ..................................... 46
Releasing ......................................... 49
Warning lamp ................................. 285
Warning lamp (function) ................... 50
Seating
Seating comfort package ............... 111
Seating comfort package ................. 111
Seats
Active multicontour seat ................ 111
Adjusting (electrically) ................... 108
Adjusting the 4-way lumbar sup-
port ................................................ 111
Adjusting the head restraint .......... 109
Calling up a stored setting (mem-
ory function) .................................. 121
Cleaning the cover ......................... 338
Correct driver's seat position ........ 106
EASY-ENTRY/EXIT system ............. 116
Folding the backrests forward/
back ............................................... 110
Important safety notes .................. 107
Seat backrest display message ..... 283
Seat heating .................................. 111
Seat heating problem .................... 113
Seat ventilation .............................. 113
Seat ventilation problem ................ 114
Storing settings (memory func-
tion) ............................................... 121
Switching seat heating on/off ....... 111
Switching seat ventilation on/off .. 113
Section
Wheels and tires ............................ 362
Securing a load
see Securing cargo
16Index
Page 125 of 410
Useful information............................124
Exterior lighting ................................ 124
Interior lighting ................................. 129
Replacing bulbs ................................. 130
Windshield wipers ............................130
123
Lights and windshield wipers
Page 132 of 410
XTo activate/deactivate:press the|
button.
When the automatic interior lighting con-
trol is activated, the button is flush with the
overhead control panel.
The interior lighting automatically switches
on if you:
Runlock the vehicle
Ropen a door
Rremove the SmartKey from the ignition lock
The interior light is activated for a short while
when the SmartKey is removed from the igni-
tion lock. This delayed switch-off can be
adjusted using COMAND (see the separate
COMAND operating instructions).
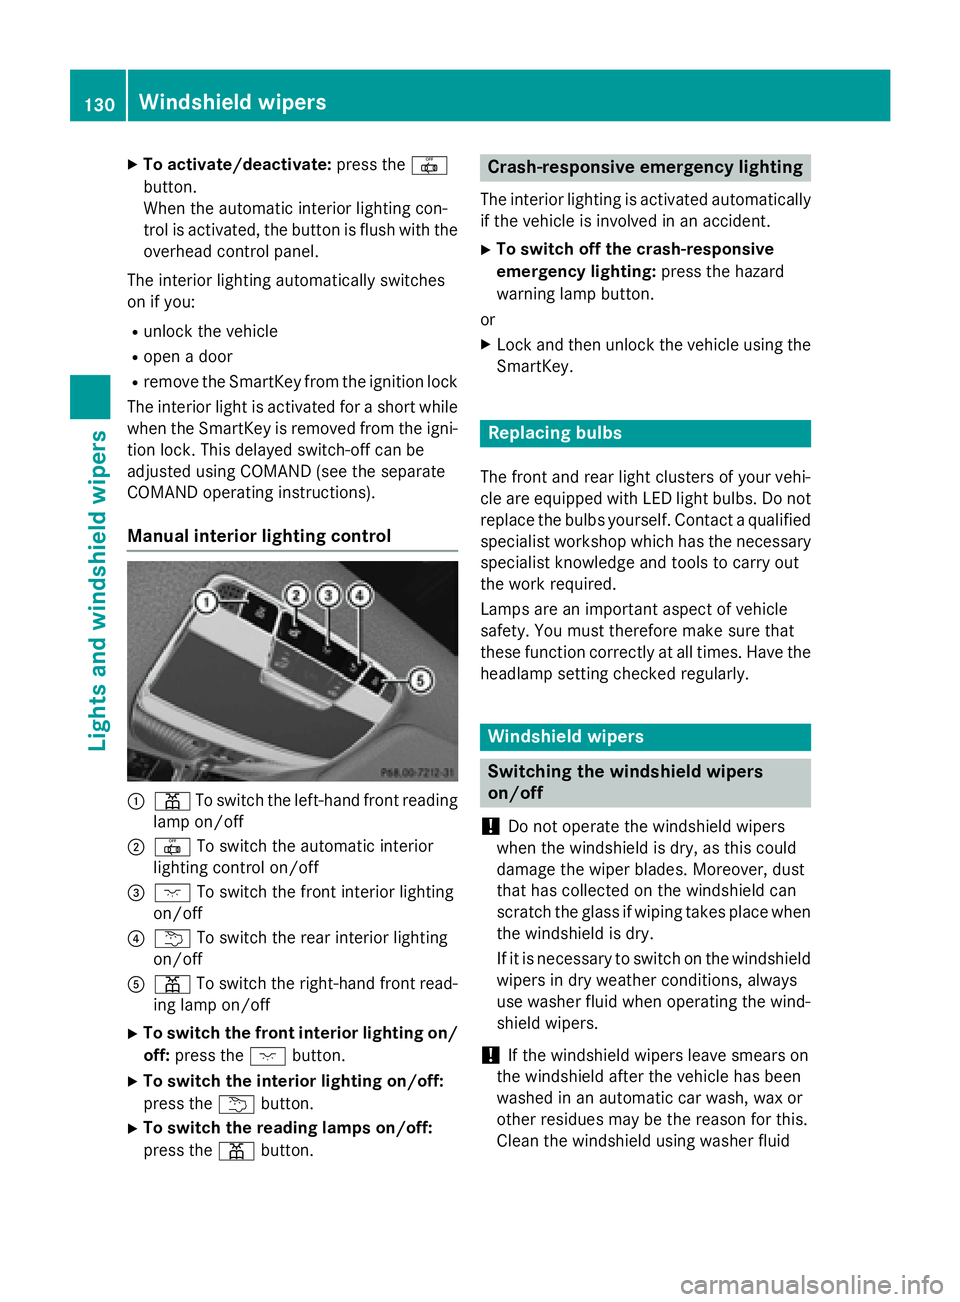
Manual interior lighting control
:p To switch the left-hand front reading
lamp on/off
;| To switch the automatic interior
lighting control on/off
=c To switch the front interior lighting
on/off
?u To switch the rear interior lighting
on/off
Ap To switch the right-hand front read-
ing lamp on/off
XTo switch the front interior lighting on/
off: press the cbutton.
XTo switch the interior lighting on/off:
press the ubutton.
XTo switch the reading lamps on/off:
press the pbutton.
Crash-responsive emergency lighting
The interior lighting is activated automatically
if the vehicle is involved in an accident.
XTo switch off the crash-responsive
emergency lighting: press the hazard
warning lamp button.
or
XLock and then unlock the vehicle using the SmartKey.
Replacing bulbs
The front and rear light clusters of your vehi-
cle are equipped with LED light bulbs. Do not
replace the bulbs yourself. Contact a qualified
specialist workshop which has the necessary
specialist knowledge and tools to carry out
the work required.
Lamps are an important aspect of vehicle
safety. You must therefore make sure that
these function correctly at all times. Have the
headlamp setting checked regularly.
Windshield wipers
Switching the windshield wipers
on/off
!
Do not operate the windshield wipers
when the windshield is dry, as this could
damage the wiper blades. Moreover, dust
that has collected on the windshield can
scratch the glass if wiping takes place when
the windshield is dry.
If it is necessary to switch on the windshield
wipers in dry weather conditions, always
use washer fluid when operating the wind-
shield wipers.
!If the windshield wipers leave smears on
the windshield after the vehicle has been
washed in an automatic car wash, wax or
other residues may be the reason for this.
Clean the windshield using washer fluid
130Windshield wipers
Lights and windshield wiper s
Page 209 of 410
shows thePark Assist Canceledmes-
sage.
When Active Parking Assist is canceled, you
must steer and brake again yourself.
If a system malfunction occurs, the vehicle is
braked to a standstill. To drive on, depress the
accelerator again.
Rear view camera
General notes
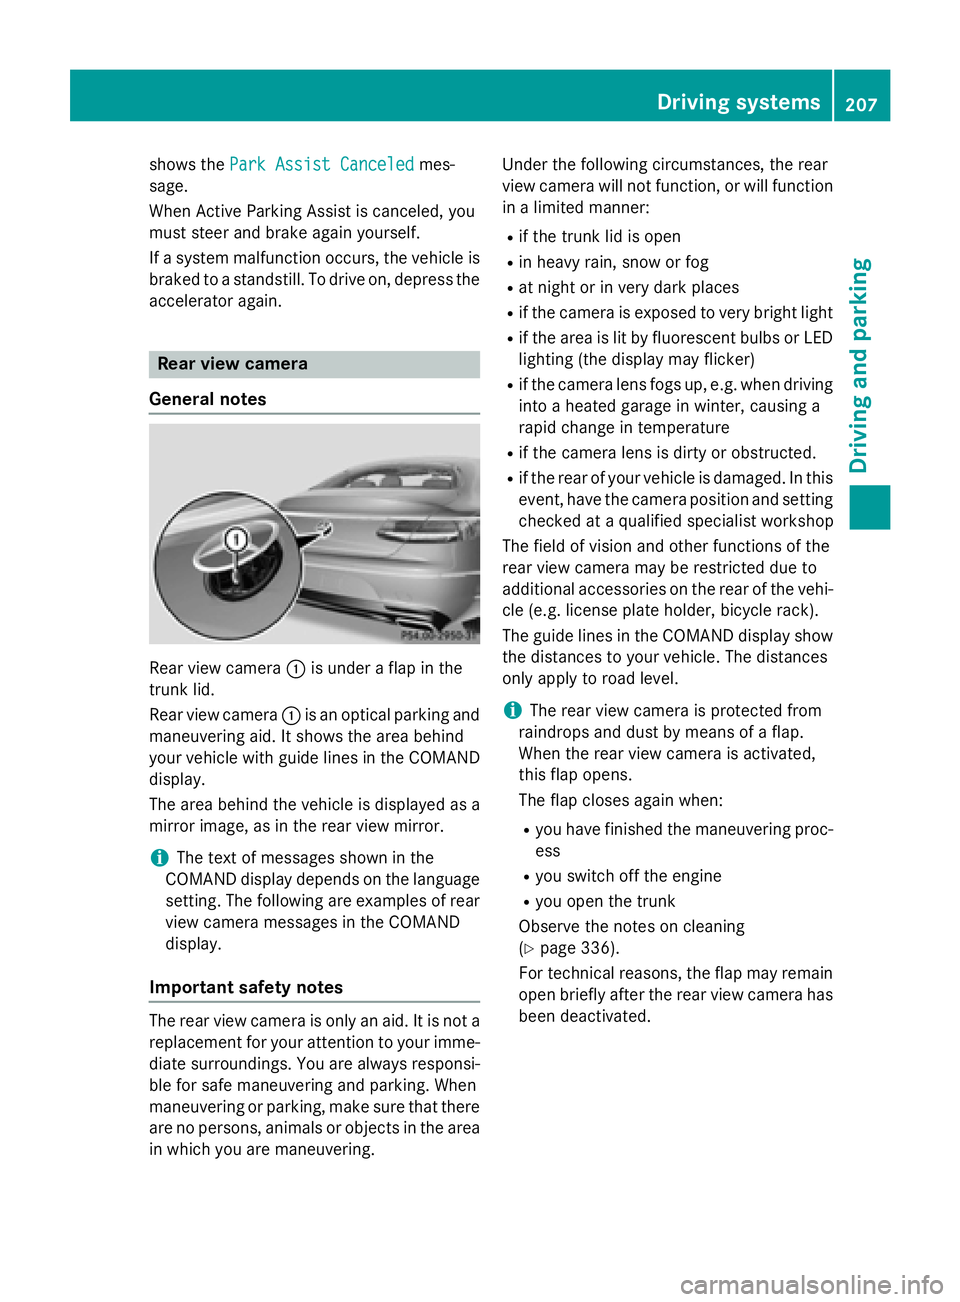
Rear view camera :is under a flap in the
trunk lid.
Rear view camera :is an optical parking and
maneuvering aid. It shows the area behind
your vehicle with guide lines in the COMAND
display.
The area behind the vehicle is displayed as a
mirror image, as in the rear view mirror.
iThe text of messages shown in the
COMAND display depends on the language
setting. The following are examples of rear
view camera messages in the COMAND
display.
Important safety notes
The rear view camera is only an aid. It is not a
replacement for your attention to your imme-
diate surroundings. You are always responsi-
ble for safe maneuvering and parking. When
maneuvering or parking, make sure that there
are no persons, animals or objects in the area in which you are maneuvering. Under the following circumstances, the rear
view camera will not function, or will function
in a limited manner:
Rif the trunk lid is open
Rin heavy rain, snow or fog
Rat night or in very dark places
Rif the camera is exposed to very bright light
Rif the area is lit by fluorescent bulbs or LED
lighting (the display may flicker)
Rif the camera lens fogs up, e.g. when driving
into a heated garage in winter, causing a
rapid change in temperature
Rif the camera lens is dirty or obstructed.
Rif the rear of your vehicle is damaged. In this
event, have the camera position and setting
checked at a qualified specialist workshop
The field of vision and other functions of the
rear view camera may be restricted due to
additional accessories on the rear of the vehi-
cle (e.g. license plate holder, bicycle rack).
The guide lines in the COMAND display show
the distances to your vehicle. The distances
only apply to road level.
iThe rear view camera is protected from
raindrops and dust by means of a flap.
When the rear view camera is activated,
this flap opens.
The flap closes again when:
Ryou have finished the maneuvering proc-
ess
Ryou switch off the engine
Ryou open the trunk
Observe the notes on cleaning
(
Ypage 336).
For technical reasons, the flap may remain
open briefly after the rear view camera has
been deactivated.
Driving systems207
Driving and parking
Z
Page 214 of 410

The 360° camera will not function or will
function in a limited manner:
Rif the doors are open
Rif the exterior mirrors are folded in
Rif the trunk lid is open
Rin heavy rain, snow or fog
Rat night or in very dark places
Rif the cameras are exposed to very bright
light
Rif the area is lit by fluorescent bulbs or LED
lighting (the display may flicker)
Rif the camera lenses fog up, e.g. when driv-
ing into a heated garage in winter, causing
a rapid change in temperature
Rif the camera lenses are dirty or covered.
Observe the notes on cleaning
(
Ypage 336)
Rif the vehicle components in which the
cameras are installed are damaged. In this
event, have the camera position and setting
checked at a qualified specialist workshop.
Do not use the 360° camera in this case. You
can otherwise injure others or cause damage
to objects or the vehicle.
The guide lines in the COMAND display show
the distances to your vehicle. The distances
only apply to road level.
iThe camera in the rear area is protected
from raindrops and dust by means of a flap. This flap opens when the 360° camera is
activated.
The flap closes again when:
Ryou have finished the maneuvering proc-
ess
Ryou switch off the engine
Ryou open the trunk
Observe the notes on cleaning
(
Ypage 336).
For technical reasons, the flap may remain
open briefly after the 360° camera has
been deactivated. On vehicles with height-adjustable chassis,
depending on technical conditions, leaving
the standard height can result in:
Rinaccuracies in the guide lines
Rinaccuracies in the display of generated
images (top view)
Activation conditions
The 360° camera image can be displayed if:
RCOMAND is switched on (see the separate
operating instructions)
Rthe 360° Camerafunction is switched on
iIf the 360° camera is activated at speeds
above approximately 19 mph (30 km/h) , a
warning message appears.
The warning message disappears if:
Rthe vehicle's speed falls below approx-
imately 19 mph (30 km/h). The 360°
camera is then activated.
Rthe message is confirmed with the %
button.
Switching the 360° camera on and off
using the button
XTo switch on: press button:.
Depending on whether position Dor Ris
engaged, the following is shown:
Rfull screen display with the image from
the front camera
Rfull screen display with the image from
the rear view camera
XTo switch off: press button:again.
212Driving systems
Driving and parking
Page 267 of 410
Display messagesPossible causes/consequences andMSolutions
DisabledSeeOperator'sManualmustno tappea rin th e
multifunction display.
XWait fo r aperiod of at leas t60 seconds until th enecessar ysys-
te m checks hav ebeen completed.
XMak esur ethat th edisplay message sdo no tappea rin th emul-
tifunction display.
If these condition sare fulfilled ,th efront-passenger seat can be
occupied again .Whether th ePASSENGER AI RBA GOF For ON
indicato rlamp remain slit or goe sout depend son how OCS clas-
sifies th eoccupant .
If th econdition sare no tfulfilled ,th esystem is no toperating cor-
rectly.
XVisit aqualified specialist workshop immediately.
Fo rfurther information about th eOccupant Classification System,
see (
Ypage 54).
Lights
i
Vehicles wit hLE Dbulbs in th eligh tclusters :
The display message fo rth ecorrespondin glamp only appears when all of th eLEDs in th e
lamp hav efailed.
Display messagesPossible causes/consequences and MSolutions
b
Check LeftCorner ‐
ing LightorCheck
Right Cornering
Light
The lef tor right-hand cornering ligh tis defective.
XVisit aqualified specialist workshop .
b
Check LeftLow
Bea morCheck
Right Low Bea m
The leftor right-hand low-beam headlamp is defective.
XVisit aqualified specialist workshop .
b
Check RearLef t
TurnSignalor
Check Rea rRight
Tur nSignal
The rear left-han dor rear right-hand tur nsignal is defective.
XVisit aqualified specialist workshop .
Display messages265
On-board computer and displays
Z