2016 MERCEDES-BENZ S-COUPE steering
[x] Cancel search: steeringPage 117 of 410
Steering wheel heating
Activating/deactivating
XTurn the SmartKey to position 2in the igni-
tion lock (
Ypage 151).
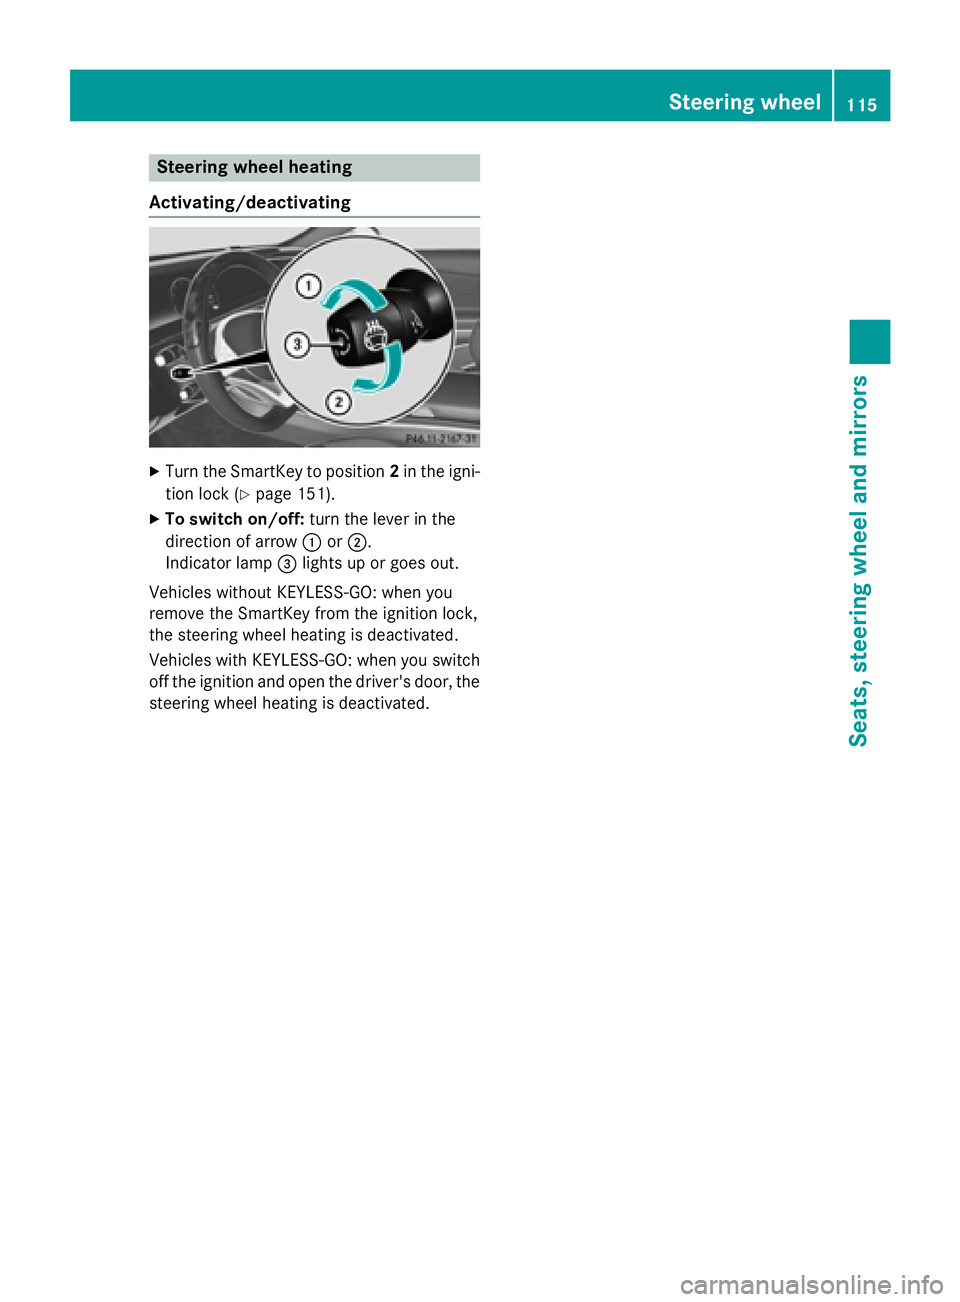
XTo switch on/off: turn the lever in the
direction of arrow :or;.
Indicator lamp =lights up or goes out.
Vehicles without KEYLESS-GO: when you
remove the SmartKey from the ignition lock,
the steering wheel heating is deactivated.
Vehicles with KEYLESS-GO: when you switch
off the ignition and open the driver's door, the steering wheel heating is deactivated.
Steering wheel115
Seats, steering wheel and mirrors
Z
Page 118 of 410
Problems with the steering wheel heating
ProblemPossible causes/consequences andMSolutions
The steering wheel
heating has switched
off prematurely or can-
not be switched on.The on-board voltage is too low because too many electrical con-
sumers are switched on.
XSwitch off electrical consumers that you do not need, such as
the rear window defroster or interior lighting.
EASY-ENTRY/EXIT feature
Important safety notes
GWARNING
When the EASY-ENTRY/EXIT feature adjusts
the steering wheel and the driver's seat, you
and other vehicle occupants – particularly
children – could become trapped. There is a
risk of injury.
While the EASY-ENTRY/EXIT feature is mak-
ing adjustments, make sure that no one has
any body parts in the sweep of the seat and
the steering wheel.
If there is a risk of becoming trapped by
Rthe steering wheel: move the steering
wheel adjustment lever.
Rthe seat: press the switch for seat adjust-
ment.
The adjustment process is stopped.
Press one of the memory function position
switches. The adjustment process is stopped.
GWARNING
If children activate the EASY-ENTRY/EXIT fea-
ture, they can become trapped, particularly
when unattended. There is a risk of injury.
When leaving the vehicle, always take the
SmartKey with you and lock the vehicle. Never
leave children unsupervised in the vehicle.
GWARNING
If you drive off while the EASY-ENTRY/EXIT
feature is making adjustments, you could lose
control of the vehicle. There is a risk of an
accident.
Always wait until the adjustment process is
complete before driving off.
The EASY-ENTRY/EXIT feature makes getting
in and out of your vehicle easier.
You can activate and deactivate the EASY-
ENTRY/EXIT feature using COMAND (see the
separate operating instructions).
Position of the steering wheel and the
driver's seat when the EASY-ENTRY/
EXIT feature is active
The steering wheel tilts upwards and the driv-
er's seat moves backwards if you:
Rremove the SmartKey from the ignition lock
Rwith KEYLESS-GO: open the driver's door;
KEYLESS-GO must be in position 1
Rwith the SmartKey:open the driver's
door; the SmartKey must be in position 0or
1 in the ignition lock (
Ypage 151)
Ropen the driver's door when the ignition is
switched off
iThe steering wheel only tilts upwards and
the driver's seat only moves backwards if
the driving position is stored after seat or
steering wheel adjustment.
The last position of the steering wheel or seat
is stored if:
Rthe ignition is switched off
Rthe setting is stored with the memory func-
tion (
Ypage 121).
iThe steering wheel only moves upwards if
it has not already reached the upper stop.
116Steering wheel
Seats, steering wheel and mirrors
Page 119 of 410
The driver's seat only moves backwards if itis not already in the rearmost position.
Position of the steering wheel and the
driver's seat for driving
The steering wheel and the driver's seat are
moved to the previously set position if:
Rthe driver's door is closed and you insert
the SmartKey into the ignition lock
Ryou close the driver's door when the igni-
tion is switched on
Ryou press the Start/Stop button once on
vehicles with KEYLESS-GO
iThe steering wheel and the driver's seat
only return to the last set position when the
driving position is stored after seat or steer-
ing wheel adjustment.
The last position of the steering wheel or seat
is stored if:
Rthe ignition is switched off
Rthe setting is stored with the memory func-
tion (
Ypage 121).
Crash-responsive EASY-EXIT feature
If the crash-responsive EASY-EXIT feature is
triggered in an accident, the steering column
will move upwards when the driver's door is
opened or the SmartKey is removed from the ignition lock. This makes it easier to exit the
vehicle and rescue the occupants.
The crash-responsive EASY-EXIT feature is
only operational if the EASY-EXIT/ENTRY fea-
ture is activated in COMAND (see the sepa-
rate operating instructions).
Mirrors
Rear-view mirror
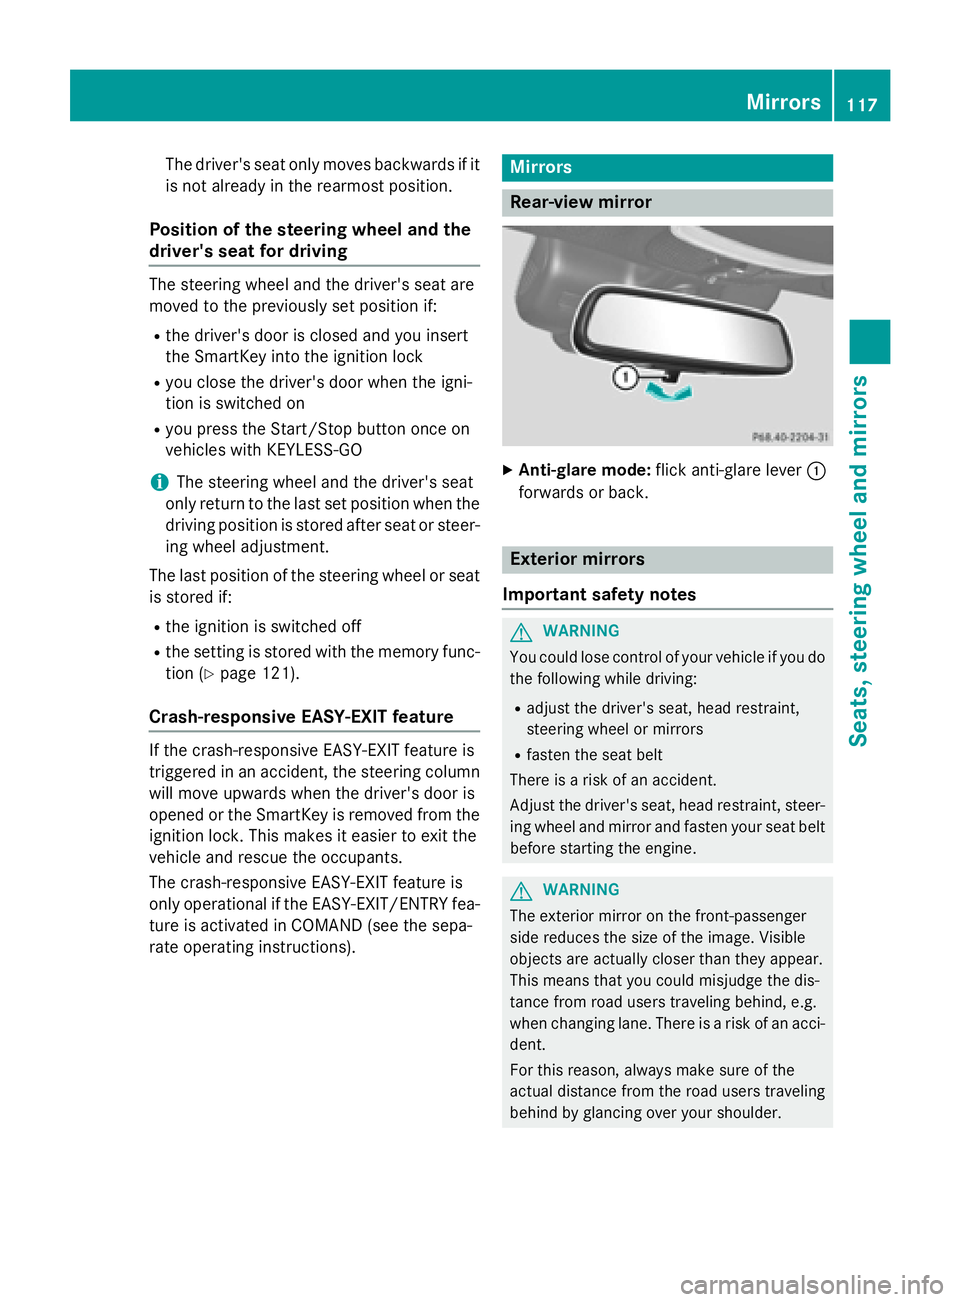
XAnti-glare mode: flick anti-glare lever :
forwards or back.
Exterior mirrors
Important safety notes
GWARNING
You could lose control of your vehicle if you do the following while driving:
Radjust the driver's seat, head restraint,
steering wheel or mirrors
Rfasten the seat belt
There is a risk of an accident.
Adjust the driver's seat, head restraint, steer-
ing wheel and mirror and fasten your seat belt before starting the engine.
GWARNING
The exterior mirror on the front-passenger
side reduces the size of the image. Visible
objects are actually closer than they appear.
This means that you could misjudge the dis-
tance from road users traveling behind, e.g.
when changing lane. There is a risk of an acci-
dent.
For this reason, always make sure of the
actual distance from the road users traveling
behind by glancing over your shoulder.
Mirrors117
Seats, steering wheel and mirrors
Z
Page 120 of 410
Adjusting the exterior mirrors
XTurn theSmartKey to position 1or 2in th e
ignition loc k (
Ypage 151).
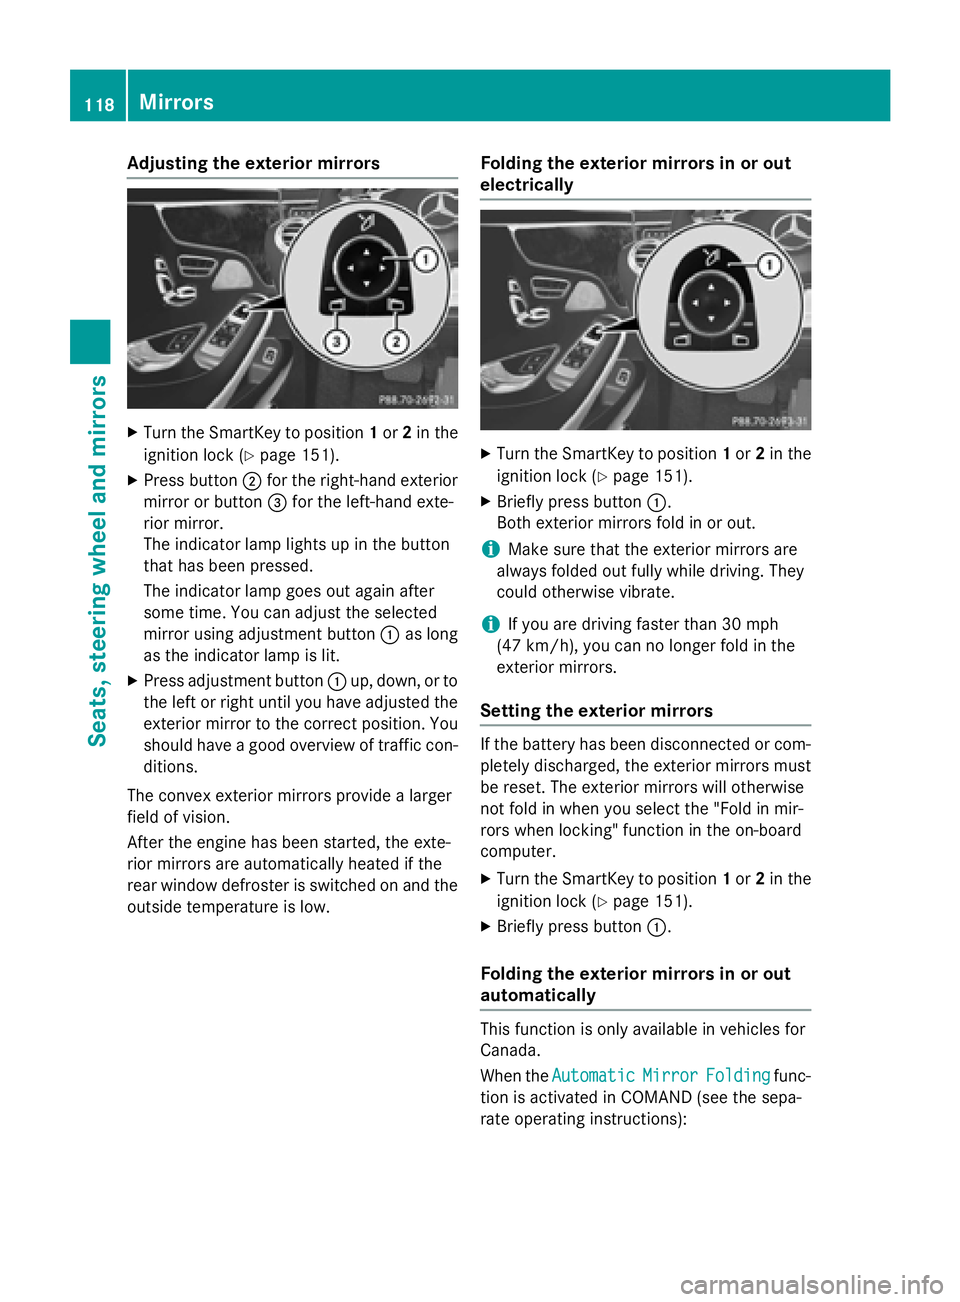
XPress butto n; for th eright-hand exterio r
mirror or butto n= for th eleft-han dexte -
rio rmirror .
The indicator lamp lights up in th ebutto n
that has been pressed.
The indicator lamp goes out again after
som etime. You can adjust th eselected
mirror usin gadjustmen tbutto n: as lon g
as th eindicator lamp is lit .
XPress adjustmentbutto n: up, down ,or to
th elef tor right until you hav eadjusted th e
exterio rmirror to th ecorrec tposition .You
should hav e agoo doverview of traffic con-
ditions.
The convex exterio rmirror sprovide alarger
field of vision .
Afte rth eengin ehas been started, th eexte -
rio rmirror sare automatically heated if th e
rear window defroste ris switched on and th e
outside temperature is low.
Folding the exteri or mirrorsinor out
electri cally
XTurn th eSmartKey to position 1or 2in th e
ignition loc k (
Ypage 151).
XBriefly pressbutto n:.
Both exterio rmirror sfol din or out .
iMake sure that theexterio rmirror sare
always folded out fully while driving .The y
could otherwise vibrate .
iIf you are driving fasterthan 30 mph
(47 km/ h), you can no longer fold in the
exterior mirrors.
Setting the exterior mirrors
If the battery has been disconnected or com-
pletely discharged, the exterior mirrors must
be reset. The exterior mirrors will otherwise
not fold in when you select the "Fold in mir-
rors when locking" function in the on-board
computer.
XTurn the SmartKey to position 1or 2in the
ignition lock (
Ypage 151).
XBriefly press button :.
Folding the exterior mirrors in or out
automatically
This function is only available in vehicles for
Canada.
When theAutomatic
MirrorFoldingfunc-
tion is activated in COMAND (see the sepa-
rate operating instructions):
118Mirrors
Seats, steering wheel and mirrors
Page 121 of 410
Rthe exterior mirrors fold in automatically as
soon as you lock the vehicle from the out-
side.
Rthe exterior mirrors fold out automatically
again as soon as you unlock the vehicle.
iIf the exterior mirrors have been folded in
manually, they do not fold out.
Exterior mirror pushed out of position
This function is only available in vehicles for
Canada.
If an exterior mirror has been pushed out of
position, proceed as follows:
XPress and hold button :until you hear a
click and the mirror engages audibly into
position (
Ypage 118).
The mirror housing is engaged again and
you can adjust the exterior mirrors as usual
(
Ypage 118).
Automatic anti-glare mirrors
GWARNING
Electrolyte may escape if the glass in an auto-
matic anti-glare mirror breaks. The electrolyte
is harmful and causes irritation. It must not
come into contact with your skin, eyes, res-
piratory organs or clothing or be swallowed.
There is a risk of injury.
If you come into contact with the electrolyte,
observe the following:
RRinse off the electrolyte from your skin
immediately with water.
RImmediately rinse the electrolyte out of
your eyes thoroughly with clean water.
RIf the electrolyte is swallowed, immediately
rinse your mouth out thoroughly. Do not
induce vomiting.
RIf electrolyte comes into contact with your
skin or hair or is swallowed, seek medical
attention immediately.
RImmediately change out of clothing which
has come into contact with electrolyte.
RIf an allergic reaction occurs, seek medical
attention immediately.
The rear-view mirror and the exterior mirror
on the driver's side automatically go into anti-
glare mode if the following conditions are met
simultaneously:
Rthe ignition is switched on
Rincident light from headlamps strikes the
sensor in the rear-view mirror.
The mirrors do not go into anti-glare mode if
reverse gear is engaged or if the interior light-
ing is switched on.
Parking position for the exterior mir-
ror on the front-passenger side
Setting and storing the parking position
Using reverse gear
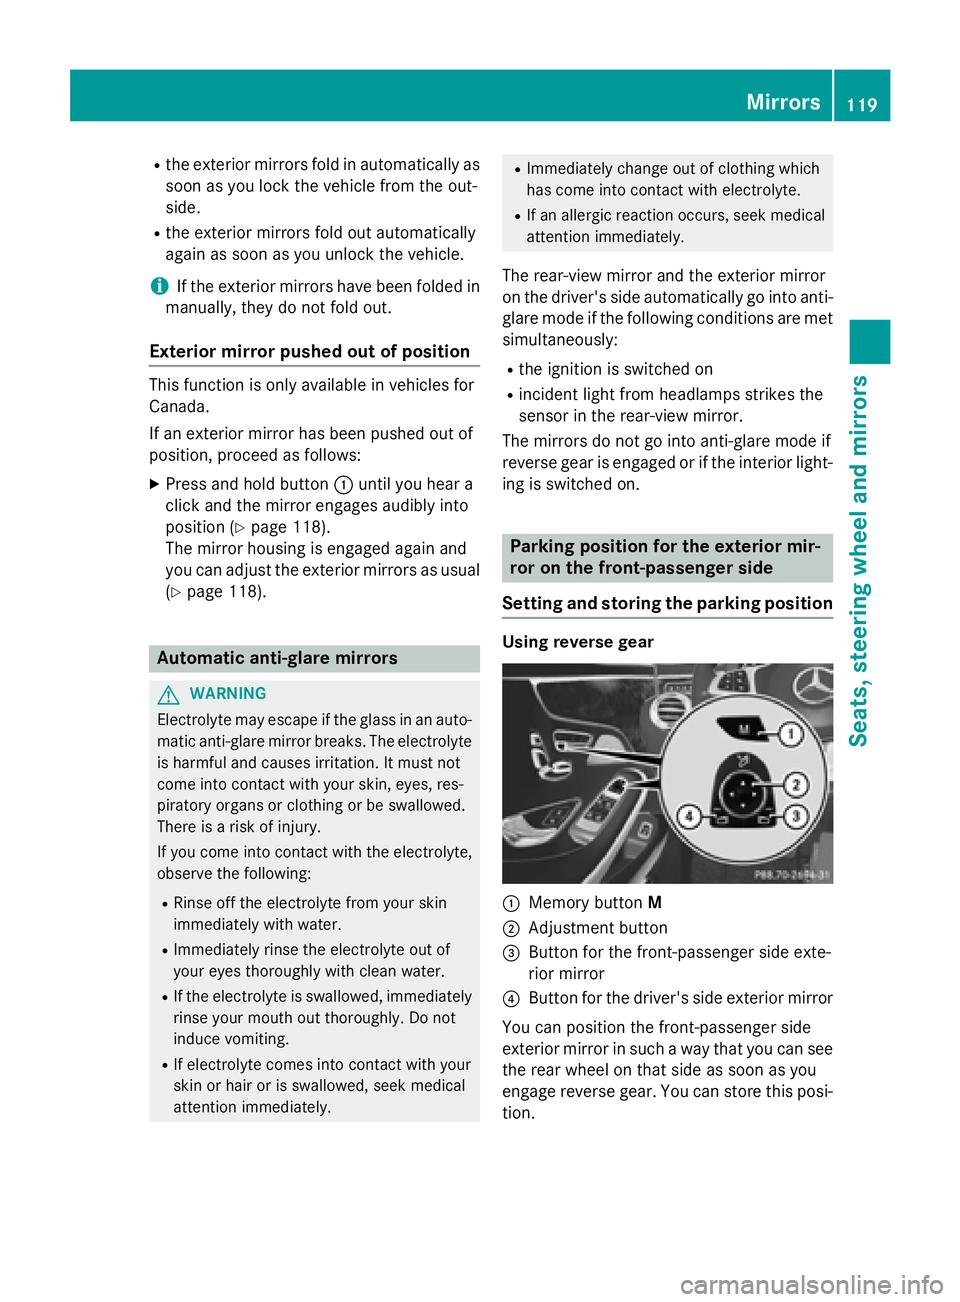
:Memory button M
;Adjustment button
=Button for the front-passenger side exte-
rior mirror
?Button for the driver's side exterior mirror
You can position the front-passenger side
exterior mirror in such a way that you can see
the rear wheel on that side as soon as you
engage reverse gear. You can store this posi-
tion.
Mirrors119
Seats, steering wheel and mirrors
Z
Page 122 of 410
XTurn the SmartKey to position2in the igni-
tion lock (
Ypage 151).
XPress button =for the exterior mirror on
the front-passenger side.
XEngage reverse gear.
The exterior mirror on the front-passenger
side moves to the preset parking position.
XUse adjustment button ;to adjust the
exterior mirror to a position that allows you
to see the rear wheel and the curb.
The parking position is stored.
iIf you shift the transmission to another
position, the exterior mirror on the front-
passenger side returns to the driving posi-
tion after approximately ten seconds.
Using the memory button
You can position the front-passenger side
exterior mirror in such a way that you can see
the rear wheel on that side as soon as you
engage reverse gear. This setting can be
stored using memory button M:.
XTurn the SmartKey to position 2in the igni-
tion lock (
Ypage 151).
XPress button =for the exterior mirror on
the front-passenger side.
XUse adjustment button ;to adjust the
exterior mirror to a position that allows you
to see the rear wheel and the curb.
XPress memory button M: and one of the
arrows on adjustment button ;within
three seconds.
The parking position is stored if the exterior
mirror does not move.
XIf the mirror moves out of position, repeat
the steps.
Calling up a stored parking position set-
ting
XTurn the SmartKey to position 2in the igni-
tion lock (
Ypage 151).
XAdjust the exterior mirror on the front-
passenger side using button =.
XEngage reverse gear.
The exterior mirror on the front-passenger
side moves to the stored parking position.
The exterior mirror on the front-passenger
side moves back to its original position:
Ras soon as you exceed a speed of 9 mph
(15 km/h)
Rabout ten seconds after you have disen-
gaged reverse gear
Rif you press button ?for the exterior mir-
ror on the driver's side
Memory function
Important safety notes
GWARNING
If you use the memory function on the driver's side while driving, you could lose control of
the vehicle as a result of the adjustments
being made. There is a risk of an accident.
Only use the memory function on the driver's
side when the vehicle is stationary.
GWARNING
When the memory function adjusts the seat or steering wheel, you and other vehicle occu-
pants – particularly children – could become
trapped. There is a risk of injury.
While the memory function is making adjust-
ments, make sure that no one has any body
parts in the sweep of the seat or steering
wheel. If somebody becomes trapped, imme-
diately release the memory function position
button. The adjustment process is stopped.
120Memory function
Seats, steering wheel and mirrors
Page 123 of 410
GWARNING
Children could become trapped if they acti-
vate the memory function, particularly when
unattended. There is a risk of injury.
When leaving the vehicle, always take the
SmartKey with you and lock the vehicle. Never
leave children unsupervised in the vehicle.
The memory function can be used at any time,
e.g. even when the SmartKey isn't in the igni-
tion lock.
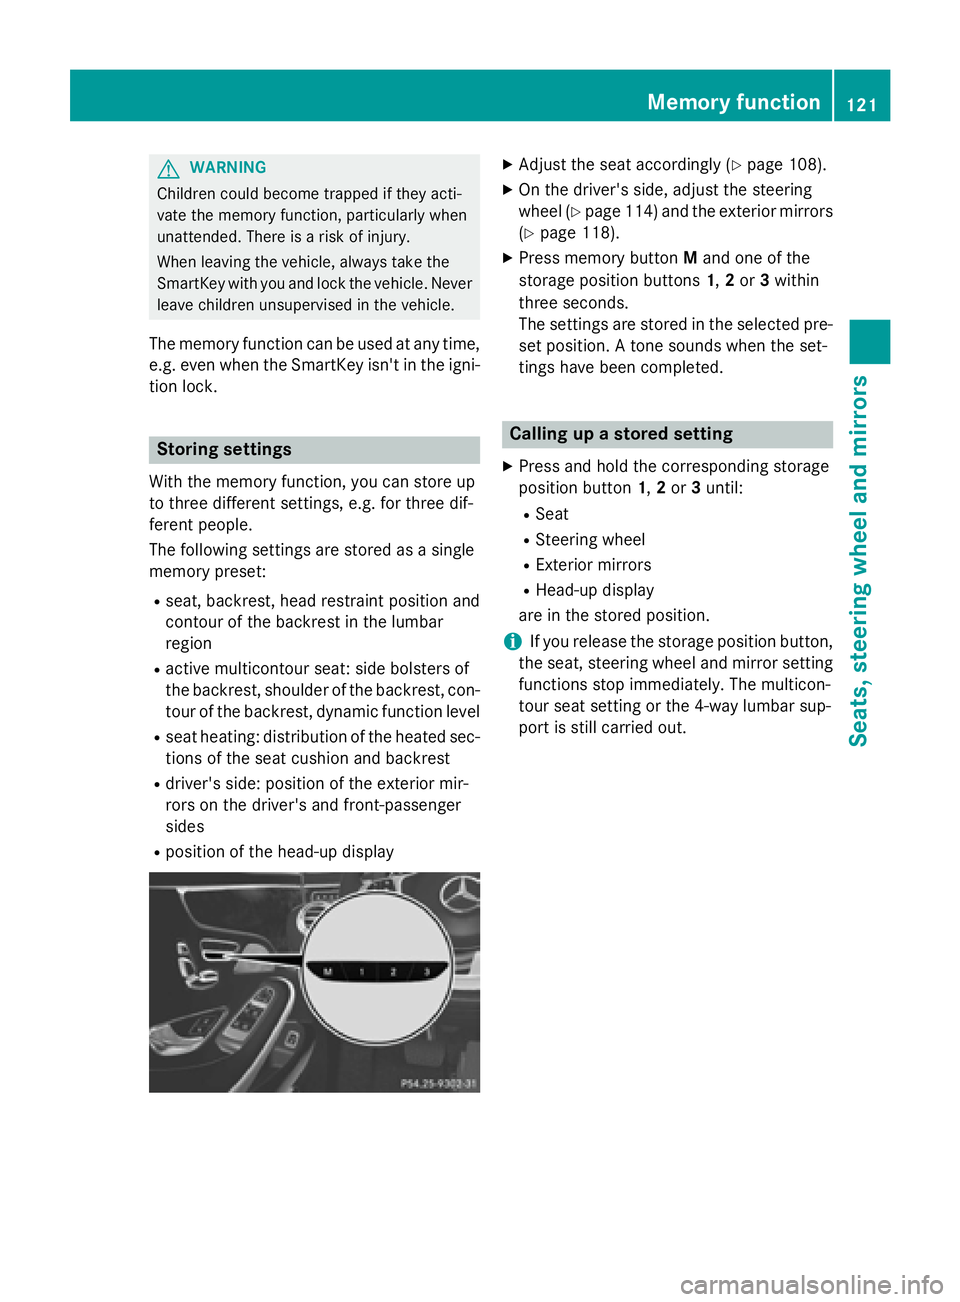
Storing settings
With the memory function, you can store up
to three different settings, e.g. for three dif-
ferent people.
The following settings are stored as a single
memory preset:
Rseat, backrest, head restraint position and
contour of the backrest in the lumbar
region
Ractive multicontour seat: side bolsters of
the backrest, shoulder of the backrest, con-
tour of the backrest, dynamic function level
Rseat heating: distribution of the heated sec- tions of the seat cushion and backrest
Rdriver's side: position of the exterior mir-
rors on the driver's and front-passenger
sides
Rposition of the head-up display
XAdjust the seat accordingly (Ypage 108).
XOn the driver's side, adjust the steering
wheel (
Ypage 114) and the exterior mirrors
(
Ypage 118).
XPress memory button Mand one of the
storage position buttons 1,2or 3within
three seconds.
The settings are stored in the selected pre-
set position. A tone sounds when the set-
tings have been completed.
Calling up a stored setting
XPress and hold the corresponding storage
position button 1,2or 3until:
RSeat
RSteering wheel
RExterior mirrors
RHead-up display
are in the stored position.
iIf you release the storage position button,
the seat, steering wheel and mirror setting
functions stop immediately. The multicon-
tour seat setting or the 4-way lumbar sup-
port is still carried out.
Memory function121
Seats, steering wheel and mirrors
Z
Page 129 of 410
The hazard warning lamps automatically
switch on if:
Ran air bag is deployed or
Rthe vehicle decelerates rapidly from a
speed of above 45 mph (70 km/h) and
comes to a standstill
The hazard warning lamps switch off auto-
matically if the vehicle reaches a speed of
above 6 mph (10 km/h) again after a full
brake application.
The hazard warning lamps still operate if the
ignition is switched off.
Cornering light function
The cornering light function improves the illu-
mination of the road over a wide angle in the
direction you are turning, enabling better vis-
ibility in tight bends, for example. It can only
be activated when the low-beam headlamps
are switched on.
Active:
Rif you are driving at speeds below 25 mph
(40 km/h) and switch on the turn signal or
turn the steering wheel
Rif you are driving at speeds between
25 mph (40 km/ h)and 45 mph (70 km/h)
and turn the steering wheel
The cornering lamp may remain lit for a short
time, but is automatically switched off after
no more than three minutes.
Adaptive Highbeam Assist Plus
General notes
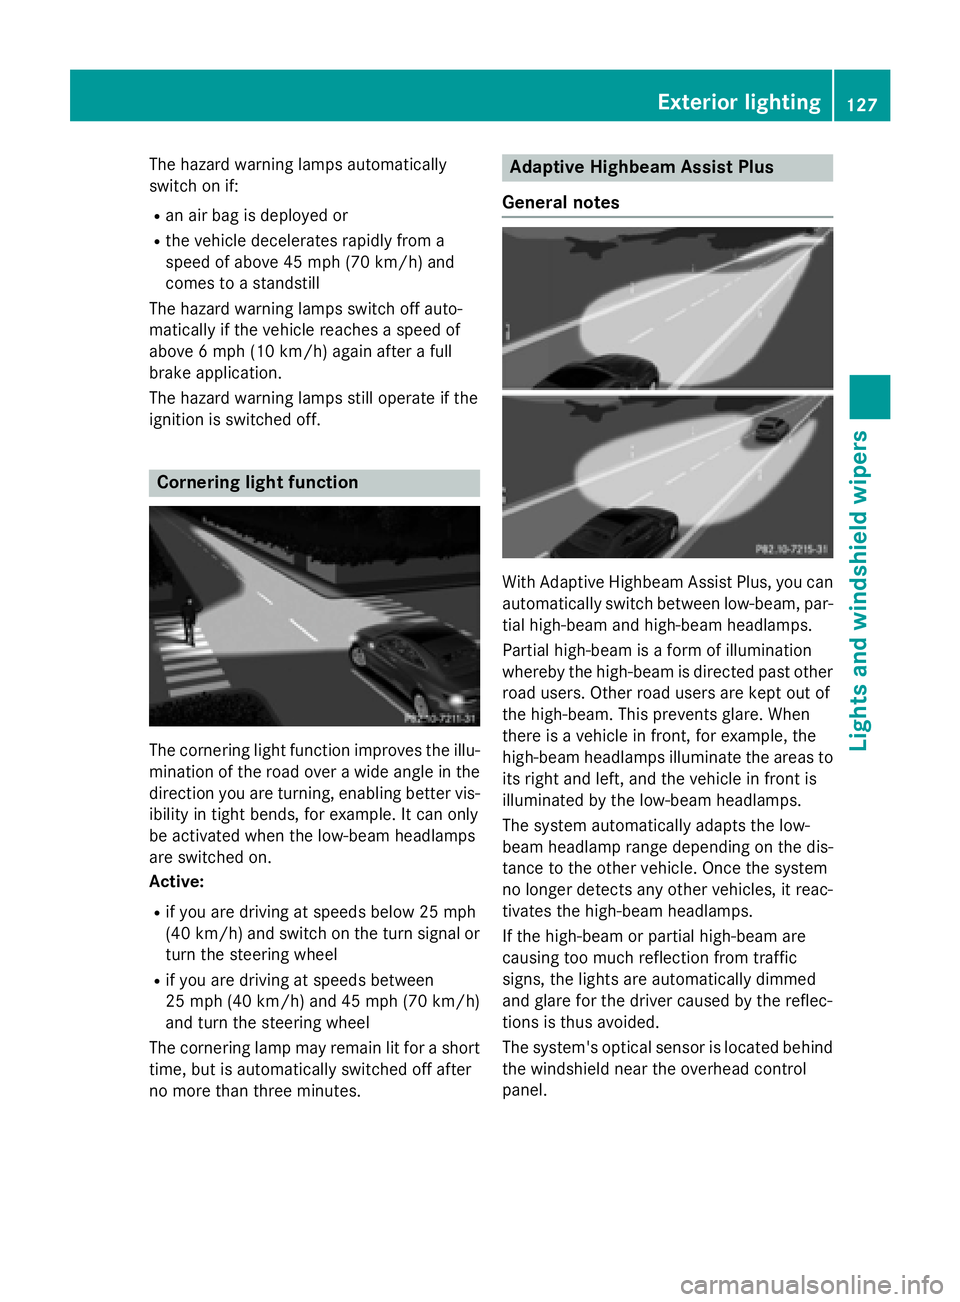
With Adaptive Highbeam Assist Plus, you can
automatically switch between low-beam, par-
tial high-beam and high-beam headlamps.
Partial high-beam is a form of illumination
whereby the high-beam is directed past other
road users. Other road users are kept out of
the high-beam. This prevents glare. When
there is a vehicle in front, for example, the
high-beam headlamps illuminate the areas to
its right and left, and the vehicle in front is
illuminated by the low-beam headlamps.
The system automatically adapts the low-
beam headlamp range depending on the dis-
tance to the other vehicle. Once the system
no longer detects any other vehicles, it reac-
tivates the high-beam headlamps.
If the high-beam or partial high-beam are
causing too much reflection from traffic
signs, the lights are automatically dimmed
and glare for the driver caused by the reflec-
tions is thus avoided.
The system's optical sensor is located behind the windshield near the overhead control
panel.
Exterior lighting127
Lights and windshield wipers
Z