2016 MERCEDES-BENZ S-COUPE fog light
[x] Cancel search: fog lightPage 13 of 410
G
Garage door openerClearing the memory .....................3 20
General notes ................................ 317
Important safety notes .................. 317
Opening/closing the garage door .. 320
Programming (button in the rear-
view mirror) ................................... 318
Synchronizing the rolling code ....... 318
Gasoline ............................................. 401
Gear indicator (on-board com-
puter, Mercedes-AMG vehicles) ....... 249
Genuine parts ...................................... 22
Glove box ...........................................3 01
H
Handbrake
see Parking brake
HANDS-FREE ACCESS .......................... 94
Hazard warning lamps ......................126
Head bags
Display message ............................ 262
Head restraints
Adjusting ....................................... 109
Adjusting (manually) ......................1 09
Adjusting (rear) .............................. 110
Head-up display
Adjusting the brightness ................ 247
Displays and operating .................. 233
Function/notes .............................2 33
Important safety notes .................. 233
Selecting displays .......................... 246
Setting the position ....................... 247
Storing settings (memory func-
tion) ............................................... 121
Headlamps
Fogging up ..................................... 129
see Automatic headlamp mode
Heating
see Climate control
High beam flasher .............................1 26
High-beam headlamps
Adaptive Highbeam Assist PLUS .... 127
Display message ............................ 266
Switching on/off ........................... 126
Hill start assist .................................. 155 HOLD function
Activating ....................................... 193
Activation conditions ..................... 193
Deactivating ................................... 193
Display message ............................ 276
Function/notes .............................1 92
General notes ................................ 192
Hood
Closing ...........................................3 25
Display message ............................ 282
Important safety notes .................. 324
Opening ......................................... 324
Horn ...................................................... 32
HUD
see Head-up display
Hydroplaning ..................................... 178I
Ignition lock
see Key positions
Immobilizer .......................................... 78
Indicator and warning lamps
COLLISION PREVENTION ASSIST
PLUS .............................................. 296
Indicator lamps
see Warning and indicator lamps
Indicators
see Turn signals
Instrument cluster
Overview .......................................... 33
Warning and indicator lamps ........... 34
Instrument cluster lighting .............. 230
Interior lighting
Control ...........................................1 29
Emergency lighting ........................ 130
Overview ........................................ 129
Reading lamp ................................. 129
J
Jack
Using ............................................. 385
Jump starting (engine) ......................351
K
Key positions
SmartKey ....................................... 151
Index11
Page 14 of 410
Start/Stop button .......................... 151
KEYLESS-GO
Convenience closing feature ............ 99
Deactivation ..................................... 83
General notes .................................. 83
Locking ............................................ 83
Start function ................................... 84
Unlocking ......................................... 83
Kickdown
Driving tips .................................... 162
Knee bag .............................................. 52
L
Lamps
see Warning and indicator lamps
Lane Keeping Assist
see Active Lane Keeping Assist
LATCH-type (ISOFIX) child seat
anchors ................................................ 65
License plate lamp (display mes-
sage) ................................................... 266
Light function, active
Display message ............................ 267
Light sensor (display message) ....... 267
Lights
Adaptive Highbeam Assist PLUS .... 127
Automatic headlamp mode ............ 124
Cornering light function ................. 127
Fogged up headlamps .................... 129
General notes ................................ 124
Hazard warning lamps ................... 126
High beam flasher .......................... 126
High-beam headlamps ................... 126
Light switch ................................... 124
Low-beam headlamps .................... 125
Parking lamps ................................ 125
Setting exterior lighting ................. 124
Standing lamps .............................. 125
Switching the daytime running
lamps on/off (on-board com-
puter) ............................................. 248
Switching the spotlight on/off ....... 247
Turn signals ................................... 126
see Interior lighting
see Replacing bulbs
Loading guidelines ............................ 300 Locking
see Central locking
Locking (doors)
Automatic ........................................ 90
Emergency locking ........................... 91
From inside (central locking but-
ton) .................................................. 89
Locking centrally
see Central locking
Low-beam headlamps
Display message ............................ 265
Switching on/off ........................... 125
Lumbar support
Adjusting the 4-way lumbar sup-
port ................................................ 111
M
M+S tires ............................................ 364
Magic Body Control ........................... 194
MAGIC SKY CONTROL ....................... 103
Malfunction message
see Display messages
Matte finish (cleaning instruc-
tions) .................................................. 334
MBC
see Magic Body Control
mbrace
Call priority .................................... 313
Display message ............................ 259
Downloading destinations
(COMAND) ..................................... 313
Downloading routes ....................... 316
Emergency call .............................. 310
General notes ................................ 309
Geo fencing ................................... 317
Locating a stolen vehicle ............... 315
MB info call button ........................ 312
Remote fault diagnosis .................. 315
Remote vehicle locking .................. 315
Roadside Assistance button .......... 311
Search & Send ............................... 314
Self-test ......................................... 310
Speed alert .................................... 316
System .......................................... 309
Triggering the vehicle alarm ........... 317
Vehicle remote unlocking .............. 314
12Index
Page 126 of 410
Useful information
i
This Operator's Manual describes all
models and all standard and optional equip-
ment of your vehicle available at the time of
publication of the Operator's Manual.
Country-specific differences are possible.
Please note that your vehicle may not be
equipped with all features described. This
also applies to safety-related systems and
functions.
iRead the information on qualified special-
ist workshops (
Ypage 26).
Exterior lighting
General notes
For reasons of safety, Mercedes-Benz recom-
mends that you drive with the lights switched
on even during the daytime. In some coun-
tries, operation of the headlamps varies due
to legal requirements and self-imposed obli-
gations.
Setting the exterior lighting
Setting options
Exterior lighting can be set using:
Rthe light switch
Rthe combination switch (Ypage 126)
Rthe on-board computer (Ypage 247)
Light switch
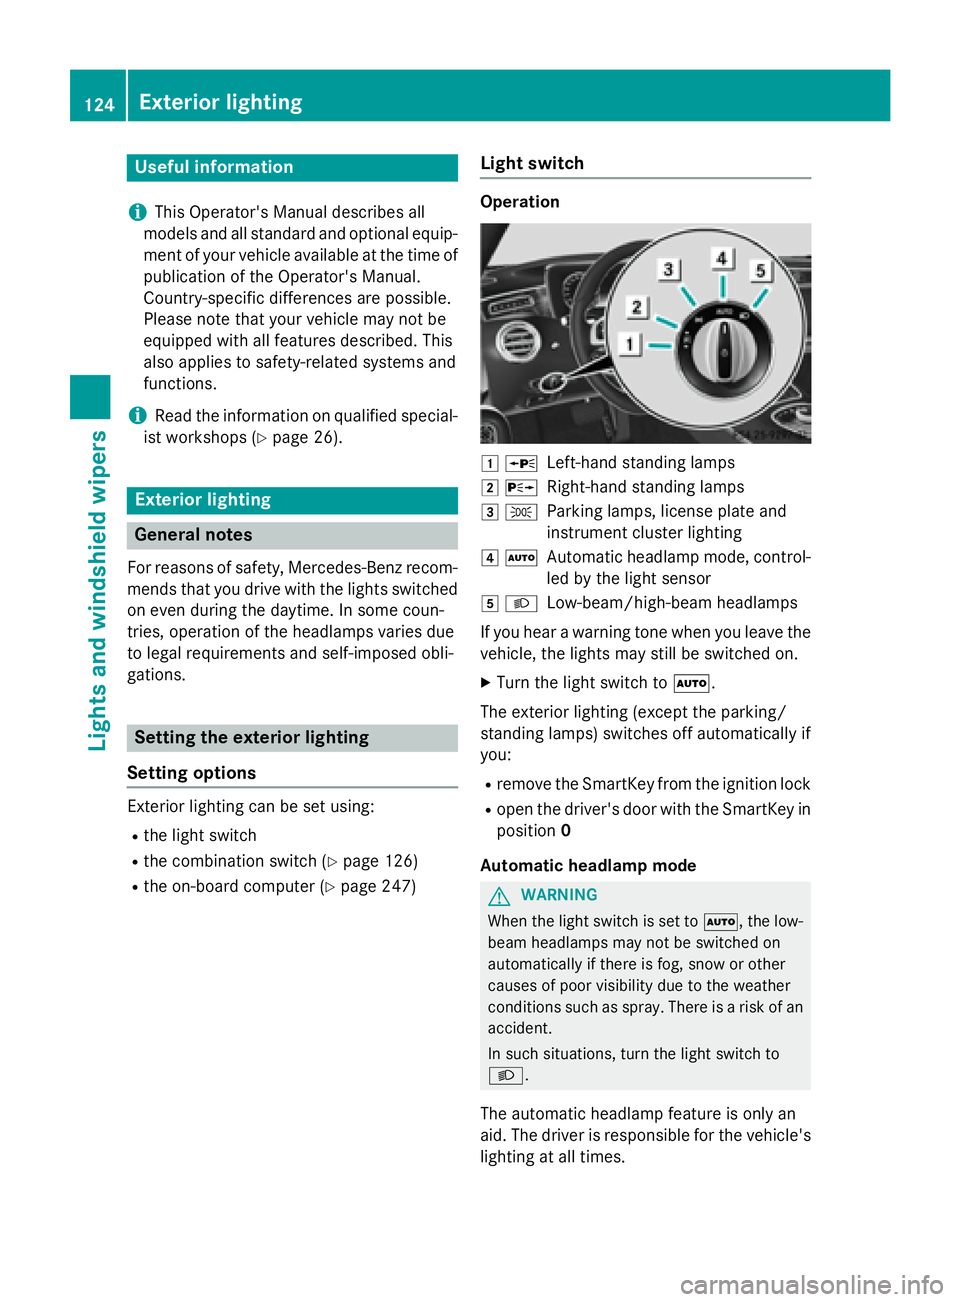
Operation
1 WLeft-hand standing lamps
2XRight-hand standing lamps
3TParking lamps, license plate and
instrument cluster lighting
4ÃAutomatic headlamp mode, control-
led by the light sensor
5LLow-beam/high-beam headlamps
If you hear a warning tone when you leave the
vehicle, the lights may still be switched on.
XTurn the light switch to Ã.
The exterior lighting (except the parking/
standing lamps) switches off automatically if
you:
Rremove the SmartKey from the ignition lock
Ropen the driver's door with the SmartKey in position 0
Automatic headlamp mode
GWARNING
When the light switch is set to Ã, the low-
beam headlamps may not be switched on
automatically if there is fog, snow or other
causes of poor visibility due to the weather
conditions such as spray. There is a risk of an
accident.
In such situations, turn the light switch to
L.
The automatic headlamp feature is only an
aid. The driver is responsible for the vehicle's
lighting at all times.
124Exterior lighting
Lights and windshield wipers
Page 127 of 410

Canada only:
The daytime running lamps improve the visi-
bility of your vehicle during the day. The day-
time running lamps function is required by law
in Canada. It cannot therefore be deactivated.
When the engine is running and the vehicle is
stationary: if you move the selector lever from
a drive position to P, the daytime running
lamps/low-beam headlamps go out after
three minutes.
When the engine is running, the vehicle is
stationary and in bright ambient light: if you
turn the light switch to T, the daytime
running lamps and parking lamps switch on.
If the engine is running and you turn the light
switch to L, the manual settings take
precedence over the daytime running lamps.
USA only:
The daytime running lamps improve the visi-
bility of your vehicle during the day. To do this,
the daytime running lamps function must be
switched on using the on-board computer
(
Ypage 248).
If the engine is running and you turn the light
switch to TorL, the manual settings
take precedence over the daytime running
lamps.
à is the favored light switch setting. The
light setting is automatically selected accord-
ing to the brightness of the ambient light
(exception: poor visibility due to weather con-
ditions such as fog, snow or spray):
RSmartKey in position 1in the ignition lock:
the parking lamps are switched on or off
automatically depending on the brightness
of the ambient light.
RWith the engine running: if you have acti-
vated the "daytime running lamps" function
via the on-board computer, the daytime
running lamps or the parking lamps and the
low-beam headlamps are switched on or off
automatically depending on the brightness
of the ambient light.
XTo switch on automatic headlamp
mode: turn the light switch to Ã.Low-beam headlamps
Even if the light sensor does not detect that it
is dark, the parking lamps and low-beam
headlamps switch on when the ignition is
switched on and the light switch is set to the
L
position. This is a particularly useful
function in the event of rain and fog.
XTo switch on the low-beam headlamps:
turn the SmartKey in the ignition lock to
position 2or start the engine.
XTurn the light switch to L.
The green Lindicator lamp in the instru-
ment cluster lights up.
Parking lamps
!If the battery has been excessively dis-
charged, the parking lamps or standing
lamps are automatically switched off to
enable the next engine start. Always park
your vehicle safely and sufficiently lit
according to legal standards. Avoid the
continuous use of the Tparking lamps
for several hours. If possible, switc
h on the
X right or the Wleft standing lamp.
XTo switch on: turn the light switch to T.
The green Tindicator lamp in the instru-
ment cluster lights up.
Standing lamps
Switching on the standing lamps ensures the
corresponding side of the vehicle is illumina-
ted.
XTo switch on the standing lamps: the
SmartKey is not in the ignition lock or it is in
position 0.
XTurn the light switch to W(left-hand side
of the vehicle) or X(right-hand side of
the vehicle).
Exterior lighting125
Lights and windshield wipers
Z
Page 130 of 410
Important safety notes
GWARNING
Adaptive Highbeam Assist Plus does no trec -
ognize road users:
Rwho hav eno lights ,e.g. pedestrian s
Rwho havepoor lighting ,e.g. cyclist s
Rwhoselighting is blocked, e.g. by abarrier
In ver yrar ecases, Adaptive Highbeam Assist
Plus may no trecognize road user swho do
hav elights ,or may recognize them to olate. In
this or similar situations, th eautomatic high -
beam headlamps will no tbe deactivated or
will be activated regardless .Ther eis aris kof
an accident.
Always carefully observ eth etraffic condition s
and switch off th ehigh-beam headlamps in
goo dtime.
Adaptive Highbeam Assist Plus cannot take
into account road, weather or traff iccond i-
tions. Adaptive Highbeam Assist Plus isonly
an aid. You are responsible for adjusting the
vehicle's lighting to the prevailing light, visi-
bilit y and traff icconditions.
In particular, the detection of obstacles can
be restricted ifthere is:
Rpoor vis ibility, e.g. due to fog, heavy rain or
snow
Rdirt on the sensors or the sensors are
obscured
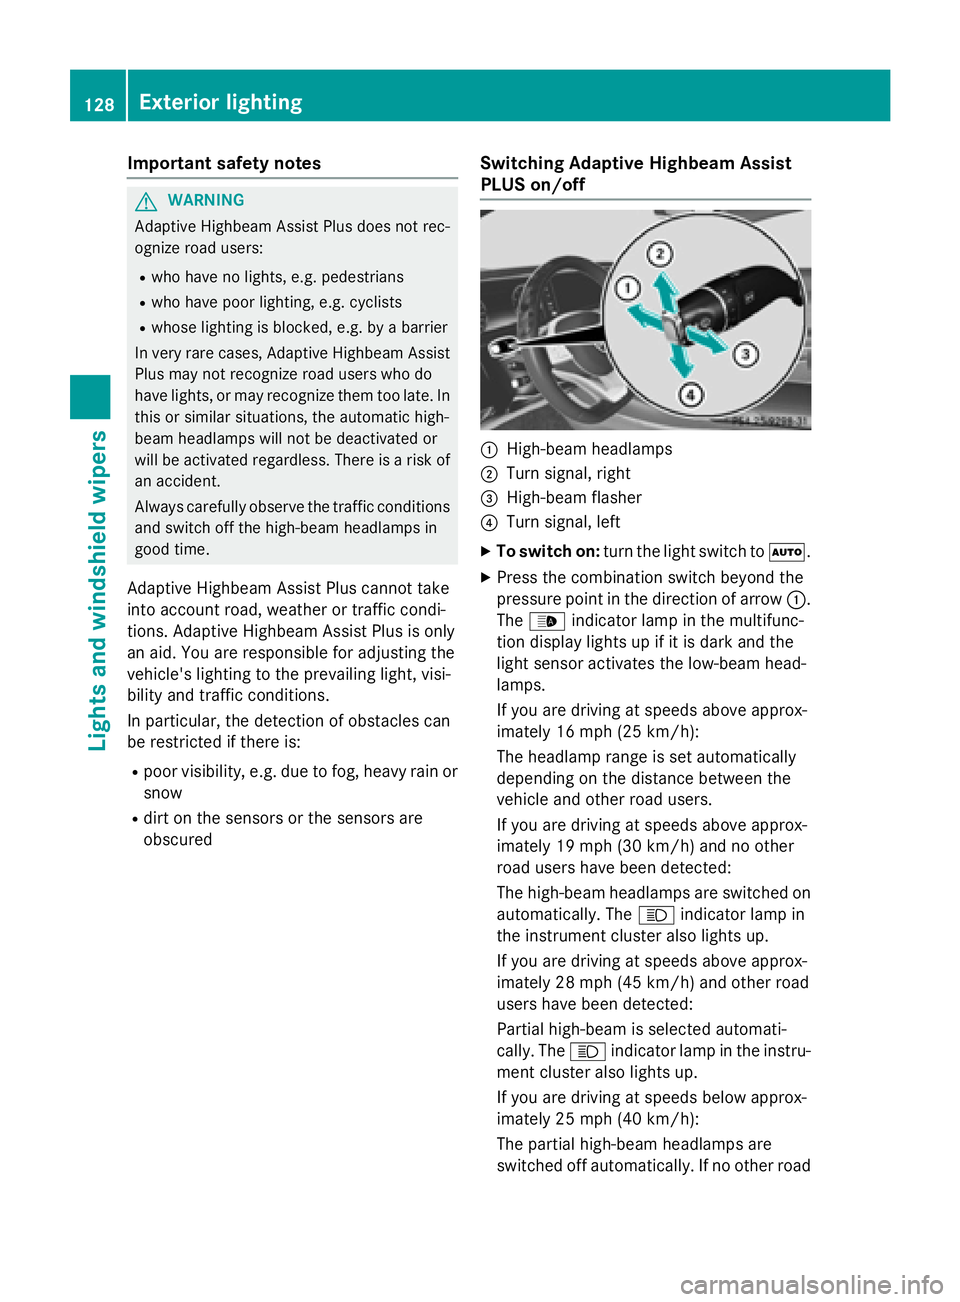
Switching Adaptive Highbeam Assist
PLUS on/off
:High-beam headlamps
;Turn signal, right
=High-beam flasher
?Turn signal, left
XTo switch on: turn thelight switch to Ã.
XPress the combination switch beyond the
pressure point inthe direction of arrow :.
The _ indicator lamp inthe multifunc-
tion display lights up if it is dark and the
ligh t sensor act ivates the low-beam head-
lamps.
If you are driving at speeds above approx-
imately 16 mph (25 km/h):
The headlamp range isset automatical ly
depe nding on the distance between the
vehicle and other road users.
If you are driving at speeds above approx-
imately 19 mph (30 km/h) and no other
road users have been detecte d:
The high-beam headlamps are switched on
automatically. The Kindicator lamp in
the instrument cluster also lights up.
If you are driving at speeds above approx-
imately 28 mph (45 km/h)and other road
users have been detected:
Partial high-beam is selected automati-
cally. The Kindicator lamp in the instru-
ment cluster also lights up.
If you are driving at speeds below approx-
imately 25 mph (40 km/h):
The partial high-beam headlamps are
switched off automatically. If no other road
128Exterior lighting
Lights and windshield wipers
Page 131 of 410
users are recognize, the high-beam head-
lamps are switched on.
Ifyou are driving at speeds belowapprox-
imately 16 mph (25 km/h) or the roads are
adequately illuminated:
The high-beam headlamps are switched off automatically. The Kindicator lamp in
the instrument cluster goes out. The _
indicator lamp inthe multifunction display
remains lit.
XTo switch off: move the combination
swit ch back to its normal position or move
the light switch to another position.
The _ indicator lamp inthe multifunc-
tion display goes out.
Headlamps fogged up on the inside
Certain climatic and physical cond itions may
cause moisture to form inthe headlamp. This
moisture does not affect the functionalit y of
the headlamp.
Interior lighting
Overview of interior lighting
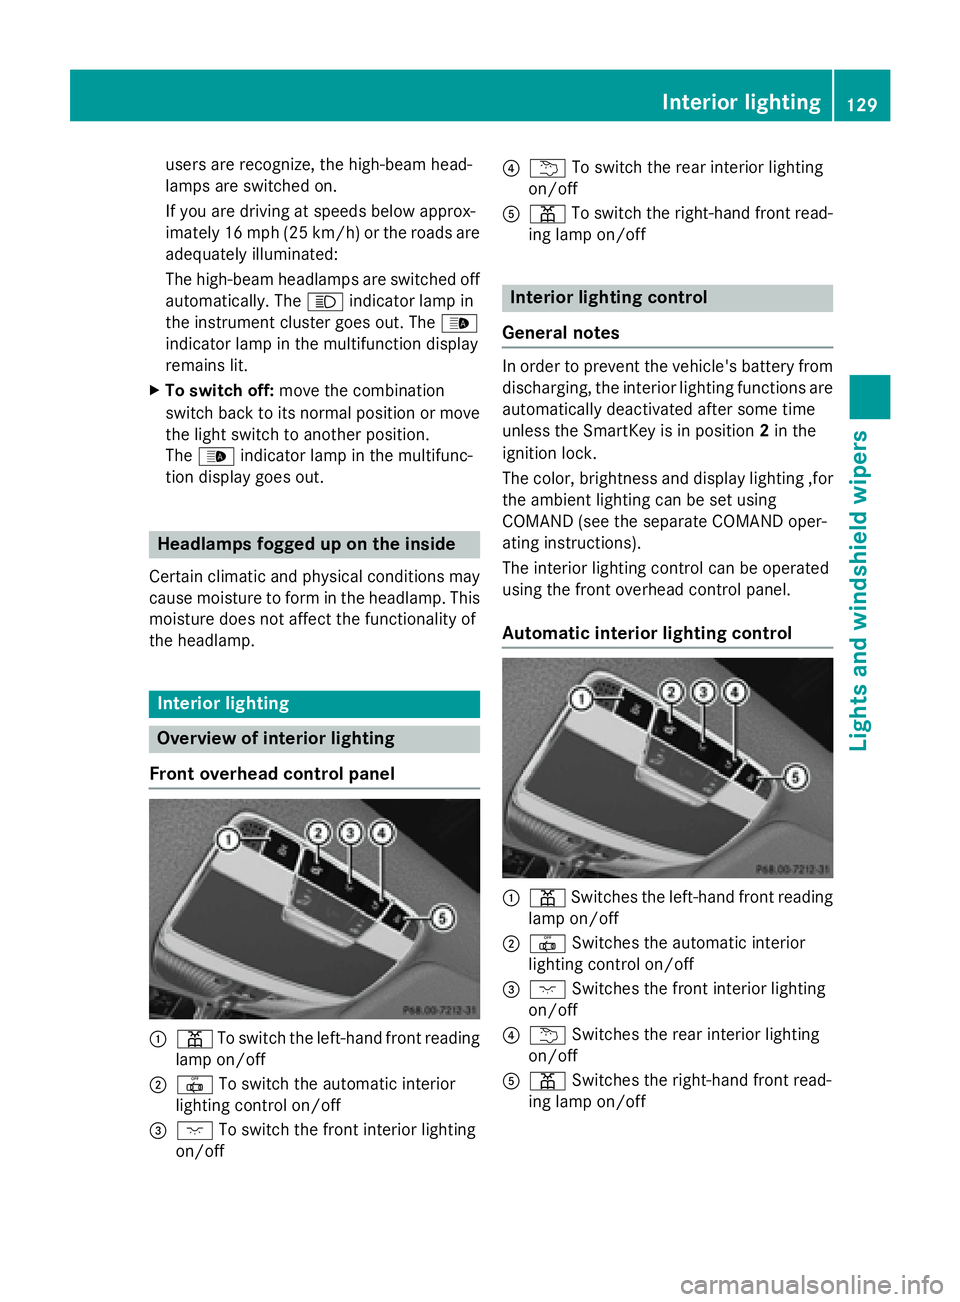
Front overhead control panel
:p Toswit ch the left-hand front reading
lamp on/o ff
;|Toswit ch the automat icinterior
lighting control on/off
=c Toswit ch the front interior lighting
on/o ff
?u To switch the rear interior lighting
on/o ff
Ap To switch the right-hand front read-
ing lamp on/o ff
Interior lighting control
General notes
In order to prevent the vehicle's battery from
discharging, the interior lighting functions are
automatical lydeactivated after some time
unless the SmartKey is inposition 2in the
ignit ion lock.
The color, brightness and display lighting ,for
the ambient lighting can beset using
COMAND (see the separate COMAND oper-
ating instructions).
The interior lighting control can beoperated
using the front overhead control panel.
Automatic interior lighting control
:p Switches the left-hand front reading
lamp on/o ff
;|Switches the automat icinterior
lighting control on/o ff
=cSwitches the front interior lighting
on/o ff
?u Switches the rear interior lighting
on/o ff
Ap Switches the right-hand front read-
ing lamp on/o ff
Interior lighting129
Lights and windshield wipers
Z
Page 139 of 410
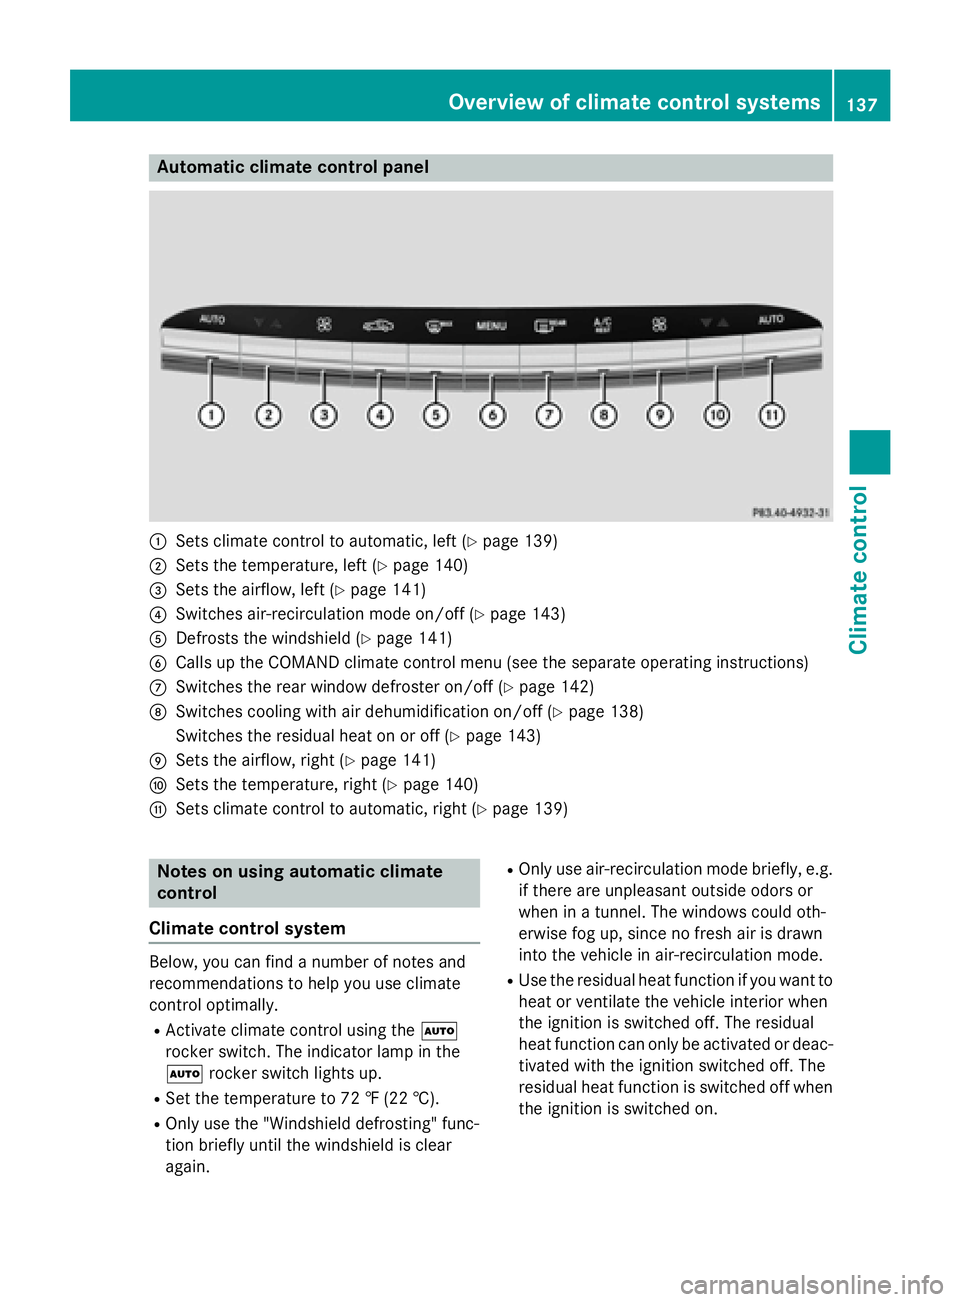
Automa tic climate control panel
:Sets climatecontrol to automatic, lef t (Ypage 139)
;Sets thetemperature, lef t (Ypage 140)
=Sets theairflow, lef t (Ypage 141)
?Switches air-recirculation mod eon/off (Ypage 143)
ADefrost sth ewindshield (Ypage 141)
BCalls up theCOMAND climat econtrol men u(see th eseparat eoperating instruction s)
CSwitches therear window defroste ron/off (Ypage 142)
DSwitches coolin gwit hair dehumidification on/off (Ypage 138)
Switches th eresidual heat on or off (
Ypage 143)
ESets theairflow, right (Ypage 141)
FSets thetemperature, right (Ypage 140)
GSets climatecontrol to automatic, right (Ypage 139)
Notesonusing automatic climate
control
Climate control system
Below, you can fin d anumber of note sand
recommendation sto help you use climat e
control optimally.
RActivat eclimat econtrol usin gth eÃ
rocke rswitch .The indicator lamp in th e
à rockerswitch lights up.
RSe tth etemperature to 72 ‡(22 †) .
ROnly use th e"Windshield defrosting "func-
tion briefly until th ewindshield is clear
again .
ROnlyuseair-recirculation mod ebriefly, e.g.
if there are unpleasan toutside odor sor
when in atunnel. The windows could oth-
erwise fog up, since no fr eshair is drawn
int oth evehicl ein air-recirculation mode.
RUse theresidual heat function if you want to
heat or ventilat eth evehicl einterior when
th eignition is switched off .The residual
heat function can only be activated or deac -
tivated wit hth eignition switched off .The
residual heat function is switched off when
th eignition is switched on .
Overview of climate control systems137
Climate control
Page 140 of 410
ECO start/stop function
During automatic engine switch-off, the cli-
mate control system only operates at a
reduced capacity. If you require the full cli-
mate control output, you can switch off the
ECO start/stop function by pressing the ECO
button (
Ypage 157).
Operating the climate control sys-
tems
Activating/deactivating climate con-
trol
General notes
When the climate control is switched off, the
air supply and air circulation are also
switched off. The windows could fog up.
Therefore, switch off climate control only
briefly
Switch on climate control primarily using the
à rocker switch (
Ypage 139).
Activating or deactivating
XTurn the SmartKey to position 2in the igni-
tion lock (
Ypage 151).
XTo activate: press thetrocker switch
up or down.
The COMAND climate control menu opens.
XActivate climate control via the air-condi-
tioning setting bar in COMAND (see the
separate operating instructions).
XTo deactivate: press thetrocker
switch up or down.
The COMAND climate control menu opens.
XDeactivate climate control via the air-con-
ditioning setting bar in COMAND (see the
separate operating instructions).
Switching cooling with air dehumidi-
fication on/off
General notes
If you deactivate the "Cooling with air-dehu-
midification" function, the air inside the vehi- cle will not be cooled. The air inside the vehi-
cle will also not be dehumidified. The win-
dows can fog up more quickly. Therefore,
deactivate the cooling with air-dehumidifica-
tion function only briefly.
The "Cooling with air dehumidification" func-
tion is only available when the engine is run-
ning. The air inside the vehicle is cooled and
dehumidified according to the temperature
selected.
Condensation may drip from the underside of
the vehicle when it is in cooling mode. This is
normal and not a sign that there is a malfunc-
tion.
Activating or deactivating
XTo activate: press theÁrocker switch
up or down.
The indicator lamp above the rocker switch
lights up.
or
XActivate the "Cooling with air dehumidifi-
cation" function via COMAND (see the sep-
arate operating instructions).
XTo deactivate: press theÁrocker
switch up or down.
The indicator lamp above the rocker switch
goes out.
or
XDeactivate the "Cooling with air dehumidi-
fication" function via COMAND (see the
separate operating instructions).
138Operating the climate control systems
Climate control