2016 MERCEDES-BENZ S-COUPE service
[x] Cancel search: servicePage 316 of 410
Search & Send
General notes
To use "Search & Send", your vehicle must be
equipped with mbrace and a navigation sys-
tem. Additionally, an mbrace service sub-
scription must be completed.
"Search & Send" is a destination entry ser-
vice. A destination address which is found on
Google Maps
®can be transferred via mbrace
directly to your vehicle's navigation system.
Specifying and sending the destination
address
XGo to the website http://
maps.google.com and enter a destination
address into the entry field.
XTo send the destination address to the
e-mail address of your mbrace account:
click on the corresponding button on the
website.
Example:
If you select 'Send to vehicle' and then
'Mercedes-Benz', the destination address
will be sent to your vehicle.
XWhen the "Send" dialog window appears:
Enter the e-mail address you specified
when setting up your mbrace account into
the corresponding field.
XClick "Send".
Information on specific commands such as
"Address entry" or "Send" can be found on the
website.
Calling up a transmitted destination
address
XTurn the SmartKey to position 2in the igni-
tion lock (
Ypage 151).
The transmitted destination address is loa-
ded into the vehicle's navigation system. A display message appears, asking
whether navigation should be started.
XSelectYesby turning
3or sliding 1
the controller and confirm with 7.
The system calculates the route and sub-
sequently starts the route guidance with
the address entered.
If you select No
the address can be stored in
the address book.
If you have sent more than one destination
address, each individual destination must
be confirmed separately.
Destination addresses are loaded in the same
order as the order in which they were sent.
If you own multiple Mercedes-Benz vehicles
with mbrace and activated mbrace accounts:
If multiple vehicles are registered under the
same e-mail address, the destination will be
sent to all the vehicles.
Vehicle remote opening
You can use the vehicle remote opening if you
have unintentionally locked your vehicle and
a replacement SmartKey is not available.
The vehicle can be opened by the Mercedes-
Benz Customer Assistance Center.
The vehicle can be immediately opened
remotely within four days of the ignition being turned off. After this time, the remote unlock-
ing may be delayed by 15 to 60 minutes. After
30 days, the vehicle can no longer be opened
remotely.
The vehicle remote unlocking feature is avail-
able if the relevant mobile phone network is
available and a data connection is possible.
XContact the following service hotlines:
Mercedes-Benz Customer Assistance Cen-
ter at 1-800-FOR-MERCedes
(1-800-367-6372) or 1-866-990-9007
You will be asked for your password.
XReturn to your vehicle at the time agreed
upon with the Mercedes-Benz Customer
Assistance Center.
314Features
Stowage and features
Page 317 of 410
Alternatively, the vehicle can be opened via:
Rthe Internet, under the "Owners Online"
section
Rthe telephone application (e.g. for iPhone®,
Android)
To do this, you will need your identification
number and password.
Vehicle remote closing
The vehicle remote-closing feature can be
used when you have forgotten to lock the
vehicle and you are no longer nearby.
The vehicle can then be locked by the
Mercedes-Benz Customer Assistance Center.
The vehicle can be immediately remotely
locked within four days of the ignition being
turned off. After this time, remote closing may
be delayed by 15 to 60 minutes. After 30 days
the vehicle can no longer be locked remotely.
The vehicle remote closing feature is availa-
ble if the relevant mobile phone network is
available and a data connection is possible.
XContact the following service hotlines:
Mercedes-Benz Customer Assistance Cen-
ter at 1-800-FOR-MERCedes
(1-800-367-6372) or 1-866-990-9007
You will be asked for your password.
The next time you are inside the vehicle and
you switch on the ignition, the Doors
Locked Remotelymessage appears in the
multifunction display.
Alternatively, the vehicle can be locked via:
Rthe Internet, under the "Owners Online"
section
Rthe telephone application (e .g. for iPhone®,
Android)
To do this, you will need your identification
number and password.
Stolen vehicle recovery service
If your vehicle has been stolen:
XNotify the police.
The police will issue a numbered incident
report.
XThis number will be forwarded to the
Mercedes-Benz Customer Assistance Cen-
ter together with your PIN.
The Mercedes-Benz Customer Assistance
Center then tries to locate the system. The
Mercedes-Benz Customer Assistance Cen-
ter contacts you and the local law enforce-
ment agency if the vehicle is located.
However, only the law enforcement agency
is informed of the location of the vehicle.
If the anti-theft alarm system is activated for
longer than 30 seconds, the Mercedes-Benz
Customer Assistance Center is automatically
notified.
Vehicle Health Check
With the Vehicle Health Check, the Customer
Assistance Center can provide improved sup-
port for problems with your vehicle. During an
existing call, vehicle data is transferred to the
Customer Assistance Center.
The customer service representative can use
the received data to decide what kind of
assistance is required. You are then, for
example, guided to the nearest authorized
Mercedes-Benz Center or a recovery vehicle
is called.
If vehicle data needs to be transferred during an MB Info call or a Roadside Assistance call,
this is initiated by the Customer Assistance
Center.
The Roadside Assistance Connected
message appears in the display. If the Vehicle
Health Check can be started, the Request
for Vehicle Diagnostics Received
Start vehicle diagnostics?message
appears in the display.
Features315
Stowage and features
Z
Page 318 of 410
XPress theYesbutton to confirm the mes-
sage.
XWhen the Vehicle Diagnostics
Please Start Ignitionmessage
appears: turn the SmartKey to position 2in
the ignition lock (
Ypage 151).
XIf the Please follow the instruc‐
tions received by phone and move
your vehicle to a safe position.
message appears: please follow the
instructions received by phone and move
your vehicle to a safe position.
The message in the display disappears.
The vehicle operating state check begins.
During this procedure, you will see the
Vehicle
DiagnosticsActivemessage.
If you select Cancel
, the Vehicle Health
Check is canceled completely.
When the check is complete, the Sending
vehicle diagnostics data. (Voice
connection may be interrupted dur‐
ingdatatransfer)message appears. The
vehicle data can now be sent.
XPress the OKbutton to confirm the mes-
sage.
The voice connection with the Customer
Assistance Center is terminated.
The Vehicle Diagnostics: Transfer‐
ring Data...message appears.
The vehicle data is sent to the Customer
Assistance Center.
Depending on what the customer service rep-
resentative agreed with you, the voice con-
nection is re-established after the transfer is
complete. If necessary, you will be contacted
at a later time by another means, e.g. by e-
mail or phone.
Another function of the Vehicle Health Check
is the transfer of service data to the Customer
Assistance Center. If a service is due, the dis-
play shows a message to this effect together
with information about any special offers at
your workshop.
This information can also be called up under
"Owners Online" at http://www.mbusa.com. Information on the data stored in the vehicle
(
Ypage 28).
Information on Roadside Assistance
(
Ypage 24).
Downloading routes
Downloading routes allows you to transfer
and save predefined routes in the navigation
system.
A route can be prepared and sent by either a
customer service representative or under
"Owners Online" at http://www.mbusa.com.
Each route can include up to four way points.
Once a route has been received by the navi-
gation system, you will see the The
to "Previous Destinations". Would
youliketostartnavigation?message
on the COMAND display.
The route is saved.
XTo start route guidance: selectYes.
An overview of the route is shown in the
display.
If you select No
the saved route can be
called up later in the navigation menu.
XSelect Start.
Route guidance starts.
Downloaded and saved routes can be called
up again.
You can find further information in the sepa-
rate COMAND/Audio 20 operating instruc-
tions.
Speed alert
You can define the upper speed limit, which
must not be exceeded by the vehicle.
If this selected speed is exceeded by the vehi-
cle, a message will be sent to the Customer
Assistance Center. The Customer Assistance Center then forwards this information to you.
You can select the way in which you receive
this information beforehand. Possible options
include text message, e-mail or an automated
call.
316Features
Stowage and features
Page 319 of 410
The data you receive contains the following
information:
Rthe location where the speed limit was
exceeded
Rthe time at which the speed limit was
exceeded
Rthe selected speed limit which was excee-
ded
Geo fencing
Geo fencing allows you to select areas which
the vehicle should not enter or leave. You will
be informed if the vehicle crosses the boun-
daries of the selected areas. You can select
the way in which you receive this information beforehand. Possible options include text
message, e-mail or an automated call.
The area can be determined as either a circle
or a polygon with a maximum of ten corners.
You can specify up to ten areas simultane-
ously. Different settings are possible for each area.
These settings can be called up under "Own-
ers Online" at http://www.mbusa.com.
Alternatively, you can trigger an MB Info call
and inform the customer service representa-
tive that you wish to activate geo fencing.
Currently inactive areas can be activated by
text message.
Triggering the vehicle alarm
With this function, you can trigger the vehi-
cle's panic alarm via text message. An alarm
sounds and the exterior lighting flashes.
Depending on the setting, the panic alarm
lasts five or ten seconds. Afterwards, the
alarm switches off.
Garage door opener
General notes
The HomeLink®garage door opener integra-
ted in the rear-view mirror allows you to oper- ate up to three different door and gate sys-
tems.
Use the integrated garage door opener only
on garage doors that:
Rhave safety stop and reverse features and
Rmeet current U.S. federal safety standards
Once programed, the integrated garage door
opener in the rear-view mirror will assume the
function of the garage door system's remote
control. Please also read the operating
instructions for the garage door system.
When programming a garage door opener,
park the vehicle outside the garage. Do not
run the engine while programming.
Certain garage door drives are incompatible
with the integrated garage door opener. If you
have difficulty programing the integrated
garage door opener, contact an authorized
Mercedes-Benz Center.
Alternatively, you can call the following tele-
phone assistance services:
RUSA: Mercedes-Benz Customer Assistance
Center at 1-800-FOR-MERCedes
RCanada: Customer Service at
1-800-387-0100
RHomeLink®hotline 1-800-355-3515 (free
of charge)
More information on HomeLink
®and/or
compatible products is also available online
at http://www.homelink.com.
Notes on the declaration of conformity
(
Ypage 26).
USA: FCC ID: CB2HMIHL4
Canada: IC: 279B-HMIHL4
Important safety notes
GWARNING
When you operate or program the garage door
with the integrated garage door opener, per-
sons in the range of movement of the garage
door can become trapped or struck by the
garage door. There is a risk of injury.
Features317
Stowage and features
Z
Page 326 of 410
Useful information
i
This Operator's Manual describes all
models and all standard and optional equip-
ment of your vehicle available at the time of
publication of the Operator's Manual.
Country-specific differences are possible.
Please note that your vehicle may not be
equipped with all features described. This
also applies to safety-related systems and
functions.
iRead the information on qualified special-
ist workshops (
Ypage 26).
Engine compartment
Hood
Important safety notes
GWARNING
If the hood is unlatched, it may open up when the vehicle is in motion and block your view.
There is a risk of an accident.
Never unlatch the hood while driving. Before
every trip, ensure that the hood is locked.
GWARNING
When opening and closing the hood, it may
suddenly fall into the closed position. There is a risk of injury to persons within range of
movement of the hood.
Open and close the hood only when no one is
within its range of movement.
GWARNING
Opening the hood when the engine is over-
heated or when there is a fire in the engine
compartment could expose you to hot gases
or other service products. There is a risk of
injury.
Let an overheated engine cool down before
opening the hood. If there is a fire in the
engine compartment, keep the hood closed
and contact the fire department.
GWARNING
The engine compartment contains moving
components. Certain components, such as
the radiator fan, may continue to run or start
again suddenly when the ignition is off. There is a risk of injury.
If you need to do any work inside the engine
compartment:
Rswitch off the ignition
Rnever reach into the area where there is a
risk of danger from moving components,
such as the fan rotation area
Rremove jewelry and watches
Rkeep items of clothing and hair, for exam-
ple, away from moving parts
GWARNING
The ignition system and the fuel injection sys-
tem work under high voltage. If you touch
components which are under voltage, you
could get an electric shock. There is a risk of
injury.
Never touch components of the ignition sys-
tem or fuel injection system when the ignition
is switched on.
Opening the hood
GWARNING
Certain components in the engine compart-
ment, such as the engine, radiator and parts
of the exhaust system, can become very hot.
Working in the engine compartment poses a
risk of injury.
Where possible, let the engine cool down and touch only the components described in the
following.
GWARNING
When the hood is open and the windshield
wipers are set in motion, you can be injured by
the wiper linkage. There is a risk of injury.
Always switch off the windshield wipers and
the ignition before opening the hood.
324Engine compartment
Maintenance and care
Page 329 of 410
Checking the oil level using the on-board computer (Mercedes-AMG S 65 models)
XMake sure that the SmartKey is in position2in the ignition lock.
XUse ò on the steering wheel to call up the list of menus.
XPress the :or9 button on the steering wheel to select the Servicemenu.
XConfirm by pressingaon the steering wheel.
XUse: or9 to select theEngine Oil Levelsubmenu.
XPress ato confirm the selection.
The Measuring
EngineOilLevelAccurateOnlyWhenVehicleIsLevelmessage
appears in the multifunction display.
The measurement takes a few seconds. You will see one of the following messages in the
multifunction display:
Display messagesPossible causes/consequences and MSolutions
EngineOilLevelOKThe oil level is correct.
Check Engine Oil
Level(Add1Liter)
The oil level is too low.
XAdd 1.1 US qt (1.0 liter) of engine oil.
Reduce Engine Oil
Level
The engine oil level is too high.
XHave excess engine oil siphoned off.
For Engine Oil
Level Ignition
Must Be On
The ignition is switched off.
XTurn the SmartKey to position2in the ignition lock.
Need More Time to
Check Engine Oil
Level
The required waiting period was not observed.
XIf the engine is at normal operating temperature: repeat the
measurement after about five minutes.
If the engine is not at normal operating temperature, e.g. if the
engine was only started briefly: repeat the measurement after
approximately 30 minutes.
Engine Oil Level
Not Measurable
withEngineRunning
The engine is running; oil level measurement is not possible.
XSwitch off the engine.
XIf the engine is at normal operating temperature: wait about five
minutes before carrying out the measurement.
If the engine is not at normal operating temperature, e.g. if the
engine was only started briefly: wait approximately 30 minutes
before carrying out the measurement.
Adding engine oil
GWARNING
Certain components in the engine compart-
ment, such as the engine, radiator and parts
of the exhaust system, can become very hot.
Working in the engine compartment poses a
risk of injury.
Engine compartment327
Maintenance and care
Z
Page 330 of 410
Where possible, let the engine cool down andtouch only the components described in the
following.
GWARNING
If engine oil comes into contact with hot com- ponents in the engine compartment, it may
ignite. There is a risk of fire and injury.
Make sure that engine oil is not spilled next to
the filler neck. Let the engine cool down and
thoroughly clean the engine oil off the com-
ponents before starting the engine.
HEnvironmental note
When adding oil, take care not to spill any. If
oil enters the soil or waterways, it is harmful to
the environment.
!Only use engine oils and oil filters that
have been approved for vehicles with a ser-
vice system. You can obtain a list of the
engine oils and oil filters tested and
approved in accordance with the
Mercedes-Benz Specifications for Service
Products at any Mercedes-Benz Service
center.
Damage to the engine or exhaust system is
caused by the following:
Rusing engine oils and oil filters that have
not been specifically approved for the
service system
Rreplacing engine oil and oil filters after
the interval for replacement specified by the service system has been exceeded
Rusing engine oil additives.
!Do not add too much oil. adding too much
engine oil can result in damage to the
engine or to the catalytic converter. Have
excess engine oil siphoned off.
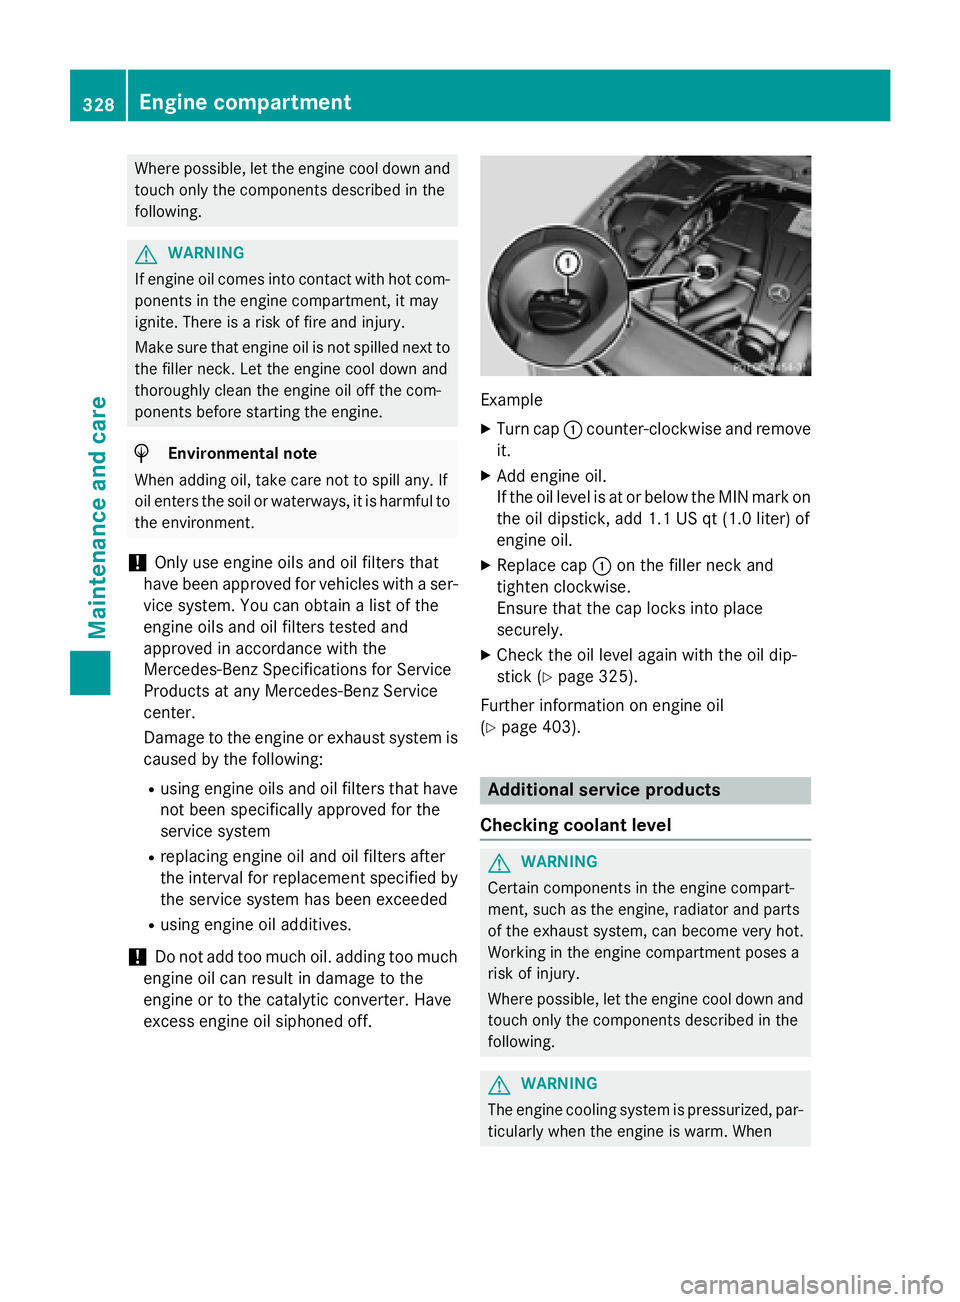
Example
XTurn cap :counter-clockwise and remove
it.
XAdd engine oil.
If the oil level is at or below the MIN mark on
the oil dipstick, add 1.1 US qt (1.0 liter) of
engine oil.
XReplace cap :on the filler neck and
tighten clockwise.
Ensure that the cap locks into place
securely.
XCheck the oil level again with the oil dip-
stick (
Ypage 325).
Further information on engine oil
(
Ypage 403).
Additional service products
Checking coolant level
GWARNING
Certain components in the engine compart-
ment, such as the engine, radiator and parts
of the exhaust system, can become very hot.
Working in the engine compartment poses a
risk of injury.
Where possible, let the engine cool down and touch only the components described in the
following.
GWARNING
The engine cooling system is pressurized, par-
ticularly when the engine is warm. When
328Engine compartment
Maintenance and care
Page 332 of 410
XAdd the premixed washer fluid.
XTo close:press cap :onto the filler neck
until it engages.
If the washer fluid level drops below the rec-
ommended minimum of 1 liter, a message
appears in the multifunction display prompt-
ing you to add washer fluid (
Ypage 283).
Further information on windshield washer
fluid/antifreeze (
Ypage 405).
ASSYST PLUS
Service message
The ASSYST PLUS service interval display
informs you of the next service due date.
Information on the type of service and service
intervals (see the separate Maintenance
Booklet).
You can obtain further information from an
authorized Mercedes-Benz Center or at
http://www.mbusa.com (USA only).
iThe ASSYST PLUS service interval display
does not show any information on the
engine oil level. Observe the notes on the
engine oil level (
Ypage 325).
The multifunction display shows a service
message for several seconds, e.g.:
RService A in .. Days
RService A Due
RService A Exceeded by .. Days
Depending on the operating conditions of the
vehicle, the remaining time or distance until
the next service due date is displayed.
The letter A
orB, possibly in connection with a
number or another letter, indicates the type
of service. A
stands for a minor service and B
for a major service.
You can obtain further information from an
authorized Mercedes-Benz Center.
The ASSYST PLUS service interval display
does not take into account any periods of
time during which the battery is disconnec-
ted. Maintaining the time-dependent service
schedule:
XNote down the service due date displayed
in the multifunction display before discon-
necting the battery.
or
XAfter reconnecting the battery, subtract
the battery disconnection periods from the service date shown on the display.
Hiding a service message
XPress the aor% button on the steer-
ing wheel.
Displaying service messages
XSwitch the ignition on.
XUse ò on the steering wheel to call up
the list of menus.
XPress the 9or: button on the steer-
ing wheel to select the Service
menu and
press ato confirm.
XPress the 9or: button on the steer-
ing wheel to select the ASSYST PLUS
sub-
menu and press ato confirm.
The service due date appears in the multi-
function display.
Information about Service
Resetting the ASSYST PLUS service
interval display
!If the ASSYST PLUS service interval dis-
play has been inadvertently reset, this set-
ting can be corrected at a qualified special-
ist workshop.
Have service work carried out as described in the Maintenance Booklet. This may oth-
erwise lead to increased wear and damage
to the major assemblies or the vehicle.
A qualified specialist workshop, e.g. an
authorized Mercedes-Benz Center, will reset
330ASSYST PLUS
Maintenance and care