2016 MERCEDES-BENZ S-COUPE height
[x] Cancel search: heightPage 116 of 410
Problems with the seat ventilation
ProblemPossible causes/consequences andMSolutions
The seat ventilation has
switched off prema-
turely or cannot be
switched on.The on-board voltage is too low because too many electrical con-
sumers are switched on.
XSwitch off electrical consumers that you do not need, such as
the rear window defroster or interior lighting.
Once the battery is sufficiently charged, the seat ventilation can
be switched back on.
Steering wheel
Important safety notes
GWARNING
You could lose control of your vehicle if you do the following while driving:
Radjust the driver's seat, head restraint,
steering wheel or mirrors
Rfasten the seat belt
There is a risk of an accident.
Adjust the driver's seat, head restraint, steer-
ing wheel and mirror and fasten your seat belt before starting the engine.
GWARNING
Children could injure themselves if they
adjust the steering wheel. There is a risk of
injury.
When leaving the vehicle, always take the
SmartKey with you and lock the vehicle. Never
leave children unsupervised in the vehicle.
The electrically adjustable steering wheel can
still be adjusted when there is no SmartKey in
the ignition lock.
Adjusting the steering wheel
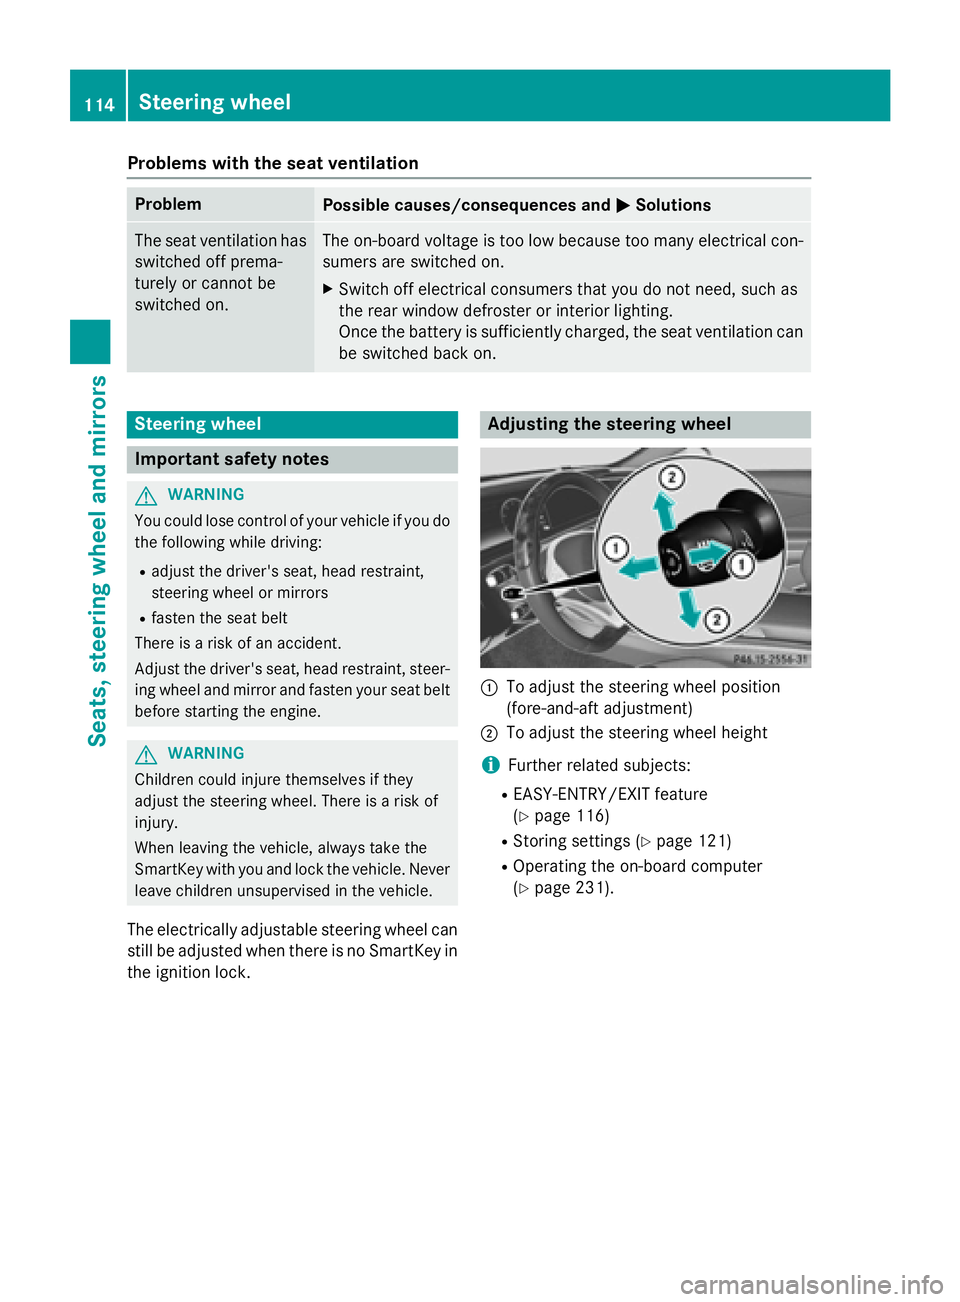
:To adjust the steering wheel position
(fore-and-aft adjustment)
;To adjust the steering wheel height
iFurther related subjects:
REASY-ENTRY/EXIT feature
(
Ypage 116)
RStoring settings (Ypage 121)
ROperating the on-board computer
(
Ypage 231).
114Steering wheel
Seats, steering wheel and mirrors
Page 196 of 410
If a malfunction in the electric parking brake
occurs, then the transmission may also be
shifted into positionPautomatically.
MAGIC BODY CONTROL
General notes
MAGIC BODY CONTROL consists of Active
Body Control (ABC), ROAD SURFACE SCAN,
the CURVE cornering function as well as auto-
matic vehicle stabilization in the event of a
crosswind.
Your vehicle automatically adjusts its ride
height to reduce fuel consumption. The sus-
pension mode is adjusted according to your
selection (SPORT, COMFORT or CURVE), the
road surface conditions and the vehicle load.
A multifunction camera detects bumps in the
road surface before the vehicle drives over
them. This reduces chassis movements.
Important safety notes
GWARNING
When the vehicle is being lowered, people
could become trapped if their limbs are
between the vehicle body and the wheels or
underneath the vehicle. There is a risk of
injury.
Make sure no one is underneath the vehicle or
in the immediate vicinity of the wheel arches
when the vehicle is being lowered.
!The vehicle is lowered when the engine is
switched off. When parking, position your
vehicle so that it does not make contact
with the curb as the vehicle is lowered. Your
vehicle could otherwise be damaged.
Crosswind Assist
The crosswind stabilization operates by
changing wheel loads through distortion of
the ABC spring struts. It reduces impairments
in handling when driving in a straight line and
assists during countersteering. Crosswind Assist is active in the speed range
between 50 mph (80 km/h) and
130 mph (210 km/h) when driving straight
ahead or cornering gently.
Active Body Control ABC
Vehicle level
All vehicles except AMG vehicles:
depend-
ing on the vehicle level that has been set, the
vehicle automatically adjusts its height
dependent on the current speed. The vehicle
is lowered by up to 0.6 in (15 mm) as the
speed increases. As the speed is reduced, the
vehicle is raised up to the set vehicle height.
In the event of poor road surface conditions,
the vehicle automatically raises by up to 0.4 in
(10 mm) and harder damping is selected.
AMG vehicles: depending on the vehicle
level that has been selected, the vehicle auto-
matically adjusts its height dependent on the current speed. The vehicle is lowered by up to
0.4 in (10 mm) below the normal level as thespeed increases. As the speed is reduced, the
vehicle is raised up to the set vehicle height.
Select the "Normal" setting for normal road
conditions and "Raised" for driving with snow
chains or in particularly poor road conditions.
Your selection remains stored even if you
remove the SmartKey from the ignition lock.
The "Raised level" setting is canceled if you:
Rare driving faster than approximately
75 mph (120 km/h).
Rdrive for approximately three minutes at a
speed over 50 mph (80 km/h).
194Driving systems
Driving and parking
Page 197 of 410
While driving, the raised level can only be
selected at speeds of under
75 mph (120 km/h).
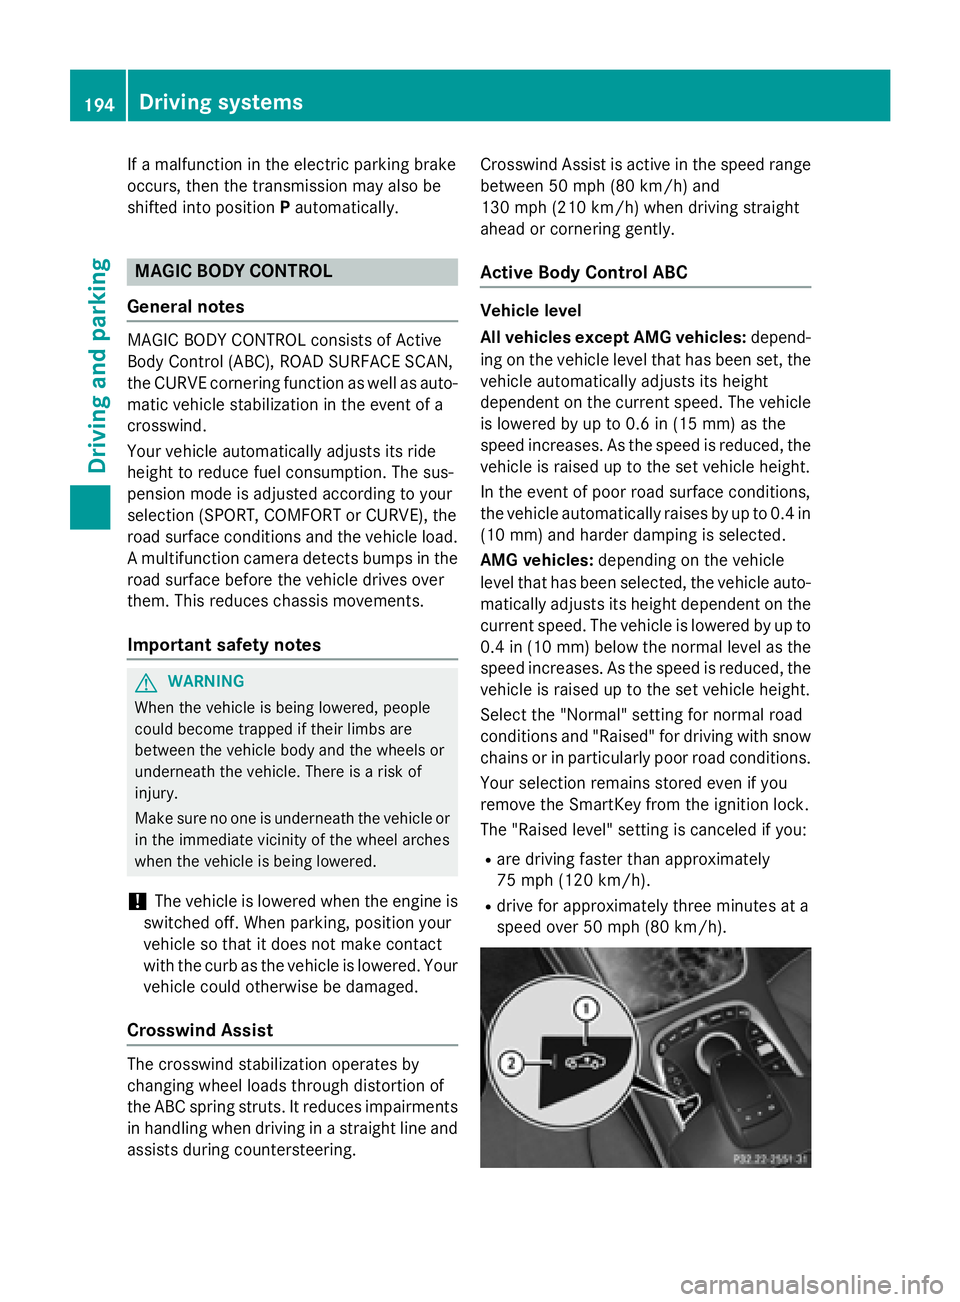
Setting the raised vehicle level
XStart the engine.
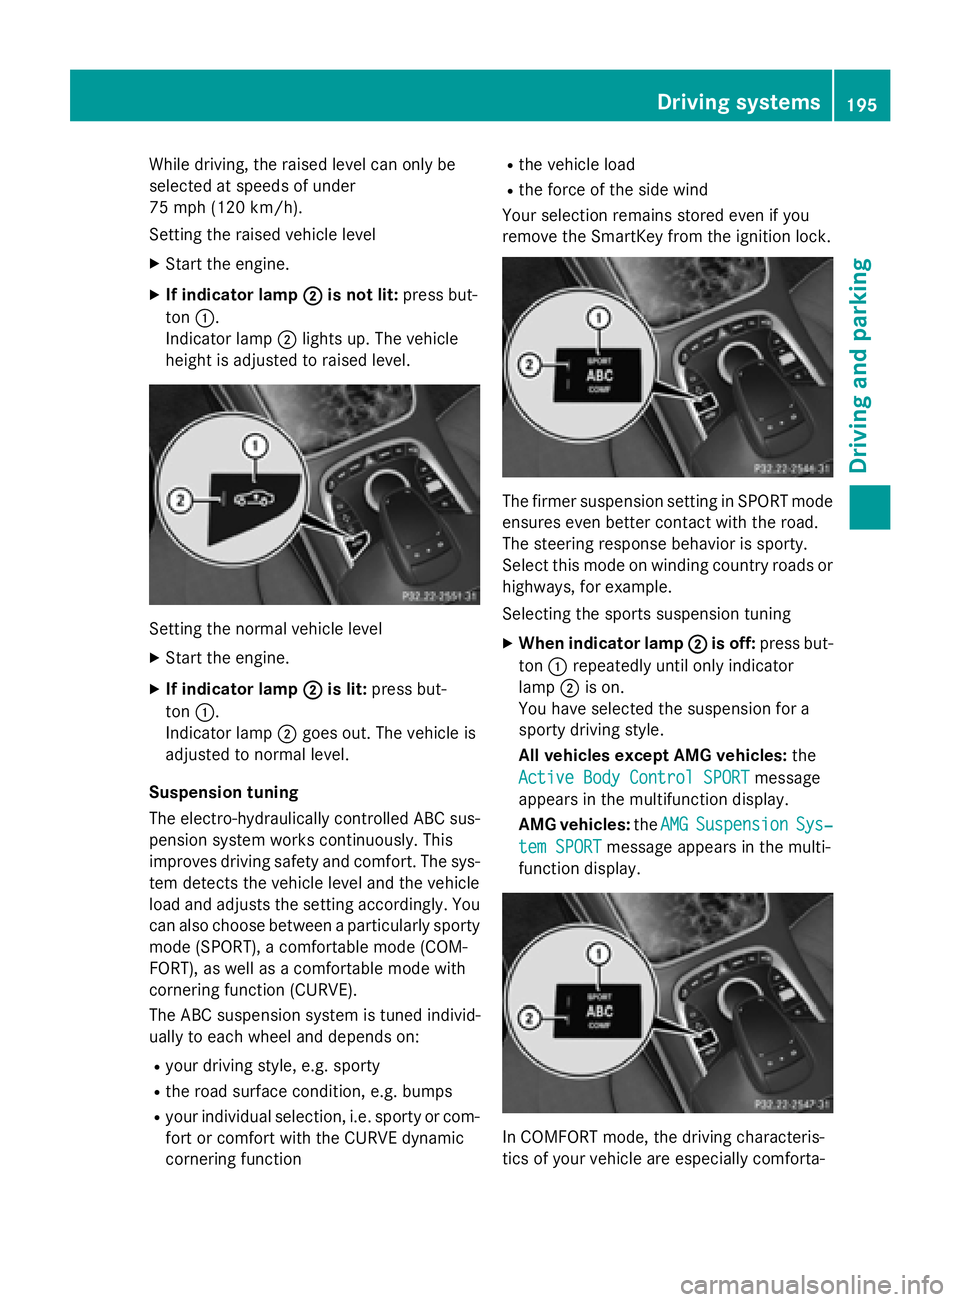
XIf indicator lamp ;is not lit:press but-
ton :.
Indicator lamp ;lights up. The vehicle
height is adjusted to raised level.
Setting the normal vehicle level
XStart the engine.
XIf indicator lamp ;is lit:press but-
ton :.
Indicator lamp ;goes out. The vehicle is
adjusted to normal level.
Suspension tuning
The electro-hydraulically controlled ABC sus-
pension system works continuously. This
improves driving safety and comfort. The sys-
tem detects the vehicle level and the vehicle
load and adjusts the setting accordingly. You
can also choose between a particularly sporty
mode (SPORT), a comfortable mode (COM-
FORT), as well as a comfortable mode with
cornering function (CURVE).
The ABC suspension system is tuned individ-
ually to each wheel and depends on:
Ryour driving style, e.g. sporty
Rthe road surface condition, e.g. bumps
Ryour individual selection, i.e. sporty or com-
fort or comfort with the CURVE dynamic
cornering function
Rthe vehicle load
Rthe force of the side wind
Your selection remains stored even if you
remove the SmartKey from the ignition lock.
The firmer suspension setting in SPORT mode
ensures even better contact with the road.
The steering response behavior is sporty.
Select this mode on winding country roads or
highways, for example.
Selecting the sports suspension tuning
XWhen indicator lamp ;is off:press but-
ton :repeatedly until only indicator
lamp ;is on.
You have selected the suspension for a
sporty driving style.
All vehicles except AMG vehicles: the
Active Body Control SPORT
message
appears in the multifunction display.
AMG vehicles: theAMG
SuspensionSys‐
tem SPORTmessage appears in the multi-
function display.
In COMFORT mode, the driving characteris-
tics of your vehicle are especially comforta-
Driving systems195
Driving and parking
Z
Page 205 of 410
Parking tips:
ROn narrow roads, drive as close to the park-
ing space as possible.
RParking spaces that are littered or over-
grown might be identified or measured
incorrectly.
RParking spaces that are partially occupied
by trailer drawbars might not be identified
as such or be measured incorrectly.
RSnowfall or heavy rain may lead to a parking
space being measured inaccurately.
RPay attention to the PARKTRONIC
(
Ypage 200) warning messages during the
parking procedure.
RYou can intervene in the steering procedure
to correct it at any time. Active Parking
Assist will then be canceled.
RWhen transporting a load which protrudes
from your vehicle, you should not use
Active Parking Assist.
RNever use Active Parking Assist when snow
chains are installed.
RMake sure that the tire pressures are
always correct. This has a direct influence
on the parking characteristics of the vehi-
cle.
Use Active Parking Assist for parking spaces:
Rparallel or at right angles to the direction of
travel
Rthat are on straight roads, not bends
Rthat are on the same level as the road, e.g.
not on the pavement
Detecting parking spaces
Objects located above the height range of
Active Parking Assist will not be detected
when the parking space is measured. These
are not taken into account when the parking
procedure is calculated, e.g. overhanging
loads, tail sections or loading ramps of goods vehicles.
GWARNING
If there are objects above the detection range:
RActive Park Assist may steer too early
Rthe vehicle may not stop in front of these
objects
You may cause a collision as a result. There is
a risk of an accident.
If objects are located above the detection
range, stop and deactivate Active Parking
Assist.
For further information on the detection
range (
Ypage 199).
Active Parking Assist does not assist you
parking in spaces at right angles to the direc-
tion of travel if:
Rtwo parking spaces are located directly
next to one another
Rthe parking space is directly next to a low
obstacle such as a low curb
Ryou park forwards
Active Parking Assist does not assist you
parking in spaces that are parallel or at right
angles to the direction of travel if:
Rthe parking space is on a curb
Rthe system reads the parking space as
being blocked, for example by foliage or
grass paving blocks
Rthe area is too small for the vehicle to
maneuver into
Rthe parking space is bordered by an obsta- cle, e.g. a tree, a post or a trailer
Driving systems203
Driving and parking
Z
Page 214 of 410

The 360° camera will not function or will
function in a limited manner:
Rif the doors are open
Rif the exterior mirrors are folded in
Rif the trunk lid is open
Rin heavy rain, snow or fog
Rat night or in very dark places
Rif the cameras are exposed to very bright
light
Rif the area is lit by fluorescent bulbs or LED
lighting (the display may flicker)
Rif the camera lenses fog up, e.g. when driv-
ing into a heated garage in winter, causing
a rapid change in temperature
Rif the camera lenses are dirty or covered.
Observe the notes on cleaning
(
Ypage 336)
Rif the vehicle components in which the
cameras are installed are damaged. In this
event, have the camera position and setting
checked at a qualified specialist workshop.
Do not use the 360° camera in this case. You
can otherwise injure others or cause damage
to objects or the vehicle.
The guide lines in the COMAND display show
the distances to your vehicle. The distances
only apply to road level.
iThe camera in the rear area is protected
from raindrops and dust by means of a flap. This flap opens when the 360° camera is
activated.
The flap closes again when:
Ryou have finished the maneuvering proc-
ess
Ryou switch off the engine
Ryou open the trunk
Observe the notes on cleaning
(
Ypage 336).
For technical reasons, the flap may remain
open briefly after the 360° camera has
been deactivated. On vehicles with height-adjustable chassis,
depending on technical conditions, leaving
the standard height can result in:
Rinaccuracies in the guide lines
Rinaccuracies in the display of generated
images (top view)
Activation conditions
The 360° camera image can be displayed if:
RCOMAND is switched on (see the separate
operating instructions)
Rthe 360° Camerafunction is switched on
iIf the 360° camera is activated at speeds
above approximately 19 mph (30 km/h) , a
warning message appears.
The warning message disappears if:
Rthe vehicle's speed falls below approx-
imately 19 mph (30 km/h). The 360°
camera is then activated.
Rthe message is confirmed with the %
button.
Switching the 360° camera on and off
using the button
XTo switch on: press button:.
Depending on whether position Dor Ris
engaged, the following is shown:
Rfull screen display with the image from
the front camera
Rfull screen display with the image from
the rear view camera
XTo switch off: press button:again.
212Driving systems
Driving and parking
Page 249 of 410
selected contents then appear in the head-up
display.
In Mercedes-AMG vehicles, you can also
choose between two AMG displays. If you
select an AMG display, the head-up display
shows AMG-specific contents.
XPress the òbutton on the steering
wheel to open the menu list.
XPress :or9 on the steering wheel
to select the Settings
menu.
XConfirm by pressing aon the steering
wheel.
XPress :or9 to select the Head-up
Displaysubmenu.
XPressato confirm.
XPress :or9 to select Display
Content.
XPressato confirm.
A graphic selection list appears.
XPress :or9 to select the desired
display.
XPress the abutton to confirm the selec-
tion.
Further information on navigation can be
found on COMAND (see the separate operat-
ing instructions).
For further information about Traffic Sign
Assist, see (
Ypage 217).
Setting the position
You can adjust the position of the head-up
display on the windshield. You can compen-
sate for height differences if the seat posi-
tions are changed, for example.
XSwitch on the head-up display
(
Ypage 233).
XPress the òbutton on the steering
wheel to open the menu list.
XPress the :or9 button on the steer-
ing wheel to select the Settings
menu.
XConfirm by pressingaon the steering
wheel.
XPress :or9 to select the Head-up
Displaysubmenu.
XPressato confirm.
XPress the :or9 button to select the
Position
function.
XPress the abutton to save the setting.
XPress :or9 to adjust the position
to a level from Level +5
toLevel -5.
XPress the aor% button to save the
setting.
Using the Memory function, you can save and
call up the set position of the head-up display
as a single memory preset (
Ypage 120).
Setting the brightness
The brightness of the head-up display is auto-
matically adjusted to the surrounding ambi-
ent light. You can also individually adjust the
brightness of the head-up display.
XSwitch on the head-up display
(
Ypage 233).
XPress òon the steering wheel to open
the menu list.
XPress the :or9 button on the steer-
ing wheel to select the Settings
menu.
XConfirm by pressingaon the steering
wheel.
XUse : or9 to select the Head-up
Displaysubmenu.
XPressato confirm.
XPress the :or9 button to select the
Brightness
function.
XPress the abutton to save the setting.
XPress :or9 to adjust the bright-
ness to a level from Level +5
(bright) to
Level -5
(dark).
XPress the aor% button to save the
setting.
Light submenu
Switching the spotlight function on/off
XPress òon the steering wheel to open
the menu list.
XPress :or9 on the steering wheel
to select the Settings
menu.
Menus and submenus247
On-board computer and displays
Z
Page 327 of 410
!Make sure that the windshield wipers are
not folded away from the windshield. You
could otherwise damage the windshield
wipers or the hood.
XMake sure that the windshield wipers are
turned off.
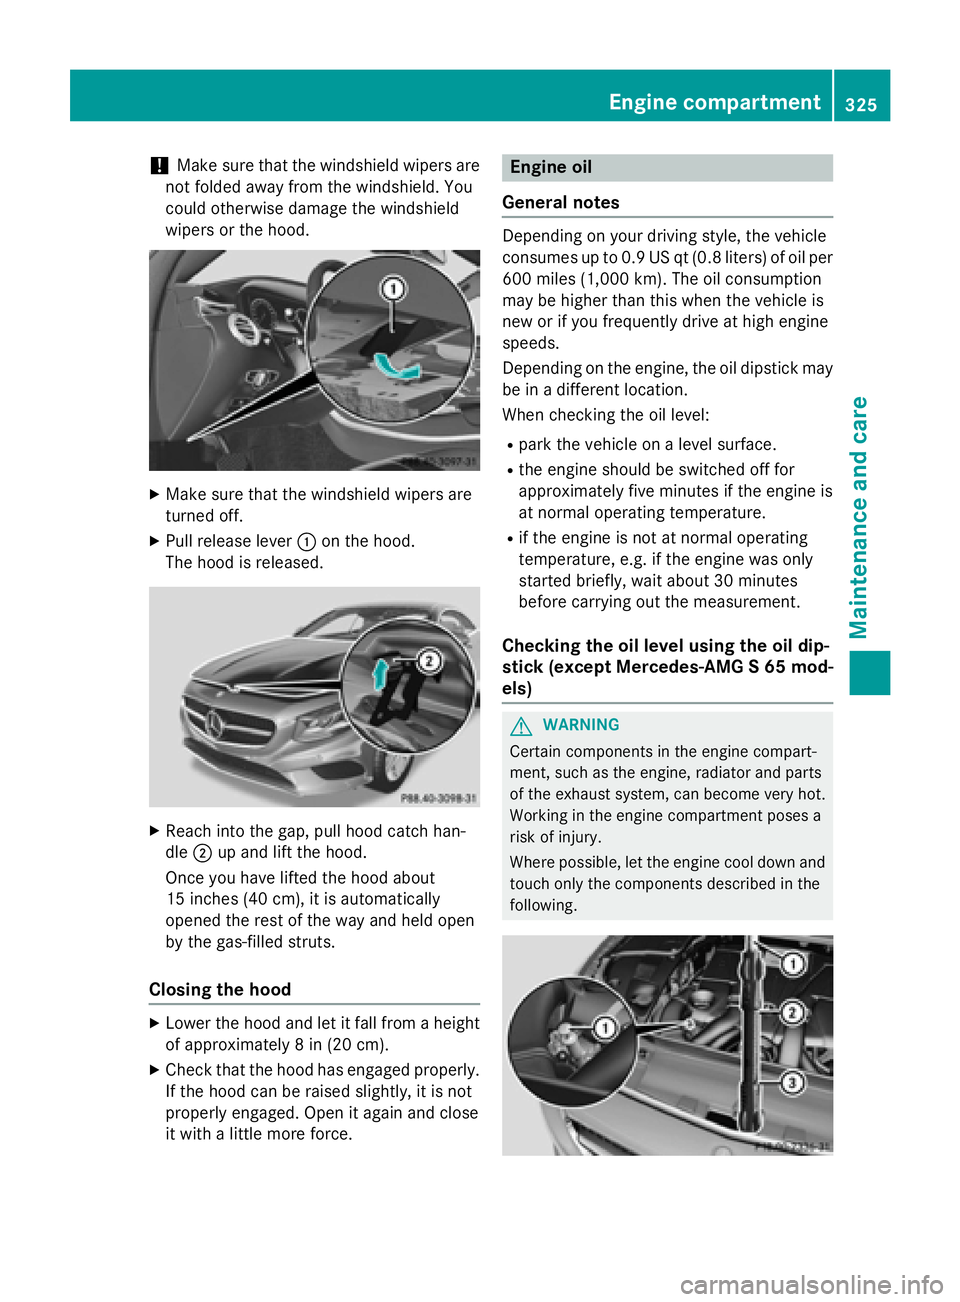
XPull release lever :on the hood.
The hood is released.
XReach into the gap, pull hood catch han-
dle ;up and lift the hood.
Once you have lifted the hood about
15 inches (40 cm), it is automatically
opened the rest of the way and held open
by the gas-filled struts.
Closing the hood
XLower the hood and let it fall from a height
of approximately 8 in (20 cm).
XCheck that the hood has engaged properly.
If the hood can be raised slightly, it is not
properly engaged. Open it again and close
it with a little more force.
Engine oil
General notes
Depending on your driving style, the vehicle
consumes up to 0.9 US qt (0.8 liters) of oil per 600 miles (1,000 km). The oil consumption
may be higher than this when the vehicle is
new or if you frequently drive at high engine
speeds.
Depending on the engine, the oil dipstick may
be in a different location.
When checking the oil level:
Rpark the vehicle on a level surface.
Rthe engine should be switched off for
approximately five minutes if the engine is
at normal operating temperature.
Rif the engine is not at normal operating
temperature, e.g. if the engine was only
started briefly, wait about 30 minutes
before carrying out the measurement.
Checking the oil level using the oil dip-
stick (except Mercedes-AMG S 65 mod-
els)
GWARNING
Certain components in the engine compart-
ment, such as the engine, radiator and parts
of the exhaust system, can become very hot.
Working in the engine compartment poses a
risk of injury.
Where possible, let the engine cool down and touch only the components described in the
following.
Engine compartment325
Maintenance and care
Z
Page 380 of 410
Therefore, only use tire types and sizes
approved for your vehicle model. Observe the
tire load rating and speed rating required for
your vehicle.
General:depending on the manufacturer's
standards, the size imprinted in the tire wall
may not contain any letters or may contain
one letter that precedes the size description.
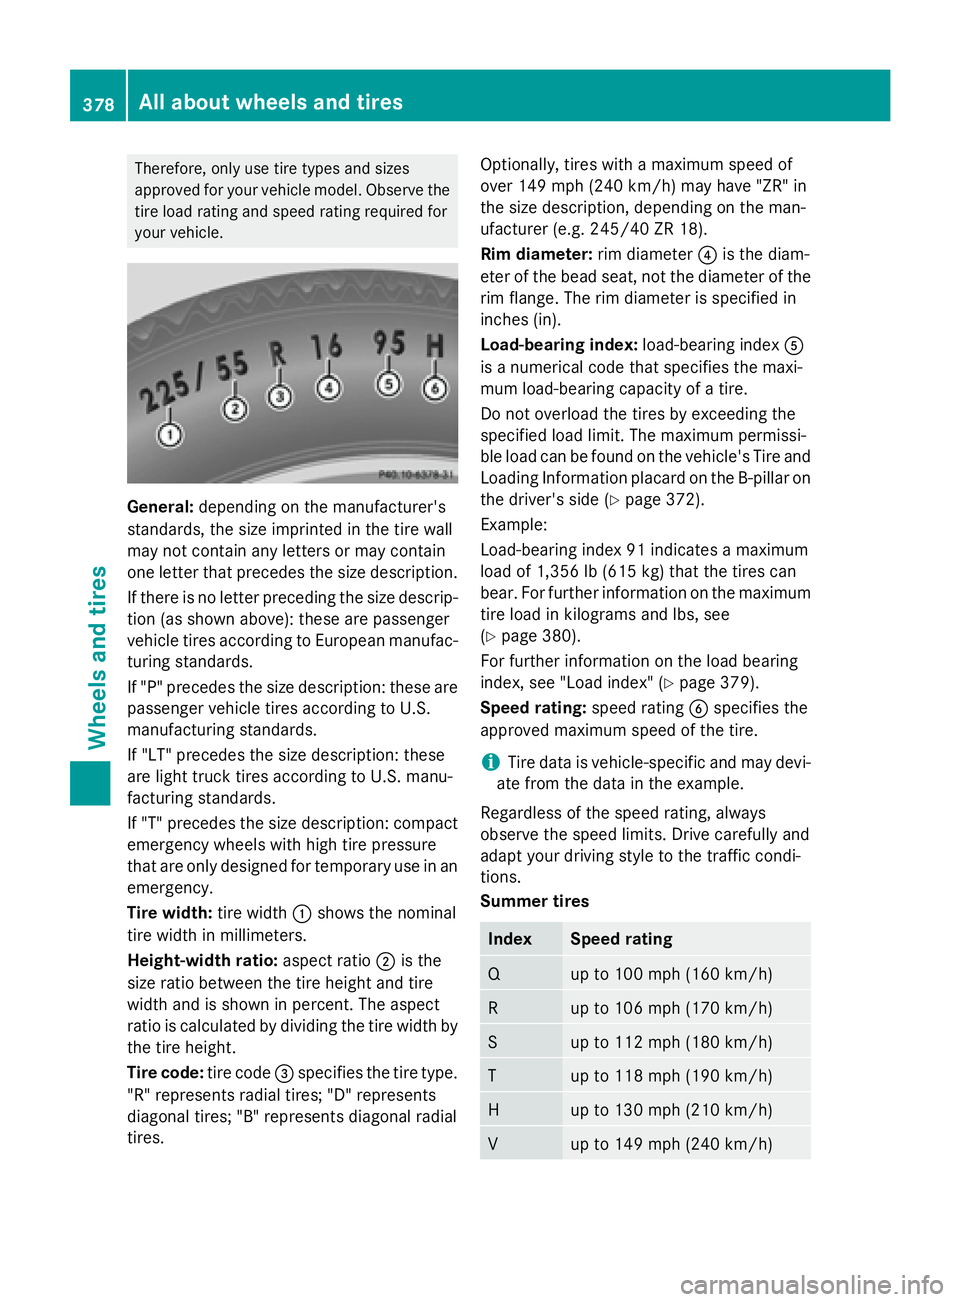
If there is no letter preceding the size descrip- tion (as shown above): these are passenger
vehicle tires according to European manufac-
turing standards.
If "P" precedes the size description: these are
passenger vehicle tires according to U.S.
manufacturing standards.
If "LT" precedes the size description: these
are light truck tires according to U.S. manu-
facturing standards.
If "T" precedes the size description: compact
emergency wheels with high tire pressure
that are only designed for temporary use in an
emergency.
Tire width: tire width:shows the nominal
tire width in millimeters.
Height-width ratio: aspect ratio;is the
size ratio between the tire height and tire
width and is shown in percent. The aspect
ratio is calculated by dividing the tire width by the tire height.
Tire code: tire code=specifies the tire type.
"R" represents radial tires; "D" represents
diagonal tires; "B" represents diagonal radial
tires. Optionally, tires with a maximum speed of
over 149 mph (240 km/h) may have "ZR" in
the size description, depending on the man-
ufacturer (e.g. 245/40 ZR 18).
Rim diameter:
rim diameter?is the diam-
eter of the bead seat, not the diameter of the
rim flange. The rim diameter is specified in
inches (in).
Load-bearing index: load-bearing indexA
is a numerical code that specifies the maxi-
mum load-bearing capacity of a tire.
Do not overload the tires by exceeding the
specified load limit. The maximum permissi-
ble load can be found on the vehicle's Tire and
Loading Information placard on the B-pillar on
the driver's side (Ypage 372).
Example:
Load-bearing index 91 indicates a maximum
load of 1,356 lb (615 kg) that the tires can
bear. For further information on the maximum tire load in kilograms and lbs, see
(
Ypage 380).
For further information on the load bearing
index, see "Load index" (
Ypage 379).
Speed rating: speed ratingBspecifies the
approved maximum speed of the tire.
iTire data is vehicle-specific and may devi-
ate from the data in t
he example.
Regardless of the speed rating, always
observe the speed limits. Drive carefully and
adapt your driving style to the traffic condi-
tions.
Summer tires
IndexSpeed rating
Qup to 100 mph (160 km/h)
Rup to 106 mph (170 km/h)
Sup to 112 mph (180 km/h)
Tup to 118 mph (190 km/h)
Hup to 130 mph (210 km/h)
Vup to 149 mph (240 km/h)
378All about wheels and tires
Wheels and tires