2016 MERCEDES-BENZ S-Class SEDAN seat adjustment button
[x] Cancel search: seat adjustment buttonPage 39 of 438

Center console
FunctionPage
:Switches multimedia system
on/off (see the separate
operating instructions)
;Adjusts the volume/mute
(see the separate operating
instructions)
=èECO start/stop func-
tion167
ÉSets the vehicle level
(vehicles with PLUG-IN
HYBRID operation)210, 212
?Touchpad (see the separate
operating instructions)
Telephone keypad (see the
separate operating instruc-
tions)
AÉ Sets the vehicle level210
Selects the operating mode
(vehicles with PLUG-IN
HYBRID operation)
243
BAdjusts the suspension set-
tings210,
212
FunctionPage
CÛ Selects the drive pro-
gram/program selector but-
ton
173
Ñ Selects the drive pro-
gram/program selector but-
ton (Mercedes-AMG vehi-
cles)
173
Selects automatic drive pro-
grams E, S and E+ (vehicles
with PLUG-IN HYBRID opera-
tion)
250
DBack button (see the sepa-
rate operating instructions)
ESeat adjustment button (see
the separate operating
instructions)
FNavigation button (see the
separate operating instruc-
tions)
GRadio button (see the sepa-
rate operating instructions)
H£ Hazard warning lamps132
IMedia button (see the sepa-
rate operating instructions)
JTelephone, address book and
Internet button (see separate
operating instructions)
Center console37
At a glance
Page 52 of 438

buckle is illuminated and extended after a rear
door is opened.
Releasing seat belts
!Make sure that the seat belt is fully rolled up.
Otherwise, the seat belt or belt tongue will be
trapped in the door or in the seat mechanism.
This could damage the door, the door trim
panel and the seat belt. Damaged seat belts
can no longer fulfill their protective function
and must be replaced. Visit a qualified spe-
cialist workshop.
XPress the release button in the belt buckle,
hold the belt tongue firmly and guide the belt
back.
Seat belt adjustment
The seat-belt adjustment is an integral part of
the PRE-SAFE®convenience function. This func-
tion adjusts the driver's and front-passenger
seat belt to the upper body of the occupants.
The belt strap is tightened slightly when:
Rthe belt tongue is engaged in the buckle and
Rthe ignition is switched on
The seat-belt adjustment will apply a certain
retraction force if any slack is detected between
the vehicle occupant and the seat belt. Do not
hold on to the seat belt tightly while it is adjust-
ing.
You can switch the seat-belt adjustment on and
off using the multimedia system. Information on
activating and deactivating the seat-belt adjust-
ment function can be found in the Digital Oper-
ator's Manual.
Belt warning for the driver and front
passenger
The 7 seat belt warning lamp in the instru-
ment cluster is a reminder that all vehicle occu-
pants must wear their seat belts. It may light up
continuously or flash. In addition, there may be
a warning tone.
Regardless of whether the driver's seat belt has
already been fastened, the 7seat belt warn-
ing lamp lights up for six seconds each time the
engine is started. If, after six seconds, the driver
or front-passenger seat belt has not been fas-
tened and the doors are closed, the 7seat
belt warning lamp lights up. As soon as the driv- er's and front-passenger seat belts are fastened or a front door is opened again, the
7seat
belt warning lamp goes out.
If the driver's seat belt is not fastened after the
engine is started, an additional warning tone will
sound. The warning tone switches off after six
seconds or once the driver's seat belt is fas-
tened.
If the vehicle's speed exceeds 15 mph
(25 km/h) once and the driver's and front-
passenger seat belts are not fastened, a warning
tone sounds. A warning tone also sounds with
increasing intensity for 60 seconds or until the
driver or front passenger have fastened their
seat belts.
If the driver or front passenger unfasten their
seat belts during the journey, the seat belt warn-
ing is activated again.
Air bags
Introduction
The air bag installation point is identified by the
label AIR BAG.
An air bag supplements a correctly fastened
seat belt. However, it is not intended as a sub-
stitute for the seat belt. Air bags provide addi-
tional protection in the event of an accident.
Not all air bags are deployed in an accident. The
various air bag systems work independently of
each other (
Ypage 57).
There is, however, no system available today
that can completely rule out injury or death.
It is also not possible to rule out a risk of injury
caused by an air bag due to the high speed at
which the air bag must be deployed.
Important safety notes
GWARNING
If you do not sit in the correct seat position,
the air bag cannot protect as intended and
could even cause additional injury when
deployed. This poses an increased risk of
injury or even fatal injury.
50Occupant safety
Safety
Page 69 of 438
GWARNING
If the child restraint system is subjected to
direct sunlight, parts may get very hot. Chil-
dren may burn themselves on these parts,
particularly on the metal parts of the child
restraint system. There is a risk of injury.
If you leave the vehicle, taking the child with
you, always ensure that the child restraint
system is not exposed to direct sunlight. Pro- tect it with a blanket, for example. If the child
restraint system has been exposed to direct
sunlight, let it cool down before securing the
child in it. Never leave children unattended in
the vehicle.
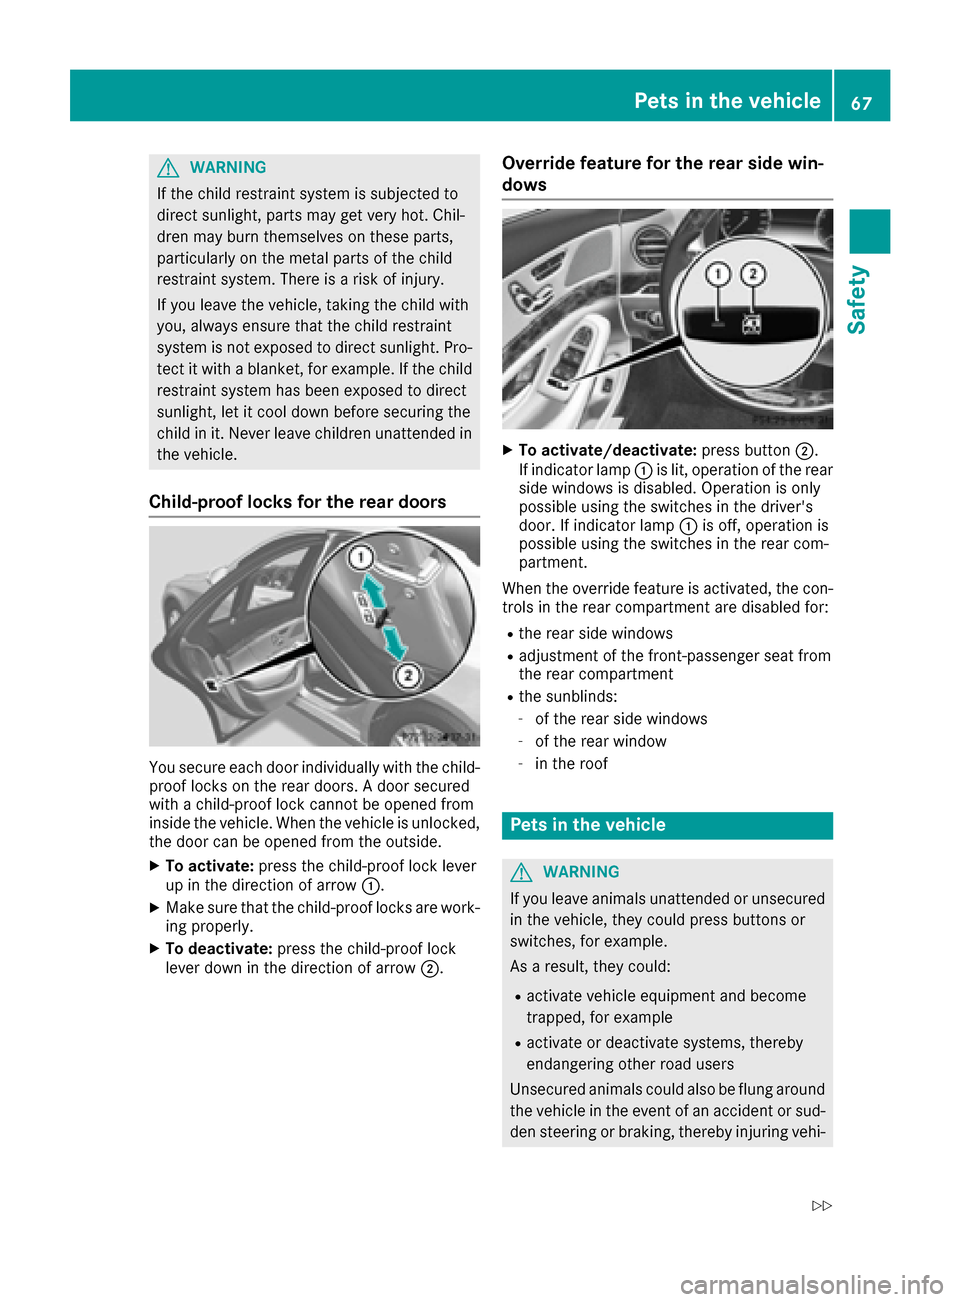
Child-proof locks for the rear doors
You secure each door individually with the child-
proof locks on the rear doors. A door secured
with a child-proof lock cannot be opened from
inside the vehicle. When the vehicle is unlocked,the door can be opened from the outside.
XTo activate: press the child-proof lock lever
up in the direction of arrow :.
XMake sure that the child-proof locks are work-
ing properly.
XTo deactivate: press the child-proof lock
lever down in the direction of arrow ;.
Override feature for the rear side win-
dows
XTo activate/deactivate:press button;.
If indicator lamp :is lit, operation of the rear
side windows is disabled. Operation is only
possible using the switches in the driver's
door. If indicator lamp :is off, operation is
possible using the switches in the rear com-
partment.
When the override feature is activated, the con-
trols in the rear compartment are disabled for:
Rthe rear side windows
Radjustment of the front-passenger seat from
the rear compartment
Rthe sunblinds:
-of the rear side windows
-of the rear window
-in the roof
Pets in the vehicle
GWARNING
If you leave animals unattended or unsecured
in the vehicle, they could press buttons or
switches, for example.
As a result, they could:
Ractivate vehicle equipment and become
trapped, for example
Ractivate or deactivate systems, thereby
endangering other road users
Unsecured animals could also be flung around
the vehicle in the event of an accident or sud-
den steering or braking, thereby injuring vehi-
Pets in the vehicle67
Safety
Z
Page 107 of 438
Seats
Important safety notes
GWARNING
Children could become trapped if they adjust
the seats, particularly when unattended.
There is a risk of injury.
When leaving the vehicle, always take the
SmartKey with you and lock the vehicle. Never
leave children unsupervised in the vehicle.
The seats can still be adjusted when there is no
SmartKey in the ignition lock.
GWARNING
When you adjust a seat, you or other vehicle
occupants could become trapped, e.g. on the seat guide rail. There is a risk of injury.
Make sure when adjusting a seat that no one
has any body parts in the sweep of the seat.
Observe the safety notes on "Air bags"
(
Ypage 50) and "Children in the Vehicle"
(Ypage 61).
GWARNING
You could lose control of your vehicle if you do the following while driving:
Radjust the driver's seat, head restraint,
steering wheel or mirrors
Rfasten the seat belt
There is a risk of an accident.
Adjust the driver's seat, head restraint, steer-
ing wheel and mirror and fasten your seat belt before starting the engine.
GWARNING
If you adjust the seat height carelessly, you or
other vehicle occupants could be trapped and
thereby injured. Children in particular could
accidentally press the electrical seat adjust-
ment buttons and become trapped. There is a
risk of injury.
While moving the seats, make sure that your
hands or other body parts do not get under the
lever assembly of the seat adjustment sys-
tem.
GWARNING
If the head restraints are not installed or not
adjusted correctly, they cannot provide pro-
tection as intended. There is an increased risk
of injury in the head and neck area, e.g. in the event of an accident or when braking.
Always drive with the head restraints instal-
led. Before driving off, make sure for every
vehicle occupant that the center of the head
restraint supports the back of the head at
about eye level.
GWARNING
The seat belt does not offer the intended level of protection if you have not moved the back-
rest to an almost vertical position. When brak-
ing or in the event of an accident, you could
slide underneath the seat belt and sustain
abdomen or neck injuries, for example. This
poses an increased risk of injury or even fatal injury.
Adjust the seat properly before beginning
your journey. Always ensure that the backrest
is in an almost vertical position and that the
shoulder section of your seat belt is routed
across the center of your shoulder.
!To avoid damage to the seats and the seat
heating, observe the following information:
Rkeep liquids from spilling on the seats. If
liquid is spilled on the seats, dry them as
soon as possible.
Rif the seat covers are damp or wet, do not
switch on the seat heating. The seat heat-
ing should also not be used to dry the seats.
Rclean the seat covers as recommended;
see "Interior care".
Rdo not transport heavy loads on the seats.
Do not place sharp objects on the seat
cushions, e.g. knives, nails or tools. The
seats should only be occupied by passen-
gers, if possible.
Rwhen the seat heating is in operation, do
not cover the seats with insulating materi-
als, e.g. blankets, coats, bags, seat covers,
child seats or booster seats.
!Make sure that there are no objects in the
footwell under or behind the seats when mov-
Seats105
Seats, steering wheel and mirrors
Z
Page 111 of 438
Make sure when adjusting a seat that no one
has any body parts in the sweep of the seat.
Observe the safety notes on "Air bags"
(
Ypage 50) and "Children in the vehicle"
(Ypage 61).
GWARNING
The front-air bags for could also injure the
vehicle occupants in the front If the front
seats are positioned too close to the dash-
board or steering wheel. This poses an
increased risk of injury or even fatal injury.
Always adjust the front seats so that they are
as far from the front air bags as possible. Also
observe the notes on the correct adjustment
of the seats.
!Do not move the front-passenger seat fully
forwards if there are objects in the parcel net
in the front-passenger footwell. The objects
could otherwise be damaged.
iYou can use the rear-compartment override
button to disable the setting of the front-
passenger seat from the rear (
Ypage 67).
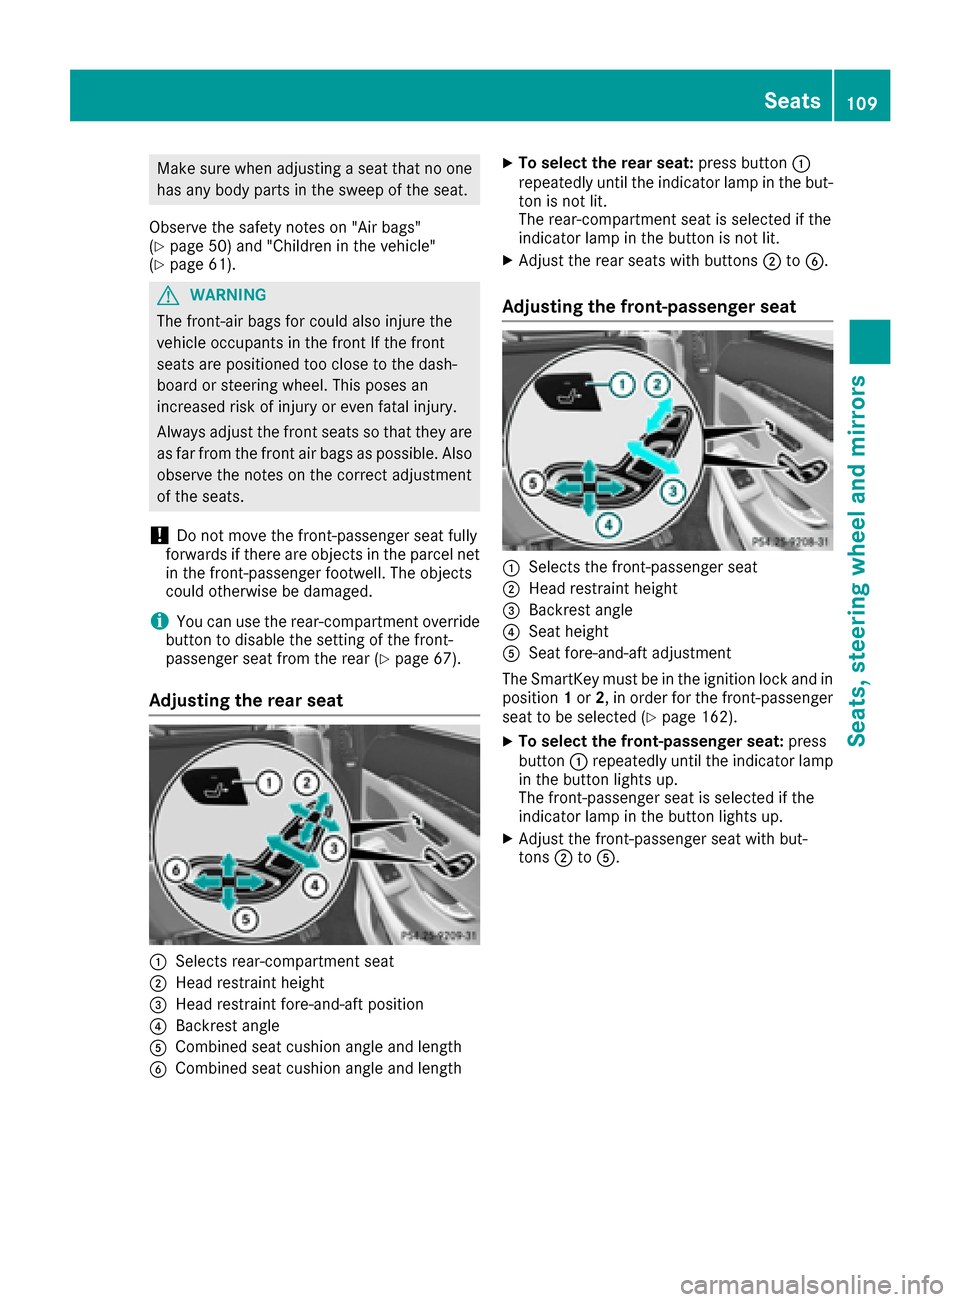
Adjusting the rear seat
:Selects rear-compartment seat
;Head restraint height
=Head restraint fore-and-aft position
?Backrest angle
ACombined seat cushion angle and length
BCombined seat cushion angle and length
XTo select the rear seat: press button:
repeatedly until the indicator lamp in the but-
ton is not lit.
The rear-compartment seat is selected if the
indicator lamp in the button is not lit.
XAdjust the rear seats with buttons ;toB.
Adjusting the front-passenger seat
:Selects the front-passenger seat
;Head restraint height
=Backrest angle
?Seat height
ASeat fore-and-aft adjustment
The SmartKey must be in the ignition lock and in
position 1or 2, in order for the front-passenger
seat to be selected (
Ypage 162).
XTo select the front-passenger seat: press
button :repeatedly until the indicator lamp
in the button lights up.
The front-passenger seat is selected if the
indicator lamp in the button lights up.
XAdjust the front-passenger seat with but-
tons ;toA.
Seats109
Seats, steering wheel and mirrors
Z
Page 115 of 438
iIf the front-passenger seat is already at the
threshold to the area for the chauffeur mode,
the position for the chauffeur mode is set
immediately.
iThe position for chauffeur mode cannot be
stored or set with the driver's seat memory
function.
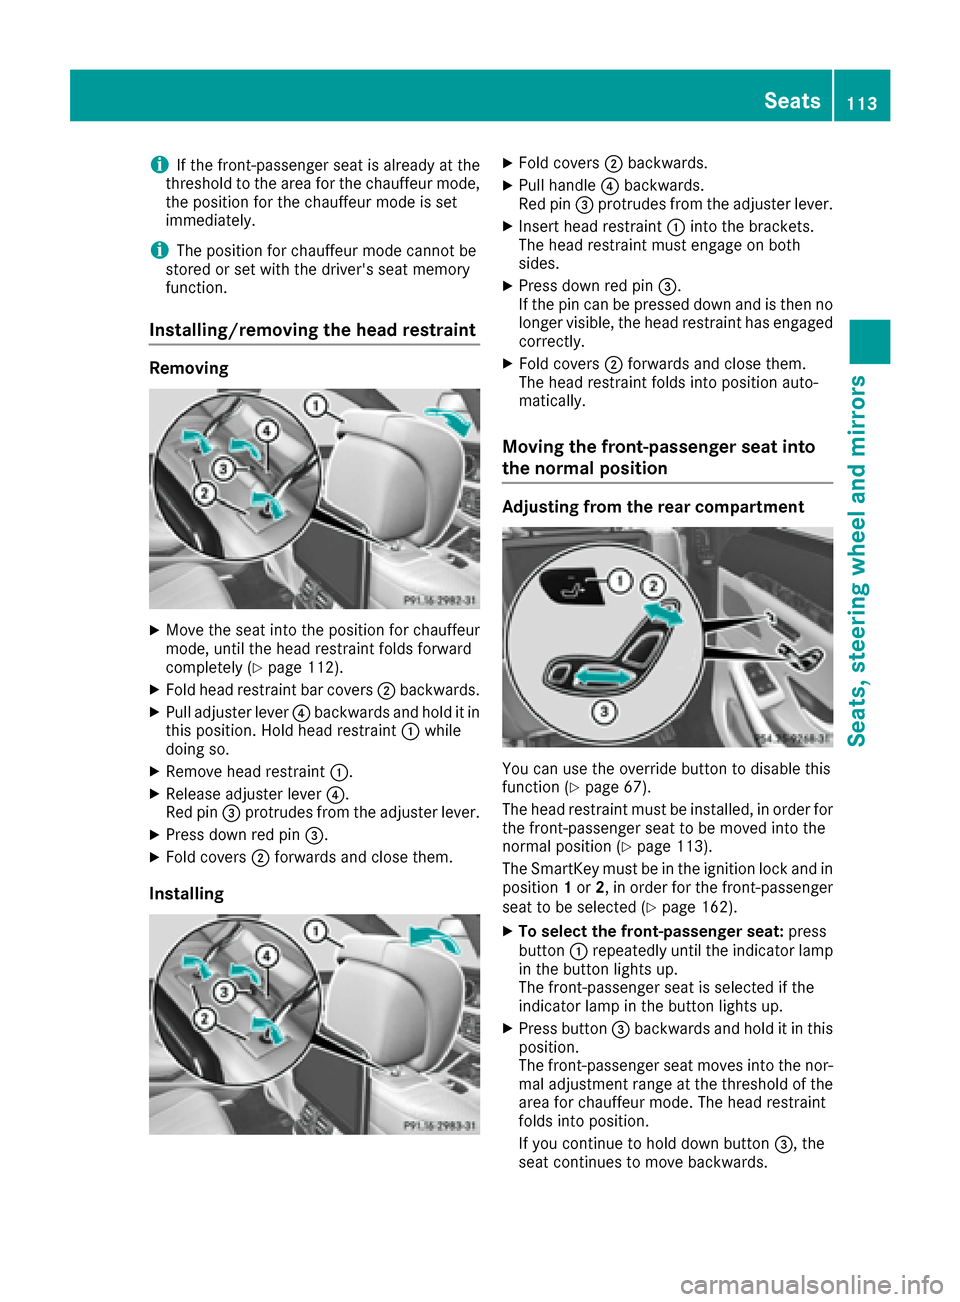
Installing/removing the head restraint
Removing
XMove the seat into the position for chauffeur
mode, until the head restraint folds forward
completely (
Ypage 112).
XFold head restraint bar covers ;backwards.
XPull adjuster lever ?backwards and hold it in
this position. Hold head restraint :while
doing so.
XRemove head restraint :.
XRelease adjuster lever?.
Red pin =protrudes from the adjuster lever.
XPress down red pin =.
XFold covers;forwards and close them.
Installing
XFold covers ;backwards.
XPull handle ?backwards.
Red pin =protrudes from the adjuster lever.
XInsert head restraint :into the brackets.
The head restraint must engage on both
sides.
XPress down red pin =.
If the pin can be pressed down and is then no longer visible, the head restraint has engaged
correctly.
XFold covers ;forwards and close them.
The head restraint folds into position auto-
matically.
Moving the front-passenger seat into
the normal position
Adjusting from the rear compartment
You can use the override button to disable this
function (Ypage 67).
The head restraint must be installed, in order for
the front-passenger seat to be moved into the
normal position (
Ypage 113).
The SmartKey must be in the ignition lock and in
position 1or 2, in order for the front-passenger
seat to be selected (
Ypage 162).
XTo select the front-passenger seat: press
button :repeatedly until the indicator lamp
in the button lights up.
The front-passenger seat is selected if the
indicator lamp in the button lights up.
XPress button =backwards and hold it in this
position.
The front-passenger seat moves into the nor-
mal adjustment range at the threshold of the
area for chauffeur mode. The head restraint
folds into position.
If you continue to hold down button =, the
seat continues to move backwards.
Seats113
Seats, steering wheel and mirrors
Z
Page 116 of 438
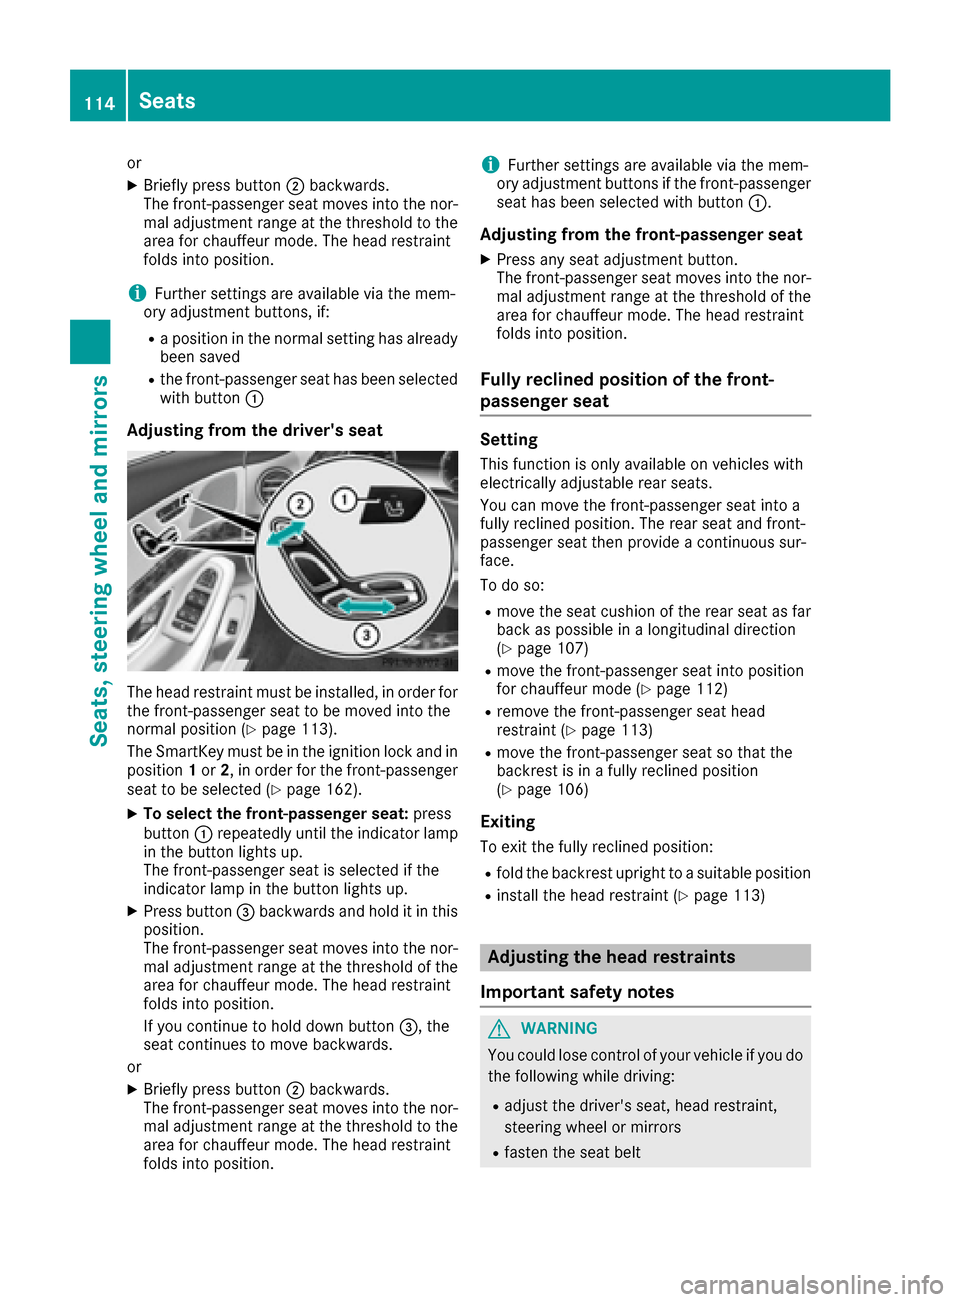
or
XBriefly press button;backwards.
The front-passenger seat moves into the nor-
mal adjustment range at the threshold to the
area for chauffeur mode. The head restraint
folds into position.
iFurther settings are available via the mem-
ory adjustment buttons, if:
Ra position in the normal setting has already been saved
Rthe front-passenger seat has been selected
with button :
Adjusting from the driver's seat
The head restraint must be installed, in order for
the front-passenger seat to be moved into the
normal position (
Ypage 113).
The SmartKey must be in the ignition lock and in
position 1or 2, in order for the front-passenger
seat to be selected (
Ypage 162).
XTo select the front-passenger seat: press
button :repeatedly until the indicator lamp
in the button lights up.
The front-passenger seat is selected if the
indicator lamp in the button lights up.
XPress button =backwards and hold it in this
position.
The front-passenger seat moves into the nor-
mal adjustment range at the threshold of the
area for chauffeur mode. The head restraint
folds into position.
If you continue to hold down button =, the
seat continues to move backwards.
or
XBriefly press button ;backwards.
The front-passenger seat moves into the nor-
mal adjustment range at the threshold to the
area for chauffeur mode. The head restraint
folds into position.
iFurther settings are available via the mem-
ory adjustment buttons if the front-passenger
seat has been selected with button :.
Adjusting from the front-passenger seat
XPress any seat adjustment button.
The front-passenger seat moves into the nor-
mal adjustment range at the threshold of the
area for chauffeur mode. The head restraint
folds into position.
Fully reclined position of the front-
passenger seat
Setting
This function is only available on vehicles with
electrically adjustable rear seats.
You can move the front-passenger seat into a
fully reclined position. The rear seat and front-
passenger seat then provide a continuous sur-
face.
To do so:
Rmove the seat cushion of the rear seat as far
back as possible in a longitudinal direction
(
Ypage 107)
Rmove the front-passenger seat into position
for chauffeur mode (Ypage 112)
Rremove the front-passenger seat head
restraint (Ypage 113)
Rmove the front-passenger seat so that the
backrest is in a fully reclined position
(
Ypage 106)
Exiting
To exit the fully reclined position:
Rfold the backrest upright to a suitable position
Rinstall the head restraint (Ypage 113)
Adjusting the head restraints
Important safety notes
GWARNING
You could lose control of your vehicle if you do the following while driving:
Radjust the driver's seat, head restraint,
steering wheel or mirrors
Rfasten the seat belt
114Seats
Seats, steering wheel and mirrors
Page 118 of 438
XTo adjust the side bolsters of the head
restraint:push or pull right and/or left-hand
side bolster :into the desired position.
iThe fore-and-aft position of the head
restraint is adjusted automatically when you
adjust the seat backrest angle using the seat
switch.
Adjusting the front head restraints elec-
trically
The height and fore-and-aft position of the front
head restraints can be adjusted with the seat
adjustment switch (
Ypage 106).
Adjusting the rear seat head restraints
Lowering the rear seat head restraints
electrically from the front
XTurn the SmartKey to position 1or 2in the
ignition lock (Ypage 162).
XBriefly press button :.
The head restraints lower.
iIf all of the rear seat head restraints are low-
ered and button :is pressed again, the outer
rear head restraints move into the last stored
position.
Extending the outer rear seat head
restraints from the front electrically
This function is available on vehicles with elec-
trically adjustable rear seats.
XTurn the SmartKey to position 1or 2in the
ignition lock (Ypage 162).
XPress and hold button :until the head
restraints have extended upwards.
Extending the outer rear head restraints
into the last stored position
This function is available on vehicles with elec-
trically adjustable rear seats.
XTurn the SmartKey to position 1or 2in the
ignition lock (Ypage 162).
XBriefly press button :.
The head restraints lower.
XBriefly press button :again.
The head restraints move to the last stored
position.
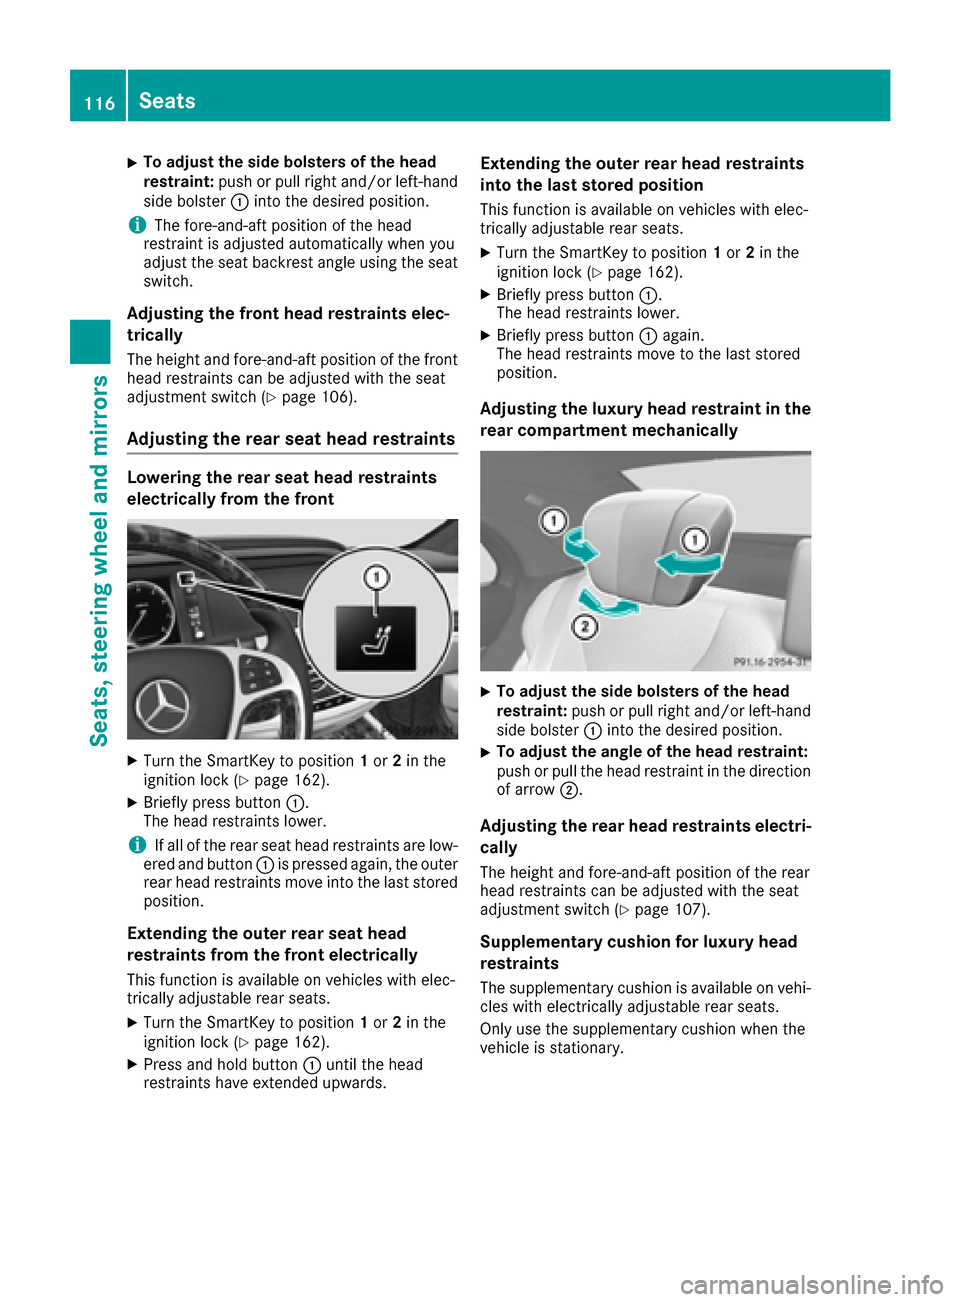
Adjusting the luxury head restraint in the
rear compartment mechanically
XTo adjust the side bolsters of the head
restraint: push or pull right and/or left-hand
side bolster :into the desired position.
XTo adjust the angle of the head restraint:
push or pull the head restraint in the direction
of arrow ;.
Adjusting the rear head restraints electri-
cally
The height and fore-and-aft position of the rear
head restraints can be adjusted with the seat
adjustment switch (
Ypage 107).
Supplementary cushion for luxury head
restraints
The supplementary cushion is available on vehi-
cles with electrically adjustable rear seats.
Only use the supplementary cushion when the
vehicle is stationary.
116Seats
Seats, steering wheel and mirrors