2016 MERCEDES-BENZ S-Class SEDAN air condition
[x] Cancel search: air conditionPage 363 of 438
!If the SmartKey is within the rear detection
range of KEYLESS-GO, the following situa-
tions, for example, could lead to the uninten-
tional opening of the trunk:
Rusing a car wash
Rusing a power washer
Make sure that the SmartKey is at least 10 ft
(3 m) away from the vehicle.
Cleaning the paintwork
!Do not affix:
Rstickers
Rfilms
Rmagnetic plates or similar items
to painted surfaces. You could otherwise
damage the paintwork.
Scratches, corrosive deposits, areas affected by corrosion and damage caused by inadequate
care cannot always be completely repaired. In
such cases, visit a qualified specialist workshop.
XRemove dirt immediately, where possible,
while avoiding rubbing too hard.
XSoak insect remains with insect remover and
rinse off the treated areas afterwards.
XSoak bird droppings with water and rinse off
the treated areas afterwards.
XRemove coolant, brake fluid, tree resin, oils,
fuels and greases by rubbing gently with a
cloth soaked in petroleum ether or lighter
fluid.
XUse tar remover to remove tar stains.
XUse silicone remover to remove wax.
If water no longer forms "beads" on the paint
surface, use the paint care products recommen-
ded and approved by Mercedes-Benz. This is the
case approximately every three to five months,
depending on the climate conditions and the
care product used.
If dirt has penetrated the paint surface or if the
paint has become dull, the paint cleaner recom-
mended and approved by Mercedes-Benz
should be used.
Do not use these care products in the sun or on
the hood while the hood is hot.
XUse a suitable touch-up stick, e.g. MB Touch-
Up Stick, to repair slight damage to the paint-
work quickly and provisionally.
Matte finish care
!Never polish the vehicle or the light alloy
wheels. Polishing causes the finish to shine.
!The following may cause the paint to
become shiny and thus reduce the matte
effect:
Rstrong rubbing of the paintwork with
unsuitable materials
Rfrequent use of automatic car washes
Rwashing the vehicle in direct sunlight
!Never use paint cleaner, buffing or polishing
products, or gloss preserver, e.g. wax. These
products are only suitable for high-gloss sur-
faces. Their use on vehicles with matte finish
leads to considerable surface damage (shiny,
mottled areas).
Always have paintwork repairs carried out at a
qualified specialist workshop.
!Do not use wash programs with a hot wax
treatment under any circumstances.
Observe these notes if your vehicle has a clear
matte finish. This will help you to avoid damage
to the paintwork due to incorrect treatment.
These notes also apply to light alloy wheels with a clear matte finish.
The vehicle should preferably be washed by
hand using a soft sponge, car shampoo and
plenty of water.
Use only insect remover and car shampoo from
the range of approved Mercedes-Benz care
products.
Cleaning the vehicle parts
Cleaning the wheels
GWARNING
The water jet from a circular jet nozzle (dirt
blasters) can cause invisible exterior damage
to the tires or chassis components. Compo-
nents damaged in this way may fail unexpect-
edly. There is a risk of an accident.
Do not use power washers with circular jet
nozzles to clean the vehicle. Have damaged
tires or chassis components replaced imme-
diately.
Care361
Maintenance and care
Z
Page 377 of 438
ing the vehicle or charging the battery, gasescan escape from the battery. There is a risk of
an explosion.
Allow the frozen battery to thaw out before
charging it or jump-starting.
!Only use battery chargers with a maximum
charging voltage of 14.8 V.
All vehicles:
!Only charge the battery using the jump-
starting connection point.
The jump-starting connection point is in the
engine compartment (
Ypage 376).
XOpen the hood.
XConnect the battery charger to the positive
terminal and ground point in the same order
as when connecting the donor battery in the
jump-starting procedure (
Ypage 376).
Keep away from fire and open flames. Do not
lean over a battery. Never charge the battery if it
is still installed in the vehicle, unless you use a
battery charger which has been tested and
approved by Mercedes-Benz. A battery charger
unit specially adapted for Mercedes-Benz vehi-
cles and tested and approved by Mercedes-
Benz is available as an accessory. It permits the
charging of the battery in its installed position.
Contact an authorized Mercedes-Benz Center
for further information and availability. Read the
battery charger's operating instructions before
charging the battery.
All vehicles except Mercedes-AMG vehicles:
if the indicator/warning lamps in the instrument
cluster do not light up at low temperatures, it is
very likely that the discharged battery has fro-
zen. In this case you may neither jump-start the
vehicle nor charge the battery. The service life of
a thawed-out battery may be shorter. The start-
ing characteristics can be impaired, particularly
at low temperatures. Have the thawed- out bat
-
tery checked at a qualified specialist workshop.
Mercedes-AMG vehicles: at low temperatures,
do not charge a battery which has been removed
using a battery charger. Allow the battery to
warm up gently first, if necessary. Otherwise,
the service life can be shortened and the start-
ing characteristics impaired, especially at low
temperatures.
PLUG-IN HYBRID vehicles: if the battery
charge is sufficient, the high-voltage battery can
also supply the 12 V battery. This only happens if the condition of charge of the 12 V battery
requires this, e.g. after using electrical consum-
ers for an extended period with the engine
switched off. As the on-board voltage is contin-
uously monitored this can also be performed
when the engine is switched off. The condition of
charge of the 12 V battery and the on-board
voltage are thereby kept stable for a longer
period.
Battery (vehicle)375
Breakdown assistance
Z
Page 389 of 438
To avoid hazardous situations:
Rnever install snow chains to the front
wheels
Ralways install snow chains in pairs to the
rear wheels.
For safety reasons, Mercedes-Benz recom-
mends that you only use snow chains that have
been specially approved for your vehicle by
Mercedes-Benz, or are of a corresponding
standard of quality.
If you intend to mount snow chains, please bear
the following points in mind:
RSnow chains may not be mounted on all
wheel/tire combinations. Permissible wheel-
tire combinations (
Ypage 410).
ROnly use snow chains when driving on roads
completely covered by snow. Remove the
snow chains as soon as possible when you
come to a road that is not snow-covered.
RLocal regulations may restrict the use of snow
chains. Observe the appropriate regulations if
you wish to mount snow chains.
RDo not exceed the maximum permissible
speed of 31 mph (50 km/h).
ROn vehicles with AIRMATIC (Ypage 212) or
Magic Body Control (MBC) (Ypage 210), you
must drive at raised vehicle level if snow
chains have been mounted.
RWhen snow chains are installed, never use
Active Parking Assist (Ypage 216).
You may wish to deactivate ESP®when pulling
away with snow chains installed (Ypage 74).
You can thereby allow the wheels to spin in a
controlled manner, achieving an increased driv- ing force (cutting action).
Tire pressure
Tire pressure specifications
Important safety notes
GWARNING
Underinflated or overinflated tires pose the
following risks:
Rthe tires may burst, especially as the load
and vehicle speed increase.
Rthe tires may wear excessively and/or
unevenly, which may greatly impair tire
traction.
Rthe driving characteristics, as well as steer-
ing and braking, may be greatly impaired.
There is a risk of an accident.
Follow recommended tire inflation pressures
and check the pressure of all the tires includ-
ing the spare wheel:
Rmonthly, at least
Rif the load changes
Rbefore beginning a long journey
Runder different operating conditions, e.g.
off-road driving
If necessary, correct the tire pressure.
The data on the Tire and Loading Information
placard and tire pressure table shown here are
examples. Tire pressure specifications are vehi-
cle-specific and may deviate from the data
shown here. The tire pressure specifications
that are valid for your vehicle can be found on
the Tire and Loading Information placard and
tire pressure table on the vehicle.
General notes
The recommended tire pressures for the tires
mounted at the factory can be found on the
labels described here.
Further information on tire pressures can be
obtained at a qualified specialist workshop.
Tire pressure387
Wheels and tires
Z
Page 391 of 438
Important notes on tire pressure
GWARNING
If th etire pressur edrops repeatedly, th e
wheel, valv eor tire may be damaged. Tir e
pressur ethat is to olow may result in atire
blow-out .Ther eis aris kof an accident.
RChec kth etire for foreign objects .
RCheckwhether th ewhee lis losing air or th e
valv eis leaking .
If you are unable to rectify th edamage, con-
tac t a qualified specialist workshop.
GWARNIN G
If you fit unsuitable accessories onto tire
valves, th etire valves may be overloaded and
malfunction ,whic hcan caus etire pressur e
loss .Due to their design ,retrofitte dtire pres-
sur emonitors keep th etire valv eopen .This
can also result in tire pressur eloss .Ther eis a
ris kof an accident.
Only screw th estandard valv ecap or other
valv ecap sapprove dby Mercedes-Ben zfor
your vehicl eonto th etire valve.
Use asuitable pressur egauge to chec kth etire
pressure. The outer appearanc eof atire does
no tpermit any reliable conclusio nabout th etire
pressure. On vehicles equipped wit hth eelec -
tronic tire pressur emonitor, th etire pressur e
can be checke din th eon-board computer.
The tire temperature and pressur eincreas e
when th evehicl eis in motion .This is dependen t
on th edriving spee dand th eload.
Therefore, you should only correc ttire pres-
sures when th etires are cold.
The tires are cold:
Rif th evehicl ehas been parked wit hth etires
out of direct sunligh tfor at least three hour s
and
Rif th evehicl ehas no tbeen driven further than
1 mile (1. 6km)
The tire temperature changes depending on th e
outside temperature, th evehicl espee dand th e
tire l
oad. If th etire temperature changes by
18 ‡(10 †), th etire pressur echanges by
approximately 10 kP a(0. 1bar/1.5 psi) .Tak e
this int oaccoun twhen checkin gth epressur eof
warm tires .Only correc tth etire pressur eif it is to
olow for th ecurren toperating conditions. If
you chec kth etire pressur ewhen th etires are
warm ,th eresulting value will be higher than if
th etires were cold. This is normal. Do no t
reduce th etire pressur eto th evalue specifie d
for cold tires .The tire pressur ewould otherwise
be to olow.
Observ eth erecommended tire pressures for
cold tires :
Ron theTir eand Loading Information placard
on th eB-pillar on th edriver' sside
Rin th etire pressur etable on th efuel filler flap
(Ypage 189)
Underinflated or overinflated tires
Underinflated tires
GWARNIN G
Tires wit hpressur ethat is to olow can over-
heat and burs tas aconsequence .In addition ,
they also suffer from excessiv eand/o rirreg-
ular wear ,whic hcan severely impair th ebrak -
ing properties and th edriving characteristics .
Ther eis aris kof an accident.
Avoid tire pressures that are to olow in all th e
tires ,includin gth espar ewheel.
Underinflated tires may:
Roverheat, leadin gto tire defects
Radversely affec thandlin g
Rwear excessively and/o runevenly
Rhav ean adverse effec ton fuel consumption
Overinflated tires
GWARNIN G
Tires wit hexcessively high pressur ecan burs t
because they are damaged mor eeasil yby
road debris, pothole setc. In addition ,they
also suffer from irregular wear ,whic hcan
severely impair th ebraking properties and th e
driving characteristics .Ther eis aris kof an
accident.
Avoid tire pressures that are to ohigh in all th e
tires ,includin gth espar ewheel.
Tire pressure389
Wheels and tires
Z
Page 396 of 438
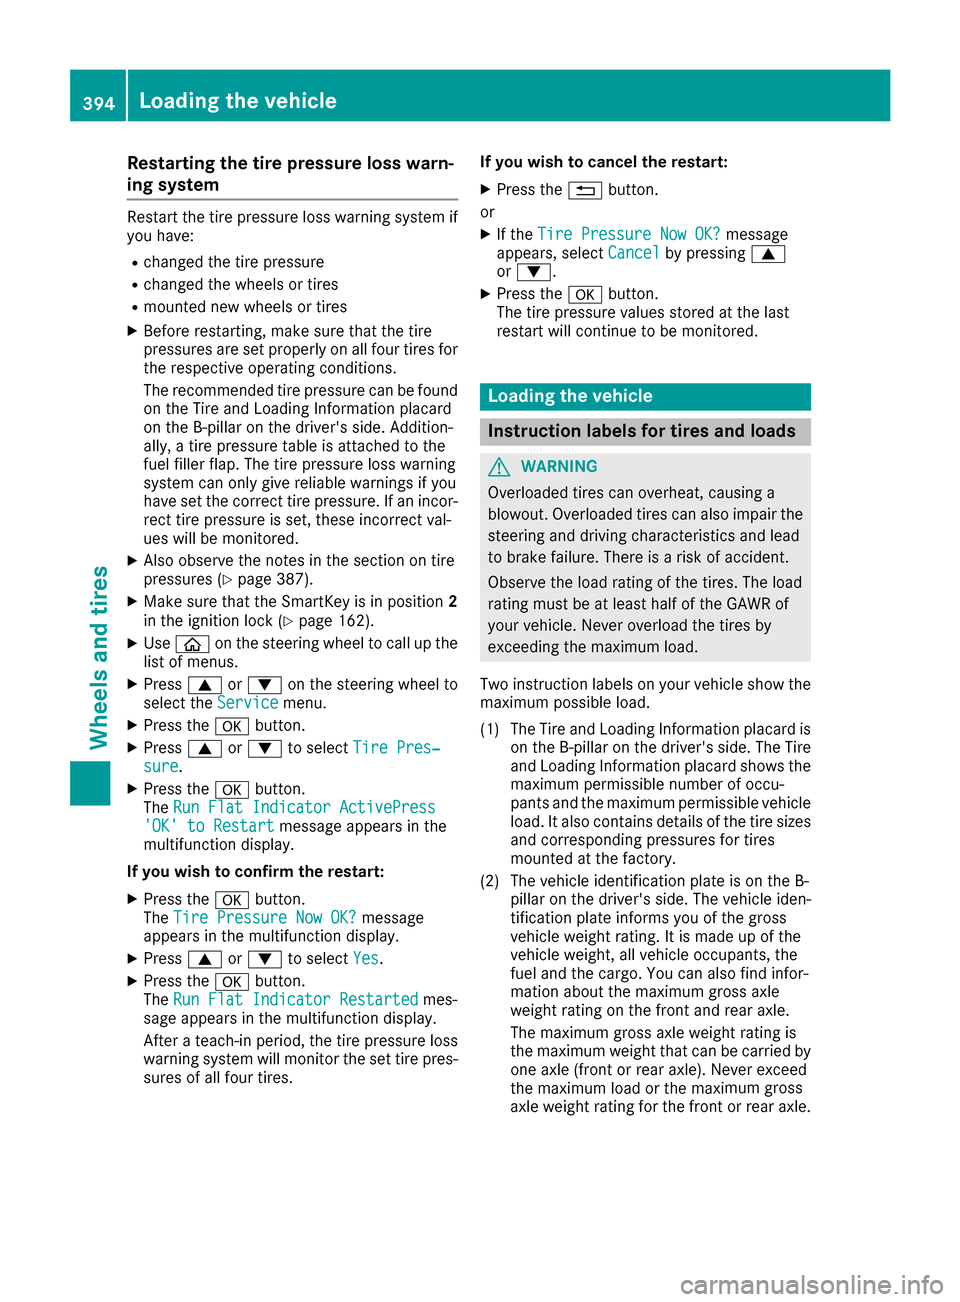
Restarting the tire pressure loss warn-
ing system
Restart the tire pressure loss warning system if
you have:
Rchanged the tire pressure
Rchanged the wheels or tires
Rmounted new wheels or tires
XBefore restarting, make sure that the tire
pressures are set properly on all four tires for
the respective operating conditions.
The recommended tire pressure can be foundon the Tire and Loading Information placard
on the B-pillar on the driver's side. Addition-
ally, a tire pressure table is attached to the
fuel filler flap. The tire pressure loss warning
system can only give reliable warnings if you
have set the correct tire pressure. If an incor-
rect tire pressure is set, these incorrect val-
ues will be monitored.
XAlso observe the notes in the section on tire
pressures (Ypage 387).
XMake sure that the SmartKey is in position 2
in the ignition lock (Ypage 162).
XUse ò on the steering wheel to call up the
list of menus.
XPress 9or: on the steering wheel to
select the Servicemenu.
XPress theabutton.
XPress 9or: to select Tire Pres‐sure.
XPress the abutton.
The Run Flat Indicator ActivePress
'OK' to Restartmessage appears in the
multifunction display.
If you wish to confirm the restart:
XPress the abutton.
The Tire Pressure Now OK?message
appears in the multifunction display.
XPress 9or: to select Yes.
XPress the abutton.
The Run Flat Indicator Restartedmes-
sage appears in the multifunction display.
After a teach-in period, the tire pressure loss
warning system will monitor the set tire pres- sures of all four tires. If you wish to cancel the restart:
XPress the
%button.
or
XIf the Tire Pressure Now OK?message
appears, select Cancelby pressing9
or :.
XPress the abutton.
The tire pressure values stored at the last
restart will continue to be monitored.
Loading the vehicle
Instruction labels for tires and loads
GWARNING
Overloaded tires can overheat, causing a
blowout. Overloaded tires can also impair the steering and driving characteristics and lead
to brake failure. There is a risk of accident.
Observe the load rating of the tires. The load
rating must be at least half of the GAWR of
your vehicle. Never overload the tires by
exceeding the maximum load.
Two instruction labels on your vehicle show the maximum possible load.
(1) The Tire and Loading Information placard is on the B-pillar on the driver's side. The Tire
and Loading Information placard shows the
maximum permissible number of occu-
pants and the maximum permissible vehicle
load. It also contains details of the tire sizes
and corresponding pressures for tires
mounted at the factory.
(2) The vehicle identification plate is on the B- pillar on the driver's side. The vehicle iden-
tification plate informs you of the gross
vehicle weight rating. It is made up of the
vehicle weight, all vehicle occupants, the
fuel and the cargo. You can also find infor-
mation about the maximum gross axle
weight rating on the front and rear axle.
The maximum gross axle weight rating is
the maximum weight that can be carried by
one axle (front or rear axle). Never exceed
the maximum load or the maxi mum g
ross
axle weight rating for the front or rear axle.
394Loading the vehicle
Wheels and tires
Page 406 of 438

GVWR (Gross Vehicle Weight Rating)
The GVWR is the maximum permissible gross
weight of a fully loaded vehicle (the weight of thevehicle including all accessories, occupants,
fuel, luggage and the drawbar noseweight, if
applicable). The gross vehicle weight rating is
specified on the vehicle identification plate on
the B-pillar on the driver's side.
Maximum loaded vehicle weight
The maximum weight is the sum of:
Rthe curb weight of the vehicle
Rthe weight of the accessories
Rthe load limit
Rthe weight of the factory installed optional
equipment
Kilopascal (kPa)
Metric unit for tire pressure. 6.9 kPa corre-
sponds to 1 psi. Another unit for tire pressure is
bar. 100 kilopascals (kPa) are the equivalent of
1 bar.
Load index
In addition to the load-bearing index, the load
index may also be imprinted on the sidewall of
the tire. This specifies the load-bearing capacity
more precisely.
Curb weight
The weight of a vehicle with standard equipment
including the maximum capacity of fuel, oil and
coolant. It also includes the air-conditioning sys-
tem and optional equipment if these are instal-
led in the vehicle, but does not include passen-
gers or luggage.
Maximum load rating
The maximum tire load is the maximum permis-
sible weight in kilograms or lbs for which a tire is
approved.
Maximum permissible tire pressure
Maximum permissible tire pressure for one tire.
Maximum load on one tire
Maximum load on one tire. This is calculated bydividing the maximum axle load of one axle by
two.
PSI (pounds per square inch)
A standard unit of measure for tire pressure.
Aspect ratio
Relationship between tire height and tire width
in percent.
Tire pressure
This is pressure inside the tire applying an out-
ward force to each square inch of the tire's sur-
face. The tire pressure is specified in pou
nds per
square inch (psi), in kilopascal (kPa) or in bar.
The tire pressure should only be corrected when
the tires are cold.
Cold tire pressure
The tires are cold:
Rif the vehicle has been parked with the tires
out of direct sunlight for at least three hours
and
Rif the vehicle has not been driven further than
1 mile (1.6 km)
Tread
The part of the tire that comes into contact with
the road.
Bead
The tire bead ensures that the tire sits securely
on the wheel. There are several steel wires in the
bead to prevent the tire from coming loose from
the wheel rim.
Sidewall
The part of the tire between the tread and the
bead.
Weight of optional extras
The combined weight of those optional extras
that weigh more than the replaced standard
parts and more than 5 lbs (2.3 kg). These
optional extras, such as high-performance
brakes, level control, a roof rack or a high-per-
formance battery, are not included in the curb
weight and the weight of the accessories.
TIN (Tire Identification Number)
This is a unique identifier which can be used by
a tire manufacturer to identify tires, for example
for a product recall, and thus identify the pur-
chasers. The TIN is made up of the manufactur- er's identity code, tire size, tire type code and
the manufacturing date.
404All about wheels and tires
Wheels and tires
Page 407 of 438
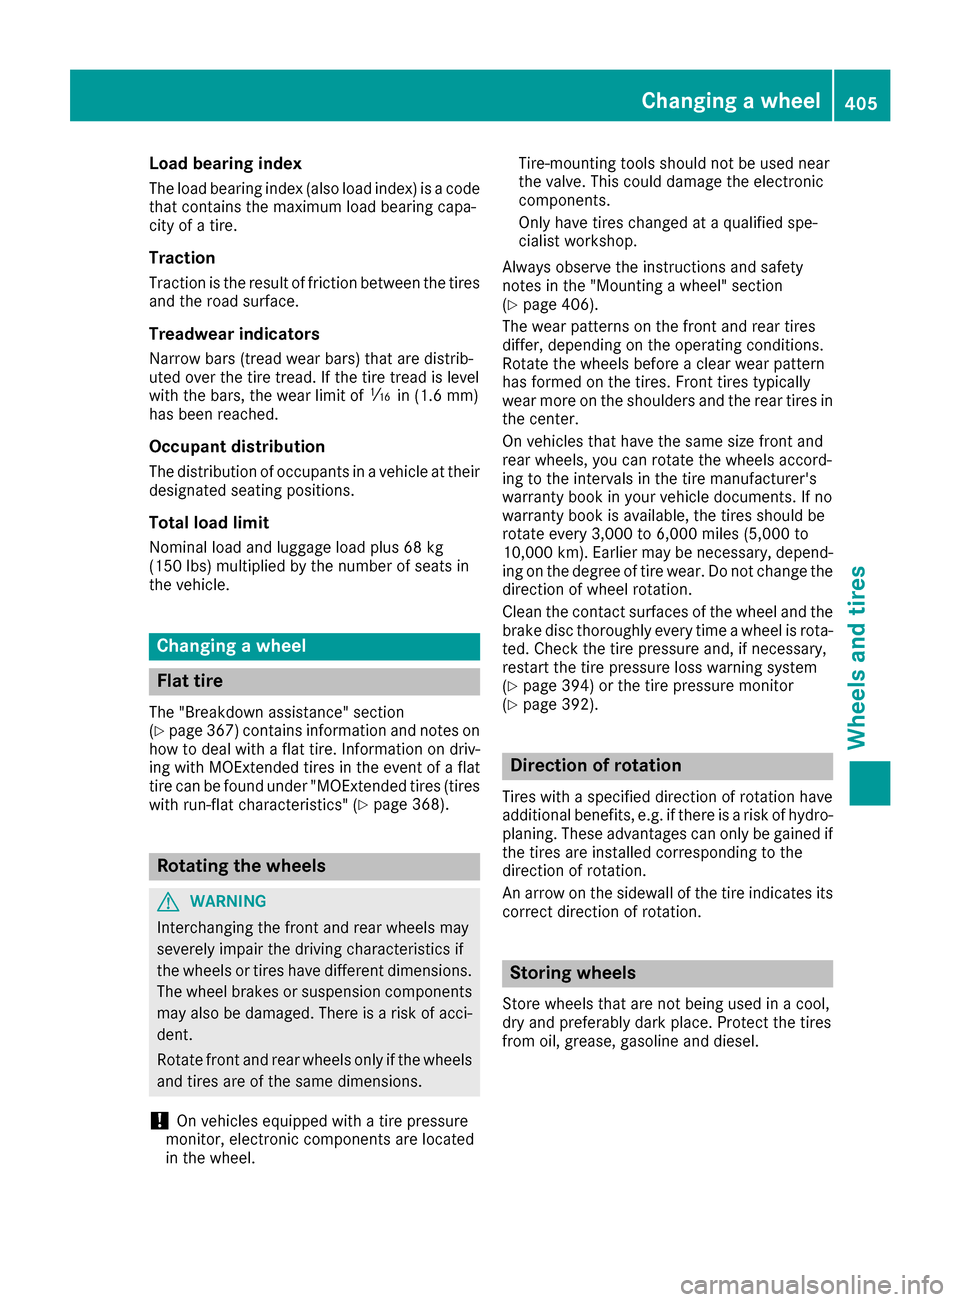
Load bearing index
The load bearing index (also load index) is a code
that contains the maximum load bearing capa-
city of a tire.
Traction
Traction is the result of friction between the tires
and the road surface.
Treadwear indicators
Narrow bars (tread wear bars) that are distrib-
uted over the tire tread. If the tire tread is level
with the bars, the wear limit ofáin (1.6 mm)
has been reached.
Occupant distribution
The distribution of occupants in a vehicle at their
designated seating positions.
Total load limit
Nominal load and luggage load plus 68 kg
(15 0lbs) multiplied by the number of seats in
the vehicle.
Changing a wheel
Flat tire
The "Breakdown assistance" section
(Ypage 367) contains information and notes on
how to deal with a flat tire. Information on driv-
ing with MOExtended tires in the event of a flat
tire can be found under "MOExtended tires (tires
with run-flat characteristics" (
Ypage 368).
Rotating the wheels
GWARNING
Interchanging the front and rear wheels may
severely impair the driving characteristics if
the wheels or tires have different dimensions. The wheel brakes or suspension components
may also be damaged. There is a risk of acci-
dent.
Rotate front and rear wheels only if the wheels and tires are of the same dimensions.
!On vehicles equipped with a tire pressure
monitor, electronic components are located
in the wheel. Tire-mounting tools should not be used near
the valve. This could damage the electronic
components.
Only have tires changed at a qualified spe-
cialist workshop.
Always observe the instructions and safety
notes in the "Mounting a wheel" section
(
Ypage 406).
The wear patterns on the front and rear tires
differ, depending on the operating conditions.
Rotate the wheels before a clear wear pattern
has formed on the tires. Front tires typically
wear more on the shoulders and the rear tires in
the center.
On vehicles that have the same size front and
rear wheels, you can rotate the wheels accord-
ing to the intervals in the tire manufacturer's
warranty book in your vehicle documents. If no
warranty book is available, the tires should be
rotate every 3,000 to 6,000 miles (5,000 to
10,000 km). Earlier may be necessary, depend-
ing on the degree of tire wear. Do not change the
direction of wheel rotation.
Clean the contact surfaces of the wheel and the
brake disc thoroughly every time a wheel is rota-
ted. Check the tire pressure and, if necessary,
restart the tire pressure loss warning system
(
Ypage 394) or the tire pressure monitor
(Ypage 392).
Direction of rotation
Tires with a specified direction of rotation have
additional benefits, e.g. if there is a risk of hydro- planing. These advantages can only be gained if
the tires are installed corresponding to the
direction of rotation.
An arrow on the sidewall of the tire indicates its
correct direction of rotation.
Storing wheels
Store wheels that are not being used in a cool,
dry and preferably dark place. Protect the tires
from oil, grease, gasoline and diesel.
Changing a wheel405
Wheels and tires
Z
Page 434 of 438
spray nozzles may otherwise become
blocked.
At temperatures above freezing:
XFill the washer fluid reservoir with a mixture of
water and windshield washer fluid, e.g. MB
SummerFit.
Add 1 part MB SummerFit to 100 parts water.
At temperatures below freezing:
XFill the washer fluid reservoir with a mixture of
water and washer fluid, e.g. MB WinterFit.
For the correct mixing ratio refer to the infor-
mation on the antifreeze reservoir.
iAdd windshield washer fluid, e.g. MB Sum-
merFit or MB WinterFit, to the washer fluid all
year round.
Climate control system refrigerant
Important safety notes
The climate control system of your vehicle is fil-
led with refrigerant R‑134a.
The instruction label regarding the refrigerant
type used can be found on the radiator cross
member.
!Only the refrigerant R‑134a and the PAG oil
approved by Mercedes-Benz may be used.
The approved PAG oil may not be mixed with
any other PAG oil that is not approved for
R-134a refrigerant. Otherwise, the climate
control system may be damaged.
Service work, such as topping up refrigerant or
replacing components, may only be carried out
by a qualified specialist workshop. All applicable
regulations, as well as SAE standard J639, must
be adhered to.
Always have work on the climate control system
carried out at a qualified specialist workshop.
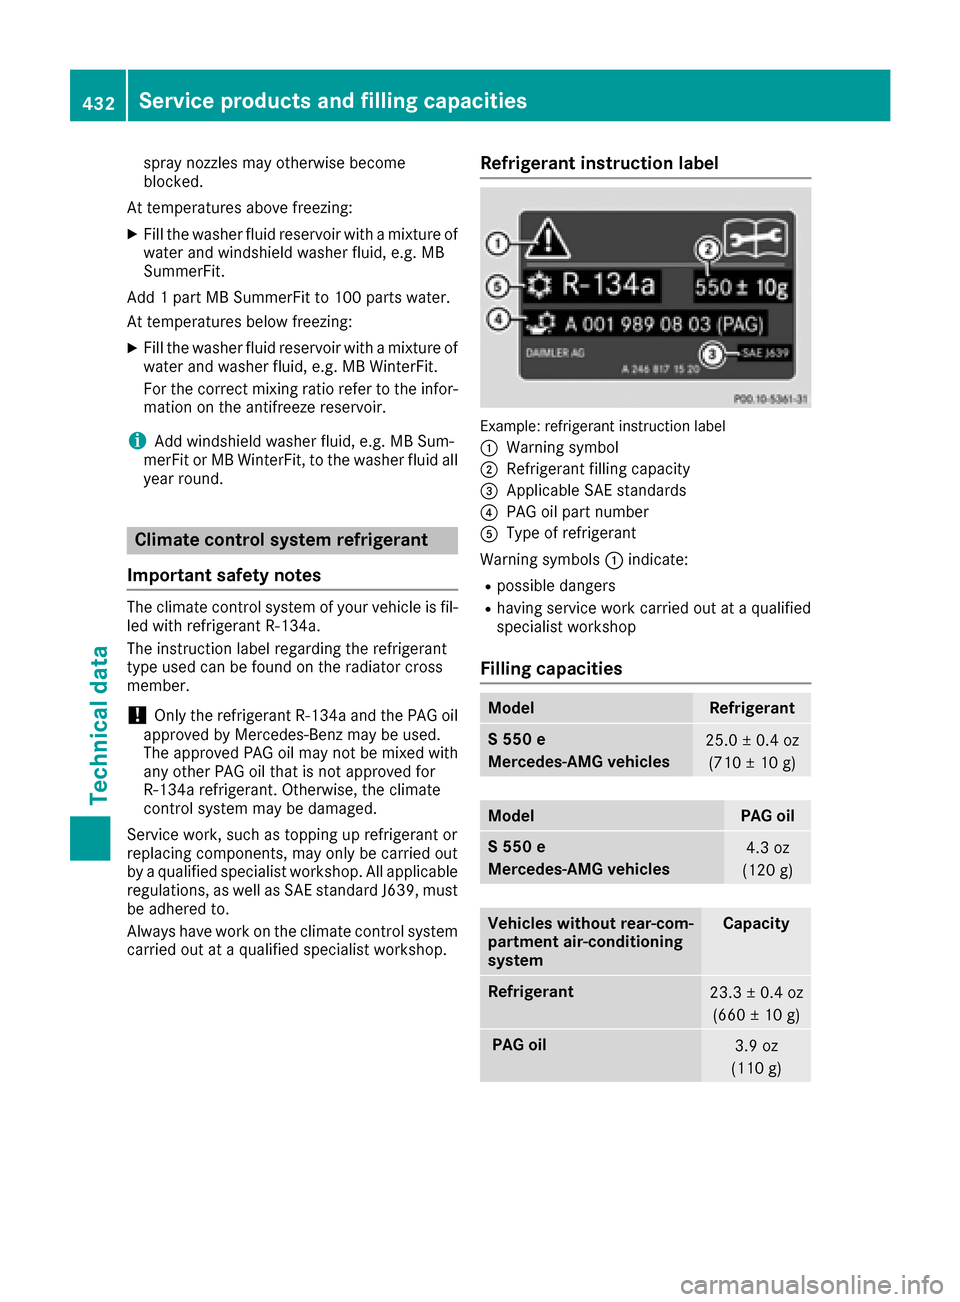
Refrigerant instruction label
Example: refrigerant instruction label
:
Warning symbol
;Refrigerant filling capacity
=Applicable SAE standards
?PAG oil part number
AType of refrigerant
Warning symbols :indicate:
Rpossible dangers
Rhaving service work carried out at a qualified
specialist workshop
Filling capacities
ModelRefrigerant
S 550 e
Mercedes‑AMG vehicles25.0 ± 0.4 oz
(710 ± 10 g)
ModelPAG oil
S 550 e
Mercedes‑AMG vehicles4.3 oz
(120 g)
Vehicles without rear-com-
partment air-conditioning
systemCapacity
Refrigerant23.3 ± 0.4 oz (660 ± 10 g)
PAG oil3.9 oz
(110 g)
432Service products and filling capacities
Technical data