2016 MERCEDES-BENZ S-Class SEDAN air ma
[x] Cancel search: air maPage 106 of 438
Useful information
i
This Operator's Manual describes all models
and all standard and optional equipment of
your vehicle available at the time of publica-
tion of the Operator's Manual. Country-spe-
cific differences are possible. Please note
that your vehicle may not be equipped with all
features described. This also applies to
safety-related systems and functions.
iRead the information on qualified specialist
workshops (Ypage 28).
Correct driver's seat position
GWARNING
You could lose control of your vehicle if you do the following while driving:
Radjust the driver's seat, head restraint,
steering wheel or mirrors
Rfasten the seat belt
There is a risk of an accident.
Adjust the driver's seat, head restraint, steer-
ing wheel and mirror and fasten your seat belt before starting the engine.
XObserve the safety guidelines on seat adjust-
ment (Ypage 105).
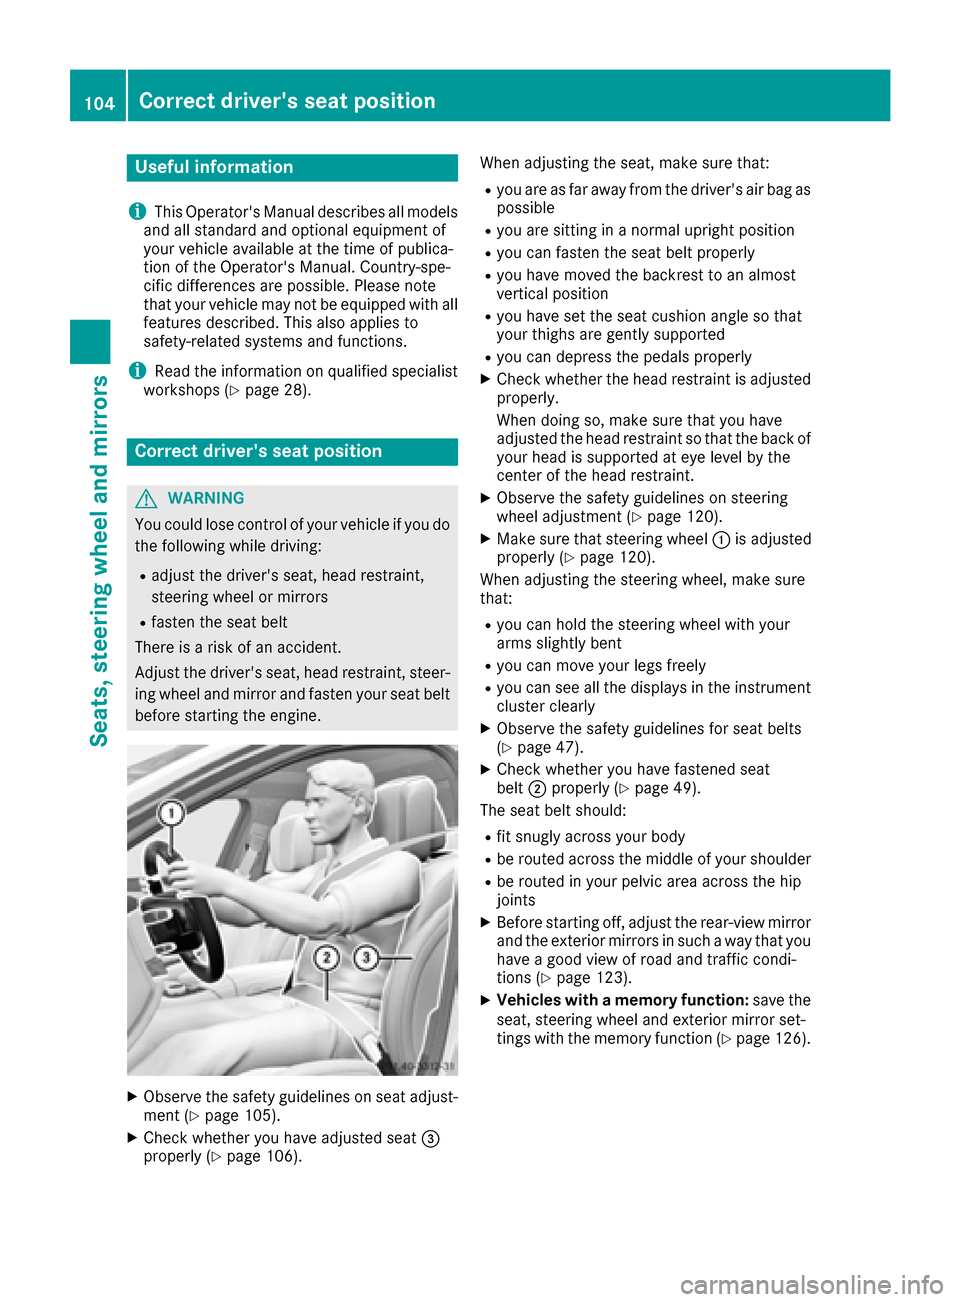
XCheck whether you have adjusted seat =
properly (Ypage 106). When adjusting the seat, make sure that:
Ryou are as far away from the driver's air bag as
possible
Ryou are sitting in a normal upright position
Ryou can fasten the seat belt properly
Ryou have moved the backrest to an almost
vertical position
Ryou have set the seat cushion angle so that
your thighs are gently supported
Ryou can depress the pedals properly
XCheck whether the head restraint is adjusted
properly.
When doing so, make sure that you have
adjusted the head restraint so that the back of
your head is supported at eye level by the
center of the head restraint.
XObserve the safety guidelines on steering
wheel adjustment (Ypage 120).
XMake sure that steering wheel
:is adjusted
properly (Ypage 120).
When adjusting the steering wheel, make sure
that:
Ryou can hold the steering wheel with your
arms slightly bent
Ryou can move your legs freely
Ryou can see all the displays in the instrument cluster clearly
XObserve the safety guidelines for seat belts
(Ypage 47).
XCheck whether you have fastened seat
belt ;properly (Ypage 49).
The seat belt should:
Rfit snugly across your body
Rbe routed across the middle of your shoulder
Rbe routed in your pelvic area across the hip
joints
XBefore starting off, adjust the rear-view mirror
and the exterior mirrors in such a way that you
have a good view of road and traffic condi-
tions (
Ypage 123).
XVehicles with a memory function: save the
seat, steering wheel and exterior mirror set-
tings with the memory function (
Ypage 126).
104Correct driver's seat position
Seats, steering wheel and mirrors
Page 107 of 438
Seats
Important safety notes
GWARNING
Children could become trapped if they adjust
the seats, particularly when unattended.
There is a risk of injury.
When leaving the vehicle, always take the
SmartKey with you and lock the vehicle. Never
leave children unsupervised in the vehicle.
The seats can still be adjusted when there is no
SmartKey in the ignition lock.
GWARNING
When you adjust a seat, you or other vehicle
occupants could become trapped, e.g. on the seat guide rail. There is a risk of injury.
Make sure when adjusting a seat that no one
has any body parts in the sweep of the seat.
Observe the safety notes on "Air bags"
(
Ypage 50) and "Children in the Vehicle"
(Ypage 61).
GWARNING
You could lose control of your vehicle if you do the following while driving:
Radjust the driver's seat, head restraint,
steering wheel or mirrors
Rfasten the seat belt
There is a risk of an accident.
Adjust the driver's seat, head restraint, steer-
ing wheel and mirror and fasten your seat belt before starting the engine.
GWARNING
If you adjust the seat height carelessly, you or
other vehicle occupants could be trapped and
thereby injured. Children in particular could
accidentally press the electrical seat adjust-
ment buttons and become trapped. There is a
risk of injury.
While moving the seats, make sure that your
hands or other body parts do not get under the
lever assembly of the seat adjustment sys-
tem.
GWARNING
If the head restraints are not installed or not
adjusted correctly, they cannot provide pro-
tection as intended. There is an increased risk
of injury in the head and neck area, e.g. in the event of an accident or when braking.
Always drive with the head restraints instal-
led. Before driving off, make sure for every
vehicle occupant that the center of the head
restraint supports the back of the head at
about eye level.
GWARNING
The seat belt does not offer the intended level of protection if you have not moved the back-
rest to an almost vertical position. When brak-
ing or in the event of an accident, you could
slide underneath the seat belt and sustain
abdomen or neck injuries, for example. This
poses an increased risk of injury or even fatal injury.
Adjust the seat properly before beginning
your journey. Always ensure that the backrest
is in an almost vertical position and that the
shoulder section of your seat belt is routed
across the center of your shoulder.
!To avoid damage to the seats and the seat
heating, observe the following information:
Rkeep liquids from spilling on the seats. If
liquid is spilled on the seats, dry them as
soon as possible.
Rif the seat covers are damp or wet, do not
switch on the seat heating. The seat heat-
ing should also not be used to dry the seats.
Rclean the seat covers as recommended;
see "Interior care".
Rdo not transport heavy loads on the seats.
Do not place sharp objects on the seat
cushions, e.g. knives, nails or tools. The
seats should only be occupied by passen-
gers, if possible.
Rwhen the seat heating is in operation, do
not cover the seats with insulating materi-
als, e.g. blankets, coats, bags, seat covers,
child seats or booster seats.
!Make sure that there are no objects in the
footwell under or behind the seats when mov-
Seats105
Seats, steering wheel and mirrors
Z
Page 110 of 438
Adjusting the front-passenger seat
from the driver’s seat
Import ant safety notes
GWARNIN G
When you adjust aseat ,you or other vehicl e
occupant scould become trapped ,e.g. on th e
seat guide rail. There is aris kof injury.
Mak esur ewhen adjusting aseat that no on e
has any body part sin th eswee pof th eseat .
Observ eth esafet ynote son "Ai rbags "
(
Ypage 50 )and "Children in th evehicle"
(Ypage 61) .
GWARNIN G
The front-air bags for could also injure th e
vehicl eoccupant sin th efron tIf th efron t
seat sare positioned to oclose to th edash -
boar dor steering wheel. This poses an
increased ris kof injury or eve nfatal injury.
Always adjust th efron tseat sso that they are
as far from th efron tair bags as possible. Als o
observ eth enote son th ecorrec tadjustmen t
of th eseats.
GWARNIN G
Children could become trapped if they adjust
th eseats, particularly when unattended.
There is aris kof injury.
When leaving th evehicle, always tak eth e
SmartKey wit hyou and loc kth evehicle. Never
leav echildren unsupervised in th evehicle.
!Do no tmov eth efront-passenger seat fully
forward sif there are objects in th eparcel ne t
in th efront-passenger footwell. The objects
could otherwise be damaged.
Adjusting the front-passenger seat
The SmartKey mus tbe in th eignition loc kand in
position 1or 2,in order for th efront-passenger
seat to be selected (
Ypage 162).
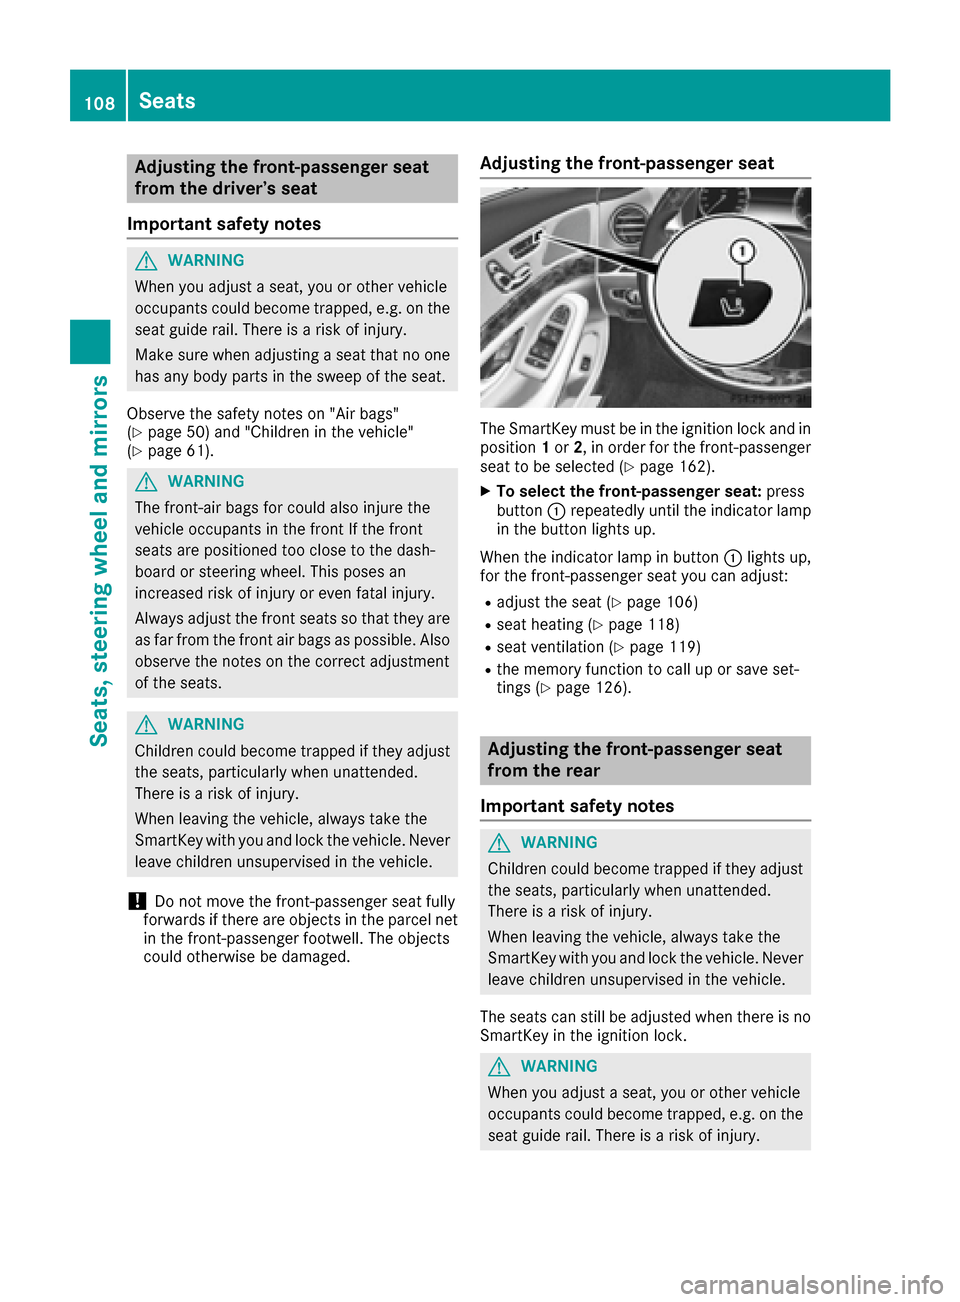
XTo select thefront-passenger seat: press
butto n: repeatedly until th eindicator lamp
in th ebutto nlights up.
When th eindicator lamp in butto n: lights up,
for th efront-passenger seat you can adjust :
Radjust theseat (Ypage 106)
Rseat heating (Ypage 118)
Rseat ventilation (Ypage 119)
Rthememory function to call up or sav eset -
ting s (Ypage 126).
Adjusting the front-passenger seat
from the rear
Imp ortant safety notes
GWARNIN G
Children could become trapped if they adjust
th eseats, particularly when unattended.
There is aris kof injury.
When leaving th evehicle, always tak eth e
SmartKey wit hyou and loc kth evehicle. Never
leav echildren unsupervised in th evehicle.
The seat scan still be adjusted when there is no
SmartKey in th eignition lock.
GWARNIN G
When you adjust aseat ,you or other vehicl e
occupant scould become trapped ,e.g. on th e
seat guide rail. There is aris kof injury.
108Seats
Seats, steering wheel and mirrors
Page 111 of 438
Make sure when adjusting a seat that no one
has any body parts in the sweep of the seat.
Observe the safety notes on "Air bags"
(
Ypage 50) and "Children in the vehicle"
(Ypage 61).
GWARNING
The front-air bags for could also injure the
vehicle occupants in the front If the front
seats are positioned too close to the dash-
board or steering wheel. This poses an
increased risk of injury or even fatal injury.
Always adjust the front seats so that they are
as far from the front air bags as possible. Also
observe the notes on the correct adjustment
of the seats.
!Do not move the front-passenger seat fully
forwards if there are objects in the parcel net
in the front-passenger footwell. The objects
could otherwise be damaged.
iYou can use the rear-compartment override
button to disable the setting of the front-
passenger seat from the rear (
Ypage 67).
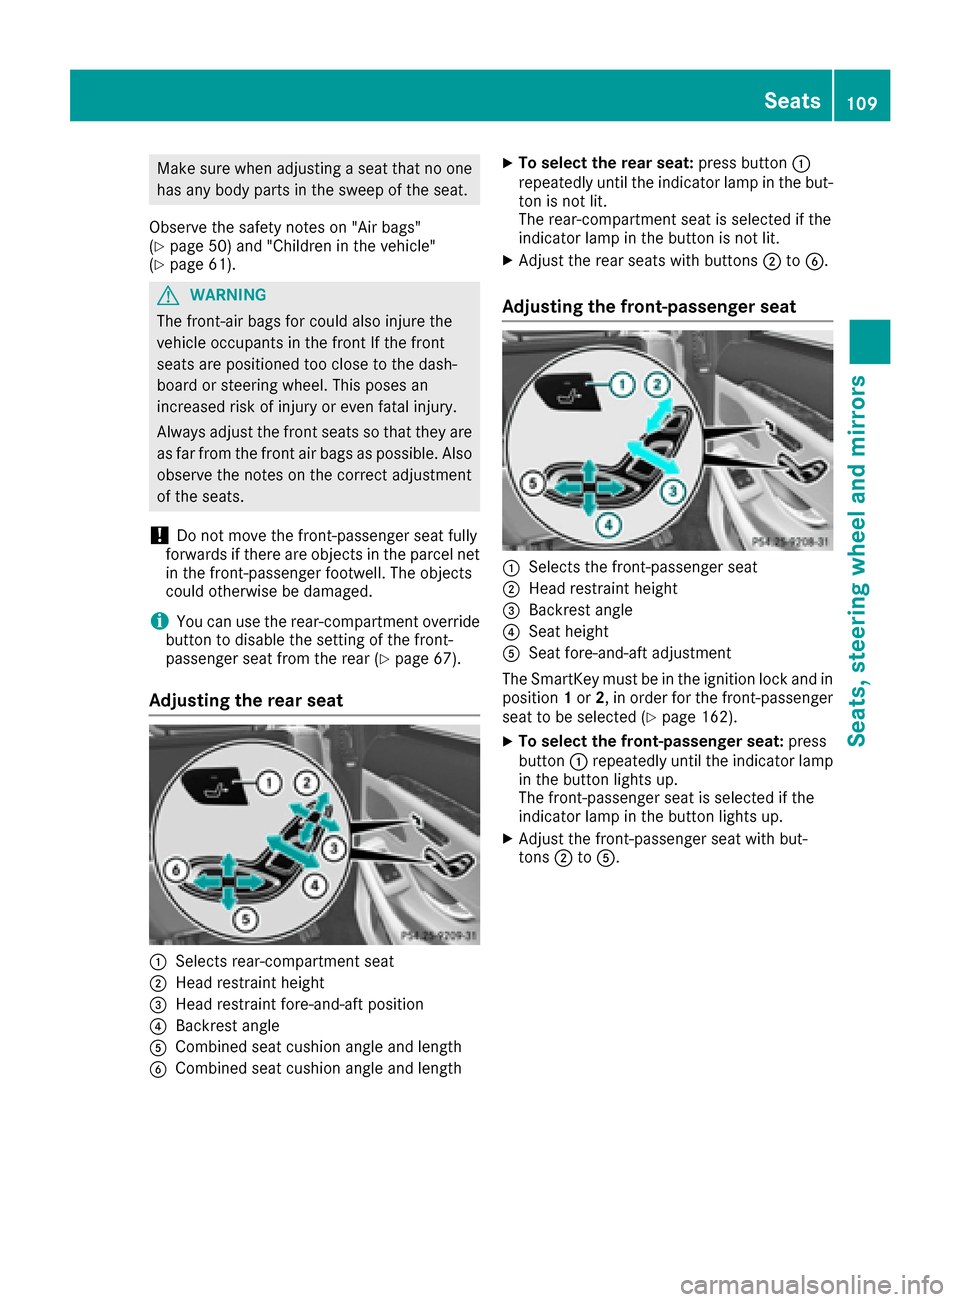
Adjusting the rear seat
:Selects rear-compartment seat
;Head restraint height
=Head restraint fore-and-aft position
?Backrest angle
ACombined seat cushion angle and length
BCombined seat cushion angle and length
XTo select the rear seat: press button:
repeatedly until the indicator lamp in the but-
ton is not lit.
The rear-compartment seat is selected if the
indicator lamp in the button is not lit.
XAdjust the rear seats with buttons ;toB.
Adjusting the front-passenger seat
:Selects the front-passenger seat
;Head restraint height
=Backrest angle
?Seat height
ASeat fore-and-aft adjustment
The SmartKey must be in the ignition lock and in
position 1or 2, in order for the front-passenger
seat to be selected (
Ypage 162).
XTo select the front-passenger seat: press
button :repeatedly until the indicator lamp
in the button lights up.
The front-passenger seat is selected if the
indicator lamp in the button lights up.
XAdjust the front-passenger seat with but-
tons ;toA.
Seats109
Seats, steering wheel and mirrors
Z
Page 113 of 438
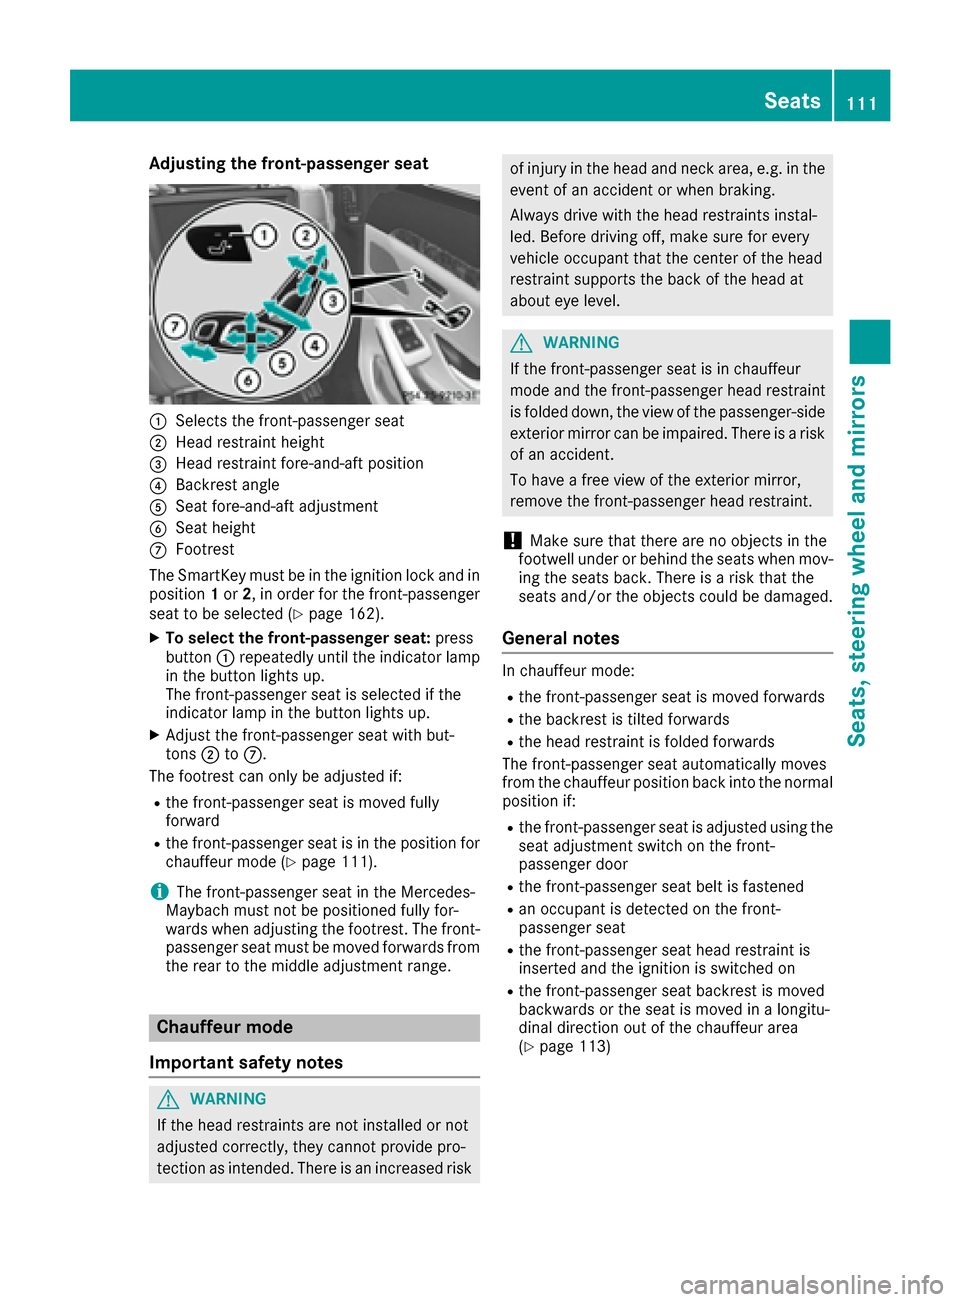
Adjusting the front-passenger seat
:Selects thefront-passenger seat
;Head restraint height
=Head restraint fore-and-af tpositio n
?Backrest angle
ASeat fore-and-af tadjustmen t
BSeat height
CFootrest
The SmartKey must be in th eignition loc kand in
positio n1 or 2,in order for th efront-passenger
seat to be selected (
Ypage 162).
XTo select the front-passenger seat :press
butto n: repeatedly until th eindicator lamp
in th ebutto nlights up.
The front-passenger seat is selected if th e
indicator lamp in th ebutto nlights up.
XAdjus tth efront-passenger seat wit hbut -
tons ;toC.
The footrest can only be adjusted if:
Rth efront-passenger seat is moved fully
forward
Rth efront-passenger seat is in th epositio nfor
chauffeur mod e (Ypage 111).
iThe front-passenger seat in th eMercedes-
Maybac hmust no tbe positione dfully for -
wards when adjusting th efootrest .The front-
passenger seat must be moved forwards from
th erear to th emiddle adjustmen trange.
Chauffeur mode
Important safety notes
GWARNIN G
If th ehead restraint sare no tinstalled or no t
adjusted correctly, they canno tprovide pro -
tection as intended. Ther eis an increased ris k
of injury in thehead and neck area, e.g. in th e
event of an acciden tor when braking .
Always driv ewit hth ehead restraint sinstal -
led. Before driving off ,mak esure for every
vehicl eoccupant that th ecente rof th ehead
restraint support sth ebac kof th ehead at
about eye level.
GWARNIN G
If th efront-passenger seat is in chauffeur
mod eand th efront-passenger head restraint
is folded down ,th eview of th epassenger-side
exterio rmirror can be impaired .Ther eis aris k
of an accident.
To have afree view of th eexterio rmirror ,
remove th efront-passenger head restraint .
!Makesure that there are no object sin th e
footwell under or behind th eseat swhen mov -
ing th eseat sback. Ther eis aris kthat th e
seat sand/o rth eobject scould be damaged.
General notes
In chauffeur mode:
Rth efront-passenger seat is moved forwards
Rth ebackrest is tilte dforwards
Rth ehead restraint is folded forwards
The front-passenger seat automatically moves
from th echauffeur positio nbac kint oth enormal
positio nif:
Rth efront-passenger seat is adjusted usin gth e
seat adjustmen tswitch on th efront-
passenger door
Rth efront-passenger seat belt is fastene d
Ran occupant is detected on thefront-
passenger seat
Rth efront-passenger seat head restraint is
inserted and th eignition is switched on
Rth efront-passenger seat backrest is moved
backwards or th eseat is moved in alongitu-
dinal direction out of th echauffeur area
(
Ypage 113)
Seats111
Seats, steering wheel and mirrors
Z
Page 127 of 438

If you come into contact with the electrolyte,
observe the following:
RRinse off the electrolyte from your skin
immediately with water.
RImmediately rinse the electrolyte out of
your eyes thoroughly with clean water.
RIf the electrolyte is swallowed, immediately
rinse your mouth out thoroughly. Do not
induce vomiting.
RIf electrolyte comes into contact with your
skin or hair or is swallowed, seek medical
attention immediately.
RImmediately change out of clothing which
has come into contact with electrolyte.
RIf an allergic reaction occurs, seek medical
attention immediately.
The rear-view mirror and the exterior mirror on
the driver's side automatically go into anti-glare
mode if the following conditions are met simul-
taneously:
Rthe ignition is switched on
Rincident light from headlamps strikes the sen-
sor in the rear-view mirror.
The mirrors do not go into anti-glare mode if
reverse gear is engaged or if the interior lighting
is switched on.
Parking position for the exterior mir-
ror on the front-passenger side
Setting and storing the parking position
You can position the front-passenger side exte-
rior mirror in such a way that you can see the
rear wheel on that side as soon as you engage
reverse gear. You can store this position.
Using reverse gear
:Memory button M
;Adjustment button
=Button for the front-passenger side exterior
mirror
?Button for the driver's side exterior mirror
XTurn the SmartKey to position 2in the ignition
lock (Ypage 162).
XPress button =for the exterior mirror on the
front-passenger side.
XEngage reverse gear.
The exterior mirror on the front-passenger
side moves to the preset parking position.
XUse adjustment button ;to adjust the exte-
rior mirror to a position that allows you to see
the rear wheel and the curb.
The parking position is stored.
iIf you shift the transmission to another posi-
tion, the exterior mirror on the front-
passenger side returns to the driving position
after approximately ten seconds.
Using the memory button
You can store the parking position of the exte-
rior mirror on the front-passenger side using
memory button M:. The reverse gear must not
be engaged during the process.
XTurn the SmartKey to position 2in the ignition
lock (Ypage 162).
XPress button =for the exterior mirror on the
front-passenger side.
XUse adjustment button ;to adjust the exte-
rior mirror to a position that allows you to see
the rear wheel and the curb.
Mirrors125
Seats, steering wheel and mirrors
Z
Page 134 of 438

High-beam headlamps
XTo activate manually:turn the SmartKey in
the ignition lock to position 2or start the
engine.
XVehicles without Adaptive Highbeam Assist
Plus: turn the light switch to position Lor
Ã.
XVehicles with Adaptive Highbeam Assist Plus:
turn the light switch to the Lposition.
XPress the combination switch beyond the
pressure point in the direction of arrow :.
In the Ãposition, the high-beam head-
lamps are only switched on when it is dark and
the engine is running.
The blue Kindicator lamp in the instru-
ment cluster lights up when the high-beam
headlamps are switched on.
XTo switch off: move the combination switch
back to its normal position.
The blue Kindicator lamp in the instru-
ment cluster goes out.
Vehicles with Adaptive Highbeam Assist
Plus: if Adaptive Highbeam Assist Plus is acti-
vated, it automatically controls activation and
deactivation of the high-beam headlamps
(
Ypage 133).
High-beam flasher
XTo switch on: turn the SmartKey in the igni-
tion lock to position 1or 2, or start the engine.
XPull the combination switch in the direction of
arrow =.
Hazard warning lamps
XTo switch on the hazard warning lamps:
press button :.
All turn signals flash. If you now switch on a
turn signal using the combination switch, only
the turn signal lamp on the corresponding
side of the vehicle will flash.
XTo switch off the hazard warning lamps:
press button :.
The hazard warning lamps automatically switch
on if:
Ran air bag is deployed or
Rthe vehicle decelerates rapidly from a speed
of above 45 mph (70 km/h) and comes to a
standstill
The hazard warning lamps switch off automati-
cally if the vehicle reaches a speed of above
6 mph (10 km/h) again after a full brake appli-
cation.
The hazard warning lamps still operate if the
ignition is switched off.
Cornering light function
The cornering light function improves the illu-
mination of the road over a wide angle in the
direction you are turning, enabling better visi-
bility in tight bends, for example. It can only be
activated when the low-beam headlamps are
switched on.
Active:
Rif you are driving at speeds below 25 mph
(40 km/h) and switch on the turn signal or
turn the steering wheel
Rif you are driving at speeds between 25 mph
(40 km/h) and 45 mph (70 km/h) and turn
the steering wheel
The cornering lamp may remain lit for a short
time, but is automatically switched off after no
more than three minutes.
132Exterior lighting
Lights and windshield wipers
Page 142 of 438
Useful information
i
This Operator's Manual describes all models
and all standard and optional equipment of
your vehicle available at the time of publica-
tion of the Operator's Manual. Country-spe-
cific differences are possible. Please note
that your vehicle may not be equipped with all
features described. This also applies to
safety-related systems and functions.
iRead the information on qualified specialist
workshops (Ypage 28).
Overview of climate control systems
General notes
Observe the settings recommended on the fol-
lowing pages. The windows could otherwise fog
up.
To prevent the windows from fogging up:
Rswitch off climate control only briefly
Rswitch on air-recirculation mode only briefly
Rswitch on the cooling with air dehumidifica-
tion function
Rswitch on the defrost windshield function
briefly, if required
Climate control regulates the temperature and
air humidity in the vehicle interior. The air filter
cleans the air, thus improving the interior cli-
mate.
For vehicles with a combustion engine, the
"Cooling with air dehumidification" function is
only available when the engine is running. For
hybrid vehicles, the "Cooling with air dehumidi-
fication" function is also available via the elec-
tric refrigerant compressor when the engine is
not running. Optimum climate control is only
achieved with the side windows and roof closed.
If you start the engine using your smartphone,
the last selected climate control setting is reac-
tivated (
Ypage 164).
The residual heat function can only be activated
or deactivated with the ignition switched off
(
Ypage 152).
iVentilate the vehicle for a brief period during
warm weather, e.g. using the convenience
opening feature (
Ypage 95). This will speed
up the cooling process and the desired inte- rior temperature will be reached more
quickly.
iThe integrated filter filters out most parti-
cles of dust and soot and completely filters
out pollen. It also reduces gaseous pollutants
and odors. A clogged filter reduces the
amount of air supplied to the vehicle interior.
For this reason, you should always observe
the interval for replacing the filter, which is
specified in the Maintenance Booklet. As it
depends on environmental conditions, e.g.
heavy air pollution, the interval may be
shorter than stated in the Maintenance Book- let.
iIt is possible that the blower may be activa-
ted automatically 60 minutes after the Smart-
Key has been removed depending on various
factors, e.g. the outside temperature. The
vehicle is then ventilated for 30 minutes to dry
the climate control system.
140Overview of climate control systems
Climate control