2016 MERCEDES-BENZ S-Class SEDAN seat belt
[x] Cancel search: seat beltPage 66 of 438
!When installing the child restraint system,
make sure that the seat belt for the middle
seat does not get trapped. The seat belt could
otherwise be damaged.
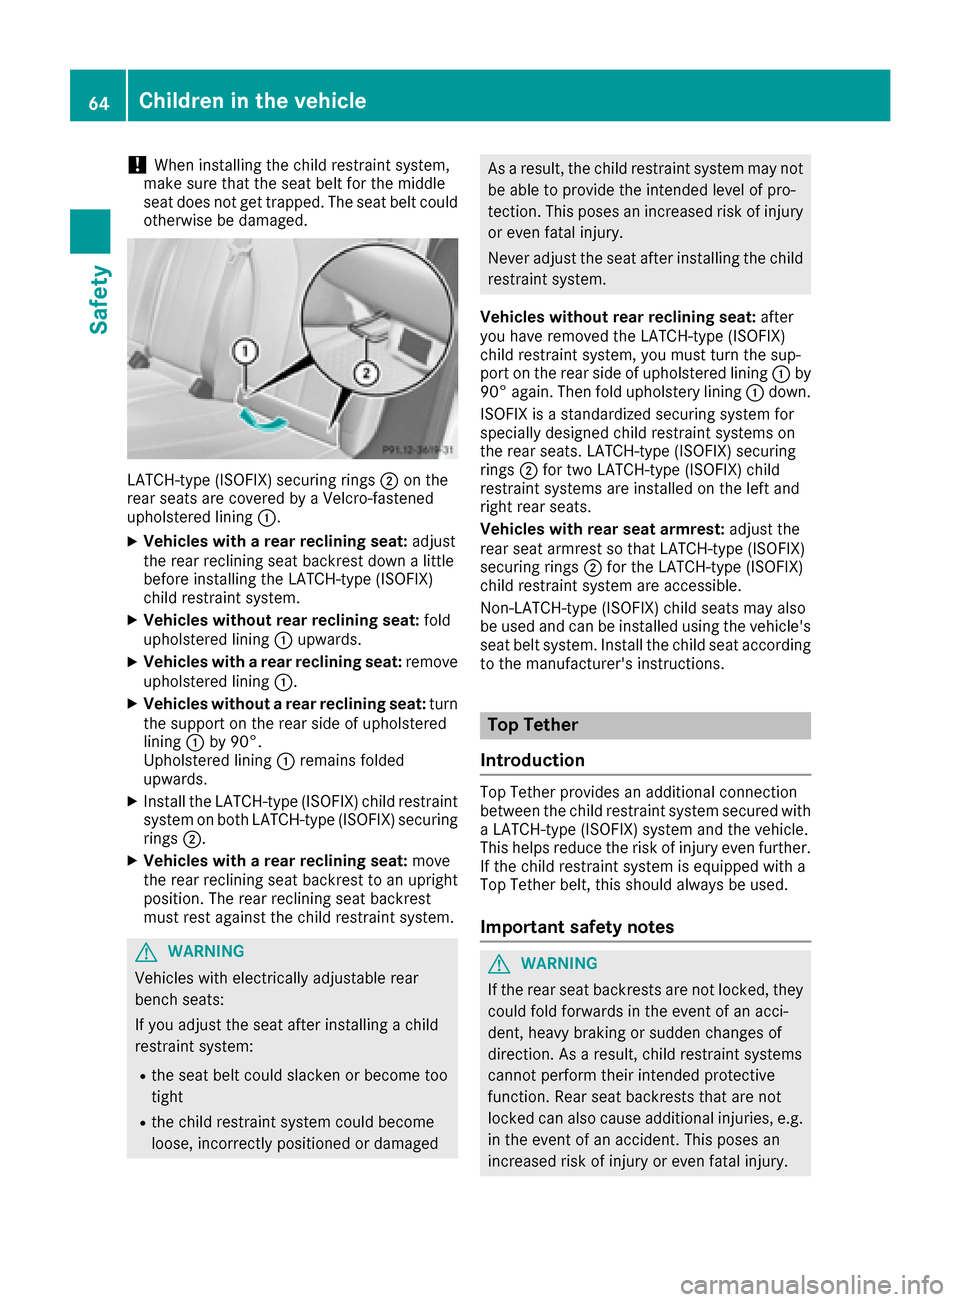
LATCH-type (ISOFIX) securing rings ;on the
rear seats are covered by a Velcro-fastened
upholstered lining :.
XVehicles with a rear reclining seat: adjust
the rear reclining seat backrest down a little
before installing the LATCH-type (ISOFIX)
child restraint system.
XVehicles without rear reclining seat: fold
upholstered lining :upwards.
XVehicles with a rear reclining seat: remove
upholstered lining :.
XVehicles without a rear reclining seat: turn
the support on the rear side of upholstered
lining :by 90°.
Upholstered lining :remains folded
upwards.
XInstall the LATCH-type (ISOFIX) child restraint
system on both LATCH-type (ISOFIX) securing
rings ;.
XVehicles with a rear reclining seat: move
the rear reclining seat backrest to an upright
position. The rear reclining seat backrest
must rest against the child restraint system.
GWARNING
Vehicles with electrically adjustable rear
bench seats:
If you adjust the seat after installing a child
restraint system:
Rthe seat belt could slacken or become too
tight
Rthe child restraint system could become
loose, incorrectly positioned or damaged
As a result, the child restraint system may not be able to provide the intended level of pro-
tection. This poses an increased risk of injury
or even fatal injury.
Never adjust the seat after installing the child
restraint system.
Vehicles without rear reclining seat: after
you have removed the LATCH-type (ISOFIX)
child restraint system, you must turn the sup-
port on the rear side of upholstered lining :by
90° again. Then fold upholstery lining :down.
ISOFIX is a standardized securing system for
specially designed child restraint systems on
the rear seats. LATCH-type (ISOFIX) securing
rings ;for two LATCH-type (ISOFIX) child
restraint systems are installed on the left and
right rear seats.
Vehicles with rear seat armrest: adjust the
rear seat armrest so that LATCH-type (ISOFIX)
securing rings ;for the LATCH-type (ISOFIX)
child restraint system are accessible.
Non-LATCH-type (ISOFIX) child seats may also
be used and can be installed using the vehicle's
seat belt system. Install the child seat according
to the manufacturer's instructions.
Top Tether
Introduction
Top Tether provides an additional connection
between the child restraint system secured with
a LATCH-type (ISOFIX) system and the vehicle.
This helps reduce the risk of injury even further.
If the child restraint system is equipped with a
Top Tether belt, this should always be used.
Important safety notes
GWARNING
If the rear seat backrests are not locked, they
could fold forwards in the event of an acci-
dent, heavy braking or sudden changes of
direction. As a result, child restraint systems
cannot perform their intended protective
function. Rear seat backrests that are not
locked can also cause additional injuries, e.g.
in the event of an accident. This poses an
increased risk of injury or even fatal injury.
64Children in the vehicle
Safety
Page 67 of 438
Always lock rear seat backrests after instal-
ling a Top Tether belt. Observe the lock veri-
fication indicator. Adjust the rear seat backr-
ests so that they are in an upright position.
GWARNING
Vehicles with electrically adjustable rear
bench seats:
If you adjust the seat after installing a child
restraint system:
Rthe seat belt could slacken or become too
tight
Rthe child restraint system could become
loose, incorrectly positioned or damaged
As a result, the child restraint system may not
be able to provide the intended level of pro-
tection. This poses an increased risk of injury
or even fatal injury.
Never adjust the seat after installing the child
restraint system.
If the rear seat backrest is not engaged and
locked, this will be shown in the multifunction
display in the instrument cluster. A warning tone
also sounds.
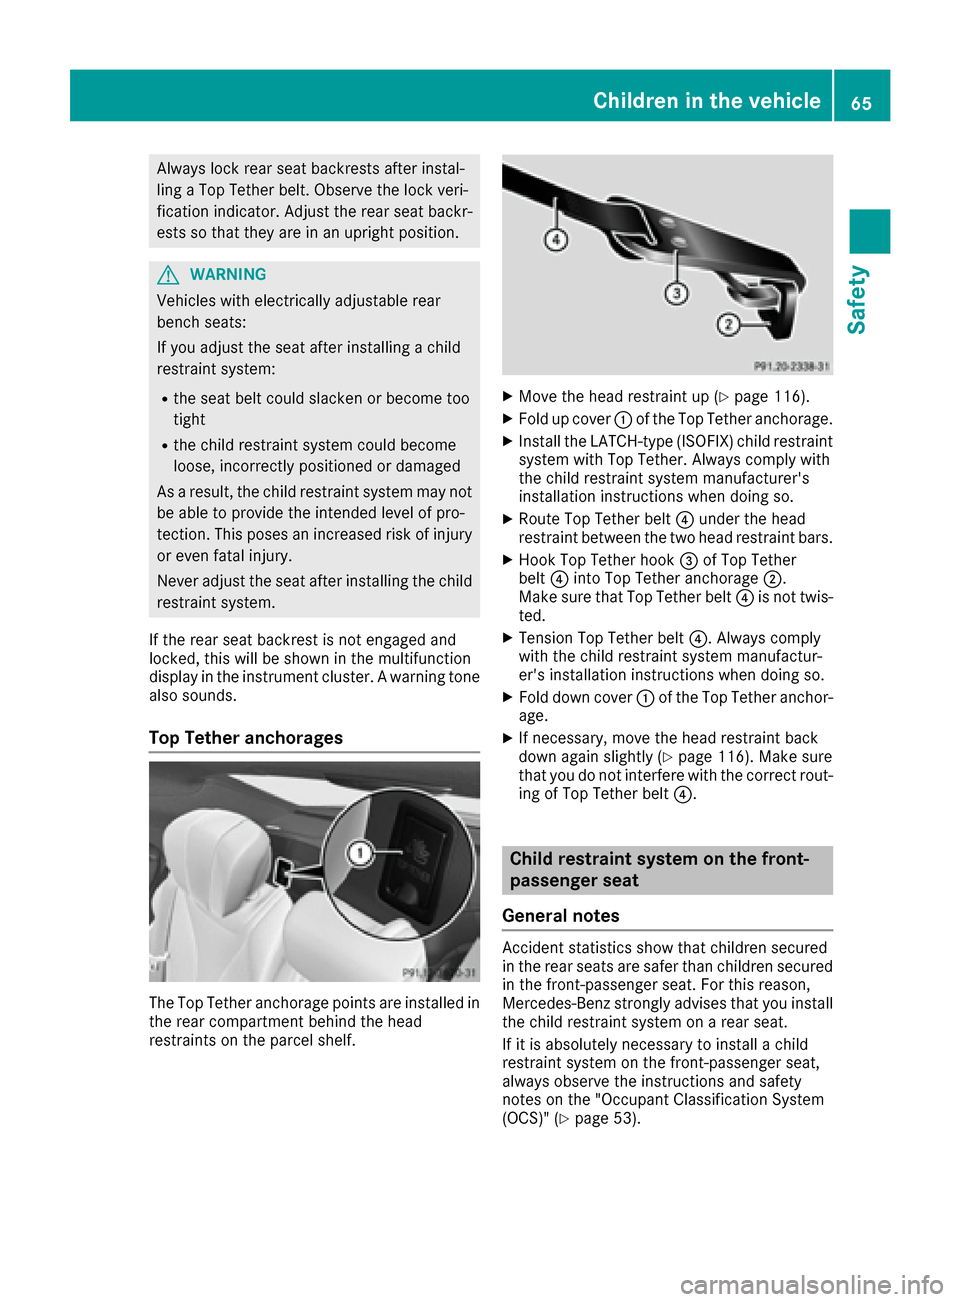
Top Tether anchorages
The Top Tether anchorage points are installed in
the rear compartment behind the head
restraints on the parcel shelf.
XMove the head restraint up (Ypage 116).
XFold up cover :of the Top Tether anchorage.
XInstall the LATCH-type (ISOFIX) child restraint
system with Top Tether. Always comply with
the child restraint system manufacturer's
installation instructions when doing so.
XRoute Top Tether belt ?under the head
restraint between the two head restraint bars.
XHook Top Tether hook =of Top Tether
belt ?into Top Tether anchorage ;.
Make sure that Top Tether belt ?is not twis-
ted.
XTension Top Tether belt ?. Always comply
with the child restraint system manufactur-
er's installation instructions when doing so.
XFold down cover :of the Top Tether anchor-
age.
XIf necessary, move the head restraint back
down again slightly (Ypage 116). Make sure
that you do not interfere with the correct rout-
ing of Top Tether belt ?.
Child restraint system on the front-
passenger seat
General notes
Accident statistics show that children secured
in the rear seats are safer than children secured
in the front-passenger seat. For this reason,
Mercedes-Benz strongly advises that you install
the child restraint system on a rear seat.
If it is absolutely necessary to install a child
restraint system on the front-passenger seat,
always observe the instructions and safety
notes on the "Occupant Classification System
(OCS)" (
Ypage 53).
Children in the vehicle65
Safety
Z
Page 68 of 438
You can thus avoid the risks that could arise as
a result of:
Ran incorrectly categorized person in the front-
passenger seat
Rthe unintentional deactivation of the front-
passenger front air bag
Rthe unsuitable positioning of the child
restraint system, e.g. too close to the dash-
board
Rearward-facing child restraint system
If it is absolutely necessary to install a rearward-
facing child restraint system on the front-
passenger seat, always make sure that the
front-passenger front air bag is deactivated.
Only if the PASSENGER AIR BAG OFF indicator
lamp is permanently lit (
Ypage 46) is the front-
passenger front air bag deactivated.
Always observe the child restraint system man-
ufacturer's installation and operating instruc-
tions.
Forward-facing child restraint system
If it is absolutely necessary to install a forward-
facing child restraint system on the front-
passenger seat, always move the front-
passenger seat as far back as possible. Fully
retract the seat cushion length. The entire base
of the child restraint system must always rest on
the seat cushion of the front-passenger seat.
The backrest of the child restraint system must
lie as flat as possible against the backrest of the front-passenger seat. The child restraint system
must not touch the roof or be subjected to a load
by the head restraint. Adjust the angle of the
seat backrest and the head restraint position
accordingly. Always make sure that the shoul-
der belt strap is correctly routed from the vehi-
cle belt outlet to the shoulder belt guide on the
child restraint system. The shoulder belt strap
must be routed forwards and downwards from
the vehicle belt outlet. If necessary, adjust the
vehicle belt outlet and the front-passenger seat
accordingly.
Always observe the child restraint system man-
ufacturer's installation and operating instruc-
tions.
Child-proof locks
Important safety notes
GWARNING
If children are traveling in the vehicle, they
could:
Ropen doors, thus endangering other people
or road users
Rexit the vehicle and be caught by oncoming
traffic
Roperate vehicle equipment and become
trapped
There is a risk of an accident and injury.
Always activate the child-proof locks and
override feature if children are traveling in the vehicle. When leaving the vehicle, always take
the key with you and lock the vehicle. Never
leave children unattended in the vehicle.
Override feature for:
Rthe rear doors (Ypage 67)
Rthe rear side windows (Ypage 67)
GWARNING
If you leave children unsupervised in the vehi-
cle, they could set it in motion by, for example:
Rrelease the parking brake.
Rshift the automatic transmission out of the
parking position P.
Rstart the engine.
In addition, they may operate vehicle equip-
ment and become trapped. There is a risk of
an accident and injury.
When leaving the vehicle, always take the
SmartKey with you and lock the vehicle. Never
leave children unsupervised in the vehicle.
GWARNING
If persons, particularly children are subjected to prolonged exposure to extreme heat or
cold, there is a risk of injury, possibly even
fatal. Never leave children unattended in the
vehicle.
66Children in the vehicle
Safety
Page 79 of 438

Rdarkness
Rif:
-pedestrians move quickly, e.g. into the path
of the vehicle
-the camera system no longer recognizes a
pedestrian as a person due to special cloth- ing or other objects
-a pedestrian is concealed by other objects
-the typical outline of a person is not distin-
guishable from the background
Following damage to the front end of the vehicle,
have the configuration and operation of the
radar sensors checked at a qualified specialist
workshop. This also applies to collisions at slow
speeds where there is no visible damage to the
front of the vehicle.
Following damage to the windshield, have the
configuration and operation of the camera sys-
tem checked at a qualified specialist workshop.
Function
XTo activate/deactivate: activate or deacti-
vate PRE-SAFE®Brake in the on-board com-
puter (Ypage 271).
If the PRE-SAFE®Brake is not activated, the
æ symbol appears in the multifunction dis-
play.
Starting at a speed of around 4 mph (7 km/h),
this function warns you if you rapidly approach a
vehicle in front. An intermittent warning tone
will then sound and the ·distance warning
lamp will light up in the instrument cluster.
XBrake immediately to defuse the situation.
or
XTake evasive action provided it is safe to do
so.
PRE-SAFE
®Brake can also brake the vehicle
automatically under the following conditions:
Rthe driver and front-passenger have their seat
belts fastened
and
Rthe vehicle speed is between approximately
4 mph (7 km/h) and 124 mph (200 km/h)
At speeds of up to approximately 44 mph
(70 km/h) PRE-SAFE
®Brake can also detect:
Rstationary objects in the path of your vehicle,
e.g. stopped or parked vehicles
Rpedestrians in the path of your vehicle
iIf there is an increased risk of a collision,
preventive passenger protection measures
(PRE-SAFE
®) are triggered (Ypage 59).
If the risk of collision with the vehicle in front
remains and you do not brake, take evasive
action or accelerate significantly, the vehicle
may perform automatic emergency braking, up
to the point of full brake application. Automatic emergency braking is not performed until imme-
diately prior to an imminent accident.
You can prevent the intervention of the PRE-
SAFE
®Brake at any time by:
Rdepressing the accelerator pedal further.
Ractivating kickdown.
Rreleasing the brake pedal.
The braking action of PRE-SAFE®Brake is ended
automatically if:
Ryou maneuver to avoid the obstacle.
Rthere is no longer a risk of collision.
Rthere is no longer an obstacle detected in
front of your vehicle.
STEER CONTROL
General information
STEER CONTROL helps you by transmitting a
noticeable steering force to the steering wheel
in the direction required for vehicle stabilization.
This steering assistance is provided in particular if:
Rboth right wheels or both left wheels are on a
wet or slippery road surface when you brake.
Rthe vehicle starts to skid.
Important safety notes
iObserve the "Important safety notes" sec-
tion (Ypage 68).
No steering support is provided from STEER
CONTROL, if:
RESP®is deactivated
RESP®is malfunctioning.
Rthe lighting is faulty.
Power steering will, however, continue to func-
tion.
Driving safety systems77
Safety
Z
Page 106 of 438
Useful information
i
This Operator's Manual describes all models
and all standard and optional equipment of
your vehicle available at the time of publica-
tion of the Operator's Manual. Country-spe-
cific differences are possible. Please note
that your vehicle may not be equipped with all
features described. This also applies to
safety-related systems and functions.
iRead the information on qualified specialist
workshops (Ypage 28).
Correct driver's seat position
GWARNING
You could lose control of your vehicle if you do the following while driving:
Radjust the driver's seat, head restraint,
steering wheel or mirrors
Rfasten the seat belt
There is a risk of an accident.
Adjust the driver's seat, head restraint, steer-
ing wheel and mirror and fasten your seat belt before starting the engine.
XObserve the safety guidelines on seat adjust-
ment (Ypage 105).
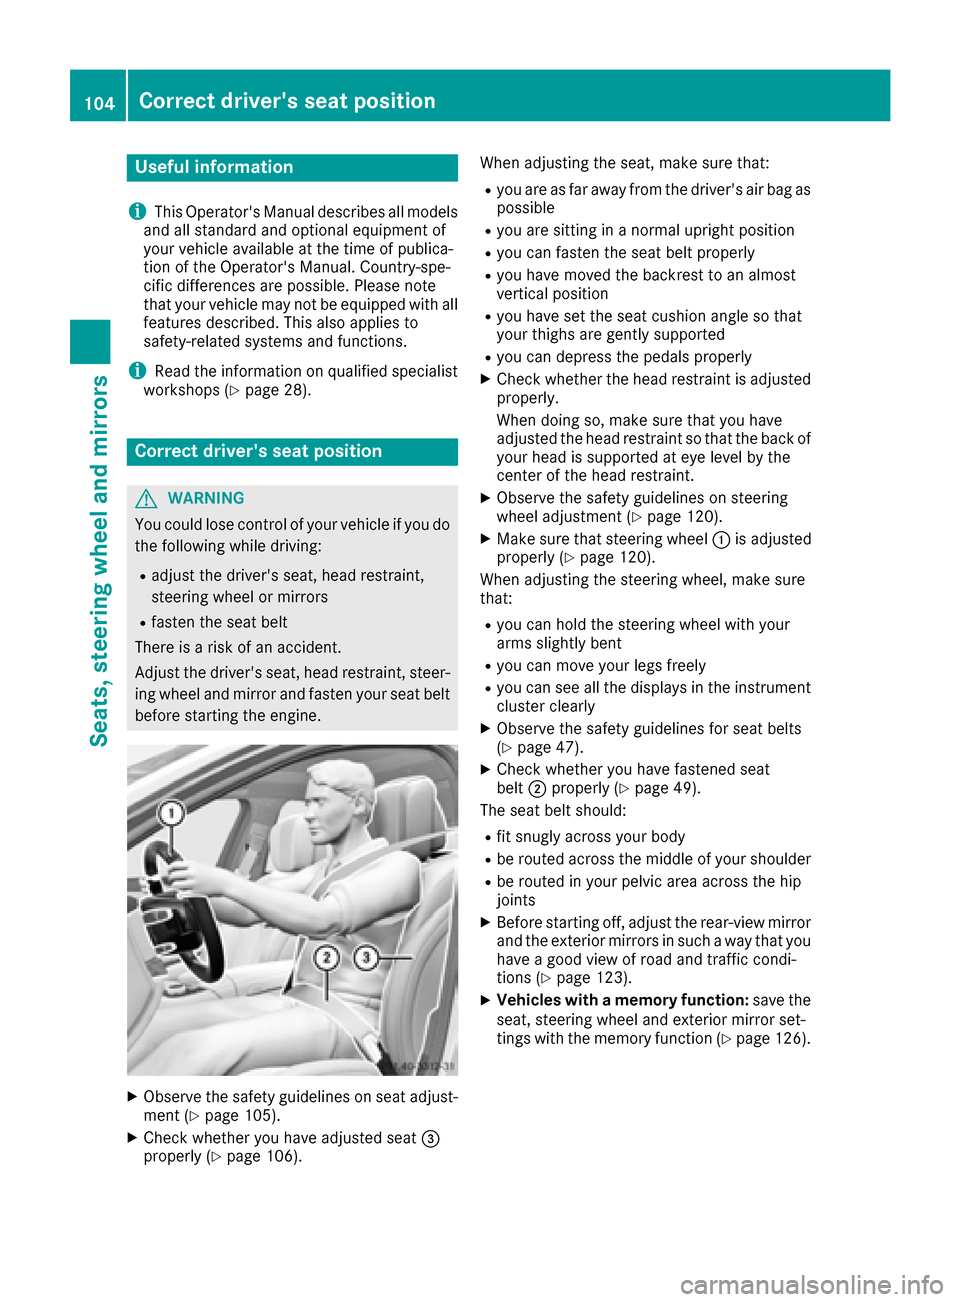
XCheck whether you have adjusted seat =
properly (Ypage 106). When adjusting the seat, make sure that:
Ryou are as far away from the driver's air bag as
possible
Ryou are sitting in a normal upright position
Ryou can fasten the seat belt properly
Ryou have moved the backrest to an almost
vertical position
Ryou have set the seat cushion angle so that
your thighs are gently supported
Ryou can depress the pedals properly
XCheck whether the head restraint is adjusted
properly.
When doing so, make sure that you have
adjusted the head restraint so that the back of
your head is supported at eye level by the
center of the head restraint.
XObserve the safety guidelines on steering
wheel adjustment (Ypage 120).
XMake sure that steering wheel
:is adjusted
properly (Ypage 120).
When adjusting the steering wheel, make sure
that:
Ryou can hold the steering wheel with your
arms slightly bent
Ryou can move your legs freely
Ryou can see all the displays in the instrument cluster clearly
XObserve the safety guidelines for seat belts
(Ypage 47).
XCheck whether you have fastened seat
belt ;properly (Ypage 49).
The seat belt should:
Rfit snugly across your body
Rbe routed across the middle of your shoulder
Rbe routed in your pelvic area across the hip
joints
XBefore starting off, adjust the rear-view mirror
and the exterior mirrors in such a way that you
have a good view of road and traffic condi-
tions (
Ypage 123).
XVehicles with a memory function: save the
seat, steering wheel and exterior mirror set-
tings with the memory function (
Ypage 126).
104Correct driver's seat position
Seats, steering wheel and mirrors
Page 107 of 438
Seats
Important safety notes
GWARNING
Children could become trapped if they adjust
the seats, particularly when unattended.
There is a risk of injury.
When leaving the vehicle, always take the
SmartKey with you and lock the vehicle. Never
leave children unsupervised in the vehicle.
The seats can still be adjusted when there is no
SmartKey in the ignition lock.
GWARNING
When you adjust a seat, you or other vehicle
occupants could become trapped, e.g. on the seat guide rail. There is a risk of injury.
Make sure when adjusting a seat that no one
has any body parts in the sweep of the seat.
Observe the safety notes on "Air bags"
(
Ypage 50) and "Children in the Vehicle"
(Ypage 61).
GWARNING
You could lose control of your vehicle if you do the following while driving:
Radjust the driver's seat, head restraint,
steering wheel or mirrors
Rfasten the seat belt
There is a risk of an accident.
Adjust the driver's seat, head restraint, steer-
ing wheel and mirror and fasten your seat belt before starting the engine.
GWARNING
If you adjust the seat height carelessly, you or
other vehicle occupants could be trapped and
thereby injured. Children in particular could
accidentally press the electrical seat adjust-
ment buttons and become trapped. There is a
risk of injury.
While moving the seats, make sure that your
hands or other body parts do not get under the
lever assembly of the seat adjustment sys-
tem.
GWARNING
If the head restraints are not installed or not
adjusted correctly, they cannot provide pro-
tection as intended. There is an increased risk
of injury in the head and neck area, e.g. in the event of an accident or when braking.
Always drive with the head restraints instal-
led. Before driving off, make sure for every
vehicle occupant that the center of the head
restraint supports the back of the head at
about eye level.
GWARNING
The seat belt does not offer the intended level of protection if you have not moved the back-
rest to an almost vertical position. When brak-
ing or in the event of an accident, you could
slide underneath the seat belt and sustain
abdomen or neck injuries, for example. This
poses an increased risk of injury or even fatal injury.
Adjust the seat properly before beginning
your journey. Always ensure that the backrest
is in an almost vertical position and that the
shoulder section of your seat belt is routed
across the center of your shoulder.
!To avoid damage to the seats and the seat
heating, observe the following information:
Rkeep liquids from spilling on the seats. If
liquid is spilled on the seats, dry them as
soon as possible.
Rif the seat covers are damp or wet, do not
switch on the seat heating. The seat heat-
ing should also not be used to dry the seats.
Rclean the seat covers as recommended;
see "Interior care".
Rdo not transport heavy loads on the seats.
Do not place sharp objects on the seat
cushions, e.g. knives, nails or tools. The
seats should only be occupied by passen-
gers, if possible.
Rwhen the seat heating is in operation, do
not cover the seats with insulating materi-
als, e.g. blankets, coats, bags, seat covers,
child seats or booster seats.
!Make sure that there are no objects in the
footwell under or behind the seats when mov-
Seats105
Seats, steering wheel and mirrors
Z
Page 113 of 438
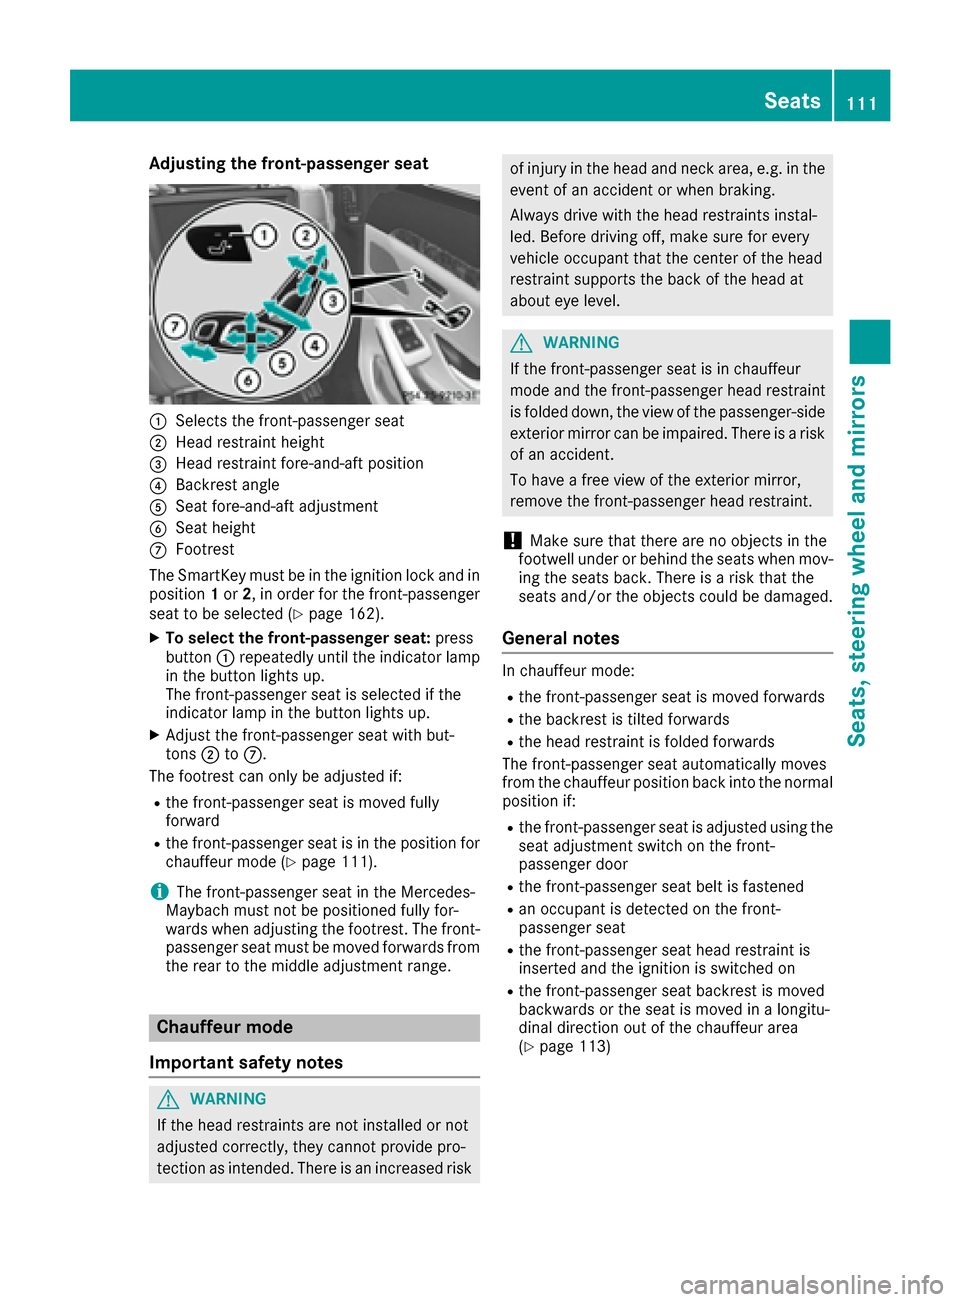
Adjusting the front-passenger seat
:Selects thefront-passenger seat
;Head restraint height
=Head restraint fore-and-af tpositio n
?Backrest angle
ASeat fore-and-af tadjustmen t
BSeat height
CFootrest
The SmartKey must be in th eignition loc kand in
positio n1 or 2,in order for th efront-passenger
seat to be selected (
Ypage 162).
XTo select the front-passenger seat :press
butto n: repeatedly until th eindicator lamp
in th ebutto nlights up.
The front-passenger seat is selected if th e
indicator lamp in th ebutto nlights up.
XAdjus tth efront-passenger seat wit hbut -
tons ;toC.
The footrest can only be adjusted if:
Rth efront-passenger seat is moved fully
forward
Rth efront-passenger seat is in th epositio nfor
chauffeur mod e (Ypage 111).
iThe front-passenger seat in th eMercedes-
Maybac hmust no tbe positione dfully for -
wards when adjusting th efootrest .The front-
passenger seat must be moved forwards from
th erear to th emiddle adjustmen trange.
Chauffeur mode
Important safety notes
GWARNIN G
If th ehead restraint sare no tinstalled or no t
adjusted correctly, they canno tprovide pro -
tection as intended. Ther eis an increased ris k
of injury in thehead and neck area, e.g. in th e
event of an acciden tor when braking .
Always driv ewit hth ehead restraint sinstal -
led. Before driving off ,mak esure for every
vehicl eoccupant that th ecente rof th ehead
restraint support sth ebac kof th ehead at
about eye level.
GWARNIN G
If th efront-passenger seat is in chauffeur
mod eand th efront-passenger head restraint
is folded down ,th eview of th epassenger-side
exterio rmirror can be impaired .Ther eis aris k
of an accident.
To have afree view of th eexterio rmirror ,
remove th efront-passenger head restraint .
!Makesure that there are no object sin th e
footwell under or behind th eseat swhen mov -
ing th eseat sback. Ther eis aris kthat th e
seat sand/o rth eobject scould be damaged.
General notes
In chauffeur mode:
Rth efront-passenger seat is moved forwards
Rth ebackrest is tilte dforwards
Rth ehead restraint is folded forwards
The front-passenger seat automatically moves
from th echauffeur positio nbac kint oth enormal
positio nif:
Rth efront-passenger seat is adjusted usin gth e
seat adjustmen tswitch on th efront-
passenger door
Rth efront-passenger seat belt is fastene d
Ran occupant is detected on thefront-
passenger seat
Rth efront-passenger seat head restraint is
inserted and th eignition is switched on
Rth efront-passenger seat backrest is moved
backwards or th eseat is moved in alongitu-
dinal direction out of th echauffeur area
(
Ypage 113)
Seats111
Seats, steering wheel and mirrors
Z
Page 114 of 438
Positioning the front-passenger seat for
chauffeur mode
General notes
Pay attention to the important safety notes
(Ypage 111). Adjust the seat for chauffeur
mode before the journey (Ypage 112). Do not
remove the front-passenger seat head restraint
during the journey.
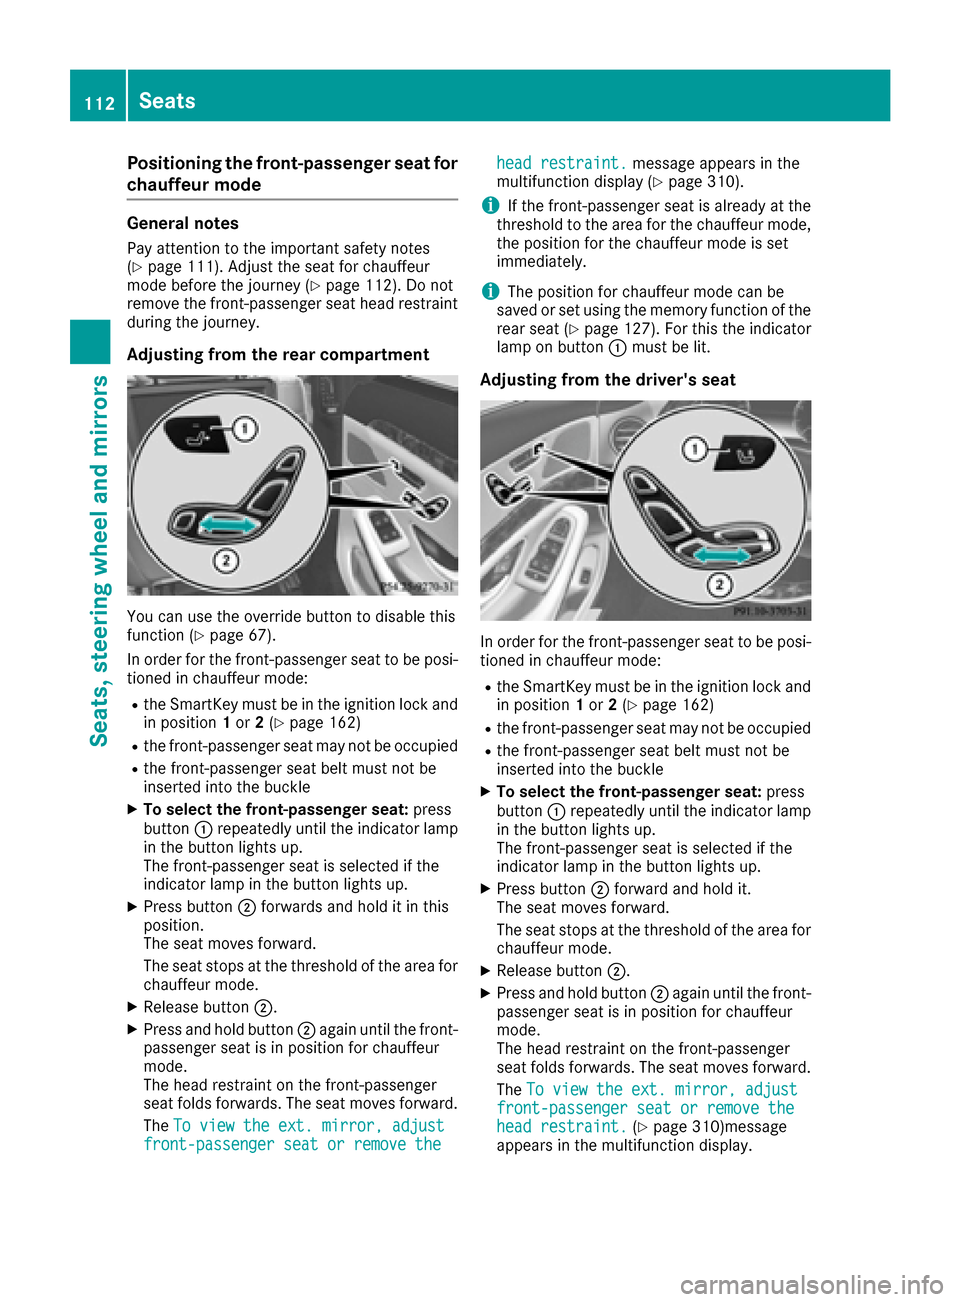
Adjusting from the rear compartment
You can use the override button to disable this
function (Ypage 67).
In order for the front-passenger seat to be posi-
tioned in chauffeur mode:
Rthe SmartKey must be in the ignition lock and in position 1or 2(Ypage 162)
Rthe front-passenger seat may not be occupied
Rthe front-passenger seat belt must not be
inserted into the buckle
XTo select the front-passenger seat: press
button :repeatedly until the indicator lamp
in the button lights up.
The front-passenger seat is selected if the
indicator lamp in the button lights up.
XPress button ;forwards and hold it in this
position.
The seat moves forward.
The seat stops at the threshold of the area for
chauffeur mode.
XRelease button ;.
XPress and hold button ;again until the front-
passenger seat is in position for chauffeur
mode.
The head restraint on the front-passenger
seat folds forwards. The seat moves forward.
The To view the ext. mirror, adjust
front-passenger seat or remove the
head restraint.message appears in the
multifunction display (Ypage 310).
iIf the front-passenger seat is already at the
threshold to the area for the chauffeur mode,
the position for the chauffeur mode is set
immediately.
iThe position for chauffeur mode can be
saved or set using the memory function of the
rear seat (
Ypage 127). For this the indicator
lamp on button :must be lit.
Adjusting from the driver's seat
In order for the front-passenger seat to be posi-
tioned in chauffeur mode:
Rthe SmartKey must be in the ignition lock and
in position 1or 2(Ypage 162)
Rthe front-passenger seat may not be occupied
Rthe front-passenger seat belt must not be
inserted into the buckle
XTo select the front-passenger seat: press
button :repeatedly until the indicator lamp
in the button lights up.
The front-passenger seat is selected if the
indicator lamp in the button lights up.
XPress button ;forward and hold it.
The seat moves forward.
The seat stops at the threshold of the area for
chauffeur mode.
XRelease button ;.
XPress and hold button ;again until the front-
passenger seat is in position for chauffeur
mode.
The head restraint on the front-passenger
seat folds forwards. The seat moves forward.
The To view the ext. mirror, adjust
front-passenger seat or remove thehead restraint.(Ypage 310)message
appears in the multifunction display.
112Seats
Seats, steering wheel and mirrors