2016 MERCEDES-BENZ S-Class SEDAN radio
[x] Cancel search: radioPage 218 of 438

Problems with PARKTRONIC
ProblemPossible causes/consequences andMSolutions
Only the red segments in
the PARKTRONIC warn-
ing displays are lit. You
also hear a warning tone
for approximately two
seconds.
PARKTRONIC is then
deactivated and the indi-
cator lamp on the
PARKTRONIC button
lights up.PARKTRONIC has malfunctioned and has switched off.
XIf problems persist, have PARKTRONIC checked at a qualified spe-
cialist workshop.
Only the red segments in
the PARKTRONIC warn-
ing displays are lit.
PARKTRONIC is then
deactivated.The PARKTRONIC sensors are dirty or there is interference.
XClean the PARKTRONIC sensors (Ypage 362).
XSwitch the ignition back on.
The problem may be caused by an external source of radio or ultra-
sound waves.
XSee if PARKTRONIC functions in a different location.
Active Parking Assist
General notes
Active Parking Assist is an electronic parking aid
with ultrasound. It measures the road on both
sides of the vehicle. A parking symbol indicates a suitable parking space. Active steering inter-
vention and brake application can assist you
during parking and when exiting a parking
space. You may also use PARKTRONIC
(
Ypage 214).
Important safety notes
Active Parking Assist is merely an aid. It is not a
replacement for your attention to your immedi-
ate surroundings. You are always responsible
for safe maneuvering, parking and exiting a
parking space. Make sure that no persons, ani-
mals or objects are in the maneuvering range.
When PARKTRONIC is switched off, Active Park-
ing Assist is also unavailable.
GWARNING
While parking or pulling out of a parking
space, the vehicle swings out and can drive
onto areas of the oncoming lane. This could
result in a collision with another road user.
There is a risk of an accident.
Pay attention to other road users. Stop the
vehicle if necessary or cancel the Active Park- ing Assist parking procedure.
!If unavoidable, you should drive over obsta-
cles such as curbs slowly and not at a sharp
angle. Otherwise, you may damage the
wheels or tires.
Active Parking Assist may possibly indicate
parking spaces which are not suitable for park-
ing, for example:
Rwhere parking or stopping is prohibited
Rin front of driveways or entrances and exits
Ron unsuitable surfaces
Parking tips:
ROn narrow roads, drive as close to the parking
space as possible.
RParking spaces that are littered or overgrown
might be identified or measured incorrectly.
RParking spaces that are partially occupied by
trailer drawbars might not be identified as
such or be measured incorrectly.
216Driving systems
Driving and parking
Page 259 of 438
Outside temperature display
You should pay special attention to road condi-
tions when temperatures are around freezing
point.
Bear in mind that the outside temperature dis-
play indicates the temperature measured and
does not record the road temperature.
The outside temperature display is in the multi-function display (
Ypage 258).
There is a short delay before a change in outside
temperature is shown in the multifunction dis-
play.
Coolant temperature display
GWARNING
Opening the hood when the engine is over-
heated or when there is a fire in the engine
compartment could expose you to hot gases
or other service products. There is a risk of
injury.
Let an overheated engine cool down before
opening the hood. If there is a fire in the
engine compartment, keep the hood closed
and contact the fire department.
!A display message is shown if the coolant
temperature is too high.
If the coolant temperature is above 257 ‡
(125 †) do not drive any further. The engine
will otherwise be damaged.
All vehicles except PLUG‑ IN HYBRID vehicles:
the coolant temperature gauge is in the lower
area of the tachometer (
Ypage 33).
PLUG-IN HYBRID vehicles: the multifunction dis-
play shows the coolant temperature in the
Coolant
submenu (Ypage 269).
Under normal operating conditions and with the
specified coolant level, the coolant temperature
may rise to 255 ‡ (124 †).
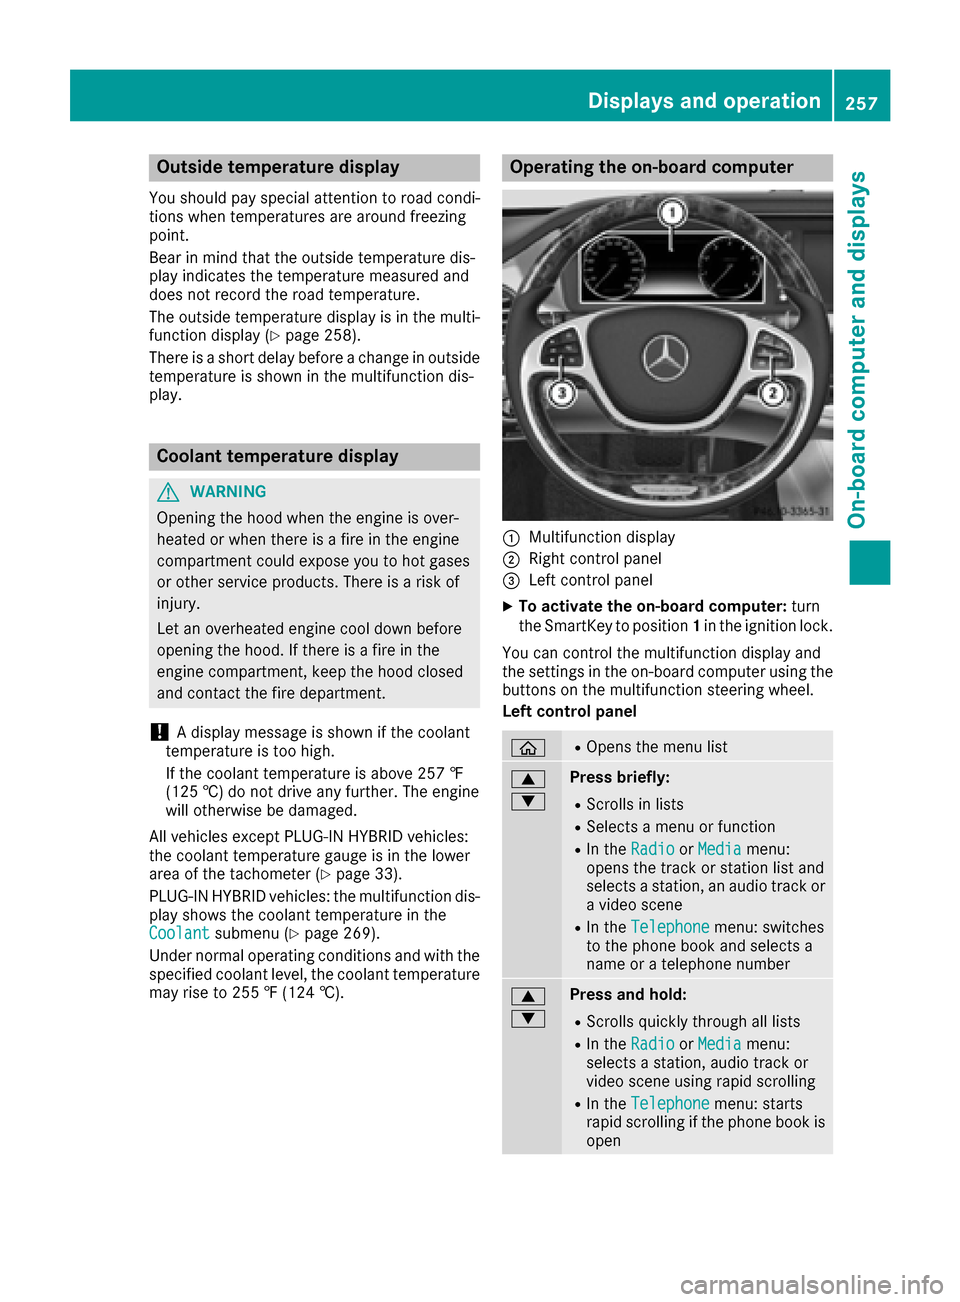
Operating the on-board computer
:Multifunction display
;Right control panel
=Left control panel
XTo activate the on-board computer: turn
the SmartKey to position 1in the ignition lock.
You can control the multifunction display and
the settings in the on-board computer using the
buttons on the multifunction steering wheel.
Left control panel
òROpens the menu list
9
:Press briefly:
RScrolls in lists
RSelects a menu or function
RIn the RadioorMediamenu:
opens the track or station list and
selects a station, an audio track or
a video scene
RIn the Telephonemenu: switches
to the phone book and selects a
name or a telephone number
9
:Press and hold:
RScrolls quickly through all lists
RIn the RadioorMediamenu:
selects a station, audio track or
video scene using rapid scrolling
RIn the Telephonemenu: starts
rapid scrolling if the phone book is
open
Displays and operation257
On-board computer and displays
Z
Page 260 of 438
aRIn all menus: confirms the selected
entry in the list
RIn theRadioorMediamenu:
opens the list of available radio
sources or media
RIn the Telephonemenu: switches
to the phone book and starts dial-
ing the selected number
ñRSwitches off the Voice Control
System (see the separate operat-
ing instructions)
%Press briefly:
RBack
RIn the RadioorMediamenu: dese-
lects the track or station list or list
of available radio sources or media
RHides display messages
RExits the telephone book/redial
memory
%Press and hold:
RCalls up the standard display in the
Tripmenu
Right control panel
~RRejects or ends a call
RExits the telephone book/redial
memory
6RMakes or accepts a call
RSwitches to the redial memory
W
XRAdjusts the volume
8RMute
óRSwitches on the Voice Control Sys-
tem (see the separate operating
instructions)
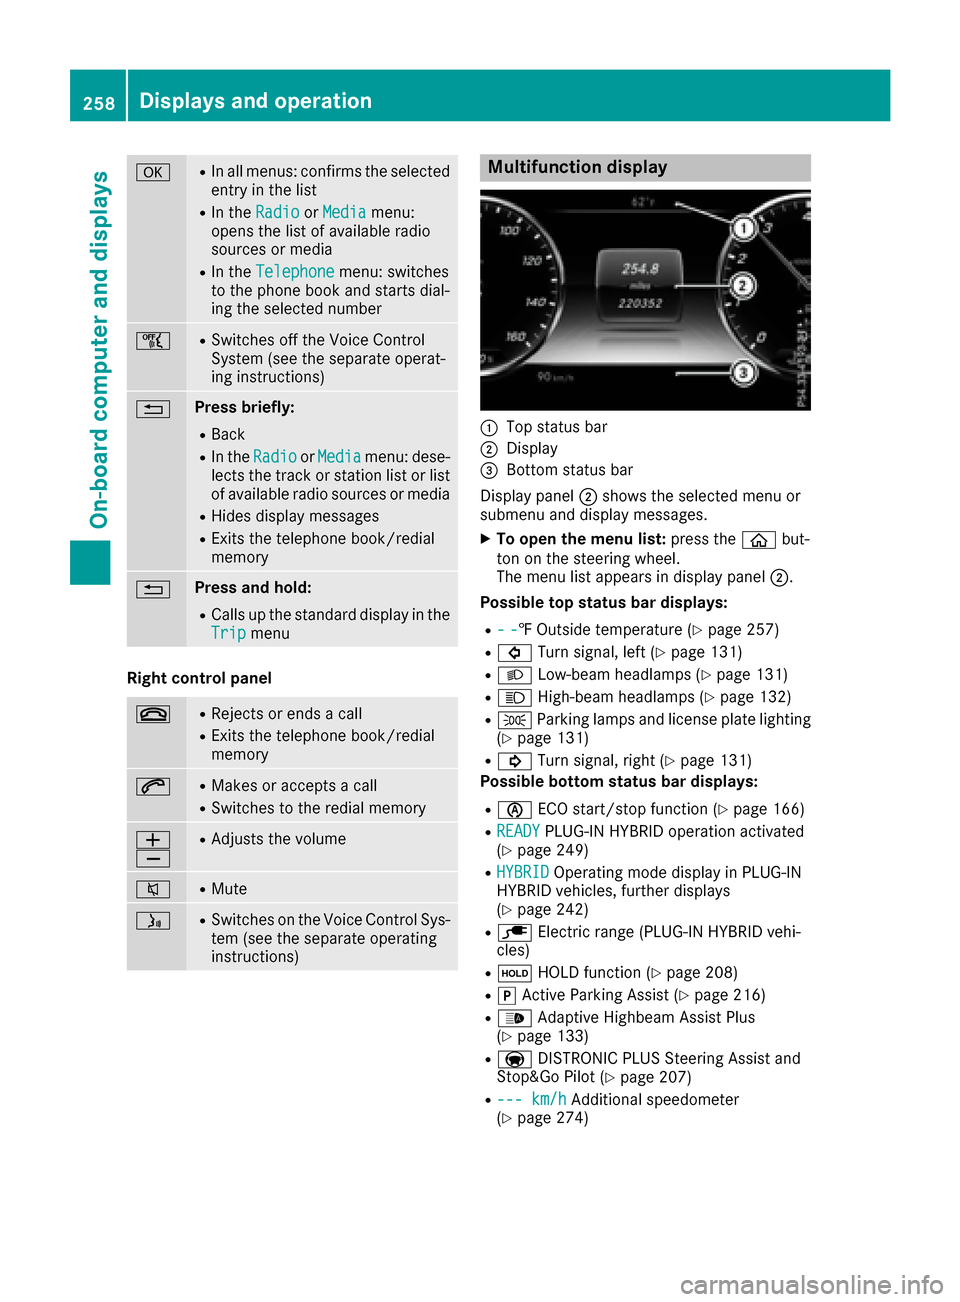
Multifunction display
:Top status bar
;Display
=Bottom status bar
Display panel ;shows the selected menu or
submenu and display messages.
XTo open the menu list: press theòbut-
ton on the steering wheel.
The menu list appears in display panel ;.
Possible top status bar displays:
R--‡ Outside temperature (Ypage 257)
R# Turn signal, left (Ypage 131)
RLLow-beam headlamps (Ypage 131)
RKHigh-beam headlamps (Ypage 132)
RTParking lamps and license plate lighting
(Ypage 131)
R! Turn signal, right (Ypage 131)
Possible bottom status bar displays:
Rè ECO start/stop function (Ypage 166)
RREADYPLUG-IN HYBRID operation activated
(Ypage 249)
RHYBRIDOperating mode display in PLUG-IN
HYBRID vehicles, further displays
(
Ypage 242)
Rè Electric range (PLUG-IN HYBRID vehi-
cles)
Rë HOLD function (Ypage 208)
RjActive Parking Assist (Ypage 216)
R_ Adaptive Highbeam Assist Plus
(Ypage 133)
Ra DISTRONIC PLUS Steering Assist and
Stop&Go Pilot (Ypage 207)
R--- km/hAdditional speedometer
(Ypage 274)
258Displays and operation
On-board computer and displays
Page 263 of 438
Setting options
You can adjust the following settings in the
head-up display submenu:
Radjust the position of the head-up display on
the windshield (Ypage 273)
Radjust the brightness of the displays in the
head-up display (Ypage 273)
Rselect displays in the head-up display
(Ypage 273).
Using the Display Content
function, you
can, depending on your vehicle's equipment,
choose between four standard displays. The
selected contents then appear in the head-up
display.
In Mercedes-AMG vehicles, you can also
choose between two AMG displays. If you
select an AMG display, the head-up display
shows AMG-specific contents.
If you select a display with traffic signs, detec- ted traffic signs from Traffic Sign Assist
appear in the head-up display.
Menus and submenus
Menu overview
Press the òbutton on the steering wheel to
open the menu list.
Operating the on-board computer (
Ypage 257).
Depending on the vehicle equipment, you can
select the following menu:
RTripmenu (Ypage 261)
RNavimenu (navigation instructions)
(Ypage 263)
RRadiomenu (Ypage 265)
RMediamenu (Ypage 265)
RTelephonemenu (Ypage 267)
RAssistance Graphicmenu (Ypage 268)
RServicemenu (Ypage 269)
RSettingsmenu (Ypage 269)
RAMGmenu (Mercedes-AMG vehicles)
(Ypage 275)
Trip menu
Standard display
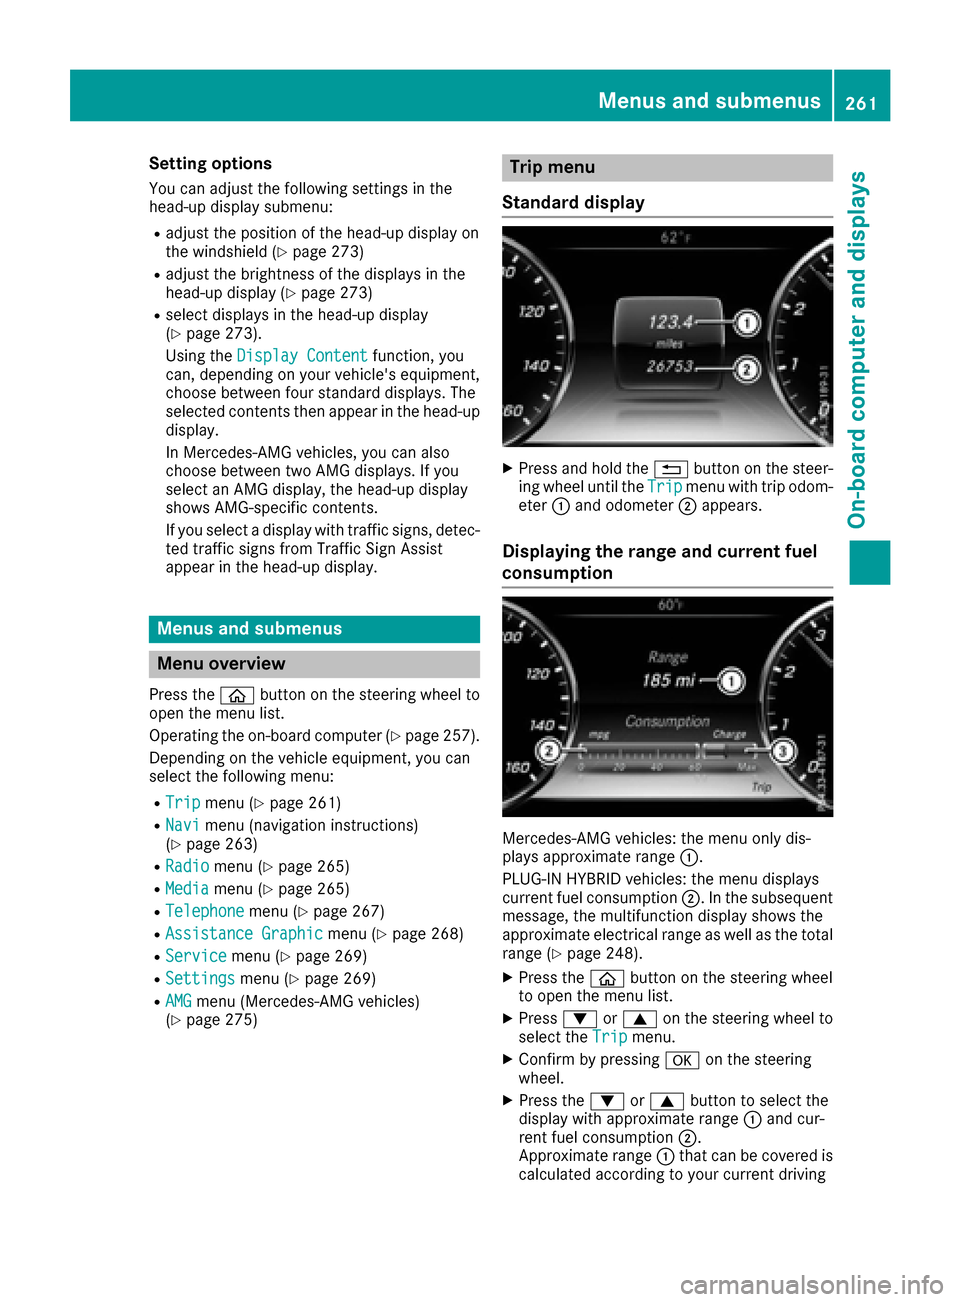
XPress and hold the %button on the steer-
ing wheel until the Tripmenu with trip odom-
eter :and odometer ;appears.
Displaying the range and current fuel
consumption
Mercedes-AMG vehicles: the menu only dis-
plays approximate range :.
PLUG-IN HYBRID vehicles: the menu displays
current fuel consumption ;. In the subsequent
message, the multifunction display shows the
approximate electrical range as well as the total
range (
Ypage 248).
XPress the òbutton on the steering wheel
to open the menu list.
XPress :or9 on the steering wheel to
select the Tripmenu.
XConfirm by pressing aon the steering
wheel.
XPress the :or9 button to select the
display with approximate range :and cur-
rent fuel consumption ;.
Approximate range :that can be covered is
calculated according to your current driving
Menus and submenus261
On-board computer and displays
Z
Page 267 of 438

Other status indicators of the naviga-
tion system
:Additional information
Other possible additional information:
RNew Route...orCalculating Route...
A new route is calculated.
RRoad Not Mapped
The vehicle position is inside the area of the
digital map but the road is not recognized, e.g. newly built streets, car parks or private land.
RNo Route
No route could be calculated to the selected
destination.
RO
You have reached the destination or an inter-
mediate destination.
Radio menu
:Frequency range
;Station frequency with memory position
=Name of artist
?Name of track
AGenre The multifunction display shows station
;with
station frequency or station name. The preset
position is only displayed along with station ;if
this has been stored. You can store radio sta-
tions in the multimedia system.
XSwitch on the multimedia system (see sepa-
rate operating instructions).
XPress the òbutton on the steering wheel
to open the menu list.
XPress :or9 on the steering wheel to
select the Radiomenu.
XConfirm by pressing aon the steering
wheel.
Currently set station ;appears in the multi-
function display.
XTo open the station list: press the:or
9 button briefly.
XTo select a station in the station list: press
the : or9 button briefly.
XTo select a station in the station list using
rapid scrolling: press and hold the :or
9 button.
XTo select the frequency range or station
memory: pressabriefly.
XPress :or9 to select the frequency
range or station memory.
XPress ato confirm the selection.
iSIRIUS XM satellite radio functions like a
normal radio.
Further information on radio operation can be
found in the multimedia system (see the sep-
arate operating instructions).
Media menu
Changing the media source
Menus and submenus265
On-board computer and displays
Z
Page 351 of 438
Several attempts might be necessary. You
should test every position for at least
25 seconds before trying another position.
Synchronizing the rolling code
Pay attention to the "Important safety notes"
(Ypage 348).
If the garage door system uses a rolling code,
you will also have to synchronize the garage
door system with the integrated garage door
opener in the rear-view mirror. To do this you will
need to use the programming button on the door
drive control panel. The programming button
may be located in different places depending on
the manufacturer. It is usually located on the
door drive unit on the garage ceiling.
Familiarize yourself with the garage door drive
operating instructions, e.g. under "Program-
ming additional remote controls", before carry-
ing out the following steps.
Your vehicle must be within reach of the garage
door or gate opener drive. Make sure that nei-
ther your vehicle nor any persons/objects are
present within the sweep of the door or gate.
XTurn the SmartKey to position 2in the ignition
lock (Ypage 162).
XGet out of the vehicle.
XPress the programming button on the door
drive unit.
Usually, you now have 30 seconds to initiate
the next step.
XGet into the vehicle.
XPress previously programmed button ;,=
or ? on the integrated garage door opener
repeatedly and in quick succession until the
door closes.
The rolling code synchronization is then com- plete.
Notes on programming the remote con-
trol
Canadian radio frequency laws require a "break"(or interruption) of the transmission signals
after broadcasting for a few seconds. Therefore,
these signals may not last long enough for the
integrated garage door opener. The signal is not recognized during programming. Comparable
with Canadian law, some U.S. garage door open-
ers also feature a "break". Proceed as follows:
Rif you live in Canada
Rif you have difficulties programming the
garage door opener (regardless of where you
live) when using the programming steps
XPress and hold one of buttons
;to? on the
integrated garage door opener.
After a short time, indicator lamp :lights up
yellow.
XRelease the button.
Indicator lamp :flashes yellow.
XPress button Bof garage door remote con-
trol Afor two seconds, then release it for two
seconds.
XPress button Bagain for two seconds.
XRepeat this sequence on button Bof remote
control Auntil indicator lamp :lights up
green.
When indicator lamp :lights up green: pro-
gra mming i
s finished.
When indicator lamp :flashes green: pro-
gramming was successful. The next step is to
synchronize the rolling code.
XRelease button Bof remote control Aof the
garage door drive.
If indicator lamp :lights up red: repeat the
programming process for the corresponding
button on the rear-view mirror. When doing
so, vary the distance between remote control
A and the rear-view mirror.
The required distance between remote con-
trol Aand the integrated garage door opener
depends on the garage door drive system.
Several attempts might be necessary. You
should test every position for at least
25 seconds before trying another position.
Problems when programming
If you are experiencing problems programing
the integrated garage door opener on the rear-
view mirror, take note of the following instruc-
tions:
RCheck the transmitter frequency used by
garage door drive remote control Aand
whether it is supported. The transmitter fre-
quency can usually be found on the back of
the garage door drive remote control.
The integrated garage door opener is com-
patible with devices that have units which
Features349
Stowage and features
Z
Page 353 of 438
XTo remove:pull the floormat from retain-
ers ;.
XRemove the floormat.
Infrared reflective windshield
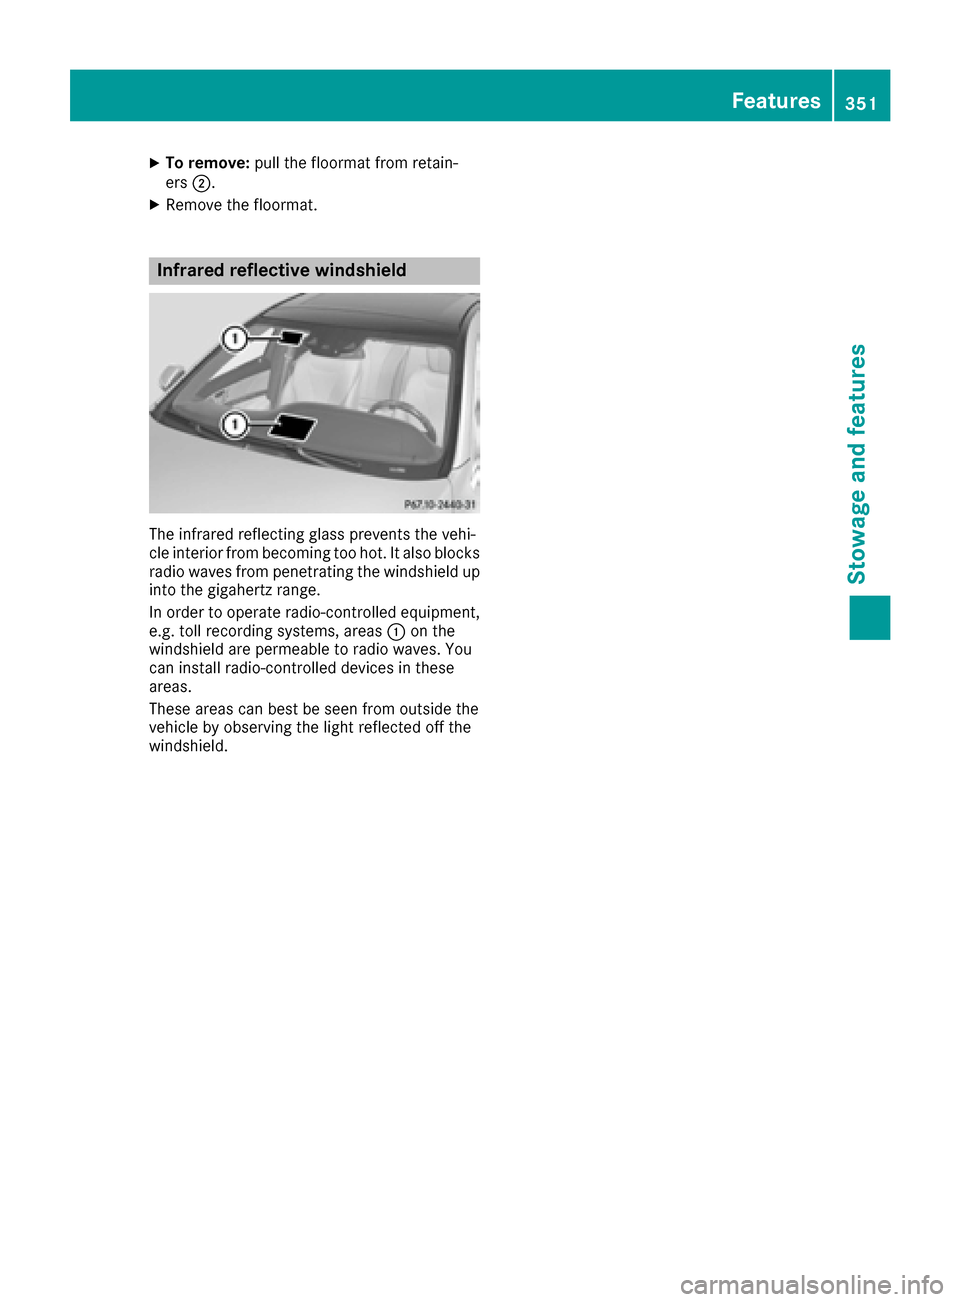
The infrared reflecting glass prevents the vehi-
cle interior from becoming too hot. It also blocks
radio waves from penetrating the windshield up
into the gigahertz range.
In order to operate radio-controlled equipment,
e.g. toll recording systems, areas :on the
windshield are permeable to radio waves. You
can install radio-controlled devices in these
areas.
These areas can best be seen from outside the
vehicle by observing the light reflected off the
windshield.
Features351
Stowag ean d features
Z
Page 394 of 438

the information on display messages
(Ypage 306).
It may take up to ten minutes for a malfunction of the tire pressure monitor to be indicated. A
malfunction will be indicated by the tire pres-
sure warning lamp flashing for approximately
one minute and then remaining lit. When the
malfunction has been rectified, the tire pressure
warning lamp goes out after a few minutes of
driving.
The tire pressure values indicated by the on-
board computer may differ from those meas-
ured at a gas station with a pressure gauge. The
tire pressures shown by the on-board computer
refer to those measured at sea level. At high
altitudes, the tire pressure values indicated by a
pressure gauge are higher than those shown by the on-board computer. In this case, do not
reduce the tire pressures.
The operation of the tire pressure monitor can
be affected by interference from radio transmit-
ting equipment (e.g. radio headphones, two-way
radios) that may be being operated in or near the vehicle.
Checking the tire pressure electroni-
cally
XMake sure that the SmartKey is in position 2
in the ignition lock (Ypage 162).
XUse ò on the steering wheel to call up the
list of menus.
XPress 9or: on the steering wheel to
select the Servicemenu.
XPress theabutton.
XPress 9or: to select Tire Pres‐sure.
XPress the abutton.
The current tire pressure of each tire is shown
in the multifunction display.
If the vehicle was parked for longer than
20 minute s,the following message appears:
Tire
pressurewillbedisplayedafterdriving a few minutes.
After a teach-in process, the tire pressure mon- itor automatically detects new wheels or new
sensors. As long as a clear allocation of the tire
pressure value to the individual wheels is not
possible, the Tire
PressureMonitorActivemessage is shown instead of the tire pressure
display. The tire pressures are already being
monitored.
Tire pressure monitor warning mes-
sages
If the tire pressure monitor detects a pressure
loss in one or more tires, a warning message is
shown in the multifunction display. The yellow
tire pressure warning lamp then lights up.
RIf thePlease Correct Tire Pressuremessage appears in the multifunction display,
the tire pressure in at least one tire is too low.
The tire pressure must be corrected when the
opportunity arises.
RIf theCheck Tiresmessage appears in the
multifunction display, the tire pressure in at
least one tire has dropped significantly. The
tires must be checked.
RIf the WarningTireMalfunctionmessage
appears in the multifunction display, the tire
pressure in at least one tire has dropped sud-
denly. The tires must be checked.
Observe the instructions and safety notes in the
display messages in the "Tires" section
(
Ypage 306).
If the wheel positions on the vehicle are rotated,
the tire pressures may be displayed for the
wrong positions for a short time. This is rectified after a few minutes of driving, and the tire pres-
sures are displayed for the correct positions.
Restarting the tire pressure monitor
When you restart the tire pressure monitor, all
existing warning messages are deleted and the
warning lamps go out. The monitor uses the cur- rently set tire pressures as the reference values
for monitoring. In most cases, the tire pressure
monitor will automatically detect the new refer-
ence values after you have changed the tire
pressure. However, you can also define refer-
ence values manually as described here. The tire
pressure monitor then monitors the new tire
pressure values.
XSet the tire pressure to the value recommen- ded for the corresponding driving situation on
the Tire and Loading Information placard on
the driver's side B-pillar (
Ypage 387).
You can find more tire pressure values for
various operating conditions in the tire pres-
sure table inside the fuel filler flap
(
Ypage 387).
XMake sure that the tire pressure is correct on
all four wheels.
392Tire pressure
Wheels and tires