2016 MERCEDES-BENZ S-Class SEDAN Remove
[x] Cancel search: RemovePage 103 of 438
MAGIC SKY CONTROL darkens automatically
after a short period when you turn the SmartKey
to position0or remove the SmartKey.
Risk of electric shock
GDANGER
MAGIC SKY CONTROL operates using high
voltage. If the headliner is damaged or
removed, electrical components will be
exposed. If you touch these components, you
could get an electric shock. There is a risk of
fatal injury.
RNever remove the headliner.
RIf the headliner is damaged, never touch the
electrical components behind it.
RAlways have work on the MAGIC SKY CON-
TROL carried out at a qualified specialist
workshop.
The high-voltage components of MAGIC SKY
CONTROL are protected behind the headliner.
These are in the hidden portion of the movable
roof element of the panorama roof with power
tilt/sliding panel and above the left rear door.
The MAGIC SKY CONTROL voltage transformer
is stamped with a high-voltage symbol, warning
you about the high voltage. The electric cables
of the high-voltage section are color orange.
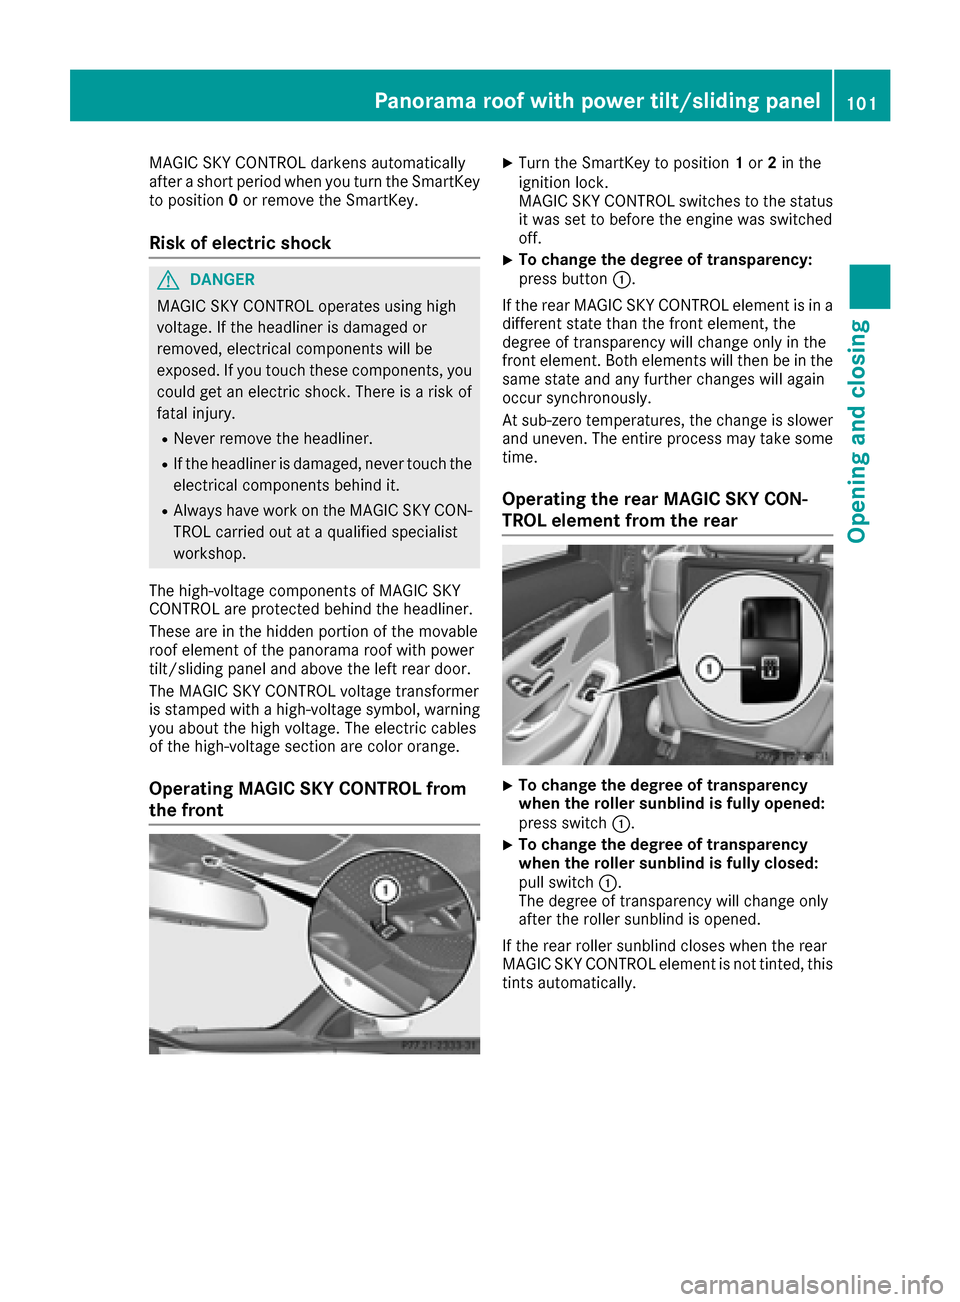
Operating MAGIC SKY CONTROL from
the front
XTurn the SmartKey to position 1or 2in the
ignition lock.
MAGIC SKY CONTROL switches to the status
it was set to before the engine was switched
off.
XTo change the degree of transparency:
press button :.
If the rear MAGIC SKY CONTROL element is in a
different state than the front element, the
degree of transparency will change only in the
front element. Both elements will then be in the
same state and any further changes will again
occur synchronously.
At sub-zero temperatures, the change is slower
and uneven. The entire process may take some time.
Operating the rear MAGIC SKY CON-
TROL element from the rear
XTo change the degree of transparency
when the roller sunblind is fully opened:
press switch :.
XTo change the degree of transparency
when the roller sunblind is fully closed:
pull switch:.
The degree of transparency will change only
after the roller sunblind is opened.
If the rear roller sunblind closes when the rear
MAGIC SKY CONTROL element is not tinted, this
tints automatically.
Panorama roof with power tilt/sliding panel101
Opening and closing
Z
Page 113 of 438
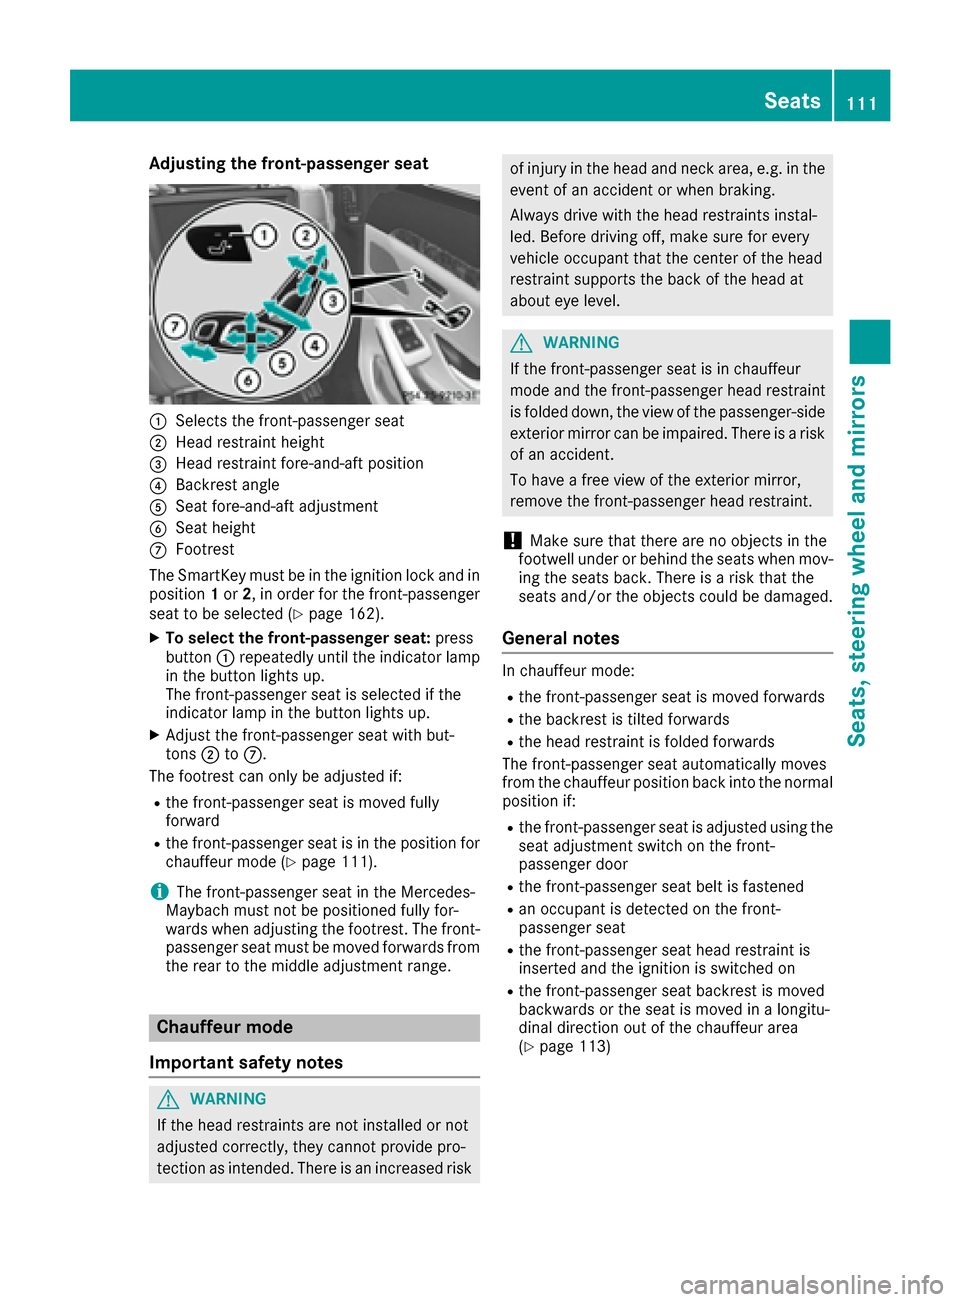
Adjusting the front-passenger seat
:Selects thefront-passenger seat
;Head restraint height
=Head restraint fore-and-af tpositio n
?Backrest angle
ASeat fore-and-af tadjustmen t
BSeat height
CFootrest
The SmartKey must be in th eignition loc kand in
positio n1 or 2,in order for th efront-passenger
seat to be selected (
Ypage 162).
XTo select the front-passenger seat :press
butto n: repeatedly until th eindicator lamp
in th ebutto nlights up.
The front-passenger seat is selected if th e
indicator lamp in th ebutto nlights up.
XAdjus tth efront-passenger seat wit hbut -
tons ;toC.
The footrest can only be adjusted if:
Rth efront-passenger seat is moved fully
forward
Rth efront-passenger seat is in th epositio nfor
chauffeur mod e (Ypage 111).
iThe front-passenger seat in th eMercedes-
Maybac hmust no tbe positione dfully for -
wards when adjusting th efootrest .The front-
passenger seat must be moved forwards from
th erear to th emiddle adjustmen trange.
Chauffeur mode
Important safety notes
GWARNIN G
If th ehead restraint sare no tinstalled or no t
adjusted correctly, they canno tprovide pro -
tection as intended. Ther eis an increased ris k
of injury in thehead and neck area, e.g. in th e
event of an acciden tor when braking .
Always driv ewit hth ehead restraint sinstal -
led. Before driving off ,mak esure for every
vehicl eoccupant that th ecente rof th ehead
restraint support sth ebac kof th ehead at
about eye level.
GWARNIN G
If th efront-passenger seat is in chauffeur
mod eand th efront-passenger head restraint
is folded down ,th eview of th epassenger-side
exterio rmirror can be impaired .Ther eis aris k
of an accident.
To have afree view of th eexterio rmirror ,
remove th efront-passenger head restraint .
!Makesure that there are no object sin th e
footwell under or behind th eseat swhen mov -
ing th eseat sback. Ther eis aris kthat th e
seat sand/o rth eobject scould be damaged.
General notes
In chauffeur mode:
Rth efront-passenger seat is moved forwards
Rth ebackrest is tilte dforwards
Rth ehead restraint is folded forwards
The front-passenger seat automatically moves
from th echauffeur positio nbac kint oth enormal
positio nif:
Rth efront-passenger seat is adjusted usin gth e
seat adjustmen tswitch on th efront-
passenger door
Rth efront-passenger seat belt is fastene d
Ran occupant is detected on thefront-
passenger seat
Rth efront-passenger seat head restraint is
inserted and th eignition is switched on
Rth efront-passenger seat backrest is moved
backwards or th eseat is moved in alongitu-
dinal direction out of th echauffeur area
(
Ypage 113)
Seats111
Seats, steering wheel and mirrors
Z
Page 114 of 438
Positioning the front-passenger seat for
chauffeur mode
General notes
Pay attention to the important safety notes
(Ypage 111). Adjust the seat for chauffeur
mode before the journey (Ypage 112). Do not
remove the front-passenger seat head restraint
during the journey.
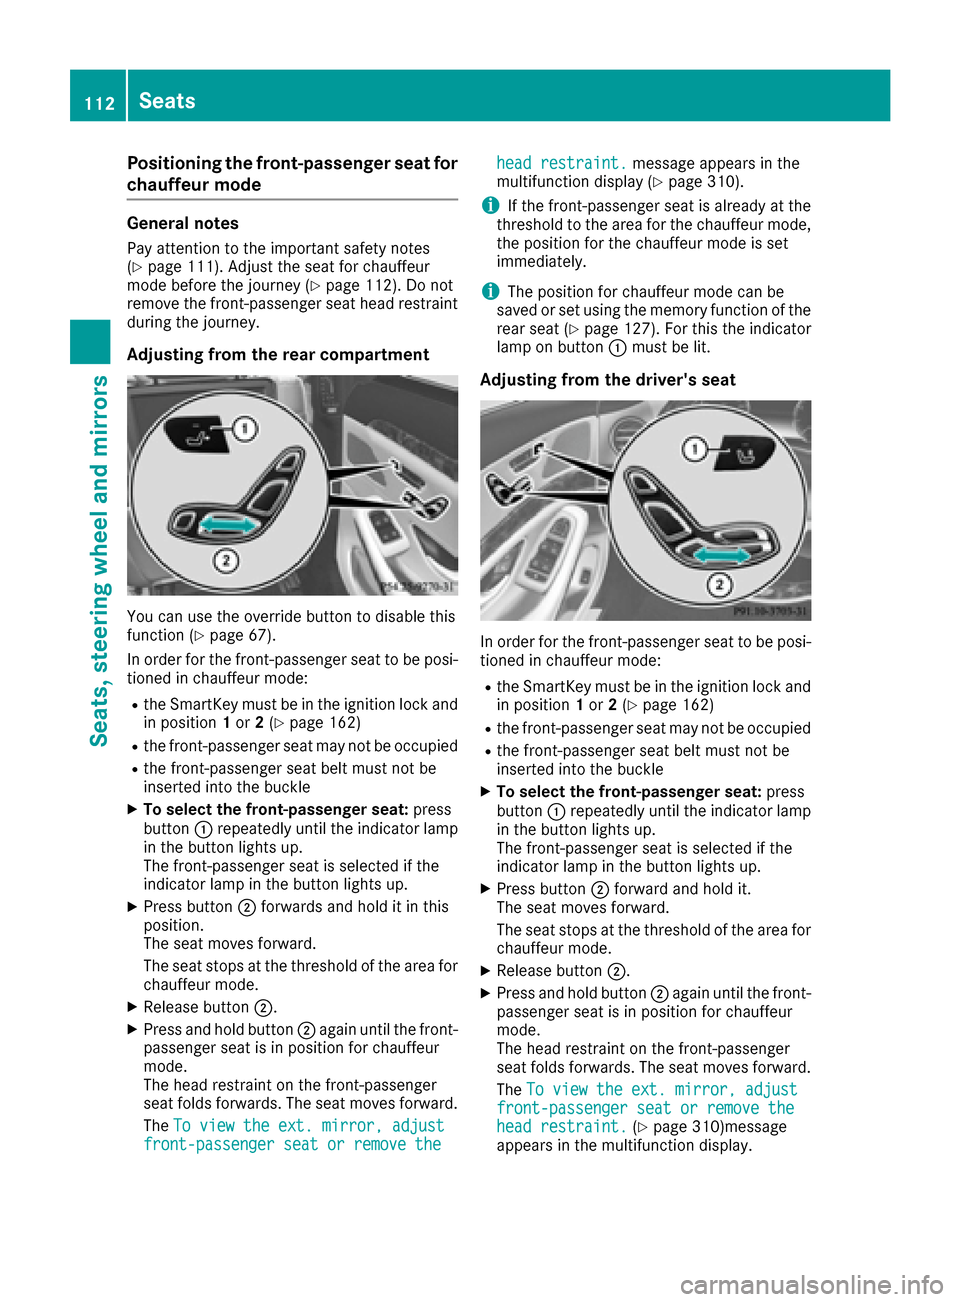
Adjusting from the rear compartment
You can use the override button to disable this
function (Ypage 67).
In order for the front-passenger seat to be posi-
tioned in chauffeur mode:
Rthe SmartKey must be in the ignition lock and in position 1or 2(Ypage 162)
Rthe front-passenger seat may not be occupied
Rthe front-passenger seat belt must not be
inserted into the buckle
XTo select the front-passenger seat: press
button :repeatedly until the indicator lamp
in the button lights up.
The front-passenger seat is selected if the
indicator lamp in the button lights up.
XPress button ;forwards and hold it in this
position.
The seat moves forward.
The seat stops at the threshold of the area for
chauffeur mode.
XRelease button ;.
XPress and hold button ;again until the front-
passenger seat is in position for chauffeur
mode.
The head restraint on the front-passenger
seat folds forwards. The seat moves forward.
The To view the ext. mirror, adjust
front-passenger seat or remove the
head restraint.message appears in the
multifunction display (Ypage 310).
iIf the front-passenger seat is already at the
threshold to the area for the chauffeur mode,
the position for the chauffeur mode is set
immediately.
iThe position for chauffeur mode can be
saved or set using the memory function of the
rear seat (
Ypage 127). For this the indicator
lamp on button :must be lit.
Adjusting from the driver's seat
In order for the front-passenger seat to be posi-
tioned in chauffeur mode:
Rthe SmartKey must be in the ignition lock and
in position 1or 2(Ypage 162)
Rthe front-passenger seat may not be occupied
Rthe front-passenger seat belt must not be
inserted into the buckle
XTo select the front-passenger seat: press
button :repeatedly until the indicator lamp
in the button lights up.
The front-passenger seat is selected if the
indicator lamp in the button lights up.
XPress button ;forward and hold it.
The seat moves forward.
The seat stops at the threshold of the area for
chauffeur mode.
XRelease button ;.
XPress and hold button ;again until the front-
passenger seat is in position for chauffeur
mode.
The head restraint on the front-passenger
seat folds forwards. The seat moves forward.
The To view the ext. mirror, adjust
front-passenger seat or remove thehead restraint.(Ypage 310)message
appears in the multifunction display.
112Seats
Seats, steering wheel and mirrors
Page 115 of 438
iIf the front-passenger seat is already at the
threshold to the area for the chauffeur mode,
the position for the chauffeur mode is set
immediately.
iThe position for chauffeur mode cannot be
stored or set with the driver's seat memory
function.
Installing/removing the head restraint
Removing
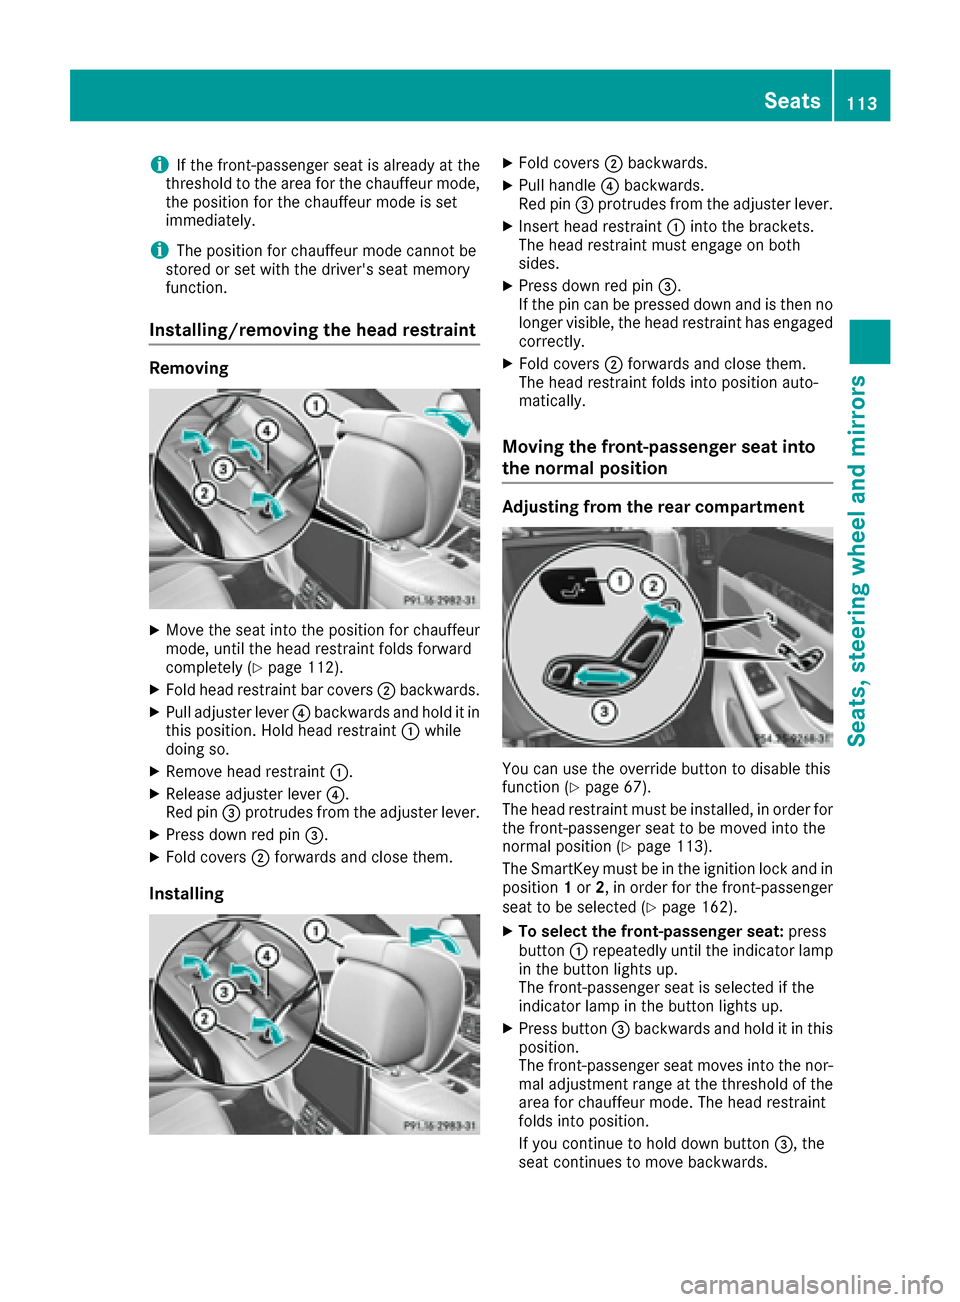
XMove the seat into the position for chauffeur
mode, until the head restraint folds forward
completely (
Ypage 112).
XFold head restraint bar covers ;backwards.
XPull adjuster lever ?backwards and hold it in
this position. Hold head restraint :while
doing so.
XRemove head restraint :.
XRelease adjuster lever?.
Red pin =protrudes from the adjuster lever.
XPress down red pin =.
XFold covers;forwards and close them.
Installing
XFold covers ;backwards.
XPull handle ?backwards.
Red pin =protrudes from the adjuster lever.
XInsert head restraint :into the brackets.
The head restraint must engage on both
sides.
XPress down red pin =.
If the pin can be pressed down and is then no longer visible, the head restraint has engaged
correctly.
XFold covers ;forwards and close them.
The head restraint folds into position auto-
matically.
Moving the front-passenger seat into
the normal position
Adjusting from the rear compartment
You can use the override button to disable this
function (Ypage 67).
The head restraint must be installed, in order for
the front-passenger seat to be moved into the
normal position (
Ypage 113).
The SmartKey must be in the ignition lock and in
position 1or 2, in order for the front-passenger
seat to be selected (
Ypage 162).
XTo select the front-passenger seat: press
button :repeatedly until the indicator lamp
in the button lights up.
The front-passenger seat is selected if the
indicator lamp in the button lights up.
XPress button =backwards and hold it in this
position.
The front-passenger seat moves into the nor-
mal adjustment range at the threshold of the
area for chauffeur mode. The head restraint
folds into position.
If you continue to hold down button =, the
seat continues to move backwards.
Seats113
Seats, steering wheel and mirrors
Z
Page 116 of 438
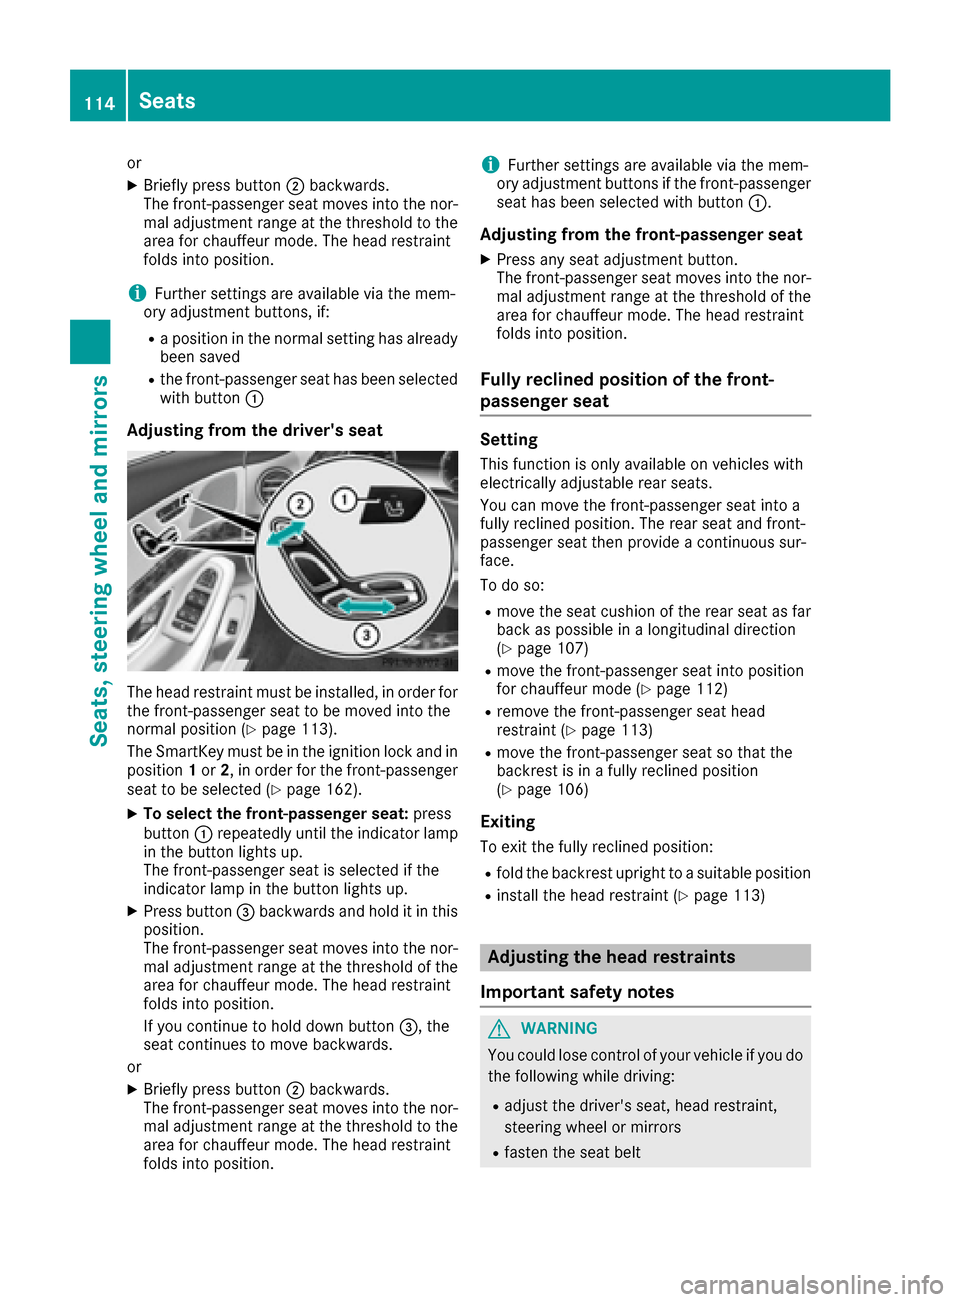
or
XBriefly press button;backwards.
The front-passenger seat moves into the nor-
mal adjustment range at the threshold to the
area for chauffeur mode. The head restraint
folds into position.
iFurther settings are available via the mem-
ory adjustment buttons, if:
Ra position in the normal setting has already been saved
Rthe front-passenger seat has been selected
with button :
Adjusting from the driver's seat
The head restraint must be installed, in order for
the front-passenger seat to be moved into the
normal position (
Ypage 113).
The SmartKey must be in the ignition lock and in
position 1or 2, in order for the front-passenger
seat to be selected (
Ypage 162).
XTo select the front-passenger seat: press
button :repeatedly until the indicator lamp
in the button lights up.
The front-passenger seat is selected if the
indicator lamp in the button lights up.
XPress button =backwards and hold it in this
position.
The front-passenger seat moves into the nor-
mal adjustment range at the threshold of the
area for chauffeur mode. The head restraint
folds into position.
If you continue to hold down button =, the
seat continues to move backwards.
or
XBriefly press button ;backwards.
The front-passenger seat moves into the nor-
mal adjustment range at the threshold to the
area for chauffeur mode. The head restraint
folds into position.
iFurther settings are available via the mem-
ory adjustment buttons if the front-passenger
seat has been selected with button :.
Adjusting from the front-passenger seat
XPress any seat adjustment button.
The front-passenger seat moves into the nor-
mal adjustment range at the threshold of the
area for chauffeur mode. The head restraint
folds into position.
Fully reclined position of the front-
passenger seat
Setting
This function is only available on vehicles with
electrically adjustable rear seats.
You can move the front-passenger seat into a
fully reclined position. The rear seat and front-
passenger seat then provide a continuous sur-
face.
To do so:
Rmove the seat cushion of the rear seat as far
back as possible in a longitudinal direction
(
Ypage 107)
Rmove the front-passenger seat into position
for chauffeur mode (Ypage 112)
Rremove the front-passenger seat head
restraint (Ypage 113)
Rmove the front-passenger seat so that the
backrest is in a fully reclined position
(
Ypage 106)
Exiting
To exit the fully reclined position:
Rfold the backrest upright to a suitable position
Rinstall the head restraint (Ypage 113)
Adjusting the head restraints
Important safety notes
GWARNING
You could lose control of your vehicle if you do the following while driving:
Radjust the driver's seat, head restraint,
steering wheel or mirrors
Rfasten the seat belt
114Seats
Seats, steering wheel and mirrors
Page 119 of 438
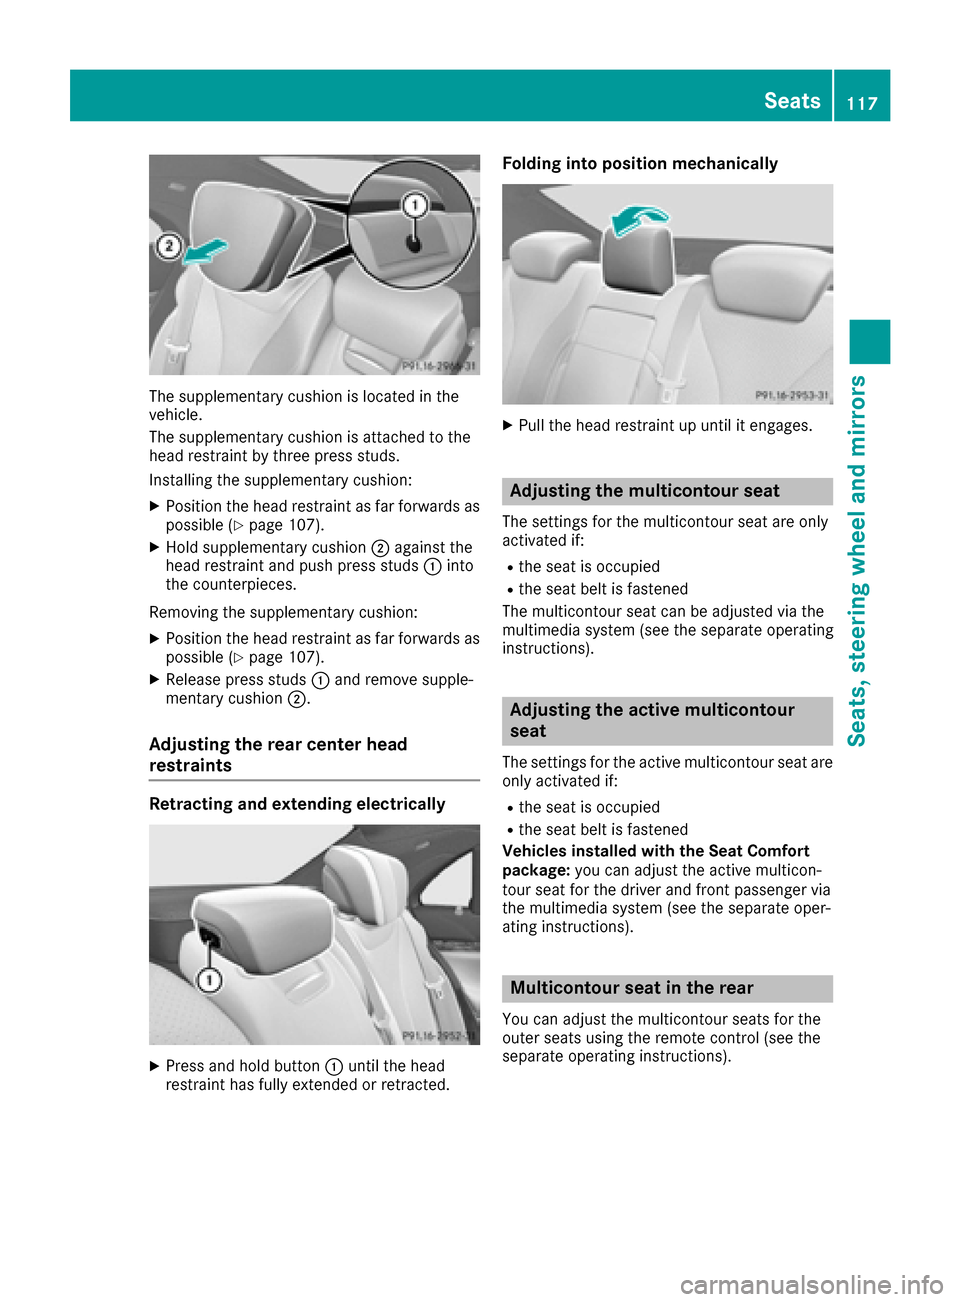
The supplementary cushion is located in the
vehicle.
The supplementary cushion is attached to the
head restraint by three press studs.
Installing the supplementary cushion:
XPosition the head restraint as far forwards as
possible (Ypage 107).
XHold supplementary cushion;against the
head restraint and push press studs :into
the counterpieces.
Removing the supplementary cushion:
XPosition the head restraint as far forwards as
possible (Ypage 107).
XRelease press studs :and remove supple-
mentary cushion ;.
Adjusting the rear center head
restraints
Retracting and extending electrically
XPress and hold button :until the head
restraint has fully extended or retracted.
Folding into position mechanically
XPull the head restraint up until it engages.
Adjusting the multicontour seat
The settings for the multicontour seat are only
activated if:
Rthe seat is occupied
Rthe seat belt is fastened
The multicontour seat can be adjusted via the
multimedia system (see the separate operating
instructions).
Adjusting the active multicontour
seat
The settings for the active multicontour seat are
only activated if:
Rthe seat is occupied
Rthe seat belt is fastened
Vehicles installed with the Seat Comfort
package: you can adjust the active multicon-
tour seat for the driver and front passenger via
the multimedia system (see the separate oper-
ating instructions).
Multicontour seat in the rear
You can adjust the multicontour seats for the
outer seats using the remote control (see the
separate operating instructions).
Seats117
Seats, steering wheel and mirrors
Z
Page 124 of 438

Problems with the steering wheel heating
ProblemPossible causes/consequences andMSolutions
The steering wheel heat-
ing has switched off pre-
maturely or cannot be
switched on.The on-board voltage is too low because too many electrical consum-
ers are switched on.
XSwitch off electrical consumers that you do not need, such as the
rear window defroster or interior lighting.
EASY-ENTRY/EXIT feature
Important safety notes
GWARNING
When the EASY-ENTRY/EXIT feature adjusts
the steering wheel and the driver's seat, you
and other vehicle occupants – particularly
children – could become trapped. There is a
risk of injury.
While the EASY-ENTRY/EXIT feature is mak-
ing adjustments, make sure that no one has
any body parts in the sweep of the seat and
the steering wheel.
If there is a risk of becoming trapped by
Rthe steering wheel: move the steering
wheel adjustment lever.
Rthe seat: press the switch for seat adjust-
ment.
The adjustment process is stopped.
Press one of the memory function position
switches. The adjustment process is stopped.
This function is only available on vehicles with
memory function.
GWARNING
If children activate the EASY-ENTRY/EXIT fea-
ture, they can become trapped, particularly
when unattended. There is a risk of injury.
When leaving the vehicle, always take the
SmartKey with you and lock the vehicle. Never
leave children unsupervised in the vehicle.
GWARNING
If you drive off while the EASY-ENTRY/EXIT
feature is making adjustments, you could lose
control of the vehicle. There is a risk of an
accident.
Always wait until the adjustment process is
complete before driving off.
The EASY-ENTRY/EXIT feature makes getting in
and out of your vehicle easier.
You can activate and deactivate the EASY-
ENTRY/EXIT feature using the multimedia sys-
tem (see the separate operating instructions).
Position of the steering wheel and the
driver's seat when the EASY-ENTRY/
EXIT feature is active
The steering wheel tilts upwards and the driver's
seat moves backwards if you:
Rremove the SmartKey from the ignition lock
Rwith KEYLESS-GO: open the driver's door;
KEYLESS-GO must be in position 1
Rwith the SmartKey:open the driver's door;
the SmartKey must be in position 0or 1in the
ignition lock (
Ypage 162)
Ropen the driver's door when the ignition is
switched off
iThe steering wheel only tilts upwards and
the driver's seat only moves backwards if the
driving position is stored after seat or steering wheel adjustment.
The last position of the steering wheel or seat is
stored if:
Rthe ignition is switched off
Rthe setting is stored with the memory function
(Ypage 126).
iThe steering wheel only moves upwards if it
has not already reached the upper stop. The
driver's seat only moves backwards if it is not
already in the rearmost position.
122Steering wheel
Seats, steering wheel and mirrors
Page 125 of 438

Position of the steering wheel and the
driver's seat for driving
The steering wheel and the driver's seat are
moved to the previously set position if:
Rthe driver's door is closed and you insert the
SmartKey into the ignition lock
Ryou close the driver's door when the ignition
is switched on
Ryou press the Start/Stop button once on vehi-
cles with KEYLESS-GO
iThe steering wheel and the driver's seat only
return to the last set position when the driving
position is stored after seat or steering wheel
adjustment.
The last position of the steering wheel or seat is
stored if:
Rthe ignition is switched off
Rthe setting is stored with the memory function
(Ypage 126).
Crash-responsive EASY-EXIT feature
If the crash-responsive EASY-EXIT feature is trig-
gered in an accident, the steering column will
move upwards when the driver's door is opened
or the SmartKey is removed from the ignition
lock. This makes it easier to exit the vehicle and
rescue the occupants.
The crash-responsive EASY-EXIT feature is only
operational if the EASY-EXIT/ENTRY feature is
activated in the multimedia system (see the sep-
arate operating instructions).
Mirrors
Rear-view mirror
XAnti-glare mode: flick anti-glare lever :for-
wards or back.
Exterior mirrors
Important safety notes
GWARNING
You could lose control of your vehicle if you do the following while driving:
Radjust the driver's seat, head restraint,
steering wheel or mirrors
Rfasten the seat belt
There is a risk of an accident.
Adjust the driver's seat, head restraint, steer-
ing wheel and mirror and fasten your seat belt before starting the engine.
GWARNING
The exterior mirror on the front-passenger
side reduces the size of the image. Visible
objects are actually closer than they appear.
This means that you could misjudge the dis-
tance from road users traveling behind, e.g.
when changing lane. There is a risk of an acci-
dent.
For this reason, always make sure of the
actual distance from the road users traveling
behind by glancing over your shoulder.
Adjusting the exterior mirrors
Mirrors123
Seats, steering wheel and mirrors
Z