2016 MERCEDES-BENZ S-Class SEDAN armrest
[x] Cancel search: armrestPage 160 of 438
these will be activated together with the "Pre-
entry climate control at departure time".
Activating the perfume atomizer or ionization
(see separate operating instructions).
Setting the departure time
You can set the departure time using the on-
board computer or via the My Mercedes Electric
– Vehicle Homepage. The activation of the "Pre-
entry climate control at departure time" func-
tion can be linked to this departure time. Your
vehicle will then be cooled or heated until the
desired temperature is reached in time for the
set departure time. "Pre-entry climate control at departure time" will be activated a maximum of
55 minutes before departure. If the departure is
delayed, the vehicle will be heated or cooled for
another five minutes.
XTo set the departure time: set the departure
time using the on-board computer
(
Ypage 272). Set the departure time via the
My Mercedes Electric – Vehicle Homepage
(
Ypage 189).
XTo activate or deactivate "Pre-entry cli-
mate control at departure time": activate
or deactivate "Pre-entry climate control at
departure time" via the multimedia system
(see the separate operating instructions).
Activate or deactivate "Pre-entry climate con-
trol at departure time" via the My Mercedes
Electric – Vehicle Homepage (
Ypage 189).
When activating the "Pre-entry climate control
at departure time" function: you can sele ct
w
hether only the driver's area or the whole vehi-
cle interior should be heated or cooled.
The "Pre-entry climate control at departure
time" function switches off automatically when
the vehicle is started. The following functions
remain active:
RSeat heating
RSeat ventilation
RArmrest heating
RSteering wheel heating
RPerfume atomizer
RIonization
Switching off "Pre-entry climate control at
departure time": the activated "Pre-entry cli-
mate control at departure time" can be switched
off using the rocker switch (
Ypage 158).
Activating or deactivating "Immediate
pre-entry climate control" using the
rocker switch
You can activate "Immediate pre-entry climate
control" even if the vehicle interior is already at
the desired temperature. This means that the
vehicle interior continues to be cooled or
heated, e.g. if the journey is interrupted for up to 50 minutes, and the interior temperature is kept
constant.
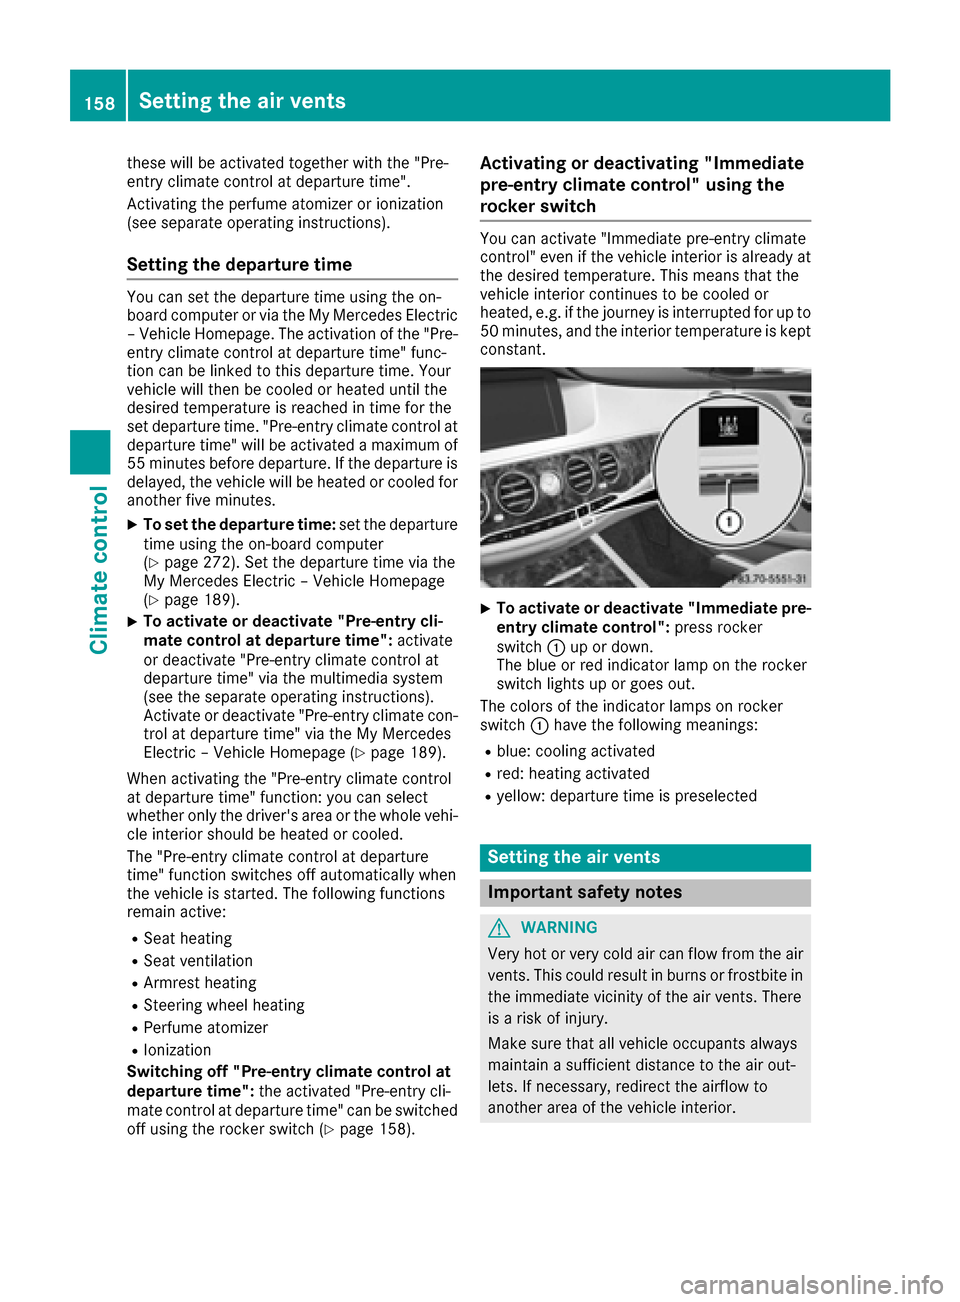
XTo activate or deactivate "Immediate pre-
entry climate control": press rocker
switch :up or down.
The blue or red indicator lamp on the rocker
switch lights up or goes out.
The colors of the indicator lamps on rocker
switch :have the following meanings:
Rblue: cooling activated
Rred: heating activated
Ryellow: departure time is preselected
Setting the air vents
Important safety notes
GWARNING
Very hot or very cold air can flow from the air
vents. This could result in burns or frostbite in
the immediate vicinity of the air vents. There
is a risk of injury.
Make sure that all vehicle occupants always
maintain a sufficient distance to the air out-
lets. If necessary, redirect the airflow to
another area of the vehicle interior.
158Setting the air vents
Climate control
Page 329 of 438
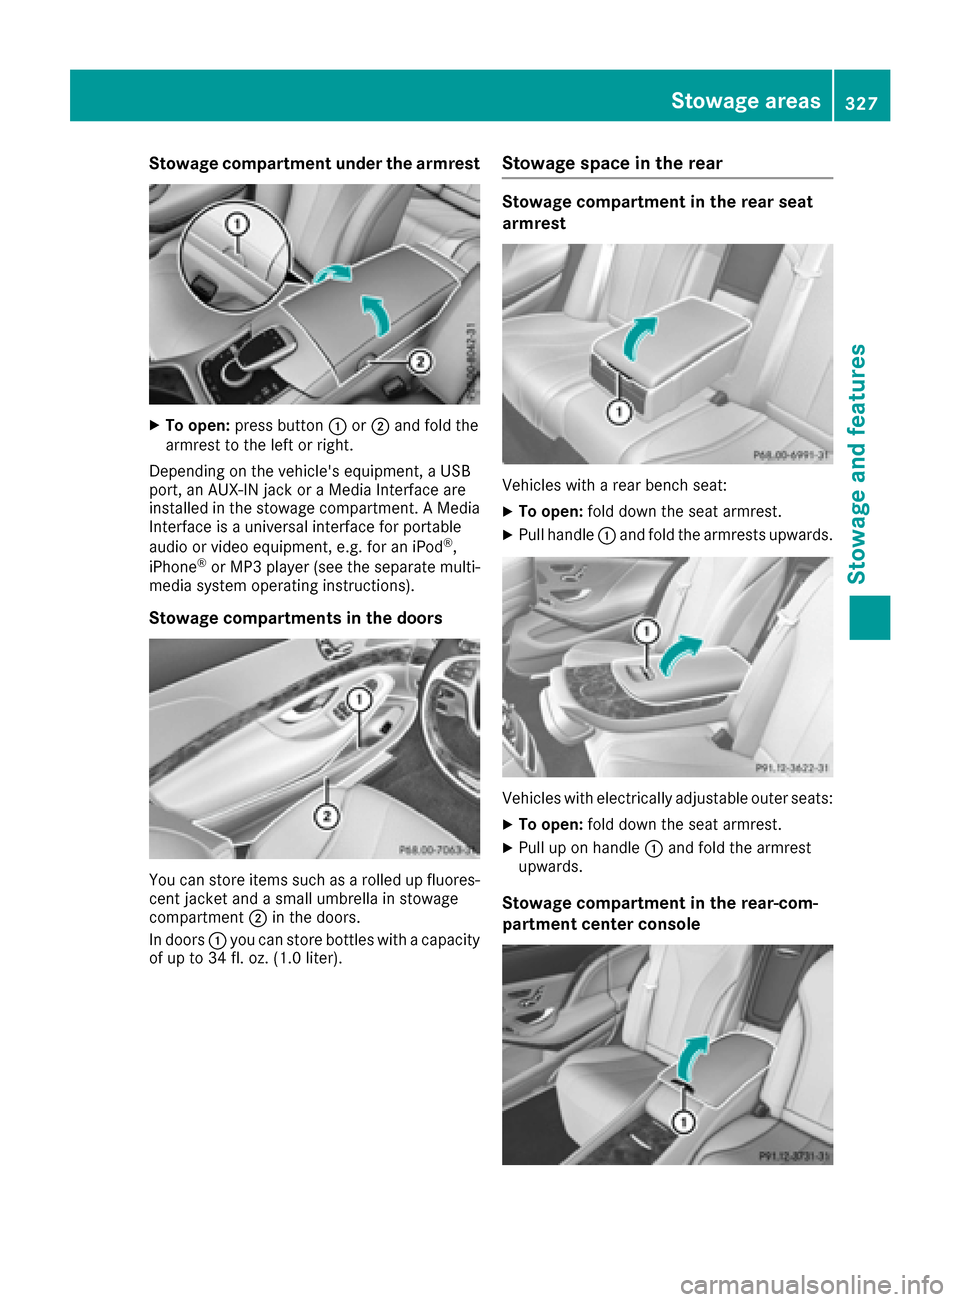
Stowage compartment under the armrest
XTo open:press button :or; and fold the
armrest to the left or right.
Depending on the vehicle's equipment, a USB
port, an AUX-IN jack or a Media Interface are
installed in the stowage compartment. A Media Interface is a universal interface for portable
audio or video equipment, e.g. for an iPod
®,
iPhone®or MP3 player (see the separate multi-
media system operating instructions).
Stowage compartments in the doors
You can store items such as a rolled up fluores-
cent jacket and a small umbrella in stowage
compartment ;in the doors.
In doors :you can store bottles with a capacity
of up to 34 fl. oz. (1.0 liter).
Stowage space in the rear
Stowage compartment in the rear seat
armrest
Vehicles with a rear bench seat:
XTo open: fold down the seat armrest.
XPull handle :and fold the armrests upwards.
Vehicles with electrically adjustable outer seats:
XTo open: fold down the seat armrest.
XPull up on handle :and fold the armrest
upwards.
Stowage compartment in the rear-com-
partment center console
Stowage areas327
Stowage and features
Z
Page 330 of 438
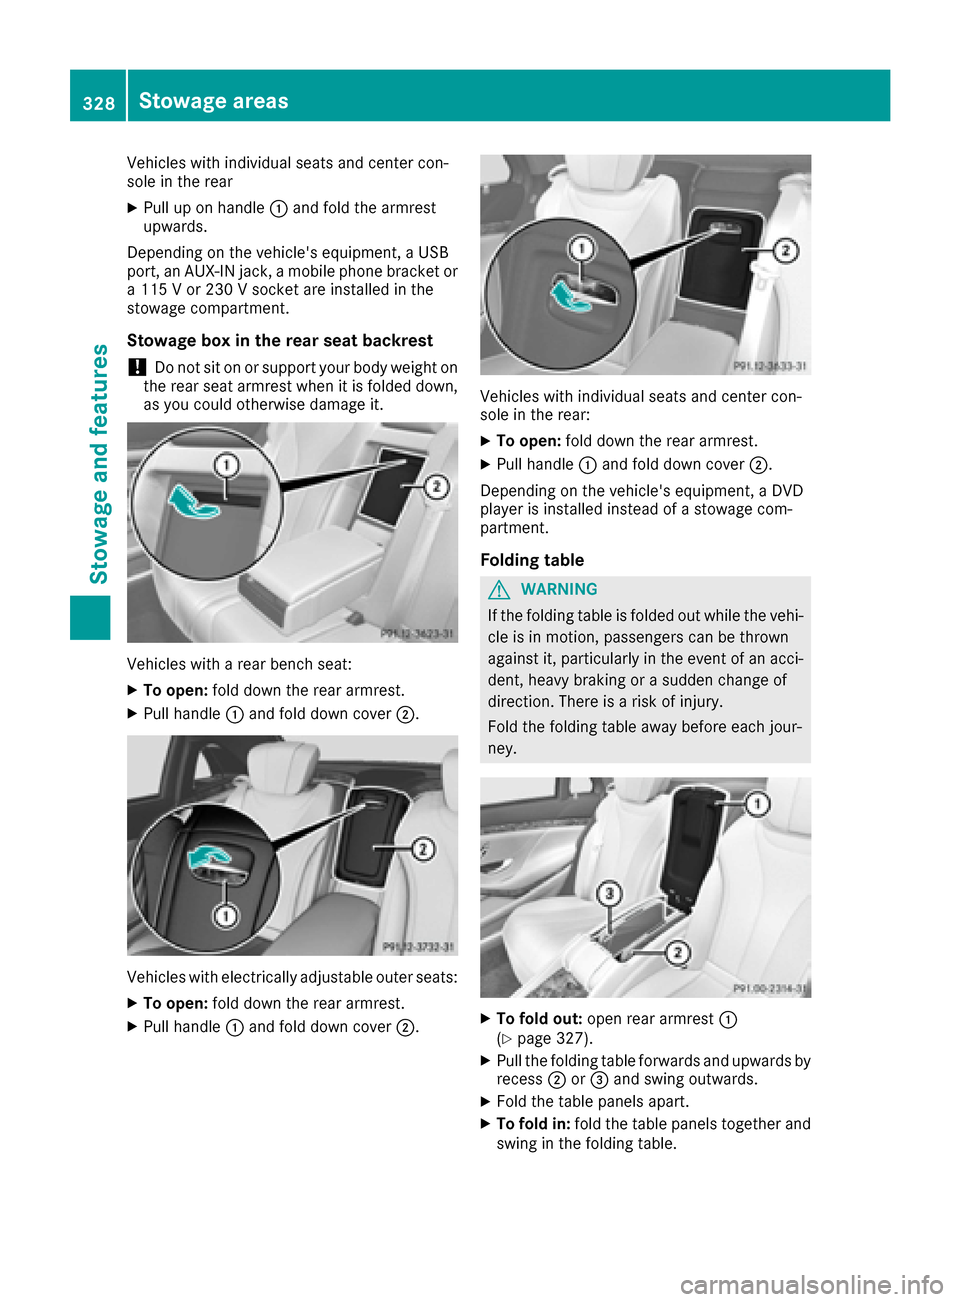
Vehicles with individual seats and center con-
sole in the rear
XPull up on handle:and fold the armrest
upwards.
Depending on the vehicle's equipment, a USB
port, an AUX-IN jack, a mobile phone bracket or
a 115 V or 230 V socket are installed in the
stowage compartment.
Stowage box in the rear seat backrest
!Do not sit on or support your body weight on
the rear seat armrest when it is folded down,
as you could otherwise damage it.
Vehicles with a rear bench seat:
XTo open: fold down the rear armrest.
XPull handle :and fold down cover ;.
Vehicles with electrically adjustable outer seats:
XTo open:fold down the rear armrest.
XPull handle :and fold down cover ;.
Vehicles with individual seats and center con-
sole in the rear:
XTo open:fold down the rear armrest.
XPull handle :and fold down cover ;.
Depending on the vehicle's equipment, a DVD
player is installed instead of a stowage com-
partment.
Folding table
GWARNING
If the folding table is folded out while the vehi-
cle is in motion, passengers can be thrown
against it, particularly in the event of an acci-
dent, heavy braking or a sudden change of
direction. There is a risk of injury.
Fold the folding table away before each jour-
ney.
XTo fold out: open rear armrest :
(Ypage 327).
XPull the folding table forwards and upwards by
recess ;or= and swing outwards.
XFold the table panels apart.
XTo fold in: fold the table panels together and
swing in the folding table.
328Stowage areas
Stowage and features
Page 333 of 438
retain all objects they contain. There is a riskof injury, particularly in the event of sudden
braking or a sudden change in direction.
RAlways stow objects so that they cannot be
thrown around in such situations.
RAlways make sure that objects do not pro-
trude from stowage spaces, parcel nets or
stowage nets.
RClose the lockable stowage spaces before
starting a journey.
RAlways stow and secure heavy, hard, poin-
ted, sharp-edged, fragile or bulky objects in
the trunk.
Observe the loading guidelines (
Ypage 325).
Mercedes-Maybach vehicles equipped with
champagne glasses: for your own safety, when
using champagne glasses, please observe the
following:
Rdo not use the champagne glasses while the
vehicle is in motion
Rdo not use champagne glasses made of
breakable glass, and store them in the trunk if
possible
!Only use the cup holders for containers of
the right size and which have lids. The drinks
could otherwise spill.
!Do not expose drinks bottles in the cup
holder in the center console to continuous,
strong and direct sunlight. The passenger
compartment in the area of the center con-
sole can otherwise be damaged by the con-
centrated and reflected sunlight.
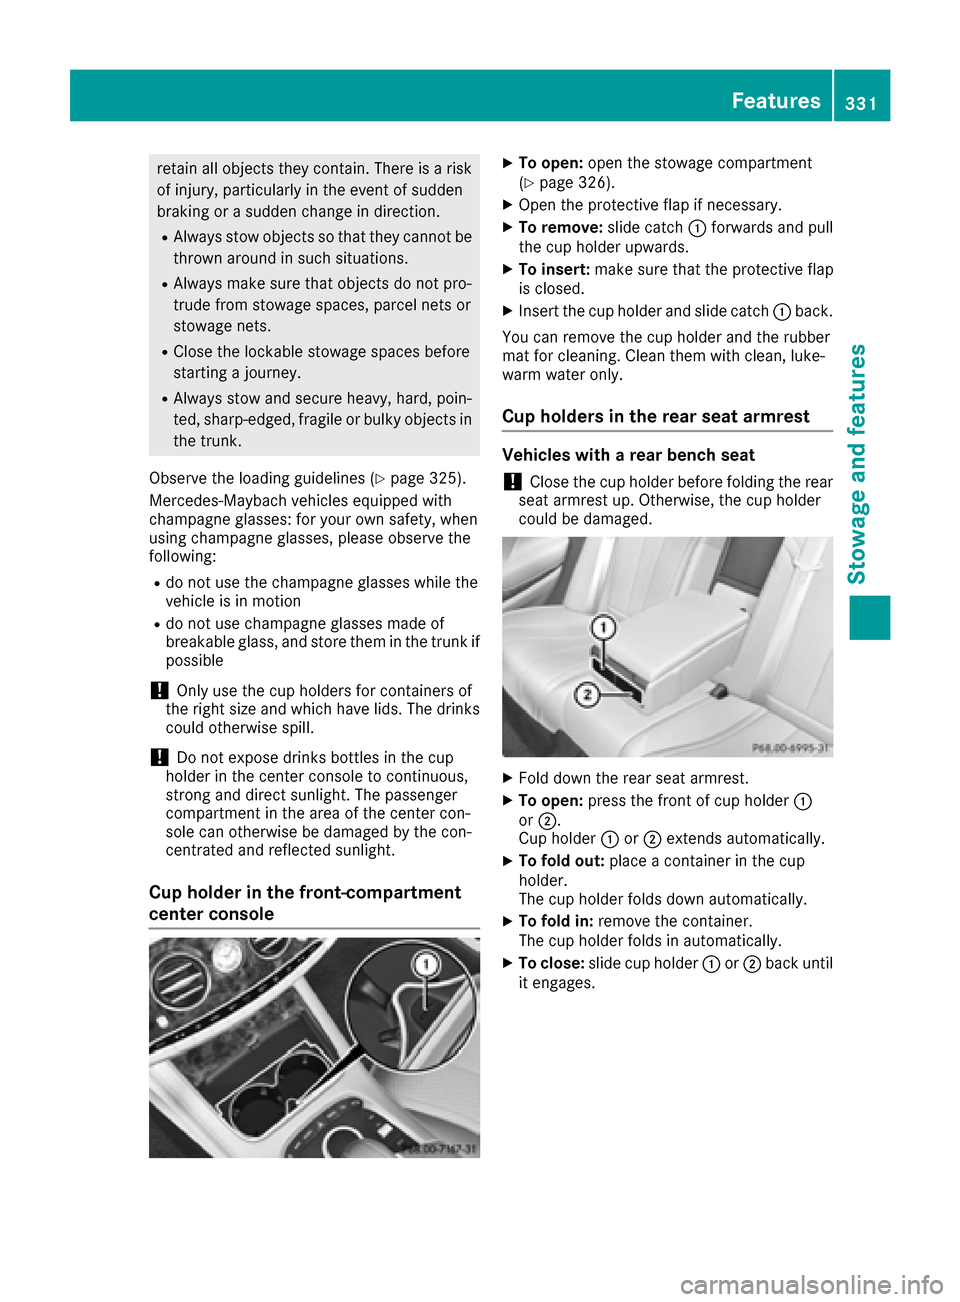
Cup holder in the front-compartment
center console
XTo open: open the stowage compartment
(Ypage 326).
XOpen the protective flap if necessary.
XTo remove: slide catch:forwards and pull
the cup holder upwards.
XTo insert: make sure that the protective flap
is closed.
XInsert the cup holder and slide catch :back.
You can remove the cup holder and the rubber
mat for cleaning. Clean them with clean, luke-
warm water only.
Cup holders in the rear seat armrest
Vehicles with a rear bench seat
!Close the cup holder before folding the rear
seat armrest up. Otherwise, the cup holder
could be damaged.
XFold down the rear seat armrest.
XTo open: press the front of cup holder :
or ;.
Cup holder :or; extends automatically.
XTo fold out: place a container in the cup
holder.
The cup holder folds down automatically.
XTo fold in: remove the container.
The cup holder folds in automatically.
XTo close: slide cup holder :or; back until
it engages.
Features331
Stowage and features
Z
Page 334 of 438
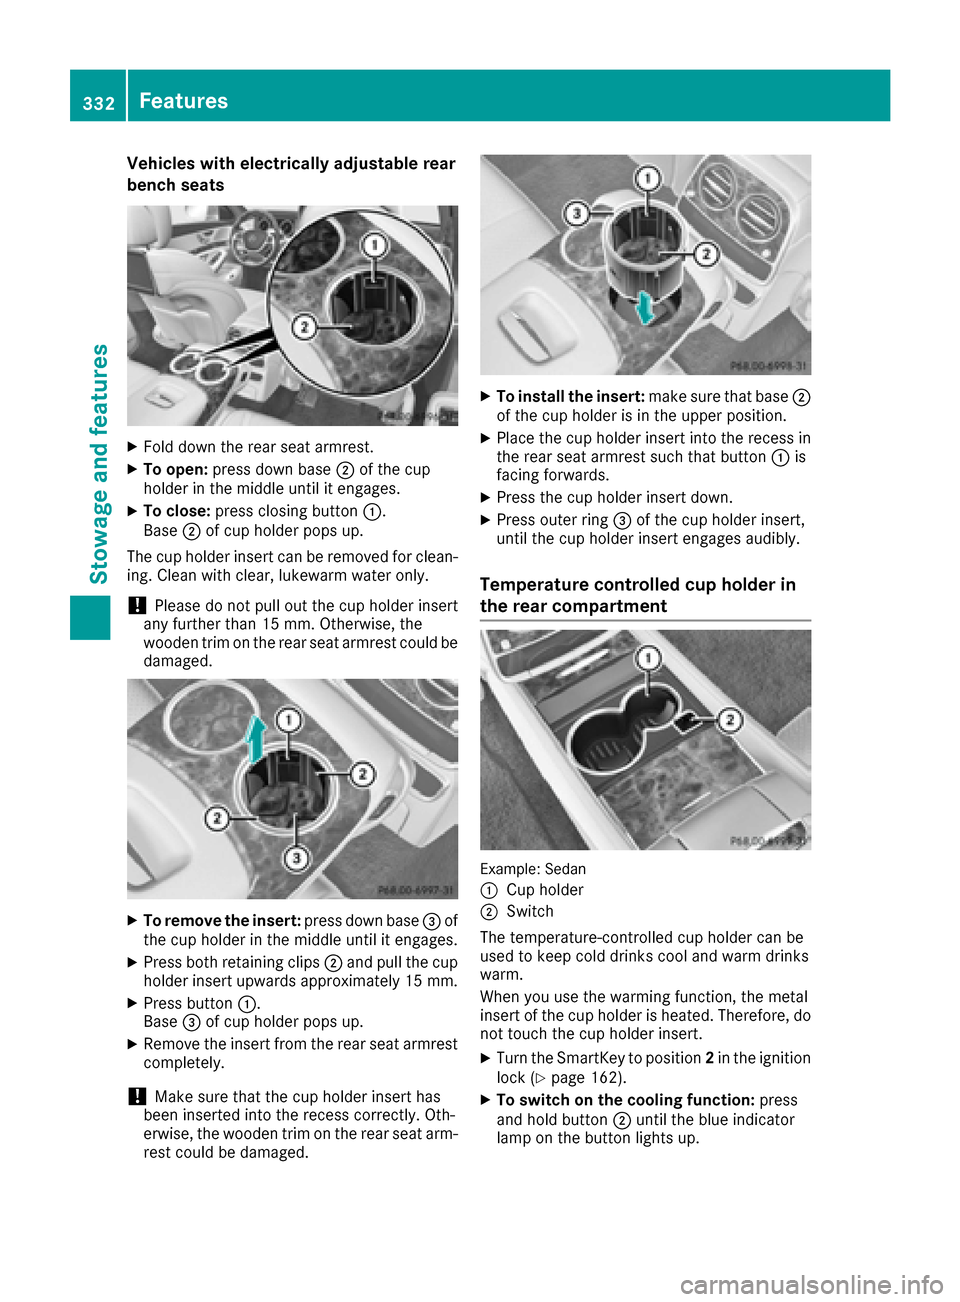
Vehicles with electrically adjustable rear
bench seats
XFold down the rear seat armrest.
XTo open:press down base ;of the cup
holder in the middle until it engages.
XTo close: press closing button :.
Base ;of cup holder pops up.
The cup holder insert can be removed for clean-
ing. Clean with clear, lukewarm water only.
!Please do not pull out the cup holder insert
any further than 15 mm. Otherwise, the
wooden trim on the rear seat armrest could be
damaged.
XTo remove the insert: press down base=of
the cup holder in the middle until it engages.
XPress both retaining clips ;and pull the cup
holder insert upwards approximately 15 mm.
XPress button :.
Base =of cup holder pops up.
XRemove the insert from the rear seat armrest
completely.
!Make sure that the cup holder insert has
been inserted into the recess correctly. Oth-
erwise, the wooden trim on the rear seat arm-
rest could be damaged.
XTo install the insert: make sure that base;
of the cup holder is in the upper position.
XPlace the cup holder insert into the recess in
the rear seat armrest such that button :is
facing forwards.
XPress the cup holder insert down.
XPress outer ring =of the cup holder insert,
until the cup holder insert engages audibly.
Temperature controlled cup holder in
the rear compartment
Example: Sedan
:
Cup holder
;Switch
The temperature-controlled cup holder can be
used to keep cold drinks cool and warm drinks
warm.
When you use the warming function, the metal
insert of the cup holder is heated. Therefore, do
not touch the cup holder insert.
XTurn the SmartKey to position 2in the ignition
lock (Ypage 162).
XTo switch on the cooling function: press
and hold button ;until the blue indicator
lamp on the button lights up.
332Features
Stowage and features
Page 340 of 438
RUse only connector cables that are dry and
free of damage.
RWhen the ignition is off, make sure that the
115 V power socket is dry.
RHave the 115 V power socket checked or
replaced immediately at a qualified speci-
alized workshop if it is damaged or has been
pulled out of the trim.
RNever plug the connector cable into a 115 V
power socket that is damaged or has been
pulled out of the trim.
GDANGER
If you reach into the power socket or plug
inappropriate devices into the power socket,
you could receive an electric shock. There is a
risk of fatal injury.
Only connect appropriate devices to the
power socket.
!Note that work and repairs on the 115 V
power socket should only be carried out by
qualified specialist personnel.
General notes
The 115 V power socket provides an alternating
voltage of 115 V so that small electronic devices
can be connected. These devices, such as
games consoles, chargers and laptops, must not consume more than a maximum of 150 watts
altogether.
Requirements for operation of these devices:
Rthe electronic device that you connect has a
suitable connector and conforms to stand-
ards specific to the country you are in.
Rthe plug of the electronic device is plugged
correctly into 115 V power socket.
Rthe maximum wattage of the device to be
connected must not exceed 150 watts.
Rthe on-board power supply is within a permis-sible voltage range.
Rthe 12 V sockets in the center console in the
front compartment (Ypage 336) and in the
trunk are functional (Ypage 337).
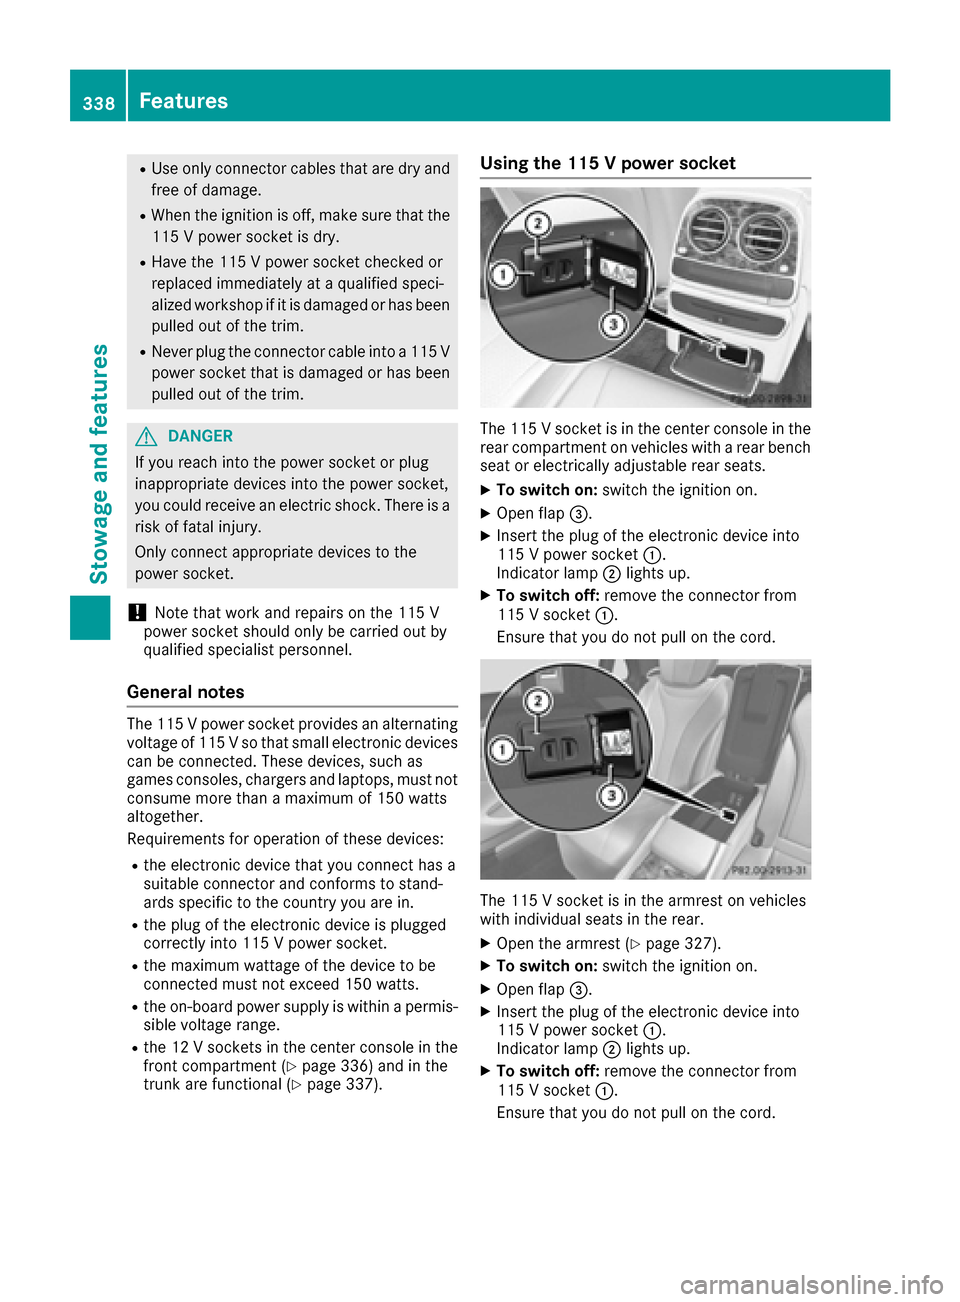
Using the 115 V power socket
The 115 V socket is in the center console in the
rear compartment on vehicles with a rear bench
seat or electrically adjustable rear seats.
XTo switch on: switch the ignition on.
XOpen flap=.
XInsert the plug of the electronic device into
115 V power socket :.
Indicator lamp ;lights up.
XTo switch off: remove the connector from
115 V socket :.
Ensure that you do not pull on the cord.
The 115 V socket is in the armrest on vehicles
with individual seats in the rear.
XOpen the armrest (Ypage 327).
XTo switch on: switch the ignition on.
XOpen flap=.
XInsert the plug of the electronic device into
115 V power socket :.
Indicator lamp ;lights up.
XTo switch off: remove the connector from
115 V socket :.
Ensure that you do not pull on the cord.
338Features
Stowage and features
Page 341 of 438

Problems with the 115 V power socket
ProblemPossible causes/consequences andMSolutions
The warning lamp on the
115 V power socket is
not lit.The on-board voltage is too low because the battery is too weak.
XStart the engine.
or
XCharge the battery (Ypage 374).
If the indicator lamp still does not light up:
XVisit a qualified specialist workshop.
The temperature of the DC/AC converter is temporarily too high.
XRemove the electronic device connector from the 115 V socket.
XLet the DC/AC converter cool down.
If the indicator lamp still does not light up after cooling down the
converter:
XVisit a qualified specialist workshop.
You have connected an electronic device that has a constant nominal
power of less than 150 watts, but has a very high switch-on current.
This device will not work. If you connect such a device, the 115 V
power socket will not supply it with power.
XConnect a suitable electronic device.
Coolbox in the rear compartment
Important safety notes
GWARNING
If you cover the ventilation grille for the cool-
box, it may overheat. There is a risk of fire.
Always make sure that the ventilation grille is not covered.
The ventilation grille for the coolbox is in the
trunk.
The coolbox can bear a maximum load of 7.7 lb (3.5 kg).
If you want to store a bottle in the upper com-
partment of the coolbox, the capacity of the
bottle must not exceed 17 fl. oz. (0.5 l).
Store only plastic bottles in the upper compart-
ment of the coolbox.
Using the coolbox
XVehicles with rear seat armrest: fold down
the rear seat armrest.
XPull handle :and fold down cover ;.
Features339
Stowage and features
Z