2016 MERCEDES-BENZ S-Class SEDAN armrest
[x] Cancel search: armrestPage 14 of 438

LATCH-type (ISOFIX) child seat
anchors................................................ 63
License plate lamp (display mes-
sage) .................................................. .292
Light function, active
Display message ............................ 293
Light sensor (display message) ....... 293
Lights
Adaptive Highbeam Assist PLUS .... 133
Automatic headlamp mode ............ 130
Cornering light function ................. 132
Fogged up headlamps .................... 134
General notes ................................ 130
Hazard warning lamps ................... 132
High beam flasher .......................... 132
High-beam headlamps ................... 132
Light switch ................................... 130
Low-beam headlamps .................... 131
Parking lamps ................................ 131
Setting exterior lighting ................. 130
Standing lamps .............................. 131
Switching the daytime running
lamps on/off (on-board com-
puter) ............................................. 274
Switching the spotlight on/off ....... 274
Turn signals ................................... 131
see Interior lighting
see Replacing bulbs
Loading guidelines ............................ 325
Locking
see Central locking
Locking (doors)
Automatic ........................................ 87
Emergency locking ........................... 88
From inside (central locking but-
ton) ..................................................8 6
Locking centrally
see Central locking
Low-beam headlamps
Display message ............................ 291
Switching on/off .......................... .131
Lumbar support
Adjusting the 4-way lumbar sup-
port ................................................ 118
Luxury head restraints .....................115M
M+S tires
............................................ 386
Magic Body Control ........................... 210
MAGIC SKY CONTROL ....................... 100
Malfunction message
see Display messages
Matte finish (cleaning instruc-
tions) ..................................................3 61
Maximum charge current
Setting (charging cable) ................. 184
Setting (on-board computer) .......... 272
MBC
see Magic Body Control
mbrace
Call priority ....................................3 44
Display message ............................ 283
Downloading destinations
(COMAND) ..................................... 344
Downloading routes ....................... 347
Emergency call .............................. 341
General notes ................................ 340
Geo fencing ................................... 347
Locating a stolen vehicle ...............3 46
MB info call button ........................ 343
Remote fault diagnosis .................. 346
Remote vehicle locking .................. 345
Roadside Assistance button .......... 342
Search & Send ............................... 344
Self-test ......................................... 341
Speed alert ....................................3 47
System .......................................... 341
Triggering the vehicle alarm ........... 347
Vehicle remote unlocking .............. 345
Mechanical key
Function/notes ................................ 81
General notes .................................. 81
Inserting .......................................... 82
Locking vehicle ................................ 88
Removing ......................................... 81
Unlocking the driver's door .............. 87
Media Interface
USB port in the armrest of the
center console ............................... 327
see Separate operating instructions
Memory card (audio) ......................... 266
Memory function
In the rear compartment ................ 127
12Index
Page 21 of 438

Switching on/off ........................... 131
Start/Stop button
General notes ................................ 162
Key positions ................................. 163
Removing ....................................... 163
Starting the engine ........................ 164
Start/stop function
see ECO start/stop function
Starting (engine) ................................ 164
STEER CONTROL .................................. 77
Steering
Display message ............................ 311
Warning lamps ............................... 324
Steering Assist
see DISTRONIC PLUS
Steering Assist and Stop&Go Pilot
(DISTRONIC PLUS)
Display message ............................ 305
Steering assistant STEER CON-
TROL
see STEER CONTROL
Steering wheel
Adjusting (electrically) ................... 120
Button overview ............................... 35
Buttons (on-board computer) ......... 257
Cleaning ......................................... 365
EASY ENTRY/EXIT feature ............. 122
Important safety notes .................. 120
Paddle shifters ............................... 174
Steering wheel heating .................. 120
Storing settings (memory func-
tion) ............................................... 126
Steering wheel heating
Problem (malfunction) ................... 122
Switching on/off ........................... 120
Steering wheel paddle shifters ........ 174
Stop&Go Pilot
see DISTRONIC PLUS
Stowage areas ................................... 325
Stowage compartments
Armrest (under) ............................. 327
Center console .............................. 326
Center console in rear compart-
ment .............................................. 327
Cup holders ................................... 330
Door ............................................... 327
Eyeglasses compartment ............... 326
Glove box ....................................... 326 Important safety information ......... 325
Rear ............................................... 327
Rear seat backrest ......................... 328
Stowage net ................................... 329
see Stowage areas
Stowage net ....................................... 329
Stowage space
Folding table .................................. 328
Parcel net retainers ....................... 329
Securing a load .............................. 329
Stowage well beneath the trunk
floor .................................................... 329
Summer tires
In w
inter ........................................ 386
Sun visor ............................................ 333
Suspension mode
Active Body Control ABC ............... 210
Suspension setting
AIRMATIC ...................................... 212
Suspension settings
SETUP (on-board computer) .......... 276
Switching air-recirculation mode
on/off ................................................. 152
T
Tachometer ........................................ 256
Tail lamps
Display message ............................ 292
see Lights
Tank content
Fuel gauge ....................................... 33
Technical data
Capacities ...................................... 427
Information .................................... 425
Tires/wheels ................................. 410
Vehicle data ................................... 433
Telephone
Accepting a call (multifunction
steering wheel) .............................. 267
Display message ............................ 311
Introduction ................................... 267
Menu (on-board computer) ............ 267
Number from the phone book ........ 268
Redialing ........................................ 268
Rejecting/ending a call ................. 268
Temperature
Coolant .......................................... 257
Index19
Page 43 of 438
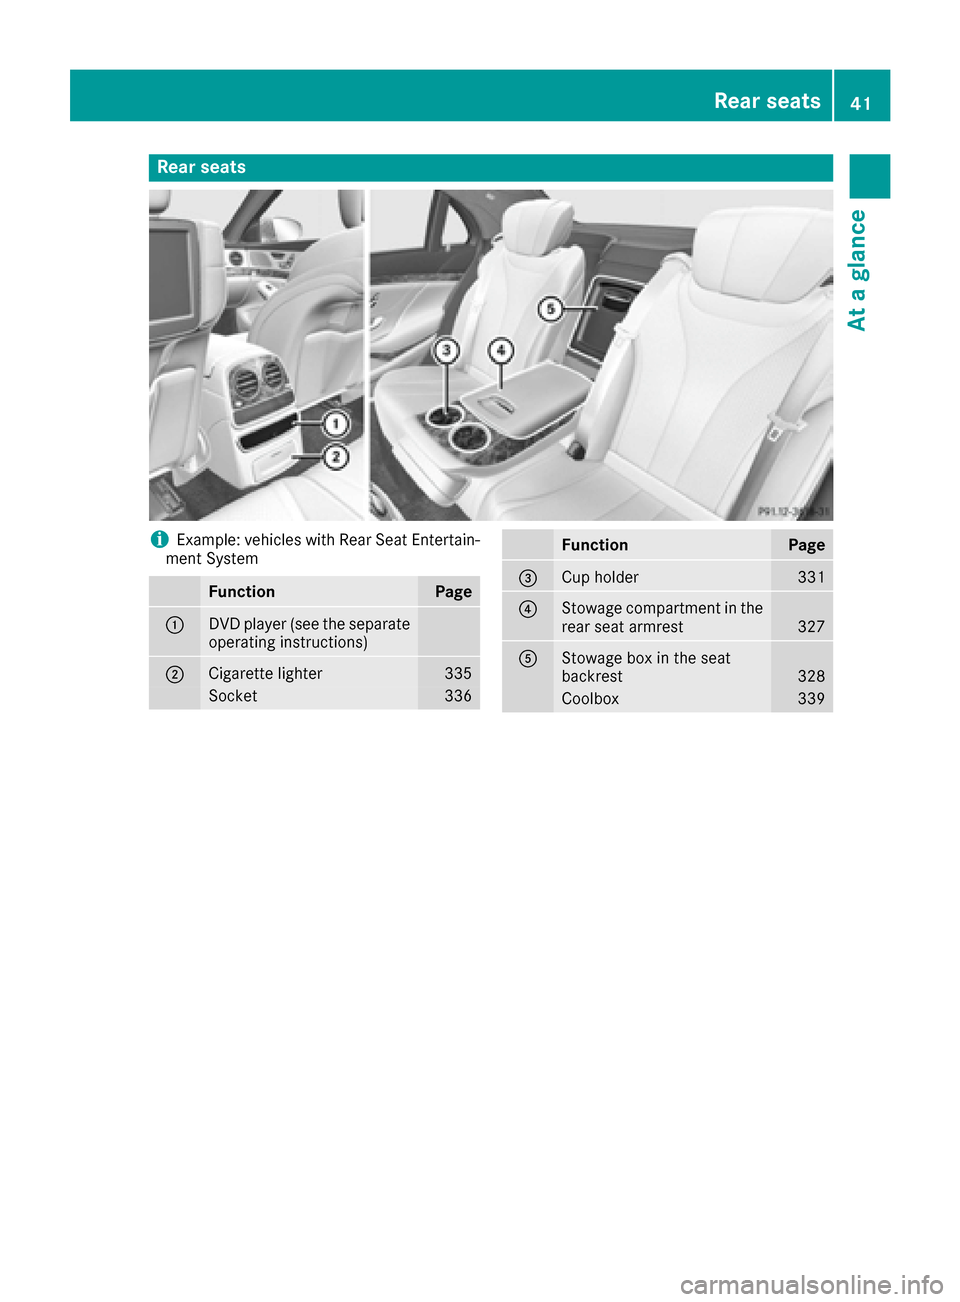
Rear seats
iExample: vehicles with Rear Seat Entertain-
ment System
FunctionPage
:DVD player (see the separate
operating instructions)
;Cigarette lighter335
Socket336
FunctionPage
=Cup holder331
?Stowage compartment in the
rear seat armrest327
AStowage box in the seat
backrest328
Coolbox339
Rear seats41
At a glance
Page 55 of 438
The side impact air bag on the front-passenger
side (front) deploys under the following condi-
tions:
Rthe OCS system detects that the front-
passenger seat is occupied or
Rthe belt tongue is engaged in the belt buckle
of the front-passenger seat
If the belt tongue is engaged in the belt buckle,
the side impact air bag on the front-passenger
side deploys if an appropriate accident situation occurs. In this case, deployment is independent
of whether the front-passenger seat is occupied
or not.
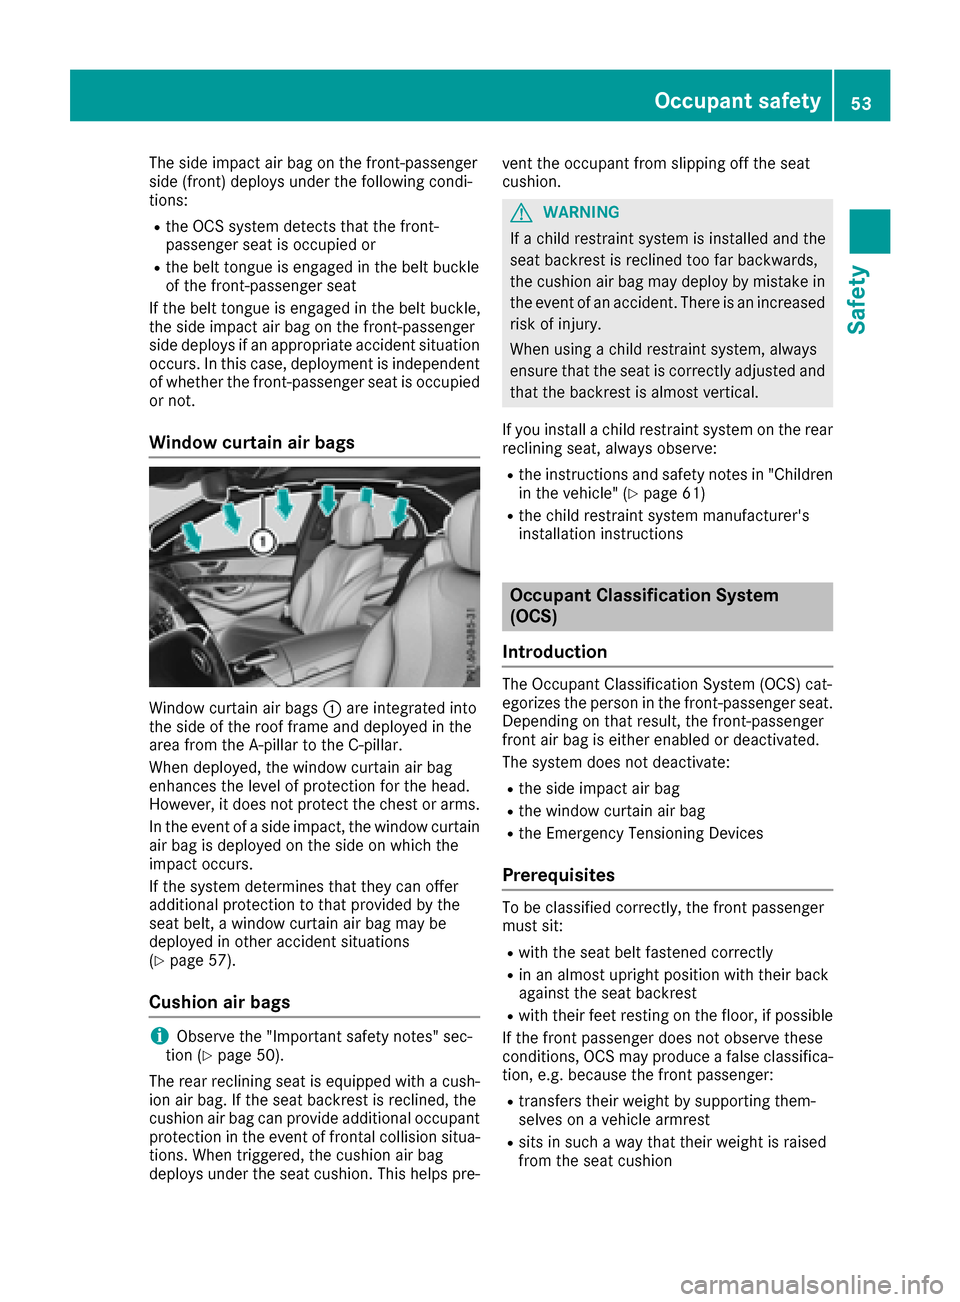
Window curtain air bags
Window curtain air bags :are integrated into
the side of the roof frame and deployed in the
area from the A-pillar to the C-pillar.
When deployed, the window curtain air bag
enhances the level of protection for the head.
However, it does not protect the chest or arms.
In the event of a side impact, the window curtain air bag is deployed on the side on which the
impact occurs.
If the system determines that they can offer
additional protection to that provided by the
seat belt, a window curtain air bag may be
deployed in other accident situations
(
Ypage 57).
Cushion air bags
iObserve the "Important safety notes" sec-
tion (Ypage 50).
The rear reclining seat is equipped with a cush-
ion air bag. If the seat backrest is reclined, the
cushion air bag can provide additional occupant
protection in the event of frontal collision situa-
tions. When triggered, the cushion air bag
deploys under the seat cushion. This helps pre- vent the occupant from slipping off the seat
cushion.
GWARNING
If a child restraint system is installed and the
seat backrest is reclined too far backwards,
the cushion air bag may deploy by mistake in
the event of an accident. There is an increased
risk of injury.
When using a child restraint system, always
ensure that the seat is correctly adjusted and
that the backrest is almost vertical.
If you install a child restraint system on the rear
reclining seat, always observe:
Rthe instructions and safety notes in "Children
in the vehicle" (Ypage 61)
Rthe child restraint system manufacturer's
installation instructions
Occupant Classification System
(OCS)
Introduction
The Occupant Classification System (OCS) cat-
egorizes the person in the front-passenger seat.
Depending on that result, the front-passenger
front air bag is either enabled or deactivated.
The system does not deactivate:
Rthe side impact air bag
Rthe window curtain air bag
Rthe Emergency Tensioning Devices
Prerequisites
To be classified correctly, the front passenger
must sit:
Rwith the seat belt fastened correctly
Rin an almost upright position with their back
against the seat backrest
Rwith their feet resting on the floor, if possible
If the front passenger does not observe these
conditions, OCS may produce a false classifica-
tion, e.g. because the front passenger:
Rtransfers their weight by supporting them-
selves on a vehicle armrest
Rsits in such a way that their weight is raised
from the seat cushion
Occupant safety53
Safety
Z
Page 66 of 438
!When installing the child restraint system,
make sure that the seat belt for the middle
seat does not get trapped. The seat belt could
otherwise be damaged.
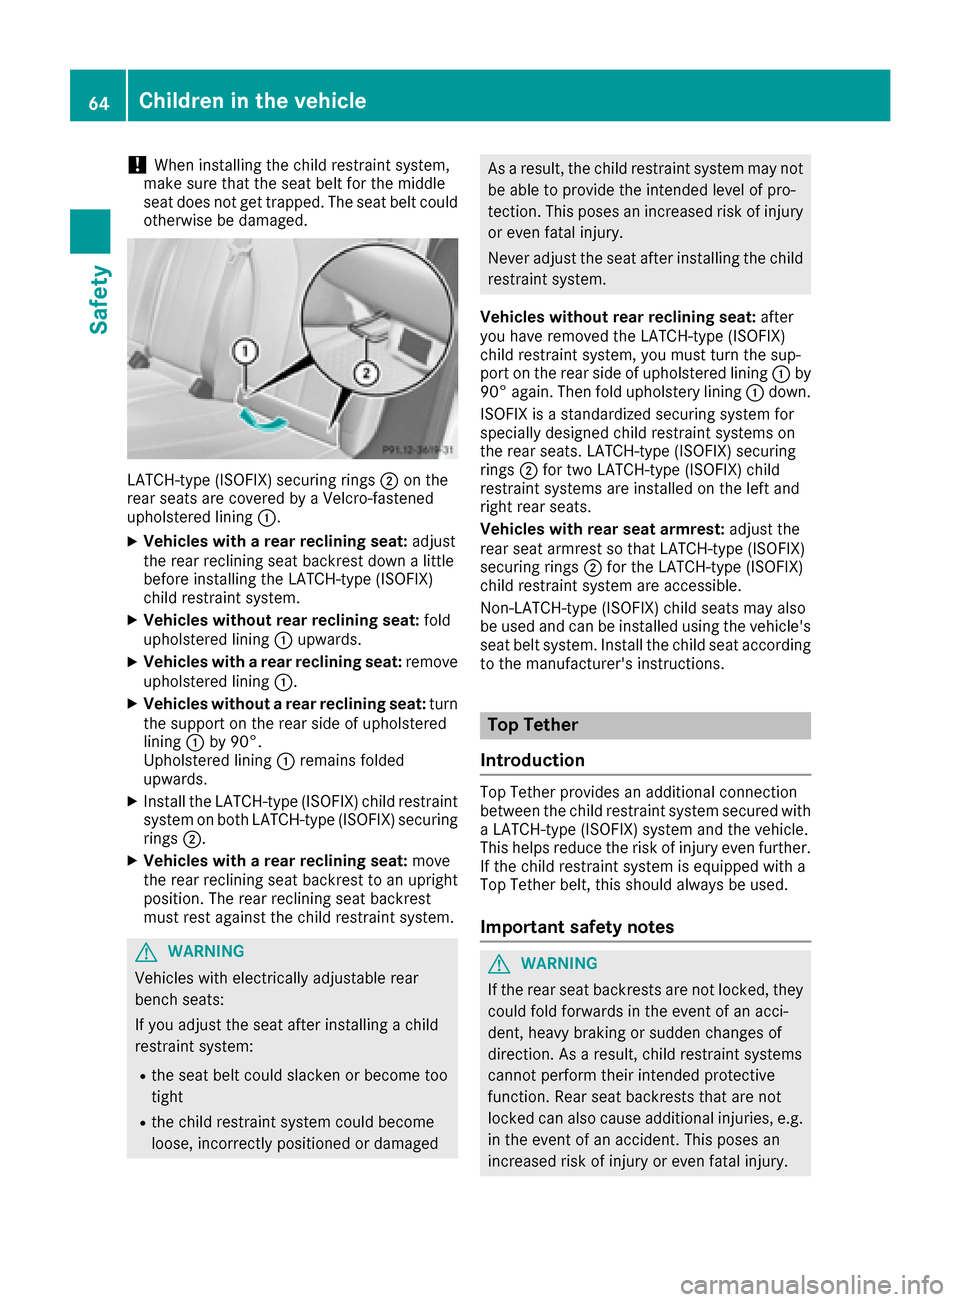
LATCH-type (ISOFIX) securing rings ;on the
rear seats are covered by a Velcro-fastened
upholstered lining :.
XVehicles with a rear reclining seat: adjust
the rear reclining seat backrest down a little
before installing the LATCH-type (ISOFIX)
child restraint system.
XVehicles without rear reclining seat: fold
upholstered lining :upwards.
XVehicles with a rear reclining seat: remove
upholstered lining :.
XVehicles without a rear reclining seat: turn
the support on the rear side of upholstered
lining :by 90°.
Upholstered lining :remains folded
upwards.
XInstall the LATCH-type (ISOFIX) child restraint
system on both LATCH-type (ISOFIX) securing
rings ;.
XVehicles with a rear reclining seat: move
the rear reclining seat backrest to an upright
position. The rear reclining seat backrest
must rest against the child restraint system.
GWARNING
Vehicles with electrically adjustable rear
bench seats:
If you adjust the seat after installing a child
restraint system:
Rthe seat belt could slacken or become too
tight
Rthe child restraint system could become
loose, incorrectly positioned or damaged
As a result, the child restraint system may not be able to provide the intended level of pro-
tection. This poses an increased risk of injury
or even fatal injury.
Never adjust the seat after installing the child
restraint system.
Vehicles without rear reclining seat: after
you have removed the LATCH-type (ISOFIX)
child restraint system, you must turn the sup-
port on the rear side of upholstered lining :by
90° again. Then fold upholstery lining :down.
ISOFIX is a standardized securing system for
specially designed child restraint systems on
the rear seats. LATCH-type (ISOFIX) securing
rings ;for two LATCH-type (ISOFIX) child
restraint systems are installed on the left and
right rear seats.
Vehicles with rear seat armrest: adjust the
rear seat armrest so that LATCH-type (ISOFIX)
securing rings ;for the LATCH-type (ISOFIX)
child restraint system are accessible.
Non-LATCH-type (ISOFIX) child seats may also
be used and can be installed using the vehicle's
seat belt system. Install the child seat according
to the manufacturer's instructions.
Top Tether
Introduction
Top Tether provides an additional connection
between the child restraint system secured with
a LATCH-type (ISOFIX) system and the vehicle.
This helps reduce the risk of injury even further.
If the child restraint system is equipped with a
Top Tether belt, this should always be used.
Important safety notes
GWARNING
If the rear seat backrests are not locked, they
could fold forwards in the event of an acci-
dent, heavy braking or sudden changes of
direction. As a result, child restraint systems
cannot perform their intended protective
function. Rear seat backrests that are not
locked can also cause additional injuries, e.g.
in the event of an accident. This poses an
increased risk of injury or even fatal injury.
64Children in the vehicle
Safety
Page 157 of 438
Problems with the perfume atomizer
ProblemPossible causes/consequences andMSolutions
The vehicle interior is not
perfumed although the
perfume atomizer is acti-
vated.The perfume vial has not been pushed into the holder as far as it will
go.
XSlide the perfume vial into the holder as far as it will go.
The perfume vial is not filled sufficiently.
XPre-filled vials:dispose of the empty vial.
XUse a new pre-filled vial.
XRefillable vials: fill the perfume vial with a maximum of 0.5 fl. oz.
(15 ml) of the same perfume.
The perfume atomizer is faulty.
XHave the perfume atomizer checked at a qualified specialist work-
shop.
Ionization
You can use the "Ionization" function to purify
the air in the vehicle interior and attain an
improved interior climate.
The ionization of the interior air is odorless and
cannot be perceived directly in the vehicle inte-
rior.
You can switch ionization on or off using the
multimedia system (see the separate operating
instructions).
Ionization can only be switched on if the front
climate control system is activated. The side air
vent on the driver's side must be open.
Pre-entry climate control via Smart-
Key
General notes
The "Pre-entry climate control via SmartKey"
function is only available in PLUG-IN HYBRID
vehicles.
Before getting in, the driver's seat area or the
whole interior can be briefly warmed or ventila-
ted in advance with the air from the air vents
being pre-cooled.
The high-voltage battery must be sufficiently
charged before "Pre-entry climate control via
SmartKey" can be activated. When the vehicle is pre-cooled, the following
functions are activated if required:
RClimate control system
RBlower
RSeat ventilation
When the vehicle is pre-heated, the following
functions are activated if required:
RClimate control system
RBlower
RSeat heating
RSteering wheel heating
RExterior mirror heating
RRear window defroster
If you have activated the following functions
using the multimedia system, they are activated
together with the "Pre-entry climate control via
SmartKey" function:
RArmrest heating
RPerfume atomizer
RIonization
Activating the perfume atomizer or ionization
(see separate operating instructions).
Activating or deactivating "Pre-entry
climate control via SmartKey"
Before "Pre-entry climate control via SmartKey"
can be activated, you must activate the function
via the multimedia system (see separate oper-
ating instructions).
Operating the climate control systems155
Climate control
Z
Page 158 of 438

XTo activate pre-entry climate control via
SmartKey:unlock the vehicle with the Smart-
Key or KEYLESS-GO.
The climate control functions are activated
for up to 5 minutes for pre-heating and pre-
cooling.
To deactivate "Pre-entry climate control via SmartKey": "Pre-entry climate control via
SmartKey" switches off automatically when the
engine is started.
The following functions remain active after the
engine is started:
RSeat heating (heating)
RSeat ventilation (ventilation)
RArmrest heating
RPerfume atomizer
RIonization
An activated "Pre-entry climate control via
SmartKey" function can be deactivated using
the rocker switch (
Ypage 158).
156Operating the climate control systems
Climate control
Page 159 of 438
Problems with "Pre-entry climate control via SmartKey"
ProblemPossible causes/consequences andMSolutions
"Pre-entry climate con-
trol via SmartKey" can-
not be switched on or
has switched itself off.The condition of charge of the high-voltage battery is under the speci-
fied minimum condition of charge.
XStart the engine when the vehicle is at a standstill.
The engine powers the electric motor. The electric motor operates
as a generator. The high-voltage battery is being charged.
Further information on charging the high-voltage battery via:
Ra mains socket (Ypage 183)
Ra charging station (Ypage 186)
Ra wallbox (Ypage 185)
"Pre-entry climate control via SmartKey" has been started more than
twice with the engine switched off.
XSwitch on the engine and let it run for more than ten seconds.
XTry again to switch on "Pre-entry climate control via SmartKey".
Pre-entry climate control at time of
departure
Important safety notes
GWARNING
If persons, particularly children are subjected to prolonged exposure to extreme heat or
cold, there is a risk of injury, possibly even
fatal. Never leave children unattended in the
vehicle.
General notes
The "Pre-entry climate control at departure
time" function is only available in PLUG-IN
HYBRID vehicles.
You can use the "Pre-entry climate control at
departure time" function to cool or heat the
vehicle interior if the engine is not running.
The "Pre-entry climate control at departure
time" function can be activated regardless of
whether or not the vehicle is connected to an
electric power supply. The condition of charge of
the high-voltage battery must be higher than the
specified minimum condition of charge, how-
ever.
When the vehicle is connected to an electric
power supply, priority is given to charging the
high-voltage battery to the specified minimum charge. "Pre-entry climate control at departure
time" is only activated subsequently.
The running time of the "Pre-entry climate con-
trol at departure time" function may be reduced
if:
Rthe vehicle is not connected to an electric
power supply and
Rthe high-voltage battery is not fully charged
With active "Pre-entry climate control at depar-
ture time" the condition of charge of the high-
voltage battery can be reduced, even if the
charge cable connector is connected.
When the vehicle is cooled, the following func-
tions are activated if required:
RClimate control system
RBlower
RSeat ventilation
When the vehicle is heated, the following func-
tions are activated if required:
RClimate control system
RBlower
RSeat heating
RSteering wheel heating
RArmrest heating
RExterior mirror heating
RRear window defroster
If you have switched on the perfume atomizer or the ionization using the multimedia system,
Operating the climate control systems157
Climate control
Z