2016 MERCEDES-BENZ S-Class SEDAN Auto hold
[x] Cancel search: Auto holdPage 89 of 438
Automa tic locking featu re
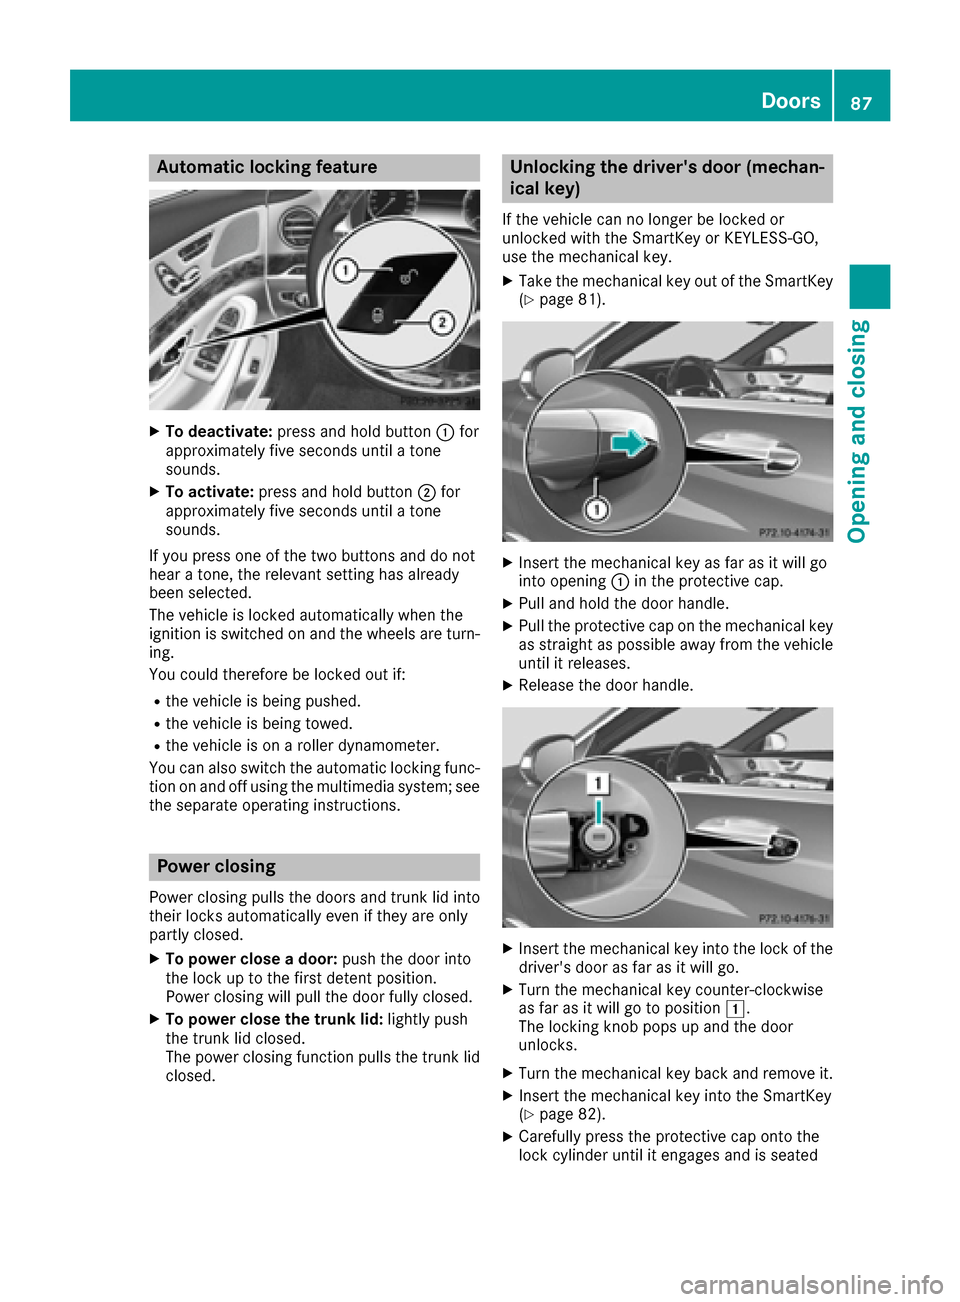
XTo deactivate:press and hold butto n: for
approximately fiv eseconds until atone
sounds.
XTo activate: press and hold butto n; for
approximately fiv eseconds until atone
sounds.
If you press on eof th etwo buttons and do no t
hear atone ,th erelevan tsetting has already
been selected.
The vehicl eis locke dautomatically when th e
ignition is switched on and th ewheels are turn-
ing .
You could therefor ebe locke dout if:
Rth evehicl eis bein gpushed.
Rth evehicl eis bein gtowed.
Rth evehicl eis on aroller dynamometer.
You can also switch th eautomatic locking func-
tion on and off usin gth emultimedia system; see
th eseparat eoperating instructions.
Power closing
Powe rclosin gpulls th edoor sand trunk lid int o
their locks automatically eve nif they are only
partly closed.
XTo power close adoor :push th edoor int o
th eloc kup to th efirst deten tposition .
Powe rclosin gwill pull th edoor fully closed.
XTo power close th etrunk lid :lightl ypush
th etrunk lid closed.
The powe rclosin gfunction pulls th etrunk lid
closed.
Unlocking the driver's door(mechan-
ical key)
If th evehicl ecan no longer be locke dor
unlocke dwit hth eSmartKey or KEYLESS-GO ,
use th emechanical key.
XTak eth emechanical ke yout of th eSmartKey
(Ypage 81).
XInser tth emechanical ke yas far as it will go
int oopening :in th eprotective cap .
XPull and hold th edoor handle.
XPull th eprotective cap on th emechanical ke y
as straight as possibl eaway from th evehicl e
until it releases.
XReleas eth edoor handle.
XInser tth emechanical ke yint oth eloc kof th e
driver's door as far as it will go.
XTurn th emechanical ke ycounter-clockwise
as far as it will go to position 1.
The locking knob pops up and th edoor
unlocks .
XTurn themechanical ke ybac kand remove it .
XInsertth emechanical ke yint oth eSmartKey
(Ypage 82) .
XCarefully press th eprotective cap onto th e
loc kcylinder until it engage sand is seated
Doors87
Opening and closing
Z
Page 92 of 438

Vehicles with trunk lid remote closing fea-
ture or power closing:
XLightly push the trunk lid closed.
The power closing function pulls the trunk lid
closed.
XLock the vehicle if necessary with the&
button on the SmartKey or with KEYLESS-GO
(
Ypage 80).
iIf KEYLESS-GO detects a SmartKey in the
trunk, the trunk lid cannot be locked. It then
opens again.
Opening/closing automatically from
outside
Important safety notes
GWARNING
Parts of the body could become trapped dur-
ing automatic closing of the trunk lid. More-
over, people, e.g. children, may be standing in the closing area or may enter the closing area
during the closing process. There is a risk of
injury.
Make sure that nobody is in the vicinity of the
closing area during the closing process.
Use one of the following options to stop the
closing process:
Rpress the Fbutton on the SmartKey.
Rpull or press the remote operating switch
on the driver's door.
Rpress the closing or locking button on the
trunk lid.
Rpull the trunk lid handle
Vehicles with HANDS-FREE ACCESS: it is also
possible to stop the closing process by perform-
ing a kicking movement under the rear bumper.
GWARNING
Combustion engines emit poisonous exhaust
gases such as carbon monoxide. Exhaust
gases can enter the vehicle interior if the
trunk lid is open when the engine is running,
especially if the vehicle is in motion. There is a
risk of poisoning.
Always switch off the engine before opening
the trunk lid. Never drive with the trunk lid
open.
!The trunk lid swings upwards when opened.
Therefore, make sure that there is sufficient
clearance above the trunk lid.
The opening dimensions of the trunk lid can be
found in the "Vehicle data" section
(
Ypage 433).
Opening
You can open the trunk lid automatically using
the SmartKey or the handle in the trunk lid.
XPress and hold the Fbutton on the Smart-
Key until the trunk lid opens.
or
XIf the trunk lid is unlocked, pull the trunk lid
handle and let it go again immediately.
Closing
You can close the trunk lid automatically using
the SmartKey or the closing button in the trunk
lid.
XPress closing button :on the trunk lid.
or
XIf the SmartKey is located in the immediate
vicinity of the vehicle: press the Fbutton
on the SmartKey.
You can release the button as soon as the
trunk lid starts to close.
XTo stop the closing process:
RPress the Fbutton on the SmartKey or
RPull the trunk lid handle, or
RPress closing button :or locking but-
ton ;on the trunk lid, or
90Trunk
Opening and closing
Page 94 of 438

ilar to these. This will prevent the uninten-
tional opening/closing of the trunk.
Operation
XTo open/close:kick into sensor detection
range :under the bumper with your foot.
A warning tone will sound while the trunk lid is
opening or closing.
XIf the trunk lid does not open/close after
several attempts: wait at least ten seconds
and then using your foot kick under the
bumper again.
If you hold your foot under the bumper for too
long, the trunk lid does not open or close.
Repeat the leg movement more quickly if this
occurs.
To stop the opening or closing procedure:
Rkick with your leg in the sensor detection
range :under the bumper or
Rpull the handle on the outside of the trunk lid
or
Rpress the closing button on the trunk lid, or
Rpress the Fbutton on the SmartKey
If the trunk lid closing procedure has been stop-
ped:
Rmove your foot under the bumper again and
the trunk lid will open
If the trunk lid opening procedure has been
stopped:
Rmove your foot under the bumper again and
the trunk lid will close
Opening/closing automatically from
inside
Important safety notes
GWARNING
The reversing feature does not react:
Rto soft, light and thin objects, e.g. small fin-
gers
Rover the last 1/3 in (8 mm) of the closing
movement
This means that the reversing feature cannot
prevent someone being trapped in these sit-
uations. There is a risk of injury.
Make sure that no body parts are in close
proximity during the closing procedure.
If somebody becomes trapped:
Rpress the Fbutton on the SmartKey, or
Rpull or press the remote operating switch
on the driver's door or
Rpress the closing or locking button on the
trunk lid, or
Rpull on the trunk lid handle
Vehicles with HANDS-FREE ACCESS: it is also
possible to stop the closing process by perform-
ing a kicking movement under the rear bumper.
GWARNING
Combustion engines emit poisonous exhaust
gases such as carbon monoxide. Exhaust
gases can enter the vehicle interior if the
trunk lid is open when the engine is running,
especially if the vehicle is in motion. There is a
risk of poisoning.
Always switch off the engine before opening
the trunk lid. Never drive with the trunk lid
open.
!The trunk lid swings upwards when opened.
Therefore, make sure that there is sufficient
clearance above the trunk lid.
The opening dimensions of the trunk lid can be
found in the "Vehicle data" section
(
Ypage 433).
92Trunk
Opening and closing
Page 97 of 438
Opening and closing the side win-
dows
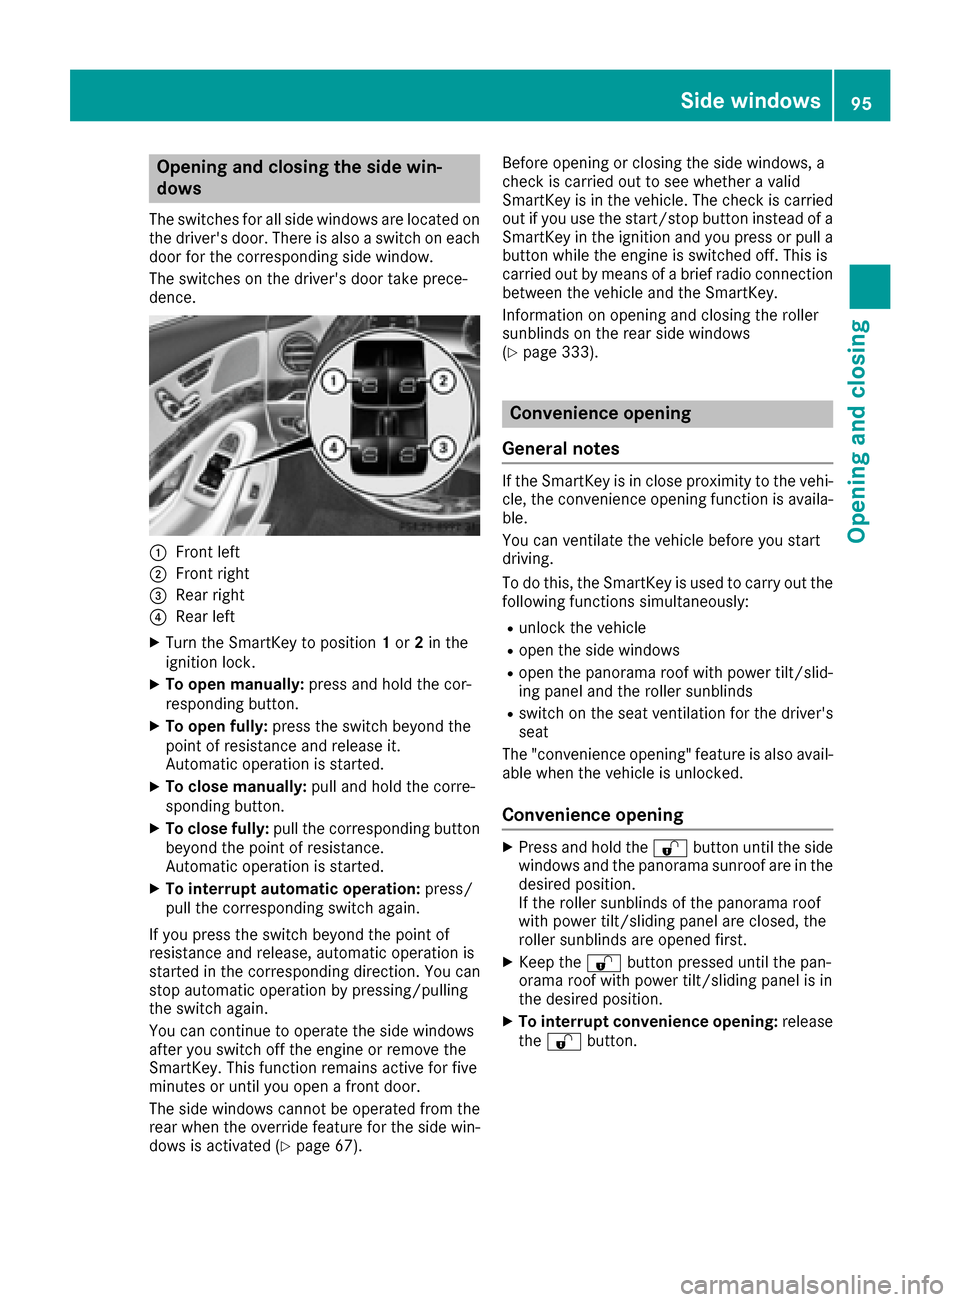
The switches for all side windows are located on
the driver's door. There is also a switch on each
door for the corresponding side window.
The switches on the driver's door take prece-
dence.
:Front left
;Front right
=Rear right
?Rear left
XTurn the SmartKey to position1or 2in the
ignition lock.
XTo open manually: press and hold the cor-
responding button.
XTo open fully: press the switch beyond the
point of resistance and release it.
Automatic operation is started.
XTo close manually: pull and hold the corre-
sponding button.
XTo close fully: pull the corresponding button
beyond the point of resistance.
Automatic operation is started.
XTo interrupt automatic operation: press/
pull the corresponding switch again.
If you press the switch beyond the point of
resistance and release, automatic operation is
started in the corresponding direction. You can
stop automatic operation by pressing/pulling
the switch again.
You can continue to operate the side windows
after you switch off the engine or remove the
SmartKey. This function remains active for five
minutes or until you open a front door.
The side windows cannot be operated from the
rear when the override feature for the side win-
dows is activated (
Ypage 67). Before opening or closing the side windows, a
check is carried out to see whether a valid
SmartKey is in the vehicle. The check is carried
out if you use the start/stop button instead of a
SmartKey in the ignition and you press or pull a
button while the engine is switched off. This is
carried out by means of a brief radio connection
between the vehicle and the SmartKey.
Information on opening and closing the roller
sunblinds on the rear side windows
(
Ypage 333).
Convenience opening
General notes
If the SmartKey is in close proximity to the vehi-
cle, the convenience opening function is availa-
ble.
You can ventilate the vehicle before you start
driving.
To do this, the SmartKey is used to carry out the following functions simultaneously:
Runlock the vehicle
Ropen the side windows
Ropen the panorama roof with power tilt/slid-
ing panel and the roller sunblinds
Rswitch on the seat ventilation for the driver's
seat
The "convenience opening" feature is also avail-
able when the vehicle is unlocked.
Convenience opening
XPress and hold the %button until the side
windows and the panorama sunroof are in the
desired position.
If the roller sunblinds of the panorama roof
with power tilt/sliding panel are closed, the
roller sunblinds are opened first.
XKeep the %button pressed until the pan-
orama roof with power tilt/sliding panel is in
the desired position.
XTo interrupt convenience opening: release
the % button.
Side windows95
Opening and closing
Z
Page 98 of 438

Convenience closing feature
Important safety notes
GWARNING
When the convenience closing feature is oper- ating, parts of the body could become trapped
in the closing area of the side window and the
sliding sunroof. There is a risk of injury.
Observe the complete closing procedure
when the convenience closing feature is oper-
ating. Make sure that no body parts are in
close proximity during the closing procedure.
When you lock the vehicle, you can simultane-
ously:
Rclose the side windows
Rclose the panorama roof with power tilt/slid-
ing panel
On vehicles with a panorama roof with power
tilt/sliding panel, you can then close the roller
sunblinds.
iNotes on the automatic reversing feature
for:
Rthe side window (Ypage 94)
Rthe panorama roof with power tilt/sliding
panel (Ypage 98)
Rthe roller sunblinds (Ypage 99)
Using the SmartKey
XPress and hold the &button until the side
windows and the panorama roof with power
tilt/sliding panel are fully closed.
XMake sure that all the side windows and the
panorama roof with power tilt/sliding panel
are closed.
XOn vehicles with a panorama roof with
power tilt/sliding panel: press and hold the
& button again until the roller sunblinds of
the panorama roof with power tilt/sliding
panel close.
XTo interrupt convenience closing: release
the & button.
Using KEYLESS-GO
The SmartKey must be outside the vehicle. All
the doors must be closed.
XTouch recessed sensor surface :on the
door handle until the side windows and the
panorama roof with power tilt/sliding panel
are fully closed.
iMake sure you only touch recessed sensor
surface :.
XMake sure that all the side windows and the
panorama roof with power tilt/sliding panel
are closed.
XVehicles with a panorama roof with
power tilt/sliding panel: touch recessed
sensor surface :on the door handle again
until the roller sunblinds of the panorama roof
with power tilt/sliding panel close.
XTo interrupt convenience closing: release
recessed sensor surface :on the door han-
dle.
Resetting the side windows
If a side window can no longer be closed fully,
you must reset it.
XClose all the doors.
XTurn the SmartKey to position 1or 2in the
ignition lock.
XPull the corresponding switch on the door
control panel until the side window is com-
pletely closed (
Ypage 95).
XHold the switch for an additional second.
If the side window opens again slightly:
XImmediately pull the corresponding switch on
the door control panel until the side window is
completely closed (
Ypage 95).
XHold the switch for an additional second.
XIf the respective side window remains closed
after the button is released, then it has been
set correctly. If this is not the case, repeat the
steps above.
96Side windows
Opening and closing
Page 102 of 438
Opening and closing the front roller sun-
blind
The front roller sunblind can only be closed
when the sliding sunroof is closed.
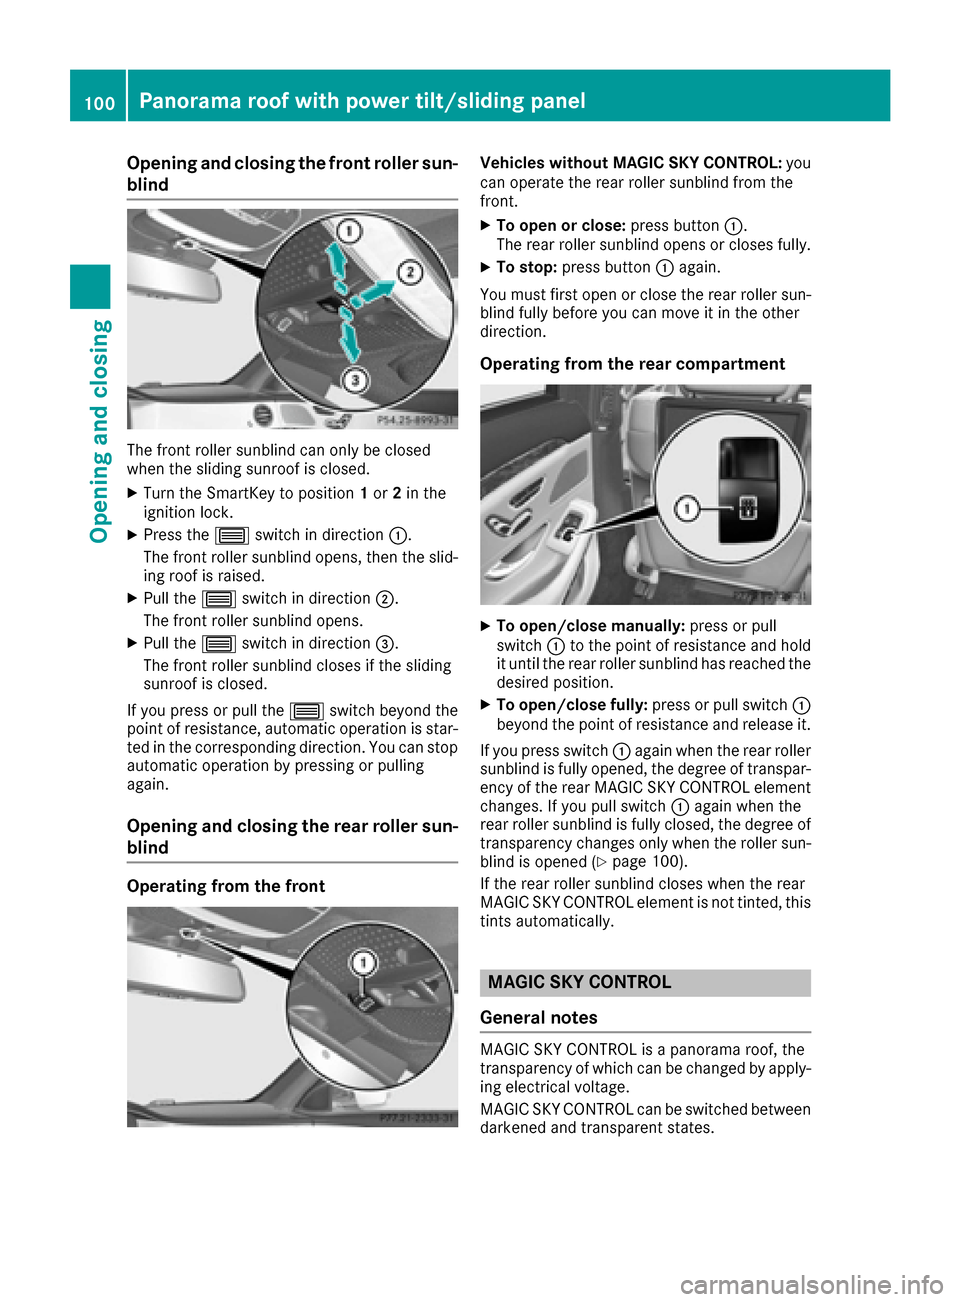
XTurn the SmartKey to position1or 2in the
ignition lock.
XPress the 3switch in direction :.
The front roller sunblind opens, then the slid-
ing roof is raised.
XPull the 3switch in direction ;.
The front roller sunblind opens.
XPull the 3switch in direction =.
The front roller sunblind closes if the sliding
sunroof is closed.
If you press or pull the 3switch beyond the
point of resistance, automatic operation is star-
ted in the corresponding direction. You can stop
automatic operation by pressing or pulling
again.
Opening and closing the rear roller sun-
blind
Operating from the front
Vehicles without MAGIC SKY CONTROL: you
can operate the rear roller sunblind from the
front.
XTo open or close: press button:.
The rear roller sunblind opens or closes fully.
XTo stop: press button :again.
You must first open or close the rear roller sun-
blind fully before you can move it in the other
direction.
Operating from the rear compartment
XTo open/close manually: press or pull
switch :to the point of resistance and hold
it until the rear roller sunblind has reached the
desired position.
XTo open/close fully: press or pull switch:
beyond the point of resistance and release it.
If you press switch :again when the rear roller
sunblind is fully opened, the degree of transpar-
ency of the rear MAGIC SKY CONTROL element
changes. If you pull switch :again when the
rear roller sunblind is fully closed, the degree of transparency changes only when the roller sun-
blind is opened (
Ypage 100).
If the rear roller sunblind closes when the rear
MAGIC SKY CONTROL element is not tinted, this
tints automatically.
MAGIC SKY CONTROL
General notes
MAGIC SKY CONTROL is a panorama roof, the
transparency of which can be changed by apply- ing electrical voltage.
MAGIC SKY CONTROL can be switched between
darkened and transparent states.
100Panorama roof with power tilt/sliding panel
Opening and closing
Page 115 of 438
iIf the front-passenger seat is already at the
threshold to the area for the chauffeur mode,
the position for the chauffeur mode is set
immediately.
iThe position for chauffeur mode cannot be
stored or set with the driver's seat memory
function.
Installing/removing the head restraint
Removing
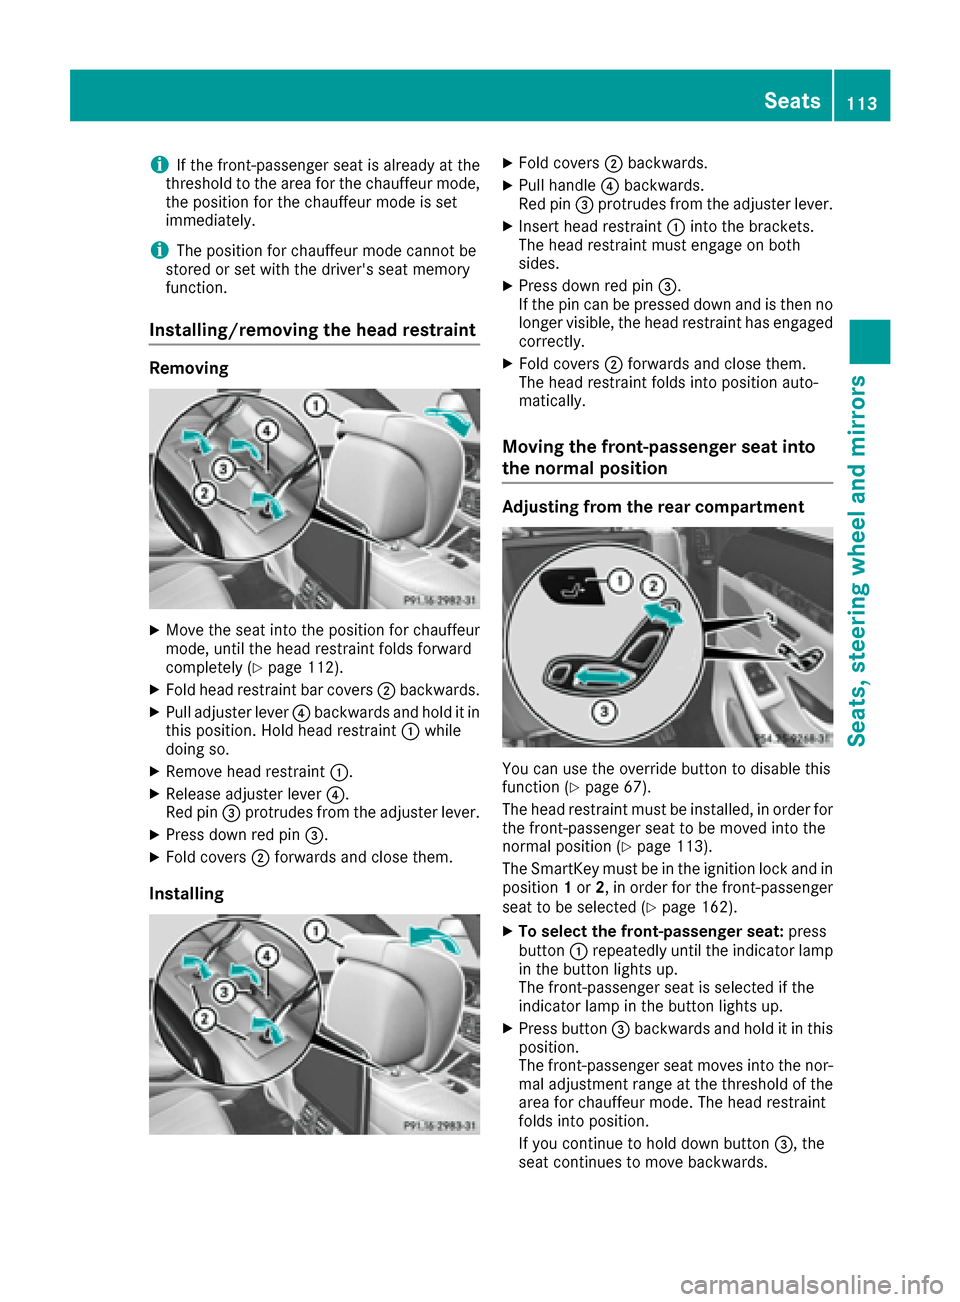
XMove the seat into the position for chauffeur
mode, until the head restraint folds forward
completely (
Ypage 112).
XFold head restraint bar covers ;backwards.
XPull adjuster lever ?backwards and hold it in
this position. Hold head restraint :while
doing so.
XRemove head restraint :.
XRelease adjuster lever?.
Red pin =protrudes from the adjuster lever.
XPress down red pin =.
XFold covers;forwards and close them.
Installing
XFold covers ;backwards.
XPull handle ?backwards.
Red pin =protrudes from the adjuster lever.
XInsert head restraint :into the brackets.
The head restraint must engage on both
sides.
XPress down red pin =.
If the pin can be pressed down and is then no longer visible, the head restraint has engaged
correctly.
XFold covers ;forwards and close them.
The head restraint folds into position auto-
matically.
Moving the front-passenger seat into
the normal position
Adjusting from the rear compartment
You can use the override button to disable this
function (Ypage 67).
The head restraint must be installed, in order for
the front-passenger seat to be moved into the
normal position (
Ypage 113).
The SmartKey must be in the ignition lock and in
position 1or 2, in order for the front-passenger
seat to be selected (
Ypage 162).
XTo select the front-passenger seat: press
button :repeatedly until the indicator lamp
in the button lights up.
The front-passenger seat is selected if the
indicator lamp in the button lights up.
XPress button =backwards and hold it in this
position.
The front-passenger seat moves into the nor-
mal adjustment range at the threshold of the
area for chauffeur mode. The head restraint
folds into position.
If you continue to hold down button =, the
seat continues to move backwards.
Seats113
Seats, steering wheel and mirrors
Z
Page 118 of 438
XTo adjust the side bolsters of the head
restraint:push or pull right and/or left-hand
side bolster :into the desired position.
iThe fore-and-aft position of the head
restraint is adjusted automatically when you
adjust the seat backrest angle using the seat
switch.
Adjusting the front head restraints elec-
trically
The height and fore-and-aft position of the front
head restraints can be adjusted with the seat
adjustment switch (
Ypage 106).
Adjusting the rear seat head restraints
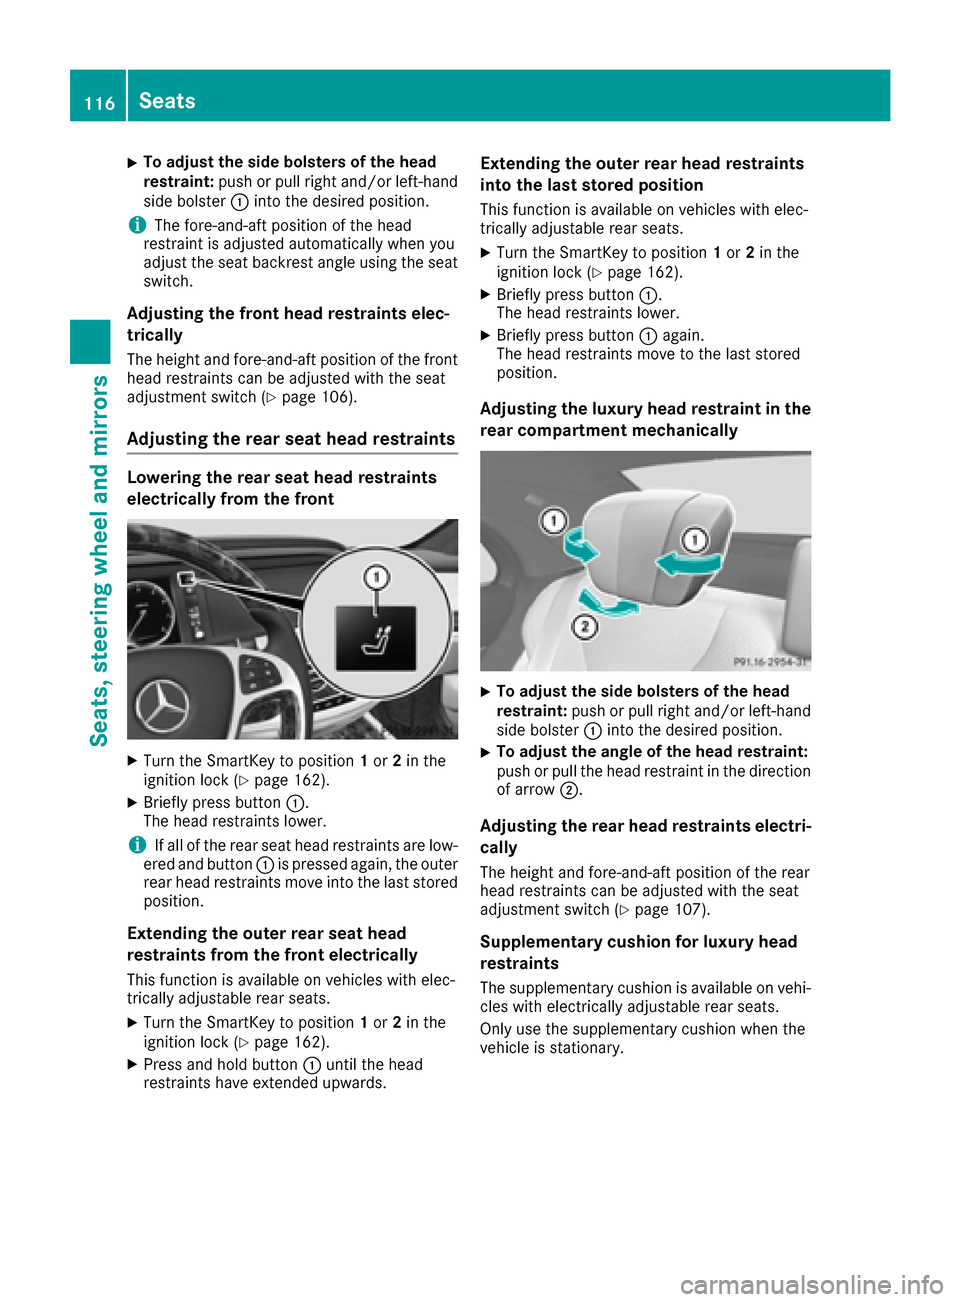
Lowering the rear seat head restraints
electrically from the front
XTurn the SmartKey to position 1or 2in the
ignition lock (Ypage 162).
XBriefly press button :.
The head restraints lower.
iIf all of the rear seat head restraints are low-
ered and button :is pressed again, the outer
rear head restraints move into the last stored
position.
Extending the outer rear seat head
restraints from the front electrically
This function is available on vehicles with elec-
trically adjustable rear seats.
XTurn the SmartKey to position 1or 2in the
ignition lock (Ypage 162).
XPress and hold button :until the head
restraints have extended upwards.
Extending the outer rear head restraints
into the last stored position
This function is available on vehicles with elec-
trically adjustable rear seats.
XTurn the SmartKey to position 1or 2in the
ignition lock (Ypage 162).
XBriefly press button :.
The head restraints lower.
XBriefly press button :again.
The head restraints move to the last stored
position.
Adjusting the luxury head restraint in the
rear compartment mechanically
XTo adjust the side bolsters of the head
restraint: push or pull right and/or left-hand
side bolster :into the desired position.
XTo adjust the angle of the head restraint:
push or pull the head restraint in the direction
of arrow ;.
Adjusting the rear head restraints electri-
cally
The height and fore-and-aft position of the rear
head restraints can be adjusted with the seat
adjustment switch (
Ypage 107).
Supplementary cushion for luxury head
restraints
The supplementary cushion is available on vehi-
cles with electrically adjustable rear seats.
Only use the supplementary cushion when the
vehicle is stationary.
116Seats
Seats, steering wheel and mirrors