2016 MERCEDES-BENZ GLS SUV sport mode
[x] Cancel search: sport modePage 259 of 397

A
Coolant temperature
B Transmission oil temperature
X Press the =or; button on the steering
wheel to select the AMG
AMG menu.
Upshift indicator: upshift indicatorUp
Up=
indicates that the engine has reached the
overrevving range when in the manual drive
program.
Engine/transmission oil temperature:
when the engine and transmission are at nor-
mal operating temperature, oil tempera-
ture ?and Bare displayed in white in the
multifunction display.
If the multifunction display shows oil temper- ature ?orB in blue, the engine or the
transmission are not yet at normal operating
temperature. Avoid using the full output of the engine during this time.
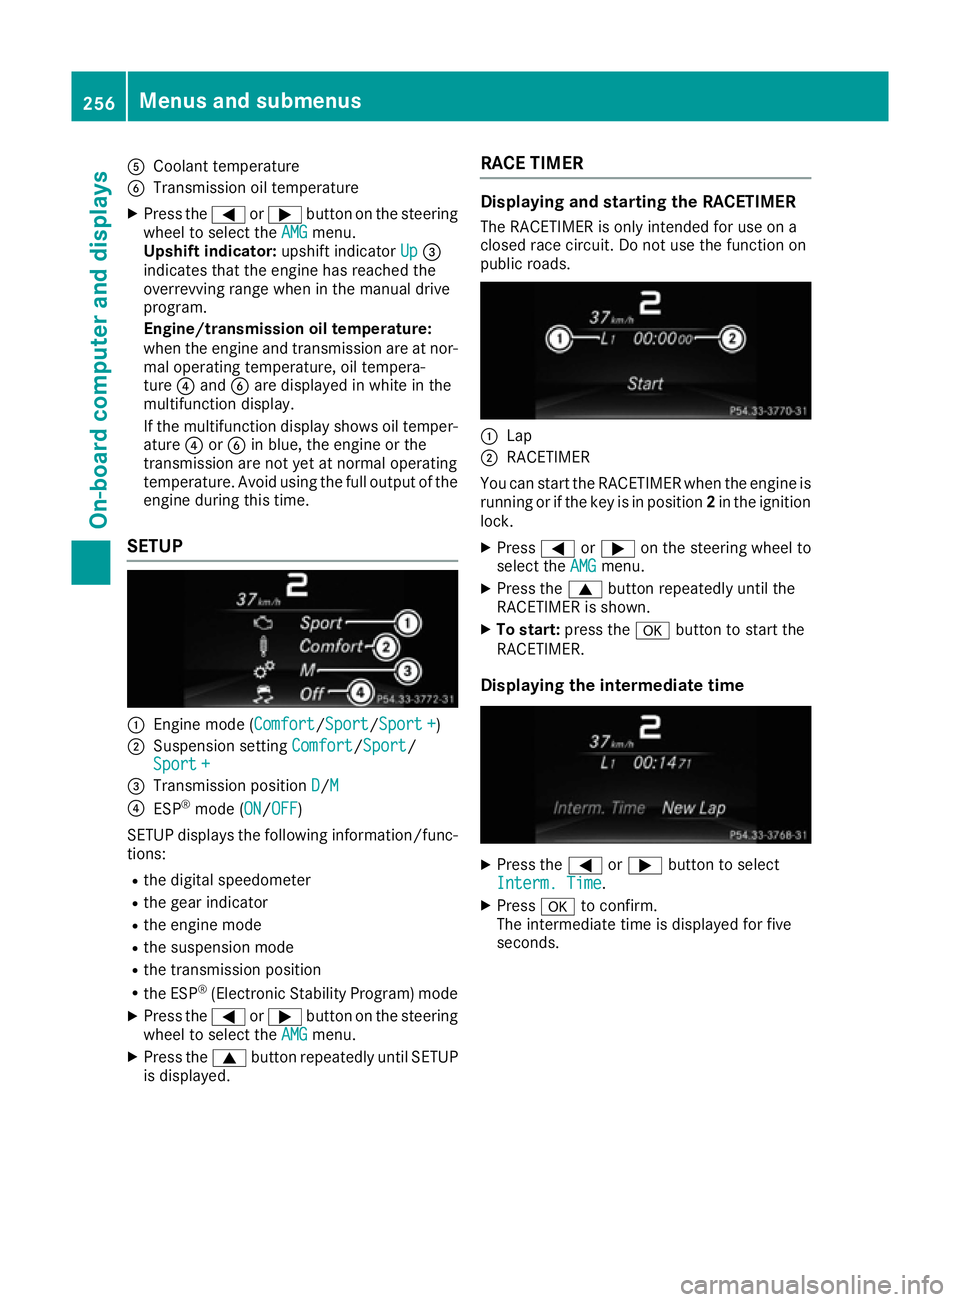
SETUP :
Engine mode (Comfort Comfort/SportSport/Sport + Sport +)
; Suspension setting Comfort
Comfort/Sport
Sport/
Sport +
Sport +
= Transmission position D
D/M
M
? ESP ®
mode ( ON
ON/OFFOFF)
SETUP displays the following information/func- tions:
R the digital speedometer
R the gear indicator
R the engine mode
R the suspension mode
R the transmission position
R the ESP ®
(Electronic Stability Program) mode
X Press the =or; button on the steering
wheel to select the AMG
AMG menu.
X Press the 9button repeatedly until SETUP
is displayed. RACE TIMER Displaying and starting the RACETIMER
The RACETIMER is only intended for use on a
closed race circuit. Do not use the function on
public roads. :
Lap
; RACETIMER
You can start the RACETIMER when the engine is running or if the key is in position 2in the ignition
lock.
X Press =or; on the steering wheel to
select the AMG AMGmenu.
X Press the 9button repeatedly until the
RACETIMER is shown.
X To start: press the abutton to start the
RACETIMER.
Displaying the intermediate time X
Press the =or; button to select
Interm. Time
Interm. Time.
X Press ato confirm.
The intermediate time is displayed for five
seconds. 256
Menus and submenusOn-board computer and displays
Page 360 of 397

tance a distance so that the tow rope does
not sag.
R Do not use steel cables or chains to tow
your vehicle. You could otherwise damage
the vehicle.
! Do not use the trailer tow hitch for recovery
or towing. Do not use the towing eye for
recovery. This could damage the vehicle. If in doubt, have the vehicle recovered using a
crane.
! When towing, pull away slowly and
smoothly. Pull the towed vehicle as straight as possible and not at an acute angle. If the trac-
tive power is too high, the vehicles could be
damaged.
When towing, it is preferable to use a rigid tow- ing bar as opposed to a tow rope. A rigid towing
bar helps to keep the tractive power low.
! To tow vehicles with KEYLESS-GO, use the
key instead of the Start/Stop button. The
automatic transmission may otherwise
switch to position Pwhen you open the driv-
er's or front-passenger door which could
damage the transmission.
! Vehicles with differential locks: make sure
the differential locks are in automatic mode.
When towing, the differential locks must not
be switched on. The transmission may other- wise be damaged.
! You may tow the vehicle for a maximum of
50km. A towing speed of 50 km/h must not
be exceeded.
For towing distances over 50 km, the entire
vehicle must be lifted up and transported.
Observe the legal requirements for the relevant countries when towing.
It is better to have the vehicle transported than
to have it towed.
If the vehicle has suffered transmission damage, have it transported on a transporter or trailer.
The automatic transmission must be in position
N when the vehicle is being towed.
The battery must be connected and charged.
Otherwise, you:
R cannot turn the key to position 2in the igni-
tion lock
R cannot release the electric parking brake
R cannot shift the automatic transmission to
position N Deactivate the automatic locking feature before
towing the vehicle (Y page 253). You could oth-
erwise be locked out when pushing or towing
the vehicle.
Deactivate tow-away protection before the vehi-
cle is towed away (Y page 79). Fitting/removing the towing eye
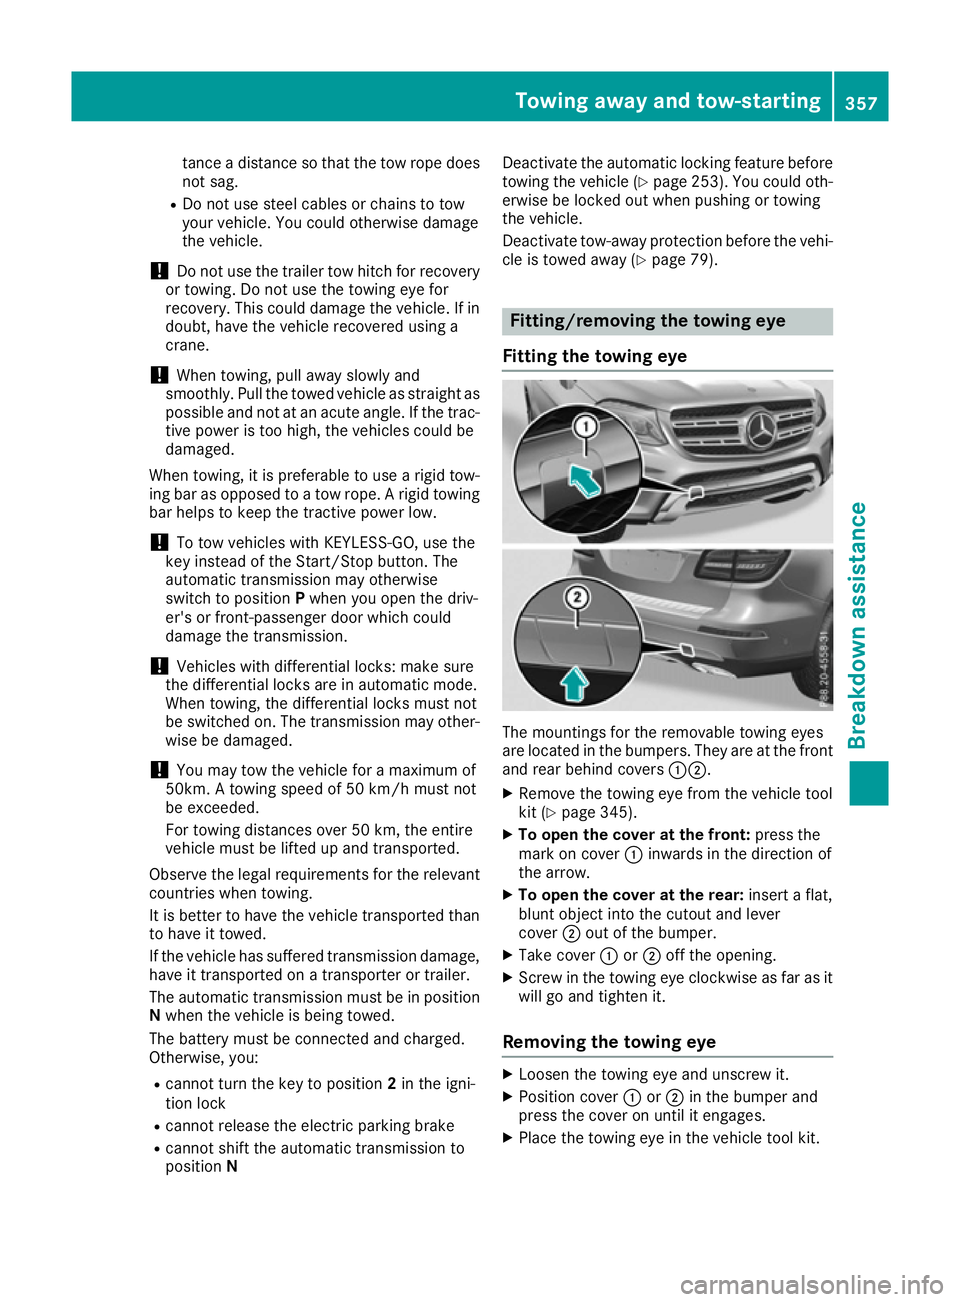
Fitting the towing eye The mountings for the removable towing eyes
are located in the bumpers. They are at the front and rear behind covers :;.
X Remove the towing eye from the vehicle tool
kit (Y page 345).
X To open the cover at the front: press the
mark on cover :inwards in the direction of
the arrow.
X To open the cover at the rear: insert a flat,
blunt object into the cutout and lever
cover ;out of the bumper.
X Take cover :or; off the opening.
X Screw in the towing eye clockwise as far as it
will go and tighten it.
Removing the towing eye X
Loosen the towing eye and unscrew it.
X Position cover :or; in the bumper and
press the cover on until it engages.
X Place the towing eye in the vehicle tool kit. Towing away and tow-starting
357Breakdown assistance Z
Page 367 of 397

When you have fitted the M+S tyres:
X Check the tyre pressures (Y page 364).
X Restart the tyre pressure monitor
(Y page 368).
X Restart the tyre pressure loss warning system
(Y page 366).
Information about driving with an emergency
spare wheel (Y page 375). Snow chains
G
WARNING
If you have fitted snow chains to the front
wheels, they may scrape against the vehicle
body or chassis components. This could
cause damage to the vehicle or the tyres.
There is a risk of an accident.
To avoid hazardous situations:
R never fit snow chains on the front wheels
R fit snow chains to the rear wheels in pairs.
! You must drive at a raised vehicle level if
snow chains have been fitted. The vehicle
could otherwise be damaged. Observe the
notes in the "AIRMATIC package" section.
! When driving with snow chains fitted, do not
use the ADS sport mode (Adaptive Damping
System). The vehicle could otherwise be dam-
aged.
For safety reasons, Mercedes-Benz recom-
mends that you only use snow chains that have been approved for Mercedes-Benz or that are of
an equivalent standard of quality. For more
information, please contact a qualified special-
ist workshop.
Fit the snow chains on all driven wheels for max-
imum tractive power and driving stability. If you
own snow chains for two driven wheels only, fit the snow chains to the wheels on the rear axle.
The vehicle then remains more stable under
braking.
If you wish to fit snow chains, please bear the
following points in mind:
R snow chains cannot be fitted to all wheel/tyre
combinations. Permitted wheel/tyre combi-
nations (Y page 374).
R use snow chains only if the road surface is
completely snow-covered. Remove the snow chains as soon as possible when you come to
a road that is not snow-covered.
R local regulations may restrict the use of snow
chains. Observe the appropriate regulations if you wish to fit snow chains.
R do not exceed the maximum permissible
speed of 50 km/h.
R never use Parking Pilot when snow chains are
fitted (Y page 204).
You may wish to deactivate ESP ®
when pulling
away with snow chains fitted (Y page 73). This
allows the wheels to spin in a controlled manner, achieving increased propulsive force (cut).
Information on driving with an emergency sparewheel (Y page 375). Tyre pressure
Tyre pressure specifications
G
WARNING
Underinflated or overinflated tyres pose the
following risks:
R the tyres may burst, especially as the load
and vehicle speed increase.
R the tyres may wear excessively and/or
unevenly, which may greatly impair tyre
traction.
R the driving characteristics, as well as steer-
ing and braking, may be greatly impaired.
There is a risk of an accident.
Observe the recommended tyre pressure and check the tyre pressure of all the tyres includ-
ing the spare wheel:
R at least every two weeks
R when the load changes
R before embarking on a longer journey
R for changed operating conditions, e.g. off-
road driving
If necessary, correct the tyre pressure. G
WARNING
If you fit unsuitable accessories onto tyre
valves, the tyre valves may be overloaded and malfunction, which can cause tyre pressure
loss. Due to their design, retrofitted tyre pres- 364
Tyre pressureWheels and tyres
Page 392 of 397

Fording
depth Off-road level 3 60 cm
Mercedes-AMG vehicles
Further information about off-road fording
(Y page 175). Approach/departure angle
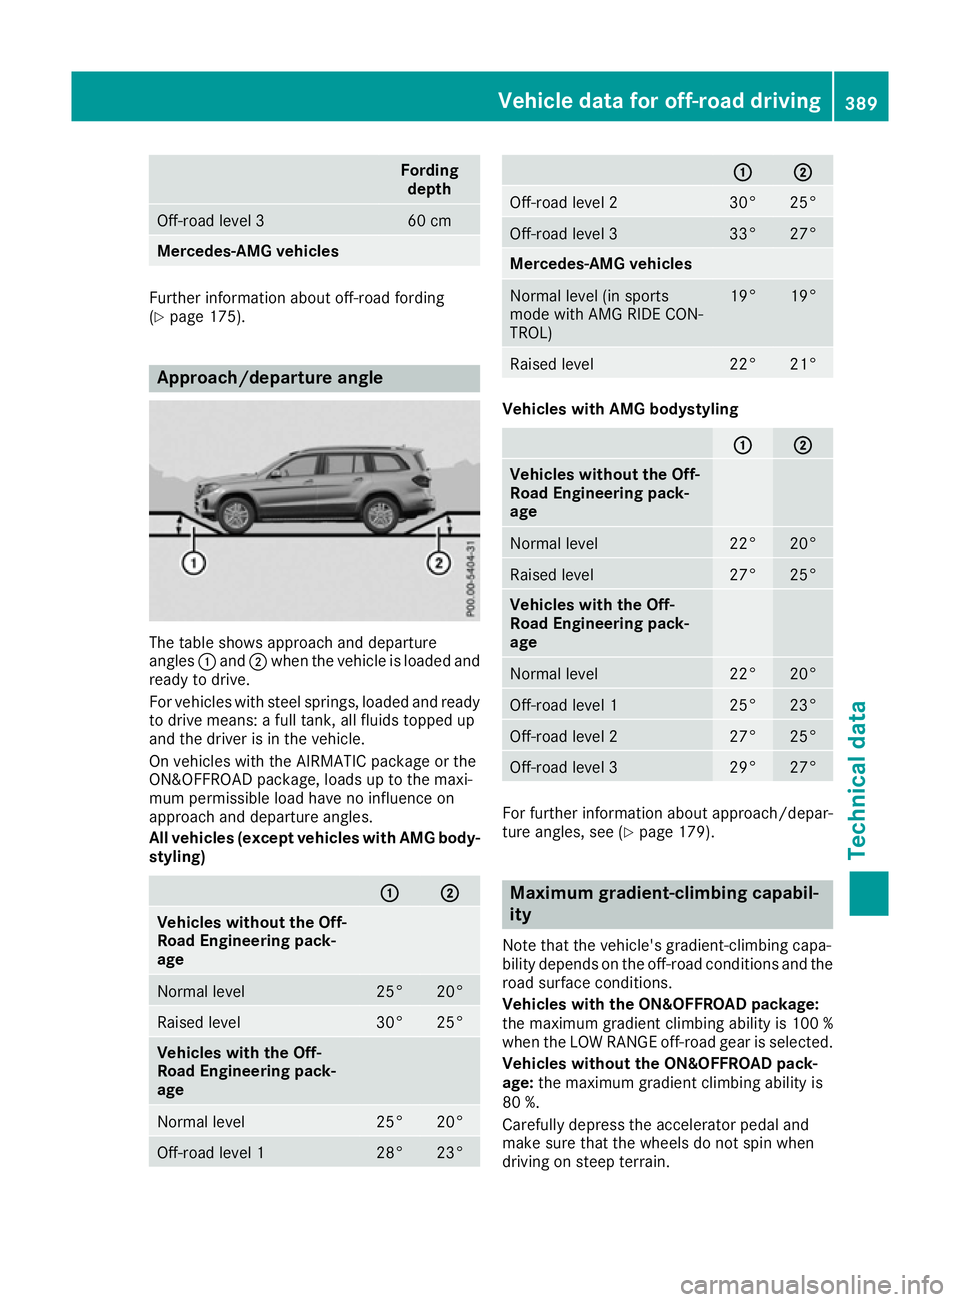
The table shows approach and departure
angles :and ;when the vehicle is loaded and
ready to drive.
For vehicles with steel springs, loaded and ready
to drive means: a full tank, all fluids topped up
and the driver is in the vehicle.
On vehicles with the AIRMATIC package or the
ON&OFFROAD package, loads up to the maxi-
mum permissible load have no influence on
approach and departure angles.
All vehicles (except vehicles with AMG body- styling) : : ;
;
Vehicles without the Off-
Road Engineering pack-
age
Normal level 25° 20°
Raised level 30° 25°
Vehicles with the Off-
Road Engineering pack-
age
Normal level 25° 20°
Off-road level 1 28° 23° : : ;
;
Off-road level 2 30° 25°
Off-road level 3 33° 27°
Mercedes-AMG vehicles
Normal level (in sports
mode with AMG RIDE CON-
TROL) 19° 19°
Raised level 22° 21°
Vehicles with AMG bodystyling
: : ;
;
Vehicles without the Off-
Road Engineering pack-
age
Normal level 22° 20°
Raised level 27° 25°
Vehicles with the Off-
Road Engineering pack-
age
Normal level 22° 20°
Off-road level 1 25° 23°
Off-road level 2 27° 25°
Off-road level 3 29° 27°
For further information about approach/depar-
ture angles, see (Y
page 179). Maximum gradient-climbing capabil-
ity
Note that the vehicle's gradient-climbing capa-
bility depends on the off-road conditions and the road surface conditions.
Vehicles with the ON&OFFROAD package:
the maximum gradient climbing ability is 100 %
when the LOW RANGE off-road gear is selected.
Vehicles without the ON&OFFROAD pack-
age: the maximum gradient climbing ability is
80 %.
Carefully depress the accelerator pedal and
make sure that the wheels do not spin when
driving on steep terrain. Vehicle data for off-road driving
389Technical data Z