2016 MERCEDES-BENZ GLE tow
[x] Cancel search: towPage 335 of 450
! The backrest is heavy. Therefore, take care
when folding it down. Make sure that the head
restraints are pushed all the way in so that the
backrests and seat cushions are not dam-
aged.
Observe the loading guidelines ( Y
page 329).
The left-hand and right-hand rear seat backrests
can be folded forwards separately to increase
the cargo compartment capacity.
Folding the rear bench seat forwards
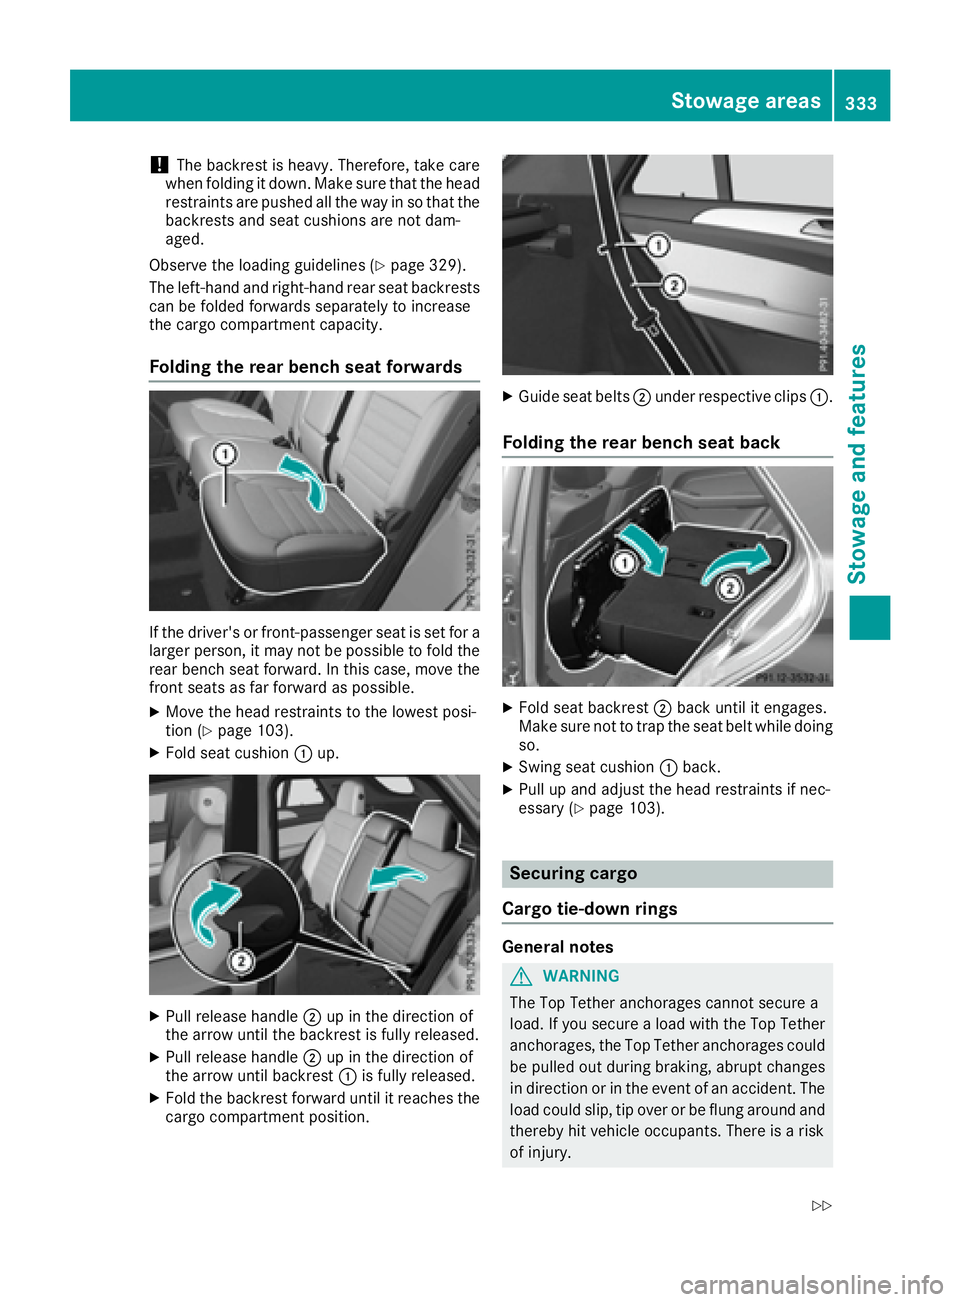
If the driver's or front-passenger seat is set for a
larger person, it may not be possible to fold the
rear bench seat forward. In this case, move the
front seats as far forward as possible. X
Move the head restraints to the lowest posi-
tion ( Y
page 103).X
Fold seat cushion �C up.
X
Pull release handle �D up in the direction of
the arrow until the backrest is fully released. X
Pull release handle �D up in the direction of
the arrow until backrest �C is fully released.X
Fold the backrest forward until it reaches the
cargo compartment position. X
Guide seat belts �D under respective clips �C .
Folding the rear bench seat back
X
Fold seat backrest �D back until it engages.
Make sure not to trap the seat belt while doing
so. X
Swing seat cushion �C back.X
Pull up and adjust the head restraints if nec-
essary ( Y
page 103).
Securing cargo
Cargo tie-down rings
General notes
G WARNING
The Top Tether anchorages cannot secure a
load. If you secure a load with the Top Tether
anchorages, the Top Tether anchorages could
be pulled out during braking, abrupt changes
in direction or in the event of an accident. The
load could slip, tip over or be flung around and
thereby hit vehicle occupants. There is a risk
of injury.Stowage areas 333
Stowage and features Z
Page 336 of 450
Only use the cargo tie down rings when secur-
ing a load.
Observe the following notes on securing loads: R
Secure the load using the cargo tie-down
rings. R
Distribute the load on the cargo tie-down
rings evenly. R
Do not use elastic straps or nets to secure a
load, as these are only intended as an anti-slip
protection for light loads. R
Do not route tie-downs across sharp edges or
corners. R
Pad sharp edges for protection.
Cargo compartment
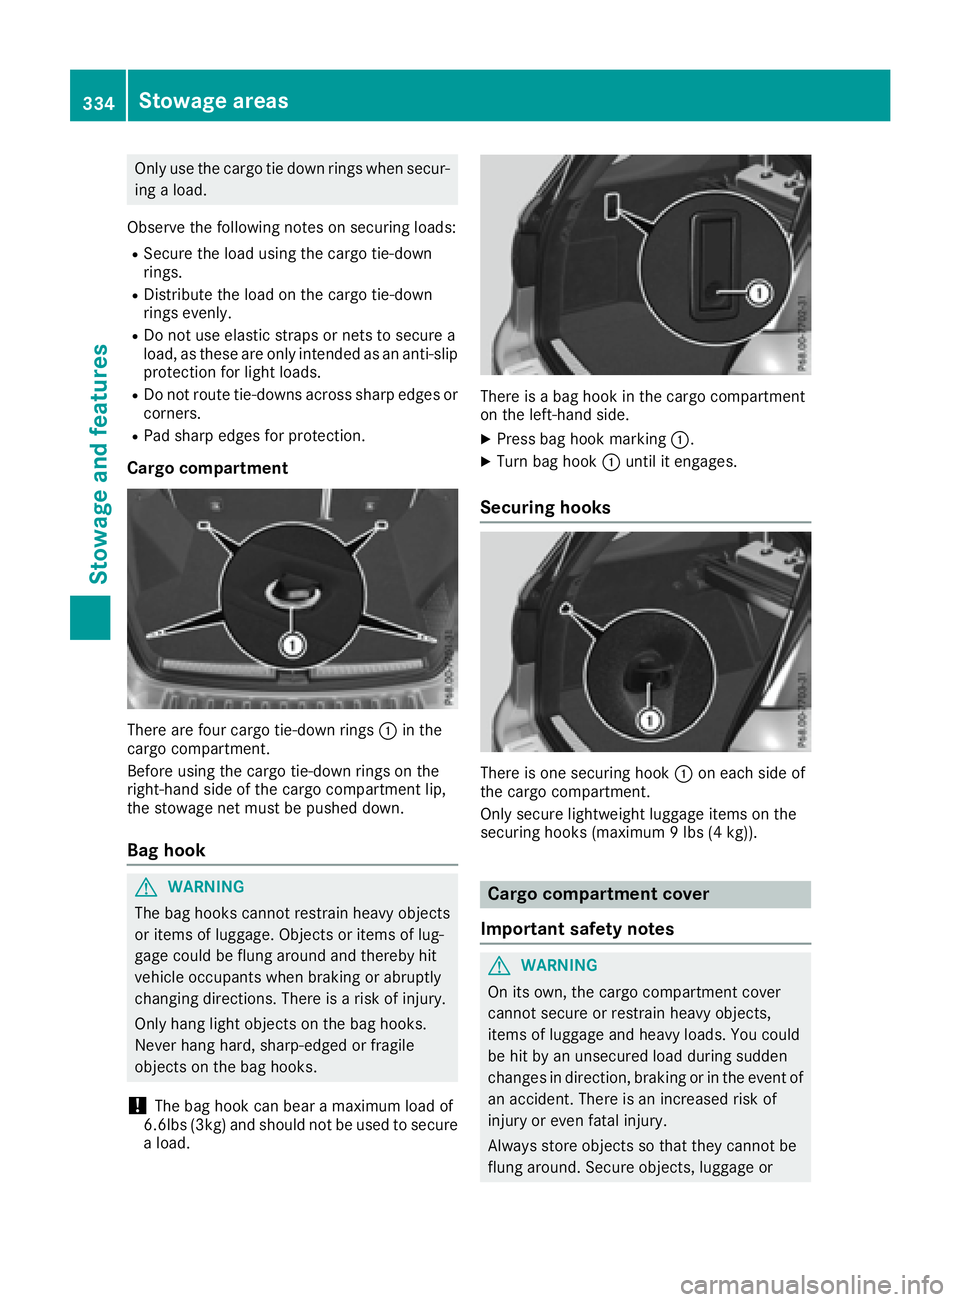
There are four cargo tie-down rings �C in the
cargo compartment.
Before using the cargo tie-down rings on the
right-hand side of the cargo compartment lip,
the stowage net must be pushed down.
Bag hook
G WARNING
The bag hooks cannot restrain heavy objects
or items of luggage. Objects or items of lug-
gage could be flung around and thereby hit
vehicle occupants when braking or abruptly
changing directions. There is a risk of injury.
Only hang light objects on the bag hooks.
Never hang hard, sharp-edged or fragile
objects on the bag hooks.
! The bag hook can bear a maximum load of
6.6lbs (3kg) and should not be used to secure
a load. There is a bag hook in the cargo compartment
on the left-hand side. X
Press bag hook marking �C .X
Turn bag hook �C until it engages.
Securing hooks
There is one securing hook �C on each side of
the cargo compartment.
Only secure lightweight luggage items on the
securing hooks (maximum 9 lbs (4 kg)).
Cargo compartment cover
Important safety notes
G WARNING
On its own, the cargo compartment cover
cannot secure or restrain heavy objects,
items of luggage and heavy loads. You could
be hit by an unsecured load during sudden
changes in direction, braking or in the event of
an accident. There is an increased risk of
injury or even fatal injury.
Always store objects so that they cannot be
flung around. Secure objects, luggage or334
Stowage areas
Stowage and features
Page 341 of 450
An incorrectly secured roof carrier or roof load
may become detached from the vehicle. You
must therefore ensure that you observe the roof
carrier manufacturer's installation instructions.
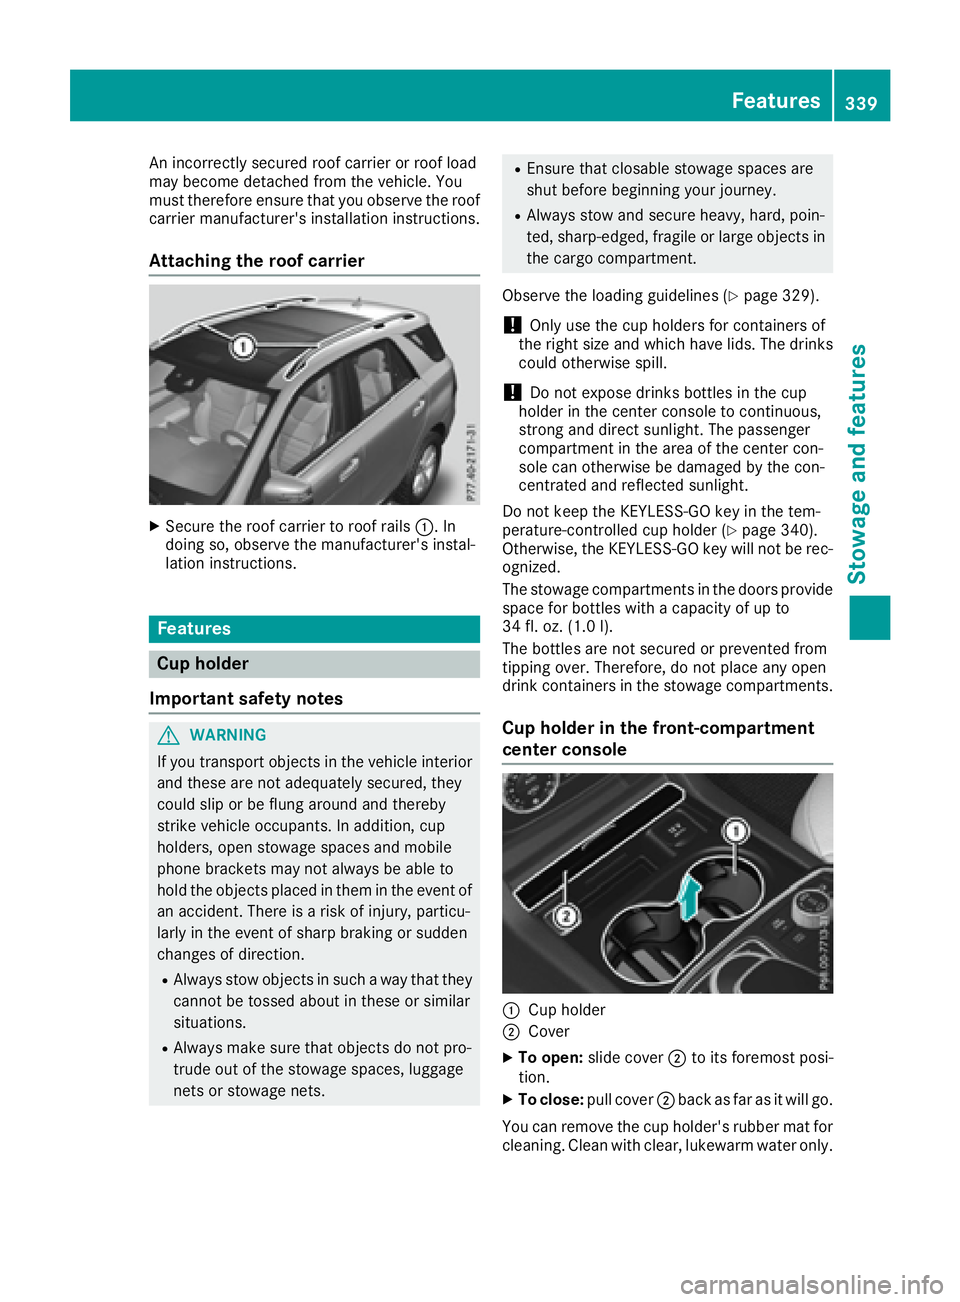
Attaching the roof carrier X
Secure the roof carrier to roof rails �C . In
doing so, observe the manufacturer's instal-
lation instructions.
Features
Cup holder
Important safety notes
G WARNING
If you transport objects in the vehicle interior
and these are not adequately secured, they
could slip or be flung around and thereby
strike vehicle occupants. In addition, cup
holders, open stowage spaces and mobile
phone brackets may not always be able to
hold the objects placed in them in the event of
an accident. There is a risk of injury, particu-
larly in the event of sharp braking or sudden
changes of direction. R
Always stow objects in such a way that they
cannot be tossed about in these or similar
situations. R
Always make sure that objects do not pro-
trude out of the stowage spaces, luggage
nets or stowage nets. R
Ensure that closable stowage spaces are
shut before beginning your journey. R
Always stow and secure heavy, hard, poin-
ted, sharp-edged, fragile or large objects in
the cargo compartment.
Observe the loading guidelines ( Y
page 329).
! Only use the cup holders for containers of
the right size and which have lids. The drinks
could otherwise spill.
! Do not expose drinks bottles in the cup
holder in the center console to continuous,
strong and direct sunlight. The passenger
compartment in the area of the center con-
sole can otherwise be damaged by the con-
centrated and reflected sunlight.
Do not keep the KEYLESS-GO key in the tem-
perature-controlled cup holder ( Y
page 340).
Otherwise, the KEYLESS-GO key will not be rec-
ognized.
The stowage compartments in the doors provide
space for bottles with a capacity of up to
34 fl. oz. (1.0 l).
The bottles are not secured or prevented from
tipping over. Therefore, do not place any open
drink containers in the stowage compartments.
Cup holder in the front-compartment
center console
�C
Cup holder
�D
Cover X
To open: slide cover �D to its foremost posi-
tion. X
To close: pull cover �D back as far as it will go.
You can remove the cup holder's rubber mat for
cleaning. Clean with clear, lukewarm water only. Features 339
Sto wag e an d features Z
Page 345 of 450
12 V sockets
General notes X
Turn the SmartKey to position 1 in the ignition
lock ( Y
page 145).
With the exception of the socket in the front
center console, all sockets can be used for
accessories with a maximum current draw of
240 W (20 A). The socket in the front center
console can be used for accessories with a max-
imum current draw of 180 W( 15 A). Accessories
include such items as chargers for mobile
phones.
If you use the sockets for long periods when the
engine is switched off, the battery may dis-
charge.
i An emergency cut-out ensures that the on-
board voltage does not drop too low. If the on-
board voltage is too low, the power to the
sockets is automatically cut. This ensures
that there is sufficient power to start the
engine.
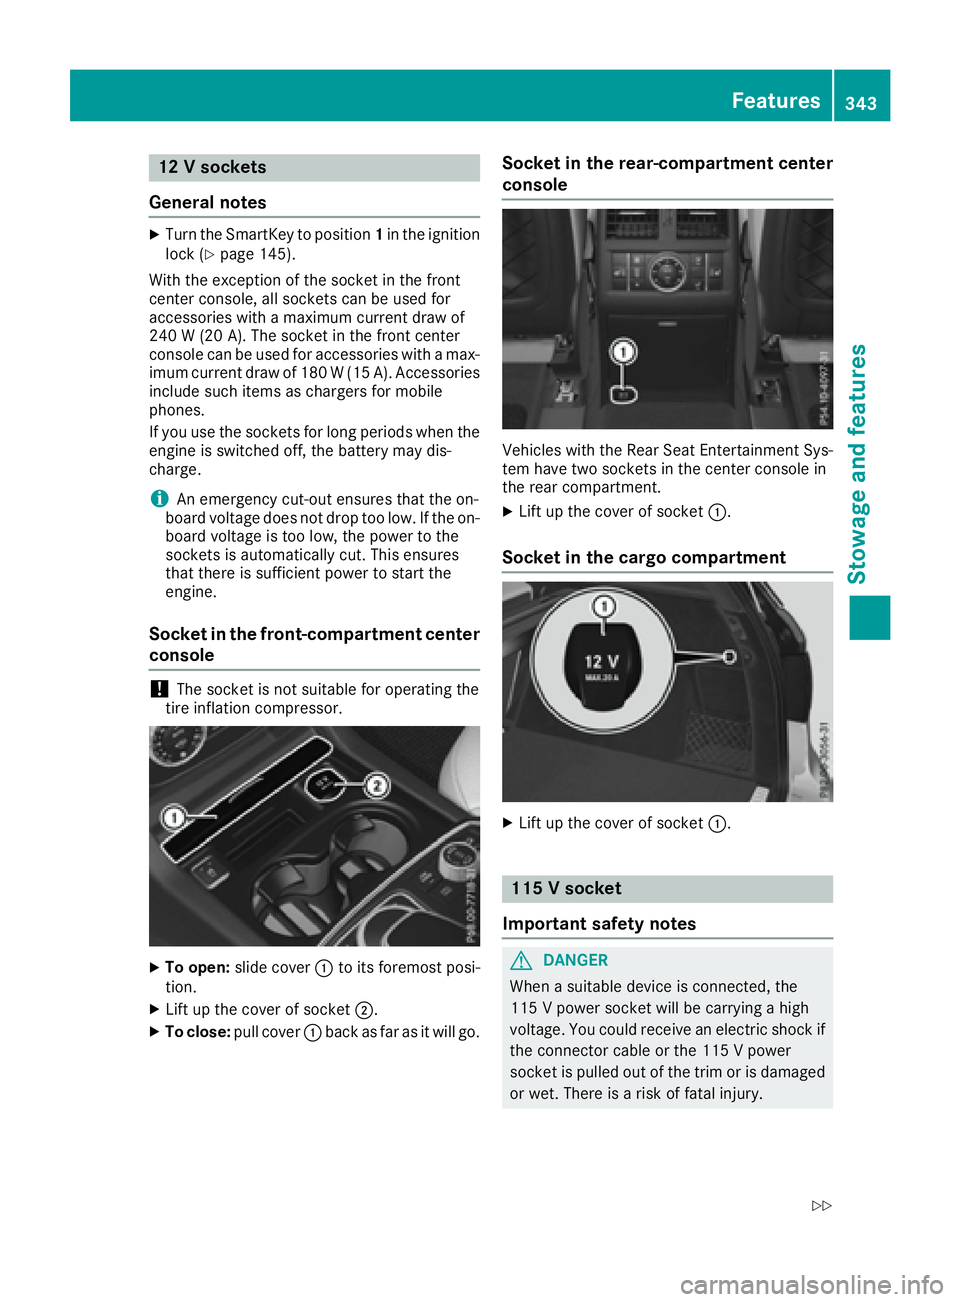
Socket in the front-compartment center
console
! The socket is not suitable for operating the
tire inflation compressor.
X
To open: slide cover �C to its foremost posi-
tion. X
Lift up the cover of socket �D .X
To close: pull cover �C back as far as it will go. Socket in the rear-compartment center
console
Vehicles with the Rear Seat Entertainment Sys-
tem have two sockets in the center console in
the rear compartment. X
Lift up the cover of socket �C .
Socket in the cargo compartment
X
Lift up the cover of socket �C .
115 V socket
Important safety notes
G DANGER
When a suitable device is connected, the
115 V powe r socket will be carrying a high
voltage. You could receive an electric shock if
the connector cable or the 115 V power
socket is pulled out of the trim or is damaged
or wet. There is a risk of fatal injury. Features 343
Stowage and features Z
Page 349 of 450
lished between the Customer Assistance Center
and the vehicle occupants. R
If the vehicle occupants respond, the
Mercedes-Benz Customer Assistance Center
attempts to get more information on the
emergency. R
If there is no response from the vehicle occu-
pants, an ambulance is immediately sent to
the vehicle.
If no voice connection can be established to the
Mercedes-Benz Customer Assistance Center,
the system has been unable to initiate an emer-
gency call.
This can occur, for example, if the relevant
mobile phone network is not available. The indi-
cator lamp in the SOS button flashes continu-
ously.
The Call Failed message appears in the mul-
tifunction display and must be confirmed.
In this case, summon assistance by other
means.
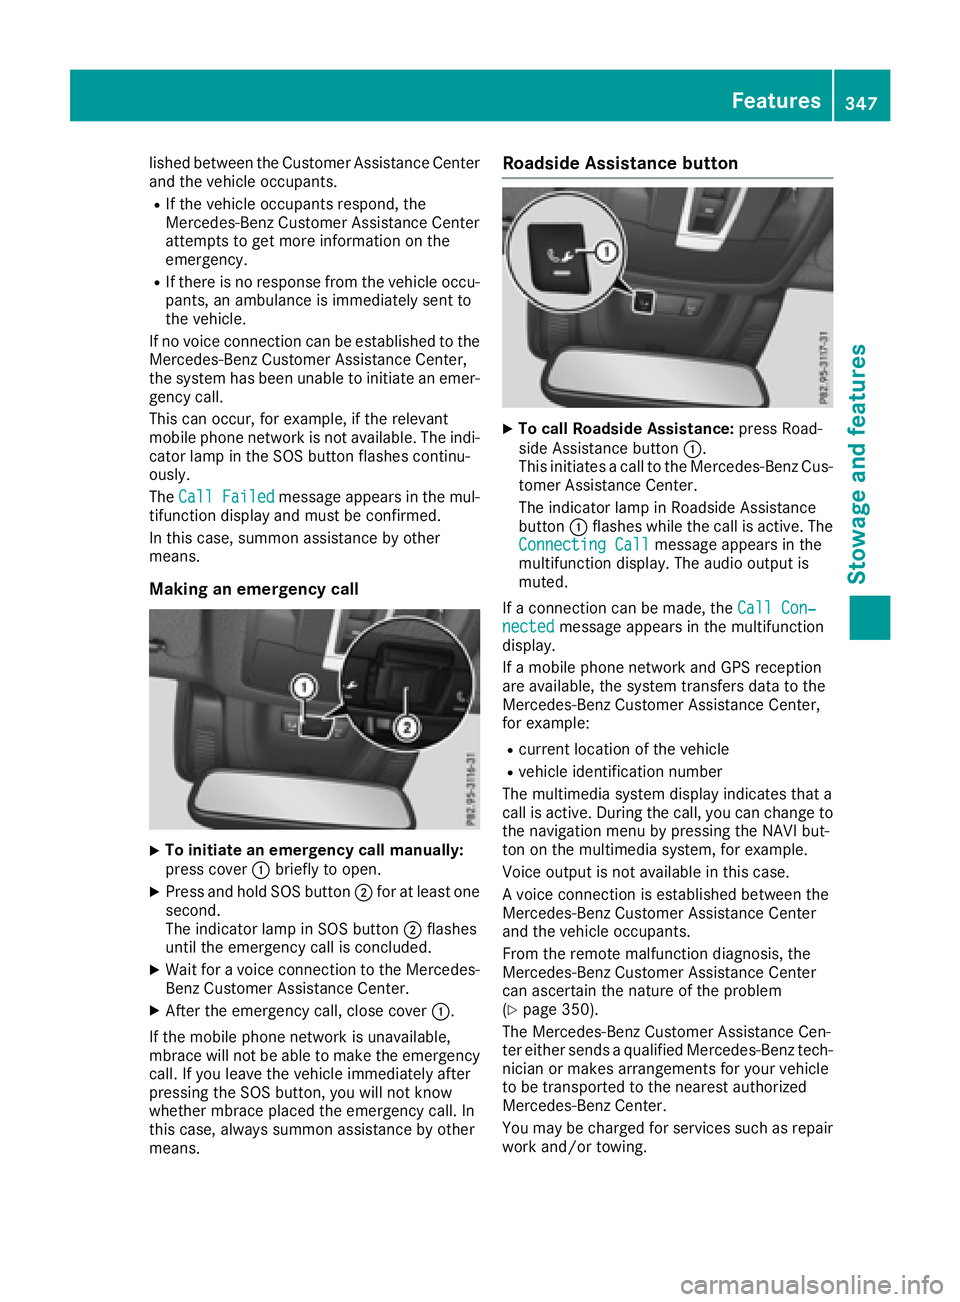
Making an emergency call
X
To initiate an emergency call manually:
press cover �C briefly to open.X
Press and hold SOS button �D for at least one
second.
The indicator lamp in SOS button �D flashes
until the emergency call is concluded. X
Wait for a voice connection to the Mercedes-
Benz Customer Assistance Center. X
After the emergency call, close cover �C .
If the mobile phone network is unavailable,
mbrace will not be able to make the emergency
call. If you leave the vehicle immediately after
pressing the SOS button, you will not know
whether mbrace placed the emergency call. In
this case, always summon assistance by other
means. Roadside Assistance button X
To call Roadside Assistance: press Road-
side Assistance button �C .
This initiates a call to the Mercedes-Benz Cus-
tomer Assistance Center.
The indicator lamp in Roadside Assistance
button �C flashes while the call is active. The
Connecting Call message appears in the
multifunction display. The audio output is
muted.
If a connection can be made, the Call Con‐
nected message appears in the multifunction
display.
If a mobile phone network and GPS reception
are available, the system transfers data to the
Mercedes-Benz Customer Assistance Center,
for example: R
current location of the vehicle R
vehicle identification number
The multimedia system display indicates that a
call is active. During the call, you can change to
the navigation menu by pressing the NAVI but-
ton on the multimedia system, for example.
Voice output is not available in this case.
A voice connection is established between the
Mercedes-Benz Customer Assistance Center
and the vehicle occupants.
From the remote malfunction diagnosis, the
Mercedes-Benz Customer Assistance Center
can ascertain the nature of the problem
( Y
page 350).
The Mercedes-Benz Customer Assistance Cen-
ter either sends a qualified Mercedes-Benz tech-
nician or makes arrangements for your vehicle
to be transported to the nearest authorized
Mercedes-Benz Center.
You may be charged for services such as repair
work and/or towing. Features 347
Stowage and features Z
Page 351 of 450
The mobile phone is no longer connected to the
multimedia system.
However, if you want to use your mobile phone,
do so only when the vehicle is stationary and in
a safe location.
Downloading destinations in COMAND Downloading destinations Downloading destinations gives you access to a
database with over 15 million points of interest
(POIs). These can be downloaded on the navi-
gation system in your vehicle. If you know the
destination, the address can be downloaded.
Alternatively, you can obtain the location of
Points of Interest (POIs)/important destinations
in the vicinity.
Furthermore, you can download routes with up
to four way points.
You are prompted to confirm route guidance to
the address entered. X
Select Yes by turning 3 or sliding 1
the controller and confirm with 7 .
The system calculates the route and subse-
quently starts the route guidance with the
address entered.
If you select No the address can be stored in
the address book.
The destination download function is available
if: R
the vehicle is equipped with a navigation sys-
tem. R
the relevant mobile phone network is availa-
ble and data transfer is possible.
Route Assistance
This service is part of the mbrace PLUS Package
and cannot be purchased separately.
You can use the route assistance function even
if the vehicle is not equipped with a navigation
system.
Within the framework of this service, you receive
a professional and reliable form of navigation
support without having to leave your vehicle.
The customer service representative finds a
suitable route depending on your vehicle's cur-
rent position and the desired destination. You
will then be guided live through the current route
section. Search & Send General notes To use "Search & Send", your vehicle must be
equipped with mbrace and a navigation system.
Additionally, an mbrace service subscription
must be completed.
"Search & Send" is a destination entry service. A
destination address which is found on Google
Maps ®
can be transferred via mbrace directly to
your vehicle's navigation system.
Specifying and sending the destination
address X
Go to the website http://maps.google.com
and enter a destination address into the entry
field. X
To send the destination address to the e-
mail address of your mbrace account:
click on the corresponding button on the web-
site.
Example:
If you select 'Send to vehicle' and then
'Mercedes-Benz', the destination address will
be sent to your vehicle. X
When the "Send" dialog window appears:
Enter the e-mail address you specified when
setting up your mbrace account into the cor-
responding field. X
Click "Send".
Information on specific commands such as
"Address entry" or "Send" can be found on the
website.
Calling up a transmitted destination
address X
Turn the SmartKey to position 2 in the ignition
lock ( Y
page 145).
The transmitted destination address is loaded
into the vehicle's navigation system.
A display message appears, asking whether
navigation should be started. X
Select Yes by turning 3 or sliding 1
the controller and confirm with 7 .
The system calculates the route and subse-
quently starts the route guidance with the
address entered.
If you select No
the address can be stored in
the address book. Features 349
Stowage and features Z
Page 352 of 450
If you have sent more than one destination
address, each individual destination must be
confirmed separately.
Destination addresses are loaded in the same
order as the order in which they were sent.
If you own multiple Mercedes-Benz vehicles with
mbrace and activated mbrace accounts:
If multiple vehicles are registered under the
same e-mail address, the destination will be
sent to all the vehicles.
Vehicle remote opening You can use the vehicle remote opening if you
have unintentionally locked your vehicle and a
replacement SmartKey is not available.
The vehicle can be opened by the Mercedes-
Benz Customer Assistance Center.
The vehicle can be immediately opened
remotely within four days of the ignition being
turned off. After this time, the remote unlocking
may be delayed by 15 to 60 minutes. After
30 days, the vehicle can no longer be opened
remotely.
The vehicle remote unlocking feature is availa-
ble if the relevant mobile phone network is avail-
able and a data connection is possible. X
Contact the following service hotlines:
Mercedes-Benz Customer Assistance Center
at 1-800-FOR-MERCedes (1-800-367-6372)
or 1-866-990-9007
You will be asked for your password. X
Return to your vehicle at the time agreed upon
with the Mercedes-Benz Customer Assis-
tance Center.
Alternatively, the vehicle can be opened via: R
the Internet, under the "Owners Online" sec-
tion R
the telephone application (e. g. for iPhone ®
,
Android)
To do this, you will need your identification num-
ber and password.
Vehicle remote closing
The vehicle remote-closing feature can be used
when you have forgotten to lock the vehicle and
you are no longer nearby.
The vehicle can then be locked by the Mercedes-
Benz Customer Assistance Center. The vehicle can be immediately remotely locked
within four days of the ignition being turned off.
After this time, remote closing may be delayed
by 15 to 60 minutes. After 30 days the vehicle
can no longer be locked remotely.
The vehicle remote closing feature is available if
the relevant mobile phone network is available
and a data connection is possible. X
Contact the following service hotlines:
Mercedes-Benz Customer Assistance Center
at 1-800-FOR-MERCedes (1-800-367-6372)
or 1-866-990-9007
You will be asked for your password.
The next time you are inside the vehicle and you
switch on the ignition, the Doors Locked
Remotely message appears in the multifunction
display.
Alternatively, the vehicle can be locked via: R
the Internet, under the "Owners Online" sec-
tion R
the telephone application (e. g. for iPhone ®
,
Android)
To do this, you will need your identification num-
ber and password.
Stolen vehicle recovery service If your vehicle has been stolen: X
Notify the police.
The police will issue a numbered incident
report. X
This number will be forwarded to the
Mercedes-Benz Customer Assistance Center
together with your PIN.
The Mercedes-Benz Customer Assistance
Center then tries to locate the system. The
Mercedes-Benz Customer Assistance Center
contacts you and the local law enforcement
agency if the vehicle is located.
However, only the law enforcement agency is
informed of the location of the vehicle.
If the anti-theft alarm system is activated for
longer than 30 seconds, the Mercedes-Benz
Customer Assistance Center is automatically
notified.
Vehicle Health Check
With the Vehicle Health Check, the Customer
Assistance Center can provide improved sup-
port for problems with your vehicle. During an350
Features
Stowage and features
Page 353 of 450
existing call, vehicle data is transferred to the
Customer Assistance Center.
The customer service representative can use
the received data to decide what kind of assis-
tance is required. You are then, for example,
guided to the nearest authorized Mercedes-
Benz Center or a recovery vehicle is called.
If vehicle data needs to be transferred during an
MB Info call or a Roadside Assistance call, this is
initiated by the Customer Assistance Center.
The Roadside Assistance Connected mes-
sage appears in the display. If the Vehicle Health
Check can be started, the Request for Vehi‐
cle Diagnostics Received Start vehi‐
cle diagnostics? message appears in the
display. X
Press the Yes button to confirm the message.X
When the Vehicle Diagnostics Please
Start Ignition message appears: turn the
SmartKey to position 2 in the ignition lock
( Y
page 145). X
If the Please follow the instructions
received by phone and move your vehi‐
cle to a safe position. message
appears: please follow the instructions
received by phone and move your vehicle to a
safe position.
The message in the display disappears.
The vehicle operating state check begins.
During this procedure, you will see the Vehi‐
cle Diagnostics Active message.
If you select Cancel
, the Vehicle Health
Check is canceled completely.
When the check is complete, the Sending
vehicle diagnostics data. (Voice con‐
nection may be interrupted during
data transfer) message appears. The vehicle
data can now be sent. X
Press the OK button to confirm the message.
The voice connection with the Customer
Assistance Center is terminated.
The Vehicle Diagnostics: Transfer‐
ring Data... message appears.
The vehicle data is sent to the Customer
Assistance Center.
Depending on what the customer service rep-
resentative agreed with you, the voice connec-
tion is re-established after the transfer is com-
plete. If necessary, you will be contacted at a
later time by another means, e.g. by e-mail or
phone. Another function of the Vehicle Health Check is
the transfer of service data to the Customer
Assistance Center. If a service is due, the display
shows a message to this effect together with
information about any special offers at your
workshop.
This information can also be called up under
"Owners Online" at http://www.mbusa.com.
Information on the data stored in the vehicle
( Y
page 30).
Information on Roadside Assistance
( Y
page 27).
Downloading routes Downloading routes allows you to transfer and
save predefined routes in the navigation sys-
tem.
A route can be prepared and sent by either a
customer service representative or under "Own-
ers Online" at http://www.mbusa.com.
Each route can include up to four way points.
Once a route has been received by the naviga-
tion system, you will see the External route
ICON_POI_Category Name_1 has been
saved to "Previous destinations".
Would you like to start navigation?
message on the multimedia system display.
The route is saved. X
To start route guidance: select Yes .
An overview of the route is shown in the dis-
play.
If you select No , the saved route can be called
up later in the navigation menu. X
Select Start .
Starting route guidance.
Downloaded and saved routes can be called up
again.
You can find further information in the separate
multimedia system operating instructions.
Speed alert
You can define the upper speed limit, which
must not be exceeded by the vehicle.
If this selected speed is exceeded by the vehicle,
a message will be sent to the Customer Assis-
tance Center. The Customer Assistance Center
then forwards this information to you.
You can select the way in which you receive this
information beforehand. Possible options Features 351
Stowage and features Z