2016 MERCEDES-BENZ GLE ignition
[x] Cancel search: ignitionPage 95 of 450
Vehicles with KEYLESS-GO: R
Release the sensor surfaces on the exterior
door handle to interrupt the closing proce-
dure. R
To open, pull the same door handle immedi-
ately and hold it firmly. The door windows and
the sliding sunroof will open for as long as the
door handle is held but the door is not
opened.
Notes on the automatic reversing feature for: R
the side window ( Y
page 91)R
the sliding sunroof ( Y
page 96)R
the panorama roof with power tilt/sliding
panel ( Y
page 96)
Using the SmartKey The SmartKey must be close to the vehicle. For
vehicles without KEYLESS-GO, the SmartKey
must be near the driver's door handle. X
Vehicles without KEYLESS-GO: point the tip
of the SmartKey at the door handle on the
driver's door. X
Press and hold the �7 button until the side
windows and the sliding sunroof or the pano-
rama roof with power tilt/sliding panel are
fully closed. X
Make sure that all the side windows and the
sliding sunroof or panorama roof with power
tilt/sliding panel are closed.
On vehicles with a panorama roof with power
tilt/sliding panel: X
Press and hold the �7 button again until the
roller sunblinds of the panorama roof with
power tilt/sliding panel close. X
To interrupt convenience closing: release
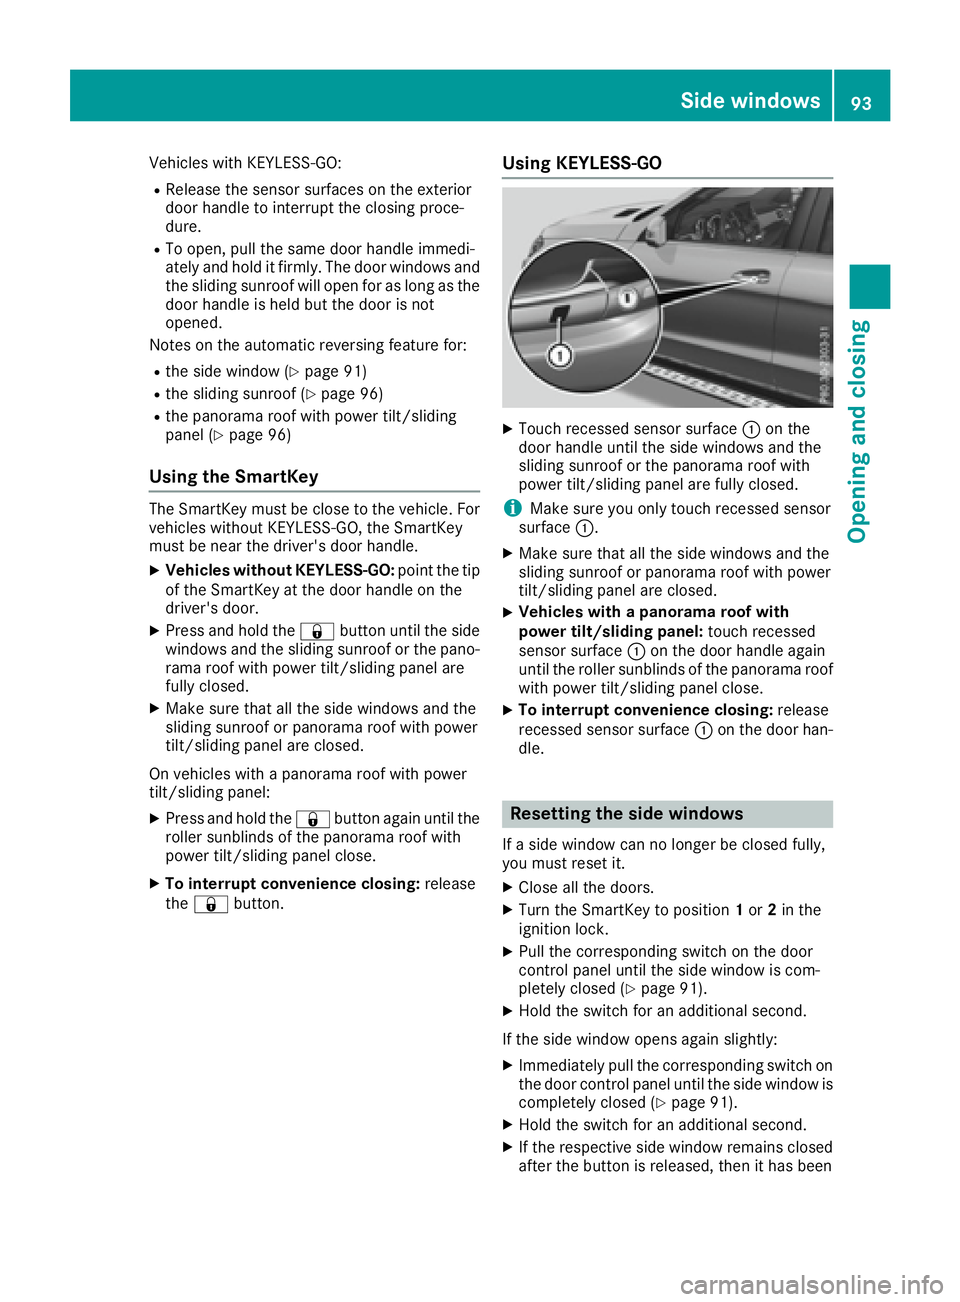
the �7 button. Using KEYLESS-GO X
Touch recessed sensor surface �C on the
door handle until the side windows and the
sliding sunroof or the panorama roof with
power tilt/sliding panel are fully closed.
i Make sure you only touch recessed sensor
surface �C . X
Make sure that all the side windows and the
sliding sunroof or panorama roof with power
tilt/sliding panel are closed. X
Vehicles with a panorama roof with
power tilt/sliding panel: touch recessed
sensor surface �C on the door handle again
until the roller sunblinds of the panorama roof
with power tilt/sliding panel close. X
To interrupt convenience closing: release
recessed sensor surface �C on the door han-
dle.
Resetting the side windows If a side window can no longer be closed fully,
you must reset it. X
Close all the doors. X
Turn the SmartKey to position 1 or 2 in the
ignition lock. X
Pull the corresponding switch on the door
control panel until the side window is com-
pletely closed ( Y
page 91). X
Hold the switch for an additional second.
If the side window opens again slightly: X
Immediately pull the corresponding switch on
the door control panel until the side window is
completely closed ( Y
page 91).X
Hold the switch for an additional second. X
If the respective side window remains closed
after the button is released, then it has beenSide windows 93
Opening and closing Z
Page 99 of 450
Resetting
! If the sliding sunroof still cannot be opened
or closed fully after resetting, contact a quali-
fied specialist workshop.
Reset the sliding sunroof if it does not move
smoothly. X
Turn the SmartKey to position 1 or 2 in the
ignition lock. X
Raise the sliding sunroof fully at the rear
( Y
page 96). X
Keep the �V switch pressed for another
second. X
Make sure that the sliding sunroof can be fully
opened and closed again ( Y
page 96).X
If this is not the case, repeat the steps above.
Operating the panorama roof with
power tilt/sliding panel
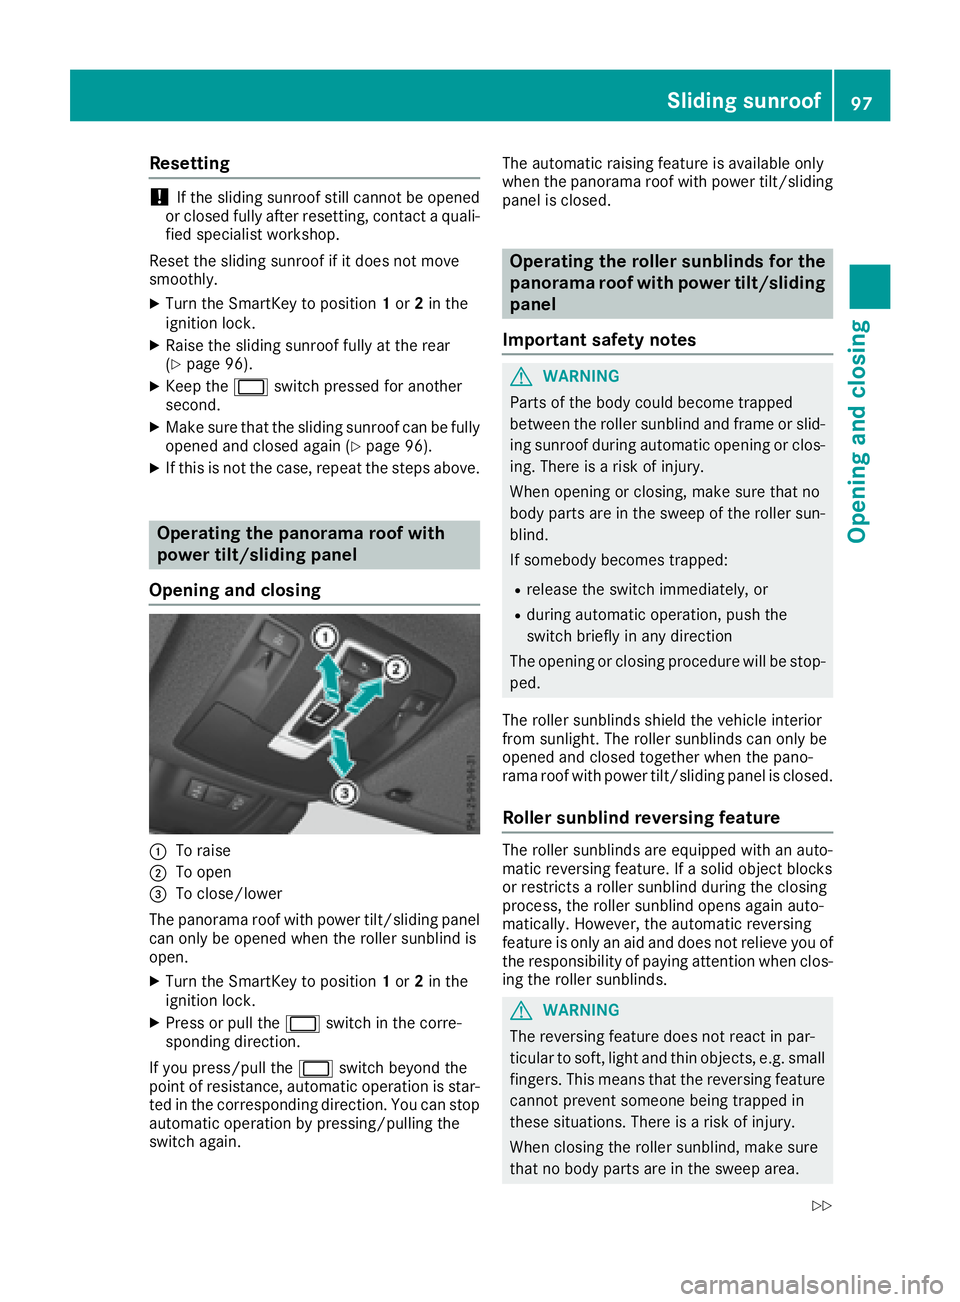
Opening and closing
�C
To raise�D
To open�
Page 103 of 450
Seats
Important safety notes
G WARNING
Children could become trapped if they adjust
the seats, particularly when unattended.
There is a risk of injury.
When leaving the vehicle, always take the
SmartKey with you and lock the vehicle. Never
leave children unsupervised in the vehicle.
The seats can still be adjusted when there is no
SmartKey in the ignition lock.
G WARNING
When you adjust a seat, you or other vehicle
occupants could become trapped, e.g. on the
seat guide rail. There is a risk of injury.
Make sure when adjusting a seat that no one
has any body parts in the sweep of the seat.
Observe the safety notes on "Air bags"
( Y
page 49) and "Children in the Vehicle"
( Y
page 60).
G WARNING
You could lose control of your vehicle if you do
the following while driving: R
adjust the driver's seat, head restraint,
steering wheel or mirrors R
fasten the seat belt
There is a risk of an accident.
Adjust the driver's seat, head restraint, steer-
ing wheel and mirror and fasten your seat belt
before starting the engine.
G WARNING
If you adjust the seat height carelessly, you or
other vehicle occupants could be trapped and
thereby injured. Children in particular could
accidentally press the electrical seat adjust-
ment buttons and become trapped. There is a
risk of injury.
While moving the seats, make sure that your
hands or other body parts do not get under the
lever assembly of the seat adjustment sys-
tem. G WARNING
If the head restraints are not installed or not
adjusted correctly, they cannot provide pro-
tection as intended. There is an increased risk
of injury in the head and neck area, e.g. in the
event of an accident or when braking.
Always drive with the head restraints instal-
led. Before driving off, make sure for every
vehicle occupant that the center of the head
restraint supports the back of the head at
about eye level.
G WARNING
The seat belt does not offer the intended level
of protection if you have not moved the back-
rest to an almost vertical position. When brak-
ing or in the event of an accident, you could
slide underneath the seat belt and sustain
abdomen or neck injuries, for example. This
poses an increased risk of injury or even fatal
injury.
Adjust the seat properly before beginning
your journey. Always ensure that the backrest
is in an almost vertical position and that the
shoulder section of your seat belt is routed
across the center of your shoulder.
! To avoid damage to the seats and the seat
heating, observe the following information: R
keep liquids from spilling on the seats. If
liquid is spilled on the seats, dry them as
soon as possible. R
if the seat covers are damp or wet, do not
switch on the seat heating. The seat heat-
ing should also not be used to dry the seats. R
clean the seat covers as recommended;
see "Interior care". R
do not transport heavy loads on the seats.
Do not place sharp objects on the seat
cushions, e.g. knives, nails or tools. The
seats should only be occupied by passen-
gers, if possible. R
when the seat heating is in operation, do
not cover the seats with insulating materi-
als, e.g. blankets, coats, bags, seat covers,
child seats or booster seats.
! Make sure that there are no objects in the
footwell under or behind the seats when mov- Seats 101
Seats, steering wheel and mirrors Z
Page 107 of 450
Therefore, do not switch the seat heating on
repeatedly.
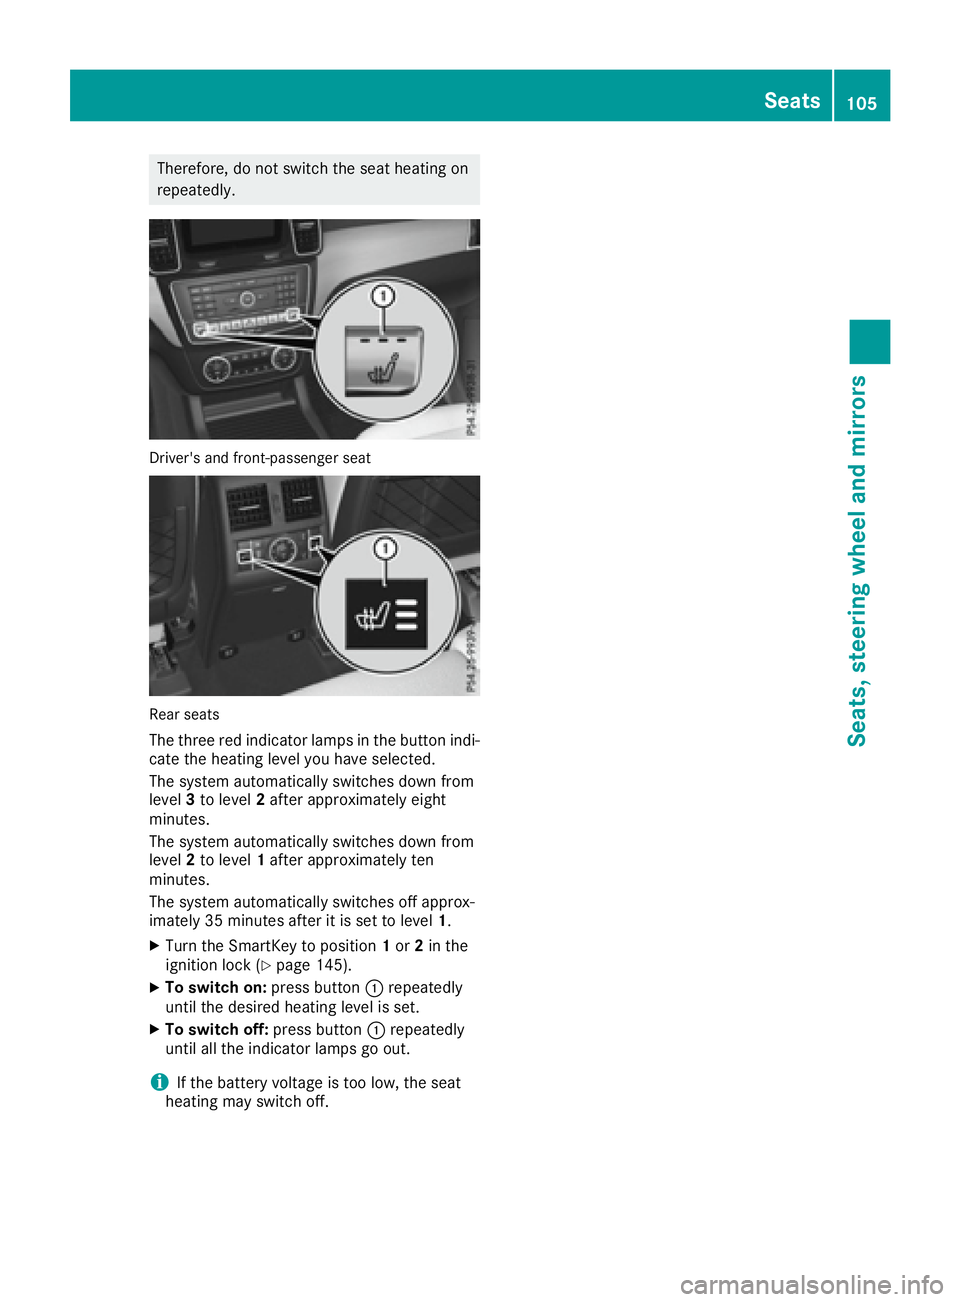
Driver's and front-passenger seat
Rear seats
The three red indicator lamps in the button indi-
cate the heating level you have selected.
The system automatically switches down from
level 3 to level 2 after approximately eight
minutes.
The system automatically switches down from
level 2 to level 1 after approximately ten
minutes.
The system automatically switches off approx-
imately 35 minutes after it is set to level 1 .X
Turn the SmartKey to position 1 or 2 in the
ignition lock ( Y
page 145).X
To switch on: press button �C repeatedly
until the desired heating level is set. X
To switch off: press button �C repeatedly
until all the indicator lamps go out.
i If the battery voltage is too low, the seat
heating may switch off. Seats 105
Seats, steering wheel and mirrors Z
Page 108 of 450
Problems with the seat heating Problem
Possible causes/consequences and �P Solutions
The seat heating has
switched off prematurely
or cannot be switched
on. The on-board voltage is too low because too many electrical consum-
ers are switched on. X
Switch off electrical consumers that you do not need, such as the
rear window defroster or interior lighting.
Once the battery is sufficiently charged, the seat heating will switch
back on automatically.
Switching the seat ventilation on/off
Switching on/off
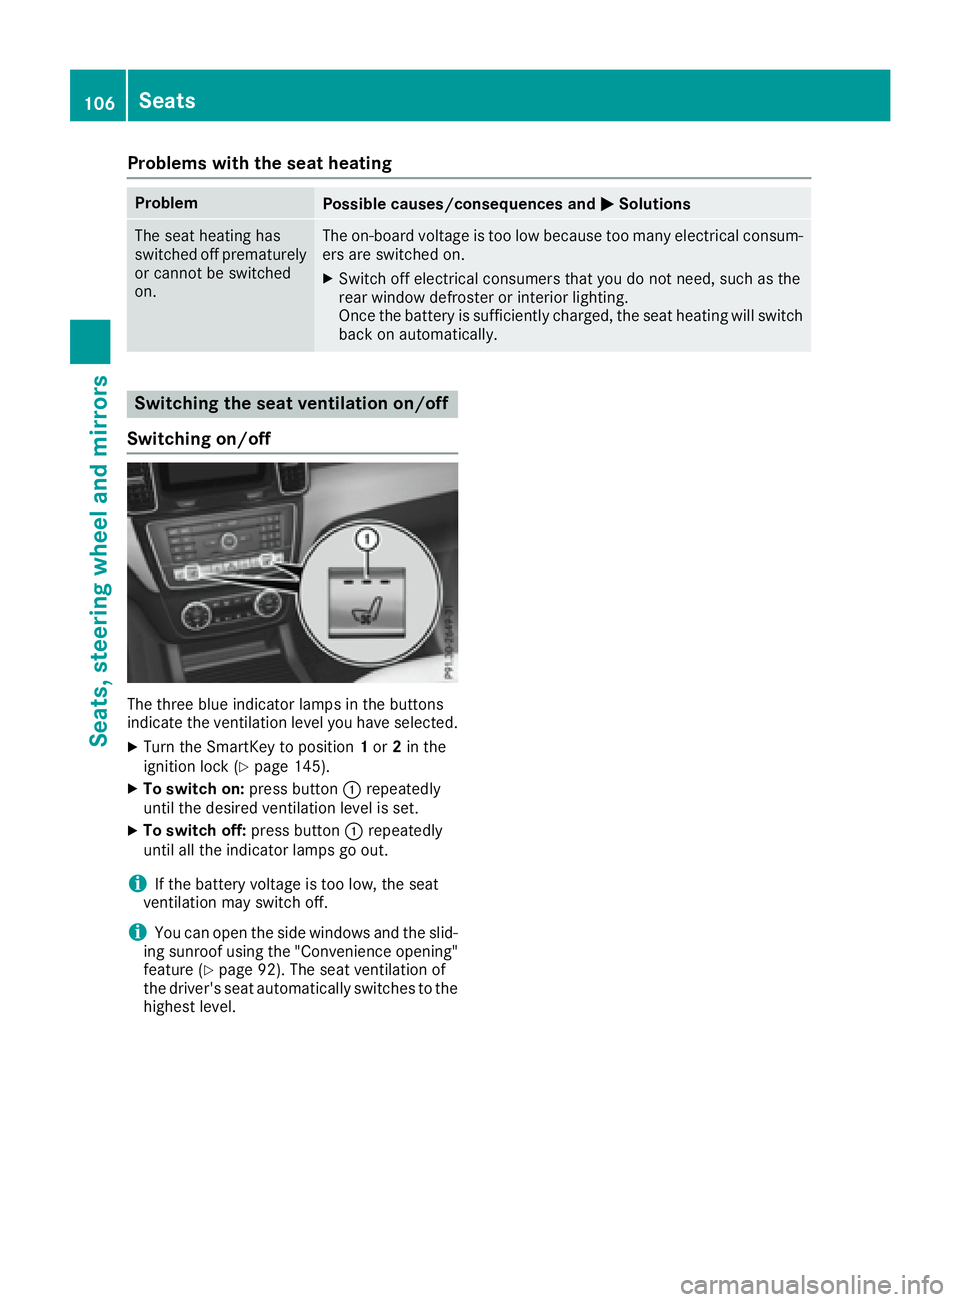
The three blue indicator lamps in the buttons
indicate the ventilation level you have selected. X
Turn the SmartKey to position 1 or 2 in the
ignition lock ( Y
page 145).X
To switch on: press button �C repeatedly
until the desired ventilation level is set. X
To switch off: press button �C repeatedly
until all the indicator lamps go out.
i If the battery voltage is too low, the seat
ventilation may switch off.
i You can open the side windows and the slid-
ing sunroof using the "Convenience opening"
feature ( Y
page 92). The seat ventilation of
the driver's seat automatically switches to the
highest level.106
Seats
Seats, steering wheel and mirrors
Page 109 of 450
Problems with the seat ventilation Problem
Possible causes/consequences and �P Solutions
The seat ventilation has
switched off prematurely
or cannot be switched
on. The on-board voltage is too low because too many electrical consum-
ers are switched on. X
Switch off electrical consumers that you do not need, such as the
rear window defroster or interior lighting.
Once the battery is sufficiently charged, the seat ventilation will
switch back on automatically.
Steering wheel
Important safety notes
G WARNING
You could lose control of your vehicle if you do
the following while driving: R
adjust the driver's seat, head restraint,
steering wheel or mirrors R
fasten the seat belt
There is a risk of an accident.
Adjust the driver's seat, head restraint, steer-
ing wheel and mirror and fasten your seat belt
before starting the engine.
G WARNING
Children could injure themselves if they
adjust the steering wheel. There is a risk of
injury.
When leaving the vehicle, always take the
SmartKey with you and lock the vehicle. Never
leave children unsupervised in the vehicle.
The electrically adjustable steering wheel can
still be adjusted when there is no SmartKey in
the ignition lock.
Adjusting the steering wheel man-
ually
G WARNING
If the steering wheel is unlocked while the
vehicle is in motion, it could change position
unexpectedly. This could cause you to lose control of the vehicle. There is a risk of an
accident.
Before starting off, make sure the steering
wheel is locked. Never unlock the steering
wheel while the vehicle is in motion.
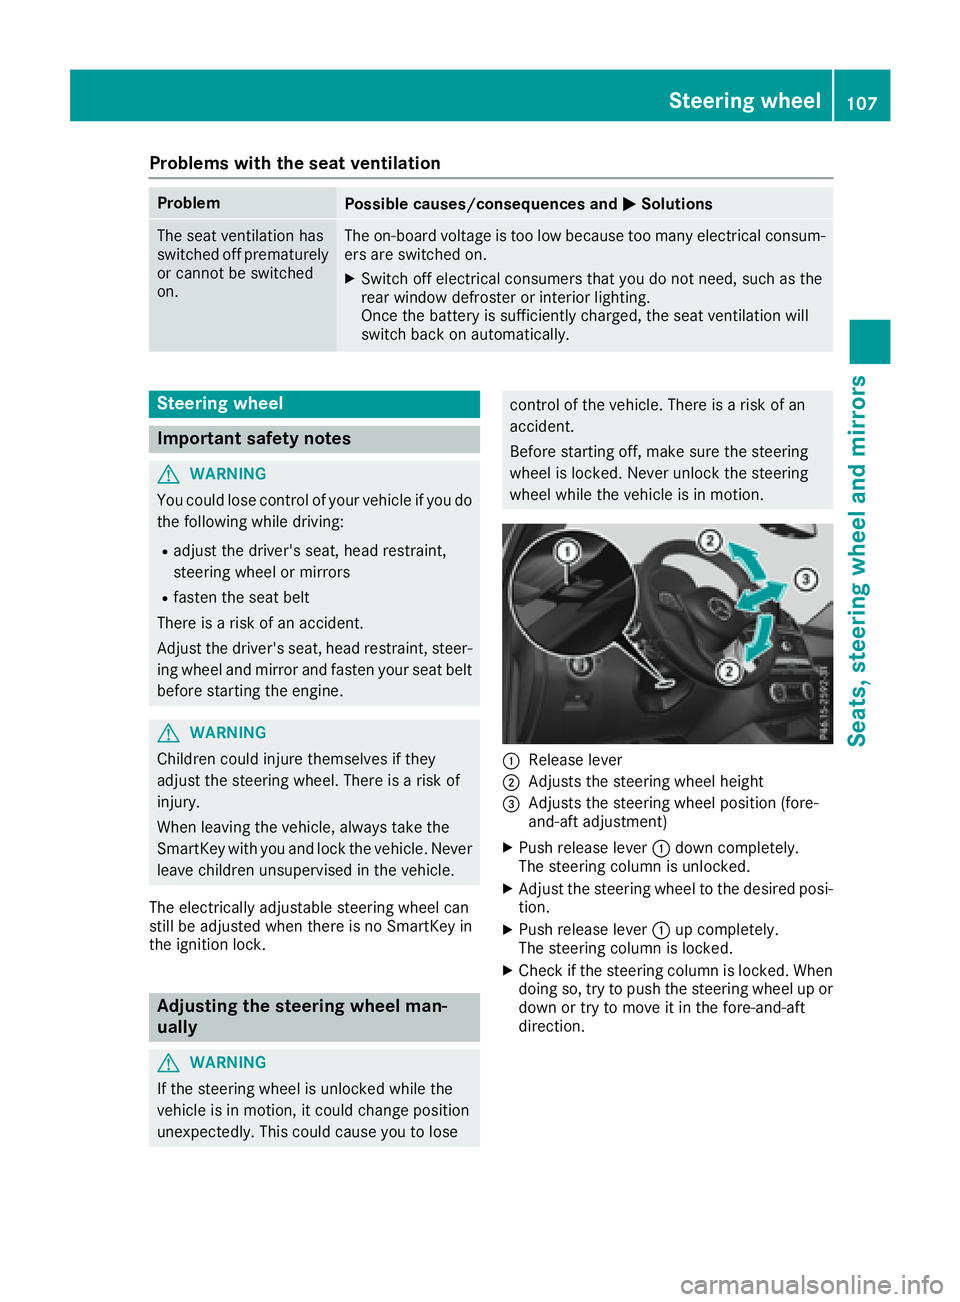
�C
Release lever �D
Adjusts the steering wheel height �
Page 110 of 450
Adjusting the steering wheel elect ri -
cally
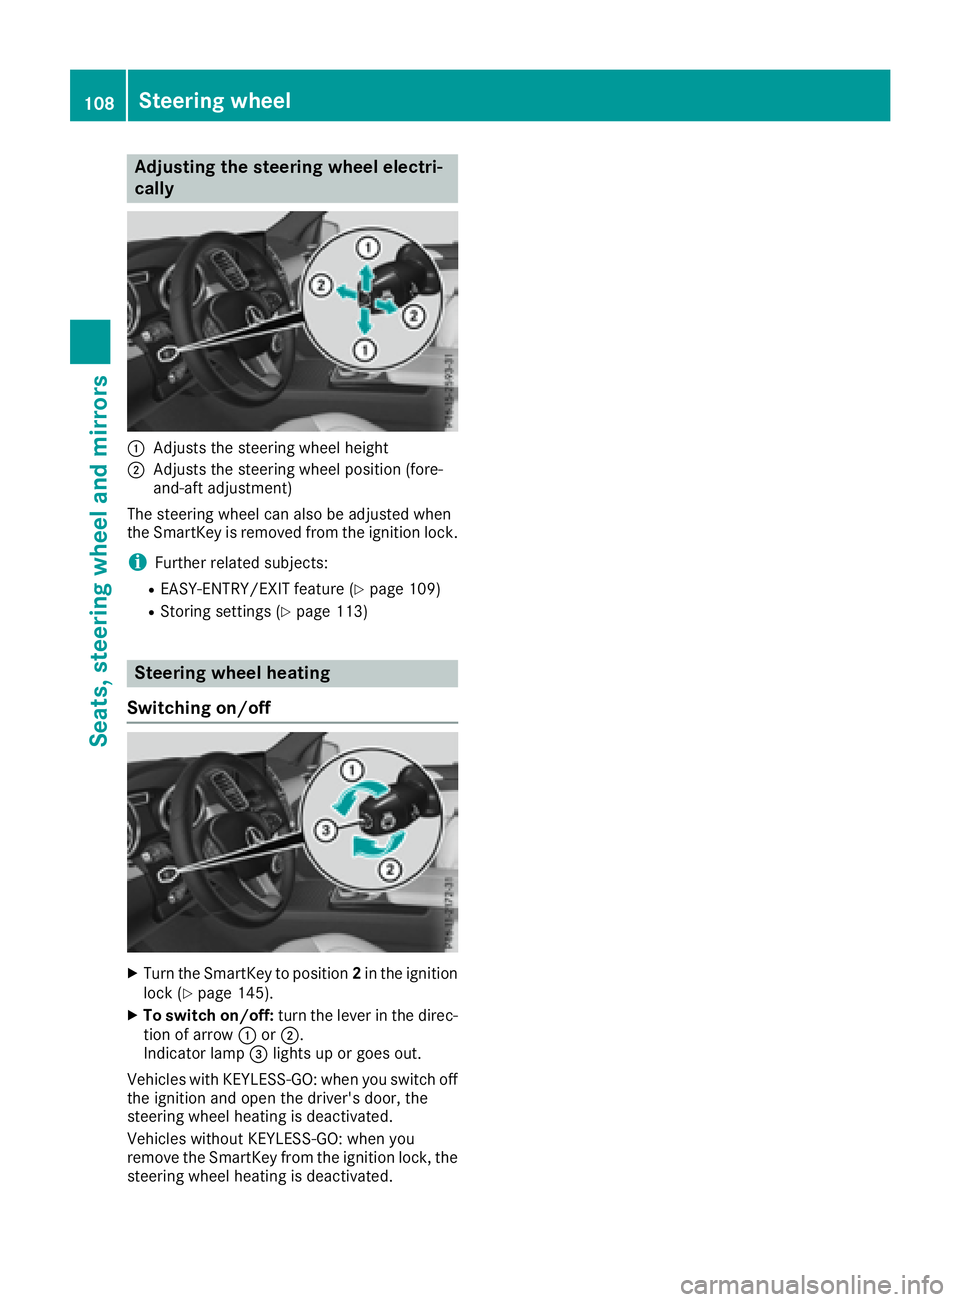
�C
Adjusts th e steering whee l height�D
Adjusts th e steering whee l position (fore-
and-af t adjustment)
The steering whee l can also be adjusted when
th e SmartKey is remove d from th e ignition lock.
i Further relate d subjects :R
EASY-ENTRY/EXIT feature ( Y
page 109)R
Storing setting s ( Y
page 113)
Steering wheel heating
Switching on/off
X
Turn th e SmartKey to position 2 in th e ignition
loc k ( Y
page 145).X
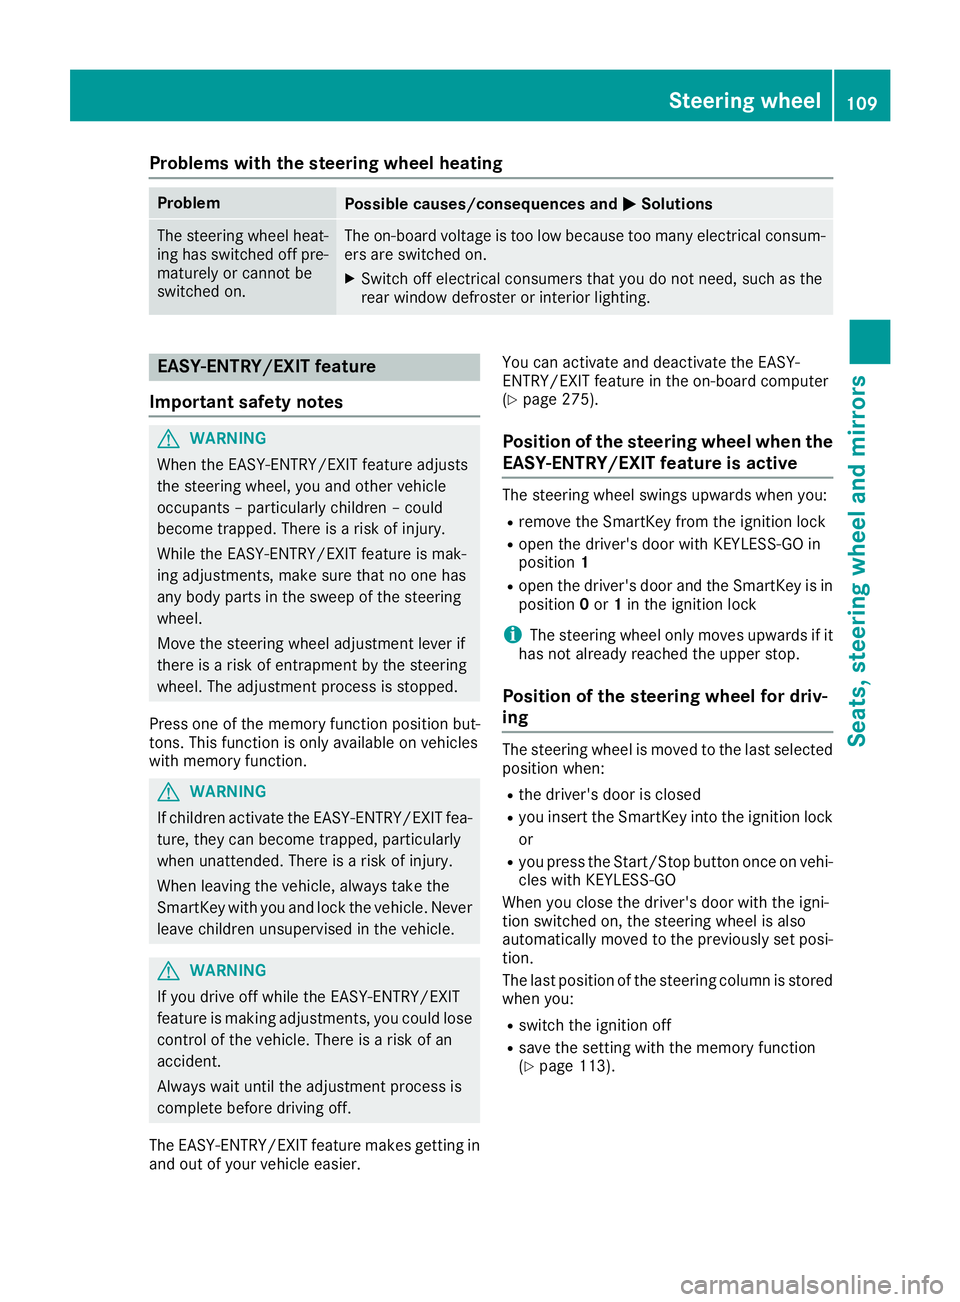
To switch on/off: tur n th e lever in th e direc -
tion of arrow �C or �D .
Indicato r lamp �
Page 111 of 450
Problems with the steering wheel heating Problem
Possible causes/consequences and �P Solutions
The steering wheel heat-
ing has switched off pre-
maturely or cannot be
switched on. The on-board voltage is too low because too many electrical consum-
ers are switched on. X
Switch off electrical consumers that you do not need, such as the
rear window defroster or interior lighting.
EASY-ENTRY/EXIT feature
Important safety notes
G WARNING
When the EASY-ENTRY/EXIT feature adjusts
the steering wheel, you and other vehicle
occupants – particularly children – could
become trapped. There is a risk of injury.
While the EASY-ENTRY/EXIT feature is mak-
ing adjustments, make sure that no one has
any body parts in the sweep of the steering
wheel.
Move the steering wheel adjustment lever if
there is a risk of entrapment by the steering
wheel. The adjustment process is stopped.
Press one of the memory function position but-
tons. This function is only available on vehicles
with memory function.
G WARNING
If children activate the EASY-ENTRY/EXIT fea-
ture, they can become trapped, particularly
when unattended. There is a risk of injury.
When leaving the vehicle, always take the
SmartKey with you and lock the vehicle. Never
leave children unsupervised in the vehicle.
G WARNING
If you drive off while the EASY-ENTRY/EXIT
feature is making adjustments, you could lose
control of the vehicle. There is a risk of an
accident.
Always wait until the adjustment process is
complete before driving off.
The EASY-ENTRY/EXIT feature makes getting in
and out of your vehicle easier. You can activate and deactivate the EASY-
ENTRY/EXIT feature in the on-board computer
( Y
page 275).
Position of the steering wheel when the
EASY-ENTRY/EXIT feature is active The steering wheel swings upwards when you: R
remove the SmartKey from the ignition lock R
open the driver's door with KEYLESS-GO in
position 1 R
open the driver's door and the SmartKey is in
position 0 or 1 in the ignition lock
i The steering wheel only moves upwards if it
has not already reached the upper stop.
Position of the steering wheel for driv-
ing The steering wheel is moved to the last selected
position when: R
the driver's door is closed R
you insert the SmartKey into the ignition lock
or R
you press the Start/Stop button once on vehi-
cles with KEYLESS-GO
When you close the driver's door with the igni-
tion switched on, the steering wheel is also
automatically moved to the previously set posi-
tion.
The last position of the steering column is stored
when you: R
switch the ignition off R
save the setting with the memory function
( Y
page 113).Steering wheel 109
Seats, steering wheel and mirrors Z