2016 MERCEDES-BENZ GLE towing
[x] Cancel search: towingPage 63 of 450
retractor. When activated, the special seat belt
retractor ensures that the seat belt cannot
slacken once the child seat is secured.
Installing a child restraint system: X
Make sure you observe the child restraint
system manufacturer's installation instruc-
tions. X
Pull the seat belt smoothly from the belt out-
let. X
Engage seat belt tongue in belt buckle.
Activating the special seat belt retractor: X
Pull the seat belt out fully and let the inertia
reel retract it again.
While the seat belt is retracting, you should
hear a ratcheting sound. The special seat belt
retractor is enabled. X
Push the child restraint system down so that
the seat belt is tight and does not loosen.
Removing the child restraint system and deac-
tivating the special seat belt retractor: X
Make sure you observe the child restraint
system manufacturer's installation instruc-
tions. X
Press the release button of the seat belt
buckle and guide the seat belt tongue back
towards the belt sash guide.
The special seat belt retractor is deactivated.
Child restraint system The use of seat belts and child restraint systems
is required by law in: R
all 50 states R
the U.S. territories R
the District of Columbia R
all Canadian provinces
If you install a rearward-facing child restraint
system on the center rear seat, the rear arm rest
must be folded back as far as possible.
You can obtain further information about the
correct child restraint system from any author-
ized Mercedes-Benz Center.
G WARNING
If the child restraint system is installed incor-
rectly on a suitable seat, it cannot protect as
intended. The child cannot then be restrained
in the event of an accident, heavy braking or sudden changes of direction. There is an
increased risk of injury, possibly even fatal.
Make sure that you observe the child restraint
system manufacturer's installation instruc-
tions and the notes on use. Please ensure,
that the base of the child restraint system is
always resting completely on the seat cush-
ion. Never place objects, e.g. cushions, under
or behind the child restraint system. Only use
child restraint systems with the original cover
designed for them. Only replace damaged
covers with genuine covers.
G WARNING
If the child restraint system is installed incor-
rectly or is not secured, it can come loose in
the event of an accident, heavy braking or a
sudden change in direction. The child
restraint system could be thrown about, strik-
ing vehicle occupants. There is an increased
risk of injury, possibly even fatal.
Always install child restraint systems prop-
erly, even if they are not being used. Make
sure that you observe the child restraint sys-
tem manufacturer's installation instructions.
You will find further information on stowing
objects, luggage or loads under "Loading guide-
lines" ( Y
page 329).
G WARNING
Child restraint systems or their securing sys-
tems which have been damaged or subjected
to a load in an accident can no longer protect
as intended. The child cannot then be
restrained in the event of an accident, heavy
braking or sudden changes of direction. There
is an increased risk of injury, possibly even
fatal.
Replace child restraint systems which have
been damaged or subjected to a load in an
accident as soon as possible. Have the secur-
ing systems on the child restraint system
checked at a qualified specialist workshop,
before you install a child restraint system
again.Children in the vehicle 61
Safety Z
Page 117 of 450
The daytime running lamps improve the visibility
of your vehicle during the day. The daytime run-
ning lamps function is required by law in Can-
ada. It cannot therefore be deactivated.
When the engine is running and the vehicle is
stationary: if you move the selector lever from a
drive position to P , the daytime running lamps/
low-beam headlamps go out after three
minutes.
When the engine is running, the vehicle is sta-
tionary and in bright ambient light: if you turn the
light switch to �` , the daytime running lamps
and parking lamps switch on.
If the engine is running and you turn the light
switch to �X , the manual settings take prec-
edence over the daytime running lamps.
USA only:
The daytime running lamps improve the visibility
of your vehicle during the day. To do this, the
daytime running lamps function must be
switched on using the on-board computer
( Y
page 275).
If the engine is running and you turn the light
switch to �` or �X , the manual settings
take precedence over the daytime running
lamps.
Low-beam headlamps Even if the light sensor does not detect that it is
dark, the parking lamps and low-beam head-
lamps switch on when the ignition is switched on
and the light switch is set to the �X position.
This is a particularly useful function in the event
of rain and fog. X
To switch on the low-beam headlamps:
turn the SmartKey in the ignition lock to posi-
tion 2 or start the engine.X
Turn the light switch to �X .
The green �X indicator lamp in the instru-
ment cluster lights up.
Rear fog lamp
The rear fog lamp improves visibility of your
vehicle for the traffic behind in the event of thick
fog. Please take note of the country-specific
regulations for the use of rear fog lamps. X
To switch on the rear fog lamp: turn the
SmartKey in the ignition lock to position 2 or
start the engine. X
Turn the light switch to �X or �X . X
Press the �^ button.
The yellow �^ indicator lamp in the instru-
ment cluster lights up. X
To switch off the rear fog lamp: press the
�^ but ton.
The yellow �^ indicator lamp in the instru-
ment cluster goes out.
Parking lamps
! If the battery has been excessively dis-
charged, the parking lamps or standing lamps
are automatically switched off to enable the
next engine start. Always park your vehicle
safely and sufficiently lit according to legal
standards. Avoid the continuous use of the
�` parking lamps for several hours. If pos-
sible, switch on the �d right or the �c left
standing lamp. X
To switch on: turn the light switch to �` .
The green �` indicator lamp in the instru-
ment cluster lights up.
Standing lamps Switching on the standing lamps ensures the
corresponding side of the vehicle is illuminated. X
To switch on the standing lamps: the
SmartKey should not be in the ignition lock or
it should be in position 0 .X
Turn the light switch to �c (left-hand side of
the vehicle) or �d (right-hand side of the
vehicle).
Vehicles towing a trailer: both the right-hand
and left-hand standing lamps (tail lamps) are
always illuminated on the trailer.Exterior lighting 115
Lights and windshield wipers Z
Page 158 of 450
If you want the automatic transmission to
remain in neutral N , e.g. when having the vehicle
cleaned in an automatic car wash with a towing
system:
Using the SmartKey: X
Switch on the ignition. X
Depress the brake pedal and keep it
depressed. X
Shift to neutral N .X
Release the brake pedal. X
Release the electric parking brake. X
Switch off the ignition and leave the SmartKey
in the ignition lock.
With the Start/Stop button: X
Remove the Start/Stop button from the igni-
tion lock. X
Insert the SmartKey into the ignition lock. X
Switch on the ignition. X
Depress the brake pedal and keep it
depressed. X
Shift to neutral N .X
Release the brake pedal. X
Release the electric parking brake. X
Switch off the ignition and leave the SmartKey
in the ignition lock.
Engaging drive position D X
If the transmission is in position R or N : push
the DIRECT SELECT lever down past the first
point of resistance. X
If the transmission is in position P : depress
the brake pedal and push the DIRECT SELECT
lever down past the first point of resistance. Transmission positions �E Park position
Only shift the transmission into posi-
tion P when the vehicle is stationary
( Y
page 178). The parking lock
should not be used as a brake when
parking. Always apply the electronic
parking brake in addition to the park-
ing lock in order to secure the vehi-
cle.
If the vehicle electronics are malfunc-
tioning, the transmission may be
locked in position P . Have the vehicle
electronics checked immediately at a
qualified specialist workshop.
Park position P is automatically
engaged if: R
you switch off the engine using the
SmartKey and remove the Smart-
Key R
you switch off the engine using the
SmartKey or using the Start/Stop
button and open the driver's door
or front-passenger door R
the driver's door is opened when
the vehicle is stationary or driving
at very low speed and the trans-
mission is in position D or R
�F Reverse gear
Only shift the transmission into posi-
tion R when the vehicle is stationary.156
Automatic transmission
Driving and parking
Page 160 of 450
R
you use th e DIRECT SELECT lever to switch
th e transmission position ( Y
page 154).R
use th e DYNAMIC SELECT controller to
chang e th e drive progra m ( Y
page 152).R
you activat e manual gearshiftin g
( Y
page 159).R
you leav e th e suitable speed range.
Mercedes-AMG vehicles Glidin g mod e is characterized by th e following:R
th e combustion engin e is disconnected from
th e drive train .R
th e engin e speed corresponds to th e idlin g
speed. R
in th e multifunction display, th e glidin g sym -
bol appears in th e drive progra m display.
Glidin g mod e can be activated under th e follow-
in g conditions: R
th e Comfor t drive progra m is activated or you
select th e "Comfort" setting for th e drive sys-
te m within th e Individua l drive program. You
can fin d information about this in th e Digital
Operator' s Manual.R
th e ECO start/sto p function is activated.R
you are drivin g carefully wit h low acceleration
of th e vehicle.R
th e engin e is at normal operating tempera-
ture. R
th e speed is within a suitable range.R
th e cours e of th e roa d is suitable, e.g. there
are no steep up or downhill gradients .R
you are no longer depressin g th e accelerato r
pedal .
Glidin g mod e is d eactivated under th e fo
llowin g
conditions: R
you hav e deactivated th e ECO start/sto p
function .R
you depress th e accelerato r pedal .R
you depress th e brak e pedal .R
you use th e DIRECT SELECT lever to switch
th e transmission position ( Y
page 154).R
use th e DYNAMIC SELECT controller to
chang e th e drive progra m ( Y
page 152).R
you activat e manual gearshiftin g
( Y
page 159).R
you leav e th e suitable speed range. Towing a trailer X
Drive in th e middle of th e engin e speed range
on uphil l gradients .X
Dependin g on th e uphil l or downhill gradient,
use left-han d steerin g whee l paddl e shifter
( Y
page 159) to select a lower gear , eve n if
cruise control or DISTRONI C PLU S are acti-
vated.
Drive programs
Slippery drive program The Slipper y drive progra m has th e followin g
characteristics : R
reduce d engin e and transmission setting s for
optimum propulsion on slipper y or snow-cov-
ere d roads. R
optimized ES P ®
stabilit y control on slipper y or
snow-covered roads. R
th e vehicl e has improved drivin g stabilit y on
slipper y or snow-covered roads, for example.
Comfort drive program The Comfor t drive progra m has th e followin g
characteristics : R
comfort-oriented engin e and transmission
settings. R
optimal fuel consumption resultin g from th e
automati c transmission shiftin g up sooner.R
th e vehicl e pullin g away mor e gentl y in
forward and revers e gears, unless th e accel-
erator pedal is depressed fully. R
th e automati c transmission shiftin g up
sooner. This result s in th e vehicl e bein g driven
at lower engin e speeds and th e wheels bein g
less likely to spin .
Sp or t drive program The Sport drive progra m has th e followin g char-
acteristics : R
sport y engin e and transmission settings. R
th e automati c transmission shiftin g up later.
th e fuel consumption possibl y bein g higher as
a result of th e later automati c transmission
shift points . R
th e suspension exhibits sport y dampin g (vehi-
cle s wit h AIRMATIC) .158
Automatic transmission
Driving an d parking
Page 174 of 450
If the charging cable or charging cable connec-
tor become too hot, have the mains power sup-
ply checked.
Protection device against overvoltage
! Overvoltage in the mains supply may dam-
age the vehicle. For this reason, the vehicle is
equipped with a protection device against
overvoltage in the mains supply. This device
may be triggered during severe thunder-
storms, for example, and may lead to the buil-
ding's fuse being tripped and an interruption
in the power supply. These functions protect
the vehicle. After the building fuse is switched
on again, the charging process resumes auto-
matically. Following an interruption in the
power supply or tripping of the building's fuse,
it may take up to 10 minutes for charging to
resume automatically.
Switch on the building protection system again
after it has been triggered. Otherwise, the
charging process cannot be continued.
General information about the charging
procedure Pay attention to the "Important safety notes"
( Y
page 169).
The vehicle socket is located in the rear bumper
on the right below the tail lamp.
The charge socket flap and the vehicle are cen-
trally locked or unlocked simultaneously.
Charging the high-voltage battery via
the electrical outlet
Charging cable for electrical outlets
Important safety notes
! Only use the charging cable to charge the
high-voltage battery. Do not use the charging
cable for other purposes. It may otherwise be
damaged.
The vehicle is supplied with a country-specific
charging cable for connection to a mains socket.
Only use the charging cable supplied with the
vehicle or a charging cable approved for the
vehicle. i If you use the supplied 12 A charging cable
to charge a high-voltage battery: R
the charge time increases considerably R
electrical consumption increases consider-
ably
Where possible, charge the high-voltage bat-
tery at a charging station ( Y
page 175). Only
then can certified electrical energy consump-
tion levels be reached.
i The charging process can vary depending on
the power supply. Therefore, always observe
the local information.
Information about charging from a wallbox
( Y
page 175).
Information on charging at a charging station
( Y
page 175).
Stowing the charging cable The charging cable can be stowed and secured
in the bag provided in the cargo compartment of
the vehicle.
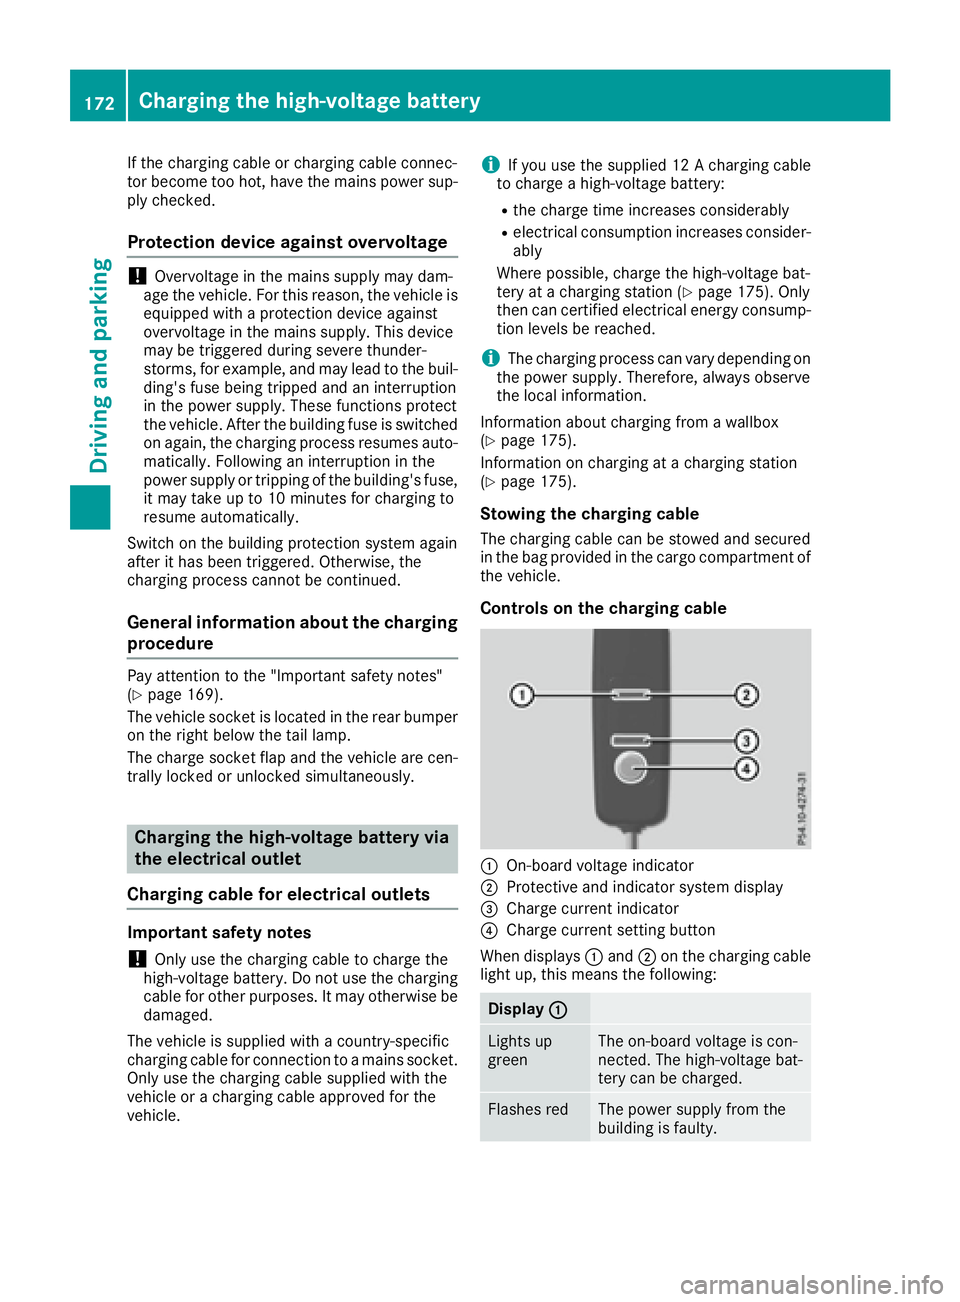
Controls on the charging cable
�C
On-board voltage indicator �D
Protective and indicator system display �
Page 181 of 450
Switching off the engine
Important safety notes
G WARNING
The automatic transmission switches to neu-
tral position N when you switch off the engine.
The vehicle may roll away. There is a risk of an
accident.
After switching off the engine, always switch
to parking position P . Prevent the parked vehi-
cle from rolling away by applying the parking
brake.
Using the SmartKey X
Apply the electric parking brake. X
Shift the transmission to position P .X
Turn the SmartKey to position 0 in the ignition
lock and remove it.
The immobilizer is activated.
If you switch the engine off with the transmis-
sion in position R or D , the automatic transmis-
sion shifts to N automatically.
If you then open the driver's door or the front-
passenger door or remove the SmartKey from
the ignition, the automatic transmission shifts
to P automatically.
If you want the automatic transmission to
remain in neutral N , e.g. when having the vehicle
cleaned in an automatic car wash with a towing
system: X
Switch on the ignition. X
Depress the brake pedal and keep it
depressed. X
Shift to neutral N .X
Release the brake pedal. X
Release the electric parking brake. X
Switch off the ignition and leave the SmartKey
in the ignition lock.
Using KEYLESS-GO X
Apply the electric parking brake. X
Shift the transmission to position P .X
Press the Start/Stop button ( Y
page 146)
The engine stops and all the indicator lamps in
the instrument cluster go out. If you switch the engine off with the transmis-
sion in position R or D , the automatic transmis-
sion shifts to N automatically.
If you then open the driver's or front-passenger
door, the automatic transmission shifts to P
automatically.
If you want the automatic transmission to
remain in neutral N , e.g. when having the vehicle
cleaned in an automatic car wash with a towing
system: X
Remove the Start/Stop button from the igni-
tion lock. X
Insert the SmartKey into the ignition lock. X
Switch on the ignition. X
Depress the brake pedal and keep it
depressed. X
Shift to neutral N . X
Release the brake pedal. X
Release the electric parking brake. X
Switch off the ignition and leave the SmartKey
in the ignition lock.
i The engine can be switched off in an emer-
gency while the vehicle is in motion by press-
ing and holding the Start/Stop button for
three seconds.
Electric parking brake
General notes
G WARNING
If you leave children unsupervised in the vehi-
cle, they could set it in motion by, for example: R
release the parking brake. R
shift the automatic transmission out of the
parking position P . R
start the engine.
In addition, they may operate vehicle equip-
ment and become trapped. There is a risk of
an accident and injury.
When leaving the vehicle, always take the
SmartKey with you and lock the vehicle. Never
leave children unsupervised in the vehicle. Parking 179
Driving and parking Z
Page 193 of 450
i The special off-road ABS setting enables a
precise, brief and repeated locking of the
front wheels. This causes them to dig into
loose earth. Be aware that the front wheels
easily skid across the ground surface if com-
pletely braked and therefore lose their ability
to steer.
Driving systems
Intelligent Drive Mercedes-Benz Intelligent Drive stands for inno-
vative driver assistance and safety systems
which enhance comfort and support the driver in
critical situations. With these intelligent co-ordi-
nated systems Mercedes-Benz has set a mile-
stone on the path towards autonomous driving.
Mercedes-Benz Intelligent Drive embraces all
elements of active and passive safety in one well
thought out system – for the safety of the vehi-
cle occupants and that of other road users.
Further information on driving safety systems
( Y
page 66).
Cruise control
General notes Cruise control maintains a constant road speed
for you. It brakes automatically in order to avoid
exceeding the set speed. You must select a
lower gear in good time on long and steep down-
hill gradients, especially if the vehicle is laden or
towing a trailer. By doing so, you will make use of
the braking effect of the engine. This relieves the
load on the brake system and prevents the
brakes from overheating and wearing too
quickly.
Use cruise control only if road and traffic con-
ditions make it appropriate to maintain a steady
speed for a prolonged period. You can store any
road speed above 20 mph (30 km/h).
i Cruise control should not be activated when
driving off-road.
Important safety notes
If you fail to adapt your driving style, cruise con-
trol can neither reduce the risk of an accident
nor override the laws of physics. Cruise control
cannot take into account the road, traffic and weather conditions. Cruise control is only an
aid. You are responsible for the distance to the
vehicle in front, for vehicle speed, for braking in
good time and for staying in your lane.
Do not use cruise control: R
in road and traffic conditions which do not
allow you to maintain a constant speed e.g. in
heavy traffic or on winding roads R
on slippery road surfaces. Braking or accel-
erating could cause the drive wheels to lose
traction and the vehicle could then skid R
when there is poor visibility, e.g. due to fog,
heavy rain or snow
If there is a change of drivers, advise the new
driver of the speed stored.
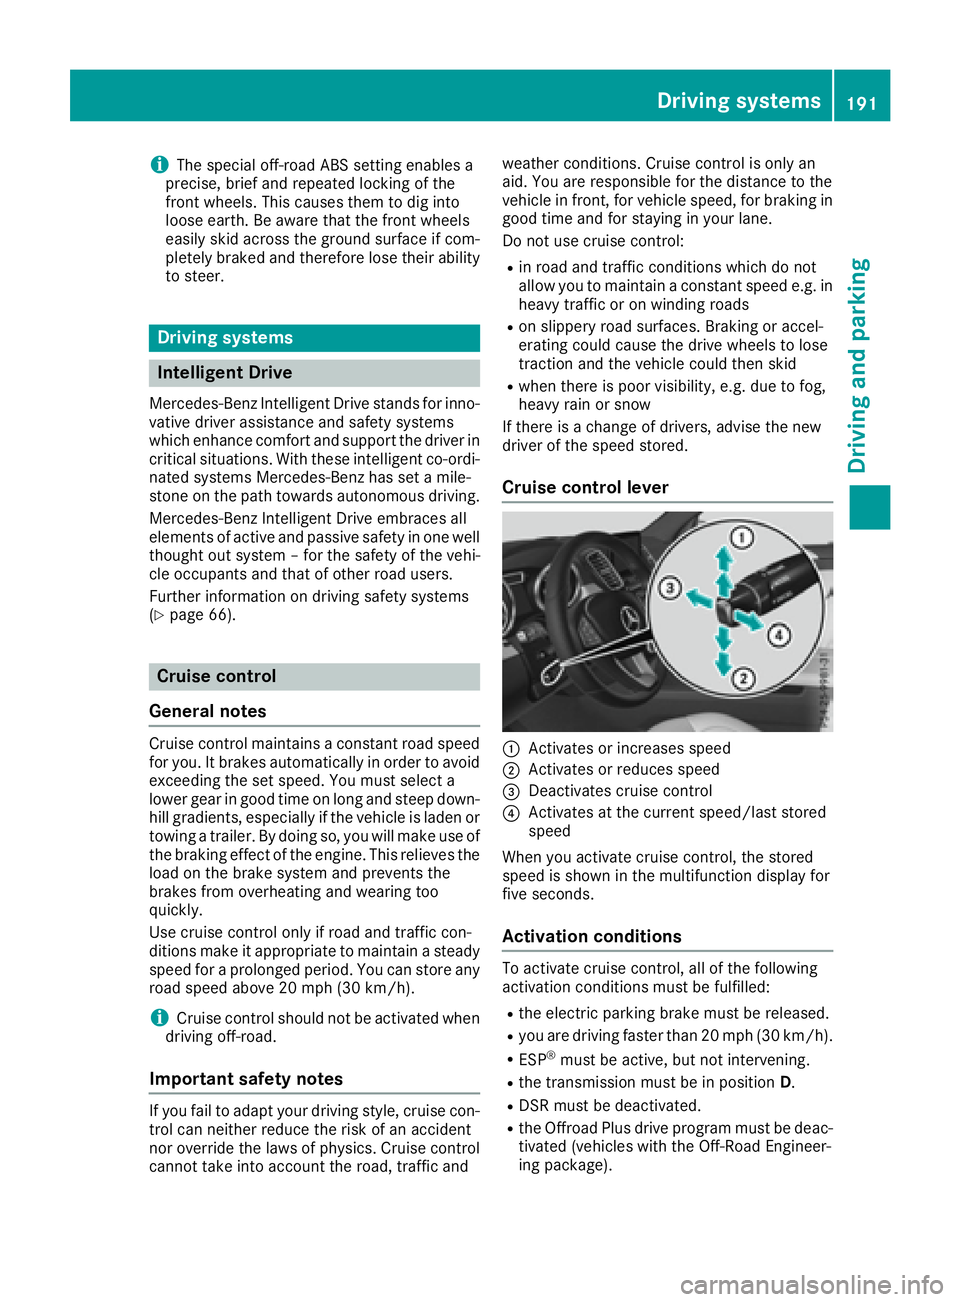
Cruise control lever
�C
Activates or increases speed �D
Activates or reduces speed �
Page 195 of 450
trol Off message in the multifunction display
for approximately five seconds.
i When you switch off the engine, the last
speed stored is cleared.
DISTRONIC PLUS
General notes DISTRONIC PLUS regulates the speed and auto-
matically helps you maintain the distance to the
vehicle detected in front. Vehicles are detected
with the aid of the radar sensor system.
DISTRONIC PLUS brakes automatically so that
the set speed is not exceeded.
You must select a lower gear in good time on
long and steep downhill gradients, especially if
the vehicle is laden or towing a trailer. By doing
so, you will make use of the braking effect of the
engine. This relieves the load on the brake sys-
tem and prevents the brakes from overheating
and wearing too quickly.
If DISTRONIC PLUS detects that there is a risk of
a collision, you will be warned visually and
acoustically. DISTRONIC PLUS cannot prevent a
collision without your intervention. An intermit-
tent warning tone will then sound and the dis-
tance warning lamp will light up in the instru-
ment cluster. Brake immediately in order to
increase the distance to the vehicle in front or
take evasive action provided it is safe to do so.
For DISTRONIC PLUS to assist you, the radar
sensor system must be operational.
DISTRONIC PLUS operates in range between
0 mph (0 km/h) and 120 mph (200 km/h).
Do not use DISTRONIC PLUS while driving on
roads with steep gradients.
As DISTRONIC PLUS transmits radar waves, it
can resemble the radar detectors of the respon-
sible authorities. You can refer to the relevant
chapter in the Operator's Manual if questions
are asked about this.
i USA only:
This device has been approved by the FCC as
a "Vehicular Radar System". The radar sensor
is intended for use in an automotive radar
system only. Removing, tampering with, or
altering the device will void any warranties,
and is not permitted by the FCC. Do not tam-
per with, alter, or use in any non-approved
way. Any unauthorized modification to this device
could void the user’s authority to operate the
equipment.
i Canada only: This device complies with
RSS-210 of Industry Canada. Operation is
subject to the following two conditions:
1. This device may not cause harmful inter-
ference, and
2. This device must accept any interference
received, including interference that may
cause undesired operation of the device.
Removal, tampering, or altering of the device
will void any warranties, and is not permitted.
Do not tamper with, alter, or use in any non-
approved way .
Any unauthorized modification to this device
could void the user's authority to operate the
equipment.
Important safety notes
G WARNING
DISTRONIC PLUS does not react to: R
people or animals R
stationary obstacles on the road, e.g. stop-
ped or parked vehicles R
oncoming and crossing traffic
As a result, DISTRONIC PLUS may neither give
warnings nor intervene in such situations.
There is a risk of an accident.
Always pay careful attention to the traffic sit-
uation and be ready to brake.
G WARNING
DISTRONIC PLUS cannot always clearly iden-
tify other road users and complex traffic sit-
uations.
In such cases, DISTRONIC PLUS may: R
give an unnecessary warning and then
brake the vehicle R
neither give a warning nor intervene R
accelerate or brake unexpectedly
There is a risk of an accident.
Continue to drive carefully and be ready to
brake, in particular when warned to do so by
DISTRONIC PLUS.Driving systems 193
Driving and parking Z