2016 MERCEDES-BENZ GLE clock
[x] Cancel search: clockPage 378 of 450

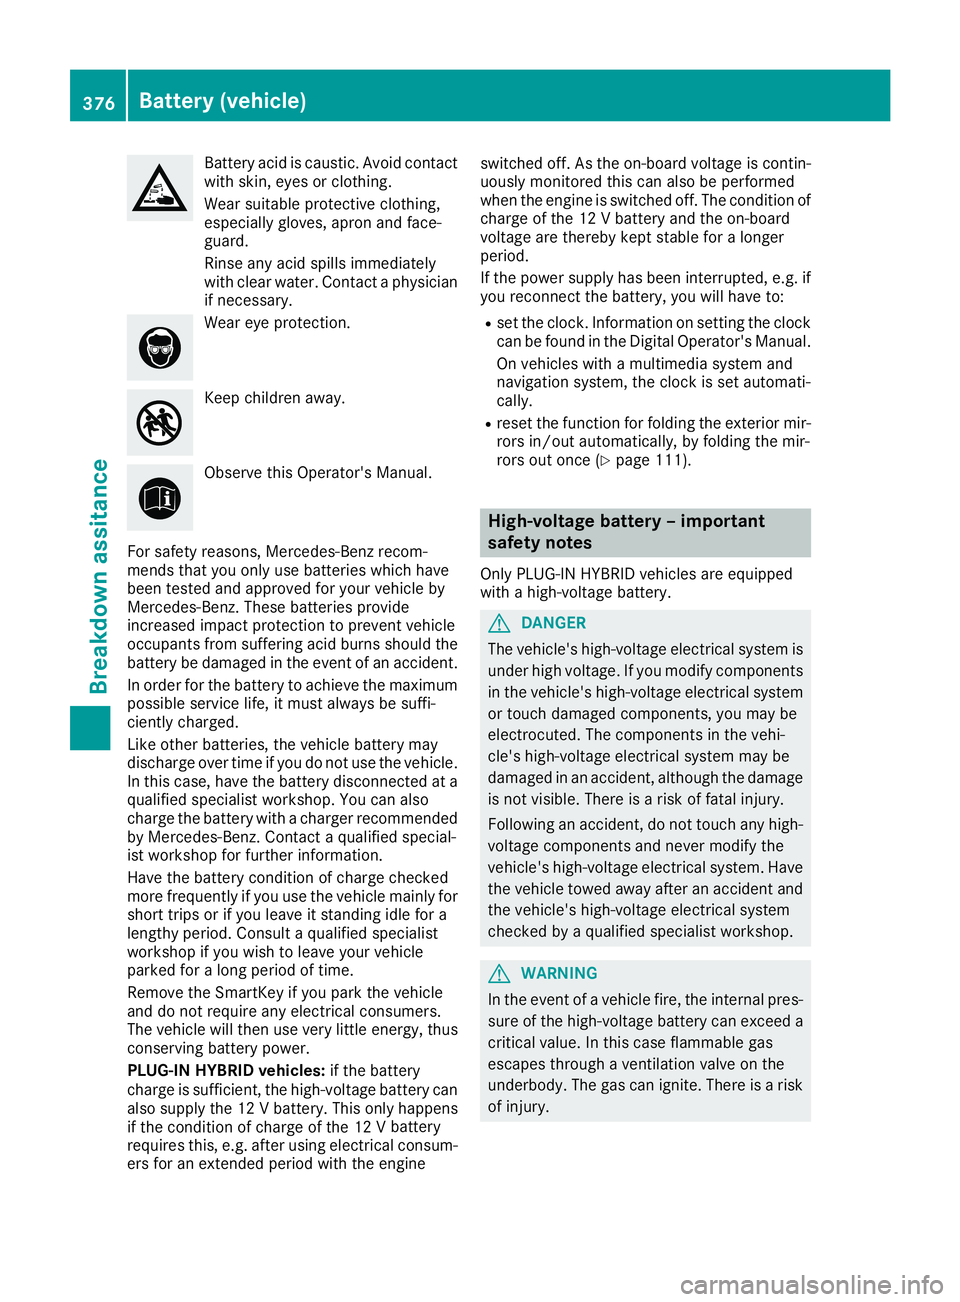
Battery acid is caustic. Avoid contact
with skin, eyes or clothing.
Wear suitable protective clothing,
especially gloves, apron and face-
guard.
Rinse any acid spills immediately
with clear water. Contact a physician
if necessary.
Wear eye protection.
Keep children away.
Observe this Operator's Manual.
For safety reasons, Mercedes-Benz recom-
mends that you only use batteries which have
been tested and approved for your vehicle by
Mercedes-Benz. These batteries provide
increased impact protection to prevent vehicle
occupants from suffering acid burns should the
battery be damaged in the event of an accident.
In order for the battery to achieve the maximum
possible service life, it must always be suffi-
ciently charged.
Like other batteries, the vehicle battery may
discharge over time if you do not use the vehicle.
In this case, have the battery disconnected at a
qualified specialist workshop. You can also
charge the battery with a charger recommended
by Mercedes-Benz. Contact a qualified special-
ist workshop for further information.
Have the battery condition of charge checked
more frequently if you use the vehicle mainly for
short trips or if you leave it standing idle for a
lengthy period. Consult a qualified specialist
workshop if you wish to leave your vehicle
parked for a long period of time.
Remove the SmartKey if you park the vehicle
and do not require any electrical consumers.
The vehicle will then use very little energy, thus
conserving battery power.
PLUG-IN HYBRID vehicles: if the battery
charge is sufficient, the high-voltage battery can
also supply the 12 V battery. This only happens
if the condition of charge of the 12 V battery
requ i
res this, e.g. after using electrical consum-
ers for an extended period with the engine switched off. As the on-board voltage is contin-
uously monitored this can also be performed
when the engine is switched off. The condition of
charge of the 12 V battery and the on-board
voltage are thereby kept stable for a longer
period.
If the power supply has been interrupted, e.g. if
you reconnect the battery, you will have to: R
set the clock. Information on setting the clock
can be found in the Digital Operator's Manual.
On vehicles with a multimedia system and
navigation system, the clock is set automati-
cally. R
reset the function for folding the exterior mir-
rors in/out automatically, by folding the mir-
rors out once ( Y
page 111).
High-voltage battery – important
safety notes Only PLUG-IN HYBRID vehicles are equipped
with a high-voltage battery.
G DANGER
The vehicle's high-voltage electrical system is
under high voltage. If you modify components
in the vehicle's high-voltage electrical system
or touch damaged components, you may be
electrocuted. The components in the vehi-
cle's high-voltage electrical system may be
damaged in an accident, although the damage
is not visible. There is a risk of fatal injury.
Following an accident, do not touch any high-
voltage components and never modify the
vehicle's high-voltage electrical system. Have
the vehicle towed away after an accident and
the vehicle's high-voltage electrical system
checked by a qualified specialist workshop.
G WARNING
In the event of a vehicle fire, the internal pres-
sure of the high-voltage battery can exceed a
critical value. In this case flammable gas
escapes through a ventilation valve on the
underbody. The gas can ignite. There is a risk
of injury.376
Battery (vehicle)
Breakdown assitance
Page 384 of 450

Otherwise, the automatic transmission may
shift to position P when the driver's or front-
passenger door are opened, which could lead
to damage to the transmission.
! Do not tow with sling-type equipment. This
could damage the vehicle.
! Vehicles with differential locks: make sure
the differential locks are in automatic mode.
When towing, the differential locks must not
be switched on. The transmission may other-
wise be damaged.
! The vehicle can be towed a maximum of
30 miles (50km). The towing speed of 30 mph
(50 km/h) must not be exceeded.
If the vehicle has to be towed more than
30 miles (50km), the entire vehicle must be
raised and transported.
It is better to have the vehicle transported than
to have it towed away.
If the vehicle has suffered transmission damage,
have it transported on a transporter or trailer.
The automatic transmission must be in position
N when the vehicle is being towed.
The battery must be connected and charged.
Otherwise, you: R
cannot turn the SmartKey to position 2 in the
ignition lock R
cannot release the electric parking brake R
cannot shift the automatic transmission to
position N
Disarm the automatic locking feature before the
vehicle is towed ( Y
page 275). You could other-
wise be locked out when pushing or towing the
vehicle.
PLUG-IN HYBRID vehicles:
PLUG-IN HYBRID vehicles may not be towed
away but must instead be transported, if: R
the multifunction display is not working or R
the á Towing Not Permitted See
Operator's Manual message appears in the
multifunction display.
If the vehicle is in a dangerous area, it can be
towed out of that area with both axles on the
ground. In this case, the towing distance must
not be greater than 165 ft (50 m) and must not
exceed a towing speed of 6 mph (10 km/h). For
longer distances, have the vehicle loaded and
transported. Installing/removing the towing eye
Installing the towing eye
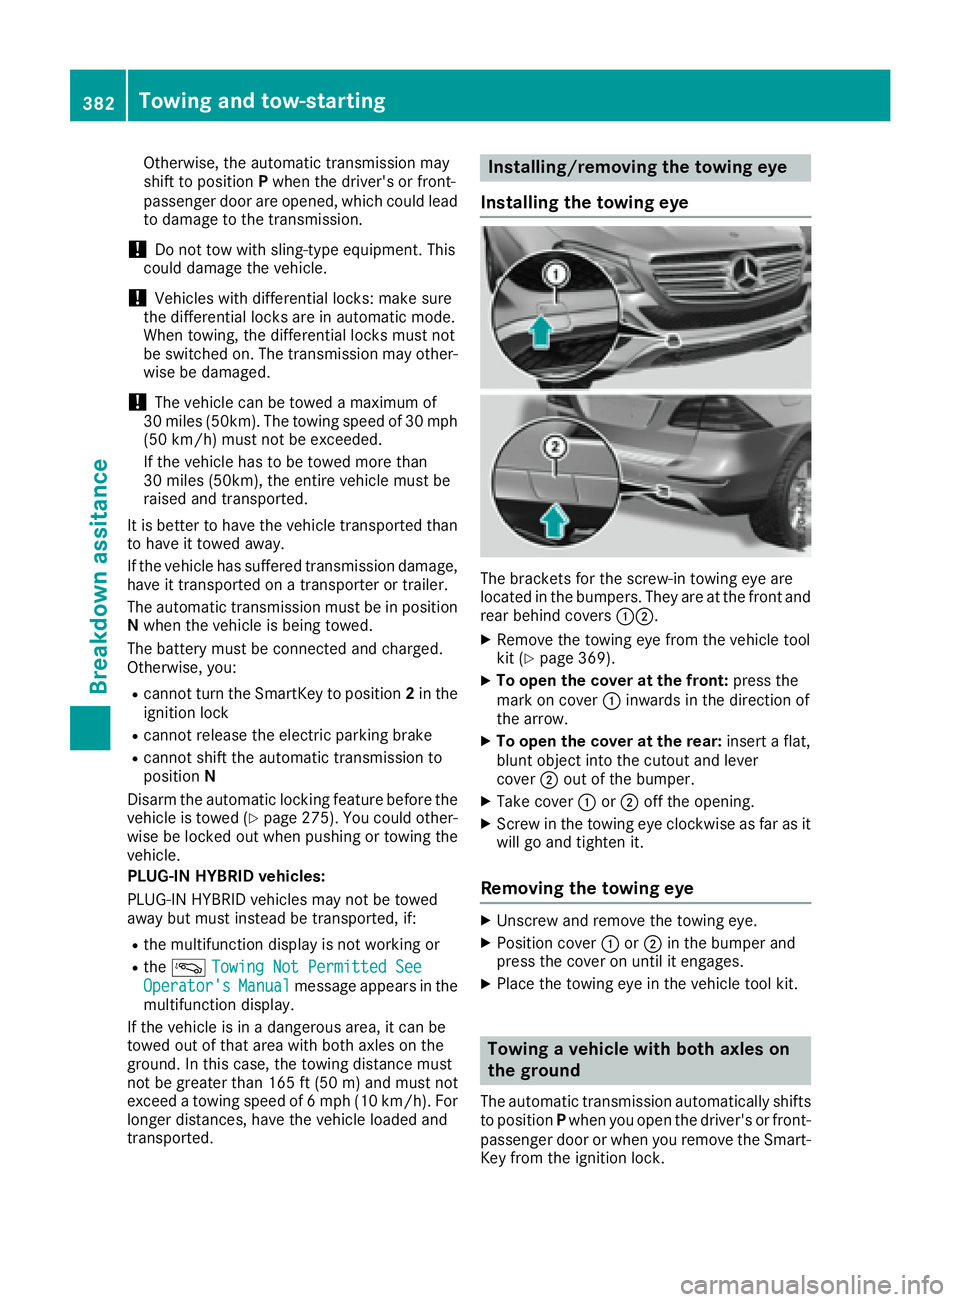
The brackets for the screw-in towing eye are
located in the bumpers. They are at the front and
rear behind covers �C�D .X
Remove the towing eye from the vehicle tool
kit ( Y
page 369). X
To open the cover at the front: press the
mark on cover �C inwards in the direction of
the arrow. X
To open the cover at the rear: insert a flat,
blunt object into the cutout and lever
cover �D out of the bumper. X
Take cover �C or �D off the opening.X
Screw in the towing eye clockwise as far as it
will go and tighten it.
Removing the towing eye X
Unscrew and remove the towing eye. X
Position cover �C or �D in the bumper and
press the cover on until it engages. X
Place the towing eye in the vehicle tool kit.
Towing a vehicle with both axles on
the ground
The automatic transmission automatically shifts
to position P when you open the driver's or front-
passenger door or when you remove the Smart-
Key from the ignition lock.382
Towing and tow-starting
Breakdown assitance
Page 429 of 450

Removing/stowing the emergency
spare wheel
Vehicles with a "Minispare" emergency
spare wheel under the cargo compart-
ment floor Always observe the instructions and safety
notes in the "Mounting a wheel" section
( Y
page 409).
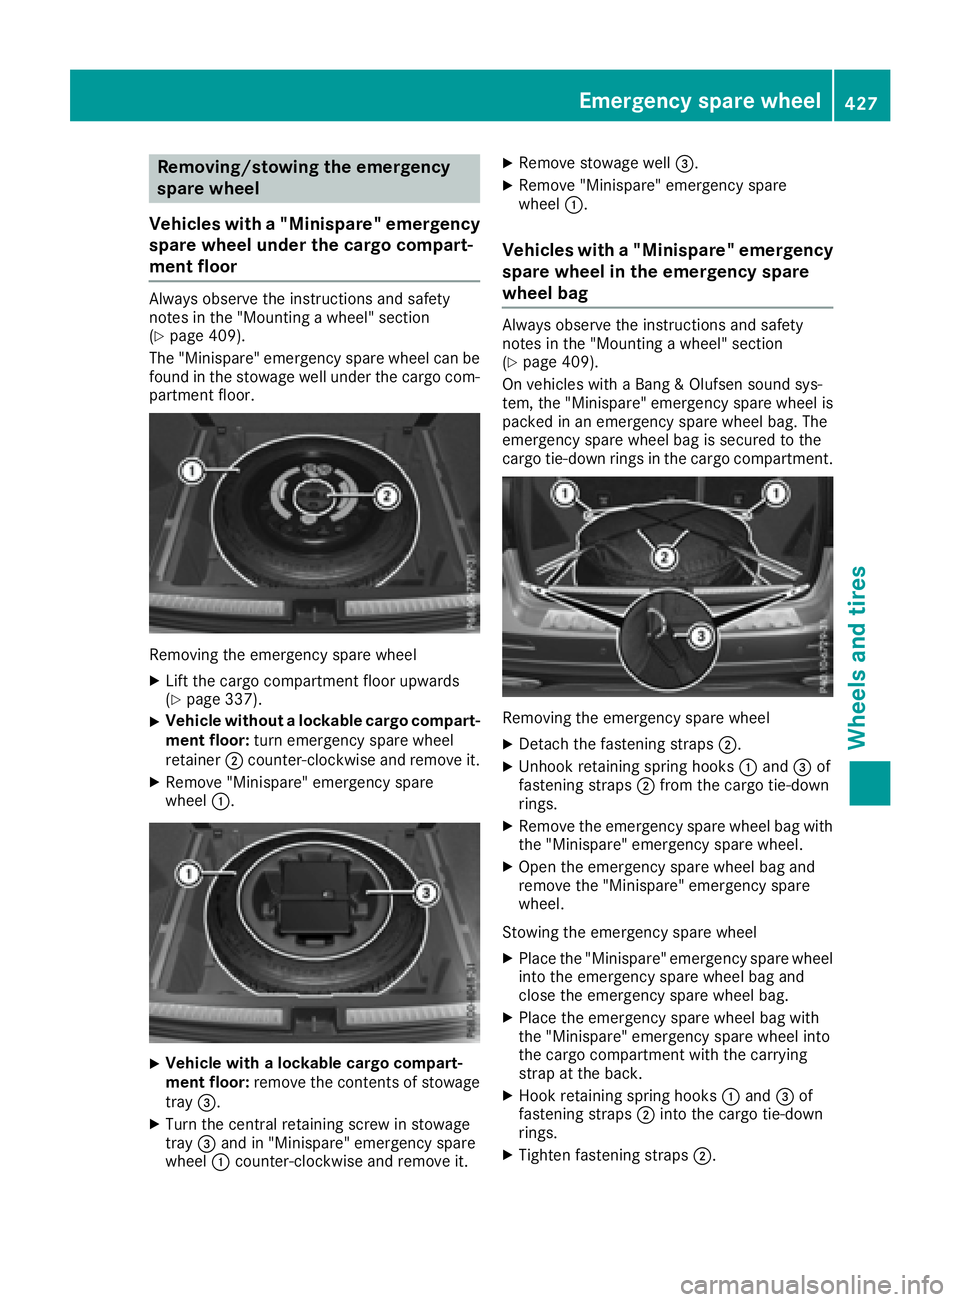
The "Minispare" emergency spare wheel can be
found in the stowage well under the cargo com-
partment floor.
Removing the emergency spare wheel X
Lift the cargo compartment floor upwards
( Y
page 337). X
Vehicle without a lockable cargo compart-
ment floor: turn emergency spare wheel
retainer �D counter-clockwise and remove it.X
Remove "Minispare" emergency spare
wheel �C .
X
Vehicle with a lockable cargo compart-
ment floor: remove the contents of stowage
tray �
Page 430 of 450

Mercedes-AMG vehicles with a collaps-
ible spare wheel under the cargo com-
partment floor
! Only place the collapsible spare wheel in the
vehicle when it is dry. Otherwise, moisture
may get into the vehicle.
Always observe the instructions and safety
notes in the "Mounting a wheel" section
( Y
page 409).
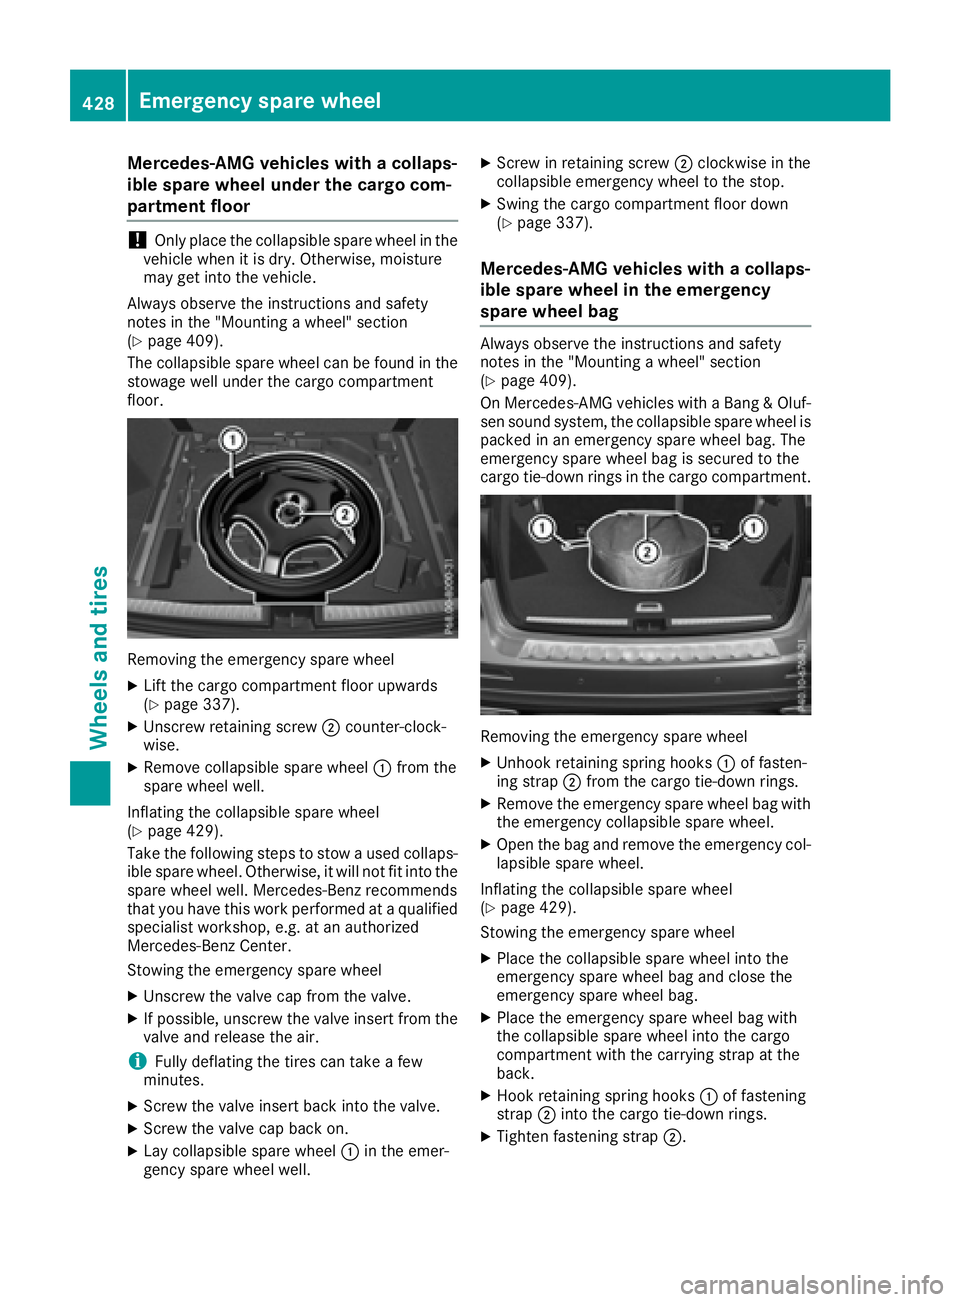
The collapsible spare wheel can be found in the
stowage well under the cargo compartment
floor.
Removing the emergency spare wheel X
Lift the cargo compartment floor upwards
( Y
page 337).X
Unscrew retaining screw �D counter-clock-
wise. X
Remove collapsible spare wheel �C from the
spare wheel well.
Inflating the collapsible spare wheel
( Y
page 429).
Take the following steps to stow a used collaps-
ible spare wheel. Otherwise, it will not fit into the
spare wheel well. Mercedes-Benz recommends
that you have this work performed at a qualified
specialist workshop, e.g. at an authorized
Mercedes-Benz Center.
Stowing the emergency spare wheel X
Unscrew the valve cap from the valve. X
If possible, unscrew the valve insert from the
valve and release the air.
i Fully deflating the tires can take a few
minutes. X
Screw the valve insert back into the valve. X
Screw the valve cap back on. X
Lay collapsible spare wheel �C in the emer-
gency spare wheel well. X
Screw in retaining screw �D clockwise in the
collapsible emergency wheel to the stop. X
Swing the cargo compartment floor down
( Y
page 337).
Mercedes-AMG vehicles with a collaps-
ible spare wheel in the emergency
spare wheel bag Always observe the instructions and safety
notes in the "Mounting a wheel" section
( Y
page 409).
On Mercedes-AMG vehicles with a Bang & Oluf-
sen sound system, the collapsible spare wheel is
packed in an emergency spare wheel bag. The
emergency spare wheel bag is secured to the
cargo tie-down rings in the cargo compartment.
Removing the emergency spare wheel X
Unhook retaining spring hooks �C of fasten-
ing strap �D from the cargo tie-down rings. X
Remove the emergency spare wheel bag with
the emergency collapsible spare wheel. X
Open the bag and remove the emergency col-
lapsible spare wheel.
Inflating the collapsible spare wheel
( Y
page 429).
Stowing the emergency spare wheel X
Place the collapsible spare wheel into the
emergency spare wheel bag and close the
emergency spare wheel bag. X
Place the emergency spare wheel bag with
the collapsible spare wheel into the cargo
compartment with the carrying strap at the
back. X
Hook retaining spring hooks �C of fastening
strap �D into the cargo tie-down rings. X
Tighten fastening strap �D .428
Emergency spare wheel
Wheels and tires