2016 MERCEDES-BENZ GLE-CLASS SUV battery
[x] Cancel search: batteryPage 25 of 450

Vehicle data ................................... 441
Vehicle battery
see Battery (vehicle)
Vehicle data ....................................... 441
Vehicle data (off-road driving)
Approach/departure angle ............ 443
Fording depth ................................ 442
Maximum gradient climbing abil-
ity .................................................. 444
Vehicle dimensions ........................... 441
Vehicle emergency locking ................ 86
Vehicle identification number
see VIN
Vehicle identification plate .............. 432
Vehicle level
AIRMATIC ...................................... 207
Vehicle level (display message) ....... 302
Vehicle tool kit .................................. 369
Video
Operating the DVD .........................2 70
VIN ...................................................... 432
Seat ............................................... 433
Type plate ...................................... 432
W
Warning Stickers ...........................................4 2
Warning and indicator lamps
ABS ................................................ 319
Brakes ...........................................3 17
Check Engine ................................. 325
Coolant .......................................... 325
Distance warning ........................... 327
DISTRONIC PLUS ........................... 327
ESP
®.............................................. 321
ESP®OFF ....................................... 322
Fuel tank ........................................ 325
Hybrid drive system ....................... 318
Overview .......................................... 35
Parking brake ................................ 324
PASSENGER AIR BAG ......................4 5
RBS (Recuperative Brake Sys -
tem) .............................................. .318
Reserve fuel ................................... 325
Restraint system ............................ 324
Seat belt ........................................ 316
Tire pressure monitor .................... 328 Warranty
.............................................. 26
Washer fluid
Display message ............................ 314
Wheel and tire combinations
Tires ............................................... 414
Wheel bolt tightening torque ........... 412
Wheel chock ...................................... 409
Wheels
Changing a wheel .......................... 408
Checking ........................................ 388
Cleaning ......................................... 364
Emergency spare wheel ................. 426
General notes ................................ 413
Important safety notes .................. 387
Information on driving .................... 387
Interchanging/changing ................ 408
Mounting a new wheel ................... 411
Mounting a wheel .......................... 409
Overview ........................................ 387
Removing a wheel .......................... 411
Storing ...........................................4 09
Tightening torque ........................... 412
Wheel size/tire si
ze ....................... 413
Window curtain air bag
Display message ............................ 289
Operation ......................................... 51
Windows
see Side windows
Windshield
Defrosting ...................................... 136
Windshield washer fluid
see Windshield washer system
Windshield washer system
Adding washer fluid ....................... 359
Important safety notes .................. 439
Windshield wipers
Problem (malfunction) ................... 125
Rear window wiper ........................ 122
Replacing the wiper blades ............ 122
Switching on/off ........................... 121
Winter driving
Slippery road surfaces ................... 186
Snow chains .................................. 390
Winter operation
General notes ................................ 389
Overview ........................................ 389
Radiator cover ............................... 357
Index23
Page 31 of 450

Declarations of conformity
Vehicl ecomponent swhich receive
and/o rtransmit radi owaves
USA: "The wireles sdevices of this vehicle com-
ply wit hPar t15 of th eFCC Rules .Operation is
subjec tto th etw ofollowin gtw oconditions: 1)
These devices may no tcause harmful interfer-
ence ,and 2) These devices mus taccept any
interferenc ereceived, includin ginterferenc e
that may cause undesired operation .Changes
or modification sno texpressl yapproved by th e
party responsible fo rcompliance could void th e
user’s authorit yto operat eth eequipment. "
Canada: "The wireles sdevices of this vehicle
compl ywit hIndustry Canada license-exemp t
RSS standard(s) .Operation is subjec tto th efol-
lowing tw oconditions: (1) These devices may
no tcause interference, and (2) These devices
mus taccept any interference, includin ginter-
ference that may cause undesired operation of
th edevice. "
Diagnostics connection
The diagnostic sconnection is only intended fo r
th econnection of diagnostic equipmen tat a
qualified specialis tworkshop .
GWARNING
If you connec tequipmen tto th ediagnostic s
connection in th evehicle, it may affec tth e
operation of th evehicle systems .As aresult ,
th eoperatin gsafet yof th evehicle could be
affected. There is aris kof an accident.
Do no tconnec tany equipmen tto adiagnos-
tics connection in th evehicle.
GWARNING
Objects in th edriver's footwell can restric tth e
peda ltrave lor obstruct adepressed pedal.
The operatin gand road safet yof th evehicle is
jeopardized. There is aris kof an accident.
Mak esur ethat all objects in th evehicle are
stowed correctly, and that they canno tente r
th edriver's footwell. Install th efloormat s
securely and as specifie din order to ensur e
sufficien tclearanc efo rth epedals. Do no tuse
loose floormat sand do no tplac efloormat son
to pof on eanother.
!If th eengin eis switched of fand equipmen t
on th ediagnostic sconnection is used ,th e
starter battery may discharge.
Connectin gequipmen tto th ediagnostic scon-
nection can lead to emission smonitorin ginfor-
mation bein greset ,fo rexample. Thi smay lead
to th evehicle failin gto mee tth erequirements of
th enext emission stest durin gth emain inspec-
tion .
Qualified specialist workshop
An authorized Mercedes-Ben zCente ris aquali-
fie dspecialis tworkshop .It has th enecessary
specialis tknowledge ,tools and qualification sto
correctl ycarry out th ewor krequire don your
vehicle. Thi sis especially th ecas efo rwor krel -
evant to safety.
Observ eth enote sin th eMaintenance Booklet .
Always hav eth efollowin gwor kcarrie dout at an
authorized Mercedes-Ben zCenter:
Rwor krelevant to safet y
Rserviceand maintenance wor k
Rrepair work
Ralterations, installation wor kand modifica-
tion s
Rworkon electronic component s
Correct use
If you remov eany warnin gstickers ,you or oth-
ers could fail to recogniz ecertain dangers.
Leave warnin gstickers in position .
Observ eth efollowin ginformation when drivin g
your vehicle:
Rth esafet ynote sin this manual
Rth evehicle technical dat a
Rtraffic rulesand regulation s
Rlaws and safetystandard spertainin gto moto r
vehicles
Problem swit hyou rvehicle
If you should experience aproblem wit hyour
vehicle, particularly on ethat you believe may
Introduction29
Z
Page 45 of 450

Deactivate the hybrid system manually if:
Rthe6 restraint system warning lamp in the
instrument cluster lights up after an accident
Rthe vehicle is badly damaged, e.g. after an
accident, and the restraint system compo-
nents were not activated
Rthe vehicle is badly damaged and has to be
towed or transported
XIf possible, move the vehicle out of the
danger zone: shift the automatic transmis-
sion into position N.
XRelease the electric parking brake.
XRoll the vehicle to a safe place and park it
safely.
Get assistance from others if necessary.
The vehicle is locked automatically when the
ignition is switched on and the wheels are turn-
ing. There is therefore a risk of being locked out
if the vehicle is being pushed or tested on a
dynamometer.
XSwitch the ignition off.
XShift the automatic transmission to park posi-
tion P.
Depress the electric parking brake
(
Ypage 179).
Secure the vehicle against rolling away
(
Ypage 409).
XTo use the high-voltage switch-off device:
open the tailgate.
XLift the cargo compartment floor up
(Ypage 337).
XPull off the right-hand paneling in the cargo
compartment.
XPress release clip :in the direction of the
arrow and pull it out.
XPull the high voltage switch-off device ;
apart until it engages in the stop position. If the hybrid drive system has been deactivated
due to reasons mentioned above, have it
checked at a qualified specialist workshop
before reactivation.
High-voltage battery
GWARNING
In the event of a vehicle fire, the internal pres- sure of the high-voltage battery can exceed a
critical value. In this case flammable gas
escapes through a ventilation valve on the
underbody. The gas can ignite. There is a risk
of injury.
Leave the danger zone immediately. Secure
the danger area at a suitable distance, whilst
observing legal requirements.
GWARNING
If the housing of the high-voltage battery has
been damaged, electrolyte and gases may
leak out. These are poisonous and caustic.
There is a risk of injury.
Avoid contact with skin, eyes or clothing.
Immediately rinse electrolyte splashes off
with water and seek medical attention
straight away.
!Exhaustive discharge caused by the vehicle
standing idle for lengthy periods can damage
the high-voltage battery. If the vehicle is idle
for lengthy periods leave the high-voltage bat-
tery connected to a charging station.
Charging the high-voltage battery (
Ypage 169).
Engine compartment
Before opening the hood:
XApply the electric parking brake.
XShift the transmission to position P.
XSwitch the ignition off.
XRemove the SmartKey from the ignition lock.
or, in vehicles with KEYLESS-GO start-function
or KEYLESS ‑GO
XRemove the Start/Stop button from the igni-
tion lock.
Hybrid vehicles43
Safety
Z
Page 79 of 450

iThe immobilizer is always deactivated when
you start the engine.
In the event that the engine cannot be started
(yet the vehicle's battery is charged), the sys-
tem is not operational. Contact an authorized
Mercedes-Benz Center or call
1-800-FOR-MERCedes (in the USA) or
1-800-387-0100 (in Canada).
ATA (anti-theft alarm system)
XTo arm: lock the vehicle with the SmartKey or
KEYLESS-GO.
Indicator lamp :flashes. The alarm system
is armed after approximately 15 seconds.
XTo deactivate using the SmartKey: unlock
the vehicle with the SmartKey.
or
XInsert the SmartKey into the ignition lock.
XTo deactivate using KEYLESS-GO: unlock
the vehicle with KEYLESS-GO.
or
XPress the Start/Stop button on the dash-
board. The SmartKey must be inside the vehi- cle.
A visual and audible alarm is triggered if the
alarm system is armed and you open:
Ra door
Rthe vehicle with the mechanical key
Rthe tailgate
Rthe hood
XTo switch the alarm off with the Smart-
Key: press the %or& button on the
SmartKey.
The alarm is switched off.
or
XInsert the SmartKey into the ignition lock.
The alarm is switched off.
XTo stop the alarm using KEYLESS-GO:
grasp the outside door handle. The SmartKey
must be outside the vehicle.
The alarm is switched off.
or
XPress the Start/Stop button on the dash-
board. The SmartKey must be inside the vehi- cle.
The alarm is switched off.
The alarm is not switched off, even if you close
the open door that triggered it, for example.
iIf the alarm continues for more than
30 seconds, the mbrace emergency call sys-
tem automatically notifies the Customer
Assistance Center. This is done either by text message or data connection. The emergency
call system sends the message or data provi-
ded that:
Ryou have subscribed to the mbrace service.
Rthe mbrace service has been activated
properly.
Rthe necessary mobile phone network is
available.
Protection against theft77
Safety
Z
Page 81 of 450

The SmartKey centrally locks and unlocks the
following components:
Rthe doors
Rthe tailgate
Rthe fuel filler flap
The turn signals flash once when unlocking and
three times when locking.
You can also set an audible signal to confirm
that the vehicle has been locked. The audible
signal can be activated and deactivated using
the on-board computer (
Ypage 275).
You will receive visual and acoustic locking con-
firmation if all components were able to be
locked.
If activated in COMAND or Audio 20, the locator
lighting also lights up in the dark (see separate
operating instructions).
XTo open the tailgate automatically from
outside the vehicle: press and hold theF
button until the tailgate opens.
Vehicles with KEYLESS-GO or KEYLESS-GO start function and EASY-PACK tailgate:
XTo close the tailgate automatically from
outside the vehicle: if the SmartKey is loca-
ted in the immediate vicinity of the vehicle,
press the Fbutton on the SmartKey.
When the tailgate closes you can then release
the button.
KEYLESS-GO
General notes
Bear in mind that the engine can be started by
any of the vehicle occupants if there is a KEY-
LESS-GO key in the vehicle (
Ypage 148).
Locking/unlocking centrally
You can start, lock or unlock the vehicle using
KEYLESS-GO. To do this, you only need carry the
SmartKey with you. You can combine the func-
tions of KEYLESS-GO with those of a conven-
tional SmartKey. Unlock the vehicle by using
KEYLESS-GO, for instance, and lock it using the
& button on the SmartKey.
The driver's door and the door at which the han-
dle is used, must both be closed. The SmartKey
must be outside the vehicle. When locking or
unlocking with KEYLESS-GO, the distance between the SmartKey and the corresponding
door handle must not be greater than 3 ft (1 m).
KEYLESS-GO checks whether a valid SmartKey
is in the vehicle by periodically establishing a
radio connection between the vehicle and the
SmartKey. This happens:
Rwhen starting the engine
Rwhile driving
Rwhen the external door handles are touched
Rduring convenience closing
XTo unlock the vehicle:
touch the inner sur-
face of the door handle.
XTo lock the vehicle: touch sensor surface :
or ;.
Make sure that you do not touch the inner
surface of the door handle.
XConvenience closing feature: touch
recessed sensor surface ;for an extended
period.
Further information on the convenience closing
feature (
Ypage 92).
If you pull on the handle of the tailgate, only the cargo compartment of the vehicle is unlocked.
Deactivating and activating
If you do not intend to use a SmartKey for an
extended period of time, you can deactivate the
KEYLESS-GO function of the SmartKey. The
SmartKey will then use very little power, thereby
conserving battery power. For the purposes of
activation/deactivation, the vehicle must not be
nearby.
SmartKey79
Opening and closing
Z
Page 82 of 450

XTo deactivate:press the&button on the
SmartKey twice in rapid succession.
The battery check lamp of the SmartKey
flashes twice briefly and lights up once, then
KEYLESS-GO is deactivated (
Ypage 81).
XTo activate: press any button on the Smart-
Key.
or
XInsert the SmartKey into the ignition lock.
KEYLESS-GO and all of its associated features
are available again.
KEYLESS-GO start function
General notes
Bear in mind that the engine can be started by
any of the vehicle occupants if there is a Smart-
Key in the vehicle (
Ypage 148).
Changing the settings of the locking
system
You can change the settings of the locking sys-
tem. This means that only the driver's door and
the fuel filler flap are unlocked when the vehicle
is unlocked. This is useful if you frequently travel
on your own.
XTo change the setting: press and hold down
the % and& buttons simultaneously
for about six seconds until the battery indica-
tor lamp flashes twice (
Ypage 81).
If the setting of the locking system is changed
within the signal range of the vehicle, pressing
the & or% button:
Rlocks or
Runlocks the vehicle
The SmartKey now functions as follows:
XTo unlock: press the%button once.
XTo unlock centrally: press the%button
twice.
XTo lock centrally: press the&button. The KEYLESS-GO function is changed as fol-
lows:
XTo unlock the driver's door:
touch the inner
surface of the door handle on the driver's
door.
XTo unlock centrally: touch the inner surface
of the door handle on the front-passenger
door or the rear door.
XTo lock centrally: touch the outer sensor
surface on one of the door handles
(
Ypage 79).
XTo restore the factory settings: press and
hold down the %and& buttons simul-
taneously for approximately si x se
conds until
the battery check lamp flashes twice
(
Ypage 81).
Mechanical key
General notes
If the vehicle can no longer be locked or
unlocked with the SmartKey or the KEYLESS-GO
key, use the mechanical key.
If you use the mechanical key to unlock and
open the driver's door, the anti-theft alarm sys-
tem will be triggered. Switch off the alarm
(
Ypage 77).
If you unlock the vehicle using the mechanical
key, the fuel filler flap will not be unlocked auto- matically.
XTo unlock the fuel filler flap: insert the
SmartKey into the ignition lock.
Removing the mechanical key
80SmartKey
Opening and closing
Page 83 of 450

XPush release catch:in the direction of the
arrow and at the same time remove mechan- ical key ;from the SmartKey.
For further information about:
Runlocking the driver's door (Ypage 86)
Runlocking the cargo compartment
(Ypage 90)
Rlocking the vehicle (Ypage 86)
Inserting the mechanical key
XPush mechanical key ;completely into the
SmartKey until it engages and release
catch :is back in its basic position.
SmartKey battery
Important safety notes
GWARNING
Batteries contain toxic and corrosive substan- ces. If batteries are swallowed, it can result in
severe health problems. There is a risk of fatalinjury.
Keep batteries out of the reach of children. If
a battery is swallowed, seek medical attention immediately.
The SmartKey batteries contain perchlorate
material, which may require special handling
and regard for the environment. National guide-
lines must be observed during disposal. In Cal-
ifornia, see www.dtsc.ca.gov/
HazardousWaste/Perchlorate/index.cfm .
Mercedes-Benz recommends that you have the
batteries replaced at a qualified specialist work-
shop.
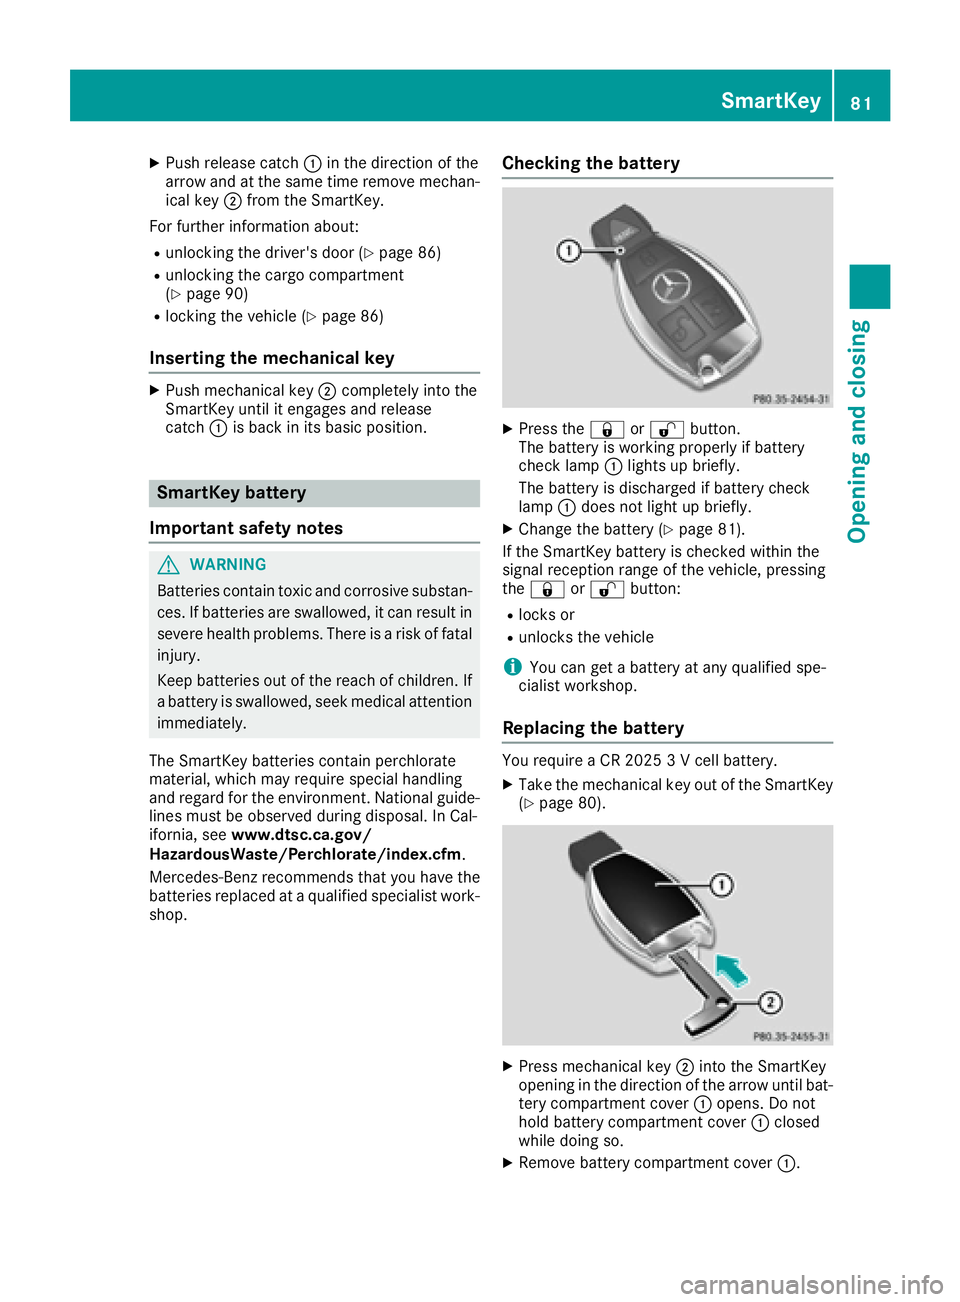
Checking the battery
XPress the &or% button.
The battery is working properly if battery
check lamp :lights up briefly.
The battery is discharged if battery check
lamp :does not light up briefly.
XChange the battery (Ypage 81).
If the SmartKey battery is checked within the
signal reception range of the vehicle, pressing
the & or% button:
Rlocks or
Runlocks the vehicle
iYou can get a battery at any qualified spe-
cialist workshop.
Replacing the battery
You require a CR 2025 3 V cell battery.
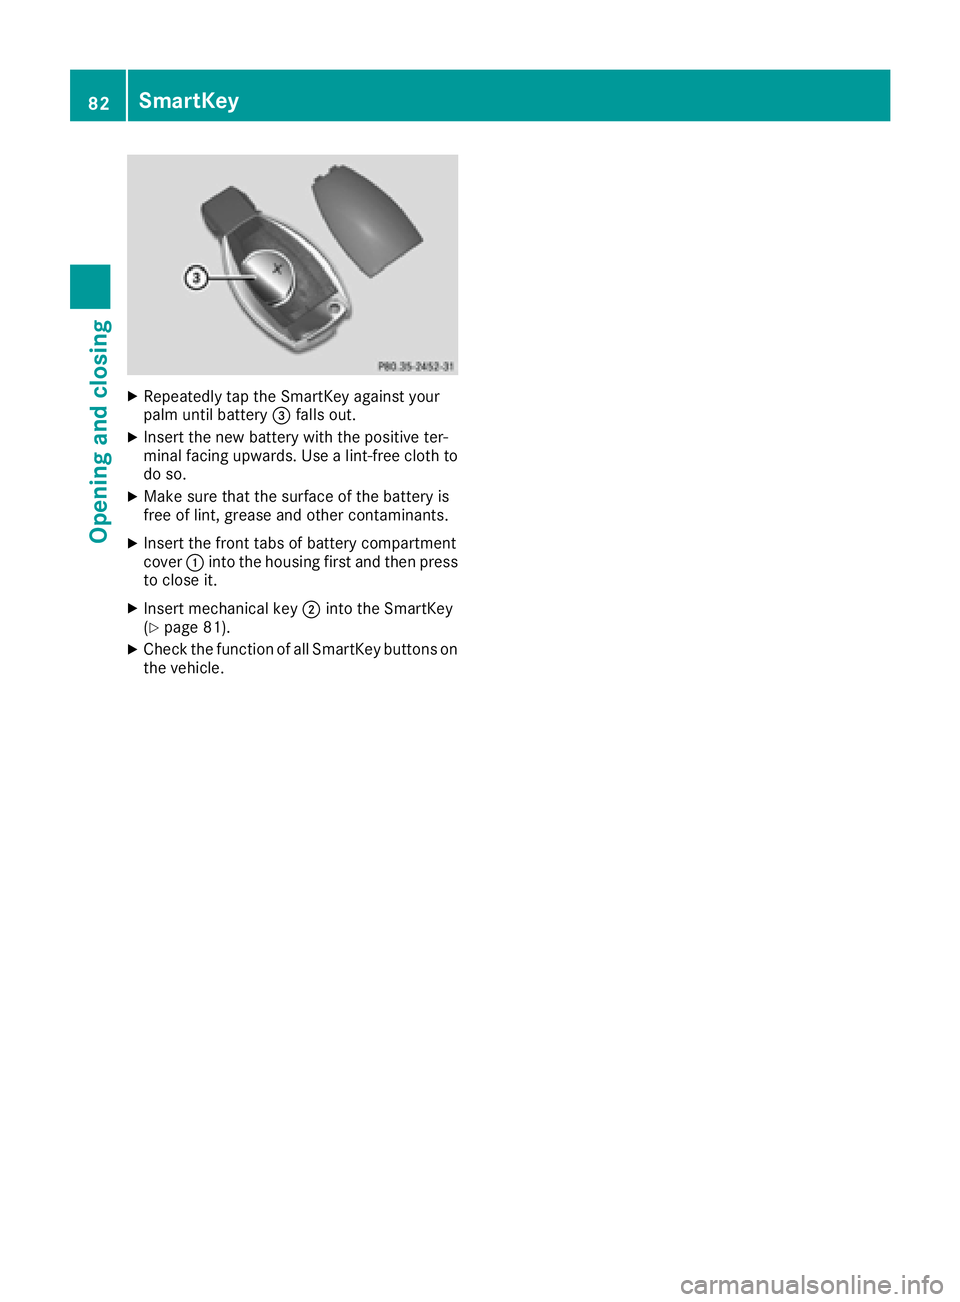
XTake the mechanical key out of the SmartKey
(Ypage 80).
XPress mechanical key ;into the SmartKey
opening in the direction of the arrow until bat-
tery compartment cover :opens. Do not
hold battery compartment cover :closed
while doing so.
XRemove battery compartment cover :.
SmartKey81
Opening and closing
Z
Page 84 of 450

XRepeatedly tap theSmartKey against your
palm until battery =falls out .
XInsertth ene wbattery wit hth epositive ter-
minal facing upwards. Use alint-free cloth to
do so.
XMak esur ethat th esurfac eof th ebattery is
free of lint, grease and other contaminants.
XInser tth efron ttab sof battery compartmen t
cover :intoth ehousing first and then press
to close it .
XInsertmechanical ke y; intoth eSmartKey
(Ypage 81).
XChec kth efunction of all SmartKey buttons on
th evehicle.
82SmartKey
Opening and closing