2016 MERCEDES-BENZ GLE-Class instrument cluster
[x] Cancel search: instrument clusterPage 248 of 450

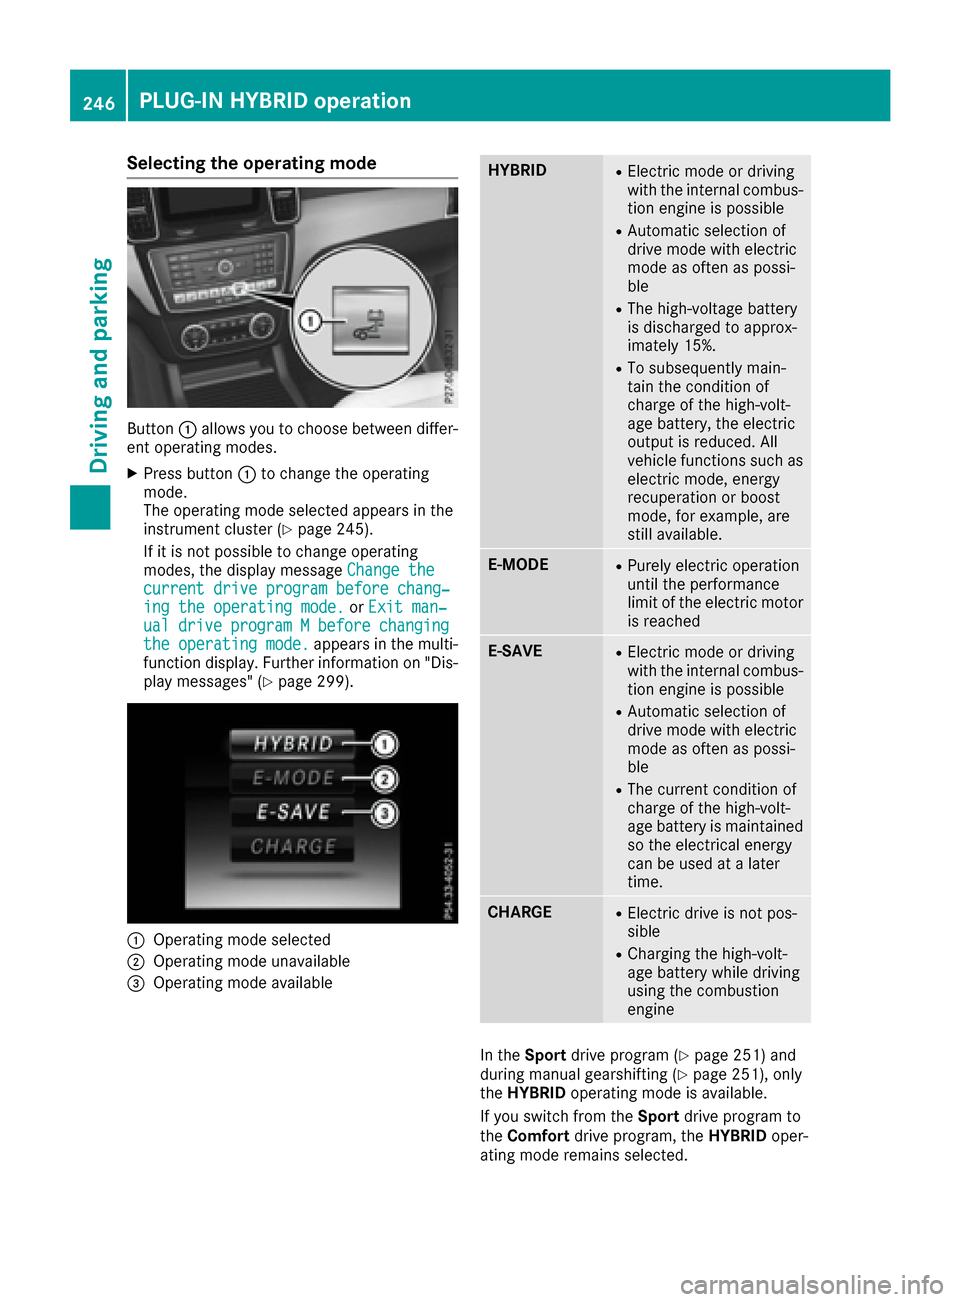
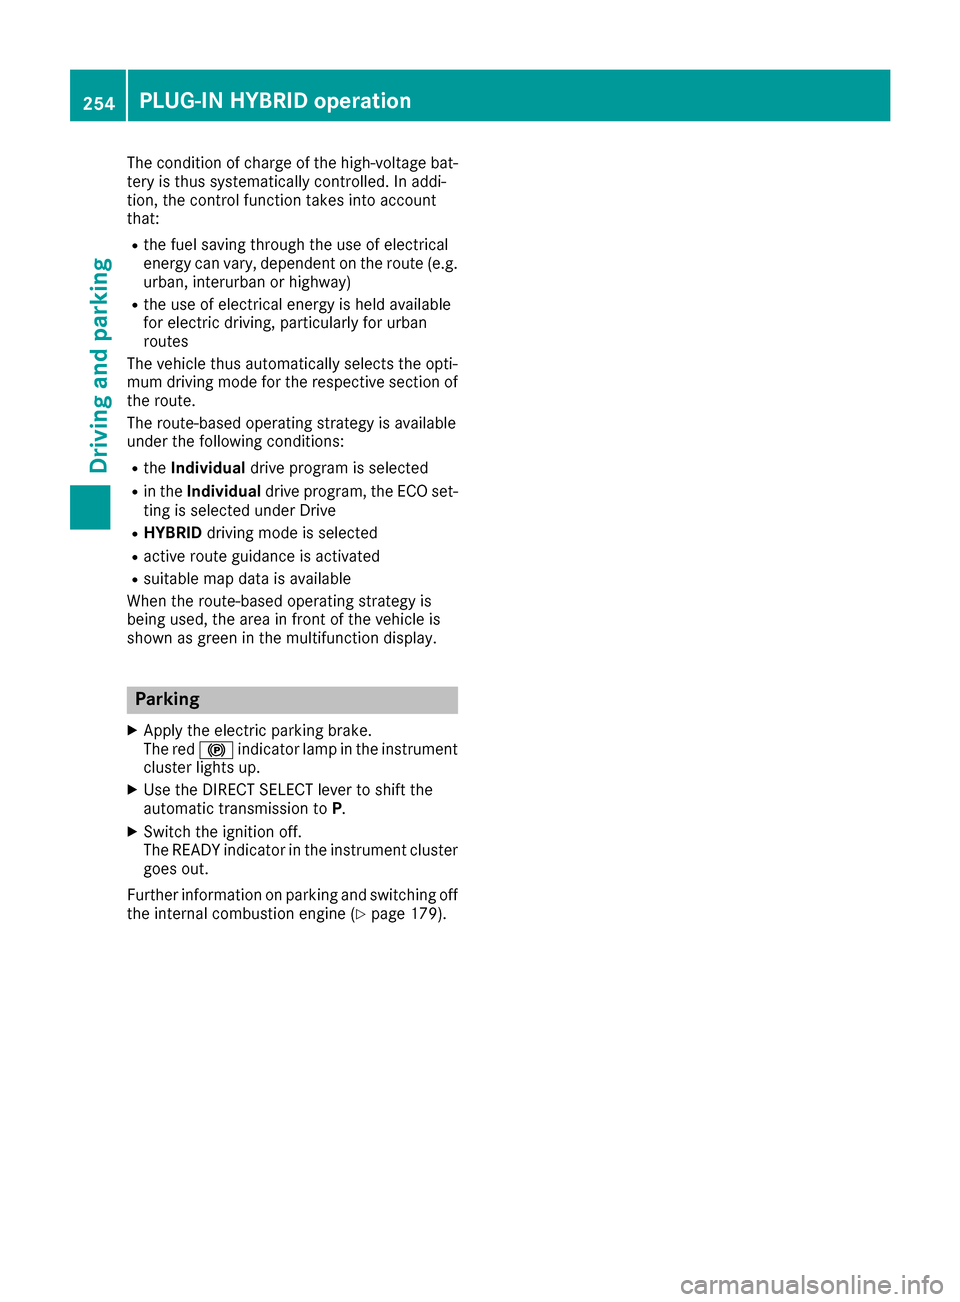
Selecting the operating mode
Button:allows you to choose between differ-
ent operating modes.
XPress button :to change the operating
mode.
The operating mode selected appears in the
instrument cluster (
Ypage 245).
If it is not possible to change operating
modes, the display message Change the
current drive program before chang‐ing the operating mode.orExit man‐ualdriveprogramMbeforechangingthe operating mode.appears in the multi-
function display. Further information on "Dis-
play messages" (
Ypage 299).
:Operating mode selected
;Operating mode unavailable
=Operating mode available
HYBRIDRElectric mode or driving
with the internal combus-
tion engine is possible
RAutomatic selection of
drive mode with electric
mode as often as possi-
ble
RThe high-voltage battery
is discharged to approx-
imately 15%.
RTo subsequently main-
tain the condition of
charge of the high-volt-
age battery, the electric
output is reduced. All
vehicle functions such as
electric mode, energy
recuperation or boost
mode, for example, are
still available.
E-MODERPurely electric operation
until the performance
limit of the electric motor is reached
E-SAVERElectric mode or driving
with the internal combus-
tion engine is possible
RAutomatic selection of
drive mode with electric
mode as often as possi-
ble
RThe current condition of
charge of the high-volt-
age battery is maintained
so the electrical energy
can be used at a later
time.
CHARGERElectric drive is not pos-
sible
RCharging the high-volt-
age battery while driving
using the combustion
engine
In the Sport drive program (Ypage 251) and
during manual gearshifting (Ypage 251), only
the HYBRID operating mode is available.
If you switch from the Sportdrive program to
the Comfort drive program, the HYBRIDoper-
ating mode remains selected.
246PLUG-IN HYBRID operation
Driving and parking
Page 256 of 450

The condition of charge of the high-voltage bat-
tery is thus systematically controlled. In addi-
tion, the control function takes into account
that:
Rthe fuel saving through the use of electrical
energy can vary, dependent on the route (e.g.
urban, interurban or highway)
Rthe use of electrical energy is held available
for electric driving, particularly for urban
routes
The vehicle thus automatically selects the opti-
mum driving mode for the respective section of
the route.
The route-based operating strategy is available
under the following conditions:
Rthe Individual drive program is selected
Rin theIndividual drive program, the ECO set-
ting is selected under Drive
RHYBRID driving mode is selected
Ractive route guidance is activated
Rsuitable map data is available
When the route-based operating strategy is
being used, the area in front of the vehicle is
shown as green in the multifunction display.
Parking
XApply the electric parking brake.
The red !indicator lamp in the instrument
cluster lights up.
XUse the DIRECT SELECT lever to shift the
automatic transmission to P.
XSwitch the ignition off.
The READY indicator in the instrument cluster
goes out.
Further information on parking and switching off
the internal combustion engine (
Ypage 179).
254PLUG-IN HYBRID operation
Driving and parking
Page 257 of 450

Problems with PLUG-IN HYBRID operation
Internal combustion engine
ProblemPossible causes/consequences and MSolutions
You cannot start the
internal combustion
engine. The multifunc-
tion display shows no
display messages. The
READY indicator in the
multifunction display is
off.For example, self-diagnosis is not yet complete or the hybrid drive
system is malfunctioning.
XSwitch off the ignition and turn it back on.
XTry to start the internal combustion engine again.
If the internal combustion engine still does not start:
XConsult a qualified specialist workshop.
You wish to pull away,
but the ECO start/stop
function does not start
the internal combustion
engine. The READY indi-
cator in the multifunc-
tion display is off.The ECO start/stop function has failed. The warning and indicator
lamps in the instrument cluster light up.
XShift the transmission to P.
XSwitch off the ignition and turn it back on.
XStart the engine.
The hybrid drive system is faulty.
XConsult a qualified specialist workshop.
Recuperative Brake System
ProblemPossible causes/consequences and MSolutions
Braking resistance is
reduced and brake pedal
travel is longer than
usual.GRisk of accident
The Recuperative Brake System is malfunctioning.
XObserve the additional display messages in the multifunction dis-
play (Ypage 280).
XObserve the information regarding indicator and warning lamps in
the instrument cluster (Ypage 318) .
PLUG-IN HYBRID operation255
Driving and parking
Z
Page 265 of 450

Useful information
i
This Operator's Manual describes all models
and all standard and optional equipment of
your vehicle available at the time of publica-
tion of the Operator's Manual. Country-spe-
cific differences are possible. Please note
that your vehicle may not be equipped with all
features described. This also applies to
safety-related systems and functions.
iRead the information on qualified specialist
workshops (Ypage 29).
Important safety notes
GWARNING
If you operate information systems and com-
munication equipment integrated in the vehi-
cle while driving, you will be distracted from
traffic conditions. You could also lose control
of the vehicle. There is a risk of an accident.
Only operate the equipment when the traffic
situation permits. If you are not sure that this
is possible, park the vehicle paying attention
to traffic conditions and operate the equip-
ment when the vehicle is stationary.
You must observe the legal requirements for the
country in which you are currently driving when
operating the on-board computer.
PLUG-IN HYBRID vehicles only:
GWARNING
If the instrument cluster has failed or mal-
functioned, you may not recognize function
restrictions in systems relevant to safety. The
operating safety of your vehicle may be
impaired. There is a risk of an accident.
Pull over as soon as it is safe to do so and
consult a qualified specialist workshop.
All vehicles, except PLUG-IN HYBRID vehi-
cles:
The on-board computer only shows messages or
warnings from certain systems in the multifunc-
tion display. You should therefore make sure
your vehicle is operating safely at all times. For an overview, see the instrument panel illus-
tration (
Ypage 34).
Displays and operation
Instrument cluster lighting
The lighting in the instrument cluster, in the dis-
plays and the controls in the vehicle interior can
be adjusted using the brightness control knob.
The brightness control knob is located on the
bottom left of the instrument cluster
(
Ypage 34).
XTurn the brightness control knob clockwise or
counter-clockwise.
If you turn the light switch to
Ã,Tor
L, the brightness is dependent upon the
brightness of the ambient light.
iThe light sensor in the instrument cluster
automatically controls the brightness of the
multifunction display.
In daylight, the displays in the instrument
cluster are not illuminated.
Speedometer with segments
The speedometer is divided into segments only
on vehicles with DISTRONIC PLUS.
The segments in the speedometer indicate
which speed range is available.
RDISTRONIC PLUS activated (Ypage 193):
One or two segments in the set speed range
light up.
RDISTRONIC PLUS detects a vehicle in front
that is driving at a slower speed than the
stored speed:
The segments between the speed of the vehi- cle in front and the stored speed light up.
Tachometer
!
Do not drive in the overrevving range, as this
could damage the engine.
The red band in the tachometer indicates the
engine's overrevving range.
The fuel supply is interrupted to protect the
engine when the red band is reached.
Displays and operation263
On-board computer and displays
Z
Page 275 of 450

XPress the:or9 button to set Off,
Standardor Adaptive.
When Lane Keeping Assist or Active Lane
Keeping Assist is activated, the multifunction
display shows the lane markings as bright
lines in the assistance graphic.
XPress the abutton to save the setting.
For further information about Lane Keeping
Assist, see (
Ypage 229).
For further information about Active Lane Keep-
ing Assist, see (
Ypage 233).
Service menu
Introduction
Depending on the equipment installed in the
vehicle, you have the following options in the
Serv.
menu:
RCalling up display messages in message
memory (Ypage 280)
RRestarting the tire pressure loss warning sys-
tem (Ypage 394) or checking the tire pres-
sure electronically (Ypage 396)
RCalling up the service due date
(Ypage 360)
RDisplaying the coolant temperature (PLUG-IN HYBRID vehicles) (Ypage 273)
Displaying the coolant temperature
The Coolantmenu is only available on PLUG-IN
HYBRID vehicles.
Observe the notes on coolant temperature
(
Ypage 264).
XPress the =or; button on the steering
wheel to select the Sett.menu.
XPress the:or9 button to select the
Serv.submenu.
XConfirm by pressing aon the steering
wheel.
XPress the :or9 button to select the
Coolantsubmenu.
XPress ato confirm your selection.
The coolant temperature is shown in a bar
display.
Settings menu
Introduction
Depending on the equipment installed in the
vehicle, In the Sett.menu you have the follow-
ing options:
RChanging HYBRID settings (PLUG-IN HYBRID
vehicles) (Ypage 273)
RChanging the instrument cluster settings
(Ypage 274)
RChanging the light settings (Ypage 275)
RChanging the vehicle settings (Ypage 275)
RChanging the convenience settings
(Ypage 275)
RRestoring the factory settings (Ypage 276)
HYBRID submenu (PLUG-IN HYBRID
vehicles)
Setting the maximum charge current
Using the MaximumChargeCurrent:function,
you can limit the charge current value at which
the high-voltage battery should be charged.
Before charging the high-voltage battery at a
power socket, check the maximum permissible
charge current for the relevant power socket or
the building.
Only set the maximum permissible charge cur-
rent using the function if:
Rit is not possible to set the charge current on
the charging cable
Rthe precise maximum permitted charge cur-
rent can only be set via the on-board com-
puter
Menus and submenus273
On-board computer and displays
Z
Page 276 of 450

Before charging the high-voltage battery at a
wallbox or charging station, ensure that the
charging current is not limited by the function. If
charging at a wallbox or a charging station,
select the maximum value.
Further information on charging the high-volt-
age battery and setting the charge current
(PLUG-IN HYBRID vehicles) (
Ypage 170).
XPress the=or; button on the steering
wheel to select the Sett.menu.
XPress the:or9 button to select the
HYBRID PLUSsubmenu.
XConfirm by pressing aon the steering
wheel.
XPress the :or9 button to select the
Maximum Charge Current:function.
You will see the selected setting.
XPress the abutton to save the setting.
The maximum charge current values in the on-
board computer may deviate from the charg- ing cable values.
Further information on charging the high-volt-
age battery (PLUG-IN HYBRID vehicles)
(
Ypage 170).
Setting the departure time
You can climatize the vehicle interior prior to
your departure with the "Set departure time"
function. Further information on pre-entry cli-
mate control (
Ypage 140).
If you recharge the high-voltage battery, the
function also displays the charging prediction.
XPress the =or; button on the steering
wheel to select the Sett.menu.
XPress the:or9 button to select the
HYBRID PLUSsubmenu.
XConfirm by pressing aon the steering
wheel.
XPress the :or9 button to select the
Departure Time:function.
You will see the selected setting.
XTo set no departure time: press the:or
9 button to select No Preselection
.
XPressato confirm.
If you recharge the high-voltage battery, the
multifunction display also shows the time
when the high-voltage battery will be fully
charged.
or
XTo set a departure time: press the:or
9 A
,Bor Cto select the desired preset.
XPress the abutton to confirm the selec-
tion.
XPress :or9 to set the hours.
XPress ato confirm.
XPress :or9 to set the minutes.
XPress ato confirm.
If you recharge the high-voltage battery, the
multifunction display shows the expected
condition of charge of the high-voltage bat-
tery for the departure time set.
Further information on charging the high-volt-
age battery (PLUG-IN HYBRID vehicles)
(
Ypage 170).
Instrument cluster submenu
Selecting the distance unit
The Display Unit Speedometer / Odome‐ter:function allows you to choose whether
certain displays appear in kilometers or miles in
the multifunction display.
XPress the =or; button on the steering
wheel to select the Sett.menu.
XPress the:or9 button to select the
Instrument Clustersubmenu.
XPress ato confirm.
XPress the :or9 button to select the
Display Unit Speedometer / Odometer
function.
You will see the selected setting: kmormiles.
XPress the abutton to save the setting.
The selected unit of measurement for distance
applies to:
RDigital speedometer in the Tripmenu
ROdometer and the trip odometer
RTrip computer
RCurrent consumption and the range
RNavigation instructions in the Navimenu
RCruise control
RDISTRONIC PLUS
RASSYST PLUS service interval display
Selecting permanent display
ThePermanent Display:function allows you
to choose whether the multifunction display
always shows the outside temperature or the
speed.
The speed display is inverse to the speedome-
ter.
274Menus and submenus
On-board computer and displays
Page 277 of 450

XPress the=or; button on the steering
wheel to select the Sett.menu.
XPress the:or9 button to select the
Instrument Clustersubmenu.
XConfirm by pressing aon the steering
wheel.
XPress the :or9 button to select the
Permanent Display:function.
The current setting, Outside Temperature,
Speedometer [km/h]or Speedometer[mph]appears.
XTo change the setting: pressaagain.
Light submenu
Setting the daytime running lamps
This function is not available in Canada.
XPress the =or; button on the steering
wheel to select the Sett.menu.
XPress the:or9 button to select the
Lightsubmenu.
XPress ato confirm.
XPress :or9 to select the DaytimeRunning Lightsfunction.
If the DaytimeRunningLightsfunction has
been switched on, the cone of light and the
W symbol in the multifunction display are
shown in orange.
XPress the abutton to save the setting.
Further information on daytime running lamps
(
Ypage 114).
Vehicle submenu
Activating/deactivating the automatic
door locking mechanism
If you activate the AutomaticDoorLockfunc-
tion, the vehicle is centrally locked above a
speed of approximately 9 mph (15 km/h).
XPress the =or; button on the steering
wheel to select the Sett.menu.
XPress the:or9 button to select the
Vehiclesubmenu.
XPress ato confirm.
XPress the :or9 button to select the
Automatic Door Lockfunction.
When the Automatic Door Lockfunction is
activated, the vehicle doors are displayed in
orange in the multifunction display.
XPress the abutton to save the setting. For further information on the automatic locking
feature, see (
Ypage 85).
Activating/deactivating the acoustic
locking verification signal
If you switch on the AcousticLockfunction, an
acoustic signal sounds when you lock the vehi-
cle.
XPress the =or; button on the steering
wheel to select the Settingsmenu.
XPress the:or9 button to select the
Vehiclesubmenu.
XPress ato confirm.
XPress the :or9 button to select the
Acoustic Lockfunction.
If the Acoustic Lockfunction is activated,
the & symbol in the multifunction display
lights up orange.
XPress the abutton to save the setting.
Convenience submenu
Activating/deactivating the EASY-
ENTRY/EXIT feature
GWARNING
When the EASY-ENTRY/EXIT feature adjusts
the steering wheel, you and other vehicle
occupants – particularly children – could
become trapped. There is a risk of injury.
While the EASY-ENTRY/EXIT feature is mak-
ing adjustments, make sure that no one has
any body parts in the sweep of the steering
wheel.
If somebody becomes trapped:
Rpress one of the memory function position
buttons, or
Rmove the switch for steering wheel adjust-
ment in the opposite direction to that in
which the steering wheel is moving.
The adjustment process is stopped.
XPress the =or; button on the steering
wheel to select the Sett.menu.
XPress the:or9 button to select the
Conveniencesubmenu.
XPress ato confirm.
Menus and submenus275
On-board computer and displays
Z
Page 283 of 450

Safety systems
Display messagesPossible causes/consequences andMSolutions
!÷
Currently Unavaila‐ble See Operator'sManual
ABS (Anti-lock Brake System), BAS (Brake Assist), ESP®(Electronic
Stability Program), ESP®trailer stabilization, PRE‑ SAFE®, the HOLD
function, hill start assist, Crosswind Assist, STEER CONTROL, Active
Lane Keeping Assist and Active Blind Spot Assist are temporarily
unavailable.
COLLISION PREVENTION ASSIST PLUS, BAS PLUS with Cross-Traffic
Assist, PRE ‑SAFE
®PLUS and PRE ‑SAFE®Brake may also have failed.
In addition, the ÷,åand! warning lamps light up in the
instrument cluster.
ATTENTION ASSIST is deactivated.
Possible causes are:
Rself-diagnosis is not yet complete.
Rthe on-board voltage may be insufficient.
GWARNING
The brake system continues to function normally, but without the
functions listed above. The wheels could therefore lock if you brake
hard, for example.
The steerability and braking characteristics may be severely affected.
The braking distance in an emergency braking situation can increase.
If ESP
®is not operational, ESP®is unable to stabilize the vehicle.
There is an increased risk of skidding and an accident.
XCarefully drive a suitable distance, making slight steering move-
ments at a speed above 12 mph (20 km/h).
If the display message disappears, the functions mentioned above are available again.
If the multifunction display still shows the display message:
XDrive on carefully.
XVisit a qualified specialist workshop immediately.
!÷
Inoperative SeeOperator's Manual
ABS, BAS, ESP®, ESP®trailer stabilization, PRE‑ SAFE®, the HOLD
function, hill start assist, Crosswind Assist, STEER CONTROL, Active
Lane Keeping Assist and Active Blind Spot Assist are unavailable due
to a malfunction.
COLLISION PREVENTION ASSIST PLUS, BAS PLUS with Cross-Traffic
Assist, PRE ‑SAFE
®PLUS and PRE‑SAFE®Brake may also have failed.
The $ (USA only) or J(Canada only), ÷,åand!
warning lamps in the instrument cluster also light up.
ATTENTION ASSIST is deactivated.
GWARNING
The brake system continues to function normally, but without the
functions listed above. The wheels could therefore lock if you brake
hard, for example.
The steerability and braking characteristics may be severely affected.
The braking distance in an emergency braking situation can increase.
Display messages281
On-board computer and displays
Z