2016 MERCEDES-BENZ GLE-Class heating
[x] Cancel search: heatingPage 140 of 450

Problems with the rear window defroster
ProblemPossible causes/consequences andMSolutions
The rear window
defroster has deactiva-
ted prematurely or can-
not be activated.The battery has not been sufficiently charged.
XSwitch off any consumers that are not required, e.g. reading lamps,
interior lighting or the seat heating.
When the battery is sufficiently charged, the rear window defroster
can be activated again.
Switching air-recirculation mode
on/off
General notes
You can deactivate the flow of fresh air if
unpleasant odors are entering the vehicle from
outside. The air already inside the vehicle will
then be recirculated.
If you switch on air-recirculation mode, the win-
dows can fog up more quickly, in particular at
low temperatures. Only use air-recirculation
mode briefly to prevent the windows from fog-
ging up.
Switching on/off
XTurn the SmartKey to position 2in the ignition
lock (Ypage 145).
XTo activate: press thedbutton.
The indicator lamp in the dbutton lights
up.
iIn the event of high pollution levels (3-zone
automatic climate control only) or at high out-
side temperatures, air-recirculation mode is
automatically activated. When air-recircula-
tion mode is activated automatically, the indi-
cator lamp in the dbutton is not lit.
Outside air is added after about 30 minutes.
XTo deactivate: press thedbutton.
The indicator lamp in the dbutton goes
out.
iAir-recirculation mode deactivates auto-
matically:
Rafter approximately five minutes at outside
temperatures below approximately 41 ‡
(5 †)
Rafter approximately five minutes if cooling
with air dehumidification is deactivated
Rafter approximately 30 minutes at outside
temperatures above approximately 41 ‡ (5 †) if the "Cooling with air dehumidifi-
cation" function is activated
Switching the residual heat on or off
General notes
The residual heat function is only available on
vehicles for Canada.
It is possible to make use of the residual heat of
the engine to continue heating the stationary
vehicle for up to 30 minutesafter the engine has
been switched off. The heating time depends on
the set interior temperature.
Switching on/off
XTo activate: press theÌorÁ button.
The indicator lamp in the ÌorÁ button
lights up.
iThe blower will run at a low speed regardless
of the airflow setting.
iIf you activate the residual heat function at
high temperatures, only the ventilation will be
activated. The blower runs at medium speed.
XTo deactivate: press theÌorÁ but-
ton.
The indicator lamp in the ÌorÁ button
goes out.
Residual heat is deactivated automatically:
Rafter approximately 30 minutes
Rwhen the ignition is switched on
Rif the battery voltage drops
Ionization
Ionization is used to purify the air in the vehicle
interior and attain an improved interior climate.
138Operating the climate control systems
Climate control
Page 141 of 450
The ionization of the interior air is odorless and
cannot be perceived directly in the vehicle inte-
rior.
You can switch ionization on and off via the mul-
timedia system (see the separate operating
instructions).
Ionization can only be operated when the auto-
matic climate control is switched on. The side air
vent on the driver's side must be open.
Pre-entry climate control via Smart-
Key
General notes
The "Pre-entry climate control via SmartKey"
function is only available in PLUG-IN HYBRID
vehicles.
Before getting in, the vehicle interior can be
briefly warmed or ventilated in advance and the air from the air vents can be pre-cooled.
The high-voltage battery must be sufficiently
charged before "Pre-entry climate control via
SmartKey" can be activated.
When the vehicle is pre-cooled, the following
functions are activated if required:
RClimate control system
RBlower
RSeat ventilation
When the vehicle is pre-heated, the following
functions are activated if required:
RClimate control system
RBlower
RSeat heating
If you have activated ionization via the multime-
dia system, it is activated together with pre-
entry climate control.
Switch on ionization (see the separate operating
instructions).
Activating or deactivating "Pre-entry
climate control via SmartKey"
Before "Pre-entry climate control via SmartKey"
can be activated, you must activate the function
using the on-board computer.
XTo activate pre-entry climate control via
SmartKey: unlock the vehicle with the Smart-
Key or KEYLESS-GO. The climate control functions are activated for
up to 5 minutes for pre-heating and pre-cooling.
To deactivate "Pre-entry climate control via
SmartKey": "Pre-entry climate control via
SmartKey" switches off automatically when the
engine is started.
The following functions remain active after the
engine is started:
RSeat heating (heating)
RSeat ventilation (ventilation)
RIonization
An activated "Pre-entry climate control via
SmartKey" function can be deactivated via the
button (
Ypage 141).
Operating the climate control systems139
Climate control
Page 142 of 450
Problems with "Pre-entry climate control via SmartKey"
ProblemPossible causes/consequences andMSolutions
"Pre-entry climate con-
trol via SmartKey" can-
not be switched on or
has switched itself off.The condition of charge of the high-voltage battery is under the speci-
fied minimum condition of charge.
XStart the engine when the vehicle is at a standstill.
The engine powers the electric motor. The electric motor operates
as a generator. The high-voltage battery is being charged.
Further information on charging the high-voltage battery via:
Ra mains socket (Ypage 172)
Ra charging station (Ypage 175)
Ra wallbox (Ypage 175)
"Pre-entry climate control via SmartKey" has been started more than
twice with the engine switched off.
XSwitch on the engine and let it run for more than ten seconds.
XTry again to switch on "Pre-entry climate control via SmartKey".
Pre-entry climate control at time of
departure
Important safety notes
GWARNING
If persons, particularly children are subjected to prolonged exposure to extreme heat or
cold, there is a risk of injury, possibly even
fatal. Never leave children unattended in the
vehicle.
General notes
The "Pre-entry climate control at departure
time" function is only available in PLUG-IN
HYBRID vehicles.
You can use the "Pre-entry climate control at
departure time" function to cool or heat the
vehicle interior if the engine is not running.
The "Pre-entry climate control at departure
time" function can be activated regardless of
whether or not the vehicle is connected to an
electric power supply. The condition of charge of
the high-voltage battery must be higher than the
specified minimum condition of charge, how-
ever.
When the vehicle is connected to an electric
power supply, priority is given to charging the
high-voltage battery to the specified minimum charge. "Pre-entry climate control at departure
time" is only activated subsequently.
The running time of the "Pre-entry climate con-
trol at departure time" function may be reduced
if:
Rthe vehicle is not connected to an electric
power supply and
Rthe high-voltage battery is not fully charged
With active "Pre-entry climate control at depar-
ture time" the condition of charge of the high-
voltage battery can be reduced, even if the
charge cable connector is connected.
When the vehicle is cooled, the following func-
tions are activated if required:
RClimate control system
RBlower
RSeat ventilation
When the vehicle is heated, the following func-
tions are activated if required:
RClimate control system
RBlower
RSeat heating
If you have activated ionization via the multime-
dia system, it is activated together with "Pre-
entry climate control".
Switch on ionization (see the separate operating
instructions).
140Operating the climate control systems
Climate control
Page 143 of 450
Setting the departure time
You can set the departure time using the on-
board computer or via the online access to the
vehicle. The activation of the "Pre-entry climate
control at departure time" function can be linked
to this departure time. Your vehicle will then be
cooled or heated until the desired temperature
is reached in time for the set departure time.
"Pre-entry climate control at departure time" will
be activated a maximum of 55 minutes before
departure. If the departure is delayed, the vehi-
cle will be heated or cooled for another five
minutes.
XTo set the departure time:set the departure
time using the on-board computer
(
Ypage 274). Set the departure time via the
online access to the vehicle (Ypage 178).
XTo activate or deactivate "Pre-entry cli-
mate control at departure time": activate
or deactivate "Pre-entry climate control at
departure time" using the on-board com-
puter. Activate or deactivate "Pre-entry cli-
mate control at departure time" via the online
access to the vehicle (
Ypage 178).
The "Pre-entry climate control at departure
time" function switches off automatically when
the vehicle is started. The following functions
remain active:
RSeat heating
RSeat ventilation
RIonization
To deactivate "Pre-entry climate control at
departure time": the activated "Pre-entry cli-
mate control at departure time" can be deacti-
vated using the button (
Ypage 141).
Activating/deactivating "Immediate
pre-entry climate control" via the but-
ton
You can activate "Immediate pre-entry climate
control" even if the vehicle interior is already at
the desired temperature. This means, for exam-
ple, that the vehicle interior continues to be
cooled or heated if the journey is interrupted for
up to 50 minutes and the interior temperature is
kept constant.
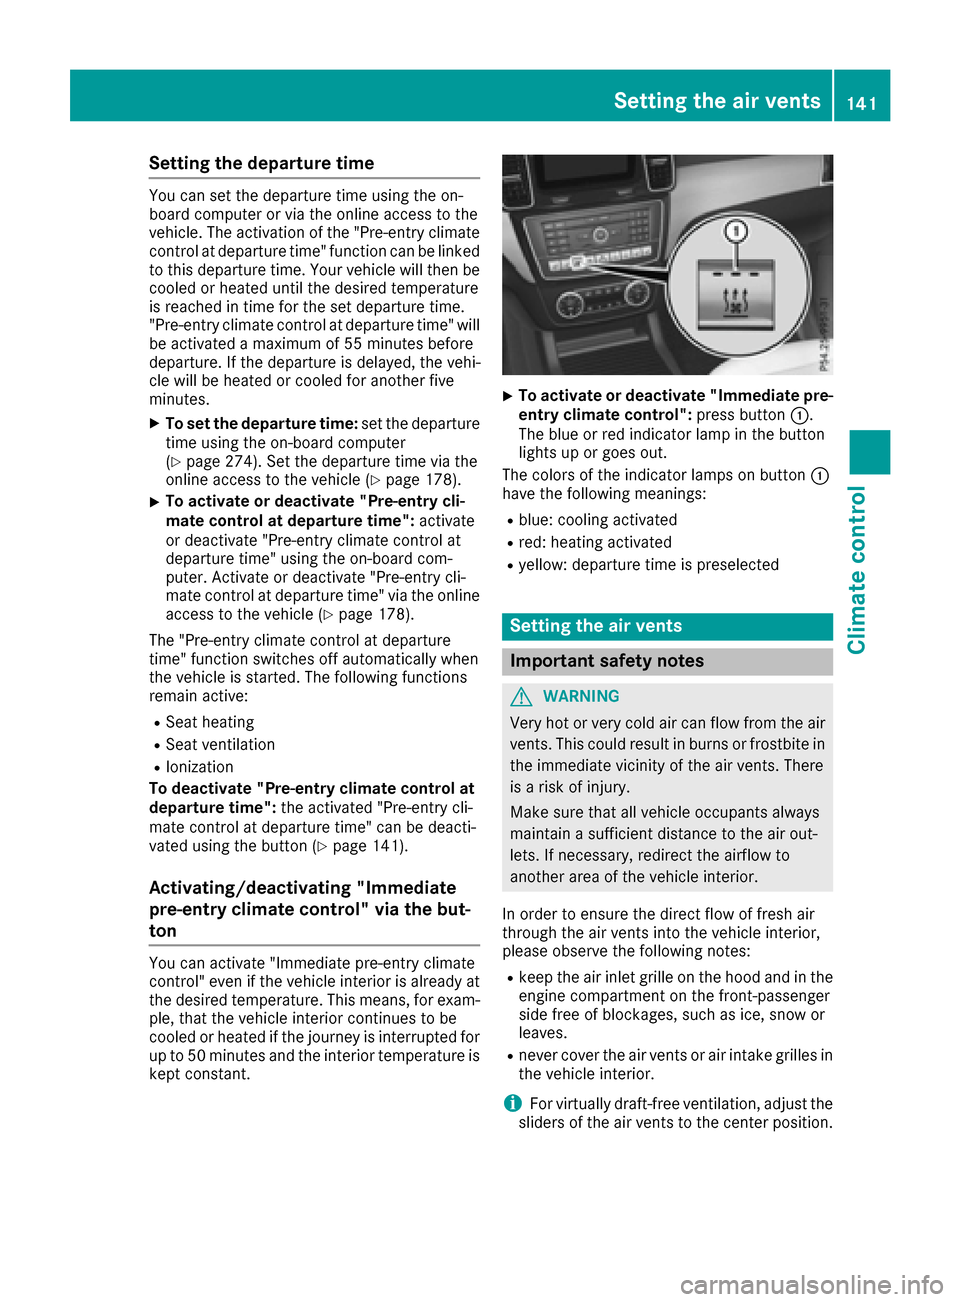
XTo activate or deactivate "Immediate pre-
entry climate control": press button:.
The blue or red indicator lamp in the button
lights up or goes out.
The colors of the indicator lamps on button :
have the following meanings:
Rblue: cooling activated
Rred: heating activated
Ryellow: departure time is preselected
Setting the air vents
Important safety notes
GWARNING
Very hot or very cold air can flow from the air
vents. This could result in burns or frostbite in
the immediate vicinity of the air vents. There
is a risk of injury.
Make sure that all vehicle occupants always
maintain a sufficient distance to the air out-
lets. If necessary, redirect the airflow to
another area of the vehicle interior.
In order to ensure the direct flow of fresh air
through the air vents into the vehicle interior,
please observe the following notes:
Rkeep the air inlet grille on the hood and in the
engine compartment on the front-passenger
side free of blockages, such as ice, snow or
leaves.
Rnever cover the air vents or air intake grilles in
the vehicle interior.
iFor virtually draft-free ventilation, adjust the
sliders of the air vents to the center position.
Setting the air vents141
Climate control
Z
Page 144 of 450
Setting the center air vents
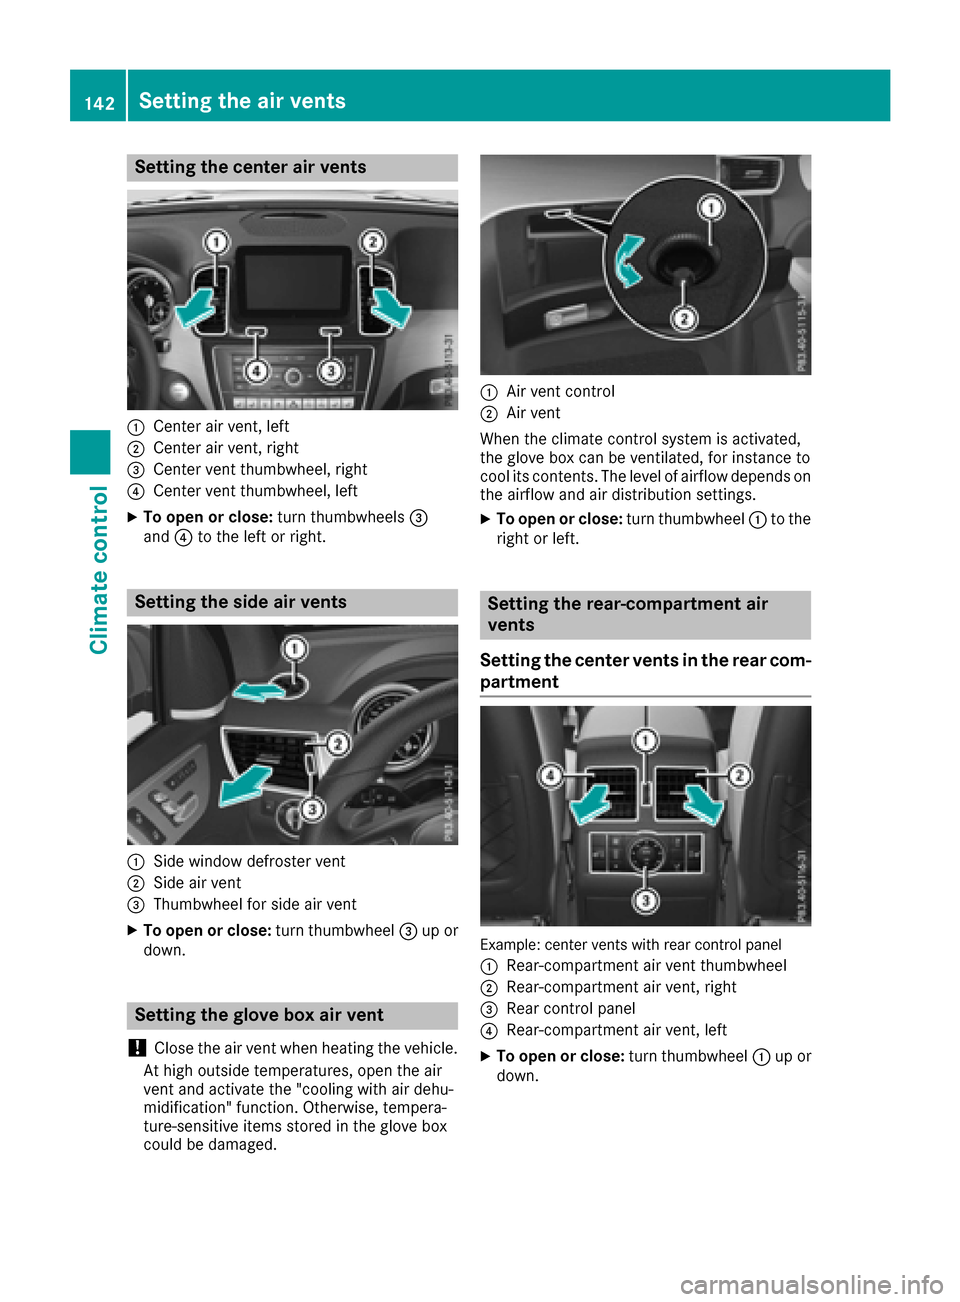
:Center air vent, left
;Center air vent, right
=Center vent thumbwheel, right
?Center vent thumbwheel, left
XTo open or close:turn thumbwheels=
and ?to the left or right.
Setting the side air vents
:Side window defroster vent
;Side air vent
=Thumbwheel for side air vent
XTo open or close: turn thumbwheel=up or
down.
Setting the glove box air vent
!
Close the air vent when heating the vehicle.
At high outside temperatures, open the air
vent and activate the "cooling with air dehu-
midification" function. Otherwise, tempera-
ture-sensitive items stored in the glove box
could be damaged.
:Air vent control
;Air vent
When the climate control system is activated,
the glove box can be ventilated, for instance to
cool its contents. The level of airflow depends on the airflow and air distribution settings.
XTo open or close: turn thumbwheel:to the
right or left.
Setting the rear-compartment air
vents
Setting the center vents in the rear com-
partment
Example: center vents with rear control panel
:
Rear-compartment air vent thumbwheel
;Rear-compartment air vent, right
=Rear control panel
?Rear-compartment air vent, left
XTo open or close: turn thumbwheel:up or
down.
142Setting the air vents
Climate control
Page 165 of 450

You must avoid fire, open flames, creating
sparks and smoking. Switch off the engine
and, if applicable, the auxiliary heating beforerefueling.
GWARNING
Fuel is poisonous and hazardous to health.
There is a risk of injury.
You must make sure that fuel does not come into contact with your skin, eyes or clothing
and that it is not swallowed. Do not inhale fuel
vapors. Keep fuel away from children.
If you or others come into contact with fuel,
observe the following:
RWash away fuel from skin immediately
using soap and water.
RIf fuel comes into contact with your eyes,
immediately rinse them thoroughly with
clean water. Seek medical assistance with-
out delay.
RIf fuel is swallowed, seek medical assis-
tance without delay. Do not induce vomit-
ing.
RImmediately change out of clothing which
has come into contact with fuel.
GWARNING
Electrostatic buildup can create sparks and
ignite fuel vapors. There is a risk of fire and
explosion.
Always touch the vehicle body before opening
the fuel filler flap or touching the fuel pump
nozzle. Any existing electrostatic buildup is
thereby discharged.
GWARNING
Vehicles with a diesel engine:
If you mix diesel fuel with gasoline, the flash
point is lower than that of pure diesel fuel.
When the engine is running, exhaust system
components could overheat without being
noticed. There is a risk of fire.
Never refuel with gasoline. Never mix gasoline with diesel fuel.
!Do not use gasoline to refuel vehicles with a
diesel engine. Do not switch on the ignition if
you accidentally refuel with the wrong fuel.
Otherwise, the fuel will enter the fuel system. Even small amounts of the wrong fuel could
result in damage to the fuel system and the
engine. The repair costs are high. Notify a
qualified specialist workshop and have the
fuel tank and fuel lines drained completely.
!Do not use diesel to refuel vehicles with a
gasoline engine. Do not switch on the ignition
if you accidentally refuel with the wrong fuel.
Otherwise, the fuel will enter the fuel system. Even small amounts of the wrong fuel could
result in damage to the fuel system and the
engine. Notify a qualified specialist workshop
and have the fuel tank and fuel lines drained
completely.
!Overfilling the fuel tank could damage the
fuel system.
!Take care not to spill any fuel on painted
surfaces. You could otherwise damage the
paintwork.
!Use a filter when refueling from a fuel can.
Otherwise, the fuel lines and/or injection sys- tem could be blocked by particles from the
fuel can.
Do not get into the vehicle again during the refu-
eling process. Otherwise, electrostatic charge
could build up again.
If you overfill the fuel tank, fuel could spray out
when the fuel pump nozzle is removed.
iFlexible Fuel vehicles can be recognized by
the Ethanol up to E85 sticker on the inside of
the fuel filler flap.
For furt her in
formation on fuel and fuel quality
(Ypage 434).
Refueling
General information
Pay attention to the important safety notes
(Ypage 162).
PLUG-IN HYBRID vehicles: pressure in the fuel
tank must be released before refueling.
Except PLUG-IN HYBRID vehicles: if you
unlock/lock the vehicle from the outside, the
fuel filler flap also unlocks/locks.
Refueling163
Driving and parking
Z
Page 175 of 450
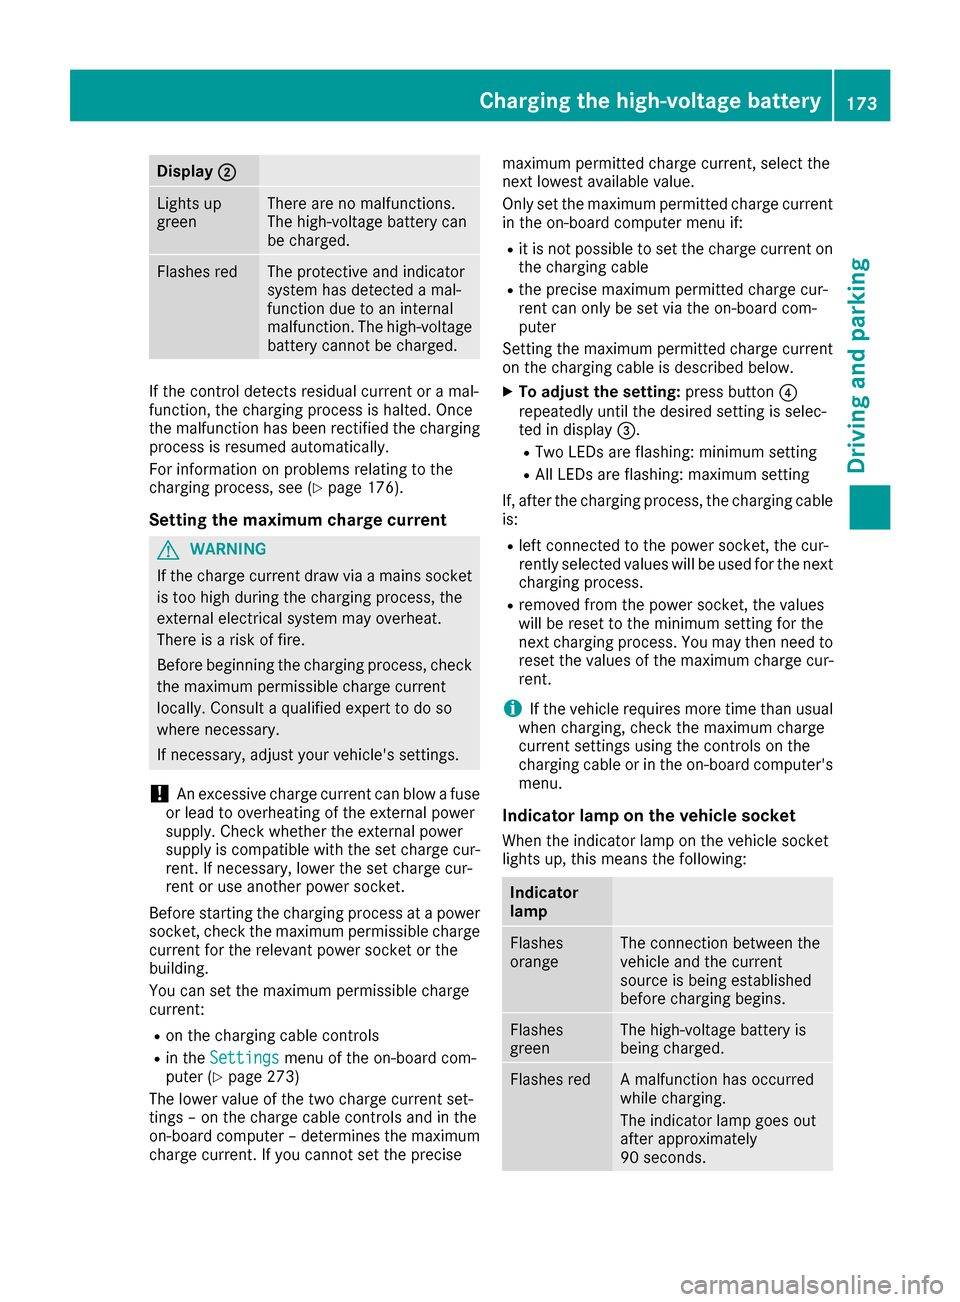
Display;
Lightsup
greenThere are no malfunctions.
The high-voltage battery can
be charged.
Flashes redThe protective and indicator
system has detecte d amal-
function due to an internal
malfunction .The high-voltage
battery canno tbe charged.
If th econtrol detects residual curren tor amal-
function ,th echarging process is halted. Once
th emalfunction has been rectifie dth echarging
process is resumed automatically.
Fo rinformation on problem srelating to th e
charging process, see (
Ypage 176).
Setting themaximum charg ecurren t
GWARNIN G
If th echarg ecurren tdraw via amain ssocke t
is to ohigh during th echarging process, th e
external electrical system may overheat.
There is aris kof fire.
Befor ebeginning th echarging process, chec k
th emaximum permissibl echarg ecurren t
locally. Consult aqualified exper tto do so
wher enecessary.
If necessary, adjust your vehicle's settings.
!An excessive charg ecurren tcan blow afus e
or lead to overheating of th eexternal powe r
supply. Chec kwhether th eexternal powe r
supply is compatible wit hth eset charg ecur -
rent. If necessary, lower th eset charg ecur -
ren tor use another powe rsocket.
Befor estarting th echarging process at apowe r
socket, chec kth emaximum permissibl echarg e
curren tfor th erelevan tpowe rsocke tor th e
building .
You can set th emaximum permissibl echarg e
current:
Ron th echarging cable control s
Rin theSettingsmen uof th eon-boar dcom-
puter (Ypage 273)
The lower value of th etwo charg ecurren tset -
ting s –on th echarg ecable control sand in th e
on-boar dcomputer –determine sth emaximum
charg ecurrent. If you canno tset th eprecis e maximum permitte
dcharg ecurrent, select th e
next lowes tavailable value .
Only set th emaximum permitte dcharg ecurren t
in th eon-boar dcomputer men uif:
Rit is no tpossibl eto set th echarg ecurren ton
th echarging cable
Rth eprecis emaximum permitte dcharg ecur -
ren tcan only be set via th eon-boar dcom-
puter
Setting th emaximum permitte dcharg ecurren t
on th echarging cable is described below.
XTo adjust th esetting: press butto n?
repeatedly until th edesire dsetting is selec-
te din display =.
RTwo LEDs are flashing: minimum setting
RAllLEDs are flashing: maximum setting
If ,after th echarging process, th echarging cable
is:
Rlef tconnecte dto th epowe rsocket, th ecur -
rentl yselected value swill be used for th enext
charging process.
Rremove dfrom th epowe rsocket, th evalue s
will be reset to th eminimum setting for th e
next charging process. You ma
y then need to
reset th evalue sof th emaximum charg ecur -
rent.
iIf th evehicl erequire smor etime than usual
when charging ,chec kth emaximum charg e
curren tsetting susin gth econtrol son th e
charging cable or in th eon-boar dcomputer' s
menu.
Indicator lam pon th evehicle socket
Whe nth eindicator lamp on th evehicl esocke t
lights up, this mean sth efollowing:
Indicator
lam p
Flashes
orang eThe connection between th e
vehicl eand th ecurren t
source is bein gestablished
before charging begins .
Flashes
greenThe high-voltage battery is
beingcharged.
Flashes redA malfunction has occurred
while charging .
The indicator lamp goe sout
after approximately
90 seconds.
Charging the high-voltage battery17 3
Driving an d parking
Z
Page 186 of 450

helps avoid overheating and excessive wear
of the brakes.
When you take advantage of the engine brak-
ing effect, a drive wheel may not turn for some
time, e.g. on a slippery road surface. This
could cause damage to the drive train. This
type of damage is not covered by the
Mercedes-Benz warranty.
Do not depress the brake pedal continuously
while the vehicle is in motion, e.g. causing the
brakes to rub by constantly applying light pres-
sure to the pedal. This results in excessive and
premature wear to the brake pads.
Heavy and light loads
GWARNING
If you rest your foot on the brake pedal while
driving, the braking system can overheat. This increases the stopping distance and can even
cause the braking system to fail. There is a
risk of an accident.
Never use the brake pedal as a footrest. Never
depress the brake pedal and the accelerator
pedal at the same time.
!Depressing the brake pedal constantly
results in excessive and premature wear to
the brake pads.
If the brakes have been subjected to a heavy
load, do not stop the vehicle immediately. Drive
on for a short while. This allows the airflow to
cool the brakes more quickly.
Wet roads
If you have driven for a long time in heavy rain
without braking, there may be a delayed reac-
tion from the brakes when braking for the first
time. This may also occur after the vehicle has
been washed or driven through deep water.
You then have to depress the brake pedal more
firmly. Maintain a greater distance from the
vehicle in front.
After driving on a wet road or having the vehicle
washed, brake firmly while paying attention to
the traffic conditions. This will warm up the
brake discs, thereby drying them more quickly
and protecting them against corrosion.
Limited braking performance on salt-
treated roads
If you drive on salted roads, a layer of salt resi-
due may form on the brake discs and brake
pads. This can result in a significantly longer
braking distance.
RBrake occasionally to remove any possible
salt residue. Make sure that you do not
endanger other road users when doing so.
RCarefully depress the brake pedal and the
beginning and end of a journey.
RMaintain a greater distance to the vehicle
ahead.
Servicing the brakes
!The brake fluid level may be too low, if:
Rif the red brake warning lamp lights up in
the instrument cluster and
Ryou hear a warning tone while the engine is
running
Observe additional warning messages in the
multifunction display.
The brake fluid level may be too low due to
brake pad wear or leaking brake lines.
Have the brake system checked immediately.
Consult a qualified specialist workshop to
arrange this.
!A function or performance test should only
be carried out on a 2-axle dynamometer. If
you wish to operate the vehicle on such a
dynamometer, please consult a qualified spe-
cialist workshop in advance. You could oth-
erwise damage the drive train or the brake
system.
!Because ESP®is an automatic system, the
engine and ignition must be switched off
(SmartKey in position 0or 1or Start/Stop
button in position 0or 1) when the electric
parking brake is being tested on a brake dyna-
mometer (maximum 10 seconds).
Braking triggered automatically by ESP
®may
seriously damage the brake system.
All checks and maintenance work on the brake
system must be carried out at a qualified spe-
cialist workshop.
Have brake pads installed and brake fluid
replaced at a qualified specialist workshop.
If the brake system has only been subject to
moderate loads, you should test the functional-
184Driving tips
Driving and parking