2016 MERCEDES-BENZ GLE-Class airmatic
[x] Cancel search: airmaticPage 207 of 450

Activating the HOLD function
XMakesur ethat th eactivation condition sare
met .
XDepress th ebrak epedal .
XQuickl ydepress th ebrak epedal further
until :appear sin th emultifunction display.
The HOLD function is activated. You can
release th ebrak epedal .
iIf depressing th ebrak epedal th efirst time
does no tactivat eth eHOLD function ,wait
briefl yand then tr yagain .
Deactivating the HOLD function
The HOLD function is deactivated automatically
if:
Ryou accelerate and th etransmission is in
position Dor R.
Ryou shif tth etransmission to position P.
Ryou depress thebrak epedal again wit h acer-
tai namount of pressur euntil :disappear s
from th emultifunction display.
Ryou secure th evehicl eusin gth eelectric park -
ing brake.
Ryou activat eDISTRONI CPLUS.
iAfte r atime, th eelectric parking brak e
secures th evehicl eand relieves th eservic e
brake.
When th eHOLD function is activated, th etrans -
mission is shifte dautomatically to position Pif:
Rth edriver's door is open and th edriver's seat
belt is unfastened.
Rth eengin eis switched off ,unless it is auto -
matically switched off by th eECO start/sto p
function .
The electric parking brak esecures th evehicl e
automatically if th eHOLD function is activated
when th evehicl eis stationary and :
Rasystem malfunction occurs.
Rth epowe rsupply is no tsufficient. On steep uphil
lor downhill inclines or if there is
a malfunction ,th etransmission may also be
automatically shifte dint oposition P.
AIRMATIC package
Gene ral notes
AIRMATIC is an air suspension wit hvariable
damping for improve ddrivin gcomfort .Level
control ensures th ebest possibl esuspension
and constan tground clearance ,eve nwit h a
laden vehicle. When you drive fast, th evehicl eis
lowered automatically to improve drivin gsafet y
and to reduce fuel consumption .There is also
th eoption to manually adjust th evehicl elevel.
All vehicles (excep tMercedes-AMG vehi-
cles): AIRMATIC consist sof:
Rlevel setting s
Rlevel control and
RADS(Adaptive Dampin gSystem)
Mercedes-AMG vehicles: AIRMATIC consists
of:
Rlevel setting s
Rlevel control and
RADSPLU S(Adaptive Dampin gSystem)
All vehicles (excep tMercedes-AMG vehi-
cles): your vehicl emay also be equipped wit h
th eACTIVE CURVE SYSTE M (
Ypage 207).
Mercedes-AMG vehicles: your vehicleis equip -
ped wit hth eACTIVE CURVE SYSTEM.
(
Ypage 207).
Observ eth enote son drivin gwit h a trailer
(
Ypage 257).
The vehicl elevel can be set usin gth eDYNAMIC
SELECT controller (
Ypage 152) or thelevel but -
to n (Ypage 207). The setting always corre-
spond sto th elast selected function .
Important safety notes
GWARNIN G
When th evehicl eis bein glowered, people
could become trapped if their limb sare
between th evehicl ebody and th ewheels or
underneat hth evehicle. There is aris kof
injury.
Driving systems205
Driving and parking
Z
Page 261 of 450
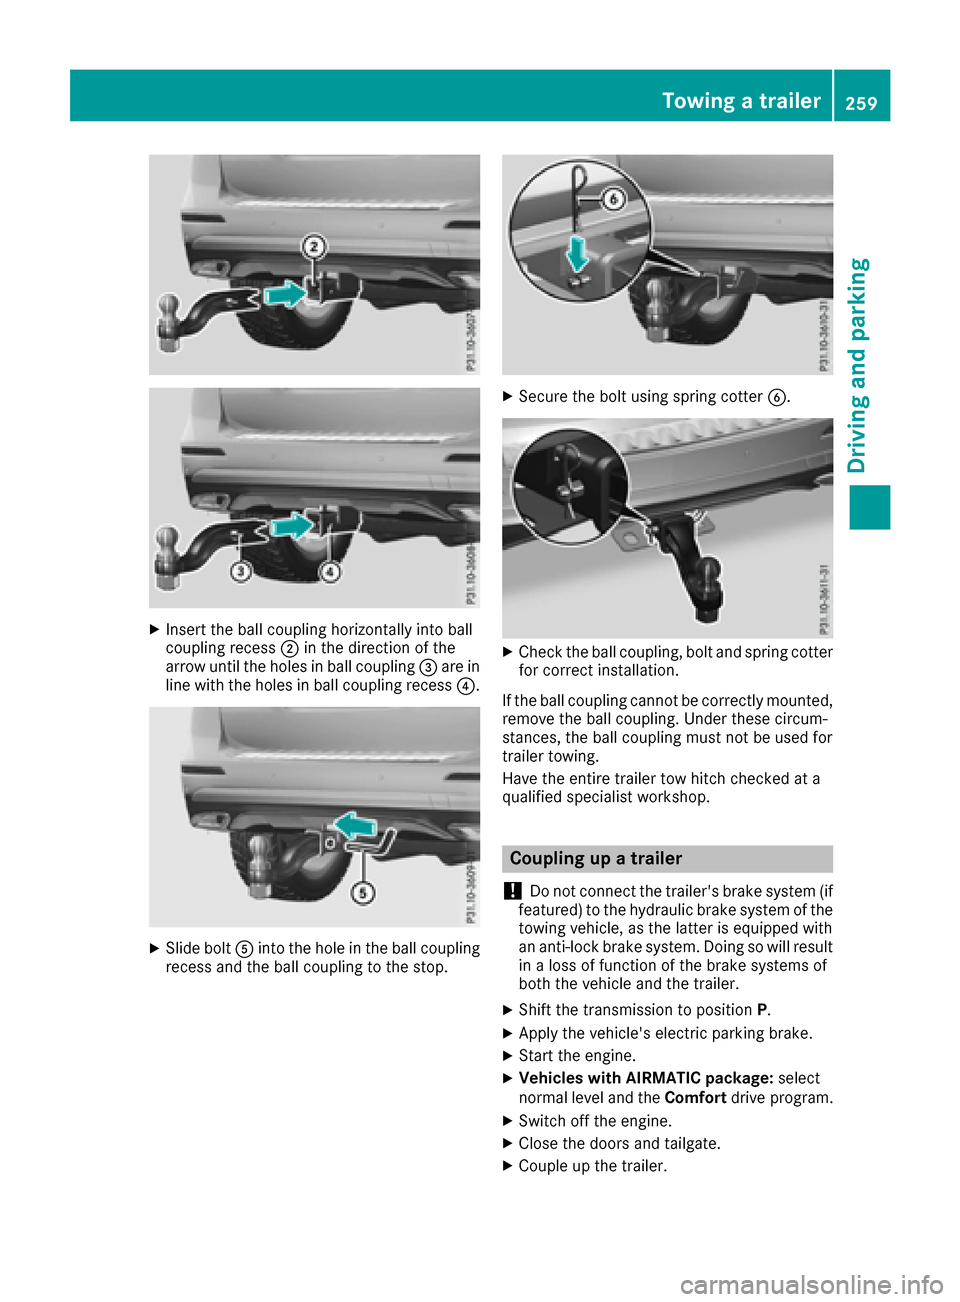
XInsert the ball coupling horizontally into ball
coupling recess;in the direction of the
arrow until the holes in ball coupling =are in
line with the holes in ball coupling recess ?.
XSlide boltAinto the hole in the ball coupling
recess and the ball coupling to the stop.
XSecure the bolt using spring cotter B.
XCheck the ball coupling, bolt and spring cotter
for correct installation.
If the ball coupling cannot be correctly mounted,
remove the ball coupling. Under these circum-
stances, the ball coupling must not be used for
trailer towing.
Have the entire trailer tow hitch checked at a
qualified specialist workshop.
Coupling up a trailer
!
Do not connect the trailer's brake system (if
featured) to the hydraulic brake system of the
towing vehicle, as the latter is equipped with
an anti-lock brake system. Doing so will result
in a loss of function of the brake systems of
both the vehicle and the trailer.
XShift the transmission to position P.
XApply the vehicle's electric parking brake.
XStart the engine.
XVehicles with AIRMATIC package: select
normal level and the Comfortdrive program.
XSwitch off the engine.
XClose the doors and tailgate.
XCouple up the trailer.
Towing a trailer259
Driving and parking
Z
Page 262 of 450
XEstablish the electrical connection between
the vehicle and the trailer.
XCheck that the trailer lighting system is work-
ing.
XPush the combination switch upwards/down-wards and check whether the corresponding
turn signal on the trailer flashes.
A trailer that is connected is recognized only
when the electrical connection is established
correctly and when the lighting system is work-
ing properly. The function of other systems also
depends on this, for example:
RESP®
RPARKTRONIC
RActive Parking Assist
RActive Blind Spot Assist
RActive Lane Keeping Assist
iVehicles with the AIRMATIC package: if you
couple up a trailer, the vehicle always remains
at normal level. When coupling up a trailer,
please observe the following:
RIf the normal level has not been set man-
ually, the vehicle is automatically lowered
to normal level. This is the case if a speed of
5 mph (8 km/h) is reached.
RThe Sport drive program is not available.
These restrictions apply to all accessories
powered through a connection to the trailer
power socket of your vehicle, e.g. a bicycle
carrier.
Observe the maximum permissible trailer
dimensions (width and leng
th).
Most U.S. states and all Canadian provinces
require by law:
RSafety chains between the towing vehicle and
the trailer. The chains should be cross-wound
under the trailer drawbar. They must be fas-
tened to the vehicle's trailer coupling, not to
the bumper or the axle.
Leave enough play in the chains to make tight
cornering possible.
RA separate brake system for certain types of
trailer.
RSafety switch for braked trailers. Check the
specific legal requirements applicable to your
state.
If the trailer becomes detached from the tow-
ing vehicle, the safety switch applies the
trailer brakes.
Towing a trailer
There are numerous legal requirements con-
cerning the towing of a trailer, e.g. speed restric- tions. Make sure that your car/trailer combina-
tion complies with the local regulations:
Rin your place of residence
Rin the location to which you are driving
The police and local authorities can provide reli- able information.
Observe the following when towing a trailer:
RTo gain driving experience and to become
accustomed to the new handling characteris-
tics, you should practice the following in a
traffic-free location:
-cornering
-stopping
-backing up
RBefore driving, check:
-trailer tow hitch
-safety switch for braked trailers
-safety chains
-electrical connections
-lights
-wheels
RAdjust the exterior mirrors to provide an
unobstructed view of the rear section of the
trailer.
RIf the trailer has electronically controlled
brakes, pull away carefully. Brake manually
using the brake controller and check whether
the brakes function correctly.
RSecure any objects on the trailer to prevent
the cargo from slipping when the vehicle is in
motion.
RWhen you couple up a trailer, check at regular
intervals that the load is firmly secured. If the
tra
iler is equipped with trailer lights and
brakes, check the trailer to ensure that these
are working.
RBear in mind that the handling will be less
stable when towing a trailer than when driving
without one. Avoid sudden steering move-
ments.
RThe vehicle/trailer combination is heavier,
accelerates more slowly, has a decreased
gradient climbing capability and a longer
braking distance.
It is more susceptible to side winds and
requires more careful steering.
260Towing a trailer
Driving an d parking
Page 304 of 450

Display messagesPossible causes/consequences andMSolutions
Á
Drive MoreSlowly
You canno tchang eth evehicl elevel.
Possibl ecauses are:
Ryou are drivin gto ofas tfor th eselected vehicl elevel.
Ryou are drivin gto ofas twit h a trailer or th etrailer-coupling socke tis
bein gused ,e.g. for abicycle rack.
XDrive mor eslowly and then select th edesire dvehicl elevel again .
RVehicles wit hth eOff-Road Engineering packag e (Ypage 201)
RVehicles withth eAIRMATIC packag e (Ypage 207)
XObserveth enote son towin g atrailer (Ypage 257).
Á
Compresso rIs Cool‐ing
You hav eselected ahigher vehicl elevel. The compressor first needs
to cool down because of frequen tlevel changes.
XDrive in amanne rappropriat efor th ecurren tvehicl elevel.
XMak esur ethat there is sufficien tground clearance .
XAllow thecompressor to cool down .
Whe nth ecompressor has cooled down ,th edisplay message dis-
appears. The vehicl ethen continues rising to th eselected level.
Á
Malfunction
AIRMATIC is malfunctioning .
XDrive as appropriatefor th ecurren tvehicl elevel, but do no texceed
50 mph (80 km/h).
XMak esur ethat there is sufficien tground clearance .
XVisitaqualified specialist workshop .
Á
Max.Speed 12 mph
You are exceedin gth espeed permissibl efor th eselected off-road
level.
In addition ,th evehicl elevel display appear sabov eth edisplay mes -
sage and awarning tone sounds.
GWARNIN G
The vehicl ecould ti pand rollover.
There is aris kof an accident.
XAdjus tyour drivin gstyle to th ealtere dhandlin gcharacteristics .
XOnly makeslight steering movement sand avoid fas tsteering move-
ments .
XDo notexceed 12 mph (20 km/h) until th evehicl ehas reached off -
roa dlevel 2.
Á
Raisin gMax.Speed12 mph
The vehicl eis bein gadjusted to off-road level 3.
In addition ,th evehicl elevel display appear sabov eth edisplay mes -
sage .
The display message refers to th emaximum speed permissibl e
(dependin gon th emodel type) for off-road level 3.
XDo no tdrive at speeds abov e12 mph (20 km/h).
302Display messages
On-board computer and displays
Page 372 of 450

XOpen the tailgate.
XLift the cargo compartment floor upwards
(Ypage 337).
XRemove the "Minispare" emergency spare
wheel (Ypage 427).
Flat tire
Preparing the vehicle
Your vehicle may be equipped with:
RMOExtended tires (tires with run-flat proper-
ties)
Vehicle preparation is not necessary on vehi-
cles with MOExtended tires
Ra TIREFIT kit (Ypage 369)
Ran emergency spare wheel (only for certain
countries)
Information on changing and mounting wheels
(
Ypage 408).
XStop the vehicle on solid, non-slippery and
level ground, as far away as possible from
traffic.
XSwitch on the hazard warning lamps.
XSecure the vehicle against rolling away
(Ypage 178).
XIf possible, bring the front wheels into the
straight-ahead position.
XVehicles with the AIRMATIC package:
make sure that the normal vehicle level is
selected (
Ypage 207).
XVehicles with the Off-Road Engineering
package: make sure that the normal vehicle
level is selected (
Ypage 201).
XSwitch off the engine.
XVehicles without KEYLESS-GO: remove the
SmartKey from the ignition lock.
XVehicles with KEYLESS-GO: open the driv-
er's door.
The on-board electronics now have status 0.
This is the same as the SmartKey having been
removed.
XVehicles with KEYLESS-GO: remove the
Start/Stop button from the ignition lock
(
Ypage 146).
XMake sure that the engine cannot be started
via your smartphone (Ypage 148).
XMake sure that the passengers are not endan-
gered as they do so. Make sure that no one is
near the danger area while a wheel is being changed. Anyone who is not directly assisting
in the wheel change should, for example,
stand behind the barrier.
XGet out of the vehicle. Pay attention to traffic
conditions when doing so.
XClose the driver's door.
XUnload heavy luggage.
iOnly operate the tire inflation compressor
using a 12 V socket, even if the ignition is
turned off (
Ypage 343).
An emergency cut-out ensures that the on-
board voltage does not drop too low. If the on-
board voltage is too low, the power to the
sockets is automatically cut. This ensures
that there is sufficient power to start the
engine.
MOExtended tires (tires with run-flat
properties)
General notes
With MOExtended tires (tires with run flat char-
acteristics), you can continue to drive your vehi-
cle even if there is a total loss of pressure in one
or more tires. The affected tire must not show
any clearly visible damage.
You can recognize MOExtended tires by the
MOExtended marking which appears on the
sidewall of the tire. You will find this marking
next to the tire size designation, the load-bear-
ing capacity and the speed index (
Ypage 403).
MOExtended tires may only be used in conjunc-
tion with an active tire pressure loss warning
system or with an active tire pressure monitor.
If a pressure loss warning message appears
in the multifunction display:
Robserve the instructions in the display mes-
sages (Ypage 309).
Rcheck the tire for damage.
Rif driving on, observe the following notes.
The driving distance possible in run-flat mode is
approximately 50 miles (80 km) when the vehi-
cle is partially laden and approximately 18 miles
(30 km) when the vehicle is fully laden.
In addition to the vehicle load, the driving dis-
tance possible depends upon:
Rvehicle speed
Rroad condition
Routside temperature
370Flat tire
Breakdown assitance
Page 411 of 450

be required earlier. Do not change the direction
of wheel rotation.
Clean the contact surfaces of the wheel and the
brake disc thoroughly every time a wheel is rota-ted. Check the tire pressure and, if necessary,
restart the tire pressure loss warning system or
the tire pressure monitor.
Direction of rotation
Tires with a specified direction of rotation have
additional benefits, e.g. if there is a risk of hydro-
planing. These advantages can only be gained if
the tires are installed corresponding to the
direction of rotation.
An arrow on the sidewall of the tire indicates its
correct direction of rotation.
Storing wheels
Store wheels that are not being used in a cool,
dry and preferably dark place. Protect the tires
from oil, grease, gasoline and diesel.
Mounting a wheel
Preparing the vehicle
XVehicle with emergency spare wheel:
when mounting the emergency spare wheel in
the event of a flat tire, follow the additional
notes on vehicle preparation under "Flat tire"
(
Ypage 370).
XStop the vehicle on solid, non-slippery and
level ground.
XApply the electric parking brake manually.
XUnload heavy luggage.
XBring the front wheels into the straight-ahead position.
XShift the transmission to position P.
XVehicles with the AIRMATIC package:
make sure that the normal vehicle level is
selected (
Ypage 207).
XVehicles with the Off-Road Engineering
package:make sure that the normal vehicle
level is selected (
Ypage 201).
XSwitch off the engine.
XVehicles without KEYLESS-GO: remove the
SmartKey from the ignition lock.
XVehicles with KEYLESS-GO: open the driv-
er's door.
The on-board electronics now have status 0.
This is the same as the SmartKey having been
removed.
XVehicles with KEYLESS-GO: remove the
Start/Stop button from the ignition lock
(
Ypage 146).
XMake sure that the engine cannot be started
via your smartphone (Ypage 148).
XIf included in the vehicle equipment, remove
the tire-change tool kit from the vehicle.
XSafeguard the vehicle against rolling away.
iApart from certain country-specific varia-
tions, vehicles are not equipped with a tire-
change tool kit. For information on which
tools are required to perform a wheel change
on your vehicle, consult an authorized
Mercedes-Benz Center.
Necessary tire-changing tools can include, for example:
RJack
RWheel chock
RLug wrench
Securing the vehicle to prevent it from
rolling away
If your vehicle is equipped with a wheel chock, itcan be found in the tire-change tool kit
(
Ypage 369).
The folding wheel chock is an additional safety
measure to prevent the vehicle from rolling
away, for example when changing a wheel.
XFold both plates upwards :.
XFold out lower plate;.
XGuide the lugs on the lower plate fully into the
openings in base plate =.
Changing a wheel409
Wheels and tires
Z
Page 416 of 450
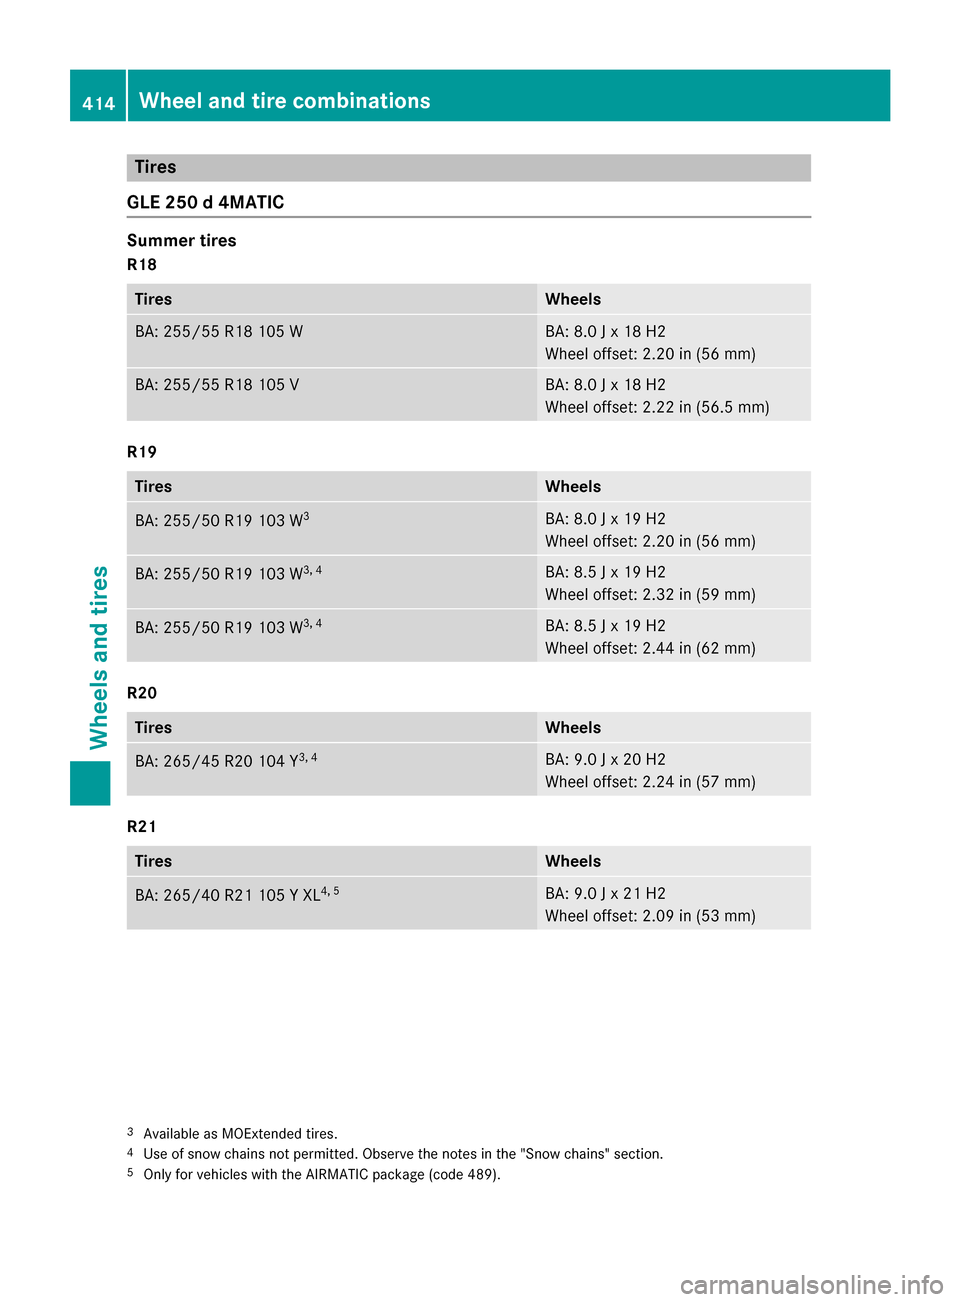
Tires
GLE 250 d 4MATIC
Summer tires
R18
TiresWheels
BA: 255/55 R1810 5 WBA: 8.0 J x 18 H2
Wheel offset: 2.20 in (56 mm)
BA: 255/55 R18 105 VBA: 8.0 J x 18 H2
Wheel offset: 2.22 in (56.5 mm)
R19
TiresWheels
BA: 255/50 R19 103 W3BA: 8.0 J x 19 H2
Wheel offset: 2.20 in (56 mm)
BA: 255/50 R19 103 W3, 4BA: 8.5 J x 19 H2
Wheel offset: 2.32 in (59 mm)
BA: 255/50 R19 103 W3, 4BA: 8.5 J x 19 H2
Wheel offset: 2.44 in (62 mm)
R20
TiresWheels
BA: 265/45 R20 104 Y3, 4BA: 9.0 J x 20 H2
Wheel offset: 2.24 in (57 mm)
R21
TiresWheels
BA: 265/40 R21 105 Y XL4, 5BA: 9.0 J x 21 H2
Wheel offset: 2.09 in (53 mm)
3Available as MOExtended tires.4Use of snow chains not permitted. Observe the notes in the "Snow chains" section.5Only for vehicles with the AIRMATIC package (code 489).
414Wheel and tire combinations
Wheels and tires
Page 418 of 450

R19
TiresWheels
BA: 255/50 R19 107 H XL M+Si3BA: 8.0 J x 19 H2
Wheel offset: 2.20 in (56 mm)
BA: 255/50 R19 107 H XL M+Si3, 4BA: 8.5 J x 19 H2
Wheel offset: 2.32 in (59 mm)
BA: 255/50 R19 103 W M+Si3BA: 8.5 J x 19 H2
Wheel offset: 2.44 in (62 mm)
R20
TiresWheels
BA: 265/45 R20 108 V XL M+S i4BA: 9.0 J x 20 H2
Wheel offset: 2.24 in (57 mm)
GLE 350
Summer tires
R21
TiresWheels
BA: 265/40 R21 105 Y XL4, 5BA: 9.0 J x 21 H2
Wheel offset: 2.09 in (53 mm)
All-weather tires
R18
TiresWheels
BA: 255/55 R18 105 H M+SBA: 8.0 J x 18 H2
Wheel offset: 2.20 in (56 mm)
BA: 255/55 R18 105 H M+SBA: 8.0 J x 18 H2
Wheel offset: 2.22 in (56.5 mm)
3Available as MOExtended tires.4Use of snow chains not permitted. Observe the notes in the "Snow chains" section.5Only for vehicles with the AIRMATIC package (code 489).
416Wheel and tire combinations
Wheels and tires