2016 MERCEDES-BENZ GLE-CLASS COUPE transmission oil
[x] Cancel search: transmission oilPage 6 of 382

AMGAdaptive sport suspension sys-
tem ................................................ 185
AMG menu (on-board computer) .....2 31
Approach/departure angle .............. 167
Ashtray ............................................... 288
Assistance display (on-board com-
puter) ..................................................2 27
Assistance menu (on-board com-
puter) ..................................................2 27
ASSYST PLUS
Displaying a service message ........3 06
Hiding a service message .............. 306
Resetting the service interval dis-
play ................................................ 306
Service message ............................ 306
Special service requirements ......... 307
ATA (Anti-Theft Alarm system)
Activating/deactivating ................... 70
Function ...........................................7 0
Switching off the alarm .................... 70
ATTENTION ASSIST
Activating/deactivating ................. 228
Display message ............................ 253
Function/notes ............................. 200
Audio menu (on-board computer) .... 225
Audio system
see separate operating instructions
Authorized Mercedes-Benz Center
see Qualified specialist workshop
AUTO lights
Display message ............................ 248
see Lights
Automatic car wash (care) ............... 307
Automatic engine start (ECO start/
stop function) .................................... 139
Automatic engine switch-off (ECO
start/stop function) .......................... 139
Automatic headlamp mode .............. 108
Automatic transmission
Accelerator pedal position ............. 145
Changing gear ............................... 145
DIRECT SELECT lever ..................... 142
Display message ............................ 261
Drive program ................................ 147
Drive program display .................... 143
Driving tips .................................... 145 DYNAMIC SELECT control
ler ......... 142
Eme
rgency running mode .............. 150
Engaging drive position .................. 144
Engaging neutral ............................ 143
Engaging park position automati-
cally ............................................... 143
Engaging reverse gear ................... 143
Engaging the park position ............ 143
Gliding mode ................................. 146
Kickdown ....................................... 146
Manual shifting .............................. 147
Oil temperature (on-board com-
puter, Mercedes-AMG vehicles) ..... 231
Overview ........................................ 142
Problem (malfunction) ................... 150
Pulling away ................................... 137
Starting the engine ........................ 136
Steering wheel paddle shifters ...... 147
Trailer towing ................................. 147
Transmission position display ........ 143
Transmission positions .................. 145
Automatic transmission emer-
gency mode ....................................... 150
Axle load, permissible (trailer tow-
ing) ...................................................... 376
B
Bag hook ............................................ 283
Ball coupling
Installing ........................................ 213
Removing ....................................... 217
BAS (Brake Assist System) ................. 61
BAS PLUS with Cross-Traffic Assist
(Brake Assist PLUS with Cross-
Traffic Assist)
Function/notes ................................ 61
Important safety notes .................... 61
Battery (SmartKey)
Checking .......................................... 75
Important safety notes .................... 75
Replacing ......................................... 75
Battery (vehicle)
Charging ........................................ 322
Display message ............................ 250
Important safety notes .................. 320
Jump starting ................................. 323
Overview ........................................ 320
4Index
Page 19 of 382

Steering wheelAdjusting (electrically) ...................1 02
Adjusting (manually) ...................... 101
Button overview ............................... 33
Buttons (on-board computer) ......... 220
Cleaning ......................................... 313
Important safety notes .................. 101
Steering wheel heating .................. 102
Storing settings (memory func-
tion) ............................................... 107
Steering wheel heating
Problem (malfunction) ................... 103
Switching on/off ........................... 102
Steering wheel paddle shifters ........ 147
Stopwatch (RACETIMER) ................... 232
Stowage areas ................................... 278
Stowage compartments
Armrest (under) ............................. 279
Center console .............................. 280
Center console (rear) ..................... 280
Cup holders ................................... 285
Eyeglasses compartment ............... 280
Glove box ....................................... 279
Important safety information ......... 279
Stowage net ................................... 280
Stowage net ....................................... 280
Summer tires ..................................... 332
Sun visor ............................................ 287
Suspension setting
AMG adaptive sport suspension
system ........................................... 185
Suspension settings
SETUP (on-board computer) .......... 232
SUV
(Sport Utility Vehicle) ....................... 25
Switching air-recirculation mode
on/off ................................................. 130
T
Tachometer ........................................ 219
Tailgate
Display message ............................ 262
Emergency unlocking ....................... 85
Important safety notes .................... 81
Limiting the opening angle ............... 84
Opening dimensions ...................... 373 Opening/closing (automatically
from inside) ...................................... 84
Opening/closing (automatically
from outside) ................................... 82
Opening/closing (from outside) ....... 82
Tank content
Fuel gauge ....................................... 31
Technical data
Capacities ...................................... 367
Emergency spare wheel ................. 364
Information .................................... 365
Tires/wheels ................................. 356
Trailer loads ................................... 376
Vehicle data ................................... 373
Telephone
Accepting a call (multifunction
steering wheel) .............................. 226
Display message ............................ 263
Menu (on-board computer) ............ 226
Number from the phone book ........ 226
Redialing ........................................ 226
Rejecting/ending a call ................. 226
Temperature
Coolant (display in the instrument
cluster) .......................................... 220
Coolant (on-board computer,
Mercedes-AMG vehicles) ............... 231
Engine oil (on-board computer,
Mercedes-AMG vehicles) ............... 231
Outside temperature ...................... 220
Setting (climate control) ................ 126
Transmission oil (on-board com-
puter, Mercedes-AMG vehicles) ..... 231
Through-loading feature ................... 281
Time
see separate operating instructions
Timing (RACETIMER) ......................... 232
Tire pressure
Calling up (on-board computer) ..... 337
Checking manually ........................ 336
Display message ............................ 259
Maximum ....................................... 336
Not reached (TIREFIT) .................... 318
Notes ............................................. 335
Reached (TIREFIT) .......................... 319
Recommended ............................... 333
Tire pressure loss warning system
Genera l note
s ................................ 336
Index17
Page 74 of 382

Useful information
i
This Operator's Manual describes all models
and all standard and optional equipment of
your vehicle available at the time of publica-
tion of the Operator's Manual. Country-spe-
cific differences are possible. Please note
that your vehicle may not be equipped with all
features described. This also applies to
safety-related systems and functions.
iRead the information on qualified specialist
workshops (Ypage 26).
SmartKey
Important safety notes
GWARNING
If children are left unsupervised in the vehicle,
they could:
Ropen the doors, thus endangering other
people or road users.
Rget out and disrupt traffic.
Roperate the vehicle's equipment.
Additionally, children could set the vehicle in
motion if, for example, they:
Rrelease the parking brake.
Rshifting the automatic transmission out of
park position P
RStart the engine.
There is a risk of an accident and injury.
When leaving the vehicle, always take the
SmartKey with you and lock the vehicle. Never
leave children or animals unattended in the
vehicle. Always keep the SmartKey out of
reach of children.
GWARNING
If you attach heavy or large objects to the
SmartKey, the SmartKey could be uninten-
tionally turned in the ignition lock. This could
cause the engine to be switched off. There is a risk of an accident.
Do not attach any heavy or large objects to theSmartKey. Remove any bulky key rings before
inserting the SmartKey into the ignition lock.
!Keep the SmartKey away from strong mag-
netic fields. Otherwise, the remote control
function could be affected.
Strong magnetic fields can occur in the vicin-
ity of powerful electrical installations.
Do not keep the SmartKey:
Rwith electronic devices, e.g. a mobile phone
or another SmartKey.
Rwith metallic objects, e.g. coins or metal foil.
Rinside metallic objects, e.g. a metal case.
This can affect the functionality of the Smart-
Key.
Do not keep the KEYLESS-GO or KEYLESS-GO
Start function key in the temperature-controlled
cup holder. Otherwise, the KEYLESS-GO or KEY-
LESS-GO Start function key will not be detected. Vehicles with KEYLESS-GO start function: do
not keep the SmartKey in the cargo compart-
ment. Otherwise, the SmartKey may not be
detected, e.g. when starting the engine using
the Start/Stop button.
SmartKey functions
:& Locks the vehicle
;FOpens/closes the tailgate
=%Unlocks the vehicle
XTo unlock centrally: press the%button.
If you do not open the vehicle within approx-
imately 40 seconds of unlocking:
Rthe vehicle is locked again.
Ranti-theft protection is reactivated.
XTo lock centrally: press the&button.
72SmartKey
Opening and closing
Page 136 of 382
GWARNING
If you switch off the ignition while driving,
safety-relevant functions are only available
with limitations, or not at all. This could affect, for example, the power steering and the brake
boosting effect. You will require considerably
more effort to steer and brake. There is a risk
of an accident.
Do not switch off the ignition while driving.
GWARNING
If the parking brake has not been fully
released when driving, the parking brake can:
Roverheat and cause a fire
Rlose its hold function.
There is a risk of fire and an accident. Release
the parking brake fully before driving off.
!Do not warm up the engine with the vehicle
stationary. Drive off immediately. Avoid high
engine speeds and driving at full throttle until
the engine has reached its operating temper-
ature.
Only shift the automatic transmission to the
desired drive position when the vehicle is sta-
tionary.
Where possible, avoid spinning the drive
wheels when pulling away on slippery roads.
You could otherwise damage the drive train.
!Mercedes-AMG vehicles: at low engine oil
temperatures below 68 ‡ (+20 †), the max-
imum engine speed is restricted in order to
protect the engine. To protect the engine and
maintain smooth engine operation, avoid driv-
ing at full throttle when the engine is cold.
SmartKey positions
SmartKey
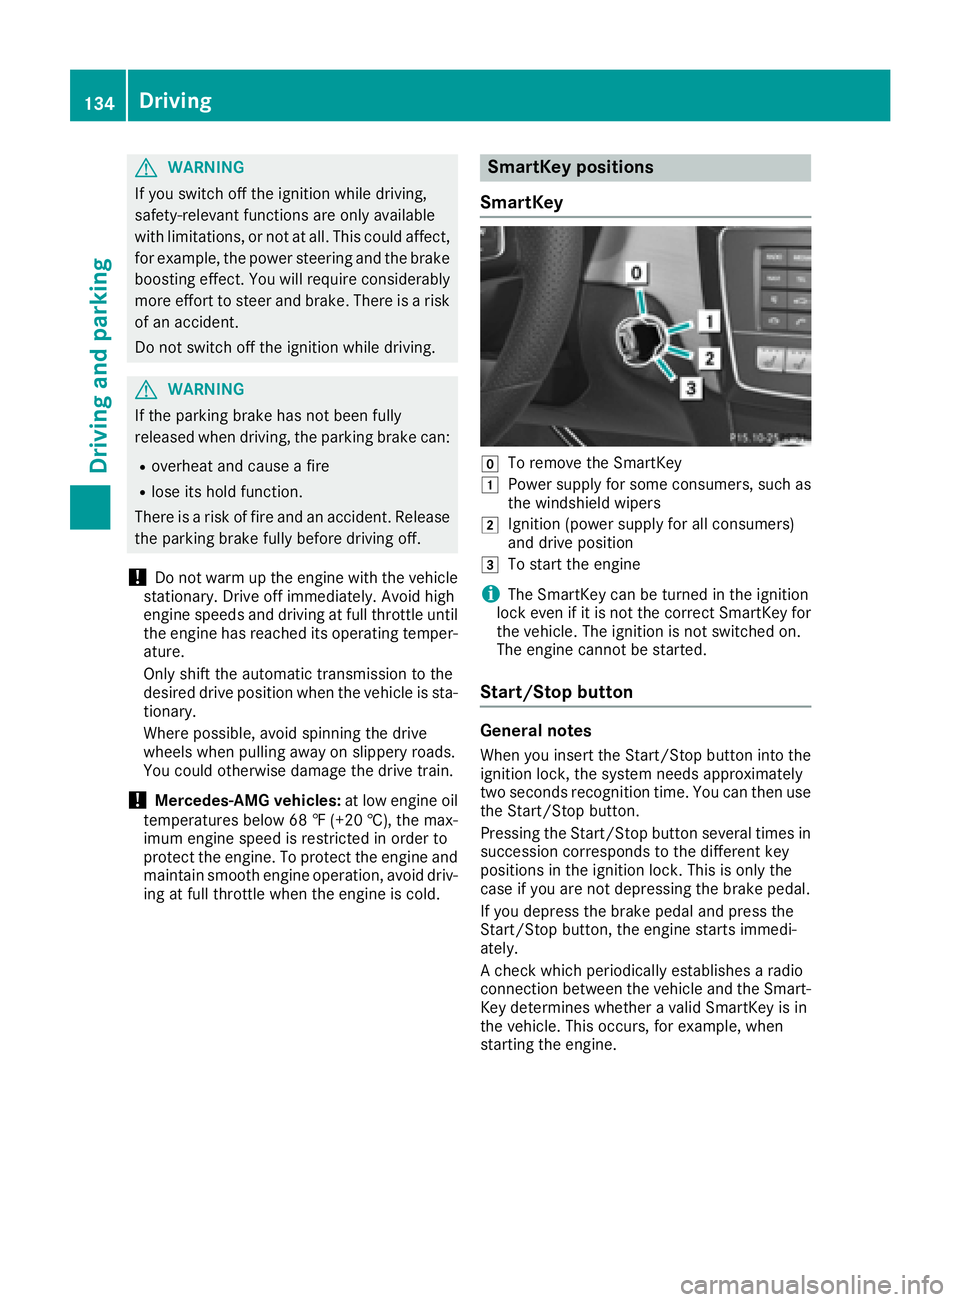
gTo remove the SmartKey
1Power supply for some consumers, such as
the windshield wipers
2Ignition (power supply for all consumers)
and drive position
3To start the engine
iThe SmartKey can be turned in the ignition
lock even if it is not the correct SmartKey for
the vehicle. The ignition is not switched on.
The engine cannot be started.
Start/Stop button
General notes
When you insert the Start/Stop button into the
ignition lock, the system needs approximately
two seconds recognition time. You can then use
the Start/Stop button.
Pressing the Start/Stop button several times in
succession corresponds to the different key
positions in the ignition lock. This is only the
case if you are not depressing the brake pedal.
If you depress the brake pedal and press the
Start/Stop button, the engine starts immedi-
ately.
A check which periodically establishes a radio
connection between the vehicle and the Smart-
Key determines whether a valid SmartKey is in
the vehicle. This occurs, for example, when
starting the engine.
134Driving
Driving and parking
Page 137 of 382
To start the vehicle without actively using the
SmartKey:
Rthe Start/Stop button must be inserted in the
ignition lock.
Rthe SmartKey must be in the vehicle.
Rthe vehicle must not be locked with the
SmartKey or KEYLESS-GO (Ypage 73).
Do not keep the SmartKey:
Rwith electronic devices, e.g. a mobile phone
or another SmartKey.
Rwith metallic objects, e.g. coins or metal foil.
Rinside metallic objects, e.g. a metal case.
This can affect the functionality of the Smart- Key.
Do not keep the SmartKey in the temperature-
controlled cup holder (
Ypage 286). Otherwise
the SmartKey will not be detected.
If you lock the vehicle with the SmartKey's
remote control or with KEYLESS-GO, after a
short time:
Ryou will not be able to switch on the ignition
with the Start/Stop button.
Ryou will not be able to start the engine with the
Start/Stop button until the vehicle is
unlocked again.
If you lock the vehicle centrally using the button
on the front door (
Ypage 79), you can continue
to start the engine with the Start/Stop button.
The engine can be switched off while the vehicle
is in motion by pressing and holding the Start/
Stop button for three seconds. This function
operates independently of the ECO start/stop
automatic engine switch-off function.
Key positions with the Start/Stop button
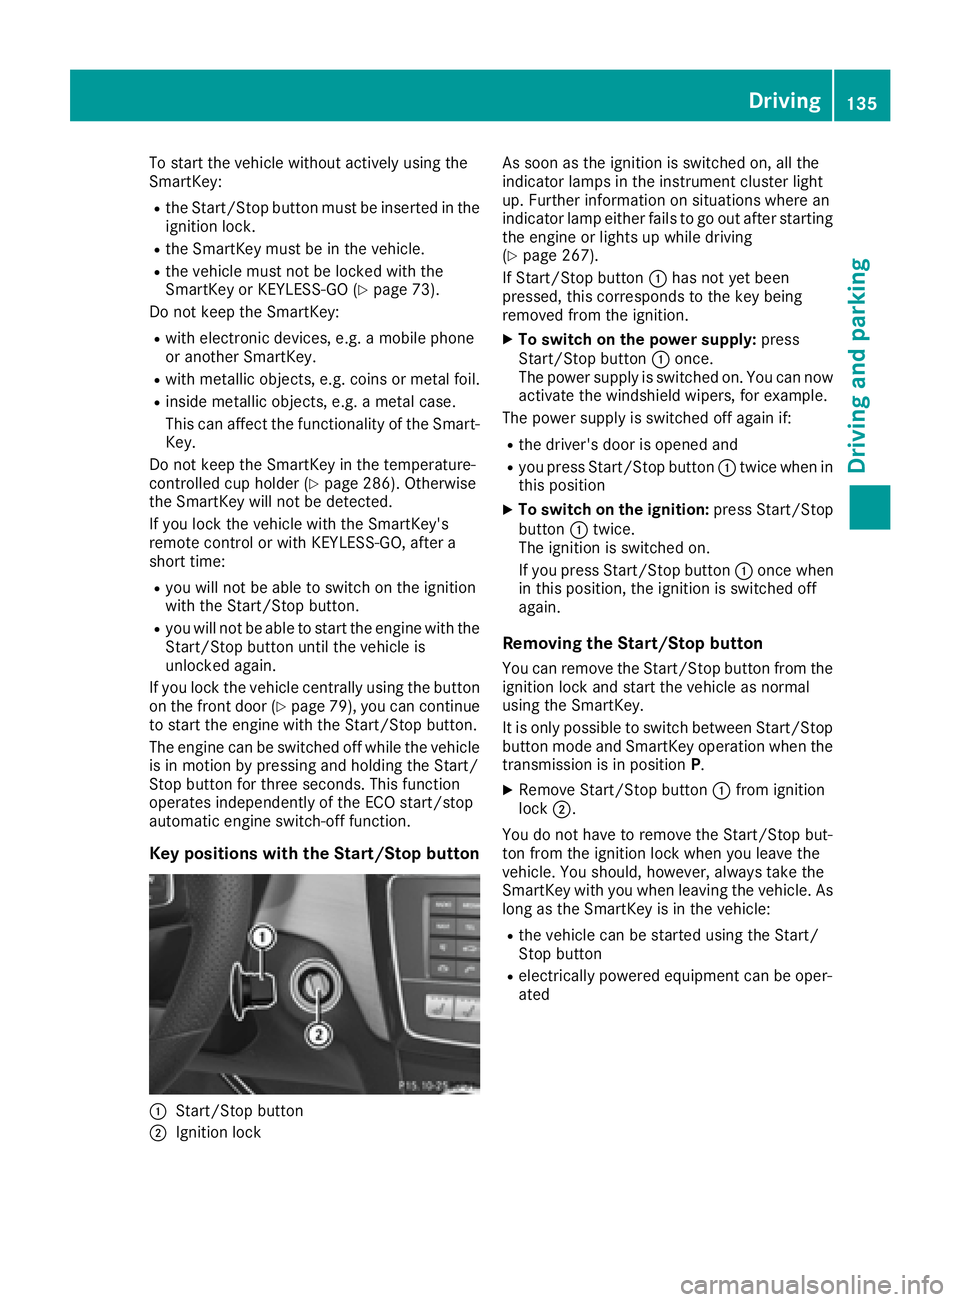
:Start/Stop button
;Ignition lock As soon as the ignition is switched on, all the
indicator lamps in the instrument cluster light
up. Further information on situations where an
indicator lamp either fails to go out after starting
the engine or lights up while driving
(
Ypage 267).
If Start/Stop button :has not yet been
pressed, this corresponds to the key being
removed from the ignition.
XTo switch on the power supply: press
Start/Stop button :once.
The power supply is switched on. You can now activate the windshield wipers, for example.
The power supply is switched off again if:
Rthe driver's door is opened and
Ryou press Start/Stop button :twice when in
this position
XTo switch on the ignition: press Start/Stop
button :twice.
The ignition is switched on.
If you press Start/Stop button :once when
in this position, the ignition is switched off
again.
Removing the Start/Stop button
You can remove the Start/Stop button from the
ignition lock and start the vehicle as normal
using the SmartKey.
It is only possible to switch between Start/Stop button mode and SmartKey operation when the
transmission is in position P.
XRemove Start/Stop button :from ignition
lock ;.
You do not have to remove the Start/Stop but-
ton from the ignition lock when you leave the
vehicle. You should, however, always take the
SmartKey with you when leaving the vehicle. As
long as the SmartKey is in the vehicle:
Rthe vehicle can be started using the Start/
Stop button
Relectrically powered equipment can be oper-
ated
Driving135
Driving and parking
Z
Page 152 of 382
Problems with the transmission
ProblemPossible causes/consequences andMSolutions
The transmission has
problems shifting gear.The transmission is losing oil.
XHave the transmission checked at a qualified specialist workshop
immediately.
All vehicles (except
Mercedes-AMG vehi-
cles):
The acceleration ability
is deteriorating.
The transmission no lon-
ger changes gear.The transmission is in emergency mode.
It is only partly possible to engage the gears or the transmission is in
positionN.
XStop the vehicle.
XShift the transmission to position P.
XSwitch off the engine.
XWait at least ten seconds before restarting the engine.
XShift the transmission to positionDor R.
XHave the transmission checked at a qualified specialist workshop
immediately.
Mercedes-AMG vehi-
cles:
The acceleration ability
is deteriorating.
The transmission no lon-
ger changes gear.The transmission is in emergency mode.
It is only possible to shift into secondgear and reverse gear.
XStop the vehicle.
XShift the transmission to position P.
XSwitch off the engine.
XWait at least ten seconds before restarting the engine.
XShift the transmission to positionDor R.
If D is selected, the transmission shifts into secondgear; ifRis
selected, the transmission shifts into reverse gear.
XHave the transmission checked at a qualified specialist workshop
immediately.
Transfer case
!
Performance tests may only be carried out
on a 2-axle dynamometer. The brake system
or transfer case could otherwise be damaged.
Contact a qualified specialist workshop for a
performance test.
!Because ESP®is an automatic system, the
engine and ignition must be switched off
(SmartKey in position 0or 1or Start/Stop
button in position 0or 1) when the electric
parking brake is being tested on a brake dyna-
mometer (maximum 10 seconds).
Braking triggered automatically by ESP
®may
seriously damage the brake system.
!Vehicles with 4MATIC must not be towed
with either the front or the rear axle raised, as
doing so will damage the transmission.
Refueling
Important safety notes
GWARNING
Fuel is highly flammable. If you handle fuel
incorrectly, there is a risk of fire and explo-
sion.
You must avoid fire, open flames, creating
sparks and smoking. Switch off the engine
and, if applicable, the auxiliary heating before refueling.
150Refueling
Driving and parking
Page 167 of 382
Observe the notes in the "Winter operation" sec-
tion (Ypage 332).
Off-road driving
Important safety notes
GWARNING
If you drive on a steep incline at an angle or
turn when driving on an incline, the vehicle
could slip sideways, tip and rollover. There is a risk of an accident.
Always drive on a steep incline in the line of
fall (straight up or down) and do not turn the
vehicle.
GWARNING
Flammable material such as leaves, grass or
twigs may ignite if they come into contact with
hot parts of the exhaust system. There is a risk of fire.
When driving off road or on unpaved roads,
check the vehicle's underside regularly. In
particular, remove parts of plants or other
flammable materials which have become
trapped. In the case of damage, contact a
qualified specialist workshop.
GWARNING
If the vehicle level is high, the vehicle center of gravity is raised. This could cause the vehicle
to tip over more easily on uphill or downhill
gradients. There is a risk of an accident.
Select the lowest possible vehicle level.
!There is a risk of damage to the vehicle if:
Rthe vehicle becomes stuck, e.g. on a high
curb or an unpaved road
Ryou drive too fast over an obstacle, e.g. a
curb or a hole in the road
Ra heavy object strikes the undercarriage or
parts of the chassis
In situations like this, the body, the undercar-
riage, chassis parts, wheels or tires could be
damaged without the damage being visible.
Components damaged in this way can unex-
pectedly fail or, in the case of an accident, no longer withstand the strain they are designed
to.
If the underbody paneling is damaged, com-
bustible materials such as leaves, grass or
twigs can gather between the underbody and
the underbody paneling. If these materials
come in contact with hot parts of the exhaust
system, they can catch fire.
In such situations, have the vehicle checked
and repaired immediately at a qualified spe-
cialist workshop. If on continuing your jour-
ney you notice that driving safety is impaired,
pull over and stop the vehicle immediately,
paying attention to road and traffic condi-
tions. In such cases, consult a qualified spe-
cialist workshop.
When driving off-road, substances such as sand,
mud and water or water mixed with oil may get
into the brakes. This could result in a reduced
braking effect or in total brake failure and also in
increased wear and tear. The braking charac-
teristics change depending on the material
ingressing the brakes. Clean the brakes after
driving off-road. If you detect a reduced braking
effect or grinding noises, have the brake system checked in a qualified specialist workshop as
soon as possible. Adapt your driving style to the
different braking characteristics.
Driving off-road increases the likelihood of dam-
age to the vehicle, which, in turn, can lead to
failure of the mechanical assembly or systems.
Adapt your driving style to suit the terrain con-
ditions. Drive carefully. Have damage to the
vehicle rectified immediately at a qualified spe-
cialist workshop.
Do not switch to transmission position
Nwhen
driving off-road. If you try to brake the vehicle
using the service brake, you could lose cont
rol
of the vehicle. If the gradient is too steep for your
vehicle, drive back down in reverse gear.
General notes
Read this section carefully before driving your
vehicle off-road. Practice by driving over more
gentle off-road terrain first.
Familiarize yourself with the characteristics of
your vehicle and the gear shift operation before driving through difficult terrain.
Driving tips165
Driving and parking
Z
Page 168 of 382
The following driving systems are specially
adapted to off-road driving:
RAIRMATIC package (vehicle level)
(Ypage 182)
RDSR (Downhill Speed Regulation)
(Ypage 180)
Observe the following notes:
RSelect a vehicle level that is suitable for the
terrain. To avoid damaging the vehicle, make
sure there is always sufficient ground clear-
ance.
RCheck that items of luggage and loads are
stowed safely and are well secured
(
Ypage 283).
RAlways keep the engine running and in gear
when driving on a downhill gradient. Activate
DSR (
Ypage 180).
RAlways keep the engine running and in gear
when driving on a slope.
RAdapt your speed to the terrain. The rougher,
steeper or more ruts on the terrain, the slower
your speed should be.
RDo not jump with the vehicle as this will inter- rupt the vehicle's propulsion.
RDrive with extreme care on unfamiliar off-road
routes where visibility is poor. For safety rea-
sons, get out of the vehicle first and survey
the off-road route.
RLook out for obstacles, such as rocks, holes,
tree stumps and furrows.
RAlways keep the doors, the tailgate, the side
windows and the sliding sunroof closed whilethe vehicle is in motion.
RDo not shift the automatic transmission to
transmission position N.
RObserve the notes on off-road fording
(Ypage 164).
iDo not use the HOLD function when driving
off-road, on steep uphill or downhill gradients
or on slippery or loose surfaces. The HOLD
function cannot hold the vehicle on such sur-
faces.
Checklist before driving off-road
!If the engine oil warning lamp lights up while
the vehicle is in motion, stop the vehicle in a
safe place as soon as possible. Check the
engine oil level. The engine oil warning lamp
warning must not be ignored. Continuing the journey while the symbol is displayed could
lead to engine damage.
XEngine oil level:
check the engine oil level
and add oil if necessary.
When driving on steep gradients, the engine
oil level must be sufficiently high to ensure a
correct oil supply in the vehicle.
XDEF tank (BlueTEC vehicles): check the
level and add if necessary (Ypage 153).
XTire-changing tool kit: check that the jack is
working and make sure you have the lug
wrench, a robust tow cable and a folding
spade in the vehicle.
XWheels and tires: check the tire tread depth
and tire pressure.
XCheck for damage and remove any foreign
objects, e.g. small stones, from the wheels/
tires.
XReplace any missing valve caps.
XReplace dented or damaged wheels.
XRims: dented or bent rims can result in a loss
of tire pressure and damage the tire bead.
Before driving off-road, check the wheels and
replace them if necessary.
Checklist after driving off-road
!If you detect damage to the vehicle after
driving off-road, have the vehicle checked
immediately at a qualified specialist work-
shop.
Driving over rough terrain places greater
demands on your vehicle than driving on normal
roads. After driving off-road, check the vehicle.
This allows you to detect damage promptly and
reduce the risk of an accident to yourself and
other road users.
XDeactivate DSR (Ypage 180).
XLower the vehicle level again to a level suita-
ble to the road conditions, e.g. to the normal
level.
XClean the headlamps and rear lights and
check for damage.
XClean the front and rear license plates.
XClean the wheels and tires with a water jet
and remove any foreign objects.
XClean the wheels, wheel housings and the
vehicle underside with a water jet; check for
any foreign objects and damage.
XCheck whether twigs or other parts of plants
have become trapped. These increase the risk
166Driving tips
Driving and parking