2016 MERCEDES-BENZ GLE-CLASS COUPE fuel reserve
[x] Cancel search: fuel reservePage 12 of 382
FordingOff-road ........................................ .164
On flooded roads ........................... 163
Frequencies
Mobile phone ................................. 365
Two-way radio ................................ 365
Fuel
Additives ........................................ 369
Consumption statistics .................. 222
Displaying the current consump-
tion ................................................ 223
Displaying the range ......................2 23
Driving tips ....................................1 60
Fuel gauge ....................................... 31
Grade (gasoline) ............................ 368
Important safety notes .................. 368
Low outside temperatures ............. 369
Problem (malfunction) ................... 153
Quality (diesel) ............................... 369
Refueling ........................................ 150
Tank content/reserve fuel ............. 368
Fuel filler flap
Opening ......................................... 152
Fuel filter (display message) ............ 252
Fuel level
Calling up the range (on-board
computer) ...................................... 223
Fuel tank
Capacity ........................................ 368
Problem (malfunction) ................... 153
Fuses
Allocation chart ............................. 328
Before changing ............................. 328
Dashboard fuse box ....................... 328
Fuse box in the engine compart-
ment .............................................. 329
Fuse box under rear bench seat .... 329
Important safety notes .................. 328
G
Garage door openerClearing the memory ..................... 301
General notes ................................ 298
Important safety notes .................. 298
Opening/closing the garage doo r..3 00
Programming (button in the rear-
view mirror) ................................... 299 Synchronizing the rolling code ....... 299
Gear indicator (on-board com-
puter, Mercedes-AMG vehicles) ....... 231
Genuine parts ...................................... 22
Glove box ...........................................2 79
GTW (Gross Trailer Weight) (defini-
tion) .................................................... 350
H
Hazard warning lamps ......................110
Head restraints
Adjusting ......................................... 96
Adjusting (electrically) ..................... 97
Adjusting (rear) ................................ 97
Installing/removing (rear) ................ 98
Luxury .............................................. 97
Headlamps
Fogging up ..................................... 112
see Automatic headlamp mode
Heating
see Climate control
High-beam headlamps
Adaptive Highbeam Assist ............. 111
Display message ............................ 247
Switching on/off ........................... 110
Hill start assist .................................. 138
HOLD function
Deactivating ................................... 180
Display message ............................ 254
Function/notes .............................1 79
Hood
Closing ...........................................3 03
Display message ............................ 263
Important safety notes .................. 302
Opening ......................................... 302
Horn ...................................................... 30
Hydroplaning ..................................... 163
I
Ignition lock
see Key positions
Immobilizer .......................................... 70
Indicator lamps
see Warning and indicator lamps
Insect protection on the radiator .... 303
10Index
Page 17 of 382

Rear fog lampDisplay message ............................ 247
Switching on/off ........................... 109
Rear seats
Adjusting ......................................... 98
Rear view camera
Cleaning instructions ..................... 311
Display in the multimedia system .. 194
Function/notes ............................. 193
Switching on/off ........................... 194
Rear window defroster
Problem (malfunction) ................... 130
Switching on/off ........................... 129
Rear-view mirror
Anti-glare (manual) ........................ 104
Dipping (automatic) ....................... 105
Refrigerant (air-conditioning sys-
tem)
Important safety notes .................. 373
Refueling
Fuel gauge ....................................... 31
Important safety notes .................. 150
Refueling process .......................... 151
see Fuel
Remote control
Garage door opener ....................... 298
Programming (garage door
opener) .......................................... 299
Replacing bulbs
General notes ................................ 113
Reporting safety defects .................... 27
Rescue card ......................................... 27
Reserve (fuel tank)
see Fuel
Reserve fuel
Display message ............................ 251
Warning lamp ................................. 274
Residual heat (climate control) ........ 130
Restraint system
Display message ............................ 242
Introduction ..................................... 38
Warning lamp ................................. 273
Warning lamp (function) ................... 39
Reversing feature
Panorama sliding sunroof ................ 90
Roller sunblind ................................. 91
Side windows ................................... 85
Tailgate ............................................ 82 Reversing lamps (display mes-
sage)
................................................... 247
Roadside Assistance (breakdown) .... 24
Roller sunblind
Panorama roof with power tilt/
sliding panel ..................................... 91
Roof carrier ........................................ 285
Roof lining and carpets (cleaning
guidelines) ......................................... 314
Roof load (maximum) ........................ 373
Route (navigati on)
se
e Route guidance (navigation)
Route guidance (navigation) ............ 223
S
Safety
Children in the vehicle ..................... 54
see Occupant safety
SD memory card
Selecting ........................................ 225
Seat belts
Adjusting the driver's and front-
passenger seat belt ......................... 42
Adjusting the height ......................... 42
Cleaning ......................................... 314
Correct usage .................................. 41
Fastening ......................................... 42
Important safety guidelines ............. 40
Introduction ..................................... 40
Releasing ......................................... 42
Switching belt adjustment on/off
(on-board computer) ...................... 230
Warning lamp ................................. 265
Warning lamp (function) ................... 42
Seats
Adjusting (electrically) ..................... 96
Adjusting the head restraint ............ 96
Cleaning the cover ......................... 313
Correct driver's seat position ........... 94
Folding the rear bench seat for-
wards/back ................................... 281
Important safety notes .................... 95
Overview .......................................... 95
Seat heating problem .................... 100
Seat ventilation problem ................ 101
Storing settings (memory func-
tion) ............................................... 107
Index15
Page 22 of 382
V
Vanity mirror (in the sun visor)........ 287
Vehicle
Correct use ...................................... 26
Data acquisition ............................... 27
Display message ............................ 261
Equipment ....................................... 23
Individual settings .......................... 229
Limited Warranty ............................. 27
Loading .......................................... 340
Locking (in an emergency) ............... 80
Locking (SmartKey) .......................... 72
Lowering ........................................ 355
Maintenance .................................... 24
Parking for a long period ................ 159
Pulling away ................................... 137
Raising ........................................... 353
Reporting problems ......................... 26
Securing from rolling away ............ 352
Towing away .................................. 325
Transporting .................................. 327
Unlocking (in an emergency) ........... 80
Unlocking (SmartKey) ...................... 72
Vehicle data ................................... 373
Vehicle data
Roof load (maximum) ..................... 373
Trunk load (maximum) ................... 373
Vehicle data (off-road driving)
Approach/departure angle ............ 375
Fording depth ................................ 375
Maximum gradient climbing abil-
ity .................................................. 376
Vehicle dimensions ........................... 373
Vehicle emergency locking ................ 80
Vehicle identification number
see VIN
Vehicle identification plate .............. 366
Vehicle level
AIRMATIC ...................................... 183
Vehicle level (display message) ....... 253
Vehicle tool kit .................................. 315
Video
Operating the DVD ......................... 225
VIN ...................................................... 366
Seat ............................................... 367
Type plate ...................................... 366
W
Warning and indicator lamps ABS ................................................ 268
Brakes ........................................... 267
Check Engine ................................. 274
Coolant .......................................... 274
Distance warning ........................... 276
DISTRONIC PLUS ........................... 276
ESP
®.............................................. 270
ESP®OFF ....................................... 271
Fuel tank ........................................ 274
Overview .......................................... 32
Parking brake ................................ 273
PASSENGER AIR BAG ...................... 39
Reserve fuel ................................... 274
Restraint system ............................ 273
Seat belt ........................................ 265
Tire pressure monitor .................... 277
Warranty .............................................. 23
Washer fluid
Display message ............................ 263
Wheel and tire combination
see Tires
Wheel bolt tightening torque ........... 355
Wheel chock ...................................... 352
Wheels
Changing a wheel .......................... 351
Checking ........................................ 331
Cleaning ......................................... 310
Emergency spare wheel ................. 360
General notes ................................ 356
Important safety notes .................. 330
Information on driving .................... 330
Interchanging/changing ................ 351
Mounting a new wheel ................... 354
Mounting a wheel .......................... 352
Overview ........................................ 330
Removing a wheel .......................... 354
Storing ........................................... 352
Tightening torque ........................... 355
Wheel size/tire size ....................... 356
Window curtain air bag
Display message ............................ 243
Operation ......................................... 45
Windows
see Side windows
20Index
Page 34 of 382
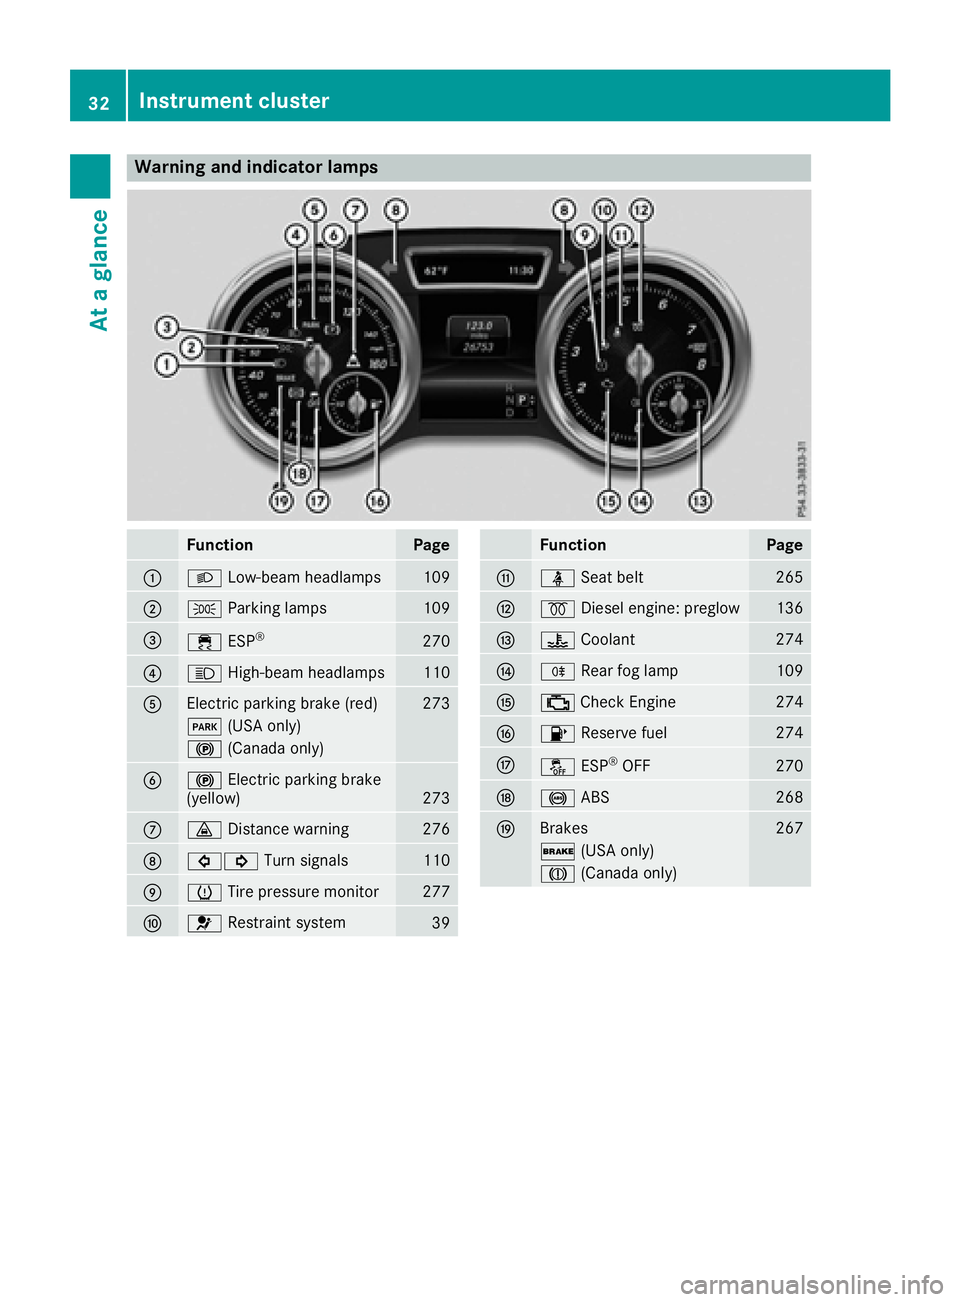
Warning and indicator lamps
FunctionPage
:LLow-beam headlamps109
;TParking lamps109
=÷ESP®270
?KHigh-beam headlamps110
AElectric parking brake (red)273
F(USA only)
!(Canada only)
B!Electric parking brake
(yellow)273
C· Distance warning276
D#! Turn signals110
EhTire pressure monitor277
F6Restraint system39
FunctionPage
GüSeat belt265
H%Diesel engine: preglow136
I?Coolant274
JRRear fog lamp109
K;Check Engine274
L8 Reserve fuel274
MåESP®OFF270
N!ABS268
OBrakes267
$(USA only)
J(Canada only)
32Instrument cluster
At a glance
Page 154 of 382
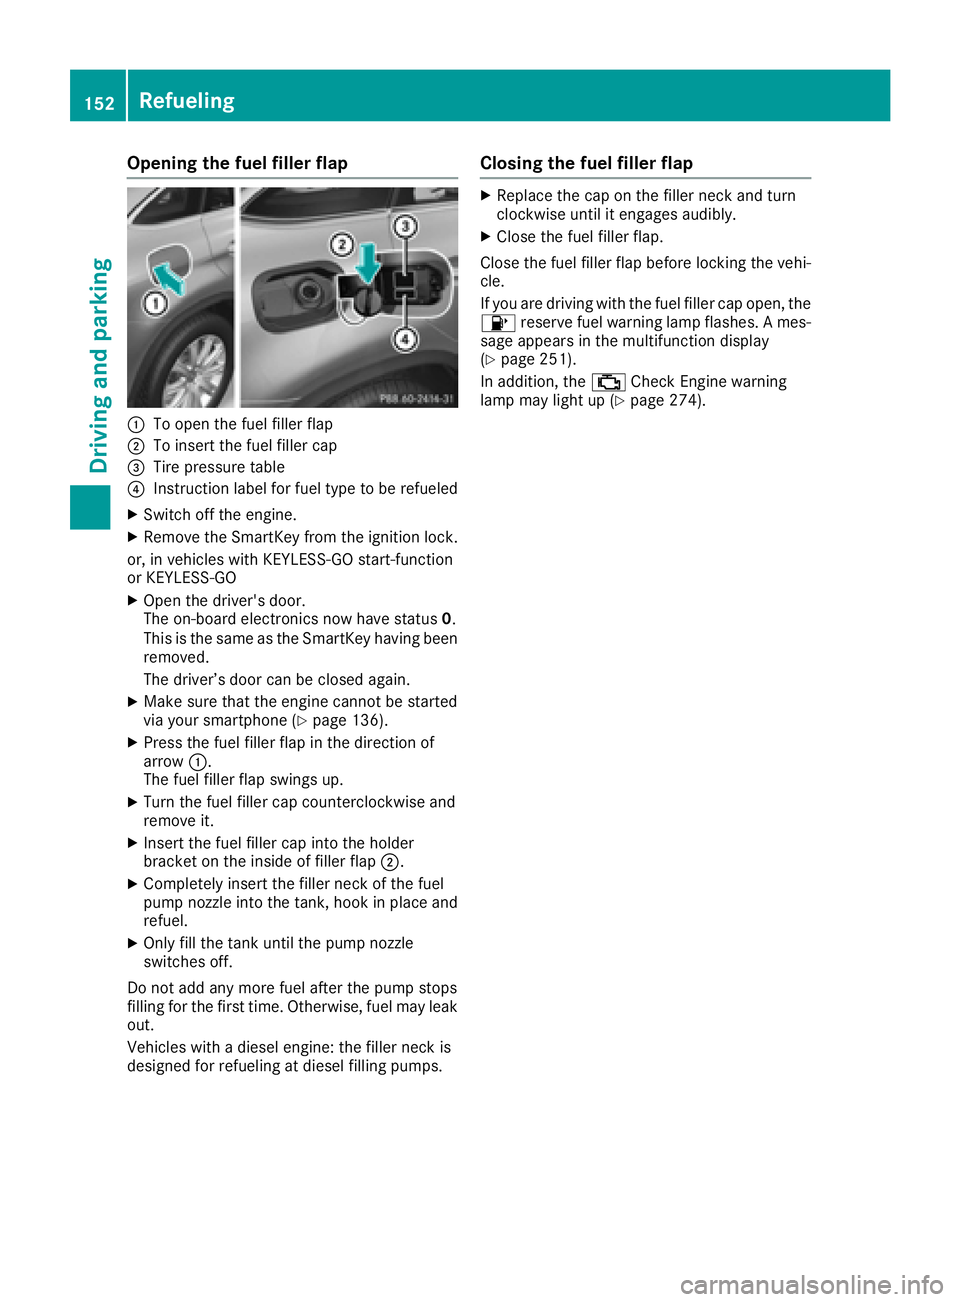
Opening the fuel filler flap
:To open the fuel filler flap
;To insert the fuel filler cap
=Tire pressure table
?Instruction label for fuel type to be refueled
XSwitch off the engine.
XRemove the SmartKey from the ignition lock.
or, in vehicles with KEYLESS-GO start-function
or KEYLESS ‑GO
XOpen the driver's door.
The on-board electronics now have status 0.
This is the same as the SmartKey having been
removed.
The driver’s door can be closed again.
XMake sure that the engine cannot be started
via your smartphone (Ypage 136).
XPress the fuel filler flap in the direction of
arrow :.
The fuel filler flap swings up.
XTurn the fuel filler cap counterclockwise and
remove it.
XInsert the fuel filler cap into the holder
bracket on the inside of filler flap ;.
XCompletely insert the filler neck of the fuel
pump nozzle into the tank, hook in place and
refuel.
XOnly fill the tank until the pump nozzle
switches off.
Do not add any more fuel after the pump stops
filling for the first time. Otherwise, fuel may leak
out.
Vehicles with a diesel engine: the filler neck is
designed for refueling at diesel filling pumps.
Closing the fuel filler flap
XReplace the cap on the filler neck and turn
clockwise until it engages audibly.
XClose the fuel filler flap.
Close the fuel filler flap before locking the vehi-
cle.
If you are driving with the fuel filler cap open, the
8 reserve fuel warning lamp flashes. A mes-
sage appears in the multifunction display
(
Ypage 251).
In addition, the ;Check Engine warning
lamp may light up (
Ypage 274).
152Refueling
Driving and parking
Page 163 of 382
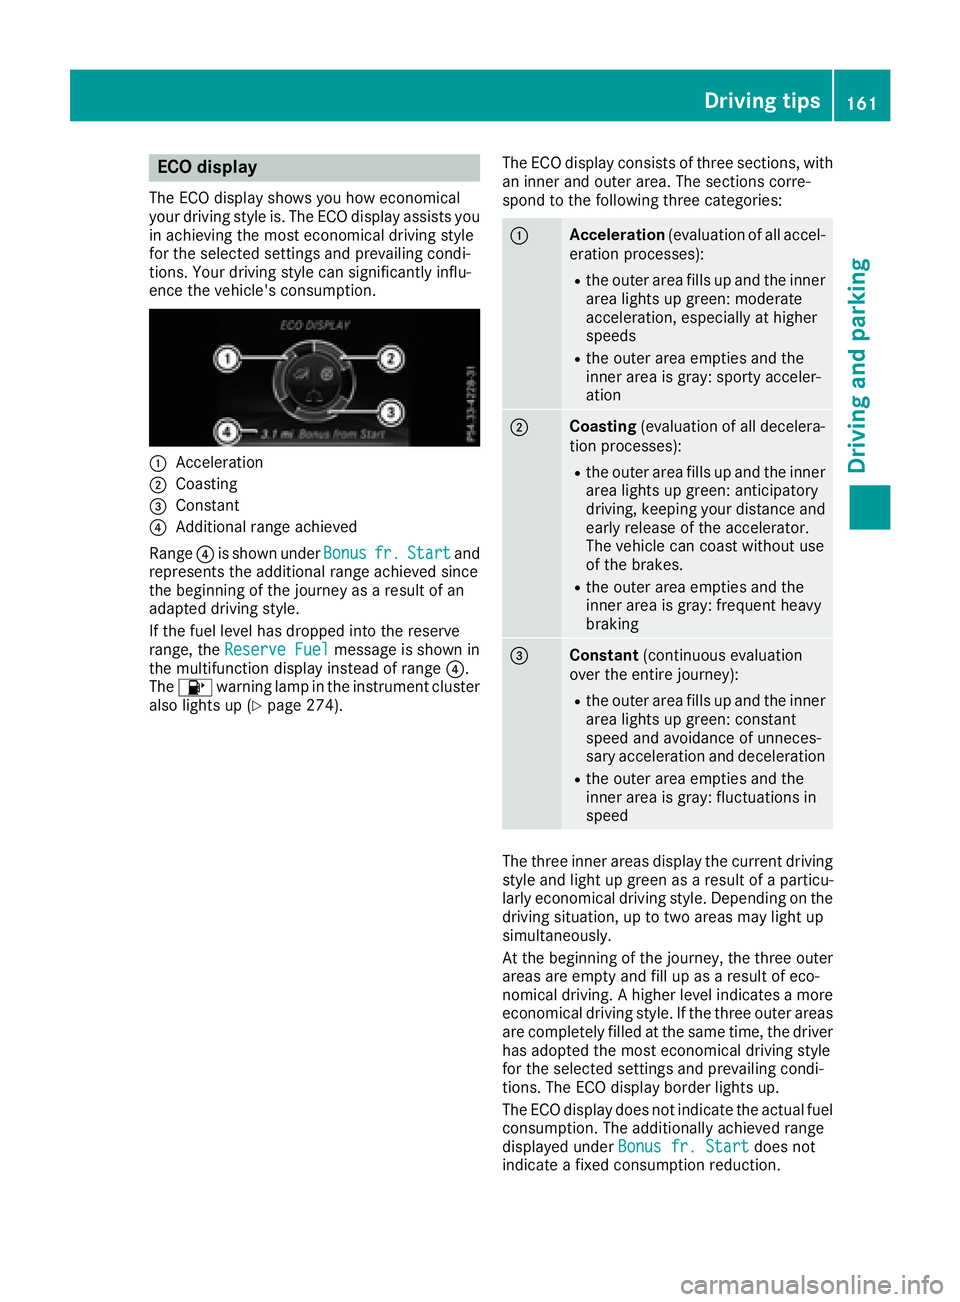
ECO display
The ECO display shows you how economical
your driving style is. The ECO display assists you
in achieving the most economical driving style
for the selected settings and prevailing condi-
tions. Your driving style can significantly influ-
ence the vehicle's consumption.
:Acceleration
;Coasting
=Constant
?Additional range achieved
Range ?is shown under Bonus
fr.Startand
represents the additional range achieved since
the beginning of the journey as a result of an
adapted driving style.
If the fuel level has dropped into the reserve
range, the Reserve Fuel
message is shown in
the multifunction display instead of range ?.
The 8 warning lamp in the instrument cluster
also lights up (
Ypage 274). The ECO display consists of three sections, with
an inner and outer area. The sections corre-
spond to the following three categories:
:Acceleration
(evaluation of all accel-
eration processes):
Rthe outer area fills up and the inner area lights up green: moderate
acceleration, especially at higher
speeds
Rthe outer area empties and the
inner area is gray: sporty acceler-
ation
;Coasting (evaluation of all decelera-
tion processes):
Rthe outer area fills up and the inner area lights up green: anticipatory
driving, keeping your distance and
early release of the accelerator.
The vehicle can coast without use
of the brakes.
Rthe outer area empties and the
inner area is gray: frequent heavy
braking
=Constant (continuous evaluation
over the entire journey):
Rthe outer area fills up and the inner area lights up green: constant
speed and avoidance of unneces-
sary acceleration and deceleration
Rthe outer area empties and the
inner area is gray: fluctuations in
speed
The three inner areas display the current driving
style and light up green as a result of a particu-
larly economical driving style. Depending on thedriving situation, up to two areas may light up
simultaneously.
At the beginning of the journey, the three outer
areas are empty and fill up as a result of eco-
nomical driving. A higher level indicates a more
economical driving style. If the three outer areas
are completely filled at the same time, the driver
has adopted the most economical driving style
for the selected settings and prevailing condi-
tions. The ECO display border lights up.
The ECO display does not indicate the actual fuel consumption. The additionally achieved range
displayed under Bonus fr. Start
does not
indicate a fixed consumption reduction.
Driving tips161
Driving and parking
Z
Page 276 of 382

Engine
Warning/
indicator
lampNSignal type
Possible causes/consequences and M
Solutions
;NThe yellow Check Engine warning lamp lights up while the engine is running.
There may be a malfunction, for example:
Rin the engine management
Rin the fuel injection system
Rin the exhaust system
Rin the ignition system (for vehicles with gasoline engines)
Rin the fuel system
The emission limit values may be exceeded and the engine may be in emergency
mode.
XVisit a qualified specialist workshop immediately.
Vehicles with a diesel engine: the fuel tank has been run dry (
Ypage 153).
XStart the engine three to four times after refueling.
If the yellow Check Engine warning lamp goes out, emergency running mode is
canceled. The vehicle need not be checked.
In some states, you must immediately visit a qualified specialist workshop as soon
as the yellow Check Engine warning lamp lights up. This is due to the legal require-
ments in effect in these states. If in doubt, check whether such legal regulations
apply in the state in which you are currently driving.
8N The yellow reserve fuel warning lamp lights up while the engine is running.
The fuel level has dropped into the reserve range.
XRefuel at the nearest gas station.
8N The yellow reserve fuel warning lamp flashes while the vehicle is in motion.
In addition, the ;Check Engine warning lamp may light up.
The fuel filler cap is not closed correctly or the fuel system is leaking.
XCheck that the fuel filler cap is correctly closed.
XIf the fuel filler cap is not correctly closed: close the fuel filler cap.
XIf the fuel filler cap is closed:visit a qualified specialist workshop.
?NThe red coolant warning lamp lights up while the engine is running and the
coolant temperature gauge is at the start of the scale.
The temperature sensor for the coolant temperature gage is defective.
The coolant temperature is no longer being monitored. There is a risk of engine
damage if the coolant temperature is too high.
XPull over and stop the vehicle safely and switch off the engine, paying attention
to road and traffic conditions. Do not continue driving under any circumstances.
XSecure the vehicle against rolling away (Ypage 156).
XConsult a qualified specialist workshop.
274Warning and indicator lamps in the instrument cluster
On-board computer and displays
Page 311 of 382
Power washers
GWARNING
The water jet from a circular jet nozzle (dirt
blasters) can cause invisible exterior damage
to the tires or chassis components. Compo-
nents damaged in this way may fail unexpect-
edly. There is a risk of an accident.
Do not use power washers with circular jet
nozzles to clean the vehicle. Have damaged
tires or chassis components replaced imme-
diately.
!Always maintain a distance of at least
11.8 in (30 cm) between the vehicle and the
power washer nozzle. Information about the
correct distance is available from the equip-
ment manufacturer.
Move the power washer nozzle around when
cleaning your vehicle.
Do not aim directly at any of the following:
Rtires
Rdoor gaps, roof gaps, joints, etc.
Relectrical components
Rbattery
Rconnectors
Rlights
Rseals
Rtrim
Rventilation slots
Damaged seals or electrical components can
lead to leaks or failures.
Cleaning the paintwork
!Do not affix:
Rstickers
Rfilms
Rmagnetic plates or similar items
to painted surfaces. You could otherwise
damage the paintwork.
Scratches, corrosive deposits, areas affected by
corrosion and damage caused by inadequate
care cannot always be completely repaired. In
such cases, visit a qualified specialist workshop.
XRemove dirt immediately, where possible,
while avoiding rubbing too hard.
XSoak insect remains with insect remover and
rinse off the treated areas afterwards.
XSoak bird droppings with water and rinse off
the treated areas afterwards.
XRemove coolant, brake fluid, tree resin, oils,
fuels and greases by rubbing gently with a
cloth soaked in petroleum ether or lighter
fluid.
XUse tar remover to remove tar stains.
XUse silicone remover to remove wax.
If water no longer forms "beads" on the paint
surface, use the paint care products recommen-
ded and approved by Mercedes-Benz. This is the
case approximately every three to five months,
depending on the climate conditions and the
care product used.
If dirt has penetrated the paint surface or if the
paint has become dull, the paint cleaner recom-
mended and approved by Mercedes-Benz
should be used.
Do not use these care products in the sun or on
the hood while the hood is hot.
XUse a suitable touch-up stick, e.g. MB Touch-
Up Stick, to repair slight damage to the paint-
work quickly and provisionally.
Matte finish care
!Never polish the vehicle or the light alloy
wheels. Polishing causes the finish to shine.
!The following may cause the paint to
become shiny and thus reduce the matte
effect:
Rstrong rubbing of the paintwork with
unsuitable materials
Rfrequent use of automatic car washes
Rwashing the vehicle in direct sunlight
!Never use paint cleaner, buffing or polishing
products, or gloss preserver, e.g. wax. These
products are only suitable for high-gloss sur-
faces. Their use on vehicles with matte finish
leads to considerable surface damage (shiny,
mottled areas).
Always have paintwork repairs carried out at a
qualified specialist workshop.
!Do not use wash programs with a hot wax
treatment under any circumstances.
Care309
Maintenance and care
Z