2016 MERCEDES-BENZ GLE-CLASS COUPE park assist
[x] Cancel search: park assistPage 215 of 382
RThe bumpers of your vehicle are not suitable
for installing detachable trailer couplings.
RDo not install hired trailer couplings or other
detachable trailer couplings on the bumpers
of your vehicle.
RIf you no longer need the ball coupling,
remove it from the ball coupling recess. This
will reduce the risk of damage to the ball cou-
pling.
When towing a trailer, set the tire pressure on
the rear axle of the towing vehicle for the max-
imum load. You will find the values in the tire
pressure table in the fuel filler flap of the vehicle
(
Ypage 349).
Please note that when towing a trailer, the fol-
lowing driving systems have limited availability
or are not available at all:
RPARKTRONIC (Ypage 186)
RBlind Spot Assist (Ypage 203)
RActive Lane Keeping Assist (Ypage 209)
On vehicles without level control, the height of
the ball coupling will alter according to the load
placed on the vehicle. If necessary, use a trailer
with a height-adjustable drawbar.
You will find installing dimensions and loads
under "Technical data" (
Ypage 376).
Driving tips
Observe the information on ESP®trailer stabili-
zation (Ypage 67) and on pulling away with a
trailer (Ypage 138).
The maximum permissible speed for vehicle/
trailer combinations depends on the type of
trailer. Before beginning the journey, check the
trailer's documents to see what the maximum
permissible speed is. Observe the legally pre-
scribed maximum speed in the relevant country.
For certain Mercedes-Benz vehicles, the maxi-
mum permissible rear axle load is increased
when towing a trailer. See "Technical data" to
find out whether this applies to your vehicle
(
Ypage 376). If you utilize any of the added
maximum rear axle load when towing a trailer,
the vehicle/trailer combination may not exceed
a maximum speed of 60 mph (100 km/h) for
reasons concerning the operating permit. This
also applies in countries in which the permissi-
ble maximum speed for vehicle/trailer combi-
nations is above 60 mph (100 km/h). When towing a trailer, your vehicle's handling
characteristics will be different in comparison
with when driving without a trailer.
Use the left-hand steering wheel paddle shifter
to shift into a lower gear in good time on long
and steep downhill gradients.
This also applies if you have activated cruise
control or DISTRONIC PLUS.
This will use the braking effect of the engine, so
that less braking will be required to maintain the
speed. This relieves the load on the brake sys-
tem and prevents the brakes from overheating
and wearing too quickly. If you need additional
braking, depress the brake pedal repeatedly
rather than continuously.
Driving tips
If the trailer swings from side to side:
XDo not accelerate.
XDo not counter-steer.
XBrake if necessary.
RMaintain a greater distance from the vehicle
in front than when driving without a trailer.
RAvoid braking abruptly. If possible, brake gen-tly at first to allow the trailer to run on. Then,
increase the braking force rapidly.
RThe values given for gradient-climbing capa-
bilities from a standstill refer to sea level.
When driving in mountainous areas, note that
the power output of the engine and, conse-
quently, the vehicle's gradient-climbing capa-
bility, decreases with increasing altitude.
Installing the ball coupling
GWARNING
If the ball coupling is not correctly installed
and secured, it can come loose during the
journey and endanger other road users. There is a risk of an accident and injury.
Always install and secure the ball coupling as
described. Before every journey, ensure that
the ball coupling is secured with the bolt and
the corresponding spring cotter.
GWARNING
If the ball coupling is not installed correctly or not secured with the bolt provided and the
Towing a trailer213
Driving and parking
Z
Page 217 of 382
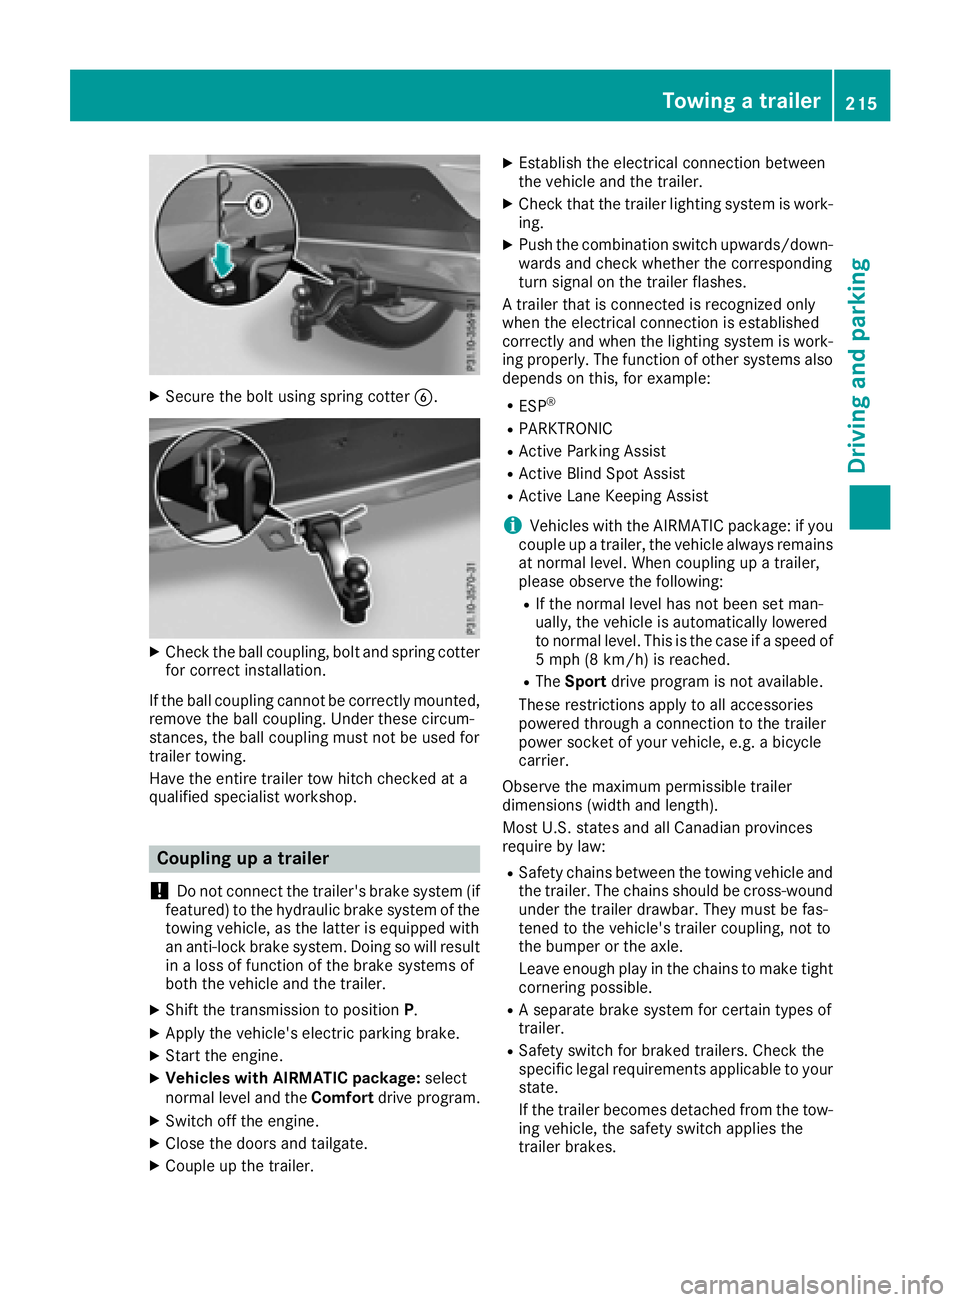
XSecure the bolt using spring cotterB.
XCheck the ball coupling, bolt and spring cotter
for correct installation.
If the ball coupling cannot be correctly mounted,
remove the ball coupling. Under these circum-
stances, the ball coupling must not be used for
trailer towing.
Have the entire trailer tow hitch checked at a
qualified specialist workshop.
Coupling up a trailer
!
Do not connect the trailer's brake system (if
featured) to the hydraulic brake system of the
towing vehicle, as the latter is equipped with
an anti-lock brake system. Doing so will result
in a loss of function of the brake systems of
both the vehicle and the trailer.
XShift the transmission to position P.
XApply the vehicle's electric parking brake.
XStart the engine.
XVehicles with AIRMATIC package: select
normal level and the Comfortdrive program.
XSwitch off the engine.
XClose the doors and tailgate.
XCouple up the trailer.
XEstablish the electrical connection between
the vehicle and the trailer.
XCheck that the trailer lighting system is work-
ing.
XPush the combination switch upwards/down-
wards and check whether the corresponding
turn signal on the trailer flashes.
A trailer that is connected is recognized only
when the electrical connection is established
correctly and when the lighting system is work-
ing properly. The function of other systems also
depends on this, for example:
RESP®
RPARKTRONIC
RActive Parking Assist
RActive Blind Spot Assist
RActive Lane Keeping Assist
iVehicles with the AIRMATIC package: if you
couple up a trailer, the vehicle always remains
at normal level. When coupling up a trailer,
please observe the following:
RIf the normal level has not been set man-
ually, the vehicle is automatically lowered
to normal level. This is the case if a speed of
5 mph (8 km/h) is reached.
RThe Sport drive program is not available.
These restrictions apply to all accessories
powered through a connection to the trailer
power socket of your vehicle, e.g. a bicycle
carrier.
Observe the maximum permissible trailer
dimensions (width and length).
Most U.S. states and all Canadian provinces
require by law:
RSafety chains between the towing vehicle and
the trailer. The chains should be cross-wound
under the trailer drawbar. They must be fas-
tened to the vehicle's trailer coupling, not to
the bumper or the axle.
Leave enough play in the chains to make tight
cornering possible.
RA separate brake system for certain types of
trailer.
RSafety switch for braked trailers. Check the
specific legal requirements applicable to your
state.
If the trailer becomes detached from the tow-
ing vehicle, the safety switch applies the
trailer brakes.
Towing a trailer215
Driving and parking
Z
Page 223 of 382

9
:Press and hold:
RIn theAudiomenu: selects a pre-
set list or a station list in the
desired frequency range, or
selects an audio track or video
scene using rapid scrolling
RIn the Tel(Telephone) menu:
starts rapid scrolling if the phone
book is open
aRConfirms the selection or display
message
RIn the Tel(Telephone) menu:
switches to the telephone book
and starts dialing the selected
number
%Press briefly:
RBack
RSwitches off voice-operated con-
trol for navigation or the Voice
Control System
RHides display messages or calls up
the last Tripmenu function used
RExits the telephone book/redial
memory
%Press and hold:
RCalls up the standard display in the
Tripmenu
Right control panel
~RRejects or ends a call
RExits the telephone book/redial
memory
6RMakes or accepts a call
RSwitches to the redial memory
W
XRAdjusts the volume
8RMute
?RSwitches on voice-operated con-
trol for navigation or the Voice
Control System
Multifunction display
:Permanent display: outside temperature or
speed (Ypage 229)
;Time
=Text field
?Menu bar
ADrive program (Ypage 143)
BTransmission position (Ypage 143)
XTo display menu bar ?: press the=
or ; button on the steering wheel.
If you do not press the buttons any longer,
menu bar ?is faded out after a few seconds.
Text field =shows the selected menu or sub-
menu as well as display messages.
iSet the time using the multimedia system
(see the Digital Operator's Manual).
Possible displays in the multifunction dis-
play:
RZ Gearshift recommendation, when shifting
manually (Ypage 147)
Rj Active Parking Assist (Ypage 189)
RCRUISECruise control (Ypage 168)
R_ Adaptive Highbeam Assist
(Ypage 112)
Rè ECO start/stop function (Ypage 138)
RëHOLD function (Ypage 179)
RaDISTRONIC PLUS Steering Assist and
Stop&Go Pilot (Ypage 177)
RDSRDownhill Speed Regulation
(Ypage 180)
Displays and operation221
On-board computer and displays
Z
Page 258 of 382

Display messagesPossible causes/consequences andMSolutions
Blind SpotAssistNot Available Whe nTowingaTraile rSee Operator' sMan ‐ualorAct. BlindSpo tAssist NotAvailable Whe nTow ‐ing aTraile rSeeOperator' sManual
Blind Spot Assis tor Active Blind Spot Assis tis deactivated while tow-
ing atrailer .
You hav eestablished th eelectrical connection between th etrailer and
your vehicle.
XPress aon thesteering whee lto confirm th edisplay message .
Blind SpotAssistInoperativeorActiveBlind Spo tAssistInoperative
Blind Spot Assis tor Active Blind Spot Assis tis defective.
The yellow 9indicator lamp salso ligh tup in th eexterio rmirrors.
XVisit aqualified specialist workshop .
ParkAssistCanceledThe driver's door is open .
XRepeat theparking gap measuremen tand parking process wit hth e
driver's door closed .
You haveinadvertentl ytouched th emultifunction steering whee lwhile
steering intervention was active .
XWhilesteering intervention is active ,mak esur ethat th emultifunc-
tion steering whee lis no ttouched unintentionally.
The vehicl ehas started to skid and ES P®has intervened.
XUse Active Parking Assistagain later (Ypage 189).
ParkAssist Inoper ‐ativePARKTRONICis malfunctioning or faulty.
XFollow th einstruction sand helpful hints in th e"Problem swit h
PARKTRONIC" section (Ypage 189).
If th emultifunction display still shows th edisplay message :
XVisitaqualified specialist workshop .
Active Parking Assistis unavailable or faulty.
XSwitc hoff th eignition and restar tth eengine.
If Active Parking Assis tcontinues to be unavailable (the jsymbol
does no tappear in th emultifunction display):
XVisit aqualified specialist workshop .
ParkAssistFinishedThe vehicl eis parked. Awarning tone also sounds.
The display message disappear sautomatically.
DISTRONIC PLU SOffDISTRONI CPLU Shas been deactivated.
If awarning tone also sounds, DISTRONI CPLU Shas switched itself off .
(
Ypage 170)
DISTRONIC PLU SNowAvailableDISTRONI CPLU Sis operational again after having been temporarily
unavailable .You can no wreactivat eDISTRONI CPLU S (Ypage 170).
256Display messages
On-board computer and displays
Page 300 of 382

include text message, e-mail or an automated
call.
The data you receive contains the following
information:
Rthe location where the speed limit was excee-
ded
Rthe time at which the speed limit was excee-
ded
Rthe selected speed limit which was exceeded
Geo fencing
Geo fencing allows you to select areas which the
vehicle should not enter or leave. You will be
informed if the vehicle crosses the boundaries
of the selected areas. You can select the way in
which you receive this information beforehand.
Possible options include text message, e-mail or an automated call.
The area can be determined as either a circle or
a polygon with a maximum of ten corners. You
can specify up to ten areas simultaneously. Dif-
ferent settings are possible for each area.
These settings can be called up under "Owners
Online" at http://www.mbusa.com.
Alternatively, you can trigger an MB Info call and
inform the customer service representative that you wish to activate geo fencing.
Currently inactive areas can be activated by text
message.
Triggering the vehicle alarm
With this function, you can trigger the vehicle's
panic alarm via text message. An alarm sounds
and the exterior lighting flashes. Depending on
the setting, the panic alarm lasts five or ten sec-
onds. Afterwards, the alarm switches off.
Garage door opener
General notes
The HomeLink®garage door opener integrated
in the rear-view mirror allows you to operate up
to three different door and gate systems.
Use the integrated garage door opener only on
garage doors that:
Rhave safety stop and reverse features and
Rmeet current U.S. federal safety standards Once programed, the integrated garage door
opener in the rear-view mirror will assume the
function of the garage door system's remote
control. Please also read the operating instruc-
tions for the garage door system.
When programming a garage door opener, park
the vehicle outside the garage. Do not run the
engine while programming.
Certain garage door drives are incompatible
with the integrated garage door opener. If you
have difficulty programing the integrated garage
door opener, contact an authorized Mercedes-
Benz Center.
Alternatively, you can call the following tele-
phone assistance services:
RUSA: Mercedes-Benz Customer Assistance
Center at 1-800-FOR-MERCedes
RCanada: Customer Service at
1-800-387-0100
RHomeLink®hotline 1-800-355-3515 (free of
charge)
More information on HomeLink
®and/or com-
patible products is also available online at
http://www.homelink.com.
Notes on the declaration of conformity
(
Ypage 26).
USA: FCC ID: CB2HMIHL4
Canada: IC: 279B-HMIHL4
Important safety notes
GWARNING
When you operate or program the garage door
with the integrated garage door opener, per-
sons in the range of movement of the garage
door can become trapped or struck by the
garage door. There is a risk of injury.
When using the integrated garage door
opener, always make sure that nobody is
within the range of movement of the garage
door.
GWARNING
Combustion engines emit poisonous exhaust
gases such as carbon monoxide. Inhaling
these exhaust gases leads to poisoning. There
is a risk of fatal injury. Therefore never leave
the engine running in enclosed spaces with-
out sufficient ventilation.
298Features
Stowage and features
Page 327 of 382
XStart the engine of the donor vehicle and run it at idling speed.
XConnect negative terminal?of donor battery Bto ground point Aof your vehicle using the
jumper cable, connecting the jumper cable to battery of other vehicle Bfirst.
XStart the engine.
XBefore disconnecting the jumper cables, let the engine run for several minutes.
XFirst, remove the jumper cables from ground point Aand negative terminal ?, then from pos-
itive clamp ;and positive terminal =. Begin each time at the contacts on your own vehicle first.
XClose cover:of positive terminal ;after removing the jumper cables.
XHave the battery checked at a qualified specialist workshop.
Jump-starting is not considered to be a normal operating condition.
iJumper cables and further information regarding jump-starting can be obtained at any qualified
specialist workshop.
Towing and tow-starting
Important safety notes
GWARNING
Functions relevant to safety are restricted or
no longer available if:
Rthe engine is not running.
Rthe brake system or the power steering is
malfunctioning.
Rthere is a malfunction in the voltage supply or the vehicle's electrical system.
If your vehicle is being towed, much more
force may be necessary to steer or brake.
There is a risk of an accident.
In such cases, use a tow bar. Before towing,
make sure that the steering moves freely.
GWARNING
When towing or tow-starting another vehicle
and its weight is greater than the permissible
gross weight of your vehicle, the:
Rthe towing eye could detach itself
Rthe vehicle/trailer combination could roll-
over.
There is a risk of an accident.
When towing or tow-starting another vehicle,
its weight should not be greater than the per- missible gross weight of your vehicle. Details on the permissible gross vehicle weight
of your vehicle can be found on the vehicle iden-
tification plate (
Ypage 366).
!When COLLISION PREVENTION ASSIST
PLUS, DISTRONIC PLUS or the HOLD function
is activated, the vehicle brakes automatically
in certain situations.
To avoid damage to the vehicle, deactivate
these systems in the following or similar sit-
uations:
Rwhen towing the vehicle
Rin the car wash
!Make sure that the electric parking brake is
released. If the electric parking brake is faulty,
visit a qualified specialist workshop.
!Only secure the tow rope or tow bar at the
towing eyes, or the trailer tow hitch, if availa-
ble. You could otherwise damage the vehicle.
!Do not use the trailer tow hitch for recovery
or towing. Do not use the towing eye for
recovery. this could damage the vehicle. If in
doubt, have the vehicle recovere d u
sing a
crane.
!When towing, pull away slowly and
smoothly. Pull the towed vehicle as straight as
possible and not at an acute angle. Excessive
tractive power could damage the vehicles.
When towing, it is preferable to use a rigid tow-
ing bar as opposed to a tow rope. A rigid towing
bar helps to keep the tractive power low.
!When towing vehicles with KEYLESS-GO,
use the key instead of the Start/Stop button.
Otherwise, the automatic transmission may
shift to position Pwhen the driver's or front-
Towing and tow-starting325
Breakdown assitance
Z
Page 370 of 382
229.5). They have not necessarily been
approved by Mercedes-Benz.
Other identifications, for example:
R0 W-30
R5 W-30
R5 W-40
Fuel
Important safety notes
GWARNING
Fuel is highly flammable. If you handle fuel
incorrectly, there is a risk of fire and explo-
sion.
You must avoid fire, open flames, creating
sparks and smoking. Switch off the engine
and, if applicable, the auxiliary heating before refueling.
GWARNING
Fuel is poisonous and hazardous to health.
There is a risk of injury.
You must make sure that fuel does not come into contact with your skin, eyes or clothing
and that it is not swallowed. Do not inhale fuel
vapors. Keep fuel away from children.
If you or others come into contact with fuel,
observe the following:
RWash away fuel from skin immediately
using soap and water.
RIf fuel comes into contact with your eyes,
immediately rinse them thoroughly with
clean water. Seek medical assistance with-
out delay.
RIf fuel is swallowed, seek medical assis-
tance without delay. Do not induce vomit-
ing.
RImmediately change out of clothing which
has come into contact with fuel.
Tank capacity
ModelTotal capa- city
All models24.6 US gal(93.0 l)
ModelOf which
reserve
Mercedes‑AMG vehiclesApprox.
3.7 US gal (14.0 l)
Allot her modelsApprox.
3.2 US gal (12.0 l)
Gasoline
Fuel grade
!Do not use diesel to refuel vehicles with a
gasoline engine. Do not switch on the ignition
if you accidentally refuel with the wrong fuel.
Otherwise, the fuel will enter the fuel system.
Even small amounts of the wrong fuel could
result in damage to the fuel system and the
engine. Notify a qualified specialist workshop
and have the fuel tank and fuel lines drained
completely.
!Only refuel using unleaded premium grade
gasoline with at least 91 AKI/95 RON.
!Only use the fuel recommended. Operating
the vehicle with other fuels can lead to engine failure.
!Do not use the following:
RE15 (gasoline with 15% ethanol)
RE85 (gasoline with 85% ethanol)
RE100 (100% ethanol)
RM15 (gasoline with 15% methanol)
RM30 (gasoline with 30% methanol)
RM85 (gasoline with 85% methanol)
RM100 (100% methanol)
RGasoline with metalliferous additives
RDiesel
Do not mix such fuels with the fuel recom-
mended for your vehicle.
368Service products and filling capacities
Technical data