2016 MERCEDES-BENZ GLE-CLASS COUPE sunroof
[x] Cancel search: sunroofPage 94 of 382
Opening and closing the roller sunblind
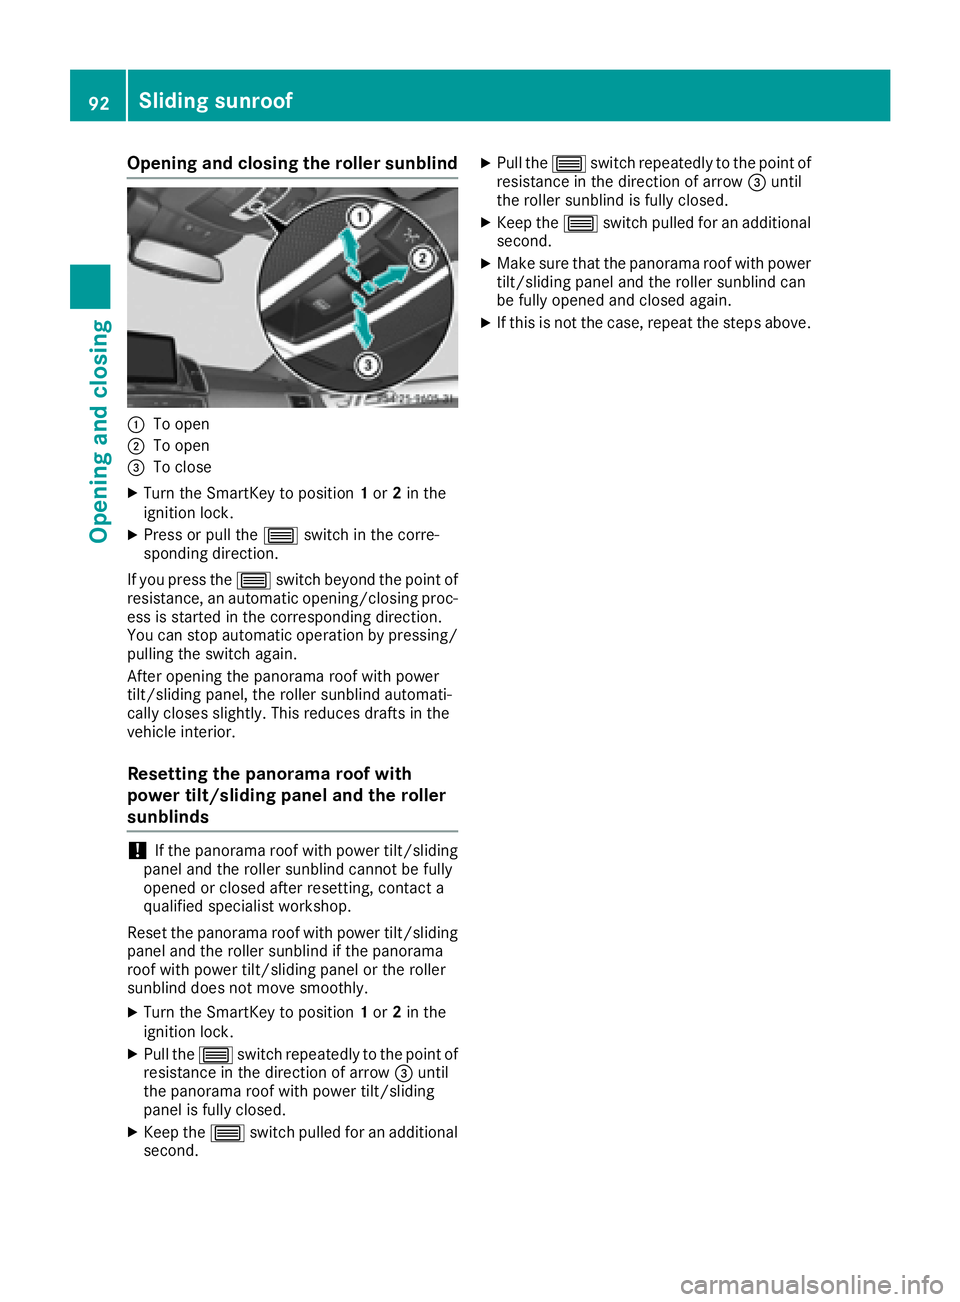
:To open
;To open
=To close
XTurn the SmartKey to position1or 2in the
ignition lock.
XPress or pull the 3switch in the corre-
sponding direction.
If you press the 3switch beyond the point of
resistance, an automatic opening/closing proc-
ess is started in the corresponding direction.
You can stop automatic operation by pressing/ pulling the switch again.
After opening the panorama roof with power
tilt/sliding panel, the roller sunblind automati-
cally closes slightly. This reduces drafts in the
vehicle interior.
Resetting the panorama roof with
power tilt/sliding panel and the roller
sunblinds
!If the panorama roof with power tilt/sliding
panel and the roller sunblind cannot be fully
opened or closed after resetting, contact a
qualified specialist workshop.
Reset the panorama roof with power tilt/sliding
panel and the roller sunblind if the panorama
roof with power tilt/sliding panel or the roller
sunblind does not move smoothly.
XTurn the SmartKey to position 1or 2in the
ignition lock.
XPull the 3switch repeatedly to the point of
resistance in the direction of arrow =until
the panorama roof with power tilt/sliding
panel is fully closed.
XKeep the 3switch pulled for an additional
second.
XPull the 3switch repeatedly to the point of
resistance in the direction of arrow =until
the roller sunblind is fully closed.
XKeep the 3switch pulled for an additional
second.
XMake sure that the panorama roof with power
tilt/sliding panel and the roller sunblind can
be fully opened and closed again.
XIf this is not the case, repeat the steps above.
92Sliding sunroof
Opening and closing
Page 95 of 382
Problems with the sliding sunroof
In the following section, the term "sliding sunroof" refers to the panorama roof with power tilt/
sliding panel.
GWARNING
If you close the sliding sunroof again immediately after it has been blocked or reset, the sliding
sunroof closes with increased or maximum force. The reversing feature is then not active. Parts
of the body could be trapped in the closing area in the process. This poses an increased risk of
injury or even fatal injury.
Make sure that no parts of the body are in the closing area.
If somebody becomes trapped:
Rrelease the switch immediately, or
Rpress the switch in any direction during the automatic closing process
The closing process is stopped.
!If the sliding sunroof still cannot be opened or closed as a result of a malfunction, contact a
qualified specialist workshop.
ProblemPossible causes/consequences and MSolutions
The sliding sunroof can-
not be closed and you
cannot see the cause.If the sliding sunroof is obstructed during closing and reopens again
slightly:
XImmediately after the sliding sunroof blocks, pull the 3switch in
the overhead control panel down to the point of resistance and hold it until the sliding sunroof is closed.
The sliding sunroof is closed with increased force.
If the sliding sunroof is obstructed again during closing and then
reopens slightly:
XImmediately after the sliding sunroof blocks, pull the 3switch in
the overhead control panel down to the point of resistance and hold it until the sliding sunroof is closed.
The sliding sunroof is closed without the automatic reversing fea-
ture.
Sliding sunroof93
Opening and closing
Z
Page 102 of 382
Problems with the seat heating
ProblemPossible causes/consequences andMSolutions
The seat heating has
switched off prematurely
or cannot be switched
on.The on-board voltage is too low because too many electrical consum-
ers are switched on.
XSwitch off electrical consumers that you do not need, such as the
rear window defroster or interior lighting.
Once the battery is sufficiently charged, the seat heating will switch
back on automatically.
Switching the seat ventilation on/off
Switching on/off
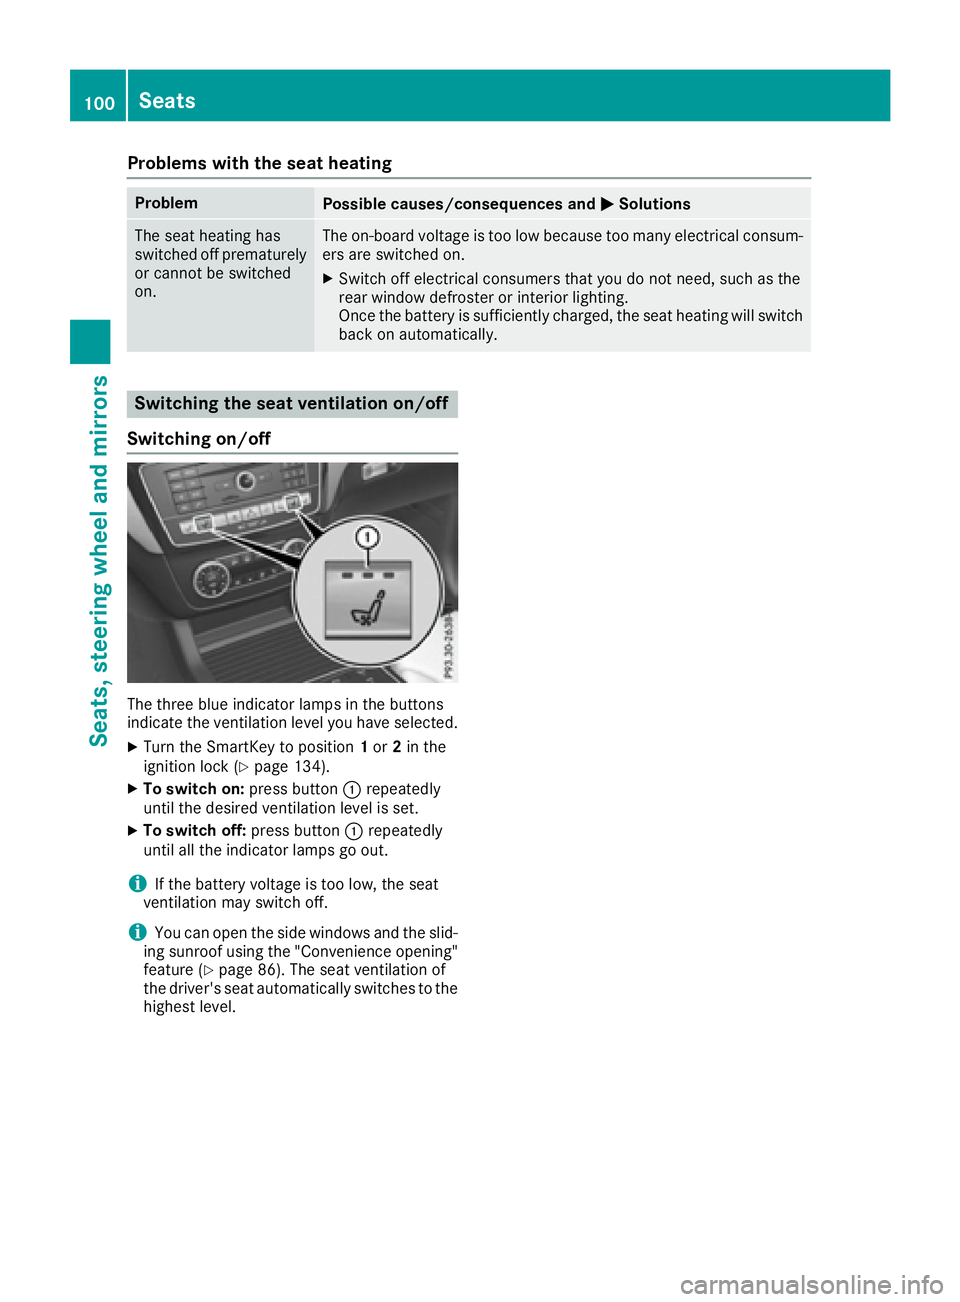
The three blue indicator lamps in the buttons
indicate the ventilation level you have selected.
XTurn the SmartKey to position 1or 2in the
ignition lock (Ypage 134).
XTo switch on: press button:repeatedly
until the desired ventilation level is set.
XTo switch off: press button:repeatedly
until all the indicator lamps go out.
iIf the battery voltage is too low, the seat
ventilation may switch off.
iYou can open the side windows and the slid-
ing sunroof using the "Convenience opening"
feature (
Ypage 86). The seat ventilation of
the driver's seat automatically switches to the
highest level.
100Seats
Seats, steering wheel and mirrors
Page 139 of 382
You can also start your engine via your smart-
phone from outside the vehicle. In this case, the
previously selected climate control setting is
activated. In this way you can cool or heat the
interior of the vehicle before starting the jour-
ney.
Only start the engine via your smartphone if it is
safe to start and run the engine where your vehi-
cle is parked.
Observe the legal stipulations in the area where your vehicle is parked. Engine start via smart-
phone may be limited to certain countries or
regions.
You can execute a maximum of two consecutive
starting attempts via your smartphone. If you
insert the key into the ignition lock, you can
carry out two more starting attempts.
Once you have started the engine, you can
switch the engine off via your smartphone at any
time.
You can only start the engine via your smart-
phone if:
Rthe key is in the ignition lock
Rpark position Pis selected
Rthe accelerator pedal is not depressed
Rthe anti-theft alarm system is not activated
Rthe panic alarm is not activated
Rthe hazard warning lamps are switched off
Rthe hood is closed.
Rthe doors are closed and locked
Rthe windows and sliding sunroof are closed
Also make sure that:
Rthe fuel tank is sufficiently filled
Rthe starter battery is sufficiently charged
GWARNING
Limbs could be crushed or trapped if the
engine is started unintentionally during ser-
vice or maintenance work. There is a risk of
injury.
Always secure the engine against uninten-
tional starting before carrying out mainte-
nance or repair work. Make sure that the engine cannot be started via
your smartphone before carrying out mainte-
nance or repairs. You can prevent an engine
start via your smartphone, for example, if you:
Rswitch on the hazard warning lamps
Rdo not lock the doors
Ropen the hood
Pulling away
General notes
GWARNING
If the engine speed is above the idling speed
and you engage transmission position Dor R,
the vehicle could pull away suddenly. There is
a risk of an accident.
When engaging transmission position Dor R,
always firmly depress the brake pedal and do not simultaneously accelerate.
Depress the accelerator carefully when pulling
away.
The vehicle locks centrally once you have pulled
away. The locking knobs in the doors drop down.
You can open the doors from the inside at any
time.
You can also deactivate the automatic locking
feature (
Ypage 230).
It is only possible to shift the transmission from
position Pto the desired position if you depress
the brake pedal. Only then is the parking lock
released. If you do not depress the brake pedal,
the DIRECT SELECT lever can still be moved but the parking lock remains engaged.
iUpshifts take place at higher engine speeds
after a cold start. This helps the catalytic con-
verter to reach its operating temperature
more quickly.
Information on the automatic release of the
electric parking brake (
Ypage 158).
Driving137
Driving and parking
Z
Page 168 of 382
The following driving systems are specially
adapted to off-road driving:
RAIRMATIC package (vehicle level)
(Ypage 182)
RDSR (Downhill Speed Regulation)
(Ypage 180)
Observe the following notes:
RSelect a vehicle level that is suitable for the
terrain. To avoid damaging the vehicle, make
sure there is always sufficient ground clear-
ance.
RCheck that items of luggage and loads are
stowed safely and are well secured
(
Ypage 283).
RAlways keep the engine running and in gear
when driving on a downhill gradient. Activate
DSR (
Ypage 180).
RAlways keep the engine running and in gear
when driving on a slope.
RAdapt your speed to the terrain. The rougher,
steeper or more ruts on the terrain, the slower
your speed should be.
RDo not jump with the vehicle as this will inter- rupt the vehicle's propulsion.
RDrive with extreme care on unfamiliar off-road
routes where visibility is poor. For safety rea-
sons, get out of the vehicle first and survey
the off-road route.
RLook out for obstacles, such as rocks, holes,
tree stumps and furrows.
RAlways keep the doors, the tailgate, the side
windows and the sliding sunroof closed whilethe vehicle is in motion.
RDo not shift the automatic transmission to
transmission position N.
RObserve the notes on off-road fording
(Ypage 164).
iDo not use the HOLD function when driving
off-road, on steep uphill or downhill gradients
or on slippery or loose surfaces. The HOLD
function cannot hold the vehicle on such sur-
faces.
Checklist before driving off-road
!If the engine oil warning lamp lights up while
the vehicle is in motion, stop the vehicle in a
safe place as soon as possible. Check the
engine oil level. The engine oil warning lamp
warning must not be ignored. Continuing the journey while the symbol is displayed could
lead to engine damage.
XEngine oil level:
check the engine oil level
and add oil if necessary.
When driving on steep gradients, the engine
oil level must be sufficiently high to ensure a
correct oil supply in the vehicle.
XDEF tank (BlueTEC vehicles): check the
level and add if necessary (Ypage 153).
XTire-changing tool kit: check that the jack is
working and make sure you have the lug
wrench, a robust tow cable and a folding
spade in the vehicle.
XWheels and tires: check the tire tread depth
and tire pressure.
XCheck for damage and remove any foreign
objects, e.g. small stones, from the wheels/
tires.
XReplace any missing valve caps.
XReplace dented or damaged wheels.
XRims: dented or bent rims can result in a loss
of tire pressure and damage the tire bead.
Before driving off-road, check the wheels and
replace them if necessary.
Checklist after driving off-road
!If you detect damage to the vehicle after
driving off-road, have the vehicle checked
immediately at a qualified specialist work-
shop.
Driving over rough terrain places greater
demands on your vehicle than driving on normal
roads. After driving off-road, check the vehicle.
This allows you to detect damage promptly and
reduce the risk of an accident to yourself and
other road users.
XDeactivate DSR (Ypage 180).
XLower the vehicle level again to a level suita-
ble to the road conditions, e.g. to the normal
level.
XClean the headlamps and rear lights and
check for damage.
XClean the front and rear license plates.
XClean the wheels and tires with a water jet
and remove any foreign objects.
XClean the wheels, wheel housings and the
vehicle underside with a water jet; check for
any foreign objects and damage.
XCheck whether twigs or other parts of plants
have become trapped. These increase the risk
166Driving tips
Driving and parking
Page 287 of 382
XSecure rod=to the bracket on the underside
of the cargo compartment floor.
XFold the cargo compartment floor down.
XPress the cargo compartment floor down until
it engages.
Locking/unlocking the cargo compart-
ment floor
1Cargo compartment floor unlocked
2Cargo compartment floor locked
The cargo compartment floor can be locked and
unlocked using the mechanical key.
Roof carrier
Important safety notes
GWARNING
When you load the roof, the center of gravity
of the vehicle rises and the driving character-
istics change. If you exceed the maximum roof
load, the driving characteristics, as well as
steering and braking, will be greatly impaired.
There is a risk of an accident.
Never exceed the maximum roof load and
adjust your driving style.
!Mercedes-Benz recommends that you only
use roof carriers that have been tested and
approved for Mercedes-Benz vehicles. This
helps to prevent damage to the vehicle.
Position the load on the roof carrier in such a
way that the vehicle will not sustain damage
even when it is in motion. Depending on the vehicle equipment, ensure
that when the roof carrier is installed you can:
Rraise the sliding sunroof fully
Ropen the panorama roof with power tilt/
sliding panel fully
Ropen the tailgate fully
You will find information on the maximum roof
load in the "Technical data" section
(
Ypage 373).
An incorrectly secured roof carrier or roof load
may become detached from the vehicle. You
must therefore ensure that you observe the roof
carrier manufacturer's installation instructions.
Attaching the roof carrier
XOpen covers :carefully in the direction of
the arrow.
XFold covers :upwards.
XOnly secure the roof carrier to the anchorage
points under covers :.
XObserve the manufacturer's installation
instructions.
Features
Cup holder
Important safety notes
GWARNING
If you transport objects in the vehicle interior
and these are not adequately secured, they
could slip or be flung around and thereby
strike vehicle occupants. In addition, cup
holders, open stowage spaces and mobile
phone brackets may not always be able to
hold the objects placed in them in the event of
Features285
Stowage and features
Z
Page 310 of 382
the width of the tire wall on the rear wheel,
see "Technical data")
Ryou enter the automatic car wash straight
and in the center of the guide rails in order
to avoid damaging the tires or wheel rims.
Fold in the exterior mirrors before the vehicle
is washed. The exterior mirrors could other-
wise be damaged.
!If DISTRONIC PLUS or the HOLD function is
activated, the vehicle brakes automatically in
certain situations.
To prevent damage to the vehicle, deactivate
DISTRONIC PLUS and the HOLD function in
the following or other similar situations:
Rwhen towing the vehicle
Rin the car wash
!Never clean your vehicle in a Touchless
Automatic Car Wash as these use special
cleaning agents. These cleaning agents can
damage the paintwork or plastic parts.
!Make sure that:
Rthe side windows and the sliding sunroof
are fully closed.
Rthe ventilation/heating is switched off (the
OFF button has been pressed).
Rthe windshield wiper switch is in position 0.
Otherwise, the vehicle might be damaged.
!In car washes with a towing mechanism,
make sure that the automatic transmission is
in transmission position N, otherwise the
vehi
cle could be damaged.
RVehicles with a SmartKey:
Do not remove the SmartKey from the igni-
tion lock. Do not open the driver's door or
front-passenger door when the engine is
switched off. Otherwise, the automatic
transmission selects park position Pauto-
matically and locks the wheels. You can
prevent this by shifting the automatic trans-
mission to Nbeforehand.
RVehicles with KEYLESS-GO:
Do not open the driver's door or front-
passenger door when the engine is
switched off. Otherwise, the automatic
transmission selects park position Pauto-
matically and locks the wheels.
Observe the following to make sure that the
automatic transmission stays in position N:
XMake sure the vehicle is stationary and the
ignition is switched off.
XTurn the SmartKey to position2in the ignition
lock (Ypage 134).
Use the SmartKey instead of the Start/Stop
button on vehicles with KEYLESS-GO.
XDepress and hold the brake pedal.
XShift the automatic transmission to position
N.
XRelease the brake pedal.
XRelease the electric parking brake.
XSwitch off the ignition and leave the SmartKey
in the ignition lock.
You can wash the vehicle in an auto
matic car
wash from the very start.
If the vehicle is very dirty, pre-wash it before
cleaning it in an automatic car wash.
After using an automatic car wash, wipe off wax
from the windshield and the wiper blades. This
will prevent smears and reduce wiping noises
caused by residue on the windshield.
Washing by hand
In some countries, washing by hand is only
allowed at specially equipped washing bays.
Observe the legal requirements in all countries
concerned.
XDo not use hot water and do not wash the
vehicle in direct sunlight.
XUse a soft sponge to clean.
XUse a mild cleaning agent, such as a car
shampoo approved by Mercedes-Benz.
XThoroughly hose down the vehicle with a gen-
tle jet of water.
XDo not point the water jet directly towards the
air inlets.
XUse plenty of water and rinse out the sponge
frequently.
XRinse the vehicle with clean water and dry
thoroughly with a chamois.
XDo not let the cleaning agent dry on the paint-
work.
When using the vehicle in winter, remove all
traces of road salt deposits carefully and as
soon as possible.
308Care
Maintenance and care