2016 MERCEDES-BENZ GLE-CLASS COUPE key battery
[x] Cancel search: key batteryPage 80 of 382
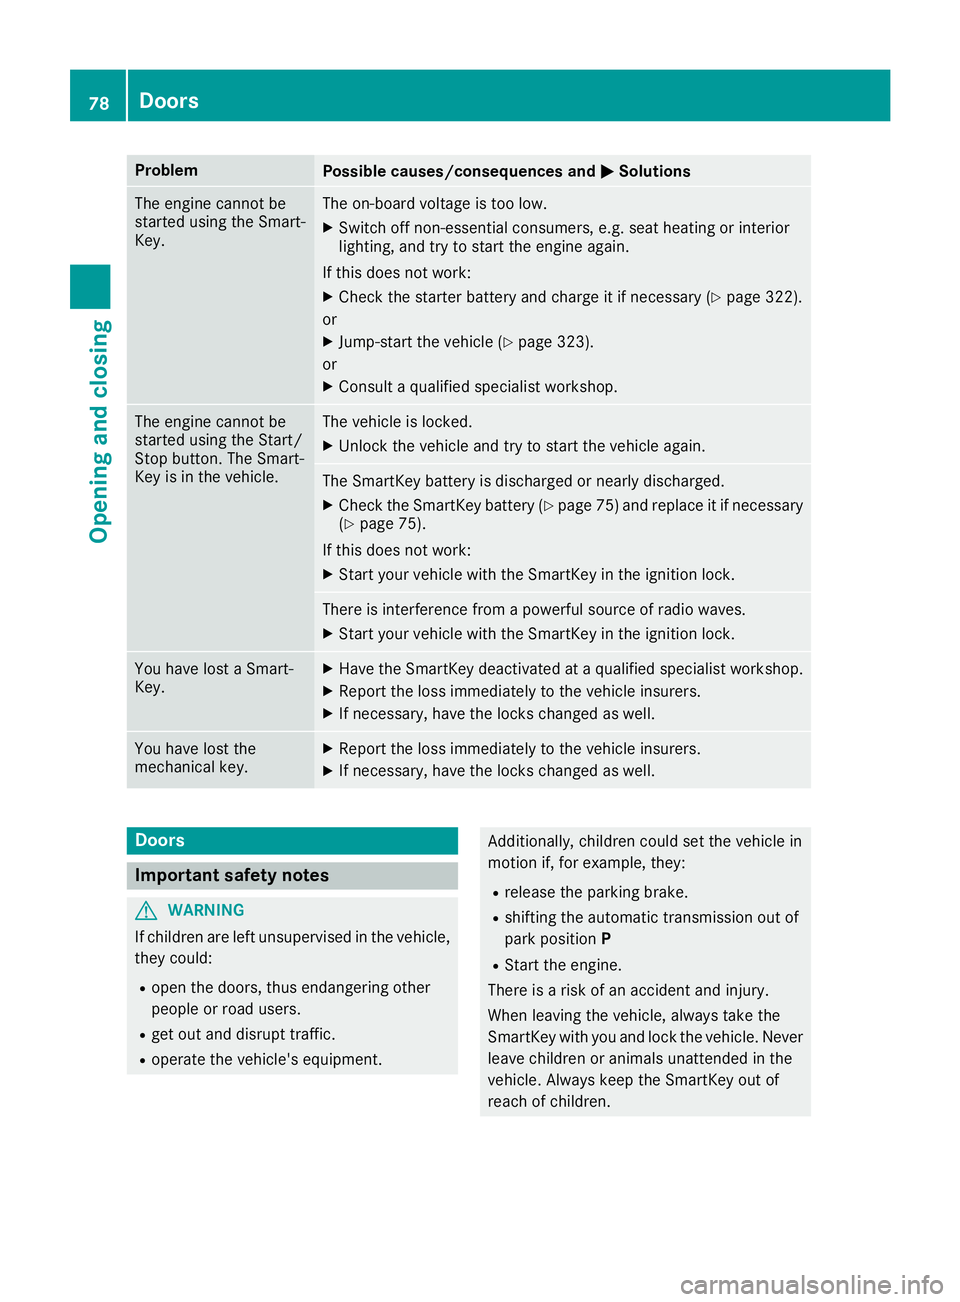
ProblemPossible causes/consequences andMSolutions
The engine cannot be
started using the Smart-
Key.The on-board voltage is too low.
XSwitch off non-essential consumers, e.g. seat heating or interior
lighting, and try to start the engine again.
If this does not work:
XCheck the starter battery and charge it if necessary (Ypage 322).
or
XJump-start the vehicle (Ypage 323).
or
XConsult a qualified specialist workshop.
The engine cannot be
started using the Start/
Stop button. The Smart-
Key is in the vehicle.The vehicle is locked.
XUnlock the vehicle and try to start the vehicle again.
The SmartKey battery is discharged or nearly discharged.
XCheck the SmartKey battery (Ypage 75) and replace it if necessary
(Ypage 75).
If this does not work:
XStart your vehicle with the SmartKey in the ignition lock.
There is interference from a powerful source of radio waves.
XStart your vehicle with the SmartKey in the ignition lock.
You have lost a Smart-
Key.XHave the SmartKey deactivated at a qualified specialist workshop.
XReport the loss immediately to the vehicle insurers.
XIf necessary, have the locks changed as well.
You have lost the
mechanical key.XReport the loss immediately to the vehicle insurers.
XIf necessary, have the locks changed as well.
Doors
Important safety notes
GWARNING
If children are left unsupervised in the vehicle,
they could:
Ropen the doors, thus endangering other
people or road users.
Rget out and disrupt traffic.
Roperate the vehicle's equipment.
Additionally, children could set the vehicle in
motion if, for example, they:
Rrelease the parking brake.
Rshifting the automatic transmission out of
park position P
RStart the engine.
There is a risk of an accident and injury.
When leaving the vehicle, always take the
SmartKey with you and lock the vehicle. Never
leave children or animals unattended in the
vehicle. Always keep the SmartKey out of
reach of children.
78Doors
Opening and closing
Page 101 of 382
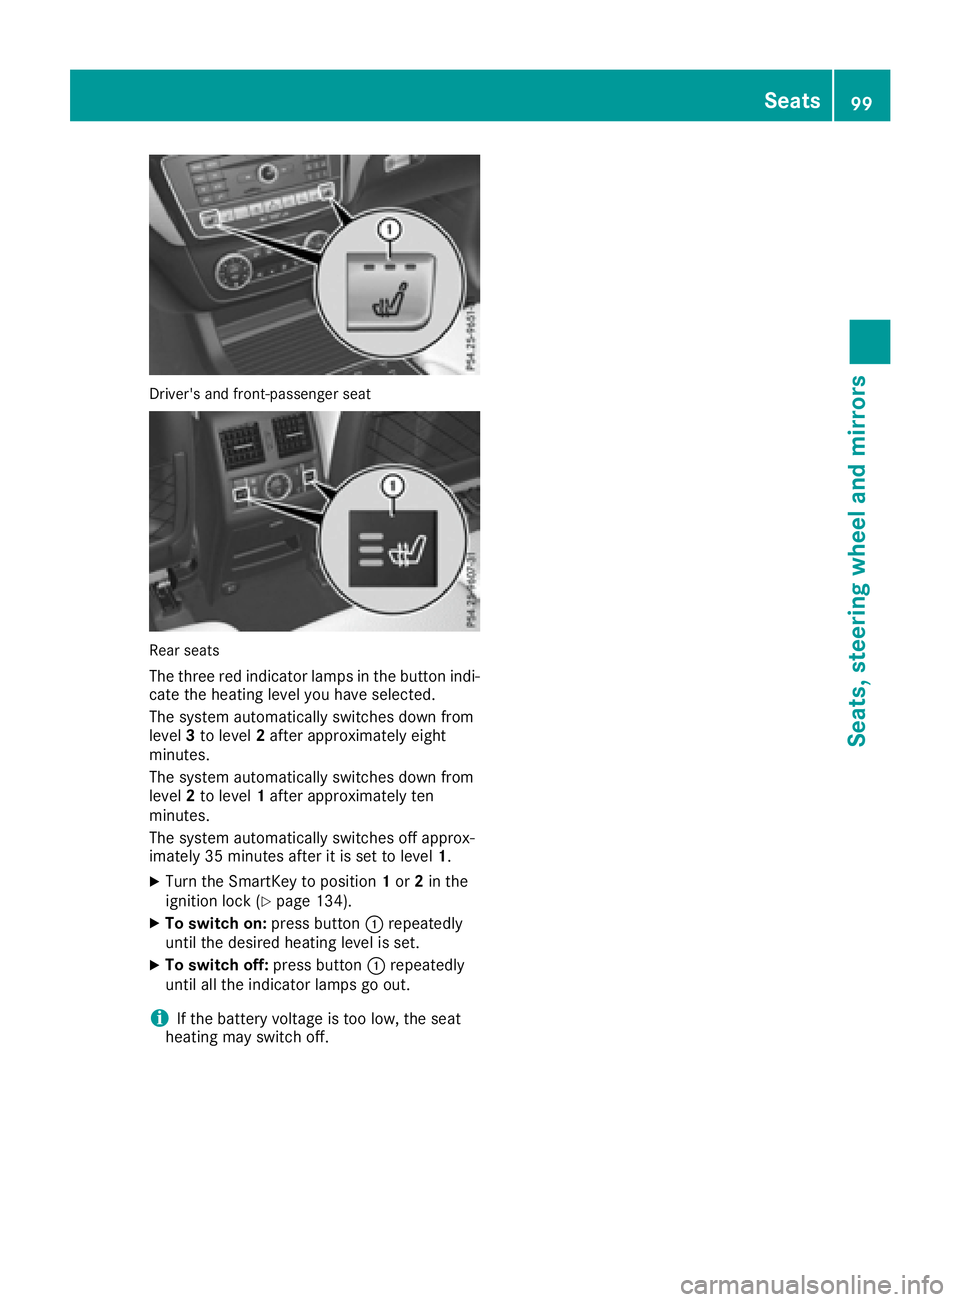
Driver's and front-passenger seat
Rear seats
The three red indicator lamps in the button indi-
cate the heating level you have selected.
The system automatically switches down from
level3to level 2after approximately eight
minutes.
The system automatically switches down from
level 2to level 1after approximately ten
minutes.
The system automatically switches off approx-
imately 35 minutes after it is set to level 1.
XTurn the SmartKey to position 1or 2in the
ignition lock (Ypage 134).
XTo switch on: press button:repeatedly
until the desired heating level is set.
XTo switch off: press button:repeatedly
until all the indicator lamps go out.
iIf the battery voltage is too low, the seat
heating may switch off.
Seats99
Seats, steering wheel and mirrors
Z
Page 102 of 382
Problems with the seat heating
ProblemPossible causes/consequences andMSolutions
The seat heating has
switched off prematurely
or cannot be switched
on.The on-board voltage is too low because too many electrical consum-
ers are switched on.
XSwitch off electrical consumers that you do not need, such as the
rear window defroster or interior lighting.
Once the battery is sufficiently charged, the seat heating will switch
back on automatically.
Switching the seat ventilation on/off
Switching on/off
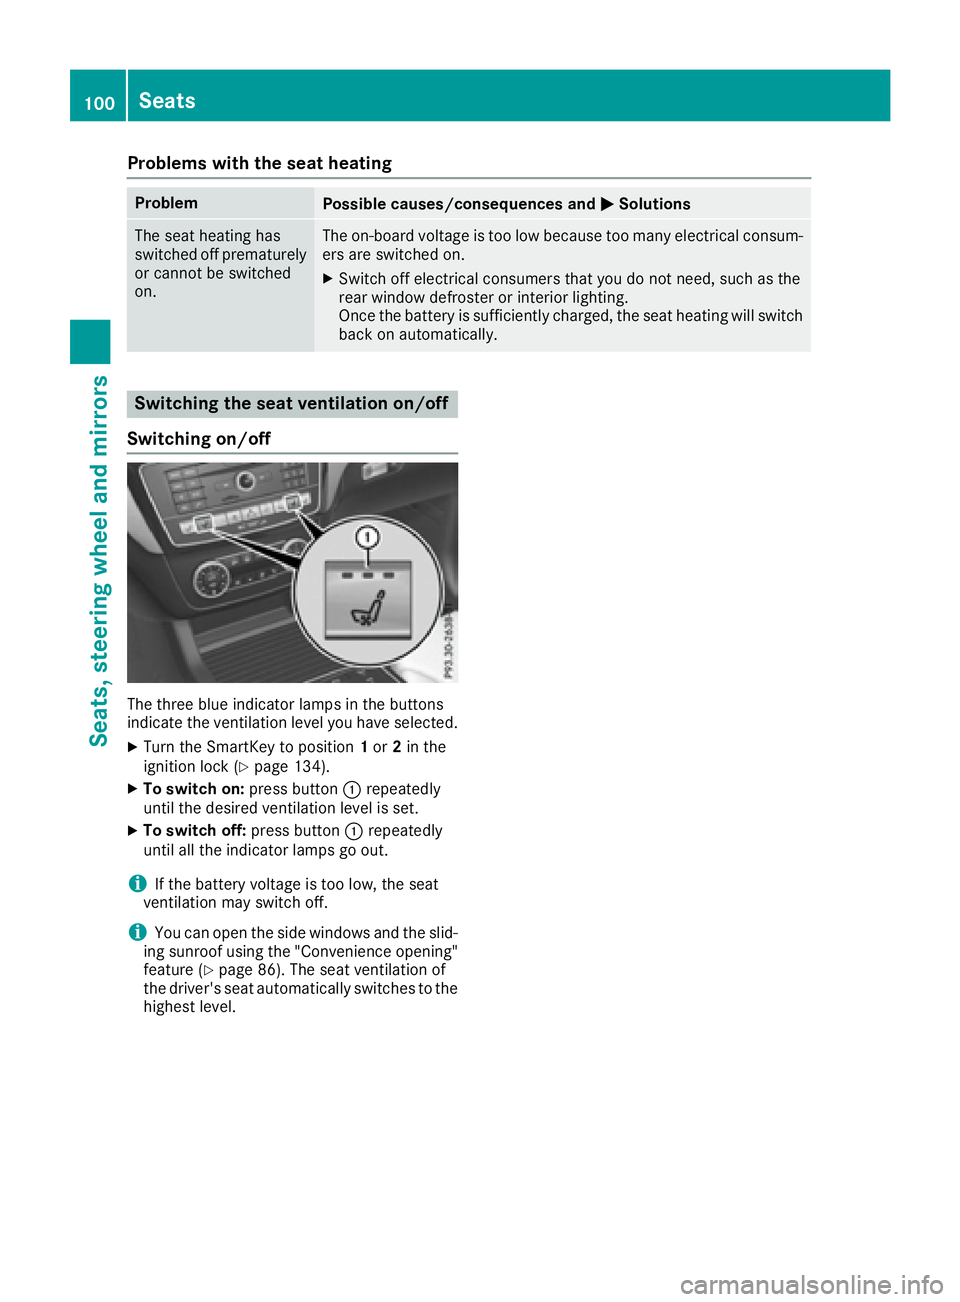
The three blue indicator lamps in the buttons
indicate the ventilation level you have selected.
XTurn the SmartKey to position 1or 2in the
ignition lock (Ypage 134).
XTo switch on: press button:repeatedly
until the desired ventilation level is set.
XTo switch off: press button:repeatedly
until all the indicator lamps go out.
iIf the battery voltage is too low, the seat
ventilation may switch off.
iYou can open the side windows and the slid-
ing sunroof using the "Convenience opening"
feature (
Ypage 86). The seat ventilation of
the driver's seat automatically switches to the
highest level.
100Seats
Seats, steering wheel and mirrors
Page 103 of 382
Problems with the seat ventilation
ProblemPossible causes/consequences andMSolutions
The seat ventilation has
switched off prematurely
or cannot be switched
on.The on-board voltage is too low because too many electrical consum-
ers are switched on.
XSwitch off electrical consumers that you do not need, such as the
rear window defroster or interior lighting.
Once the battery is sufficiently charged, the seat ventilation will
switch back on automatically.
Steering wheel
Important safety notes
GWARNING
You could lose control of your vehicle if you do the following while driving:
Radjust the driver's seat, head restraint,
steering wheel or mirrors
Rfasten the seat belt
There is a risk of an accident.
Adjust the driver's seat, head restraint, steer-
ing wheel and mirror and fasten your seat belt before starting the engine.
GWARNING
Children could injure themselves if they
adjust the steering wheel. There is a risk of
injury.
When leaving the vehicle, always take the
SmartKey with you and lock the vehicle. Never
leave children unsupervised in the vehicle.
The electrically adjustable steering wheel can
still be adjusted when there is no SmartKey in
the ignition lock.
Adjusting the steering wheel man-
ually
GWARNING
If the steering wheel is unlocked while the
vehicle is in motion, it could change position
unexpectedly. This could cause you to lose
control of the vehicle. There is a risk of an
accident.
Before starting off, make sure the steering
wheel is locked. Never unlock the steering
wheel while the vehicle is in motion.
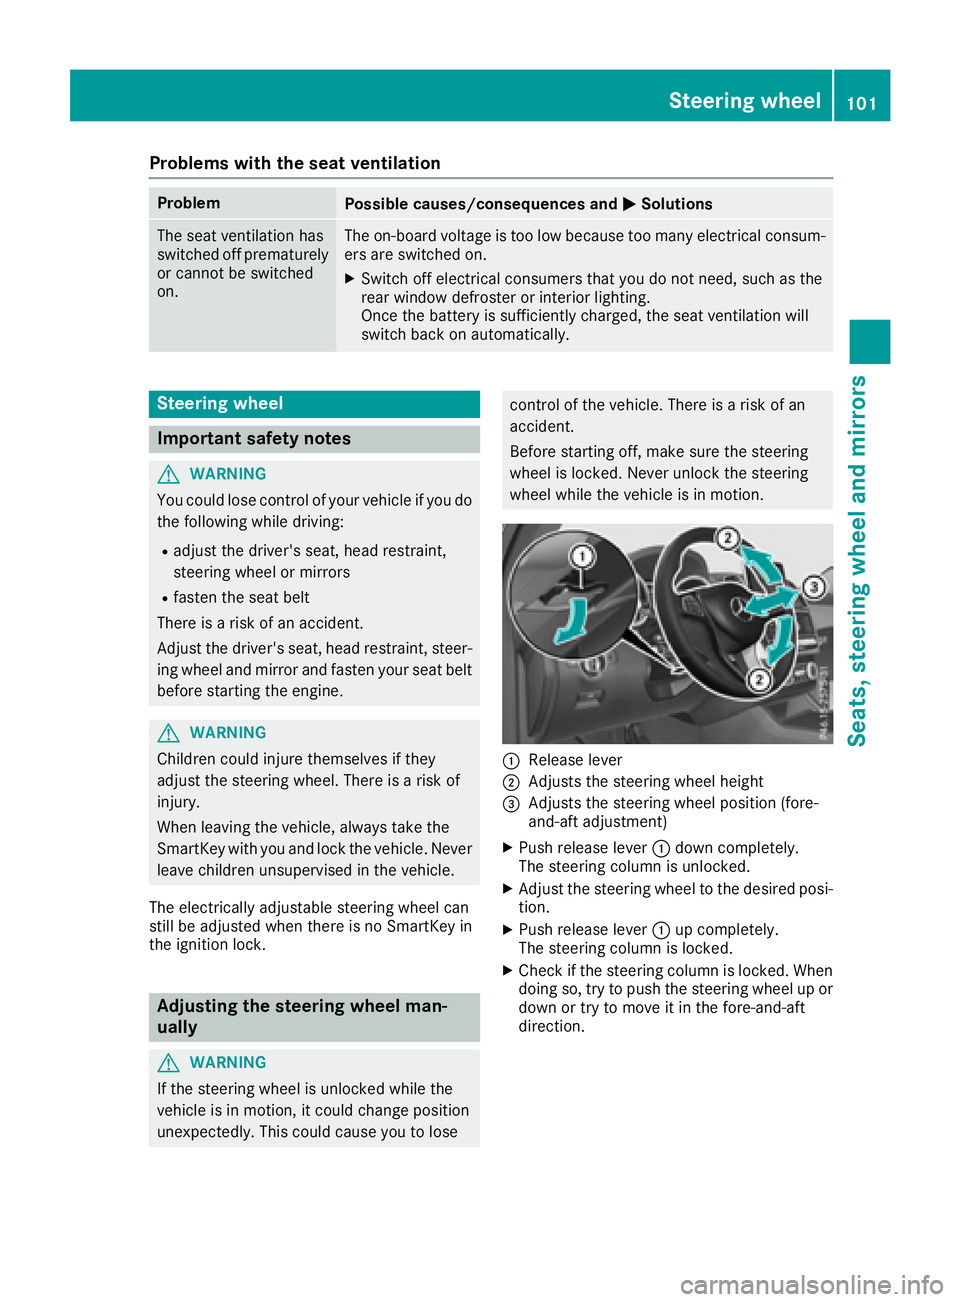
:Release lever
;Adjusts the steering wheel height
=Adjusts the steering wheel position (fore-
and-aft adjustment)
XPush release lever :down completely.
The steering column is unlocked.
XAdjust the steering wheel to the desired posi-
tion.
XPush release lever :up completely.
The steering column is locked.
XCheck if the steering column is locked. When
doing so, try to push the steering wheel up or down or try to move it in the fore-and-aft
direction.
Steering wheel101
Seats, steering wheel and mirrors
Z
Page 107 of 382
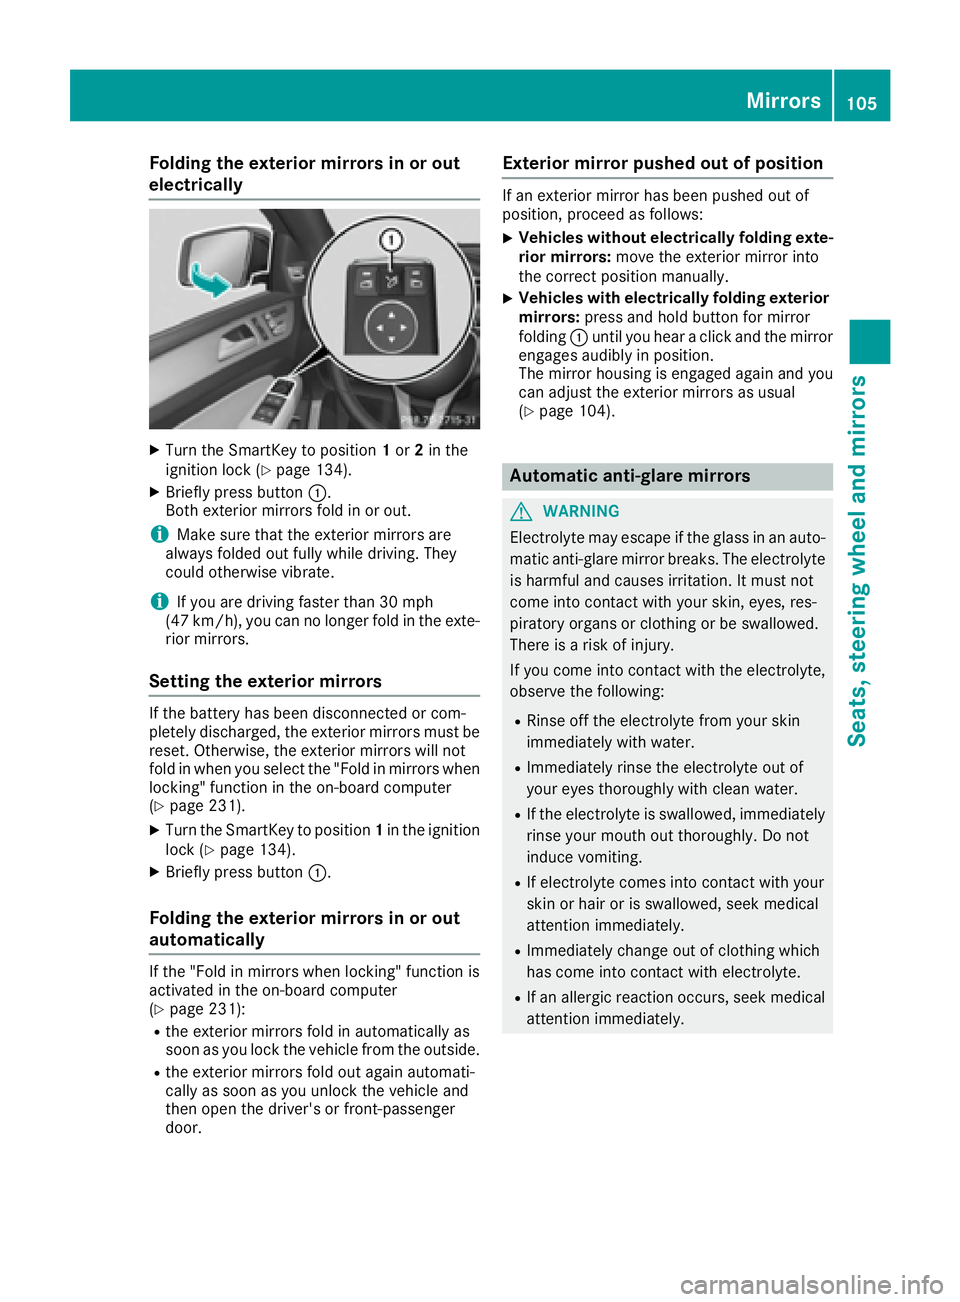
Folding the exterior mirrors in or out
electrically
XTurn theSmartKey to position 1or 2in th e
ignition loc k (Ypage 134).
XBriefly press butto n:.
Both exterio rmirror sfol din or out .
iMakesure that th eexterio rmirror sare
always folded out fully while driving .They
could otherwise vibrate .
iIf you are driving fasterthan 30 mph
(47 km/h), you can no longer fol din th eexte -
rio rmirrors.
Setting the exterior mirrors
If th ebattery has been disconnected or com-
pletely discharged, th eexterio rmirror smust be
reset .Otherwise, th eexterio rmirror swill no t
fol din when you select th e"Fold in mirror swhen
locking" function in th eon-board computer
(
Ypage 231).
XTurn th eSmartKey to position 1in th eignition
loc k (Ypage 134).
XBriefly press butto n:.
Folding the exterior mirrors in or out
automatically
If th e"Fold in mirror swhen locking" function is
activated in th eon-board computer
(
Ypage 231):
Rth eexterio rmirror sfol din automatically as
soo nas you loc kth evehicl efrom th eoutside .
Rtheexterio rmirror sfol dout again automati-
call yas soo nas you unlock th evehicl eand
then open th edriver' sor front-passenger
door .
Exterior mirror pushed out of position
If an exterio rmirror has been pushed out of
position ,procee das follows :
XVehicles without electricall yfolding exte-
rior mirrors :mov eth eexterio rmirror int o
th ecorrect position manually.
XVehicles with electricall yfolding exterior
mirrors :press and hold butto nfor mirror
foldin g: until you hear aclick and th emirror
engage saudibly in position .
The mirror housing is engage dagain and you
can adjust th eexterio rmirror sas usual
(
Ypage 104).
Automatic anti-glare mirrors
GWARNIN G
Electrolyte may escape if th eglass in an auto -
matic anti-glare mirror breaks .The electrolyt e
is harmful and causes irritation .It must no t
come int ocontact wit hyour skin, eyes, res -
piratory organs or clothing or be swallowed.
Ther eis aris kof injury.
If you come int ocontact wit hth eelectrolyte,
observ eth efollowing:
RRins eoff th eelectrolyt efrom your skin
immediately wit hwater.
RImmediately rinse th eelectrolyt eout of
your eyes thoroughly wit hclean water.
RIf th eelectrolyt eis swallowed, immediately
rinse your mout hout thoroughly. Do no t
induce vomiting .
RIf electrolytecomes int ocontact wit hyour
skin or hair or is swallowed, seek medical
attention immediately.
RImmediately chang eout of clothing whic h
has come int ocontact wit helectrolyte.
RIf an allergic reaction occurs, seek medical
attention immediately.
Mirrors105
Seats, steering wheel and mirrors
Z
Page 111 of 382

The daytime running lamps improve the visibility
of your vehicle during the day. The daytime run-ning lamps function is required by law in Can-
ada. It cannot therefore be deactivated.
When the engine is running and the vehicle is
stationary: if you move the selector lever from a
drive position to P, the daytime running lamps/
low-beam headlamps go out after three
minutes.
When the engine is running, the vehicle is sta-
tionary and in bright ambient light: if you turn the
light switch to T, the daytime running lamps
and parking lamps switch on.
If the engine is running and you turn the light
switch to L, the manual settings take prec-
edence over the daytime running lamps.
USA only:
The daytime running lamps improve the visibility
of your vehicle during the day. To do this, the
daytime running lamps function must be
switched on using the on-board computer
(
Ypage 229).
If the engine is running and you turn the light
switch to TorL, the manual settings
take precedence over the daytime running
lamps.
Low-beam headlamps
Even if the light sensor does not detect that it is
dark, the parking lamps and low-beam head-
lamps switch on when the ignition is switched on
and the light switch is set to the Lposition.
This is a particularly useful function in the event
of rain and fog.
XTo switch on the low-beam headlamps:
turn the SmartKey in the ignition lock to posi- tion 2or start the engine.
XTurn the light switch to L.
The green Lindicator lamp in the instru-
ment cluster lights up.
Rear fog lamp
The rear fog lamp improves visibility of your
vehicle for the traffic behind in the event of thick
fog. Please take note of the country-specific
regulations for the use of rear fog lamps.
XTo switch on the rear fog lamp: turn the
SmartKey in the ignition lock to position 2or
start the engine.
XTurn the light switch to LorÃ.
XPress the Rbutton.
The yellow Rindicator lamp in the instru-
ment cluster lights up.
XTo switch off the rear fog lamp: press the
R button.
The yellow Rindicator lamp in the instru-
ment cluster goes out.
Parking lamps
!If the battery has been excessively dis-
charged, the parking lamps or standing lamps
are automatically switched off to enable the
next engine start. Always park your vehicle
safely and sufficiently lit according to legal
standards. Avoid the continuous use of the
T parking lamps for several hours. If pos-
sible, switch on the Xright or the Wleft
standing lamp.
XTo switch on: turn the light switch to T.
The green Tindicator lamp in the instru-
ment cluster lights up.
Standing lamps
Switching on the standing lamps ensures the
corresponding side of the vehicle is illuminated.
XTo switch on the standing lamps: the
SmartKey should not be in the ignition lock or
it should be in position 0.
XTurn the light switch toW(left-hand side of
the vehicle) or X(right-hand side of the
vehicle).
Vehicles towing a trailer: both the right-hand
and left-hand standing lamps (tail lamps) are
always illuminated on the trailer.
Exterior lighting109
Lights and windshield wipers
Z
Page 131 of 382
Defrosting thewindows
Windows fogged up on th einside
XActivat eth e¿ orÁ coolin gwit hair
dehumidification function .
XActivateautomatic mode Ã.
XIf thewindows continue to fo gup, activat eth e
"windshield defrosting" function
(
Ypage 128).
iYou should only selec tthis setting until th e
windshield is clear again .
Windows fogged up on th eoutsid e
XActivat eth ewindshield wipers .
XPress the_ buttonrepeatedly until th e
P orO symbol appears in th edisplay.
iYou should only selec tthis setting until th e
windshield is clear again .
iIf you clean thewindows regularly, they do
no tfo gup so quickly.
Rea rwindow defroster
General notes
The rea rwindow defroster has ahig hcurren t
draw. You should therefore switch it of fas soo n
as th erea rwindow is clear .Otherwise ,th erea r
window defroster switches of fautomatically
after severa lminutes.
If th ebattery voltage is to olow, th erea rwindow
defroster may switch off.
Switchin gon/of f
XTurnth eSmartKey to position 2in th eignition
loc k (Ypage 134).
XPress th e¤ button.
The indicator lamp in th e¤ buttonlights
up or goe sout .
Operating the climate control systems129
Climate control
Page 132 of 382
Problems with the rear window defroster
ProblemPossible causes/consequences andMSolutions
The rear window
defroster has deactiva-
ted prematurely or can-
not be activated.The battery has not been sufficiently charged.
XSwitch off any consumers that are not required, e.g. reading lamps,
interior lighting or the seat heating.
When the battery is sufficiently charged, the rear window defroster
can be activated again.
Switching air-recirculation mode
on/off
General notes
You can deactivate the flow of fresh air if
unpleasant odors are entering the vehicle from
outside. The air already inside the vehicle will
then be recirculated.
If you switch on air-recirculation mode, the win-
dows can fog up more quickly, in particular at
low temperatures. Only use air-recirculation
mode briefly to prevent the windows from fog-
ging up.
Switching on/off
XTurn the SmartKey to position 2in the ignition
lock (Ypage 134).
XTo activate: press thedbutton.
The indicator lamp in the dbutton lights
up.
iIn the event of high pollution levels (3-zone
automatic climate control only) or at high out-
side temperatures, air-recirculation mode is
automatically activated. When air-recircula-
tion mode is activated automatically, the indi-
cator lamp in the dbutton is not lit.
Outside air is added after about 30 minutes.
XTo deactivate: press thedbutton.
The indicator lamp in the dbutton goes
out.
iAir-recirculation mode deactivates auto-
matically:
Rafter approximately five minutes at outside
temperatures below approximately 41 ‡
(5 †)
Rafter approximately five minutes if cooling
with air dehumidification is deactivated
Rafter approximately 30 minutes at outside
temperatures above approximately 41 ‡ (5 †) if the "Cooling with air dehumidifi-
cation" function is activated
Switching the residual heat on or off
General notes
The residual heat function is only available on
vehicles for Canada.
It is possible to make use of the residual heat of
the engine to continue heating the stationary
vehicle for up to 30 minutesafter the engine has
been switched off. The heating time depends on
the set interior temperature.
Switching on/off
XTo activate: press theÌorÁ button.
The indicator lamp in the ÌorÁ button
lights up.
iThe blower will run at a low speed regardless
of the airflow setting.
iIf you activate the residual heat function at
high temperatures, only the ventilation will be
activated. The blower runs at medium speed.
XTo deactivate: press theÌorÁ but-
ton.
The indicator lamp in the ÌorÁ button
goes out.
Residual heat is deactivated automatically:
Rafter approximately 30 minutes
Rwhen the ignition is switched on
Rif the battery voltage drops
Ionization
Ionization is used to purify the air in the vehicle
interior and attain an improved interior climate.
130Operating the climate control systems
Climate control