2016 MERCEDES-BENZ GLC COUPE warning light
[x] Cancel search: warning lightPage 137 of 389

Activating/deactivating air-recircula-
tion mode
General notes You can also temporarily deactivate the flow of
fresh air manually if unpleasant odours are
entering the vehicle from outside. The air
already inside the vehicle will then be recircula-
ted.
If you activate air-recirculation mode, the win-
dows can mist up more quickly, particularly at
low outside temperatures. Use air-recirculation
mode only briefly to prevent the windows from
misting up.
Activating/deactivating X
Turn the key to position 2in the ignition lock
(Y page 144).
X To activate: press thegrocker switch up
or down.
The indicator lamp above the grocker
switch lights up.
Air-recirculation mode is activated automati-
cally:
R at high outside temperatures
R at high levels of pollution (THERMOTRONIC
automatic climate control only)
R in tunnels (vehicles with a navigation system
only)
The indicator lamp above the grocker
switch is not lit when automatic air-recirculation
mode is activated. Outside air is added after
approximately 30 minutes.
X To deactivate: press thegrocker switch
up or down.
The indicator lamp above the grocker
switch goes out.
Air-recirculation mode is deactivated automati-
cally:
R after approximately five minutes at outside
temperatures below approximately 5 †
R after approximately five minutes if "Cooling
with air dehumidification" is deactivated
R after approximately 30 minutes at outside
temperatures above approximately 5 †if the
"Cooling with air dehumidification" function is
activated Convenience opening or closing using
the air-recirculation button G
WARNING
When the convenience closing feature is oper- ating, parts of the body could become trapped
in the closing area of the side window and the
sliding sunroof. There is a risk of injury.
Observe the complete closing procedure
when the convenience closing feature is oper-
ating. When closing make sure that no parts of the body are in the closing area. G
WARNING
During convenience opening parts of the body could be drawn in or become trapped
between the side window and window frame.
There is a risk of injury.
When opening, make sure that nobody is
touching the side window. If someone
becomes trapped, immediately press
the W switch in the door to stop the move-
ment of the side windows. To continue closing
the side window, pull on the Wswitch.
X Convenience closing feature: press and
hold the grocker switch up or down until
the side windows start to close automatically. Vehicles with sliding sunroof: the sliding
sunroof closes simultaneously.
The indicator lamp above the grocker
switch lights up. Air-recirculation mode is
activated.
If you open the side windows or the sliding
sunroof manually after closing with the con-
venience closing feature, they will remain in
this position when opened using the conve-
nience opening feature.
If parts of the body are in the closing area during convenience closing, proceed as follows:
X Press the Wbutton to stop the side win-
dows.
The side windows stop.
X To then open the side windows, press the
W button again. 134
Operating the climate control systemClimate control
Page 138 of 389
X
Only vehicles with sliding sunroof: press
the 3 switch to stop the sliding sunroof.
The sliding sunroof stops.
X Then, to open the sliding sunroof, pull back on
the 3 switch.
Notes on the automatic reversing feature for:
R the side windows (Y page 95)
R the sliding sunroof (Y page 99)
X Convenience opening feature: press and
hold the grocker switch up or down until
the side windows or the sliding sunroof start
to open automatically.
The indicator lamp above the grocker
switch goes out. Air-recirculation mode is
deactivated. Switching the residual heat on/off
General notes The residual heat function is available only with
THERMOTRONIC automatic climate control andTHERMATIC automatic climate control with aux-
iliary heating.
When the engine is switched off, it is possible to
make use of the residual heat of the engine to
continue heating or ventilating the front com-
partment of the vehicle for approximately
30 minutes. The heating or ventilation time
depends on the set interior temperature.
Activating/deactivating X
Turn the key to position 0in the ignition lock
or remove it (Y page 144).
X To switch on: press the!rocker switch
up or down.
The indicator lamp above the !rocker
switch lights up.
The blower will run at a low speed regardless of the airflow setting.
If you switch on the residual heat function at
high temperatures, only the ventilation will be
activated. The blower runs at medium speed. X
To switch off: press the!rocker switch
up or down.
The indicator lamp above the !rocker
switch goes out.
Residual heat is switched off automatically:
R after approximately 30 minutes
R when the ignition is switched on
R if the battery voltage drops
R when the auxiliary heating is switched on perfume atomiser
Operating the perfume atomiser G
WARNING
If children open the vial, they could drink the
perfume or it could come into contact with
their eyes. There is a risk of injury. Do not
leave children unsupervised in the vehicle.
If the perfume liquid has been drunk, consult
a doctor. If perfume comes into contact with
your eyes or skin, rinse the eyes with clean
water. If you continue to experience difficul-
ties, consult a doctor. H
Environmental note Full vials must not be dis-
posed of with household
waste. They must be collec-
ted separately and disposed
of in an environmentally
responsible recycling sys-
tem.
Dispose of full vials in an
environmentally responsible
manner and take them to a
harmful substance collec-
tion point.Operating the climate control system
135Climate control Z
Page 148 of 389
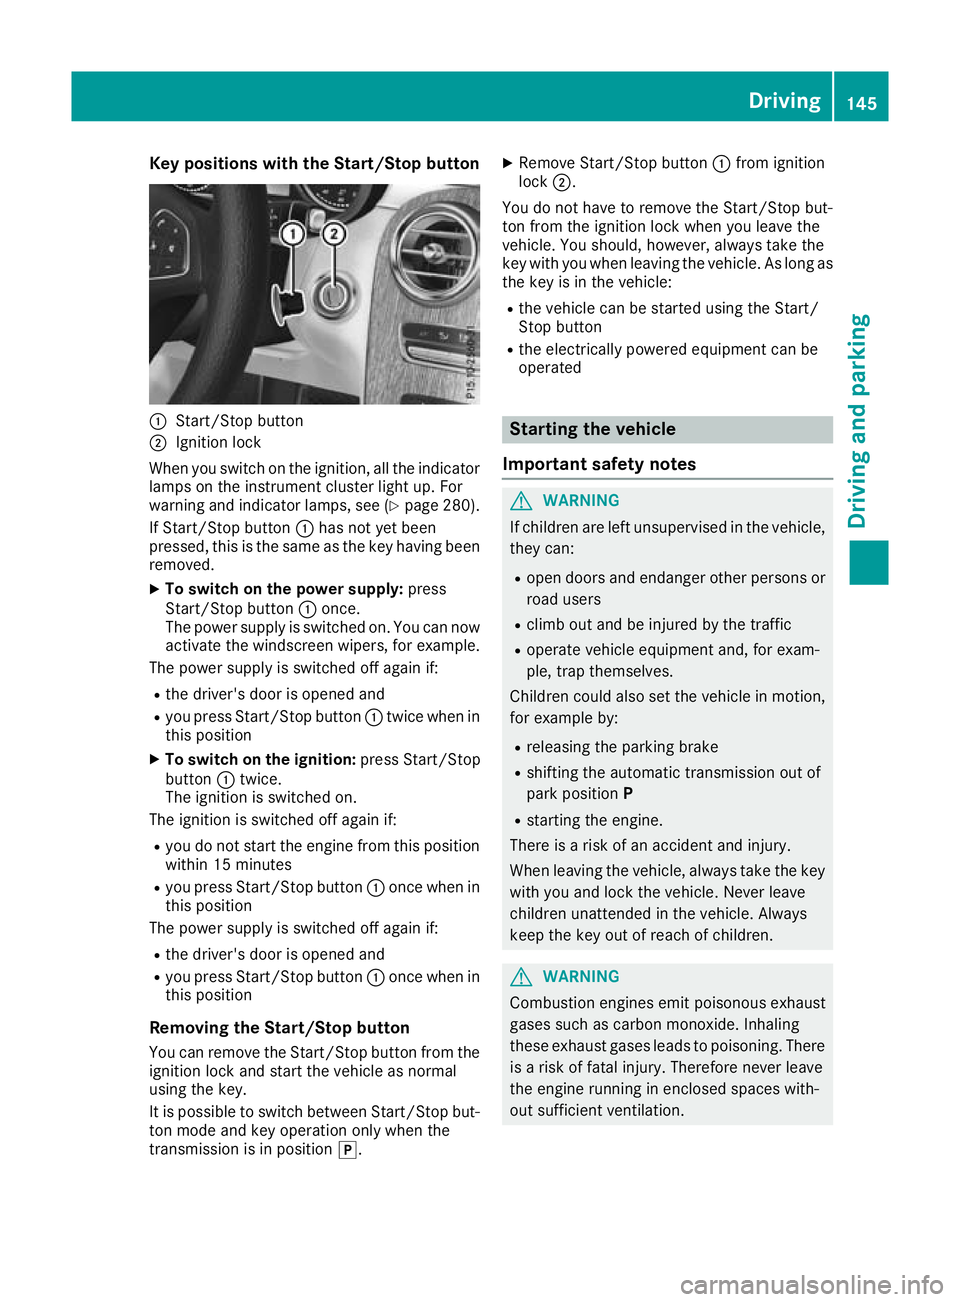
Key positions with the Start/Stop button
:
Start/Stop button
; Ignition lock
When you switch on the ignition, all the indicator lamps on the instrument cluster light up. For
warning and indicator lamps, see (Y page 280).
If Start/Stop button :has not yet been
pressed, this is the same as the key having been removed.
X To switch on the power supply: press
Start/Stop button :once.
The power supply is switched on. You can now
activate the windscreen wipers, for example.
The power supply is switched off again if:
R the driver's door is opened and
R you press Start/Stop button :twice when in
this position
X To switch on the ignition: press Start/Stop
button :twice.
The ignition is switched on.
The ignition is switched off again if:
R you do not start the engine from this position
within 15 minutes
R you press Start/Stop button :once when in
this position
The power supply is switched off again if:
R the driver's door is opened and
R you press Start/Stop button :once when in
this position
Removing the Start/Stop button
You can remove the Start/Stop button from the
ignition lock and start the vehicle as normal
using the key.
It is possible to switch between Start/Stop but- ton mode and key operation only when the
transmission is in position j.X
Remove Start/Stop button :from ignition
lock ;.
You do not have to remove the Start/Stop but-
ton from the ignition lock when you leave the
vehicle. You should, however, always take the
key with you when leaving the vehicle. As long as
the key is in the vehicle:
R the vehicle can be started using the Start/
Stop button
R the electrically powered equipment can be
operated Starting the vehicle
Important safety notes G
WARNING
If children are left unsupervised in the vehicle, they can:
R open doors and endanger other persons or
road users
R climb out and be injured by the traffic
R operate vehicle equipment and, for exam-
ple, trap themselves.
Children could also set the vehicle in motion, for example by:
R releasing the parking brake
R shifting the automatic transmission out of
park position P
R starting the engine.
There is a risk of an accident and injury.
When leaving the vehicle, always take the key
with you and lock the vehicle. Never leave
children unattended in the vehicle. Always
keep the key out of reach of children. G
WARNING
Combustion engines emit poisonous exhaust
gases such as carbon monoxide. Inhaling
these exhaust gases leads to poisoning. There is a risk of fatal injury. Therefore never leave
the engine running in enclosed spaces with-
out sufficient ventilation. Driving
145Driving and pa rking Z
Page 149 of 389
G
WARNING
Flammable materials introduced through
environmental influence or by animals can
ignite if in contact with the exhaust system or parts of the engine that heat up. There is a risk
of fire.
Carry out regular checks to make sure that
there are no flammable foreign materials in
the engine compartment or in the exhaust
system.
General notes Vehicles with a petrol engine:
the catalytic
converter is preheated for up to 30 seconds
after a cold start. The sound of the engine may
change during this time.
Automatic transmission X
Shift the transmission to position j
(Y page 154).
The transmission position indicator on the
multifunction display shows j
(Y page 155).
i You can start the engine in transmission
position jand i.
Starting procedure using the key To start the engine using the key instead of the
Start/Stop button, pull the Start/Stop button
out of the ignition lock.
X To start a diesel engine: turn the key to
position 2in the ignition lock (Y page 144).
The % preglow indicator lamp on the
instrument cluster lights up.
X Turn the key to position 3in the ignition lock
(Y page 144) and release it as soon as the
engine is running.
i Vehicles with a diesel engine:
you can
start the engine without preglow if the engine
is warm.
If the engine will not start:
X Remove the key from the ignition lock.
X Reinsert the key in the ignition lock after wait-
ing for a short period. X
Turn the key to position 2in the ignition lock
(Y page 144).
The indicator lamps on the instrument cluster
light up (Y page 280).
X Turn the key to position 3in the ignition lock
(Y page 144) and release it as soon as the
engine is running.
Starting procedure using the Start/
Stop button The Start/Stop button is available only on vehi-
cles with KEYLESS-GO or the KEYLESS-GO start
function.
The Start/Stop button can be used to start the
vehicle manually without inserting the key in the ignition lock. The key must be in the vehicle and
the Start/Stop button must be inserted in the
ignition lock. This mode for starting the engine
manually operates independently of the ECO
start/stop automatic engine start function.
You can start the engine if a valid key is in the
vehicle. Switch off the engine and always take
the key with you when leaving the vehicle, even
if you leave it for only a short time. Observe the important safety notes.
X Depress the brake pedal and keep it
depressed.
X Press the Start/Stop button once
(Y page 144).
Vehicles with a petrol engine: the engine
starts.
Vehicles with a diesel engine: preglow is
activated and the engine starts. Pulling away
General notes G
WARNING
If the engine speed is above the idling speed
and you engage transmission position Dor R,
the vehicle could pull away suddenly. There is a risk of an accident.
When engaging transmission position Dor R,
always firmly depress the brake pedal and do not simultaneously accelerate.
Depress the accelerator carefully when pulling
away. 146
DrivingDriving and parking
Page 154 of 389
Problem
Possible causes/consequences and
M
MSolutions The engine does not
start. The starter motor
can be heard. The
reserve fuel warning
lamp is lit and the fuel
gauge display is at the
reserve level. The fuel tank is empty.
X Refuel the vehicle. The engine does not
start. You cannot hear
the starter motor. The on-board voltage is too low because the battery is too weak or
discharged.
X Jump-start the vehicle (Y page 348).
If the engine does not start despite attempts to jump-start it:
X Consult a qualified specialist workshop. The starter motor was exposed to excessively high thermal load.
X Start the engine again (Y page 145).
If the engine still does not start: X Consult a qualified specialist workshop. Vehicles with a petrol
engine:
The engine is not running
smoothly and is misfir-
ing. The engine electronics or a mechanical component of the engine
management system are/is malfunctioning.
X Depress the accelerator pedal only slightly.
Otherwise, non-combusted fuel may get into the catalytic converter
and damage it.
X Have the cause rectified immediately at a qualified specialist work-
shop. The coolant temperature
display is showing more
than 120 †. A display
message may also
appear on the multifunc-
tion display and a warn-
ing tone may sound. The coolant level is too low. The coolant is too hot and the engine is not
being cooled sufficiently.
X Stop as soon as possible and allow the engine and the coolant to
cool down.
X Check the coolant level (Y page 329). Observe the warning notes
as you do so and top up the coolant if necessary. If the coolant level is correct, the engine radiator fan may be faulty. The
coolant is too hot and the engine is not being cooled sufficiently.
X If the coolant temperature is below 120 †, you can continue driving
to the nearest qualified specialist workshop.
X Avoid heavy loads on the engine as you do so, e.g. driving in moun-
tainous terrain and stop-start traffic. Driving
151Driving and parking Z
Page 174 of 389
display. In addition, warning lamp
8on the
instrument cluster lights up (Y page 286).
The ECO display consists of three sections, with an inner and outer area. The sections corre-
spond to the following three categories: :
Acceleration
(evaluation of all accel-
eration processes):
R The outer area fills up and the inner
area lights up green: moderate
acceleration, especially at higher
speeds.
R The outer area empties and the
inner area is grey: sporty acceler-
ation. ;
Coasting
(evaluation of all decelera-
tion processes):
R The outer area fills up and the inner
area lights up green: anticipatory
driving, keeping your distance and early release of the accelerator.
The vehicle can coast without use
of the brakes.
R The outer area empties and the
inner area is grey: frequent heavy
braking. =
Constant
(continuous evaluation
over the entire journey):
R The outer area fills up and the inner
area lights up green: constant
speed and avoidance of unneces-
sary acceleration and decelera-
tion.
R The outer area empties and the
inner area is grey: fluctuations in
speed. The three inner areas display the current driving
style and light up green as a result of a particu-
larly economical driving style. Depending on the driving situation, up to two areas may light up
simultaneously.
At the beginning of the journey, the three outer
areas are empty and fill up as a result of eco-
nomical driving. A higher level indicates a more
economical driving style. If the three outer areas
are completely filled at the same time, the driver
has adopted the most economical driving style
for the selected settings and prevailing condi-
tions. The ECO display border lights up. The ECO display does not indicate the actual fuel
consumption. The additionally achieved range
displayed under Bonus fr. start
Bonus fr. start does not
indicate a fixed consumption reduction.
In addition to driving style, the actual consump- tion is affected by other factors, such as:
R load
R tyre pressure
R cold start
R choice of route
R the use of electrical consumers
These factors are not included on the ECO dis-
play.
An economical driving style involves driving at a moderate engine speed.
To achieve a higher value in the categories
"Acceleration" and "Constant":
R observe the gearshift recommendation.
R drive the vehicle in drive program E
On long journeys at a constant speed, e.g. on the motorway, only the outer area for "Constant"
will change.
The ECO display summarises the driving style
from the start of the journey to its completion.
Therefore, there are more marked changes in
the outer areas at the start of a journey. During
a prolonged driving time, these changes are
smaller. For more marked changes, perform a
manual reset (Y page 234).
Further information on the ECO display
(Y page 233). Braking
Important safety notes G
WARNING
If you shift down on a slippery road surface in an attempt to increase the engine's braking
effect, the drive wheels could lose their grip.
This increases the risk of skidding and having
an accident.
Do not shift down for additional engine brak-
ing on a slippery road surface. Driving tips
171Driving and parking Z
Page 175 of 389
Downhill gradients
Change into a lower gear in good time on long
and steep downhill gradients. Take particular
note of this when driving a laden vehicle and
when towing a trailer.
This also applies if cruise control, DISTRONIC
PLUS or SPEEDTRONIC is activated.
This will use the braking effect of the engine, so
less braking will be required to maintain vehicle
speed. This relieves the load on the brake sys-
tem and prevents the brakes from overheating
and wearing too quickly.
Heavy and light loads G
WARNING
The braking system can overheat if you leave your foot on the brake pedal while driving.
This increases the braking distance and could
even cause the braking system to fail. There is
a risk of an accident.
Never use the brake pedal as a footrest. Do
not simultaneously depress both the brake
pedal and the accelerator pedal while driving.
! Depressing the brake pedal constantly
results in excessive and premature wear to
the brake pads.
If heavy demands are made on the brakes, do
not park the vehicle immediately. Drive on for a
short while. This allows the airflow to cool the
brakes more quickly.
If the brakes have been used only moderately,
you should occasionally test their effectiveness.
To do this, brake more firmly from a higher
speed while paying attention to the traffic con-
ditions. This improves the grip of the brakes.
Wet road surfaces If you have driven for a long time in heavy rain
without braking, there may be a delayed reac-
tion from the brakes when braking for the first
time. This may also occur after a car wash or
after driving through deep water.
You will have to depress the brake pedal more
firmly. Maintain a greater distance to the vehicle in front.
After driving on a wet road or having the vehicle
washed, brake firmly while paying attention to
the traffic conditions. This will warm up the brake discs, thereby drying them more quickly
and protecting them against corrosion.
Limited braking performance on salt-
treated roads If you drive on salt-treated roads, a layer of salt
may form on the brake discs and pads. This can
increase the braking distance considerably.
R In order to prevent any salt build-up, apply the
brakes occasionally while paying attention to
the traffic conditions.
R Carefully depress the brake pedal at the end
of the journey and when starting the next
journey.
R Maintain a much greater distance to the vehi-
cle in front.
New brake discs and brake pads/
linings Brake pads/linings and discs that are either new
or have been replaced achieve optimum braking
effect only after several hundred kilometres of
driving. Compensate for the reduced braking
effect by applying greater force to the brake
pedal.
For safety reasons, Mercedes-Benz recom-
mends only fitting the following brake discs and brake pads/linings:
R brake discs that have been approved by
Mercedes-Benz
R brake pads/linings that have been approved
by Mercedes-Benz or that are of an equivalent
standard of quality
Other brake discs or brake pads/linings can
compromise the safety of your vehicle.
Always replace all brake discs and brake pads/
linings on an axle at the same time. Always fit
new brake pads/linings when replacing brake
discs.
The vehicle is equipped with lightweight brake
discs to which the wheel assembly with rim and threaded connection is matched.
The use of brake discs other than those
approved by Mercedes-Benz may alter track
width and is subject to approval, if applicable.
Shock-type loads when handling the brake
discs, such as when changing wheels, can lead
to a reduction in comfort when driving with light-
weight brake discs. Avoid shock-type loads on 172
Driving tipsDriving and pa
rking
Page 176 of 389
the lightweight brake discs, particularly on the
brake plate. Driving on wet roads
Aquaplaning If water has accumulated to a certain depth on
the road surface, there is a danger of aquaplan-
ing occurring, even if:
R you are driving at low speeds
R the tyres have adequate tread depth
For this reason, drive in the following manner in
the event of heavy rain or in conditions in which aquaplaning can occur:
R lower your speed
R avoid tyre ruts
R avoid sudden steering movements
R brake carefully
Driving on flooded roads !
Bear in mind that vehicles travelling in front
or in the opposite direction create waves. This may cause the maximum permissible water
depth to be exceeded.
These notes must be observed under all cir-
cumstances. You could otherwise damage
the engine, the electronics or the transmis-
sion.
If you must drive on stretches of road on which
water has collected, please bear in mind that:
R in the case of standing water, the water level
must be no higher than the lower edge of the
vehicle body
R you should drive no faster than walking pace Winter driving
G
WARNING
If you shift down on a slippery road surface in an attempt to increase the engine's braking
effect, the drive wheels could lose their grip.
This increases the risk of skidding and having
an accident.
Do not shift down for additional engine brak-
ing on a slippery road surface. G
DANGER
If the exhaust pipe is blocked or adequate
ventilation is not possible, poisonous gases
such as carbon monoxide (CO) may enter the vehicle. This is the case, e.g. if the vehicle
becomes trapped in snow. There is a risk of
fatal injury.
If you leave the engine or the auxiliary heating
running, make sure the exhaust pipe and area
around the vehicle are clear of snow. To
ensure an adequate supply of fresh air, open a window on the side of the vehicle that is not
facing into the wind.
Have your vehicle winterproofed at a qualified
specialist workshop at the onset of winter.
You should drive particularly carefully on slip-
pery road surfaces. Avoid sudden acceleration,
steering and braking manoeuvres. Do not use
cruise control or DISTRONIC PLUS.
If the vehicle threatens to skid or cannot be
stopped when moving at low speed:
X Shift the transmission to position N.
X Try to bring the vehicle under control by using
corrective steering.
The outside temperature indicator is not
designed to serve as an ice-warning device and
is therefore unsuitable for that purpose.
Changes in the outside temperature are dis-
played after a short delay.
Indicated temperatures just above the freezing
point do not guarantee that the road surface is
free of ice. The road may still be icy, especially in wooded areas or on bridges. The vehicle could
skid if you fail to adapt your driving style. Always
adapt your driving style and drive at a speed to
suit the prevailing weather conditions.
You should pay special attention to road condi-
tions when temperatures are around freezing
point.
Further information on driving with snow chains (Y page 359).
Further information on driving with summer
tyres (Y page 358).
Observe the notes in the "Winter operation" sec-
tion (Y page 358). Driving
tips
173Driving an d parking Z