2016 MERCEDES-BENZ GLC COUPE start stop button
[x] Cancel search: start stop buttonPage 226 of 389
To deactivate the switched power supply:
X Turn the key to position 0in the ignition lock
(Y page 144).
or
X Press the Start/Stop button once on vehicles
with KEYLESS-GO or the KEYLESS-GO start
function (Y page 144). Failure check for LEDs
If LED lamps are fitted in the trailer, a malfunc-
tion message may appear in the multifunction
display even if there is no fault. The reason for
the error message may be that the current has
fallen below the minimum of 50 mA.
To ensure reliable operation of the failure indi-
cator, each LED chain in the trailer lighting must
be guaranteed a minimum current of 50 mA. Trailer with 7-pin connector
General notes Trailer with 7-pin connector:
you can connect
to the 13-pin socket on the ball coupling using
an adapter or, if necessary, an adapter cable.
Both can be obtained at a qualified specialist
workshop. Fitting the adapter !
Make sure that there is sufficient cable play
so that the cable cannot become detached
when cornering.
! Remove the adapter cable before folding in
the ball coupling. You could otherwise dam-
age the rear bumper and the adapter cable. X
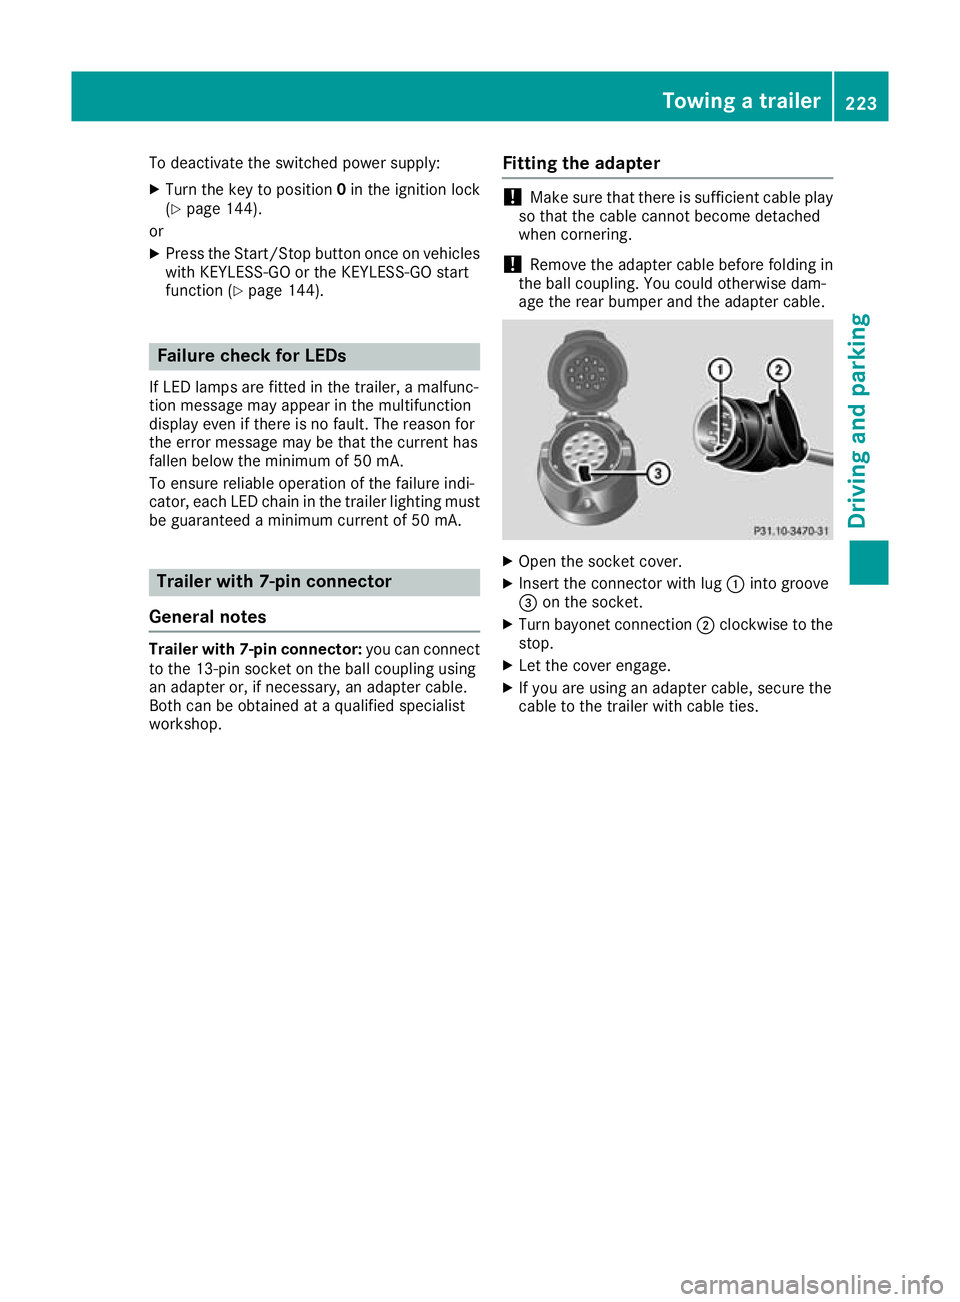
Open the socket cover.
X Insert the connector with lug :into groove
= on the socket.
X Turn bayonet connection ;clockwise to the
stop.
X Let the cover engage.
X If you are using an adapter cable, secure the
cable to the trailer with cable ties. Towing a trailer
223Driving and parking Z
Page 234 of 389
R
È SPEEDTRONIC (Y page 176)
R ¯ Cruise control (Y page 174)
R a DISTRONIC PLUS Steering Assist and
Stop&Go Pilot (Y page 184)
R _ Adaptive Highbeam Assist
(Y page 119)
R _ Adaptive Highbeam Assist Plus
(Y page 119)
R è ECO start/stop function (Y page 148)
R ë HOLD function (Y page 186)
R ð Maximum permissible speed exceeded
(for certain countries only) Head-up display
General notes The Head-up Display projects information from
the navigation system and the driver assistance
systems above the dashboard into the driver's
field of vision. This way, the Head-up Display
enables drivers to see information without hav-
ing to take their eyes off the road.
A requirement for the display of the content is
that the following functions are available in the
vehicle and are switched on:
R Cruise control
R SPEEDTRONIC
R DISTRONIC PLUS
R Traffic Sign Assist
R Navigation
Important safety notes The head-up display is only an aid and is not a
substitute for attentive driving.
Speed limits and overtaking restrictions are not
always correctly displayed. Traffic signs always
have priority over the Traffic Sign Assist display.
The visibility of the head-up display is influenced by the following conditions:
R the driver's seat position
R the positioning of the display image
R the general light conditions
R sunglasses with polarisation filters
R wet road surfaces
R blocking of sunlight by objects on the display
cover In the event of extreme sunlight, sections of the
display may fade. This can be reversed by
switching the head-up display off and on again.
i Vehicles with the head-up display are equip-
ped with a special windscreen. Should repairs
be necessary, have the windscreen replaced
at a qualified specialist workshop.
Displays and operation Switching the head-up display on/off
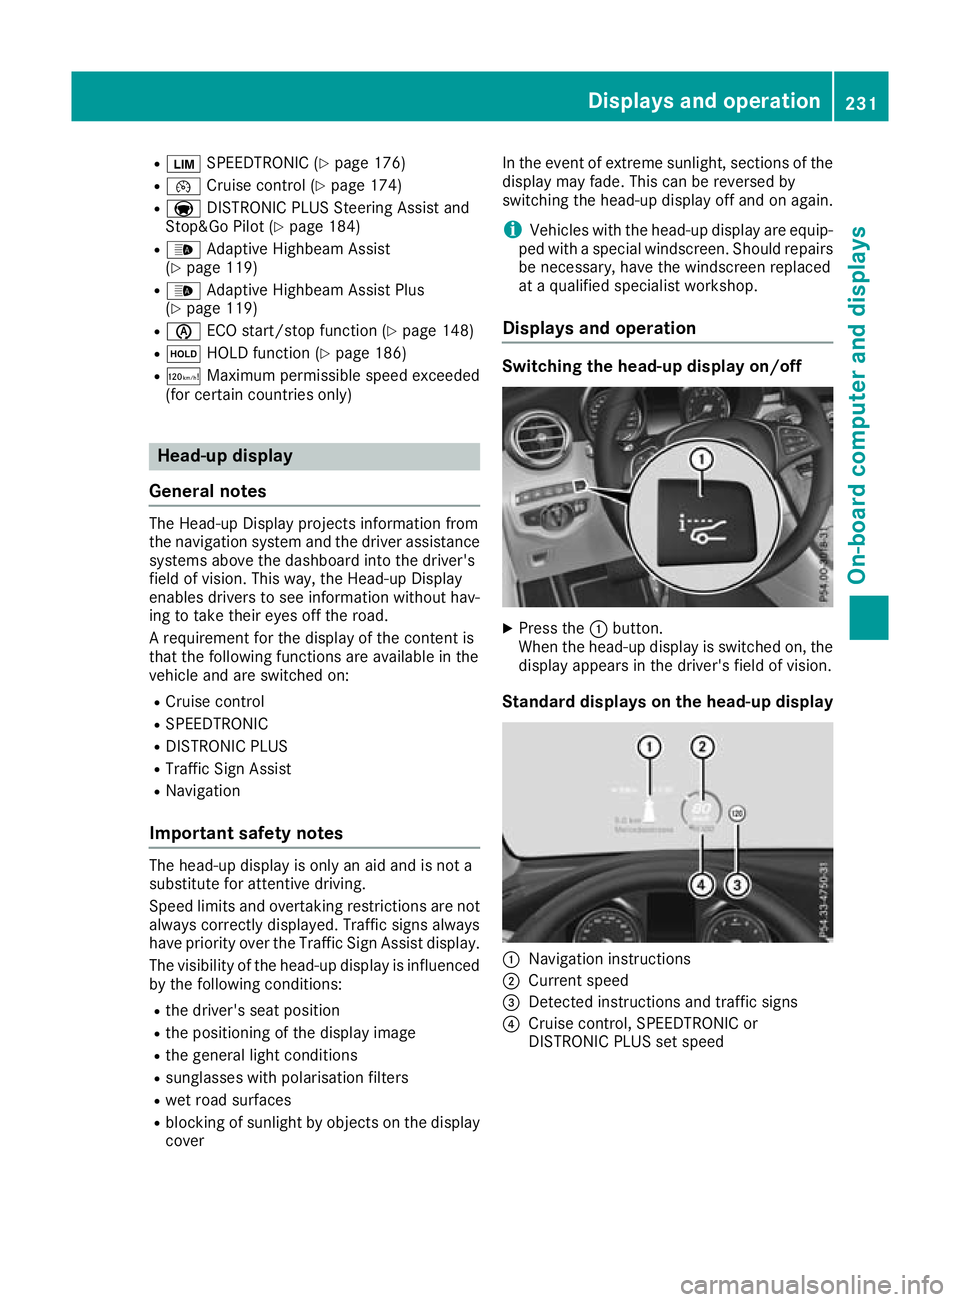
X
Press the :button.
When the head-up display is switched on, the display appears in the driver's field of vision.
Standard displays on the head-up display :
Navigation instructions
; Current speed
= Detected instructions and traffic signs
? Cruise control, SPEEDTRONIC or
DISTRONIC PLUS set speed Displays and operation
231On-board computer and displays Z
Page 242 of 389
i
You can obtain further information about
suitable mobile phones and connecting
mobile phones via Bluetooth ®
:
R on the Internet at http://www.mercedes-
benz.com/connect
R at any Mercedes-Benz Service Centre
Accepting a call If someone calls you when you are in the
Tele‐ Tele‐
phone
phone menu, a display message appears in the
multifunction display.
You can accept a call at any time irrespective of
the selected menu.
X Press the 6button on the steering wheel
to accept the call.
Rejects or ends a call X
Press the ~button on the steering wheel
to reject or end the call.
Selecting an entry in the phone book X
Press òon the steering wheel to open the
menu list.
X Press :or9 on the steering wheel to
select the Telephone
Telephone menu.
X Confirm by pressing aon the steering
wheel.
X Press :, 9ora to switch to the
phone book.
X Press :or9 to select the names one
after the other.
or X To start rapid scrolling: press and hold:
or 9 for longer than one second.
The names are displayed quickly one after the
other in the phone book.
If you press and hold the :or9 button
for longer than five seconds, the name with
the next or previous initial letter in the alpha-
bet appears.
Rapid scrolling stops when you release the
button or reach the end of the list.
X If only one telephone number is stored for
a name: press the 6ora button to
start dialling.
or X
If there is more than one number for a
name: press the 6ora button to dis-
play the numbers.
X Press :or9 to select the number you
want to dial.
X Press the 6ora button to start dial-
ling.
or
X To exit the telephone book: press the~
or % button briefly.
Redialling The on-board computer saves the last names or
numbers dialled in the redial memory.
X Press òon the steering wheel to open the
menu list.
X Press :or9 on the steering wheel to
select the Telephone Telephone menu.
X Confirm by pressing aon the steering
wheel.
X Press the 6button to switch to the redial
memory.
X Press :or9 to select the desired
name or number.
X Press the 6ora button to start dial-
ling.
or X To exit the redial memory: press the~
or % button briefly. Assistance graphic menu
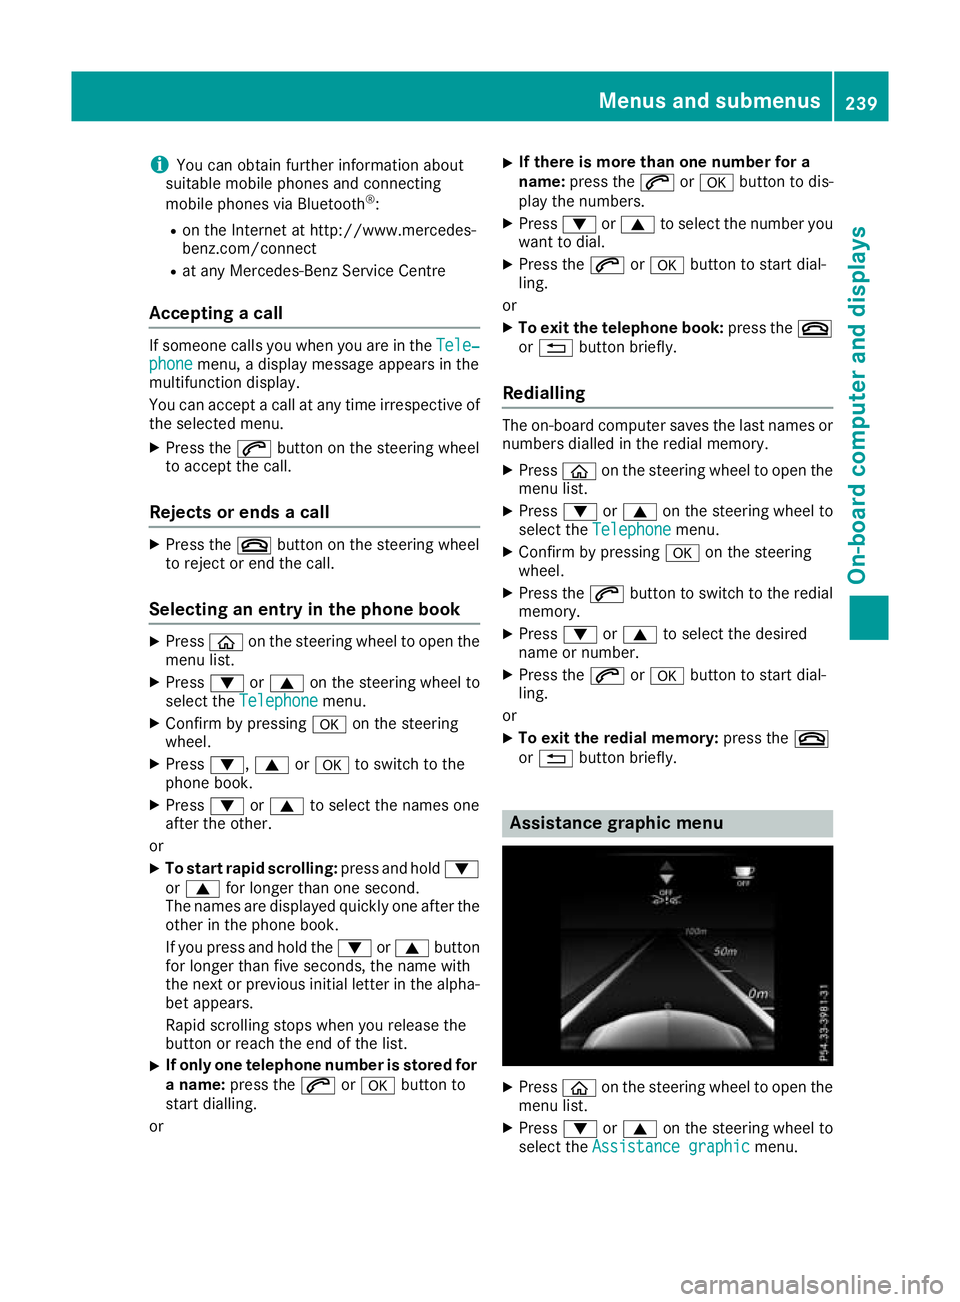
X
Press òon the steering wheel to open the
menu list.
X Press :or9 on the steering wheel to
select the Assistance graphic Assistance graphic menu. Menus and submenus
239On-board computer and displays Z
Page 249 of 389
X
Switch on the display function for notes and
traffic signs (Y page 241).
X Press òon the steering wheel to open the
menu list.
X Press :or9 on the steering wheel to
select the AMG AMGmenu.
X Confirm by pressing aon the steering
wheel.
X Press the 9button repeatedly until the
Traffic Sign Assist display appears.
G-Meter While the vehicle is in motion, the G-Meter
shows the forces that are exerted on the driver
both laterally and in the direction of travel.
The maximum values are indicated in red in the
guideline system.
X Press òon the steering wheel to open the
menu list.
X Press :or9 on the steering wheel to
select the AMG
AMG menu.
X Confirm by pressing aon the steering
wheel.
X Press the 9button repeatedly until the G-
Meter appears.
The maximum values of the G-Meter are
saved.
X To reset the G-Meter: pressaagain.
X Using :or9 select Yes
Yes on the steer-
ing wheel.
X Press ato confirm.
The maximum values of the G-Meter are
deleted.
If the ignition remains switched off for longer
than four hours, the G-Meter will be automati-
cally reset. SETUP Overview
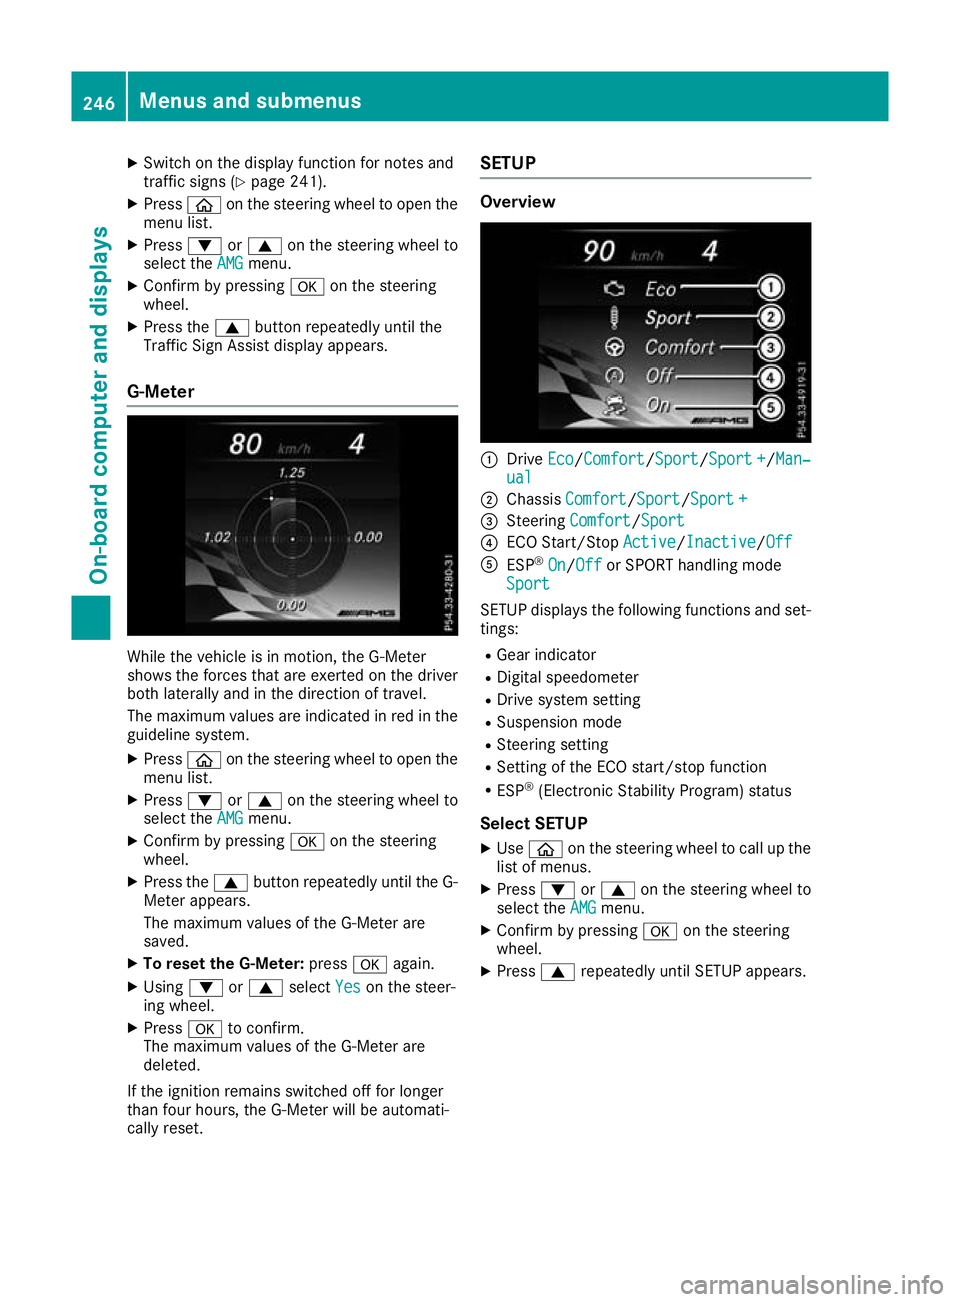
:
Drive Eco Eco/Comfort Comfort/ Sport
Sport/Sport +Sport+/Man‐
Man‐
ual
ual
; Chassis Comfort
Comfort/Sport Sport/Sport +Sport +
= Steering Comfort
Comfort/Sport Sport
? ECO Start/Stop Active
Active/InactiveInactive/Off Off
A ESP ®
On
On/Off Off or SPORT handling mode
Sport
Sport
SETUP displays the following functions and set- tings:
R Gear indicator
R Digital speedometer
R Drive system setting
R Suspension mode
R Steering setting
R Setting of the ECO start/stop function
R ESP ®
(Electronic Stability Program) status
Select SETUP X Use ò on the steering wheel to call up the
list of menus.
X Press :or9 on the steering wheel to
select the AMG
AMGmenu.
X Confirm by pressing aon the steering
wheel.
X Press 9repeatedly until SETUP appears. 246
Menus and submenusOn-board computer and displays
Page 250 of 389
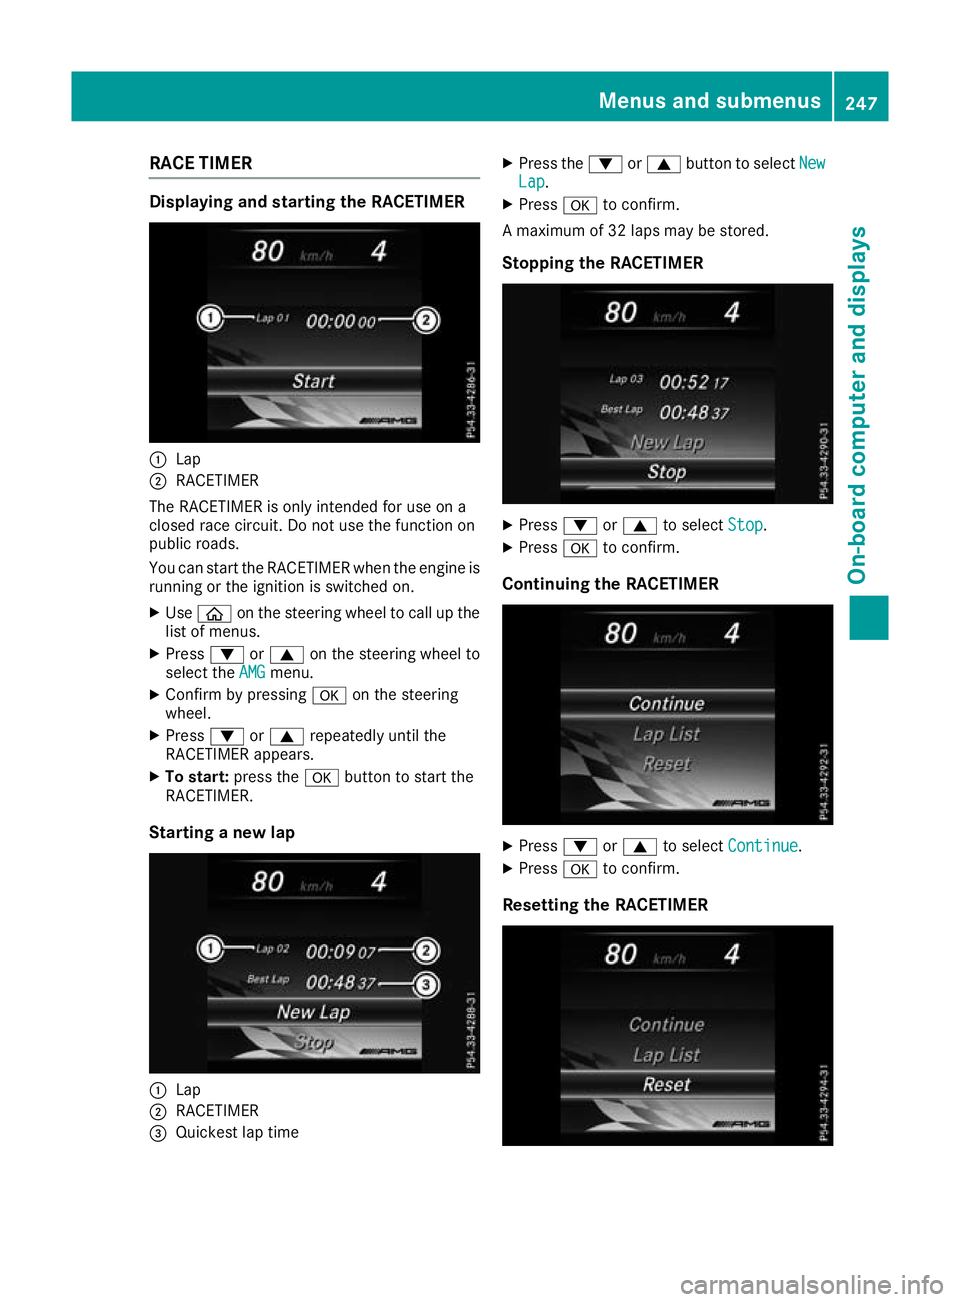
RACE TIMER
Displaying and starting the RACETIMER
:
Lap
; RACETIMER
The RACETIMER is only intended for use on a
closed race circuit. Do not use the function on
public roads.
You can start the RACETIMER when the engine is running or the ignition is switched on.
X Use ò on the steering wheel to call up the
list of menus.
X Press :or9 on the steering wheel to
select the AMG
AMG menu.
X Confirm by pressing aon the steering
wheel.
X Press :or9 repeatedly until the
RACETIMER appears.
X To start: press the abutton to start the
RACETIMER.
Starting a new lap :
Lap
; RACETIMER
= Quickest lap time X
Press the :or9 button to select New New
Lap Lap.
X Press ato confirm.
A maximum of 32 laps may be stored.
Stopping the RACETIMER X
Press :or9 to select Stop
Stop.
X Press ato confirm.
Continuing the RACETIMER X
Press :or9 to select Continue
Continue .
X Press ato confirm.
Resetting the RACETIMER Menus and submenus
247On-board computer and displays Z
Page 299 of 389
Climate control settings
General notes You can adjust the climate control settings
using the climate control bar or the climate con-
trol menu.
Important climate control functions can be set
in the climate control bar:
R Temperature
R Airflow
R Air distribution
The climate control bar is visible in most dis-
plays.
You can find all available climate control func-
tions in the climate control menu. You can use
the climate control bar to switch to the climate
control menu.
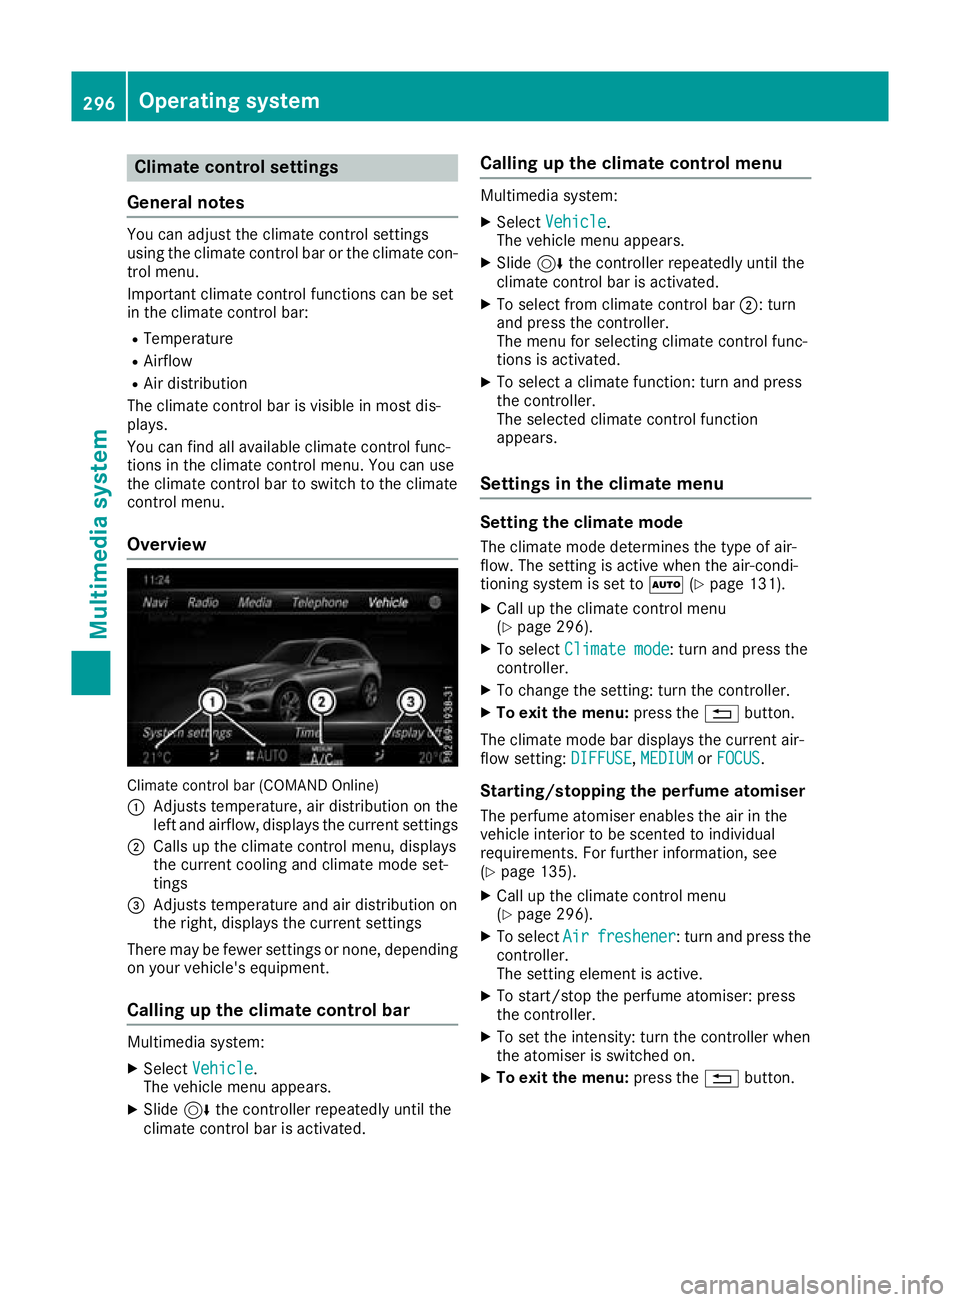
Overview Climate control bar (COMAND Online)
: Adjusts temperature, air distribution on the
left and airflow, displays the current settings
; Calls up the climate control menu, displays
the current cooling and climate mode set-
tings
= Adjusts temperature and air distribution on
the right, displays the current settings
There may be fewer settings or none, depending on your vehicle's equipment.
Calling up the climate control bar Multimedia system:
X Select Vehicle
Vehicle.
The vehicle menu appears.
X Slide 6the controller repeatedly until the
climate control bar is activated. Calling up the climate control menu Multimedia system:
X Select Vehicle Vehicle.
The vehicle menu appears.
X Slide 6the controller repeatedly until the
climate control bar is activated.
X To select from climate control bar ;: turn
and press the controller.
The menu for selecting climate control func-
tions is activated.
X To select a climate function: turn and press
the controller.
The selected climate control function
appears.
Settings in the climate menu Setting the climate mode
The climate mode determines the type of air-
flow. The setting is active when the air-condi-
tioning system is set to Ã(Ypage 131).
X Call up the climate control menu
(Y page 296).
X To select Climate mode
Climate mode: turn and press the
controller.
X To change the setting: turn the controller.
X To exit the menu: press the%button.
The climate mode bar displays the current air-
flow setting: DIFFUSE DIFFUSE,MEDIUM
MEDIUMorFOCUS
FOCUS.
Starting/stopping the perfume atomiser
The perfume atomiser enables the air in the
vehicle interior to be scented to individual
requirements. For further information, see
(Y page 135).
X Call up the climate control menu
(Y page 296).
X To select Air Airfreshener
freshener: turn and press the
controller.
The setting element is active.
X To start/stop the perfume atomiser: press
the controller.
X To set the intensity: turn the controller when
the atomiser is switched on.
X To exit the menu: press the%button. 296
Operating systemMulti
media system
Page 332 of 389
cap, you could be scalded if hot coolant
sprays out. There is a risk of injury.
Let the engine cool down before you open the cap. Wear gloves and eye protection. Open
the cap slowly to release the pressure. G
WARNING
If you open the bonnet while the engine is
overheating or while there is a fire in the
engine compartment, you could come into
contact with hot gases or other leaking ser-
vice products. There is a danger of injury.
Allow an overheating engine to cool down
before opening the bonnet. If there is a fire in the engine compartment, leave the bonnet
closed and notify the fire brigade.
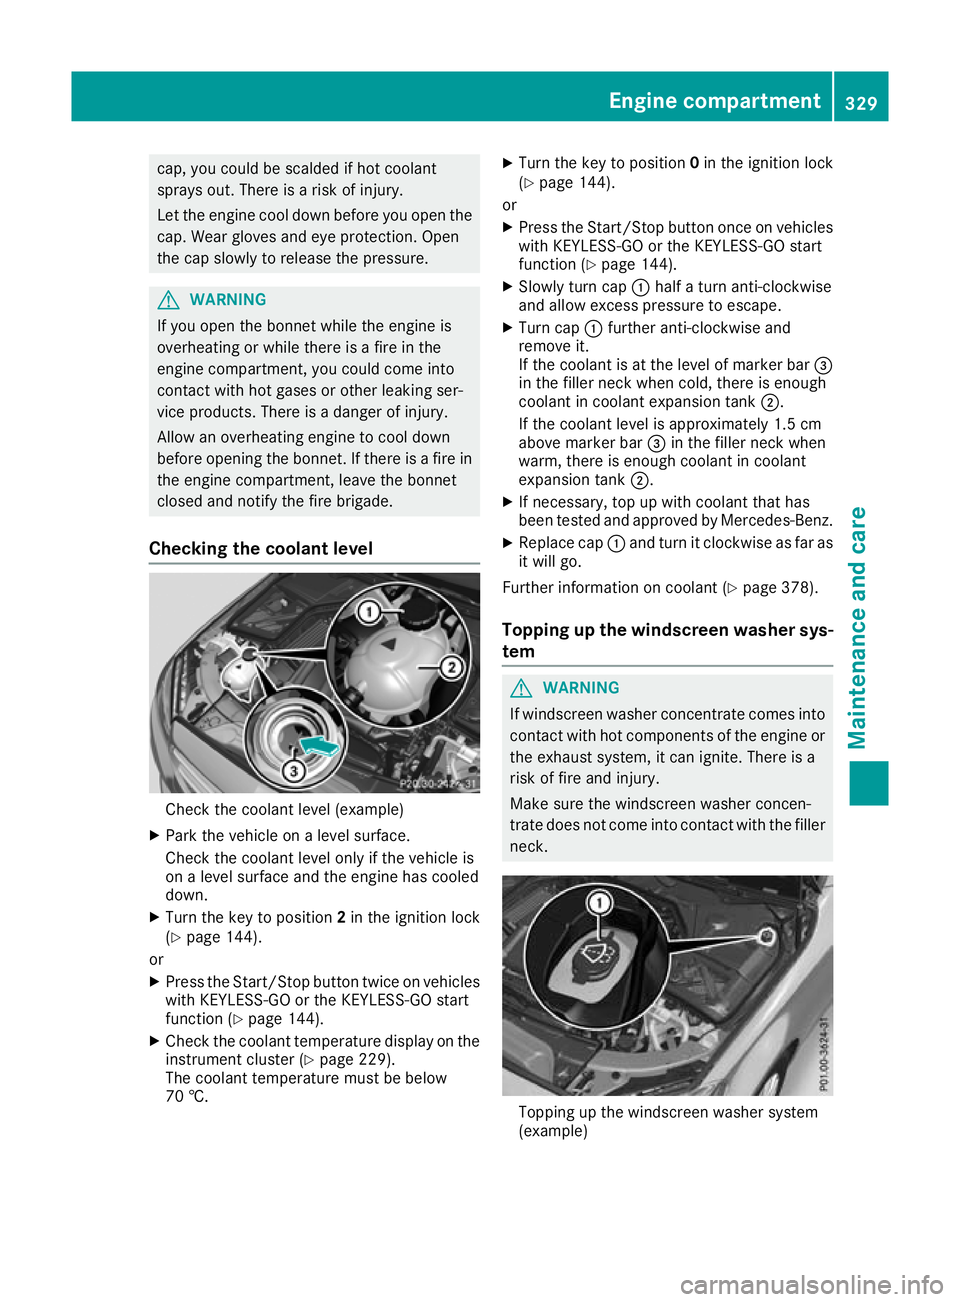
Checking the coolant level Check the coolant level (example)
X Park the vehicle on a level surface.
Check the coolant level only if the vehicle is
on a level surface and the engine has cooled
down.
X Turn the key to position 2in the ignition lock
(Y page 144).
or
X Press the Start/Stop button twice on vehicles
with KEYLESS-GO or the KEYLESS-GO start
function (Y page 144).
X Check the coolant temperature display on the
instrument cluster (Y page 229).
The coolant temperature must be below
70 †. X
Turn the key to position 0in the ignition lock
(Y page 144).
or X Press the Start/Stop button once on vehicles
with KEYLESS-GO or the KEYLESS-GO start
function (Y page 144).
X Slowly turn cap :half a turn anti-clockwise
and allow excess pressure to escape.
X Turn cap :further anti-clockwise and
remove it.
If the coolant is at the level of marker bar =
in the filler neck when cold, there is enough
coolant in coolant expansion tank ;.
If the coolant level is approximately 1.5 cm
above marker bar =in the filler neck when
warm, there is enough coolant in coolant
expansion tank ;.
X If necessary, top up with coolant that has
been tested and approved by Mercedes-Benz.
X Replace cap :and turn it clockwise as far as
it will go.
Further information on coolant (Y page 378).
Topping up the windscreen washer sys-
tem G
WARNING
If windscreen washer concentrate comes into contact with hot components of the engine or
the exhaust system, it can ignite. There is a
risk of fire and injury.
Make sure the windscreen washer concen-
trate does not come into contact with the filler neck. Topping up the windscreen washer system
(example) Engine compartment
329Maintenance and care Z
Page 335 of 389
!
If the key is within the rear detection range
of KEYLESS-GO, the following situations, for
example, could lead to the unintentional
opening of the tailgate:
R using a car wash
R using a high-pressure cleaner
Make sure that the key is at least 3 m away
from the vehicle.
! Make sure that the automatic transmission
is in neutral position Nwhen washing your
vehicle in a tow-through car wash. The vehicle may otherwise be damaged.
R Operating with the key:
Do not remove the key from the ignition
lock. Do not open the driver's door when
the engine is switched off or at very low
speeds. Otherwise, when in transmission
position Dor Rthe automatic transmission
will automatically switch to park position P
and block the wheels.
R Operating with the Start/Stop button:
Do not open the driver's door when the
engine is switched off or at very low
speeds. Otherwise, when in transmission
position Dor Rthe automatic transmission
will automatically switch to park position P
and block the wheels.
Observe the following to make sure that the
automatic transmission stays in neutral position N:
Operating with the key and Start/Stop button:
X Make sure that the ignition is switched on.
X Make sure that the vehicle is stationary.
X Depress the brake pedal and keep it
depressed.
Operating with the Start/Stop button only: X Engage parking position P.
X Release the brake pedal.
X Remove the Start/Stop button from the igni-
tion lock (Y page 144).
X Insert the key into the ignition lock.
X Switch on the ignition.
X Depress the brake pedal and keep it
depressed.
Operating with the key and Start/Stop button:
X Engage neutral N.
X Release the brake pedal. X
Release the electric parking brake, if neces-
sary.
X Switch off the ignition and leave the key in the
ignition lock.
You can wash the vehicle in an automatic car
wash from the very start.
If the vehicle is very dirty, wash off excess dirt
before cleaning the vehicle in an automatic car
wash.
After using an automatic car wash, wipe off the
wax from the windscreen and the windscreen
wiper blades. This will prevent smears and
reduce wiping noises caused by residue on the
windscreen.
Washing by hand In some countries, washing by hand is only
allowed at specially equipped washing bays.
Observe the legal requirements for each indi-
vidual country.
X Do not use hot water and do not wash the
vehicle in direct sunlight.
X Use a soft sponge to clean.
X Use a mild cleaning agent, such as a car
shampoo approved by Mercedes-Benz.
X Thoroughly hose down the vehicle with a gen-
tle jet of water.
X Do not point the water jet directly towards the
air inlet.
X Use plenty of water and rinse out the sponge
frequently.
X Rinse the vehicle with clean water and dry
thoroughly with a chamois.
X Do not let the cleaning agent dry on the paint-
work.
When using the vehicle in winter, remove all
traces of road salt deposits carefully and as
soon as possible.
High-pressure cleaning equipment G
WARNING
The water jet of circular-jet nozzles (dirt grind- ers) can cause damage not visible from the
outside to tyres or chassis components. Com-
ponents damaged in this way can unexpect-
edly fail. There is a risk of an accident.
Do not use high-pressure cleaners with circu-
lar-jet nozzles to clean the vehicle. Have dam- 332
CareMaintenance and care