2016 MERCEDES-BENZ GLC COUPE tailgate
[x] Cancel search: tailgatePage 343 of 389

Towing eye
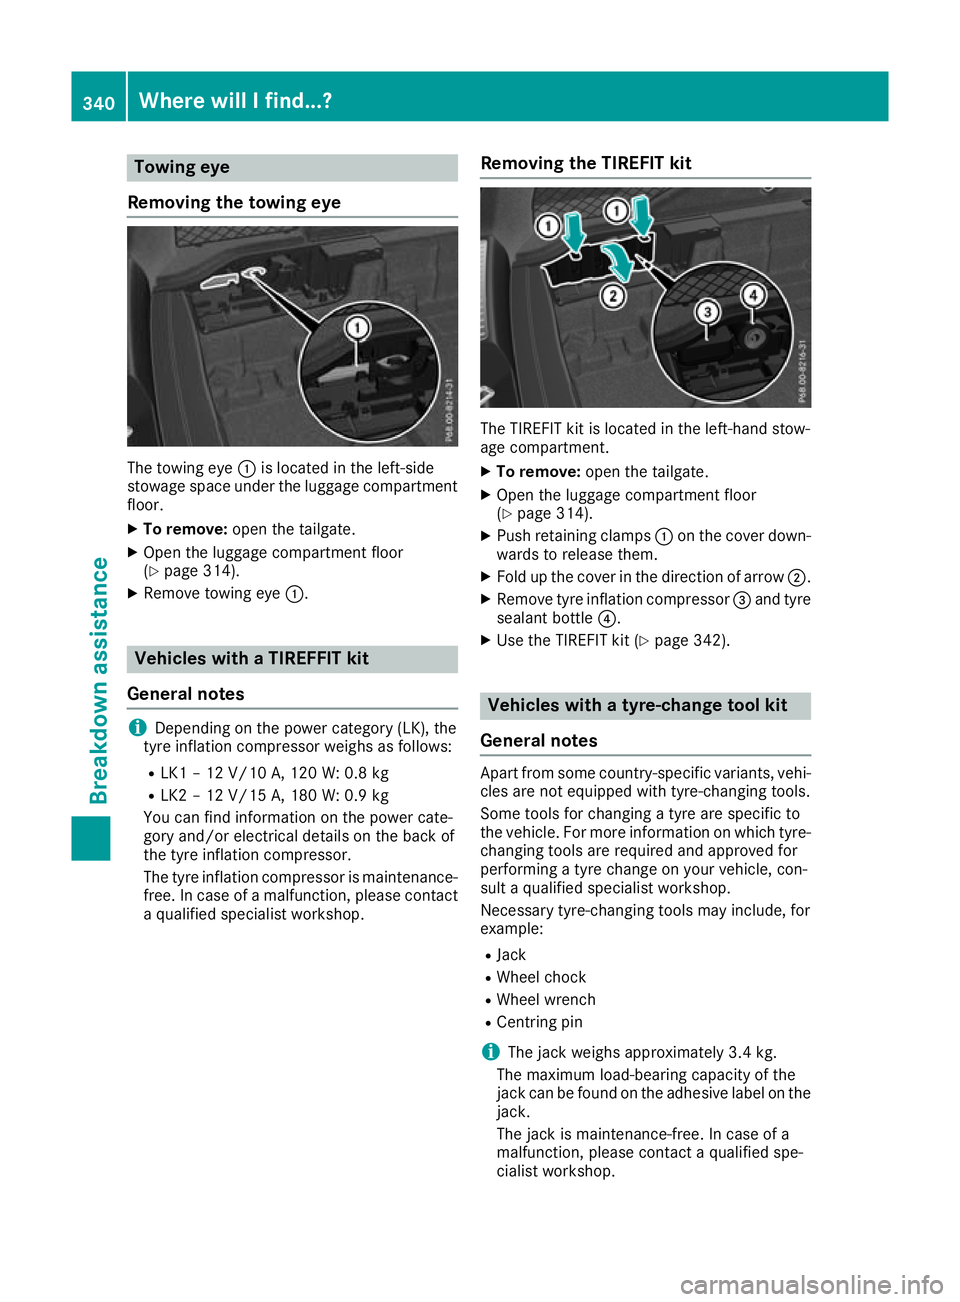
Removing the towing eye The towing eye
:is located in the left-side
stowage space under the luggage compartment
floor.
X To remove: open the tailgate.
X Open the luggage compartment floor
(Y page 314).
X Remove towing eye :.Vehicles with a TIREFFIT kit
General notes i
Depending on the power category (LK), the
tyre inflation compressor weighs as follows:
R LK1 – 12 V/10 A, 120 W: 0.8 kg
R LK2 – 12 V/15 A, 180 W:0.9 kg
You can find information on the power cate-
gory and/or electrical details on the back of
the tyre inflation compressor.
The tyre inflation compressor is maintenance-
free. In case of a malfunction, please contact
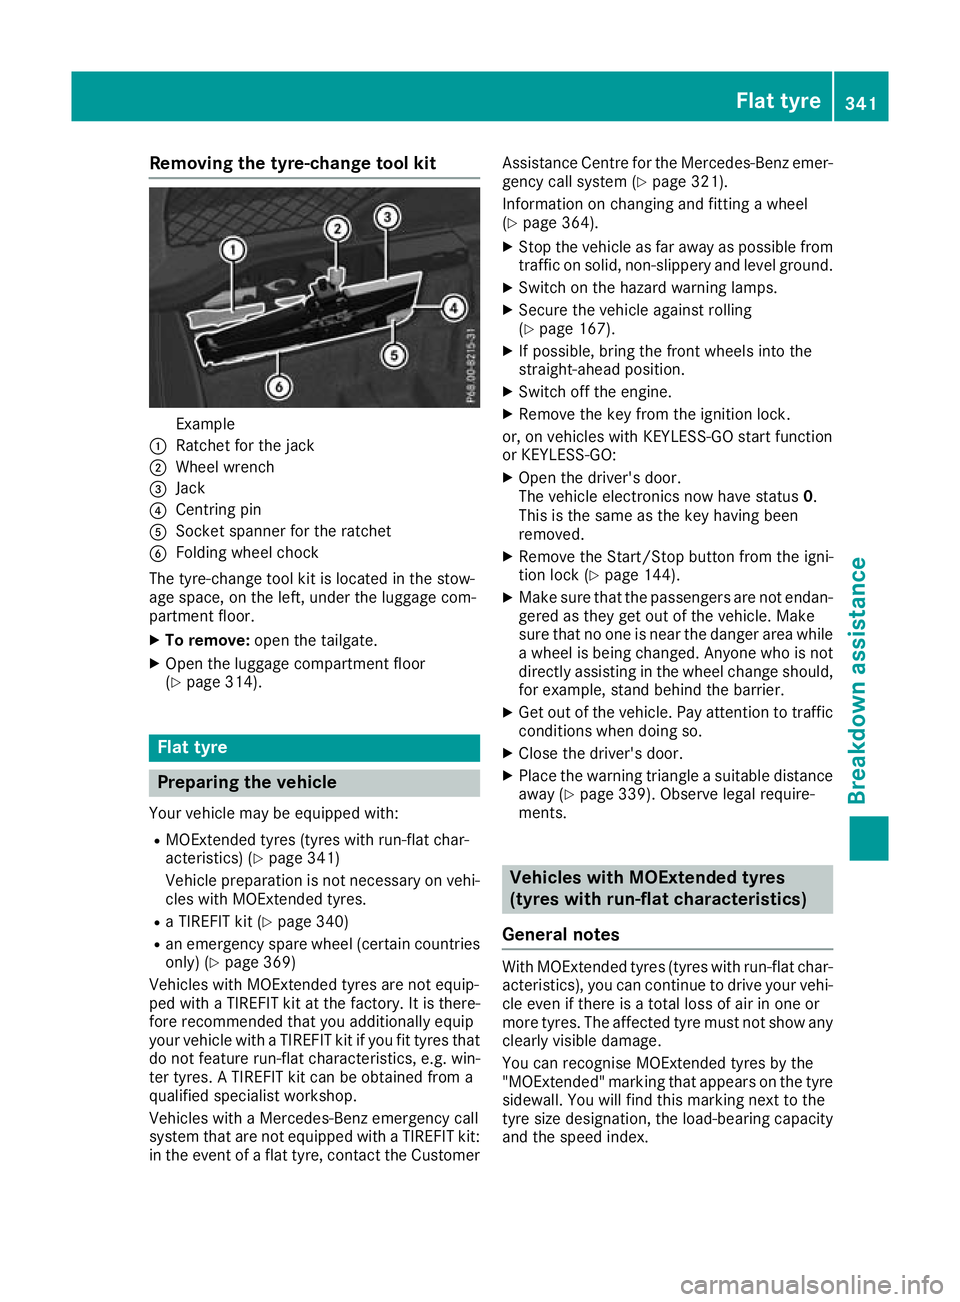
a qualified specialist workshop. Removing the TIREFIT kit The TIREFIT kit is located in the left-hand stow-
age compartment.
X To remove: open the tailgate.
X Open the luggage compartment floor
(Y page 314).
X Push retaining clamps :on the cover down-
wards to release them.
X Fold up the cover in the direction of arrow ;.
X Remove tyre inflation compressor =and tyre
sealant bottle ?.
X Use the TIREFIT kit (Y page 342). Vehicles with a tyre-change tool kit
General notes Apart from some country-specific variants, vehi-
cles are not equipped with tyre-changing tools.
Some tools for changing a tyre are specific to
the vehicle. For more information on which tyre- changing tools are required and approved for
performing a tyre change on your vehicle, con-
sult a qualified specialist workshop.
Necessary tyre-changing tools may include, for
example:
R Jack
R Wheel chock
R Wheel wrench
R Centring pin
i The jack weighs approximately 3.4 kg.
The maximum load-bearing capacity of the
jack can be found on the adhesive label on the jack.
The jack is maintenance-free. In case of a
malfunction, please contact a qualified spe-
cialist workshop. 340
Where will I find...?Breakdown assistance
Page 344 of 389

Removing the tyre-change tool kit
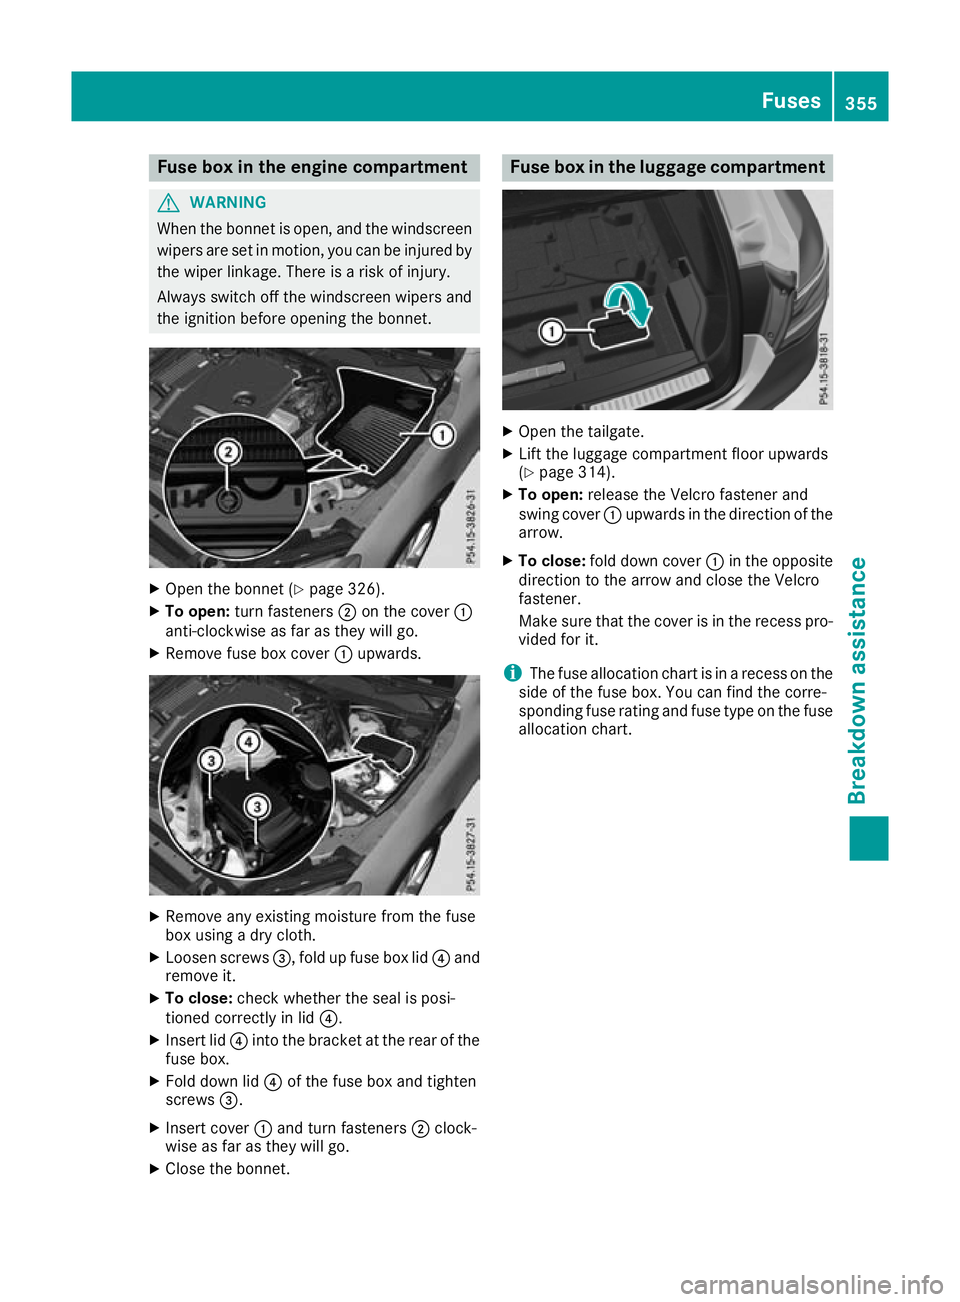
Example
: Ratchet for the jack
; Wheel wrench
= Jack
? Centring pin
A Socket spanner for the ratchet
B Folding wheel chock
The tyre-change tool kit is located in the stow-
age space, on the left, under the luggage com-
partment floor.
X To remove: open the tailgate.
X Open the luggage compartment floor
(Y page 314). Flat tyre
Preparing the vehicle
Your vehicle may be equipped with: R MOExtended tyres (tyres with run-flat char-
acteristics) (Y page 341)
Vehicle preparation is not necessary on vehi- cles with MOExtended tyres.
R a TIREFIT kit (Y page 340)
R an emergency spare wheel (certain countries
only) (Y page 369)
Vehicles with MOExtended tyres are not equip-
ped with a TIREFIT kit at the factory. It is there-
fore recommended that you additionally equip
your vehicle with a TIREFIT kit if you fit tyres that do not feature run-flat characteristics, e.g. win-
ter tyres. A TIREFIT kit can be obtained from a
qualified specialist workshop.
Vehicles with a Mercedes-Benz emergency call
system that are not equipped with a TIREFIT kit:
in the event of a flat tyre, contact the Customer Assistance Centre for the Mercedes-Benz emer-
gency call system (Y page 321).
Information on changing and fitting a wheel
(Y page 364).
X Stop the vehicle as far away as possible from
traffic on solid, non-slippery and level ground.
X Switch on the hazard warning lamps.
X Secure the vehicle against rolling
(Y page 167).
X If possible, bring the front wheels into the
straight-ahead position.
X Switch off the engine.
X Remove the key from the ignition lock.
or, on vehicles with KEYLESS-GO start function
or KEYLESS ‑GO:
X Open the driver's door.
The vehicle electronics now have status 0.
This is the same as the key having been
removed.
X Remove the Start/Stop button from the igni-
tion lock (Y page 144).
X Make sure that the passengers are not endan-
gered as they get out of the vehicle. Make
sure that no one is near the danger area while a wheel is being changed. Anyone who is notdirectly assisting in the wheel change should,
for example, stand behind the barrier.
X Get out of the vehicle. Pay attention to traffic
conditions when doing so.
X Close the driver's door.
X Place the warning triangle a suitable distance
away (Y page 339). Observe legal require-
ments. Vehicles with MOExtended tyres
(tyres with run-flat characteristics)
General notes With MOExtended tyres (tyres with run-flat char-
acteristics), you can continue to drive your vehi-
cle even if there is a total loss of air in one or
more tyres. The affected tyre must not show any clearly visible damage.
You can recognise MOExtended tyres by the
"MOExtended" marking that appears on the tyre
sidewall. You will find this marking next to the
tyre size designation, the load-bearing capacity
and the speed index. Flat tyre
341Breakdown assistance
Page 358 of 389

Fuse box in the engine compartment
G
WARNING
When the bonnet is open, and the windscreen wipers are set in motion, you can be injured by
the wiper linkage. There is a risk of injury.
Always switch off the windscreen wipers and
the ignition before opening the bonnet. X
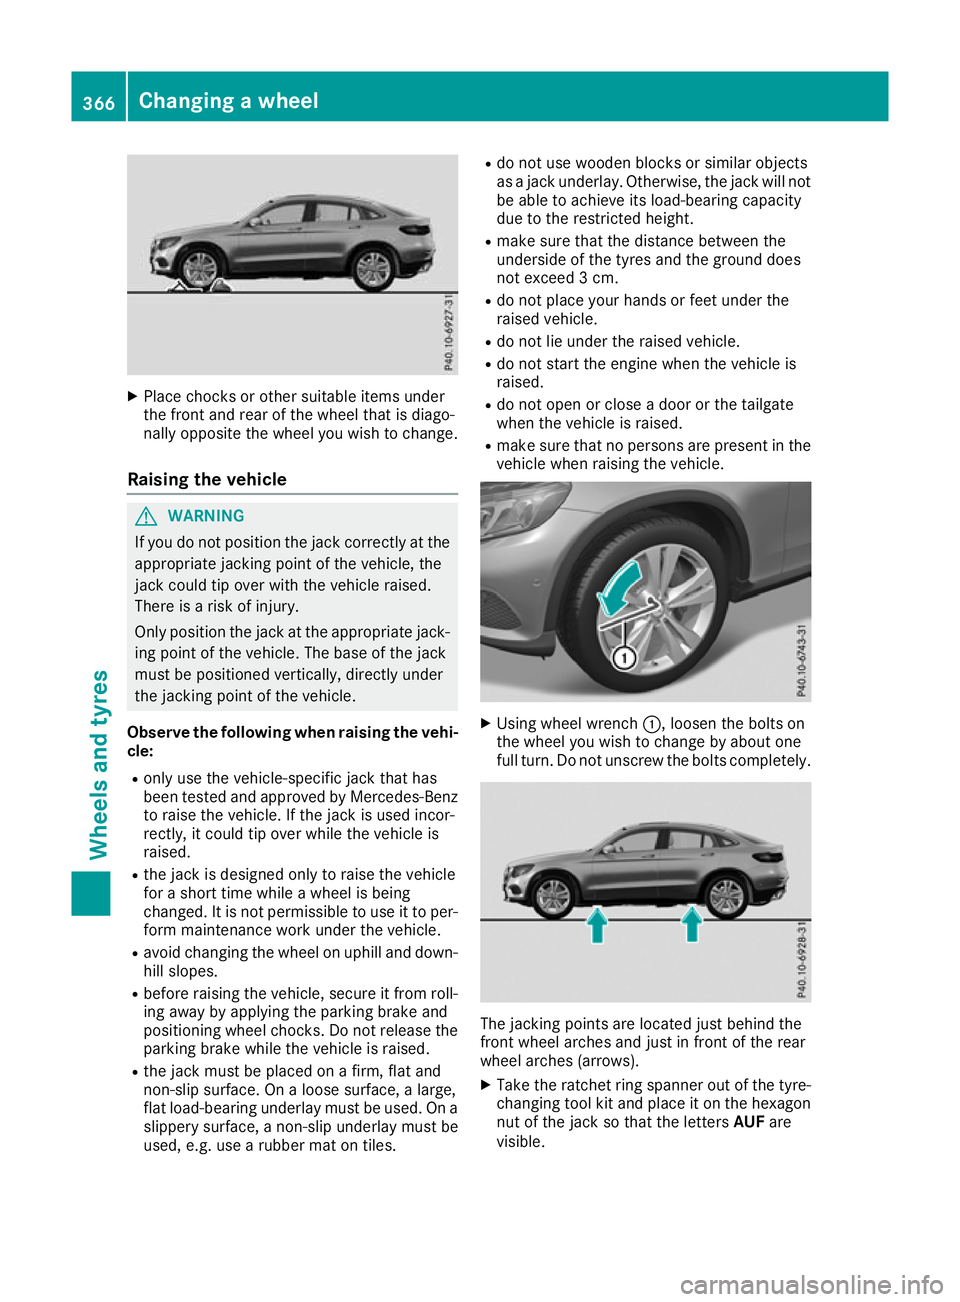
Open the bonnet (Y page 326).
X To open: turn fasteners ;on the cover :
anti-clockwise as far as they will go.
X Remove fuse box cover :upwards. X
Remove any existing moisture from the fuse
box using a dry cloth.
X Loosen screws =, fold up fuse box lid ?and
remove it.
X To close: check whether the seal is posi-
tioned correctly in lid ?.
X Insert lid ?into the bracket at the rear of the
fuse box.
X Fold down lid ?of the fuse box and tighten
screws =.
X Insert cover :and turn fasteners ;clock-
wise as far as they will go.
X Close the bonnet. Fuse box in the luggage compartment
X
Open the tailgate.
X Lift the luggage compartment floor upwards
(Y page 314).
X To open: release the Velcro fastener and
swing cover :upwards in the direction of the
arrow.
X To close: fold down cover :in the opposite
direction to the arrow and close the Velcro
fastener.
Make sure that the cover is in the recess pro-
vided for it.
i The fuse allocation chart is in a recess on the
side of the fuse box. You can find the corre-
sponding fuse rating and fuse type on the fuse
allocation chart. Fuses
355Breakdown assistance Z
Page 369 of 389

X
Place chocks or other suitable items under
the front and rear of the wheel that is diago-
nally opposite the wheel you wish to change.
Raising the vehicle G
WARNING
If you do not position the jack correctly at the appropriate jacking point of the vehicle, the
jack could tip over with the vehicle raised.
There is a risk of injury.
Only position the jack at the appropriate jack-
ing point of the vehicle. The base of the jack
must be positioned vertically, directly under
the jacking point of the vehicle.
Observe the following when raising the vehi- cle:
R only use the vehicle-specific jack that has
been tested and approved by Mercedes-Benz
to raise the vehicle. If the jack is used incor-
rectly, it could tip over while the vehicle is
raised.
R the jack is designed only to raise the vehicle
for a short time while a wheel is being
changed. It is not permissible to use it to per- form maintenance work under the vehicle.
R avoid changing the wheel on uphill and down-
hill slopes.
R before raising the vehicle, secure it from roll-
ing away by applying the parking brake and
positioning wheel chocks. Do not release the parking brake while the vehicle is raised.
R the jack must be placed on a firm, flat and
non-slip surface. On a loose surface, a large,
flat load-bearing underlay must be used. On a
slippery surface, a non-slip underlay must be
used, e.g. use a rubber mat on tiles. R
do not use wooden blocks or similar objects
as a jack underlay. Otherwise, the jack will not
be able to achieve its load-bearing capacity
due to the restricted height.
R make sure that the distance between the
underside of the tyres and the ground does
not exceed 3 cm.
R do not place your hands or feet under the
raised vehicle.
R do not lie under the raised vehicle.
R do not start the engine when the vehicle is
raised.
R do not open or close a door or the tailgate
when the vehicle is raised.
R make sure that no persons are present in the
vehicle when raising the vehicle. X
Using wheel wrench :, loosen the bolts on
the wheel you wish to change by about one
full turn. Do not unscrew the bolts completely. The jacking points are located just behind the
front wheel arches and just in front of the rear
wheel arches (arrows).
X
Take the ratchet ring spanner out of the tyre-
changing tool kit and place it on the hexagon
nut of the jack so that the letters AUFare
visible. 366
Changing a wheelWheels and tyres