2016 MERCEDES-BENZ GLC-Class display
[x] Cancel search: displayPage 252 of 418

XTo select a DVD single drive or disc:
pressabriefly. The list containing the
media sources appears.
XPress :or9 to select the corre-
sponding DVD single drive or disc.
XPress ato confirm.
XTo open the scene list: press:or
9 briefly.
XTo select the next or previous scene in
the scene list: press:or9 briefly.
XTo select a scene in the scene list using
rapid scroll: press and hold :or9
until desired scene :has been reached.
XPress ato confirm your selection.
Telephone menu
Introduction
GWARNING
If you operate information systems and com-
munication equipment integrated in the vehi-
cle while driving, you will be distracted from
traffic conditions. You could also lose control
of the vehicle. There is a risk of an accident.
Only operate the equipment when the traffic
situation permits. If you are not sure that this
is possible, park the vehicle paying attention
to traffic conditions and operate the equip-
ment when the vehicle is stationary.
When telephoning, you must observe the
legal requirements for the country in which
you are currently driving.
XSwitch on the mobile phone (see the man-
ufacturer’s operating instructions).
XSwitch on Audio 20 or COMAND, see the
separate operating instructions.
XEstablish a Bluetooth®connection to Audio
20 or COMAND, see the separate operating
instructions.
XPress the òbutton on the steering
wheel to open the menu list.
XPress :or9 on the steering wheel
to select the Telephone
menu.
XConfirm by pressing aon the steering
wheel.
You will see one of the following display mes-
sages in the multifunction display:
RPhone READYor the name of the network
provider: the mobile phone has found a
network and is ready to receive.
RPhone No Service: there is no network
available or the mobile phone is searching
for a network.
Accepting a call
If someone calls you when you are in the
Telephone
menu, a display message appears
in the multifunction display.
You can accept a call at any time, even if you
are not in the Telephone
menu.
XPress the6button on the steering
wheel to accept an incoming call.
Rejecting or ending a call
You can end or reject a call at any time even if
you are not in the Telephone
menu.
XPress the~button on the steering
wheel to reject or end a call.
250Menus and submenus
On-board computer and displays
Page 253 of 418

Selecting an entry in the phone book
XPress theòbutton on the steering
wheel to open the menu list.
XPress the :or9 button on the steer-
ing wheel to select the Telephone
menu.
XConfirm by pressingaon the steering
wheel.
XPress the :,9ora button to
switch to the phone book.
XUsing :or9, select the names one
after the other.
or
XTo start rapid scrolling: press and
hold : or9 for longer than one sec-
ond.
The names in the phone book are displayed quickly one after the other.
If you press and hold the :or9
button for longer than five seconds, the
name appears with the next or previous let-
ter initial letter in the alphabet.
Rapid scrolling stops when you release the
button or reach the end of the list.
XIf only one telephone number is stored
for a name: press the6ora button
to start dialing.
or
XIf there is more than one number for a
particular name: press the6ora
button to display the numbers.
XPress the :or9 button to select the
number you want to dial.
XPress the 6ora button to start dial-
ing.
or
XTo exit the phone book: press the~or
% button.
Redialing
The on-board computer saves the last names
or numbers dialed in the redial memory.
XPress the òbutton on the steering
wheel to open the menu list.
XPress the :or9 button on the steer-
ing wheel to select the Telephone
menu.
XConfirm by pressingaon the steering
wheel.
XPress the 6button to switch to the
redial memory.
XPress the :or9 button to select the
desired name or number.
XPress the 6ora button to start dial-
ing.
or
XTo exit the redial memory: press the
~ or% button.
Assistance graphic menu
XPress the òbutton on the steering
wheel to open the menu list.
XPress the :or9 button on the steer-
ing wheel to select the Assistance
Graphicmenu.
XConfirm by pressingaon the steering
wheel.
The multifunction display shows the
DISTRONIC PLUS distance display in the
assistance graphic.
Menus and submenus251
On-board computer and displays
Z
Page 254 of 418

The assistance graphic displays the status
of and information from the following driv-
ing systems or driving safety systems:
RDISTRONIC PLUS (Ypage 183)
RTraffic Sign Assist (Ypage 216)
RDistance warning and the autonomous
braking function COLLISION PREVEN-
TION ASSIST PLUS (
Ypage 70)
RPRE-SAFE®Brake (Ypage 75)
RBlind Spot Assist (Ypage 217) or Active
Blind Spot Assist (
Ypage 222)
RATTENTION ASSIST (Ypage 214)
RLane Keeping Assist (Ypage 220) or
Active Lane Keeping Assist
(
Ypage 225)
RRear window wiper (Ypage 135)
XPress :to display the ATTEN-
TION ASSIST assessment.
Service menu
Introduction
Depending on the equipment installed in the
vehicle, you have the following options in the
Service
menu:
RCalling up display messages in message
memory (
Ypage 257)
RChecking the tire pressure electronically
(
Ypage 383)
RCalling up the service due date
(
Ypage 343)
Settings menu
Introduction
Depending on the equipment installed in the
vehicle, you have the following options in the
Settings
menu:
RChanging assistance settings
(
Ypage 252)
RChanging head-up display settings
(
Ypage 254)
RChanging the light settings (Ypage 255)
RChanging the instrument cluster settings
(
Ypage 255)
RRestoring the factory settings
(
Ypage 256)
Assistance submenu
Activating/deactivating COLLISION PRE-
VENTION ASSIST PLUS
XPress the òbutton on the steering
wheel to open the menu list.
XPress the :or9 button on the steer-
ing wheel to select the Settings
menu.
XConfirm by pressingaon the steering
wheel.
XUse : or9 to select the DriveAs‐
sistsubmenu.
XPressato confirm.
XPress 9or: to select Collision
Prevention.
252Menus and submenus
On-board computer and displays
Page 255 of 418

XPressato confirm.
The current selection appears.
XTo activate/deactivate: press thea
button again.
When COLLISION PREVENTION ASSIST
PLUS is deactivated, the æsymbol
appears in the multifunction display in the
Assistance Graphic
menu.
For further information about COLLISION
PREVENTION ASSIST PLUS, see (
Ypage 70).
Activating/deactivating PRE-SAFE
®
Brake
PRE ‑SAFE
®Brake is only available for vehi-
cles with the Driving Assistance package.
XPress the òbutton on the steering
wheel to open the menu list.
XPress the :or9 button on the steer-
ing wheel to select the Settings
menu.
XConfirm by pressingaon the steering
wheel.
XUse : or9 to select the DriveAs‐
sistsubmenu.
XPressato confirm.
XPress :or9 to select PRE-SAFE
Brake.
XPressato confirm.
The current selection appears.
XTo activate/deactivate: press thea
button again.
When PRE-SAFE
®Brake is deactivated, the
æ symbol appears in the multifunction
display in the Assistance
Graphicmenu.
For more information on PRE ‑SAFE
®Brake,
see (
Ypage 75).
Activating/deactivating Blind Spot Assist
XPress the òbutton on the steering
wheel to open the menu list.
XPress the :or9 button on the steer-
ing wheel to select the Settings
menu.
XConfirm by pressingaon the steering
wheel.
XUse : or9 to select the DriveAs‐
sistsubmenu.
XPressato confirm.
XPress :or9 to select BlindSpot
Assist.
XPressato confirm.
The current selection appears.
XTo activate/deactivate: press thea
button again.
For further information about Blind Spot
Assist, see (
Ypage 217).
For further information about Active Blind
Spot Assist, see (
Ypage 222).
Setting ATTENTION ASSIST
XPress the òbutton on the steering
wheel to open the menu list.
XPress the :or9 button on the steer-
ing wheel to select the Settings
menu.
XConfirm by pressingaon the steering
wheel.
XUse : or9 to select the DriveAs‐
sistsubmenu.
XPressato confirm.
XPress :or9 to select ATTENTION
ASSIST.
XPressato confirm.
XPress :or9 to select Off,Stand‐
ardor Sensitive.
XPress the abutton to confirm the selec-
tion.
When ATTENTION ASSIST is deactivated,
the é symbol appears in the Assis‐
tance Graphicmenu in the multifunction
display.
For further information about ATTENTION
ASSIST, see (
Ypage 214).
Setting Lane Keeping Assist
XPress the òbutton on the steering
wheel to open the menu list.
XPress the :or9 button on the steer-
ing wheel to select the Settings
menu.
Menus and submenus253
On-board computer and displays
Z
Page 256 of 418

XConfirmbypressing aon the steering
wheel.
XUse : or9 to select the DriveAs‐
sistsubmenu.
XPressato confirm.
XPress :or9 to select Lane Keep‐
ing Assist.
XPressato confirm.
The current selection, Standard
orAdap‐
tive, appears.
XTo change the setting: pressaagain.
For further information about Lane Keeping
Assist, see (
Ypage 220).
For further information about Active Lane
Keepin g Assist, see (
Ypage 225).
Head-up display submenu
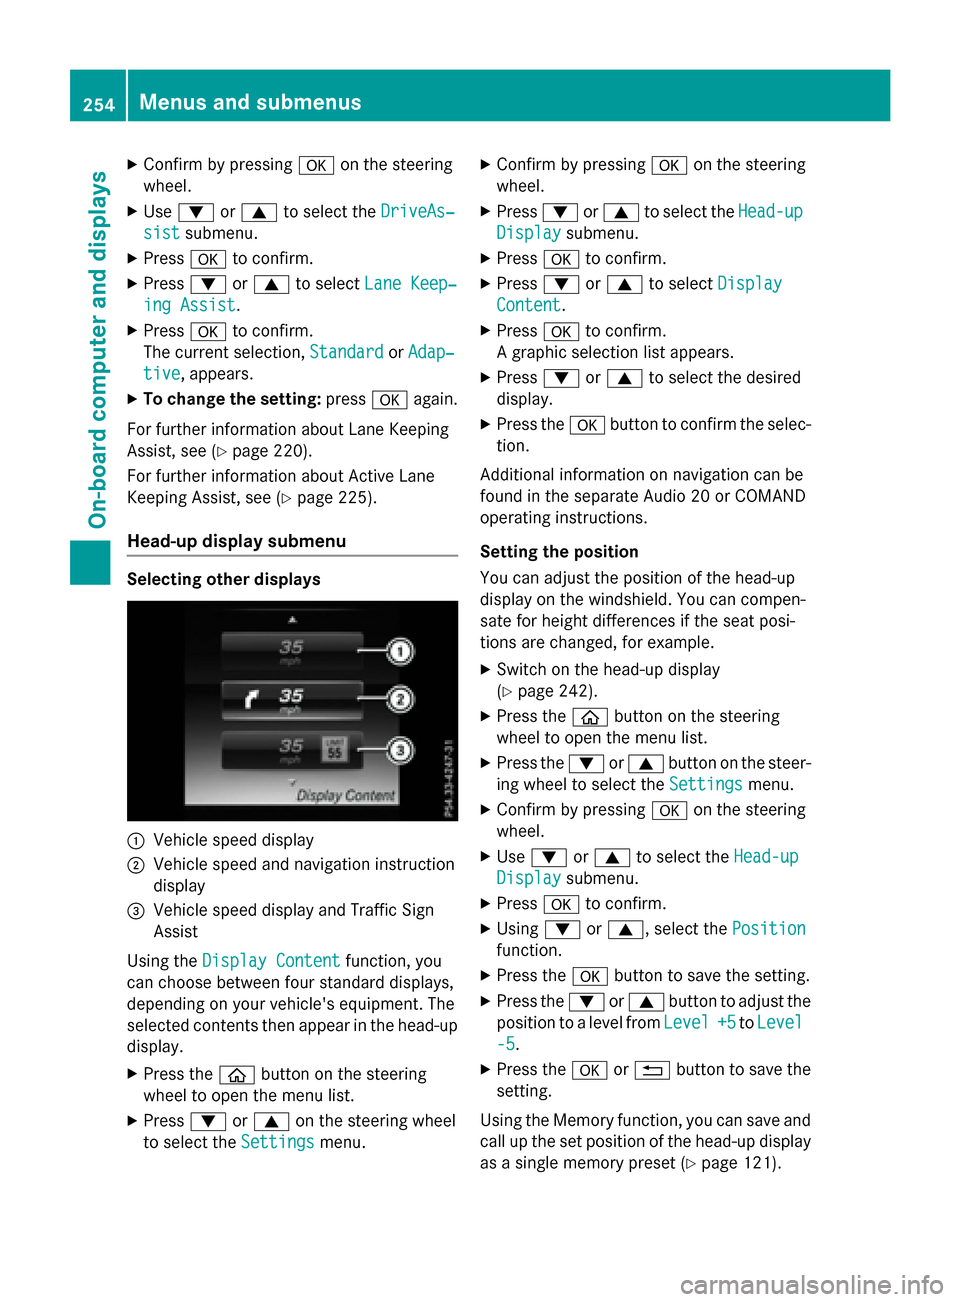
Selecting other displays
:Vehicle speed display
;Vehiclespeed and navigation instruction
disp lay
=Vehicle speed display and Traffic Sign
Assist
Using the Display Content
function, you
can choose between four standard displays,
depe nding on your vehicle's equipment. The
selected contents then appear inthe head-up
disp lay.
XPress the òbutton on the steering
wheel to open the menu list.
XPress :or9 on the steering wheel
to select the Settings
menu.
XConfirmbypressing aon the steering
wheel.
XPress :or9 to select the Head-up
Displaysubmenu.
XPressato confirm.
XPress :or9 to select Display
Content.
XPressato confirm.
A graphic selection listappears.
XPress :or9 to select the desired
display.
XPress the abutton to confirm the selec-
tion.
Ad ditional information on navigation can be
found inthe separate Aud io20 or COMAND
operating instructions.
Setting the positi on
You can adjust the position of the head-up
display on the windshield. You can compen-
sate for height differences ifthe seat posi-
tions are changed, for example.
XSwit ch on the head-up display
(
Ypage 242).
XPress the òbutton on the steering
wheel to open the menu list.
XPress the :or9 button on the steer-
ing wheel to select the Settings
menu.
XConfirmbypressing aon the steering
wheel.
XUse : or9 to select the Head-up
Displaysubmenu.
XPressato confirm.
XUsing :or9, select the Position
function.
XPress theabutton to save the setting.
XPress the :or9 button to adjust the
position to a level from Level
+5toLevel
-5.
XPress the aor% button to save the
setting.
Using the Memory function, you can save and
call up the set position of the head-up display
as a single memory preset (
Ypage 121).
254Menus and submenus
On-board computer and displays
Page 257 of 418

Setting the brightness
The brightness of the head-up display is auto-
matically adjusted to the surrounding ambi-
ent light. You can also individually adjust the
brightness of the head-up display.
XSwitch on the head-up display
(
Ypage 242).
XPress theòbutton on the steering
wheel to open the menu list.
XPress the :or9 button on the steer-
ing wheel to select the Settings
menu.
XConfirm by pressingaon the steering
wheel.
XUse : or9 to select the Head-up
Displaysubmenu.
XPressato confirm.
XUsing :or9, select the Bright‐
nessfunction.
XPress theabutton to save the setting.
XPress the :or9 button to adjust the
brightness to a level from Level
+5(bright)
to Level -5
(dark).
XPress the aor% button to save the
setting.
Light submenu
Switching the daytime running lamps on/
off
This function is not available in Canada.
XPress the òbutton on the steering
wheel to open the menu list.
XPress the :or9 button on the steer-
ing wheel to select the Settings
menu.
XConfirm by pressingaon the steering
wheel.
XUse : or9 to select the Lights
submenu.
XPressato confirm.
XPress the :or9 button to select the
Daytime Running Lights
function.
If the Daytime Running Lights
function
has been switched on, the cone of light and the
W symbol in the multifunction dis-
play are shown in white.
XPress the abutton to save the setting.
Further information on daytime running
lamps Daytime Running Lights
(Ypage 124).
Instrument cluster submenu
Selecting the distance unit
TheDisplay
UnitSpeed-/Odometerfunc-
tion allows you to choose whether certain
displays appear in kilometers or miles in the
multifunction display.
XPress the òbutton on the steering
wheel to open the menu list.
XPress the :or9 button on the steer-
ing wheel to select the Settings
menu.
XConfirm by pressingaon the steering
wheel.
XUse : or9 to select the Instru‐
ment Clustersubmenu.
XPressato confirm.
XPress :or9 to select the Display
Unit Speed-/Odometerfunction.
The current setting km
orMilesappears.
XPress the abutton to save the setting.
The selected unit of measurement for dis-
tance applies to:
RDigital speedometer in the Tripmenu
ROdometer and the trip odometer
RTrip computer
RCurrent consumption and the range
RNavigation instructions in the Navimenu
RCruise Control
RDISTRONIC PLUS with Steering Assist and
Stop&Go Pilot
RASSYST PLUS service interval display
Switching the additional speedometer
on/off
The Additional Speedometer [km/h]
function allows you to choose whether the
status area in the multifunction display shows
Menus and submenus255
On-board computer and displays
Z
Page 258 of 418

the speed digitally. The unit in the additional
speedometer is always inverse to the speed-
ometer unit.
XPress theòbutton on the steering
wheel to open the menu list.
XPress :or9 on the steering wheel
to select the Settings
menu.
XConfirm by pressing aon the steering
wheel.
XPress :or9 to select the Instru‐
ment Clustersubmenu.
XPressato confirm.
XUsing :or9, select the Addi‐
tional Speedometer [km/h]function.
The current selection appears.
XTo activate/deactivate: press thea
button again.
Restoring the factory settings
XPress the òbutton on the steering
wheel to open the menu list.
XPress the :or9 button on the steer-
ing wheel to select the Settings
menu.
XConfirm by pressingaon the steering
wheel.
XUse : or9 to select the Factory
Settingssubmenu.
XPressato confirm.
The Reset All Settings?
function
appears.
XPress :or9 to select NoorYes.
XPress ato confirm the selection.
If you have selected Yes
, the multifunction
display shows a confirmation message.
For safety reasons, the Daytime Running
Lightsfunction in theLightssubmenu is
only reset when the vehicle is stationary.
256Menus and submenus
On-board computer and displays
Page 259 of 418

Display messages
Introduction
General notes
Display message sappear in th emultifunction display.
Display message swit hgraphi cdisplays may be shown in simplified form in th eOperator's
Manual and may therefore diffe rfrom th emultifunction display.
Please respon din accordance wit hth edisplay message sand follow th eadditional note sin this
Operator's Manual.
Wit hcertain display messages, you will also hear awarnin gtone .
You can hide th edisplay messages. The display message sare then stored in th emessage
memory. Rectify th ecaus eof adisplay message as soo nas possible.
Whe nyou stop and par kth evehicle, pleas eobserv eth enote son :
RHOLD function (Ypage 194)
RParking(Ypage 172)
Hiding display messages
XPress th ea or% buttonon th esteerin gwheel.
The multifunction display hide sth edisplay message .
High-priorit ydisplay message sare shown in red in th emultifunction display. Some high-pri -
orit ydisplay message scanno tbe hidden .
The multifunction display shows these message scontinuously until th ecauses fo rth emes -
sage shav ebeen remedied.
Message memory
The on-boar dcompute rsaves certain display message sin th emessage memory .You can cal l
up th edisplay messages:
XPress th eò buttonon th esteerin gwhee lto ope nth emen ulist .
XPress :or9 on thesteerin gwhee lto selec tth eServic emenu.
XConfirmby pressing aon thesteerin gwheel.
XPress th e: or9 buttonto selec tth emessage memory.
If there are no display messages, th eNo Messages
display appears in th emultifunction
display.
Whe nthere are display messages, th enumber of stored message sappears .
XPressato confirm .
XPress the: or9 buttonto scroll through th edisplay messages.
Display messages25 7
On-board computer and displays
Z