2016 MERCEDES-BENZ GLA automatic transmission
[x] Cancel search: automatic transmissionPage 201 of 390
Chassis with adaptive adjustable
damping
General notes Suspension with the Adaptive Damping Sys-
tem provides improved driving comfort and
continuously controls the calibration of the
dampers. The damping characteristics adapt
to the current operating and driving situation.
The damping is tuned individually to each
wheel and depends on: R
your driving style, e.g. sporty R
the road surface conditions R
the drive program selected R
the vehicle level setting
The drive program can be set using the
DYNAMIC SELECT button ( Y
page 157).
Selecting Comfort mode
In the Comfort drive program, the driving
characteristics of your vehicle are more com-
fortable. Therefore, select this mode if you
favor a more comfortable driving style. Also
select the Comfort drive program when driv-
ing fast on straight roads, e.g. on straight
stretches of highway. X
Press DYNAMIC SELECT button �C
( Y
page 157) as many times as necessary
until the Comfort drive program is selec-
ted.
Selecting Sport mode
The firmer setting of the suspension tuning in
the Sport drive program ensures even better
contact with the road. Select this drive pro- gram when employing a sporty driving style,
e.g. on winding country roads.
DSR is not available in the Sport drive pro-
gram. For further information on DSR, see
( Y
page 197). X
Press DYNAMIC SELECT button �C
( Y
page 157) as many times as necessary
until the Sport drive program is selected.
Selecting Off-road mode
i The Off-road program is only available on
vehicles with the Off-road package.
The engine’s performance characteristics
and the gearshifting characteristics of the
automatic transmission are adapted for the
Off-road drive program. ABS, ESP ®
and ETS
programs especially adapted to off-road driv-
ing are also activated. Select this drive pro-
gram when driving in easily negotiable off-
road terrain, e. g. dirt tracks.
Do not use the off-road program on roads that
are snow-covered or icy or if you have moun-
ted snow chains on your vehicle. X
Press DYNAMIC SELECT button �C
( Y
page 157) as many times as necessary
until the Off-road drive program is selec-
ted.
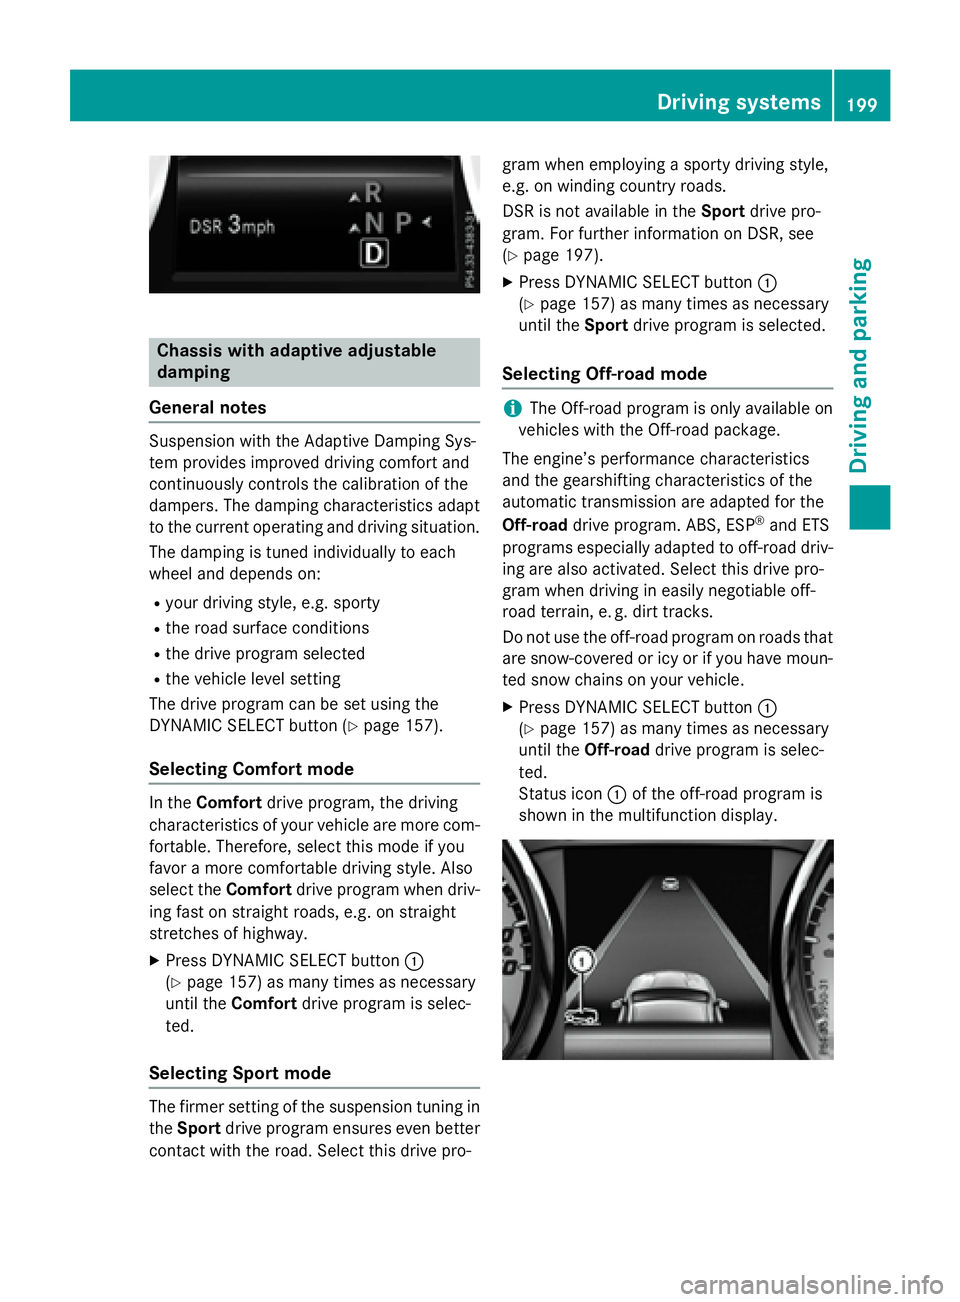
Status icon �C of the off-road program is
shown in the multifunction display. Driving systems 199
Driving and parking Z
Page 203 of 390
The sensors may not detect snow and other
objects that absorb ultrasonic waves.
Ultrasonic sources such as an automatic
car wash, the compressed-air brakes on a
truck or a pneumatic drill could cause
PARKTRONIC to malfunction.
PARKTRONIC may not function correctly on
uneven terrain.
PARKTRONIC is activated automatically when
you: R
switch on the ignition R
shift the transmission to position D , R or NR
release the electric parking brake
Range of the sensors General notes
PARKTRONIC does not take objects into con-
sideration that are: R
below the detection range, e.g. people, ani-
mals or objects. R
above the detection range, e.g. overhang-
ing loads, truck overhangs or loading
ramps.
�C
Sensors in the front bumper, left-hand
side (example)
The sensors must be free from dirt, ice or
slush. They can otherwise not function cor-
rectly. Clean the sensors regularly, taking
care not to scratch or damage them
( Y
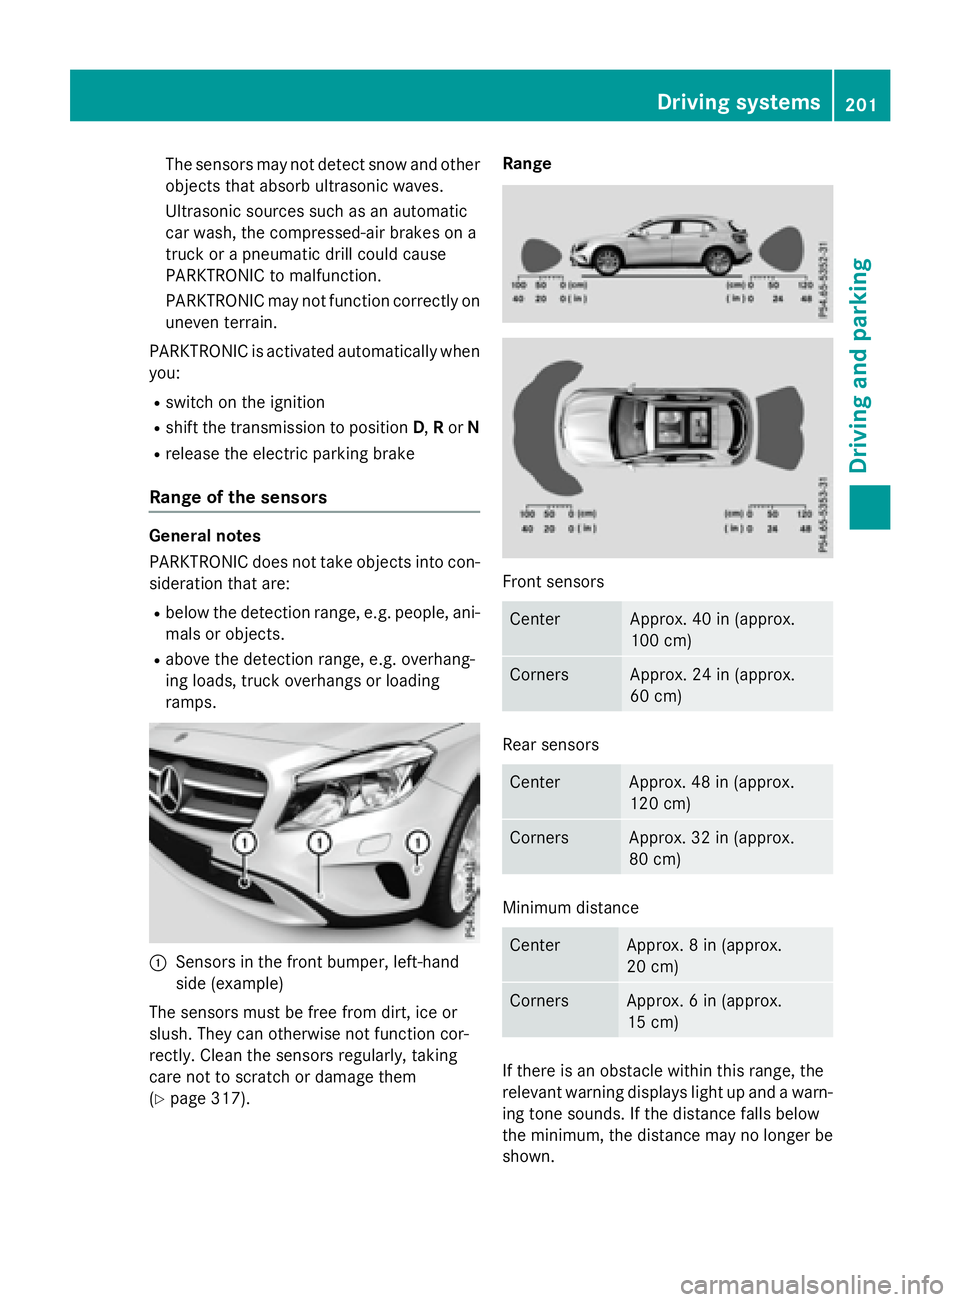
page 317). Range
Front sensors
Center Approx. 40 in (approx.
100 cm)
Corners Approx. 24 in (approx.
60 cm)
Rear sensors
Center Approx. 48 in (approx.
120 cm)
Corners Approx. 32 in (approx.
80 cm)
Minimum distance
Center Approx. 8 in (approx.
20 cm)
Corners Approx. 6 in (approx.
15 cm)
If there is an obstacle within this range, the
relevant warning displays light up and a warn-
ing tone sounds. If the distance falls below
the minimum, the distance may no longer be
shown. Driving systems 201
Driving and parking Z
Page 207 of 390
Active Parking Assist is switched on automat-
ically when driving forwards. The system is
operational at speeds of up to approximately
22 mph (35 km/h). While in operation, the
system independently locates and measures
parking spaces on both sides of the vehicle.
Active Parking Assist will only detect parking
spaces: R
that are parallel or at right-angles to the
direction of travel R
that are parallel to the direction of travel
and at least 59 in (1.5 m) wideR
that are parallel to the direction of travel
and at least 39.5 in (1.0 m) lo nger than your
vehicle R
that are at right angles to the direction of
travel and at least 39.5 in (1.0 m) wide r
than your vehicle
i Note that Active Parking Assist cannot
measure the length of a parking space if it
is at right angles to the direction of travel.
You will need to judge whether your vehicle
will fit into the parking space.
When driving at speeds below 19 mph
(30 km/h), you will see parking symbol �D as
a status indicator in the instrument cluster.
When a parking space has been detected, an
arrow towards the right or the left also
appears. By default, Active Parking Assist
onl y d isplays parking spaces on the front-
p assenger side. Parking spaces on the driv-
er's side are displayed as soon as the turn
signal on the driver's side is activated. When
parking on the driver's side, this must remain
activated until you confirm the use of Active
Parking Assist by pressing the �v button on
the multifunction steering wheel. The system
automatically determines whether the park-
ing space is parallel or at right-angles to the
direction of travel.
A parking space is displayed while you are
driving past it, and until you are approx-
imately 50 ft (15 m) away from it. Parking
G WARNING
If you leave the vehicle when it is only being
braked by Active Parking Assist it could roll
away if: R
there is a malfunction in the system or in
the voltage supply. R
the electrical system in the engine com-
partment, the battery or the fuses have
been tampered with. R
the battery is disconnected. R
the accelerator pedal has been depressed,
e.g. by a vehicle occupant.
There is a risk of an accident.
Before leaving the vehicle, always secure it
against rolling away.
i When PARKTRONIC detects obstacles,
Active Parking Assist brakes automatically
during the parking process. You are respon-
sible for braking in good time. X
Stop the vehicle when the parking space
symbol shows the desired parking space in
the instrument cluster. X
Shift the transmission to position R .
The Start Park Assist? Yes: OK No:
�8 message appears in the multifunction
display. X
To cancel the procedure: press the �8
button on the multifunction steering wheel
or pull away.
or X
To park using Active Parking Assist:
press the �v button on the multifunction
steering wheel.
The Park Assist Active Accelerate
and Brake Observe Surroundings mes-
sage appears in the multifunction display. X
Let go of the multifunction steering wheel. X
Back up the vehicle, being ready to brake at
all times. When backing up, drive at a speed
below approximately 6 mph (10 km/h). Driving system s 205
Dr ivi ng an d parking Z
Page 208 of 390
Otherwise Active Parking Assist will be can-
celed.
Active Parking Assist brakes the vehicle to
a standstill when the vehicle approaches
the rear border of the parking space.
Maneuvering may be required in tight park-
ing spaces.
The Park Assist Active Select D
Observe Surroundings message appears in
the multifunction display. X
Shift the transmission to position D while
the vehicle is stationary.
Active Parking Assist immediately steers in
the other direction.
The Park Assist Active Accelerate
and Brake Observe Surroundings mes-
sage appears in the multifunction display.
i You will achieve the best results by wait-
ing for the steering procedure to complete
before pulling away. X
Drive forwards and be ready to brake at all
times.
Active Parking Assist brakes the vehicle to
a standstill when the vehicle approaches
the front border of the parking space.
Maneuvering may be required in tight park-
ing spaces.
The Park Assist Active Select R
Observe Surroundings message appears in
the multifunction display.
As soon as the parking procedure is com-
plete, the Park
Assist Switched Off mes-
sage appears and a warning tone sounds. The
vehicle is now parked.
The vehicle is kept stationary without the
driver having to depress the brake pedal. The
braking effect is canceled when you depress
the accelerator pedal.
Active Parking Assist no longer supports you
with steering interventions and brake appli-
cations. When Active Parking Assist is fin-
ished, you must steer and brake again your-
self. PARKTRONIC is still available. Parking tips: R
The way your vehicle is positioned in the
parking space after parking is dependent
on various factors. These include the posi-
tion and shape of the vehicles parked in
front and behind it and the conditions of the
location. It may be the case that Active
Parking Assist guides you too far into a
parking space, or not far enough into it. In
some cases, it may also lead you across or
onto the curb. If necessary, you should can-
cel the parking procedure with Active Park-
ing Assist. R
You can also select preselect transmission
position D . The vehicle redirects and does
not drive as far into the parking space.
Should the transmission change take place
too early, the parking procedure will be
canceled. A sensible parking position can
no longer be achieved from this position.
Exiting a parking space In order that Active Parking Assist can sup-
port you when you exit the parking space: R
you need to have parked using Active Park-
ing Assist. R
the border of the parking space must be
high enough at the front and the rear. A
curb is too small, for example. R
the border of the parking space must not be
too wide, as the position of the vehicle must
not exceed an angle of 45° to the starting
position as it is maneuvering into the park-
ing space. R
a maneuvering distance of at least 3.3 ft
(1.0 m) must be available.
Active Parking Assist can only assist you with
exiting a parking space if you have parked the
vehicle parallel to the direction of travel using
Active Parking Assist.
i If PARKTRONIC detects obstacles, Active
Parking Assist brakes automatically whilst
the vehicle exits the parking space. You are
responsible for braking in good time.206
Driving systems
Driving and parking
Page 316 of 390
should drive for a few minutes after clean-
ing. Braking heats the brake discs and the
brake pads/linings, thus drying them. The
vehicle can then be parked.
Regular care of your vehicle is a condition for
retaining the quality in the long term.
Use care products and cleaning agents rec-
ommended and approved by Mercedes-Benz.
Washing the vehicle and cleaning the
paintwork
Automatic car wash
G WARNING
Braking efficiency is reduced after washing
the vehicle. There is a risk of an accident.
After the vehicle has been washed, brake
carefully while paying attention to the traffic
conditions until full braking power is restored.
! If DISTRONIC PLUS or the HOLD function
is activated, the vehicle brakes automati-
cally in certain situations.
To prevent damage to the vehicle, deacti-
vate DISTRONIC PLUS and the HOLD func-
tion in the following or other similar situa-
tions: R
when towing the vehicle R
in the car wash
! Never clean your vehicle in a Touchless
Automatic Car Wash as these use special
cleaning agents. These cleaning agents can
damage the paintwork or plastic parts.
! Make sure that the automatic transmis-
sion is in position N when washing your
vehicle in a tow-through car wash. The vehi-
cle could be damaged if the transmission is
in another position.
! Make sure that: R
the side windows and the sliding sunroof
are fully closed. R
the ventilation/heating is switched off
(the OFF button has been pressed/the
airflow control is set to position 0 ).R
the windshield wiper switch is in position
0 .
Otherwise, the vehicle might be damaged.
You can wash the vehicle in an automatic car
wash from the very start.
If the vehicle is very dirty, pre-wash it before
cleaning it in an automatic car wash.
After using an automatic car wash, wipe off
wax from the windshield and the wiper
blades. This will prevent smears and reduce
wiping noises caused by residue on the wind-
shield.
Washing by hand In some countries, washing by hand is only
allowed at specially equipped washing bays.
Observe the legal requirements in each coun-
try. X
Do not use hot water and do not wash the
vehicle in direct sunlight. X
Use a soft sponge to clean. X
Use a mild cleaning agent, such as a car
shampoo approved by Mercedes-Benz. X
Thoroughly hose down the vehicle with a
gentle jet of water. X
Do not point the water jet directly towards
the air inlet. X
Use plenty of water and rinse out the
sponge frequently. X
Rinse the vehicle with clean water and dry
thoroughly with a chamois. X
Do not let the cleaning agent dry on the
paintwork.
Carefully remove all deposits of road salt as
soon as possible when driving in winter.314
Care
Maintenance and care
Page 330 of 390
Always make sure that neither you nor the
battery is electrostatically charged. A build-
up of electrostatic charge can be caused, for
example: R
by wearing clothing made from synthetic
fibers R
due to friction between clothing and seats R
if you push or pull the battery across the
carpet or other synthetic materials R
if you wipe the battery with a cloth
G WARNING
During the charging process, a battery produ-
ces hydrogen gas. If a short circuit occurs or
sparks are created, the hydrogen gas can
ignite. There is a risk of an explosion. R
Make sure that the positive terminal of a
connected battery does not come into con-
tact with vehicle parts. R
Never place metal objects or tools on a bat-
tery. R
It is important that you observe the descri-
bed order of the battery terminals when
connecting and disconnecting a battery. R
When jump-starting, make sure that the
battery poles with identical polarity are
connected. R
It is particularly important to observe the
described order when connecting and dis-
connecting the jumper cables. R
Never connect or disconnect the battery
terminals while the engine is running.
G WARNING
Battery acid is caustic. There is a risk of injury.
Avoid contact with skin, eyes or clothing. Do
not inhale any battery gases. Do not lean over
the battery. Keep children away from batter-
ies. Wash away battery acid immediately with
plenty of clean water and seek medical atten-
tion. H Environmental note
Batteries contain dangerous
substances. It is against the
law to dispose of them with
the household rubbish. They
must be collected separately
and recycled to protect the
environment.
Dispose of batteries in an
environmentally friendly
manner. Take discharged
batteries to a qualified spe-
cialist workshop or a special
collection point for used bat-
teries.
! Have the battery checked regularly at a
qualified specialist workshop.
Observe the service intervals in the Main-
tenance Booklet or contact a qualified spe-
cialist workshop for more information.
! You should have all work involving the
battery carried out at a qualified specialist
workshop. In the exceptional case that it is
necessary for you to disconnect the battery
yourself, make sure that: R
you switch off the engine and remove the
key. On vehicles with KEYLESS-GO,
ensure that the ignition is switched off.
Check that all the indicator lamps in the
instrument cluster are off. Otherwise,
electronic components, such as the
alternator, may be damaged. R
you first remove the negative terminal
clamp and then the positive terminal
clamp. Never swap the terminal clamps.
Otherwise, the vehicle's electronic sys-
tem may be damaged. R
in vehicles with automatic transmission,
the transmission is locked in position P
after disconnecting the battery. The vehi-
cle is secured against rolling away. Yo u
ca n
then no longer move the vehicle.
The battery and the cover of the positive
terminal clamp must be installed securely
during operation.328
Battery (vehicle)
Breakdo wn assis tance
Page 336 of 390
! Make sure that the electric parking brake
is released. If the electric parking brake is
faulty, visit a qualified specialist workshop.
! Only secure the tow rope or tow bar at the
towing eyes. Otherwise, the vehicle could
be damaged.
! Do not use the towing eyes for recovery
purposes as this could damage the vehicle.
If in doubt, recover the vehicle with a crane.
! When towing, pull away slowly and
smoothly. If the tractive power is too high,
the vehicles could be damaged.
! The vehicle can be towed a maximum of
30 miles (50km). The towing speed of
30 mph (50km/h) must not be exceeded.
If the vehicle has to be towed more than
30 miles (50km), the front axle must be
raised or the entire vehicle raised and
transported.
! Do not tow with sling-type equipment.
This could damage the vehicle.
! When towing vehicles with KEYLESS-GO,
use the key instead of the Start/Stop but-
ton. Otherwise, the automatic transmission
may shift to position P when the driver's or
front-passenger door are opened, which
could lead to damage to the transmission.
! Vehicles with automatic transmission
must not be started by tow-starting. This
could otherwise damage the transmission.
It is better to have the vehicle transported
than to have it towed away.
If the vehicle can no longer be driven because
of an accident or breakdown, you have the
following options: R
Transporting the vehicle
As a rule, you should have the vehicle trans-
ported. R
Towing the vehicle with a tow rope or tow
bar
Only tow the vehicle in exceptional cases. The battery must be connected and charged.
Otherwise, you: R
cannot turn the SmartKey to position 2 in
the ignition lock R
cannot release the electric parking brake R
cannot shift the transmission to position N
The function of the electric parking brake and
the parking lock is dependent on the on-board
voltage.
If the on-board voltage is low or there is a
system malfunction, it is possible that: R
the electric parking brake may not be
applied in certain circumstances, or R
the transmission may not be shifted to P
Switch off non-essential consumers, e.g. the
radio.
Disarm the automatic locking feature before
the vehicle is towed ( Y
page 230). You could
otherwise be locked out when pushing or
towing the vehicle.
Installing/removing the towing eye
Installing the towing eye
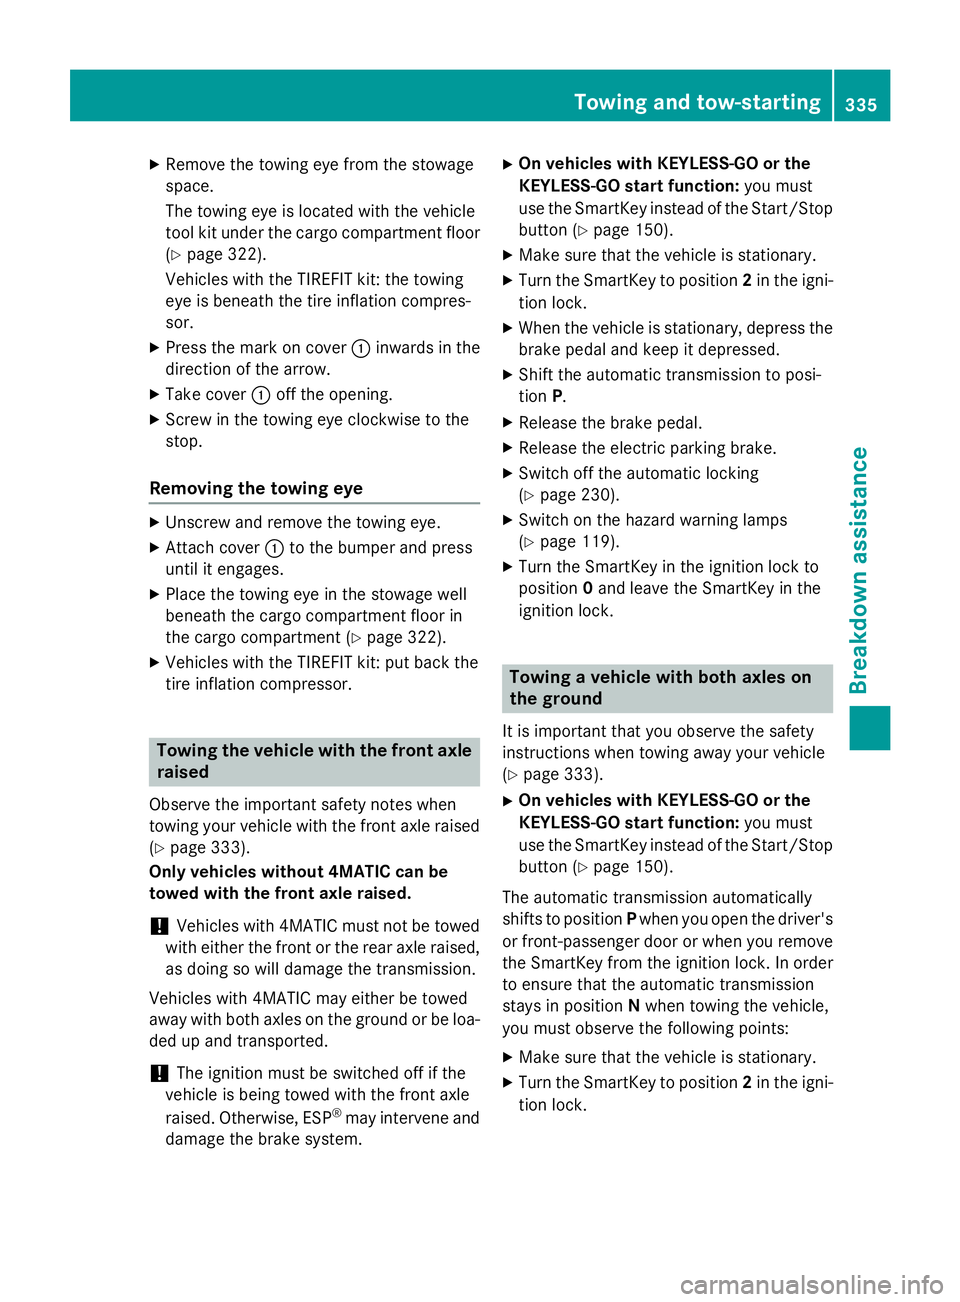
The brackets for the screw-in towing eye are
located in the bumpers. They are at the rear
and at the front, under covers �C .334
Towing and tow-starting
Breakdown assistance
Page 337 of 390
X
Remove th e towin g eye from th e stowage
space.
The towin g eye is locate d wit h th e vehicl e
tool ki t under th e cargo compartmen t floor
( Y
page 322).
Vehicles wit h th e TIREFI T kit: th e towin g
eye is beneat h th e tire inflation compres-
sor . X
Press th e mar k on cover �C inward s in th e
direction of th e arrow.X
Tak e cover �C off th e opening.X
Screw in th e towin g eye clockwise to th e
stop.
Removin g th e towing eyeX
Unscrew and remove th e towin g eye.X
Attac h cover �C to th e bumper and press
until it engages. X
Plac e th e towin g eye in th e stowage well
beneat h th e cargo compartmen t floor in
th e cargo compartmen t ( Y
page 322).X
Vehicles wit h th e TIREFI T kit: put bac k th e
tire inflation compressor.
Towing th e veh icle wit h th e fr ont axle
raised
Observ e th e important safet y note s when
towin g your vehicl e wit h th e fron t axl e raised
( Y
page 333).
Only vehicles withou t 4MATIC can be
towe d wit h th e front axle raised .
! Vehicles wit h 4MATIC mus t no t be towed
wit h either th e fron t or th e rear axl e raised,
as doin g so will damag e th e transmission .
Vehicles wit h 4MATIC may either be towed
away wit h bot h axles on th e ground or be loa-
ded up and transported.
! The ignition mus t be switched off if th e
vehicl e is bein g towed wit h th e fron t axl e
raised. Otherwise , ES P ®
may interven e and
damag e th e brak e system. X
On vehicles wit h KEYLESS-G O or th e
KEYLESS-G O star t function: you mus t
use th e SmartKey instead of th e Start/Sto p
butto n ( Y
page 150). X
Mak e sur e that th e vehicl e is stationary.X
Turn th e SmartKey to position 2 in th e igni-
tion lock. X
Whe n th e vehicl e is stationary, depress th e
brak e pedal and keep it depressed. X
Shift th e automatic transmission to posi-
tion P . X
Releas e th e brak e pedal .X
Releas e th e electric parkin g brake.X
Switc h off th e automatic locking
( Y
page 230). X
Switc h on th e hazard warnin g lamp s
( Y
page 119). X
Turn th e SmartKey in th e ignition loc k to
position 0 and leav e th e SmartKey in th e
ignition lock.
Towing a veh icle wit h bot h axles on
th e groun d
It is important that you observ e th e safet y
instruction s when towin g away your vehicl e
( Y
page 333). X
On vehicles wit h KEYLESS-G O or th e
KEYLESS-G O star t function: you mus t
use th e SmartKey instead of th e Start/Sto p
butto n ( Y
page 150).
The automatic transmission automatically
shift s to position P when you open th e driver's
or front-passenger doo r or when you remove
th e SmartKey from th e ignition lock. In order
to ensur e that th e automatic transmission
stays in position N when towin g th e vehicle,
you mus t observ e th e followin g points :X
Mak e sur e that th e vehicl e is stationary.X
Turn th e SmartKey to position 2 in th e igni-
tion lock.Towing and tow-starting 335
Breakdown assistance Z