2016 MERCEDES-BENZ GLA phone
[x] Cancel search: phonePage 298 of 390
by pressing the NAVI button on COMAND,
for example.
Voice output is not available.
A voice connection is established between
the Mercedes-Benz Customer Assistance
Center and the vehicle occupants.
You receive information about operating your
vehicle, about the nearest authorized
Mercedes-Benz Center and about other prod-
ucts and services from Mercedes-Benz.
USA only: you can find further information on
the mbrace system under "Owners Online" at
http://www.mbusa.com.
i The system has not been able to initiate
an MB Info call, if: R
the indicator lamp in MB Info call but-
ton �C is flashing continuously.R
no voice connection to the Mercedes-
Benz Customer Assistance Center was
established.
This can occur if the relevant mobile phone
network is not available, for example.
The Call Failed message appears in the
multifunction display. X
To end a call: press the �v button on the
multifunction steering wheel.
or X
Press the corresponding button for ending
a phone call on the audio system or on
COMAND.
Call priority
When service calls are active, e.g. Roadside
Assistance or MB Info calls, an emergency
call can still be initiated. In this case, an emer-
gency call will take priority and override all
other active calls.
The indicator lamp of the respective button
flashes until the call is ended.
An emergency call can only be terminated by
the Mercedes-Benz Customer Assistance
Center. All other calls can be ended by pressing: R
the �v button on the multifunction steer-
ing wheel R
the corresponding button on the audio sys-
tem or on COMAND for ending a telephone
call
i When a call is initiated, the audio system
is muted. The mobile phone is no longer
connected to COMAND. However, if you
want to use your mobile phone, do so only
when the vehicle is stationary and in a safe
location.
Downloading destinations in COMAND Downloading destinations
Downloading destinations gives you access
to a database with over 15 million points of
interest (POIs). These can be downloaded on
the navigation system in your vehicle. If you
know the destination, the address can be
downloaded. Alternatively, you can obtain the
location of Points of Interest (POIs)/impor-
tant destinations in the vicinity.
Furthermore, you can download routes with
up to 20 way points.
You are prompted to confirm route guidance
to the address entered.
The system calculates the route and subse-
quently starts the route guidance with the
address entered.
i If you select No , the address can be saved
in the address book.
i The destination download function is
available if the relevant mobile phone net-
work is available and data transfer is pos-
sible.
i The destination download function can
only be used if the vehicle is equipped with
a navigation system.
Route Assistance
This service is part of the mbrace PLUS Pack-
age and cannot be purchased separately.296
Features
Stowage and features
Page 300 of 390
R
USA: Mercedes-Benz Customer Assis-
tance Center at 1-800-FOR-MERCedes
(1-800-367-6372) or 1-866-990-9007 R
Canada: Customer Service at
1-888-923-8367
You will be asked for your password. X
Return to your vehicle at the time agreed
upon with the Mercedes-Benz Customer
Assistance Center.
USA only: alternatively, the vehicle can be
opened via: R
the Internet, under the "Owners Online"
section R
the telephone application (e. g. for iPhone ®
,
Android)
To do this, you will need your identification
number and password.
i Vehicle remote opening is only possible if
the corresponding mobile phone network is
accessible.
Vehicle remote closing
The valet locking feature can be used when
you have forgotten to lock the vehicle and you
are no longer nearby.
The vehicle can then be locked by the
Mercedes-Benz Customer Assistance Center.
The vehicle can be immediately remotely
locked within four days of the ignition being
turned off. After this time, remote closing may
be delayed by 15 to 60 minutes. After 30 days
the vehicle can no longer be locked remotely. X
Contact the following service hotlines: R
USA: Mercedes-Benz Customer Assis-
tance Center at 1-800-FOR-MERCedes
(1-800-367-6372) or 1-866-990-9007 R
Canada: Customer Service at
1-888-923-8367
You will be asked for your password.
The next time you are inside the vehicle and
you switch on the ignition, the Doors
Locked Remotely message appears in the
multifunction display. USA only: alternatively, the vehicle can be
locked via: R
the Internet, under the "Owners Online"
section R
the telephone application (e. g. for iPhone ®
,
Android)
To do this, you will need your identification
number and password.
i The vehicle remote closing feature is
available when the relevant mobile phone
network is available and data connection is
possible.
Stolen vehicle recovery service If your vehicle has been stolen: X
Notify the police.
The police will issue a numbered incident
report. X
This number will be forwarded to the
Mercedes-Benz Customer Assistance Cen-
ter together with your PIN.
The Mercedes-Benz Customer Assistance
Center then tries to locate the system. The
Mercedes-Benz Customer Assistance Cen-
ter contacts you and the local law enforce-
ment agency if the vehicle is located.
However, only the law enforcement agency
is informed of the location of the vehicle.
i If the anti-theft alarm system is activated
for longer than 30 seconds, the Mercedes-
Benz Customer Assistance Center is auto-
matically notified.
Vehicle remote malfunction diagnosis
With the Vehicle Health Check, the Customer
Assistance Center can provide improved sup-
port for problems with your vehicle. During an
existing call, vehicle data is transferred to the
Customer Assistance Center. The customer
service representative can use the received
data to decide what kind of assistance is
required. You are then, for example, guided to
the nearest authorized Mercedes-Benz Cen-
ter or a recovery vehicle is called.298
Features
Stowage and features
Page 301 of 390
If vehicle data needs to be transferred during
an MB Info call or a Roadside Assistance call,
this is initiated by the Customer Assistance
Center. You will see the Roadside Assis‐
tance Connected message in the COMAND
display. If the vehicle remote malfunction
diagnosis can be started, the Request for
vehicle diagnosis received. Start
vehicle diagnosis? message appears in
the display. X
Confirm the message with Yes .X
When the Vehicle Diagnosis Please
start ignition message appears, turn
the SmartKey to position 2 in the ignition
lock ( Y
page 149).X
When the Please follow the instruc‐
tions received by phone and move
your vehicle to a safe position
message appears, follow the customer ser-
vice representative's instructions.
The message in the display disappears.
If you select Cancel the remote malfunc-
tion diagnosis is canceled completely.
The vehicle operating state check begins.
You will see the Vehicle diagnosis
activated message.
When the diagnosis is completed, the Trans‐
fer vehicle diagnostics data (Voice
connection may be interrupted dur‐
ing data transfer) message appears. The
vehicle data can now be sent to the Customer
Assistance center. X
Press OK to confirm the message.
The voice connection with the Customer
Assistance Center is terminated.
You will see the Vehicle diagnosis:
Transferring data... message.
The vehicle data is sent to the Customer
Assistance Center.
Depending on what the customer service rep-
resentative agreed with you, the voice con-
nection is re-established after the transfer is
complete. If necessary, you will be contacted
at a later time by another means, e.g. by e-
mail or phone. Another function of the Vehicle Health Check
is the transfer of service data to the Customer
Assistance Center. If a service is overdue, the
COMAND display shows a message about
various special offers at your workshop.
USA only: this information can also be called
up under "Owners Online" at http://
www.mbusa.com.
Information on Roadside Assistance
( Y
page 24).
Downloading routes Downloading routes allows you to transfer
and save predefined routes in the navigation
system. To do this, an SD memory card must
be inserted into the COMAND system. If no
SD memory card is inserted, you must insert
the card into the card slot on the COMAND
system before saving.
A route can be prepared and sent either by a
customer service representative or via the
mbrace portal on the Internet.
Each route can include up to 20 way points.
Once a route has been received by the navi-
gation system, you will see the
Do you want to start route guidance?
message in the COMAND display. The route is
saved to the SD memory card. X
To start route guidance: select Yes .
An overview of the route is shown in the
display.
i If you select No , the saved route can be
called up later via the navigation menu. X
Select Start .
Route guidance is started.
i Downloaded and saved data can be called
up again in COMAND.
You can find further information in the sep-
arate COMAND Operating Instructions. Features 299
Stowage and features Z
Page 302 of 390
Speed alert You can define the upper speed limit, which
must not be exceeded by the vehicle.
If this selected speed is exceeded by the vehi-
cle, a message will be sent to the Customer
Assistance Center. The Customer Assistance
Center then forwards this information to you.
You can select the way in which you receive
this information beforehand. Possible options
include text message, e-mail or an automated
call.
The data you receive contains the following
information: R
the location where the speed limit was
exceeded R
the time at which the speed limit was
exceeded R
the selected speed limit which was excee-
ded
Geo fencing
Geo fencing allows you to select areas which
the vehicle should not enter or leave. You will
be informed if the vehicle crosses the boun-
daries of the selected areas. You can select
the way in which you receive this information
beforehand. Possible options include text
message, e-mail or an automated call.
The area can be determined as either a circle
or a polygon with a maximum of ten corners.
You can specify up to ten areas simultane-
ously. Different settings are possible for each
area.
USA only: these settings can be called up
under "Owners Online" at http://
www.mbusa.com.
Alternatively, you can trigger an MB Info call
and inform the customer service representa-
tive that you wish to activate geo fencing.
Currently inactive areas can be activated by
text message. Triggering the vehicle alarm With this function, you can trigger the vehi-
cle's panic alarm via text message. An alarm
sounds and the exterior lighting flashes.
Depending on the setting, the panic alarm
lasts five or ten seconds. Afterwards, the
alarm switches off.
Garage door opener
General notes The HomeLink ®
garage door opener integra-
ted in the rear-view mirror allows you to oper-
ate up to three different door and gate sys-
tems.
Use the integrated garage door opener only
on garage doors that: R
have safety stop and reverse features and R
meet current U.S. federal safety standards
Once programed, the integrated garage door
opener in the rear-view mirror will assume the
function of the garage door system's remote
control. Please also read the operating
instructions for the garage door system.
When programming a garage door opener,
park the vehicle outside the garage. Do not
run the engine while programming.
Certain garage door drives are incompatible
with the integrated garage door opener. If you
have difficulty programing the integrated
garage door opener, contact an authorized
Mercedes-Benz Center.
Alternatively, you can call the following tele-
phone assistance services: R
USA: Mercedes-Benz Customer Assistance
Center at 1-800-FOR-MERCedes R
Canada: Customer Service at
1-800-387-0100 R
HomeLink ®
hotline 1-800-355-3515 (free
of charge)
More information on HomeLink ®
and/or
compatible products is also available online
at http://www.homelink.com.300
Features
Stowage and features
Page 325 of 390
Vehicles equipped with MOExtended tires are
not equipped with a TIREFIT kit at the factory.
It is therefore recommended that you addi-
tionally equip your vehicle with a TIREFIT kit if
you mount tires that do not feature run-flat
properties, e.g. winter tires. A TIREFIT kit may
be obtained from a qualified specialist work-
shop.
Information on changing and mounting
wheels ( Y
page 363).X
Stop the vehicle on solid, non-slippery and
level ground, as far away as possible from
traffic. X
Switch on the hazard warning lamps. X
Secure the vehicle against rolling away
( Y
page 171). X
If possible, bring the front wheels into the
straight-ahead position. X
Switch off the engine. X
Vehicles without KEYLESS-GO: remove
the SmartKey from the ignition lock. X
Vehicles with KEYLESS-GO start-func-
tion or KEYLESS-GO: open the driver's
door.
The on-board electronics now have status
0 . This is the same as the SmartKey having
been removed. X
Vehicles with KEYLESS-GO start-func-
tion or KEYLESS-GO: remove the Start/
Stop button from the ignition lock
( Y
page 149). X
Make sure that the engine cannot be star-
ted via your smartphone ( Y
page 171).X
Make sure that the passengers are not
endangered as they do so. Make sure that
no one is near the danger area while a
wheel is being changed. Anyone who is not
directly assisting in the wheel change
should, for example, stand behind the bar-
rier. X
Get out of the vehicle. Pay attention to traf-
fic conditions when doing so. X
Close the driver's door. MOExtended tires (tires with run-flat
properties)
General notes With MOExtended tires (tires with run flat
characteristics), you can continue to drive
your vehicle even if there is a total loss of
pressure in one or more tires. The affected
tire must not show any clearly visible damage.
You can recognize MOExtended tires by the
MOExtended marking which appears on the
sidewall of the tire. You will find this marking
next to the tire size designation, the load-
bearing capacity and the speed index
( Y
page 357).
MOExtended tires may only be used in con-
junction with an active tire pressure loss
warning system or with an active tire pressure
monitor.
If a pressure loss warning message
appears in the multifunction display: R
observe the instructions in the display mes-
sages ( Y
page 258). R
check the tire for damage. R
if driving on, observe the following notes.
The driving distance possible in run-flat mode
is approximately 50 miles (80 km) when the
vehicle is partially laden. When the vehicle is
fully laden it is approximately 19 miles
(30 km).
In addition to the vehicle load, the driving dis-
tance possible depends upon: R
vehicle speed R
road condition R
outside temperature
The driving distance possible in run-flat mode
may be reduced by extreme driving condi-
tions or maneuvers, or it can be increased
through a moderate style of driving.
The driving distance possible in run-flat mode
is counted from the moment the tire pressure
loss warning appears in the multifunction dis-
play. Flat tire 323
Breakdown assistance
Page 352 of 390
computer refer to those measured at sea
level. At high altitudes, the tire pressure val-
ues indicated by a pressure gauge are higher
than those shown by the on-board computer.
In this case, do not reduce the tire pressures.
The operation of the tire pressure monitor can
be affected by interference from radio trans-
mitting equipment (e.g. radio headphones,
two-way radios) that may be being operated
in or near the vehicle.
Checking the tire pressure electroni-
cally X
Make sure that the SmartKey is in position
2 in the ignition lock ( Y
page 149).X
Press �Y or �e on the steering wheel
to select the Serv.
menu.X
Press the �c or �d button to select
Tire Pressure
.X
Press the �v button.
The current tire pressure of each tire is
shown in the multifunction display.
If the vehicle was parked for longer than
20 minutes, the Tire pressure will be
displayed after driving a few
minutes message is shown.
After a teach-in process, the tire pressure
monitor automatically detects new wheels or
new sensors. As long as a clear allocation of
the tire pressure value to the individual
wheels is not possible, the Tire Pressure
Monitor Active message is shown instead
of the tire pressure display. The tire pressures
are already being monitored.
Tire pressure monitor warning mes-
sages
If the tire pressure monitor detects a pressure
loss in one or more tires, a warning message
is shown in the multifunction display. The yel-
low tire pressure warning lamp then lights up. R
If the Please Correct Tire Pressure
message appears in the multifunction dis-
play, the tire pressure in at least one tire is too low. The tire pressure must be correc-
ted when the opportunity arises. R
If the Check Tire Pressure message
appears in the multifunction display, the
tire pressure in one or more tires has drop-
ped significantly. The tires must be
checked. R
If the Tire Pressure Warning Tire
Failure message appears in the multi-
function display, the tire pressure in one or
more tires has dropped suddenly. The tires
must be checked.
Observe the instructions and safety notes in
the display messages in the "Tires" section
( Y
page 258).
If the wheel positions on the vehicle are rota-
ted, the tire pressures may be displayed for
the wrong positions for a short time. This is
rectified after a few minutes of driving, and
the tire pressures are displayed for the cor-
rect positions.
Restarting the tire pressure monitor
When you restart the tire pressure monitor, all
existing warning messages are deleted and
the warning lamps go out. The monitor uses
the currently set tire pressures as the refer-
ence values for monitoring. In most cases, the
tire pressure monitor will automatically
detect the new reference values after you
have changed the tire pressure. However, you
can also define reference values manually as
described here. The tire pressure monitor
then monitors the new tire pressure values. X
Set the tire pressure to the value recom-
mended for the corresponding driving sit-
uation on the Tire and Loading Information
placard on the driver's side
B-pillar ( Y
page 343).
You can find more tire pressure values for
various operating conditions in the tire
pressure table inside the fuel filler flap
( Y
page 170). X
Make sure that the tire pressure is correct
on all four wheels.350
Tire pressure
Wheels and tires
Page 366 of 390
X
Vehicles without KEYLESS-GO: remove
the SmartKey from the ignition lock. X
Vehicles with KEYLESS-GO start-func-
tion or KEYLESS-GO: open the driver's
door.
The on-board electronics now have status
0 . This is the same as the SmartKey having
been removed. X
Vehicles with KEYLESS-GO start-func-
tion or KEYLESS-GO: remove the Start/
Stop button from the ignition lock
( Y
page 149). X
Make sure that the engine cannot be star-
ted via your smartphone ( Y
page 171).X
If included in the vehicle equipment,
remove the tire-change tool kit from the
vehicle. X
Safeguard the vehicle against rolling away
( Y
page 171).
Securing the vehicle to prevent it from
rolling away
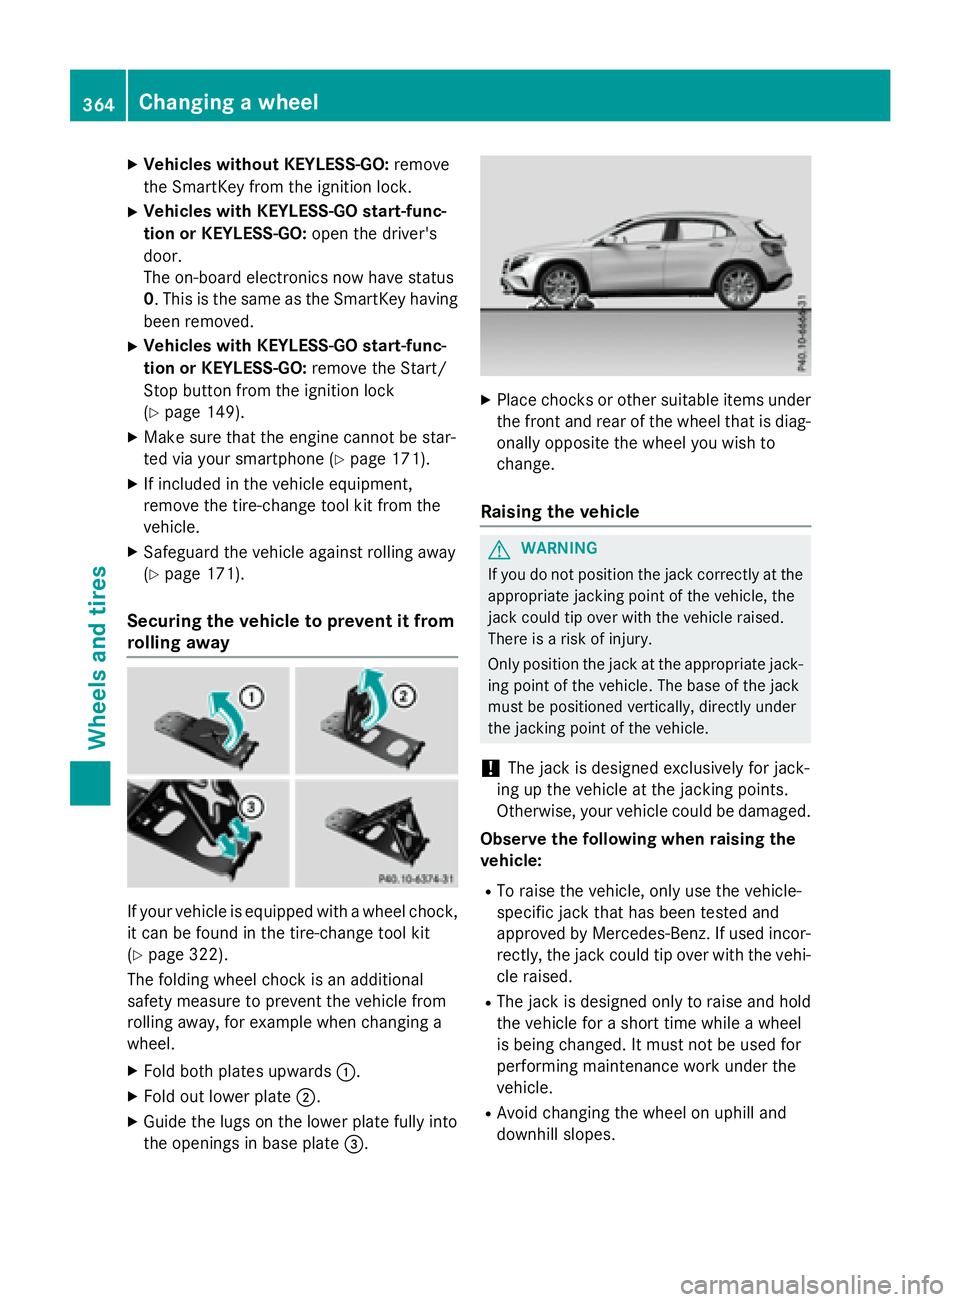
If your vehicle is equipped with a wheel chock,
it can be found in the tire-change tool kit
( Y
page 322).
The folding wheel chock is an additional
safety measure to prevent the vehicle from
rolling away, for example when changing a
wheel. X
Fold both plates upwards �C .X
Fold out lower plate �D .X
Guide the lugs on the lower plate fully into
the openings in base plate �
Page 376 of 390
Useful information
i This Operator's Manual describes all
models and all standard and optional equip-
ment of your vehicle available at the time of
publication of the Operator's Manual.
Country-specific differences are possible.
Please note that your vehicle may not be
equipped with all features described. This
also applies to safety-related systems and
functions.
i Read the information on qualified special-
ist workshops ( Y
page 25).
Information regarding technical data
i The data stated here specifically refers to
a vehicle with standard equipment. Consult
an authorized Mercedes-Benz Center for
the data for all vehicle variants and trim
levels.
Vehicle electronics
Retrofitting two-way radios and
mobile phones (RF transmitters)
G WARNING
The electromagnetic radiation from modified
or incorrectly retrofitted RF-transmitters can
interfere with the vehicle electronics. This can
compromise the operational safety of the
vehicle. There is a risk of an accident.
You should have all work to electrical and
electronic equipment carried out at a qualified
specialist workshop. G WARNING
The electromagnetic radiation from incor-
rectly operated RF transmitters can interfere
with the vehicle electronics, for example: R
if the RF transmitter is not connected with
an exterior antenna R
the exterior antenna has been installed
incorrectly or is not a low-reflection type
This can compromise the operational safety
of the vehicle. There is a risk of an accident.
Have the low-reflection exterior antenna
mounted at a qualified specialist workshop.
When operating RF transmitters in the vehi-
cle, always connect them with the low-reflec-
tion exterior antenna.
! The operating permit may be invalidated if
the instructions for installation and use of
RF transmitters are not observed.
In particular, the following conditions must
be complied with: R
only approved wavebands may be used. R
compliance with the maximum permissi-
ble output in these wavebands is
required. R
only approved antenna positions may be
used.
Excessive levels of electromagnetic radiation
may cause damage to your health and the
health of others. Using an exterior antenna
takes into account current scientific discus-
sions relating to the possible health hazards
that may result from electromagnetic fields.374
Vehicle electronics
Technical data