2016 MERCEDES-BENZ GLA-Class lock
[x] Cancel search: lockPage 279 of 390

ProblemPossible causes/consequences andMSolutions
XLeave the vehicle and keep a safe distance from the vehicle until
the engine has cooled down.
XCheck the coolant level and add coolant, observing the warning
notes (
Ypage 311).
XIf you have to add coolant frequently, have the engine cooling
system checked.
XMake sure that the air supply to the engine radiator is not
blocked, e.g. by snow, slush or ice.
XAt coolant temperatures below 248 ‡ (120 †), drive to the
nearest qualified specialist workshop.
XAvoid heavy loads on the engine as you do so, e.g. driving in
mountainous terrain and stop-start traffic.
Driving systems
ProblemPossible causes/consequences and MSolutions
·
The red distance warn-
ing lamp lights up while
the vehicle is in motion.
A warning tone also
sounds.You are approaching a vehicle or a stationary obstacle in your line
of travel at too high a speed.
XBe prepared to brake immediately.
XPay careful attention to the traffic situation. You may have to
brake or take evasive action.
For further information about the distance warning function of
COLLISION PREVENTION ASSIST PLUS, see (
Ypage 66).
Warning and indicator lamps in the instrument cluster277
On-board computer and displays
Z
Page 282 of 390

Useful information
i
This Operator's Manual describes all
models and all standard and optional equip-
ment of your vehicle available at the time of
publication of the Operator's Manual.
Country-specific differences are possible.
Please note that your vehicle may not be
equipped with all features described. This
also applies to safety-related systems and
functions.
iRead the information on qualified special-
ist workshops (
Ypage 25).
Loading guidelines
GWARNING
If objects, luggage or loads are not secured or
not secured sufficiently, they could slip, tip
over or be flung around and thereby hit vehicle
occupants. There is a risk of injury, particu-
larly in the event of sudden braking or a sud-
den change in direction.
Always store objects so that they cannot be
flung around. Secure objects, luggage or
loads against slipping or tipping before the
journey.
GWARNING
Combustion engines emit poisonous exhaust
gases such as carbon monoxide. If the tailgate
is open when the engine is running, particu-
larly if the vehicle is moving, exhaust fumes
could enter the passenger compartment.
There is a risk of poisoning.
Turn off the engine before opening the tail-
gate. Never drive with the tailgate open.
GWARNING
The exhaust tail pipe and tail pipe trim can
become very hot. If you come into contact
with these parts of the vehicle, you could burn
yourself. There is a risk of injury.
Always be particularly careful around the
exhaust tail pipe and the tail pipe trim. Allow
these components to cool down before touch-
ing them.
The handling characteristics of a laden vehi-
cle are dependent on the distribution of the
load within the vehicle. For this reason, you
should observe the following notes when
transporting a load:
RNever exceed the maximum permissible
gross vehicle mass or the gross axle weight
rating for the vehicle (including occupants).
The values are specified on the vehicle
identification plate on the B-pillar of the
driver's door.
RThe cargo compartment is the preferred
place to carry objects.
RPosition heavy loads as far forwards as pos-
sible and as low down in the cargo com-
partment as possible.
RThe load must not protrude above the
upper edge of the seat backrests.
RAlways place the load against the rear or
front seat backrests. Make sure that the
seat backrests are securely locked into
place.
RAlways place the load behind unoccupied
seats if possible.
RUse the cargo tie-down rings and the parcel
nets to transport loads and luggage.
RUse cargo tie-down rings and fastening
materials appropriate for the weight and
size of the load.
RThe maximum load capacity of the stowage
well under the cargo compartment floor is
55 lbs (25 kg).
RSecure the load with sufficiently strong and
wear-resistant tie-downs. Pad sharp edges
for protection.
!Do not position the load on one part of the
folding cargo compartment floor only. The
maximum load capacity of the folding cargo
compartment floor is 220 lbs (100 kg). Dis- tribute the weight evenly to avoid damaging
the cargo compartment floor. Place a solid
board under the load if necessary. Please
280Loading guidelines
Stowage and features
Page 283 of 390

note that the load on the cargo compart-
ment floor will be increased when the load
is lashed down.
Stowage areas
Stowage spaces
Important safety notes
GWARNING
If objects in the passenger compartment are
stowed incorrectly, they can slide or be
thrown around and hit vehicle occupants.
There is a risk of injury, particularly in the
event of sudden braking or a sudden change
in direction.
RAlways stow objects so that they cannot be
thrown around in such situations.
RAlways make sure that objects do not pro-
trude from stowage spaces, parcel nets or
stowage nets.
RClose the lockable stowage spaces before
starting a journey.
RStow and secure objects that are heavy,
hard, pointed, sharp-edged, fragile or too
large in the cargo compartment.
Observe the loading guidelines (Ypage 280).
Stowage compartments in the front
Glove box
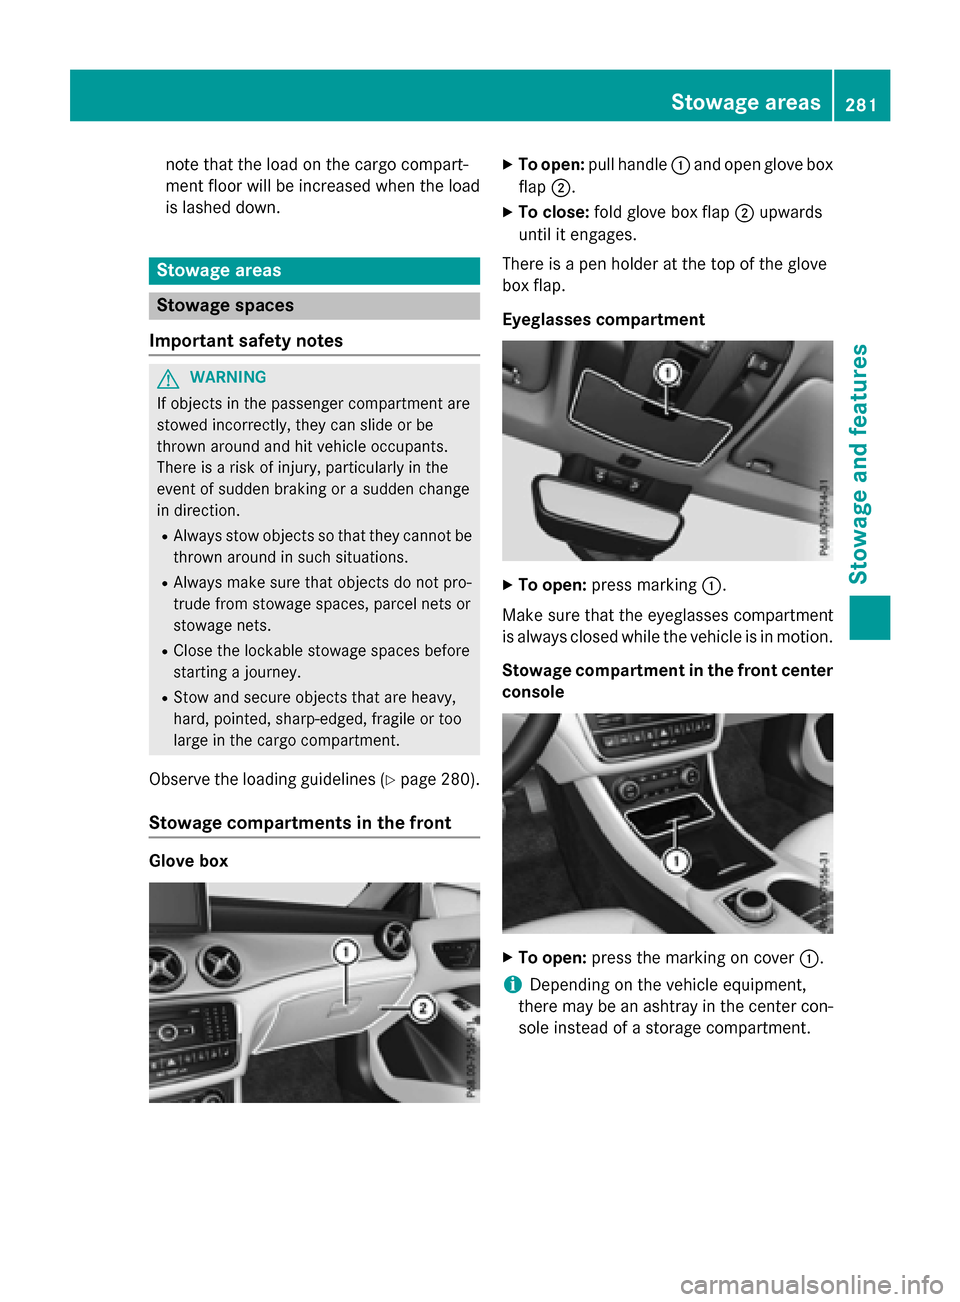
XTo open: pull handle :and open glove box
flap ;.
XTo close: fold glove box flap ;upwards
until it engages.
There is a pen holder at the top of the glove
box flap.
Eyeglasses compartment
XTo open: press marking :.
Make sure that the eyeglasses compartment
is always closed while the vehicle is in motion.
Stowage compartment in the front center
console
XTo open: press the marking on cover :.
iDepending on the vehicle equipment,
there may be an ashtray in the center con-
sole instead of a storage compartment.
Stowage areas281
Stowag ean d features
Z
Page 286 of 390

XSlide locking mechanism=in the direc-
tion of the arrow.
XSwing flap ;fully to the side.
Flap ;is held open by a magnet.
XTo close: swing flap ;in the cargo com-
partment back until it engages.
XFold armrest :up fully if necessary.
Observe the loading guidelines (
Ypage 280).
Cargo compartment enlargement
Important safety notes
GWARNING
If the rear bench seat/rear seat and seat
backrest are not engaged they could fold for-
wards, e.g. when braking suddenly or in the
event of an accident.
RThe vehicle occupant would thereby be
pushed into the seat belt by the rear bench
seat/rear seat or by the seat backrest. The
seat belt can no longer offer the intended
level of protection and could even cause
injuries.
RObjects or loads in the trunk/cargo com-
partment cannot be restrained by the seat
backrest.
There is an increased risk of injury.
Before every trip, make sure that the seat
backrests and the rear bench seat/rear seat
are engaged.
!Before folding the backrest in the rear
compartment forwards, make sure that the rear compartment armrest and the
cupholder are folded in. They may other-
wise be damaged.
Observe the loading guidelines (
Ypage 280).
The left-hand and right-hand rear seat backr-
ests can be folded forwards separately to
increase the cargo compartment capacity.
Folding the rear seat backrest forwards
and back
Folding the rear seat backrests forward
XFully insert the backrest head restraints if
necessary (
Ypage 106).
XMove the driver's or front-passenger seat
forward if necessary.
XPull left-hand or right-hand release han-
dle ;of the seat backrest forwards.
Corresponding seat backrest :is
released.
XFold backrest :forwards.
XMove the driver's or front-passenger seat
back if necessary.
284Stowage areas
Stowage and features
Page 287 of 390

XInsert the seat belt into seat-belt holder:.
Folding the rear seat backrest back
!Make sure that the seat belt does not
become trapped when folding the rear seat
backrest back. Otherwise, it could be dam-
aged.
XMove the driver's or front-passenger seat
forward if necessary.
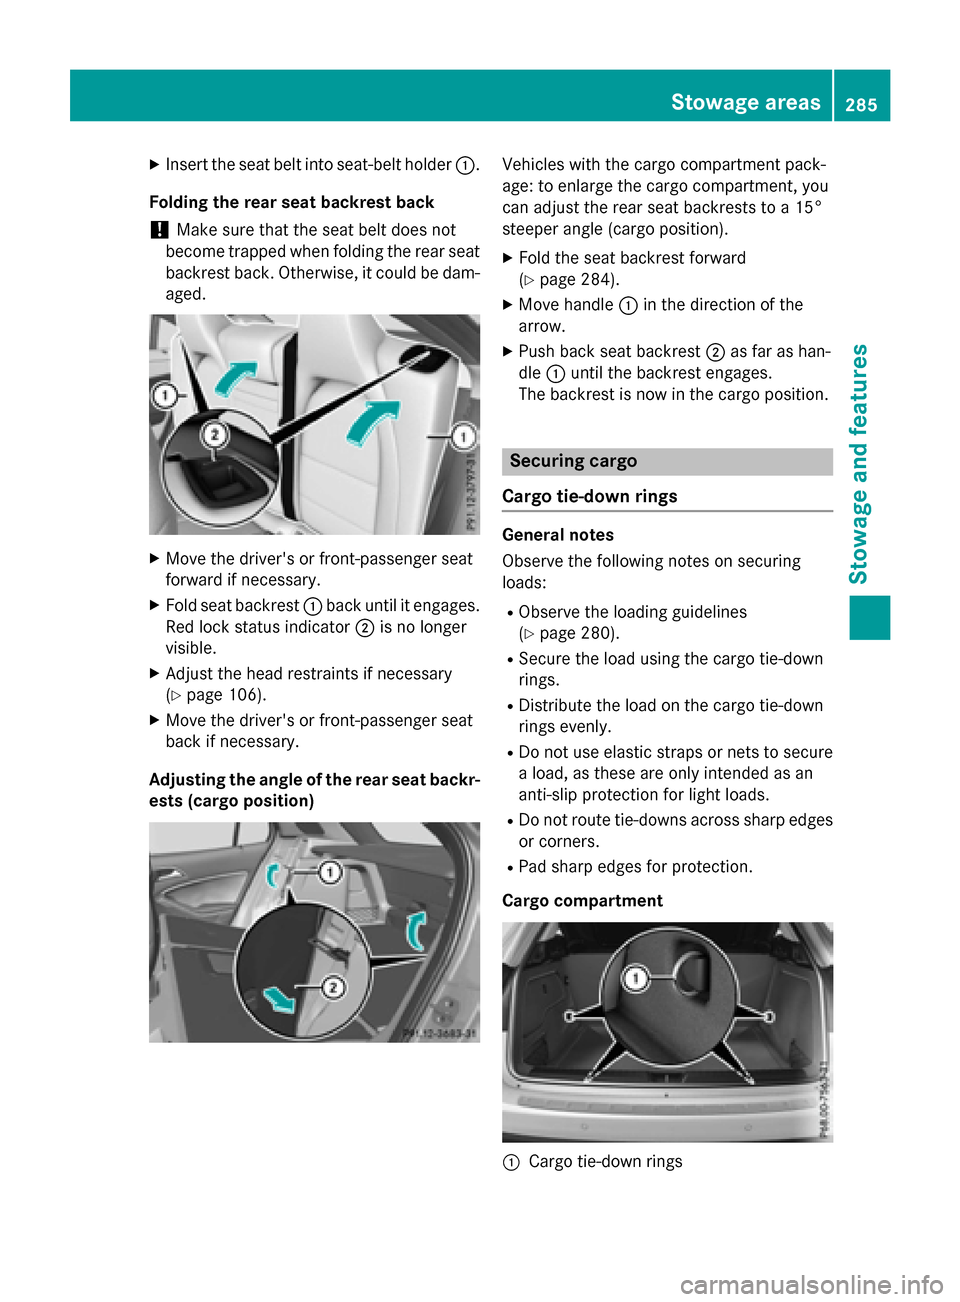
XFold seat backrest :back until it engages.
Red lock status indicator ;is no longer
visible.
XAdjust the head restraints if necessary
(
Ypage 106).
XMove the driver's or front-passenger seat
back if necessary.
Adjusting the angle of the rear seat backr-
ests (cargo position)
Vehicles with the cargo compartment pack-
age: to enlarge the cargo compartment, you
can adjust the rear seat backrests to a 15°
steeper angle (cargo position).
XFold the seat backrest forward
(
Ypage 284).
XMove handle :in the direction of the
arrow.
XPush back seat backrest ;as far as han-
dle :until the backrest engages.
The backrest is now in the cargo position.
Securing cargo
Cargo tie-down rings
General notes
Observe the following notes on securing
loads:
RObserve the loading guidelines
(
Ypage 280).
RSecure the load using the cargo tie-down
rings.
RDistribute the load on the cargo tie-down
rings evenly.
RDo not use elastic straps or nets to secure
a load, as these are only intended as an
anti-slip protection for light loads.
RDo not route tie-downs across sharp edges or corners.
RPad sharp edges for protection.
Cargo compartment
:Cargo tie-down rings
Stowage areas285
Stowage and features
Z
Page 291 of 390

RAlways stow objects so that they cannot be
thrown around in such situations.
RAlways make sure that objects do not pro-
trude from stowage spaces, parcel nets or
stowage nets.
RClose the lockable stowage spaces before
starting a journey.
RStow and secure objects that are heavy,
hard, pointed, sharp-edged, fragile or too
large in the cargo compartment.
!Only use the cup holders for containers of
the right size and which have lids. The
drinks could otherwise spill.
Observe the loading guidelines (
Ypage 280).
The stowage compartments in the doors pro-
vide space for bottles:
Rfront: capacity up to 34 fl. oz. (1.0 l)
Rrear: capacity up to 17 fl. oz. (0.5 l)
Cup holder in the front-compartment
center console
The cup holder and the rubber mat under-
neath can be removed for cleaning. Clean
them with clean, lukewarm water only.
XTo remove:carefully pull in upper sections
of cup holder :on the driver's and front-
passenger sides until they release.
XLift the cup holder upwards ;until it can
be removed.
XTo install: insert cup holder into lateral
curved sections ;in the stowage com-
partment. Insert the cup holder so that the wedge of the upper section of cup
holder :faces forwards.
XPress the cup holder downwards until it
engages on the right and left-hand sides.
Cup holder in the rear seat armrest
!Do not sit on or support your body weight
on the rear seat armrest when it is folded
down, as you could otherwise damage it.
!Close the cup holder before folding the
rear seat armrest up. Otherwise, the cup
holder could be damaged.
XFold down the rear seat armrest.
XTo open: press the front of cup holder :
or ;.
Cup holder :or; extends automatically.
XTo close: slide cup holder :or; back
until it engages.
Features289
Stowage and features
Z
Page 293 of 390

Cigarette lighter
GWARNING
You can burn yourself if you touch the hot
heating element or the socket of the cigarette lighter.
In addition, flammable materials can ignite if:
Rthe hot cigarette lighter falls
Ra child holds the hot cigarette lighter to
objects, for example
There is a risk of fire and injury.
Always hold the cigarette lighter by the knob.
Always make sure that the cigarette lighter is
out of reach of children. Never leave children
unsupervised in the vehicle.
Your attention must always be focused on the
traffic conditions. Only use the cigarette
lighter when road and traffic conditions per-
mit.
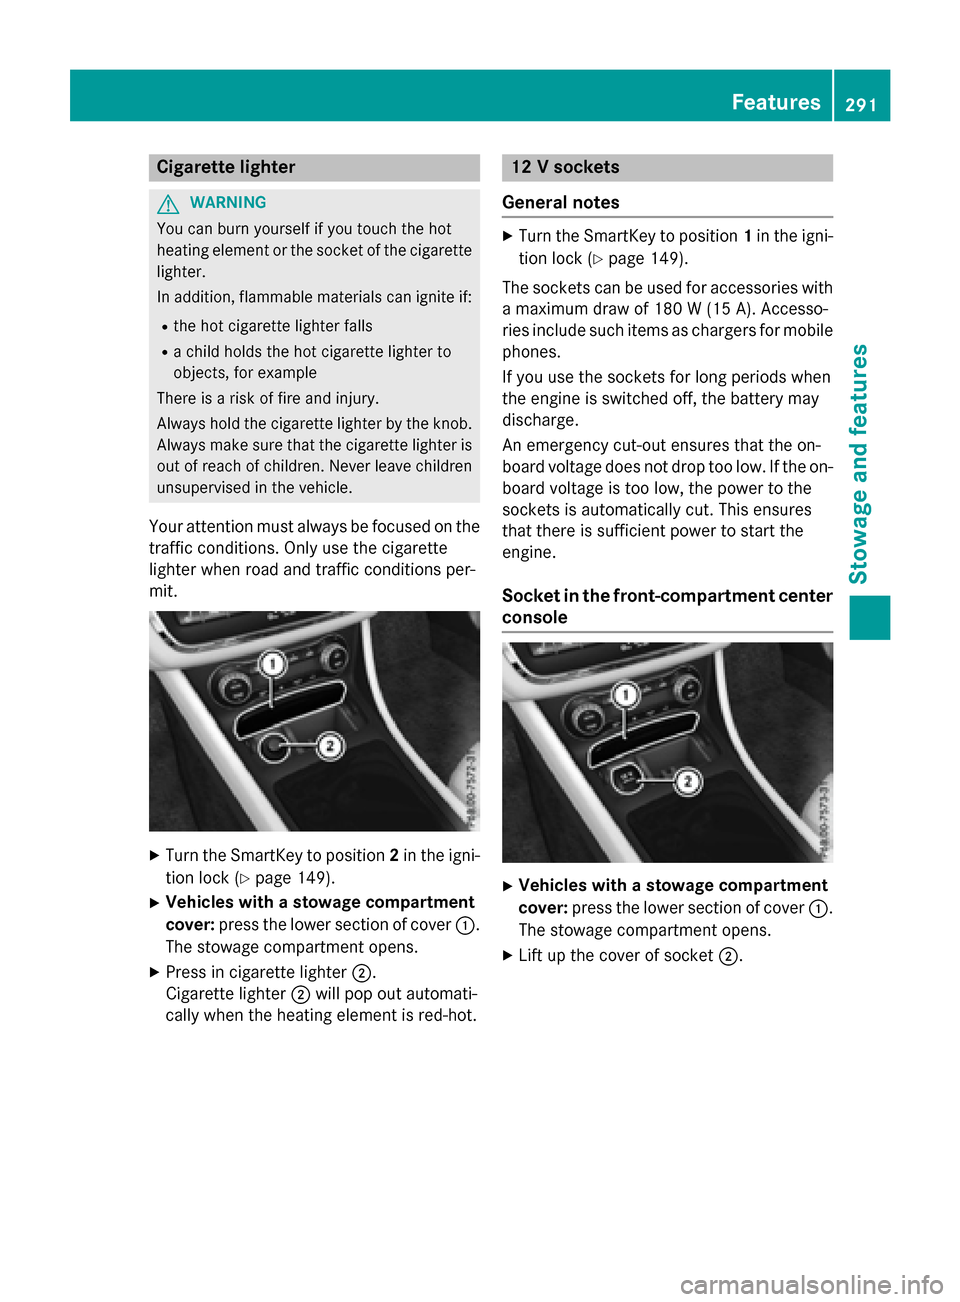
XTurn the SmartKey to position 2in the igni-
tion lock (
Ypage 149).
XVehicles with a stowage compartment
cover: press the lower section of cover :.
The stowage compartment opens.
XPress in cigarette lighter ;.
Cigarette lighter ;will pop out automati-
cally when the heating element is red-hot.
12 V sockets
General notes
XTurn the SmartKey to position 1in the igni-
tion lock (
Ypage 149).
The sockets can be used for accessories with a maximum draw of 180 W (15A). Accesso-
rie sinclude suc hitem sas charger sfo rmobile
phones.
If you use th esockets fo rlon gperiod swhe n
th eengin eis switched off, th ebattery may
discharge.
An emergency cut-out ensures that th eon -
boar dvoltage doe sno tdrop to olow. If th eon -
boar dvoltage is to olow, th epower to th e
sockets is automatically cut .Thi sensures
that ther eis sufficien tpower to start th e
engine.
Socket in th efront-co mpartment center
console
XVehicles with a stowage compartment
cover: press the lower section of cover :.
The stowage compartment opens.
XLift up the cover of socket ;.
Features291
Stowagean d features
Z
Page 299 of 390

iYou can also use the Route Assistance
function if your vehicle is not equipped with
a navigation system.
Within the framework of this service, you
receive a professional and reliable form of
navigation support without having to leave
your vehicle.
The customer service representative finds a
suitable route depending on your vehicle's
current position and the desired destination.
You will then be guided live through the cur-
rent route section.
Search & Send
General notes
iTo use "Search & Send", your vehicle
must be equipped with mbrace and a navi- gation system. Additionally, an mbrace ser-
vice subscription must be completed.
"Search & Send" is a destination entry ser-
vice. A destination address which is found on
Google Maps
®can be transferred via mbrace
directly to your vehicle's navigation system.
Specifying and sending the destination
address
XGo to the website http://
www.maps.google.com and enter a desti-
nation address into the entry field.
XTo send the destination address to the
e-mail address of your mbrace account:
click on the corresponding button on the
website.
iExample:
If you select 'Send to vehicle' and then
'Mercedes-Benz', the destination address
will be sent to your vehicle.
XWhen the "Send" dialog window appears:
Enter the e-mail address you specified
when setting up your mbrace account into
the corresponding field.
XClick "Send".
iInformation on specific commands such
as "Address entry" or "Send" can be found
on the website.
Calling up destination addresses
XSwitch on the ignition.
The destination address is loaded into the
vehicle's navigation system.
A display message appears, asking
whether navigation should be started.
XSelect Yesby turning cVdor sliding XVY
the COMAND controller and press Wto
confirm.
The system calculates the route and sub-
sequently starts the route guidance with
the address entered.
iIf you select No, the address can be saved
in the address book.
iIf you have sent more than one destina-
tion address, each individual destination
must be confirmed separately.
iDestination addresses are loaded in the
same order as the order in which they were
sent.
If you own multiple Mercedes-Benz vehi-
cles with mbrace and activated mbrace
accounts:
If multiple vehicles are registered under the
same e-mail address, the destination will
be sent to all the vehicles.
Vehicle remote opening
You can use the vehicle remote opening if you
have unintentionally locked your vehicle and
a replacement SmartKey is not available.
The vehicle can be opened by the Mercedes-
Benz Customer Assistance Center.
The vehicle can be immediately opened
remotely within four days of the ignition being
turned off. After this time, the remote unlock- ing may be delayed by 15 to 60 minutes. After
30 days, the vehicle can no longer be opened
remotely.
XContact the following service hotlines:
Features297
Stowage and features
Z