2016 MERCEDES-BENZ GL width
[x] Cancel search: widthPage 215 of 462
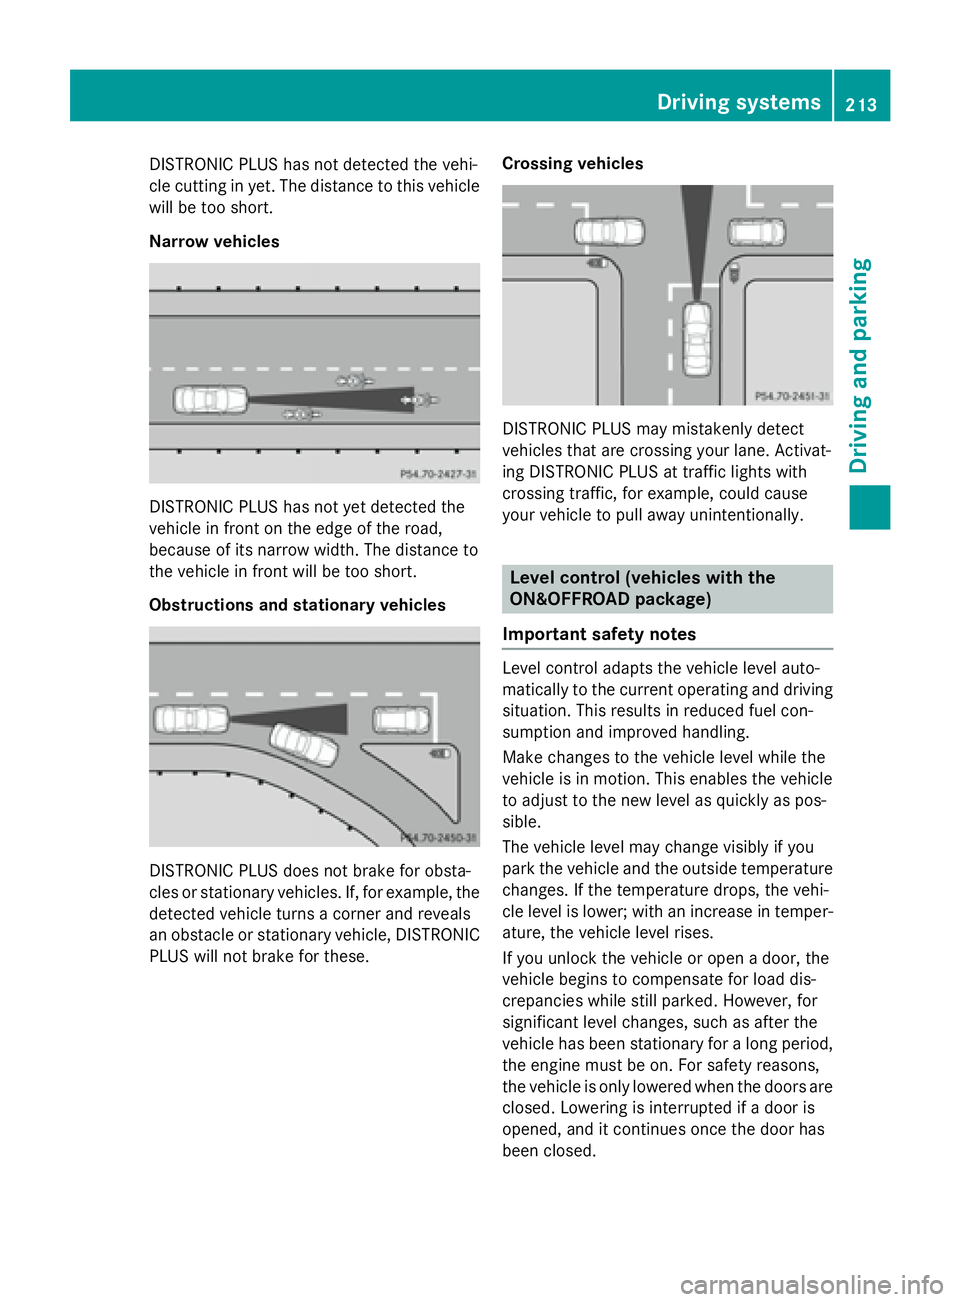
DISTRONIC PLUS has not detected the vehi-
cle cutting in yet. The distance to this vehicle
will be too short.
Narrow vehicles
DISTRONIC PLUS has not yet detected the
vehicle in front on the edge of the road,
because of its narrow width. The distance to
the vehicle in front will be too short.
Obstructions and stationary vehicles
DISTRONIC PLUS does not brake for obsta-
cles or stationary vehicles. If, for example, the
detected vehicle turns a corner and reveals
an obstacle or stationary vehicle, DISTRONIC
PLUS will not brake for these. Crossing vehicles
DISTRONIC PLUS may mistakenly detect
vehicles that are crossing your lane. Activat-
ing DISTRONIC PLUS at traffic lights with
crossing traffic, for example, could cause
your vehicle to pull away unintentionally.
Level control (vehicles with the
ON&OFFROAD package)
Important safety notes
Level control adapts the vehicle level auto-
matically to the current operating and driving
situation. This results in reduced fuel con-
sumption and improved handling.
Make changes to the vehicle level while the
vehicle is in motion. This enables the vehicle
to adjust to the new level as quickly as pos-
sible.
The vehicle level may change visibly if you
park the vehicle and the outside temperature
changes. If the temperature drops, the vehi-
cle level is lower; with an increase in temper-
ature, the vehicle level rises.
If you unlock the vehicle or open a door, the
vehicle begins to compensate for load dis-
crepancies while still parked. However, for
significant level changes, such as after the
vehicle has been stationary for a long period,
the engine must be on. For safety reasons,
the vehicle is only lowered when the doors are
closed. Lowering is interrupted if a door is
opened, and it continues once the door has
been closed. Driving system s 213
Dr ivi ng an d parking Z
Page 234 of 462
R
if there is a sudden change in temperature,
e.g. when driving into a heated garage in
winter R
if the camera lens is dirty or obstructed.
Observe the notes on cleaning
( Y
page 380) R
if the rear of your vehicle is damaged. In this
event, have the camera position and setting
checked at a qualified specialist workshop
The field of vision and other functions of the
rear view camera may be restricted due to
additional accessories on the rear of the vehi-
cle (e.g. license plate holder, bicycle rack).
For technical reasons, leaving the standard
height can result in inaccuracies in the guide
lines on vehicles with a height-adjustable
chassis.
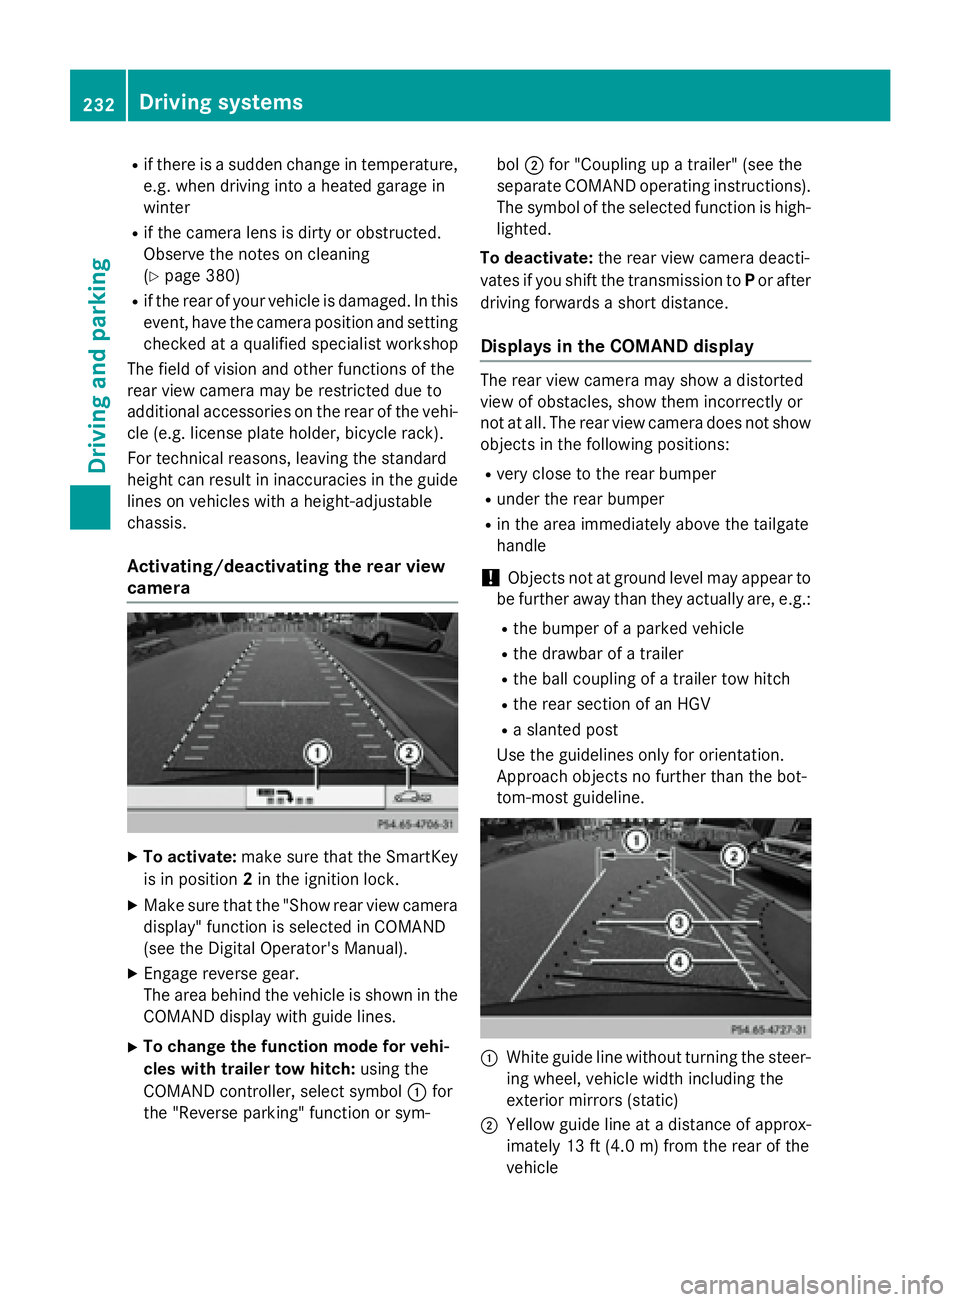
Activating/deactivating the rear view
camera
X
To activate: make sure that the SmartKey
is in position 2 in the ignition lock.X
Make sure that the "Show rear view camera
display" function is selected in COMAND
(see the Digital Operator's Manual). X
Engage reverse gear.
The area behind the vehicle is shown in the
COMAND display with guide lines. X
To change the function mode for vehi-
cles with trailer tow hitch: using the
COMAND controller, select symbol �C for
the "Reverse parking" function or sym- bol �D for "Coupling up a trailer" (see the
separate COMAND operating instructions).
The symbol of the selected function is high-
lighted.
To deactivate: the rear view camera deacti-
vates if you shift the transmission to P or after
driving forwards a short distance.
Displays in the COMAND display The rear view camera may show a distorted
view of obstacles, show them incorrectly or
not at all. The rear view camera does not show
objects in the following positions: R
very close to the rear bumper R
under the rear bumper R
in the area immediately above the tailgate
handle
! Objects not at ground level may appear to
be further away than they actually are, e.g.: R
the bumper of a parked vehicle R
the drawbar of a trailer R
the ball coupling of a trailer tow hitch R
the rear section of an HGV R
a slanted post
Use the guidelines only for orientation.
Approach objects no further than the bot-
tom-most guideline.
�C
White guide line without turning the steer-
ing wheel, vehicle width including the
exterior mirrors (static)
�D
Yellow guide line at a distance of approx-
imately 13 ft (4.0 m) from the rear of the
vehicle232
Driving system s
Dr ivi ng an d parking
Page 269 of 462
so will result in a loss of function of the
brake systems of both the vehicle and the
trailer. X
Shift the transmission to position P .X
Apply the vehicle's electric parking brake. X
Start the engine. X
Vehicles with the AIRMATIC package:
select highway level. X
Vehicles with ADS: set ADS to AUTO or
COMF .X
Switch off the engine. X
Close the doors and tailgate. X
Couple up the trailer. X
Establish the electrical connection
between the vehicle and the trailer. X
Check that the trailer lighting system is
working.
i Vehicles with the AIRMATIC package:
with a trailer attached, the vehicle will
always remain at highway level. When cou-
pling up a trailer, please observe the fol-
lowing: R
Unless highway level has been set man-
ually, the vehicle is automatically low-
ered to highway level. This is the case if a
speed of 5 mph (8 km/h) is reached. R
High-speed level is not available.
These restrictions apply to all accessories
powered through a connection to the trailer
power socket of your vehicle, e.g. a bicycle
carrier.
Observe the maximum permissible trailer
dimensions (width and length).
Most U.S. states and all Canadian provinces
require by law: R
Safety chains between the towing vehicle
and the trailer. The chains should be cross-
wound under the trailer drawbar. They must
be fastened to the vehicle's trailer cou-
pling, not to the bumper or the axle. Leave enough play in the chains to make
tight cornering possible. R
A separate brake system for certain types
of trailer. R
Safety switch for braked trailers. Check the
specific legal requirements applicable to
your state.
If the trailer becomes detached from the
towing vehicle, the safety switch applies
the trailer brakes.
Towing a trailer There are numerous legal requirements con-
cerning the towing of a trailer, e.g. speed
restrictions. Make sure that your car/trailer
combination complies with the local regula-
tions: R
in your place of residence R
in the location to which you are driving
The police and local authorities can provide
reliable information.
Observe the following when towing a trailer: R
To gain driving experience and to become
accustomed to the new handling charac-
teristics, you should practice the following
in a traffic-free location: -
cornering -
stopping -
backing up R
Before driving, check: -
trailer tow hitch -
safety switch for braked trailers -
safety chains -
electrical connections -
lights -
wheels R
Adjust the exterior mirrors to provide an
unobstructed view of the rear section of the
trailer. R
If the trailer has electronically controlled
brakes, pull away carefully. Brake manually Towing a trailer 267
Driving and parking Z
Page 378 of 462
R
solvents R
cleaning agents containing solvents
Do not scrub.
Do not touch the surfaces or protective
films with hard objects, e.g. a ring or ice
scraper. You could otherwise scratch or
damage the surfaces and protective film.
! Do not park the vehicle for an extended
period straight after cleaning it, particularly
after having cleaned the wheels with wheel
cleaner. Wheel cleaners could cause
increased corrosion of the brake discs and
brake pads/linings. For this reason, you
should drive for a few minutes after clean-
ing. Braking heats the brake discs and the
brake pads/linings, thus drying them. The
vehicle can then be parked.
Regular care of your vehicle is a condition for
retaining the quality in the long term.
Use care products and cleaning agents rec-
ommended and approved by Mercedes-Benz.
Washing the vehicle and cleaning the
paintwork
Automatic car wash
G WARNING
Braking efficiency is reduced after washing
the vehicle. There is a risk of an accident.
After the vehicle has been washed, brake
carefully while paying attention to the traffic
conditions until full braking power is restored. ! Before driving into an automatic car wash,
make sure that it is suitable for the dimen-
sions of the vehicle. In particular, make
sure that: R
there is enough ground clearance
between the vehicle underbody and the
guide rails of the automatic car wash. R
the clearance width of the automatic car
wash is sufficient, particularly the width
of the guide rails. R
you enter the automatic car wash
straight and in the center of the guide
rails in order to avoid damaging the tires
or wheel rims.
Fold in the exterior mirrors before the vehi-
cle is washed. The exterior mirrors could
otherwise be damaged.
! If DISTRONIC PLUS or the HOLD function
is activated, the vehicle brakes automati-
cally in certain situations.
To prevent damage to the vehicle, deacti-
vate DISTRONIC PLUS and the HOLD func-
tion in the following or other similar situa-
tions: R
when towing the vehicle R
in the car wash
! Never clean your vehicle in a Touchless
Automatic Car Wash as these use special
cleaning agents. These cleaning agents can
damage the paintwork or plastic parts.
! Make sure that: R
the side windows and the sliding sunroof
are fully closed. R
the ventilation/heating is switched off
(the OFF button has been pressed). R
the windshield wiper switch is in position
0 .
Otherwise, the vehicle might be damaged.
! In car washes with a towing mechanism,
make sure that the automatic transmission
is in transmission position N , otherwise the
vehicle could be damaged. R
Vehicles with a SmartKey:376
Care
Maintenance and care
Page 407 of 462
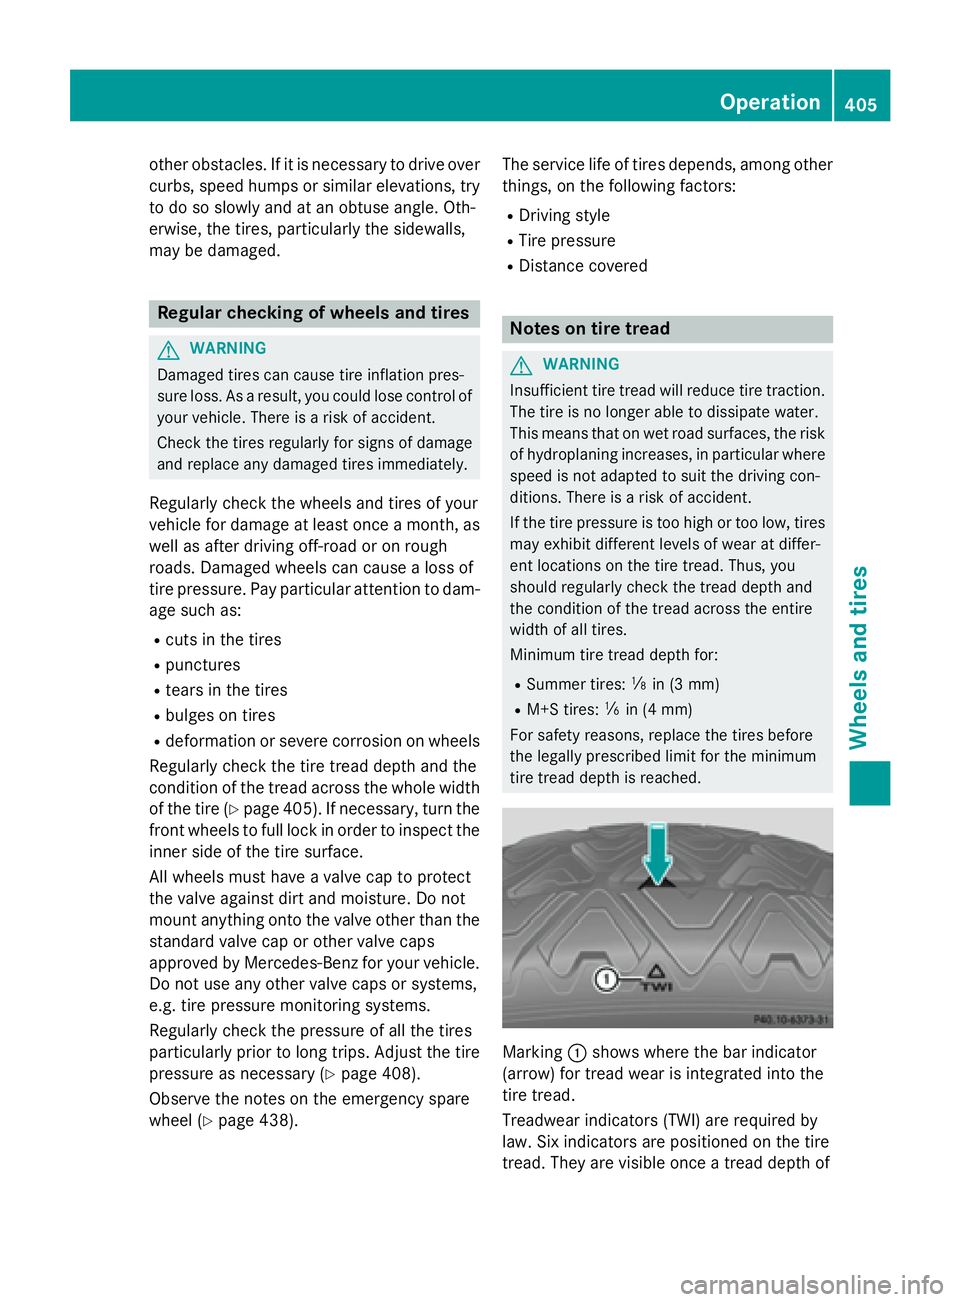
other obstacles. If it is necessary to drive over
curbs, speed humps or similar elevations, try
to do so slowly and at an obtuse angle. Oth-
erwise, the tires, particularly the sidewalls,
may be damaged.
Regular checking of wheels and tires
G WARNING
Damaged tires can cause tire inflation pres-
sure loss. As a result, you could lose control of
your vehicle. There is a risk of accident.
Check the tires regularly for signs of damage
and replace any damaged tires immediately.
Regularly check the wheels and tires of your
vehicle for damage at least once a month, as
well as after driving off-road or on rough
roads. Damaged wheels can cause a loss of
tire pressure. Pay particular attention to dam-
age such as: R
cuts in the tires R
punctures R
tears in the tires R
bulges on tires R
deformation or severe corrosion on wheels
Regularly check the tire tread depth and the
condition of the tread across the whole width
of the tire ( Y
page 405). If necessary, turn the
front wheels to full lock in order to inspect the
inner side of the tire surface.
All wheels must have a valve cap to protect
the valve against dirt and moisture. Do not
mount anything onto the valve other than the
standard valve cap or other valve caps
approved by Mercedes-Benz for your vehicle.
Do not use any other valve caps or systems,
e.g. tire pressure monitoring systems.
Regularly check the pressure of all the tires
particularly prior to long trips. Adjust the tire
pressure as necessary ( Y
page 408).
Observe the notes on the emergency spare
wheel ( Y
page 438). The service life of tires depends, among other
things, on the following factors: R
Driving style R
Tire pressure R
Distance covered
Notes on tire tread
G WARNING
Insufficient tire tread will reduce tire traction.
The tire is no longer able to dissipate water.
This means that on wet road surfaces, the risk
of hydroplaning increases, in particular where
speed is not adapted to suit the driving con-
ditions. There is a risk of accident.
If the tire pressure is too high or too low, tires
may exhibit different levels of wear at differ-
ent locations on the tire tread. Thus, you
should regularly check the tread depth and
the condition of the tread across the entire
width of all tires.
Minimum tire tread depth for: R
Summer tires: �
Page 424 of 462
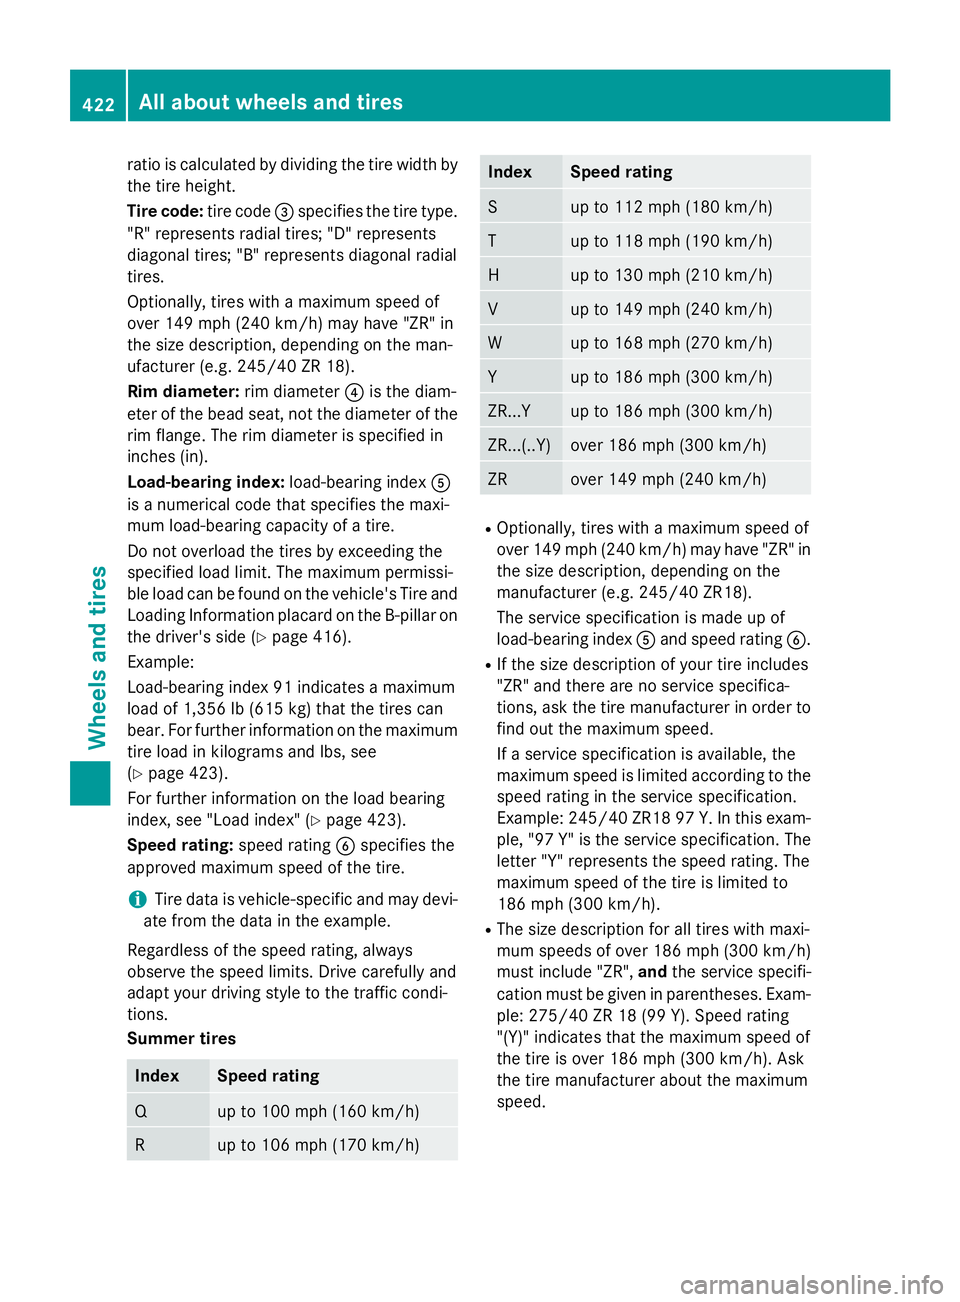
ratio is calculated by dividing the tire width by
the tire height.
Tire code: tire code �
Page 428 of 462
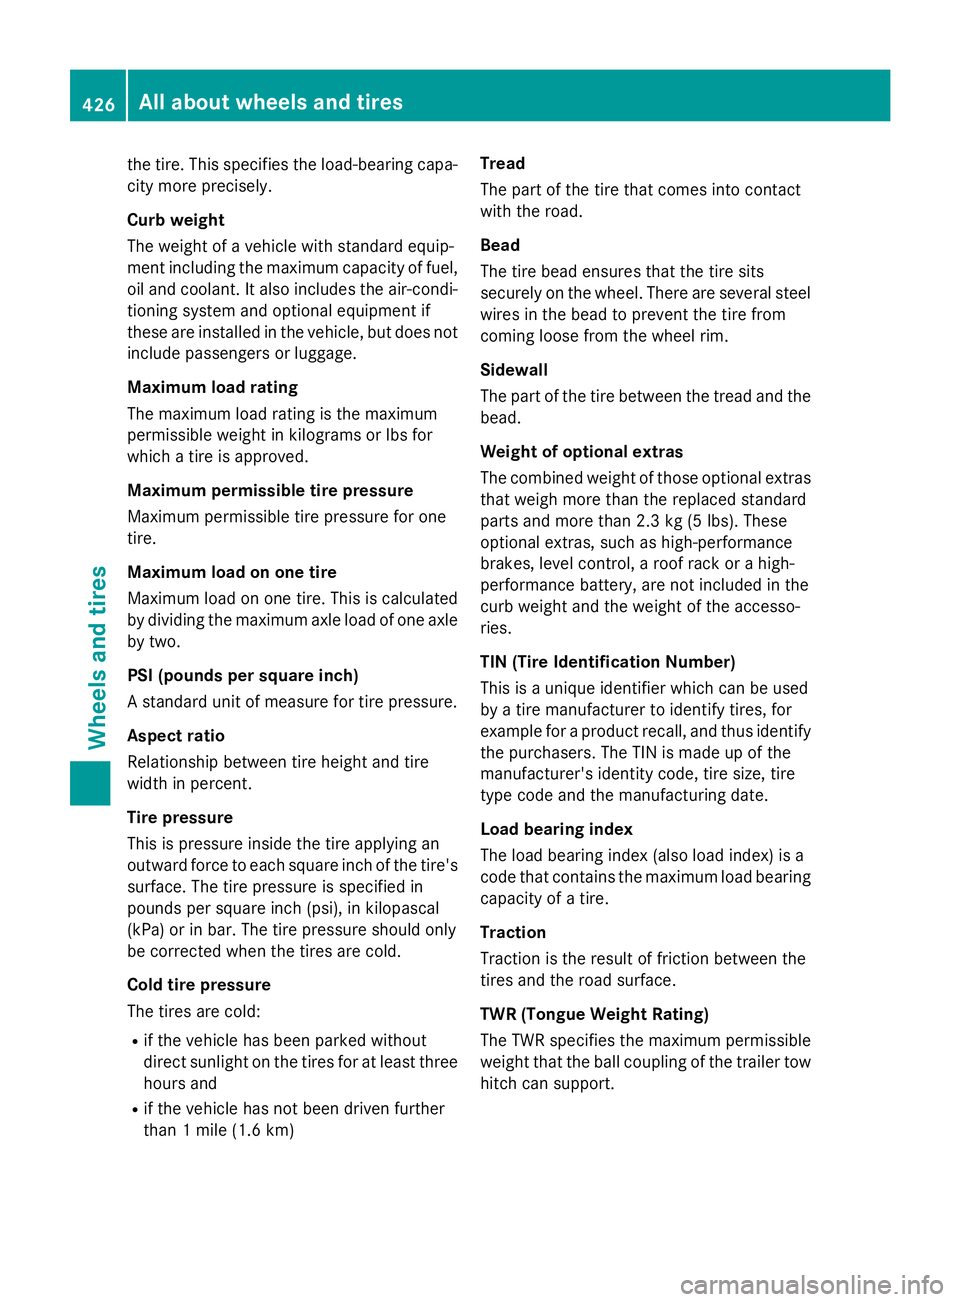
the tire. This specifies the load-bearing capa-
city more precisely.
Curb weight
The weight of a vehicle with standard equip-
ment including the maximum capacity of fuel,
oil and coolant. It also includes the air-condi-
tioning system and optional equipment if
these are installed in the vehicle, but does not
include passengers or luggage.
Maximum load rating
The maximum load rating is the maximum
permissible weight in kilograms or lbs for
which a tire is approved.
Maximum permissible tire pressure
Maximum permissible tire pressure for one
tire.
Maximum load on one tire
Maximum load on one tire. This is calculated
by dividing the maximum axle load of one axle
by two.
PSI (pounds per square inch)
A standard unit of measure for tire pressure.
Aspect ratio
Relationship between tire height and tire
width in percent.
Tire pressure
This is pressure inside the tire applying an
outward force to each square inch of the tire's
surface. The tire pressure is specified in
pounds per square inch (psi), in kilopascal
(kPa) or in bar. The tire pressure should only
be corrected when the tires are cold.
Cold tire pressure
The tires are cold: R
if the vehicle has been parked without
direct sunlight on the tires for at least three
hours and R
if the vehicle has not been driven further
than 1 mile (1.6 km) Tread
The part of the tire that comes into contact
with the road.
Bead
The tire bead ensures that the tire sits
securely on the wheel. There are several steel
wires in the bead to prevent the tire from
coming loose from the wheel rim.
Sidewall
The part of the tire between the tread and the
bead.
Weight of optional extras
The combined weight of those optional extras
that weigh more than the replaced standard
parts and more than 2.3 kg (5 lbs). These
optional extras, such as high-performance
brakes, level control, a roof rack or a high-
performance battery, are not included in the
curb weight and the weight of the accesso-
ries.
TIN (Tire Identification Number)
This is a unique identifier which can be used
by a tire manufacturer to identify tires, for
example for a product recall, and thus identify
the purchasers. The TIN is made up of the
manufacturer's identity code, tire size, tire
type code and the manufactu ring date.
L o ad bearing index
The load bearing index (also load index) is a
code that contains the maximum load bearing
capacity of a tire.
Traction
Traction is the result of friction between the
tires and the road surface.
TWR (Tongue Weight Rating)
The TWR specifies the maximum permissible
weight that the ball coupling of the trailer tow
hitch can support.426
All about wheels an d tires
Wheels and tires
Page 457 of 462
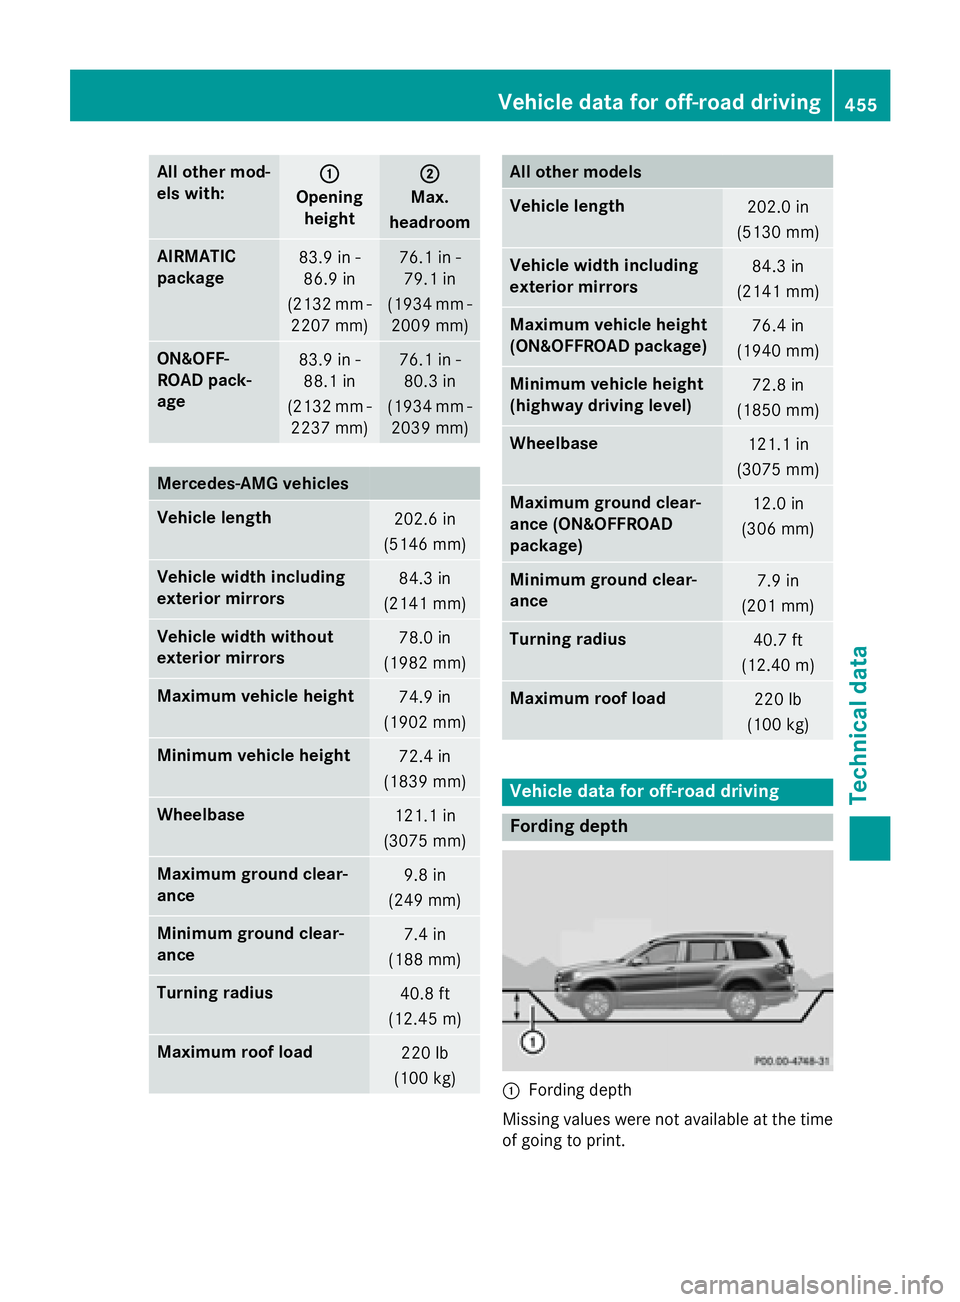
All other mod -
els with: �C
Opening
height �D
Max.
headr oom
AIRMATIC
package 83.9 in -
86.9 in
(2132 mm -
2207 mm) 76.1 in -
79.1 in
(1934 mm -
2009 mm)
ON&OFF-
RO AD pack-
age 83.9 in -
88.1 in
(2132 mm -
2237 mm) 76.1 in -
80.3 in
(1934 mm -
2039 mm)
Mercedes ‑ AMG vehicles
Vehicle length
202.6 in
(5146 mm)
Vehicle width including
exteri or mirrors 84.3 in
(2141 mm)
Vehicle width without
exteri or mirrors 78.0 in
(1982 mm)
Maximum vehicle height
74.9 in
(1902 mm)
Minimum vehicle height
72.4 in
(1839 mm)
Wh eelbase
121.1 in
(3075 mm)
Maximum ground clear-
ance 9.8 in
(249 mm)
Minimum ground clear-
ance 7.4 in
(188 mm)
Tu rn ing ra dius
40.8 ft
(12.45 m)
Maximum roo f load
220 lb
(100 kg) All oth er models
Vehicle length
202.0 in
(5130 mm)
Vehicle width including
exteri or mirrors 84.3 in
(2141 mm)
Maximum vehicle height
(ON&OFFROAD package) 76.4 in
(1940 mm)
Minimum vehicle height
(highway driving level) 72.8 in
(1850 mm)
Wh eelbase
121.1 in
(3075 mm)
Maximum ground clear-
ance (ON&OFFROAD
package) 12.0 in
(306 mm)
Minimum ground clear-
ance 7.9 in
(201 mm)
Tu rn ing ra dius
40.7 ft
(12.40 m)
Maximum roof load
220 lb
(100 kg)
Vehicle data for off-road driving
Fording depth
�C
Fording depth
Missing values were not availab le at the time
of going to print.Vehicle data for off-road driving 455
Technical data Z