2016 MERCEDES-BENZ GL-Class steering wheel
[x] Cancel search: steering wheelPage 181 of 462

Mercedes-AMG vehicles:you can activate
manual drive program Min automatic drive
programs Cand S.
Vehicles with the ON&OFFROAD package: if manual drive program Mis deactivated
using the program selector button, you can
activate manual drive program Musing the
steering wheel paddle shifters.
As well as temporary drive program M, you
can also activate permanent drive program M
(
Ypage 177).
Further information about permanent drive
program M(
Ypage 180).
Activating
XShift the transmission to position D.
XPull the left or right steering wheel paddle
shifter (
Ypage 178).
Manual drive program Mis temporarily acti-
vated. The selected gear and Mappear in
the multifunction display.
Shifting gears
If you pull on the left or right steering wheel
paddle shifter, the automatic transmission
switches to manual drive program Mfor a
limited amount of time. Depending on which
paddle shifter is pulled, the automatic trans-
mission immediately shifts into the next gear
down or up, if permitted.
XTo shift up: pull the right-hand steering
wheel paddle shifter (
Ypage 178).
The automatic transmission shifts up to the
next gear.
iIf the maximum engine speed on the cur-
rently engaged gear is reached and you
continue to accelerate, the automatic
transmission automatically shifts up in
order to prevent engine damage.
XTo shift down: pull on the left-hand steer-
ing wheel paddle shifter (
Ypage 178).
The automatic transmission shifts down to
the next gear.
iIf the engine exceeds the maximum
engine speed when shifting down, the auto- matic transmission protects against engine
damage by not shifting down.
iAutomatic down shifting occurs when
coasting.
Shift re
commendation
The gearshift recommendations assist you in
adopting an economical driving style. The rec-
ommended gear is shown in the multifunction
display.
XShift to recommended gear ;according
to gearshift recommendation :when
shown in the multifunction display of the
instrument cluster.
Deactivating
If you have activated manual drive program
M, it will remain active for a certain amount of time. Under certain conditions the minimum
amount of time is extended, e.g. in the case of
lateral acceleration, during an overrun phase
or when driving on steep terrain.
If manual drive program Mhas been deacti-
vated, the automatic transmission shifts into
the automatic drive program that was last
selected.
You can also deactivate manual drive pro-
gram Myourself:
XPull on the right-hand steering wheel pad-
dle shifter and hold it in place (
Ypage 178).
or
XUse the DIRECT SELECT lever to switch the
transmission position.
or
Automatic transmission179
Driving and parking
Z
Page 182 of 462

XMercedes-AMG vehicles:use the pro-
gram selector button to change the drive
program (
Ypage 177).
Manual drive program Mis deactivated.
The automatic transmission switches into
the automatic drive program that was last
selected, i.e. Eor S.
or
XVehicles with the
ON&OFFROAD package: use the selector
wheel to switch to the on-road program
(
Ypage 254) or the off-road program
(
Ypage 258).
Manual drive program
General information
In this drive program, you can permanently
change gear yourself by using the steering
wheel paddle shifters. The transmission must be in position D.
iAs well as this permanent drive program
M, you can also activate temporary drive
program M(
Ypage 178).
Switching on the manual drive program
In manual drive program M, you can change
gear using the steering wheel paddle shifters
if the transmission is in position D. You can
see the currently selected drive program and
which gear is engaged in the multifunction
display.
XVehicles with the ON&OFFROAD pack-
age: press the program selector button
(
Ypage 177).
The letter Mappears in the multifunction
display.
XMercedes-AMG vehicles: press the pro-
gram selector button (
Ypage 177) repeat-
edly until Mappears in the multifunction
display.
Upshifting (all vehicles except
Mercedes-AMG vehicles)
XIf corresponding gearshift recommenda-
tion :appears in the multifunction display
on the instrument cluster, pull on the right-
hand steering wheel paddle shifter
(
Ypage 178).
The automatic transmission shifts to rec-
ommended gear ;.
Upshifting (Mercedes-AMG vehicles)
!In manual drive program M, the automatic
transmission does not shift up automati-
cally even when the engine limiting speed
for the current gear is reached. When the
engine limiting speed is reached, the fuel
supply is cut to prevent the engine from
overrevving. Always make sure that the
engine speed does not reach the red area of
the tachometer. There is otherwise a risk of
engine damage.
:Gear indicator
;Upshift indicator
Before the engine speed reaches the red area,
an upshift indicator will be shown in the mul-
tifunction display.
XWhen the UPmessage appears in the mul-
tifunction display, pull on the right-hand
steering wheel paddle shifter.
180Automatic transmission
Driving and parking
Page 191 of 462
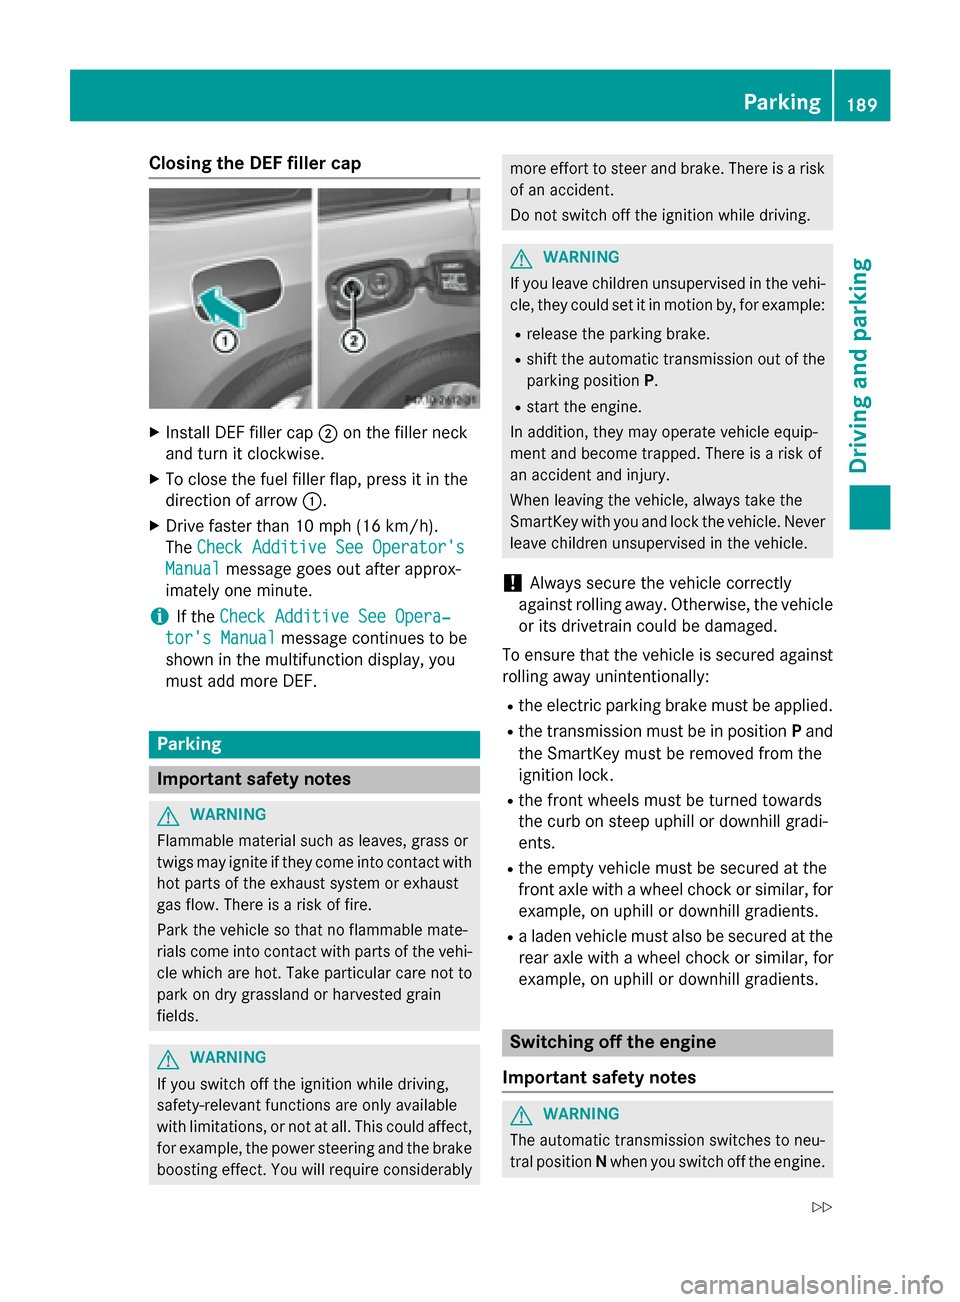
Closing the DEF filler cap
XInstall DEF filler cap;on the filler neck
and turn it clockwise.
XTo close the fuel filler flap, press it in the
direction of arrow :.
XDrive faster than 10 mph (16 km/h).
TheCheck Additive See Operator's
Manualmessage goes out after approx-
imately one minute.
iIf the Check Additive See Opera‐
tor's Manualmessage continues to be
shown in the multifunction display, you
must add more DEF.
Parking
Important safety notes
GWARNING
Flammable material such as leaves, grass or
twigs may ignite if they come into contact with
hot parts of the exhaust system or exhaust
gas flow. There is a risk of fire.
Park the vehicle so that no flammable mate-
rials come into contact with parts of the vehi-
cle which are hot. Take particular care not to
park on dry grassland or harvested grain
fields.
GWARNING
If you switch off the ignition while driving,
safety-relevant functions are only available
with limitations, or not at all. This could affect, for example, the power steering and the brake
boosting effect. You will require considerably
more effort to steer and brake. There is a risk
of an accident.
Do not switch off the ignition while driving.
GWARNING
If you leave children unsupervised in the vehi-
cle, they could set it in motion by, for example:
Rrelease the parking brake.
Rshift the automatic transmission out of the
parking position P.
Rstart the engine.
In addition, they may operate vehicle equip-
ment and become trapped. There is a risk of
an accident and injury.
When leaving the vehicle, always take the
SmartKey with you and lock the vehicle. Never
leave children unsupervised in the vehicle.
!Always secure the vehicle correctly
against rolling away. Otherwise, the vehicle
or its drivetrain could be damaged.
To ensure that the vehicle is secured against
rolling away unintentionally:
Rthe electric parking brake must be applied.
Rthe transmission must be in position Pand
the SmartKey must be removed from the
ignition lock.
Rthe front wheels must be turned towards
the curb on steep uphill or downhill gradi-
ents.
Rthe empty vehicle must be secured at the
front axle with a wheel chock or similar, for
example, on uphill or downhill gradients.
Ra laden vehicle must also be secured at the
rear axle with a wheel chock or similar, for
example, on uphill or downhill gradients.
Switching off the engine
Important safety notes
GWARNING
The automatic transmission switches to neu-
tral position Nwhen you switch off the engine.
Parking189
Driving and parking
Z
Page 199 of 462

engine's air suction nozzles and this can
cause engine damage.
iVehicles with the AIRMATIC package:
set the raised level before driving through
standing water.
Off-road fording
!Under no circumstances should you
accelerate before entering the water. The
bow wave could cause water to enter and
damage the engine and other assemblies.
!Do not open any of the vehicle's doors
while fording. Otherwise, water could get
into the vehicle interior and damage the
vehicle's electronics and interior equip-
ment.
REstablish how deep the water is and the
characteristics of the body of water before
fording.
RSelect the highest possible vehicle level.
RShift to a lower gear using the left-hand
steering wheel paddle shifter.
RAvoid high engine speeds.
REnter and exit the water at a flat place and
at a steady walking pace.
RDrive slowly and at an even speed through
the water.
REnsure that a bow wave does not form as
you drive.
RDo not stop and do not switch off the
engine. Water offers a high degree of resist-
ance, and the ground is slippery and in
some cases unstable. Therefore, it is diffi-
cult and dangerous to pull away in the
water.
RClean any mud from the tire tread after
fording.
RApply the brakes to dry them after fording.
Always observe the fording depth values
(
Ypage 455).
Winter driving
GWARNING
If you shift down on a slippery road surface in an attempt to increase the engine's braking
effect, the drive wheels could lose their grip.
There is an increased danger of skidding and
accidents.
Do not shift down for additional engine brak-
ing on a slippery road surface.
GDANGER
If the exhaust pipe is blocked or adequate
ventilation is not possible, poisonous gases
such as carbon monoxide (CO) may enter the vehicle. This is the case, e.g. if the vehicle
becomes trapped in snow. There is a risk of
fatal injury.
If you leave the engine or the auxiliary heating
running, make sure the exhaust pipe and area
around the vehicle are clear of snow. To
ensure an adequate supply of fresh air, open a
window on the side of the vehicle that is not
facing into the wind.
Have your vehicle winter-proofed at a quali-
fied specialist workshop at the onset of win-
ter.
Drive particularly carefully on slippery road
surfaces. Avoid sudden acceleration, steeringand braking maneuvers. Do not use the cruise
control or DISTRONIC PLUS.
If the vehicle threatens to skid or cannot be
stopped when moving at low speed:
XShift the transmission to position N.
Vehicles with the ON&OFFROAD package:
if driving in snow or with snow chains, select
the snow program (
Ypage 255) with the off-
road program selector wheel in the center
console.
iVehicles with a diesel engine: do not
cover the radiator, e.g. with a protective
cover. The measuring function of the on-
board diagnosis system may otherwise pro-
vide inaccurate values. Some of these val-
Driving tips197
Driving and parking
Z
Page 202 of 462

When driving on steep gradients, the
engine oil level must be sufficiently high to
ensure a correct oil supply in the vehicle.
XDEF tank (BlueTEC vehicles):check the
level and add if necessary (
Ypage 186).
XTire-changing tool kit: check that the jack
is working and make sure you have the lug
wrench, a robust tow cable and a folding
spade in the vehicle.
XWheels and tires: check the tire tread
depth and tire pressure.
XCheck for damage and remove any foreign
objects, e.g. small stones, from the
wheels/tires.
XReplace any missing valve caps.
XReplace dented or damaged wheels.
XRims: dented or bent rims can result in a
loss of tire pressure and damage the tire
bead. Before driving off-road, check the
wheels and replace them if necessary.
Checklist after driving off-road
!If you detect damage to the vehicle after
driving off-road, have the vehicle checked
immediately at a qualified specialist work-
shop.
Driving over rough terrain places greater
demands on your vehicle than driving on nor-
mal roads. After driving off-road, check the
vehicle. This allows you to detect damage
promptly and reduce the risk of an accident to
yourself and other road users.
XVehicles with the ON&OFFROAD pack-
age: activate the on-road program
(
Ypage 258).
XDeactivate the LOW RANGE off-road gear
(
Ypage 259).
XDeactivate DSR (Ypage 257).
XLower the vehicle level again to a level suit- able to the road conditions, e.g. to the high-
way level.
XClean the headlamps and rear lights and
check for damage.
XClean the front and rear license plates.
XClean the wheels and tires with a water jetand remove any foreign objects.
XClean the wheels, wheel housings and the
vehicle underside with a water jet; check
for any foreign objects and damage.
XCheck whether twigs or other parts of
plants have become trapped. These
increase the risk of fire and can damage
fuel pipes, brake hoses or the rubber bel-
lows of the axle joints and propeller shafts.
XAfter the trip, examine without fail the
entire undercarriage, wheels, tires, brakes,
bodywork structure, steering, chassis and
exhaust system for damage.
XAfter driving for extended periods across
sand, mud, gravel, water or in similarly dirty
conditions, have the brake discs, wheels,
brake pads/linings and axle joints checked
and cleaned.
XIf you detect strong vibrations after off-road travel, check for foreign objects in the
wheels and drive train and remove them if
necessary. Foreign objects can disturb the
balance and cause vibrations.
Driving on sand
Observe the following rules when driving on
sand:
RVehicles with the ON&OFFROAD pack-
age: select off-road program 1
(
Ypage 258).
RSelect a higher vehicle level.
RAvoid high engine speeds.
RUse the left-hand steering wheel paddle
shifter to shift to a lower gear appropriate
to the terrain.
200Driving tips
Driving and parking
Page 203 of 462

RDrive quickly to overcome the rolling resist-ance. Otherwise the vehicle's wheels could
become stuck in loose ground.
RDrive in the tracks of other vehicles if pos-
sible. Make sure that:
-the tire ruts are not too deep.
-the sand is sufficiently firm.
-the ground clearance of the vehicle is
sufficient.
Tire ruts and gravel roads
!Check that the ruts are not too deep and
that your vehicle has sufficient clearance.
Otherwise, your vehicle could be damaged
or bottom out and get stuck.
Observe the following rules when driving
along ruts in off-road terrain or on roads with
loose gravel:
RSelect a higher vehicle level.
RAvoid high engine speeds.
RShift to a lower gear using the left-hand
steering wheel paddle shifter.
RDrive slowly.
RWhere ruts are too deep, drive with the
wheels of one side on the center grassy
area, if possible.
Driving over obstacles
!Obstacles could damage the floor of the
vehicle or components of the chassis. Ask
passengers for guidance when driving over
large obstacles. The passenger should
always keep a safe distance from the vehi-
cle when doing so in order to avoid injury as a result of unexpected vehicle movements.
After driving off-road or over obstacles,
check the vehicle for possible damage,
especially to the underbody and the com-
ponents of the chassis.
Observe the following rules when driving over
tree stumps, large stones and other obsta-
cles:
RSelect the LOW RANGE off-road gear
(
Ypage 259).
RRaise the vehicle level.
RAvoid high engine speeds.
RShift to a lower gear using the left-hand
steering wheel paddle shifter.
RDrive very slowly.
RDrive straight over the center of obstacles.
Traveling uphill
Approach/departure angle
GWARNING
If you drive on a steep incline at an angle or
turn when driving on an incline, the vehicle
could slip sideways, tip and rollover. There is a risk of an accident.
Always drive on a steep incline in the line of
fall (straight up or down) and do not turn the
vehicle.
RObserve the rules on off-road driving.
RDo not drive at an angle on slopes, inclines
or gradients, but instead follow the direct
line of fall.
RWhen driving down an incline, make use of
the engine's braking effect. Observe the
engine speed; do not overrev the engine.
Driving tips201
Driving an d parking
Z
Page 204 of 462

RBefore driving on extreme uphill and down-
hill gradients, select the LOW RANGE off-
road gear (
Ypage 259).
RDrive slowly.
RAvoid high engine speeds. Drive at appro-
priate engine speeds (maximum
3,000 rpm).
RUse the left-hand steering wheel paddle
shifter to shift into a lower gear in good time
on long and steep downhill gradients.
RCheck the brakes after prolonged off-road
driving.
Hill start assist will aid you when pulling away
on a hill. For further information about hill
start assist, see (
Ypage 168).
Do not switch to transmission position N
when driving off-road. If you try to brake the
vehicle using the service brake, you could
lose control of the vehicle. If the gradient is
too steep for your vehicle, drive back down in
reverse gear.
Always observe the approach/departure
angle values (
Ypage 456).
Maximum gradient-climbing capability
Always observe the maximum gradient climb- ing ability values (
Ypage 456).
Hilltops
When driving up an uphill gradient, slightly
reduce pressure on the accelerator immedi-
ately before reaching the brow of the hill.
Make use of the vehicle's own impetus to
travel over the brow.
This style of driving prevents:
Rthe vehicle from lifting off the ground on thebrow of a hill
Rthe vehicle from traveling too quickly downthe other side
Driving downhill
RDrive slowly.
RDo not drive at an angle down steep
inclines. Steer into the line of fall and drive with the front wheels aligned straight. Oth-
erwise, the vehicle could slip sideways, tip
and rollover.
RShift to a lower gear using the left-hand
paddle shifter before tackling steep down-
hill gradients.
RActivate DSR. If this is not sufficient, brake
gently. When doing so, make sure that the
vehicle is facing in the direction of the line
of fall.
RCheck that the brakes are working normally
after a long downhill stretch.
iThe special off-road ABS setting enables a
precise, brief and repeated locking of the
front wheels. This causes them to dig into
loose earth. Be aware that the front wheels
easily skid across the ground surface if
completely braked and therefore lose their
ability to steer.
Driving systems
Intelligent Drive
Mercedes-Benz Intelligent Drive stands for
innovative driver assistance and safety sys-
tems which enhance comfort and support the
driver in critical situations. With these intelli-
gent co-ordinated systems Mercedes-Benz
has set a milestone on the path towards
autonomous driving.
Mercedes-Benz Intelligent Drive embraces all
elements of active and passive safety in one
well thought out system – for the safety of the vehicle occupants and that of other road
users.
Further information on driving safety systems
(
Ypage 68).
Cruise control
General notes
Cruise control maintains a constant road
speed for you. It brakes automatically in order to avoid exceeding the set speed. You must
202Driving systems
Driving and parking
Page 216 of 462

For information about driving off-road, see
(
Ypage 198).
GWARNING
When the vehicle is being lowered, people
could become trapped if their limbs are
between the vehicle body and the wheels or
underneath the vehicle. There is a risk of
injury.
Make sure no one is underneath the vehicle or
in the immediate vicinity of the wheel arches
when the vehicle is being lowered.
GWARNING
When you drive with the vehicle raised, the
driving characteristics could be impaired by
the vehicle's raised center of gravity. The vehi-
cle could rollover more easily, for example on
a bend. There is a risk of an accident.
Always select as low a vehicle level as possi-
ble and adjust your driving style.
GWARNING
When you drive with the chassis lowered or
raised, the vehicle's braking and driving char-
acteristics can be significantly impaired. You
could also exceed the permissible vehicle
height if the chassis is raised. There is a risk of an accident.
Adjust the vehicle level before pulling away.
GWARNING
Due to the high center of gravity, the vehicle
may start to skid and roll over in the event of
an abrupt steering maneuver and/or when
the vehicle's speed is not adapted to the road
conditions. There is a risk of an accident.
Always adapt your speed and driving style to
the vehicle's driving characteristics and to the
prevailing road and weather conditions.
!When driving on extremely rough terrain,
select a high vehicle level in good time.
Make sure there is always sufficient ground
clearance. You will otherwise damage the
vehicle.
RUtility vehicles have a significantly higher
rollover rate than other types of vehicles.
Failure to operate this vehicle safely may
result in an accident, rollover of the vehicle,
and severe or fatal injury.
RIn a rollover crash, an unbelted person is
significantly more likely to die than a per-
son wearing a seat belt.
You and all vehicle occupants should
always wear your seat belts.
Basic settings
The extent to which the vehicle is raised or
lowered depends on the basic setting selec-
ted.
Select:
Rhighway/high-speed level for driving on
normal roads
Roff-road level 1 for driving on easily nego-
tiable off-road terrain
Roff-road level 2 for driving on normal off-
road terrain
Roff-road level 3 for freeing the vehicle in
particularly rough terrain at low speeds
only
The individual vehicle levels differ from high-
way level as follows:
Rhighway level: +/–0 in (+/–0 mm)
Rhigh-speed level: –0.6 in (–15 mm)
Roff-road level 1: + 1.2 in (+ 30 mm)
Roff-road level 2: + 2.3 in (+ 60 mm)
Roff-road level 3: + 3.6 in (+ 90 mm)
Highway/high-speed level
!Make sure that there is enough ground
clearance when the vehicle is being low-
ered. It could otherwise hit the ground,
damaging the underbody.
214Driving systems
Driving and parking