2016 MERCEDES-BENZ G-CLASS SUV window
[x] Cancel search: windowPage 84 of 261
X
Turn the respective bulb anti-clockwise,
applying slight pressure, and pull it out of the
bulb holder.
X Insert the new bulb into the bulb holder and,
applying slight pressure, turn it clockwise
until it engages.
X Fit lens ;.
X Tighten screws :.
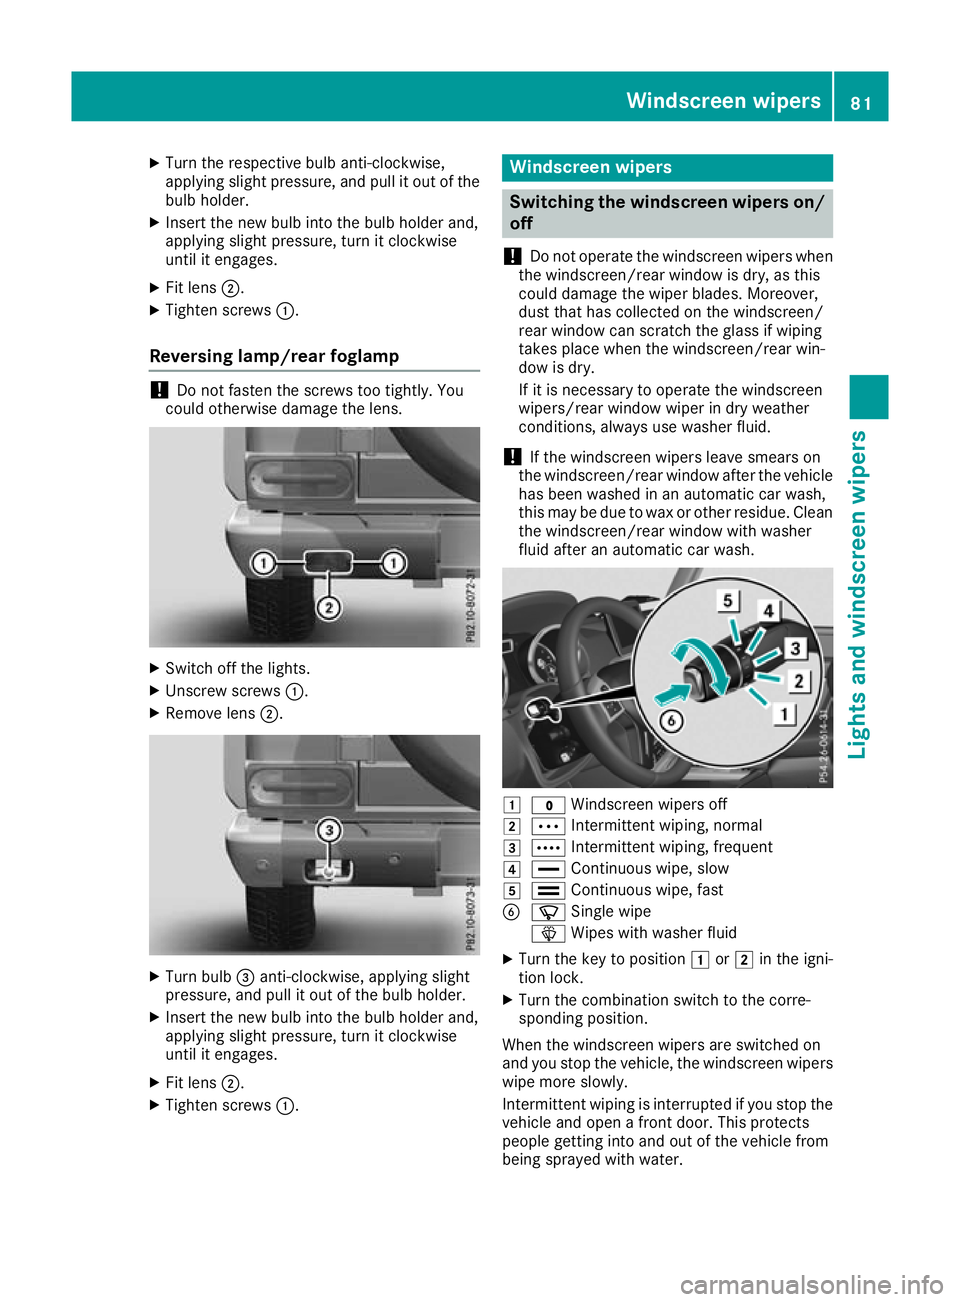
Reversing lamp/rear foglamp !
Do not fasten the screws too tightly. You
could otherwise damage the lens. X
Switch off the lights.
X Unscrew screws :.
X Remove lens ;. X
Turn bulb =anti-clockwise, applying slight
pressure, and pull it out of the bulb holder.
X Insert the new bulb into the bulb holder and,
applying slight pressure, turn it clockwise
until it engages.
X Fit lens ;.
X Tighten screws :. Windscreen wipers
Switching the windscreen wipers on/
off
! Do not operate the windscreen wipers when
the windscreen/rear window is dry, as this
could damage the wiper blades. Moreover,
dust that has collected on the windscreen/
rear window can scratc hthe glass if wiping
takes place when the windscreen/rear win-
dow is dry.
If it is necessary to operate the windscreen
wipers/rear window wiper in dry weather
conditions, always use washer fluid.
! If the windscreen wipers leave smears on
the windscreen/rear window after the vehicle has been washed in an automatic car wash,
this may be due to wax or other residue. Clean
the windscreen/rear window with washer
fluid after an automatic car wash. 1
$ Windscreen wipers off
2 Ä Intermittent wiping, normal
3 Å Intermittent wiping, frequent
4 ° Continuous wipe, slow
5 ¯ Continuous wipe, fast
B í Single wipe
î Wipes with washer fluid
X Turn the key to position 1or2 in the igni-
tion lock.
X Turn the combination switch to the corre-
sponding position.
When the windscreen wipers are switched on
and you stop the vehicle, the windscreen wipers
wipe more slowly.
Intermittent wiping is interrupted if you stop the
vehicle and open afron tdoor. This protects
people getting into and out of the vehicle from
being sprayed with water. Windscreen wipers
81Lightsand windscreen wipers Z
Page 85 of 261
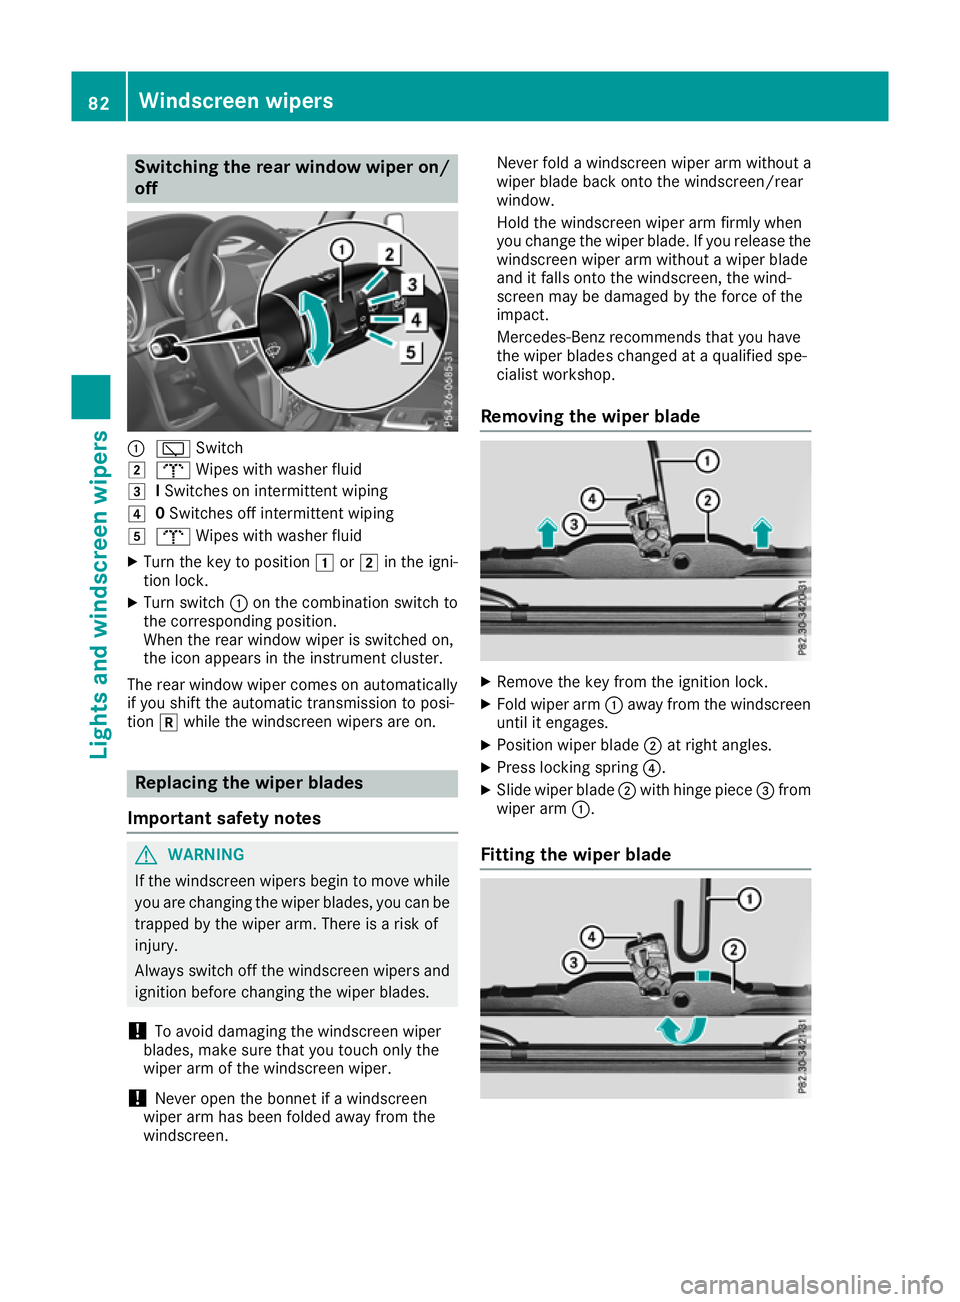
Switching the rear window wiper on/
off :
è Switch
2 b Wipes with washer fluid
3 ISwitches on intermittent wiping
4 0Switches off intermittent wiping
5 b Wipes with washer fluid
X Turn the key to position 1or2 in the igni-
tio nlock.
X Turn switch :on the combination switch to
the corresponding position.
Whe nthe rea rwindow wiper is switched on,
the ico nappears in the instrument cluster.
The rea rwindow wiper come sonautomatically
if yo ushift the automatic transmissio ntoposi-
tion kwhil ethe windscreen wiper sare on. Replacing the wiper blades
Important safety notes G
WARNING
If the windscreen wipers begi ntomove while
you are changing the wiper blades, you can be trappe dbythe wiper arm. There is arisk of
injury.
Always switch off the windscreen wipers and
ignitio nbefore changing the wiper blades.
! To avoi
ddamaging the windscreen wiper
blades, make sure that you touch only the
wiper arm of the windscreen wiper.
! Never open the bonnet if
awindscreen
wiper arm has been folde dawayfrom the
windscreen. Never fold
awindscreen wipera rm withouta
wiperb ladeback onto the windscreen/rear
window.
Hold the windscreen wipera rm firmly when
you change the wiperb lade. If you release the
windscreen wipera rm withoutawiperblade
and it falls onto the windscreen, the wind-
screen may be damaged by the force of the
impact.
Mercedes-Benz recommends that you have
the wiperb lades changed at aqualifieds pe-
cialist workshop.
Removing the wiper blade X
Remove the key from the ignitio nlock.
X Fold wiper arm :away from th ewindscreen
until it engages.
X Position wiper blade ;at right angles.
X Press lockin gspring ?.
X Slide wiper blade ;withhinge piece =from
wiper arm :.
Fitting th ewiper blade 82
Windscreen wipersLight
sand windscreen wipers
Page 87 of 261
Overview of the climat
econtrol sys-
tem General notes
Observe the settings recommended on the fol-
lowing pages. Otherwise, the windows could
mist up.
To prevent the windows from misting up:
R switch off climate control only briefly
R activate air-recirculation mode only briefly
R activate the "Cooling with dehumidification"
function
R activate the "Windscreen demisting" function
briefly, if required
Climate control regu lates the temperature and
the humidity in the vehicle interior and filters
undesirables ubstances out of the air. The "Cooling with air dehumidification" function
is available only when the engin eisrunning.
Optimum operation is only achieved when the
side windows and the sliding sunroof are closed.
Climate comfor tmay be adversely affected if the
sliding sunroof is open for along period of time.
Set the temperature manually if the sliding sun-
roof is open.
The "Residual heat" function can be switched on or off only when the ignition is switched off
(Y page 89).
The integrated filter can filter out most particles of dust and completely filters out pollen. Aclog-
ged filter reduces the amount of air supplied to
the vehicle interior. Dependin gonthe operating
conditions and environmental influences, the
interval for replacing the filter may be shorter
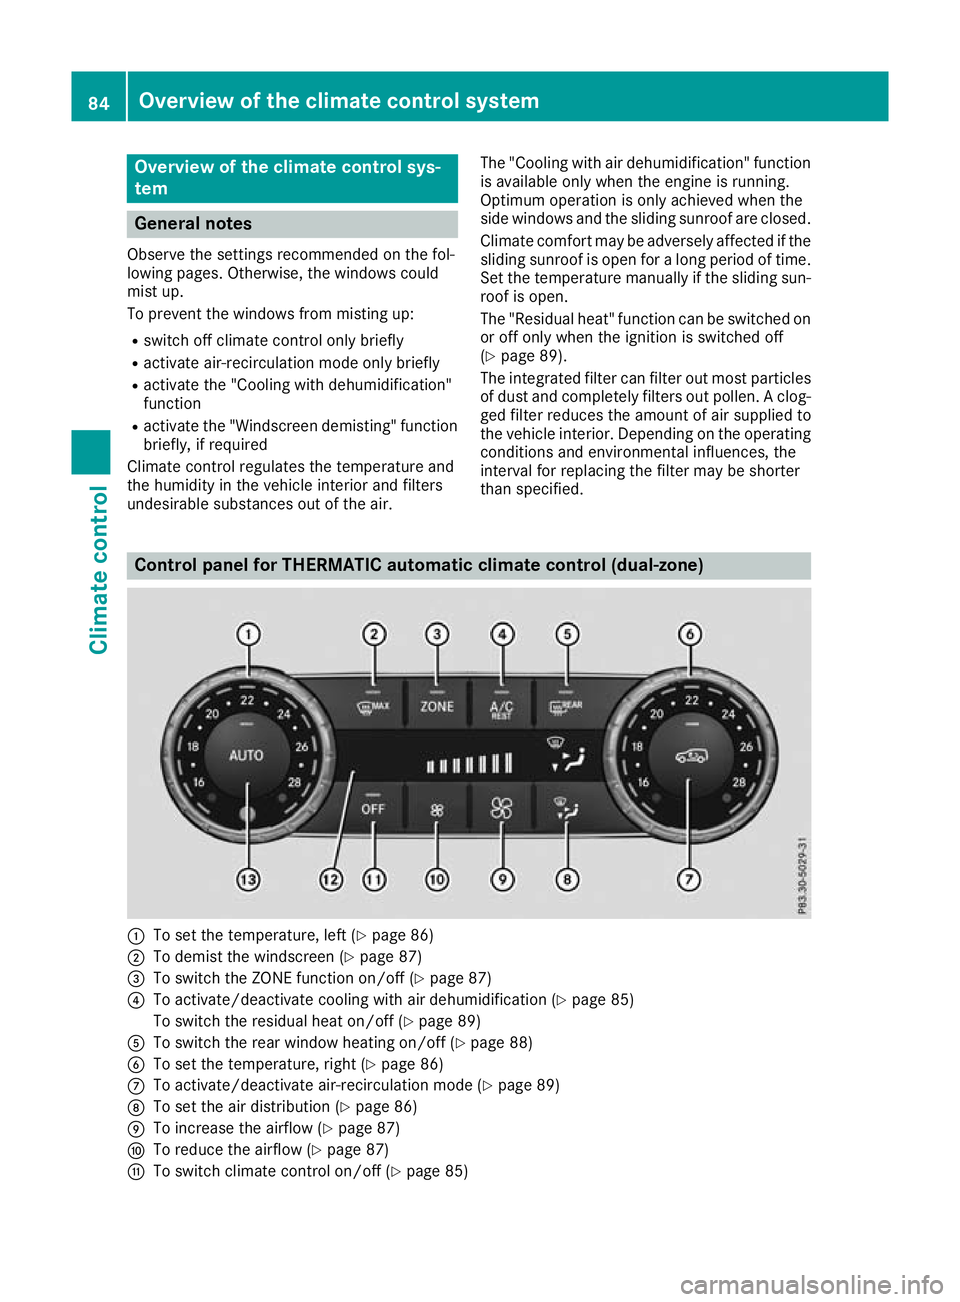
than specified. Control panel for THERMATIC automatic climate control (dual-zone)
:
To set the temperature, left (Y page 86)
; To demist the windscreen (Y page 87)
= To switch the ZONE function on/of f(Y page 87)
? To activate/deactivate cooling with air dehumidification (Y page 85)
To switch the residual heat on/of f(Ypage 89)
A To switch the rear window heating on/of f(Y page 88)
B To set the temperature, right (Y page 86)
C To activate/deactivate air-recirculation mode (Y page 89)
D To set the air distribution (Y page 86)
E To increase the airflow (Y page 87)
F To reduce the airflow (Y page 87)
G To switch climate control on/of f(Y page 85) 84
Overview of the climate control systemClimate
control
Page 88 of 261
H
Display
I To set climate contro ltoautomatic mod e(Ypage 86) Information on using THERMATIC
automatic climate control
Optimum us eofautomatic climat econ-
trol The followin
gcontains notes and recommenda-
tions on how best to use THERMATIC automatic
climate control.
R Activate climate control using the Ãand
Á buttons. The indicator lamps in the
à andÁ button slight up.
R Set the temperature to 22 †.
R Use the "Windscreen demisting" function only
briefly until the windscreen is clear again.
R Use the "Air-recirculation mode" function only
briefly, e.g. if there are unpleasant outside
odours or when in atunnel. The windows
could otherwise mist up as no fresh air is
drawn into the vehicle in air-recirculation
mode.
R Use the ZONE function to adopt the temper-
ature settings on the driver's side for the
front-passenger side as well. The indicator
lamp in the ábutton goes out.
ECO start/stop function During automatic engine switch-off, th
eclimate
contro lope rates onl yatareducedcapacity. If yo
ur equire th efull climat econtro loutput ,you
can switch off th eECO start/sto pfunction by
pressing th eECO butto n(Ypage 98). Oper
ating the climat econtrol system Switching the climate control on/off
General notes When climate control is switched off, the air
supply and air circulation are also switched off.
The windows could mist up. Therefore, switch
off climate control only briefly.
Switc honc limate control primarily using the
à button (Y page 86).
Activating/deactivating X
Turn the key to position 2(Ypage 96) in
the ignition lock.
X To switch on: press theÃbutton.
The indicator lamp in the Ãbutton lights
up. Airflow and air distribution are set to auto-
matic mode.
X To switch off: press the^button.
The indicator lamp in the ^button lights
up. Activating/deactivating cooling with air dehumidification
General notes If you deactivate the "Cooling with dehumidification
"function, the air inside the vehicle willn ot be
cooled during warm weather. The air inside the vehicle willa lso not be dehumidified. The windows
can mist up more quickly. Therefore, only deactivate the "Cooling with air dehumidification" function briefly.
The "Cooling with dehumidification" function is available only when the engine is running.
The air inside the vehicle is cooled and dehumidified according to the temperature selected.
Condensation may drip from the underside of the vehicle when cooling mode is active. This is normal
and not asign that there is amalfunction. Operating the climate control system
85Climate control
Page 90 of 261
Settings
X
Turn the key to position 2(Ypage 96) in
the ignition lock.
X Press the _button repeatedly until the
desired symbol appears in the display. Setting the airflow
X Turn the key to position 2(Ypage 96) in
the ignition lock.
X To increase: press theKbutton.
X To reduce: press theIbutton.
i The airflow from the rear-compartment
ventsa nd the centre ventsist he same.Switching the ZONE function on/off
X To switch on: press theábutton.
The indicator lamp in the ábutton lights
up.
The temperature settingf or the driver's side
is not adopted for the front-passenger side
and the rear compartment. The temperature
for the front-passenger side and the rear com-
partment is set separately.
X To switch off: press theábutton.
The indicator lamp in the ábutton goes
out.
The temperature settingf or the driver's side
is adopted for the front-passenger side and
the rear compartment. Demisti
ng thewindscreen
General notes You can use this function to defrost the wind-
screen or to demis
tthe inside of the windscreen
and the side windows.
Switch off the "Windscreen demisting" function as soon as the windscreen is clear again. Switching on/off X
Turn the key to position 2(Ypage 96) in
the ignitio nlock.
X To switch on: press the¬button.
The indicator lamp in the ¬button lights
up.
The climate control system switches to the
following functions:
R cooling with air dehumidification
R high airflow
R high temperature
R air distribution to the windscreen and front
side windows
R air-recirculation mode off
X To switch off: press the¬button.
The indicator lamp in the ¬button goes
out. The previous settings are reactivated.
The cooling with air dehumidification function remains on. Air-recirculation mode remains
deactivated.
or
X Press the Ãbutton.
The indicator lamp in the ¬button goes
out. Airflow and air distribution are set to
automatic mode.
or
X Turn control :orB clockwise or anti-clock-
wise (Y page 84).
or
X Press the KorI button. Demisting the windo
ws
Windows misted up on th einside X
Activate the Ácoolin gwitha irdehumidi-
ficatio nfunction.
X Activate the Ãautomatic mode.
X If the windows continue to mis tup,activate
the "Windscreen demisting "fun ction
(Y page 87).
i Yo
us houl donlys elect thi ssetting unti lthe
windscree nisc lear again. Operatin
gthe climat econtrol system
87Climatecont rol
Page 91 of 261
Windows misted up on the outside
X
Switch on the windscreen wiper s(Ypage 81).
X Press the _button repeatedl yuntilthe
P orO symbo lapp ears in the display.
i You shoul
donly select this setting unti lthe
windscreen is clear again.
i If yo
uclean the window sregularly, they do
not mis tupasq uickly. Switching windscree
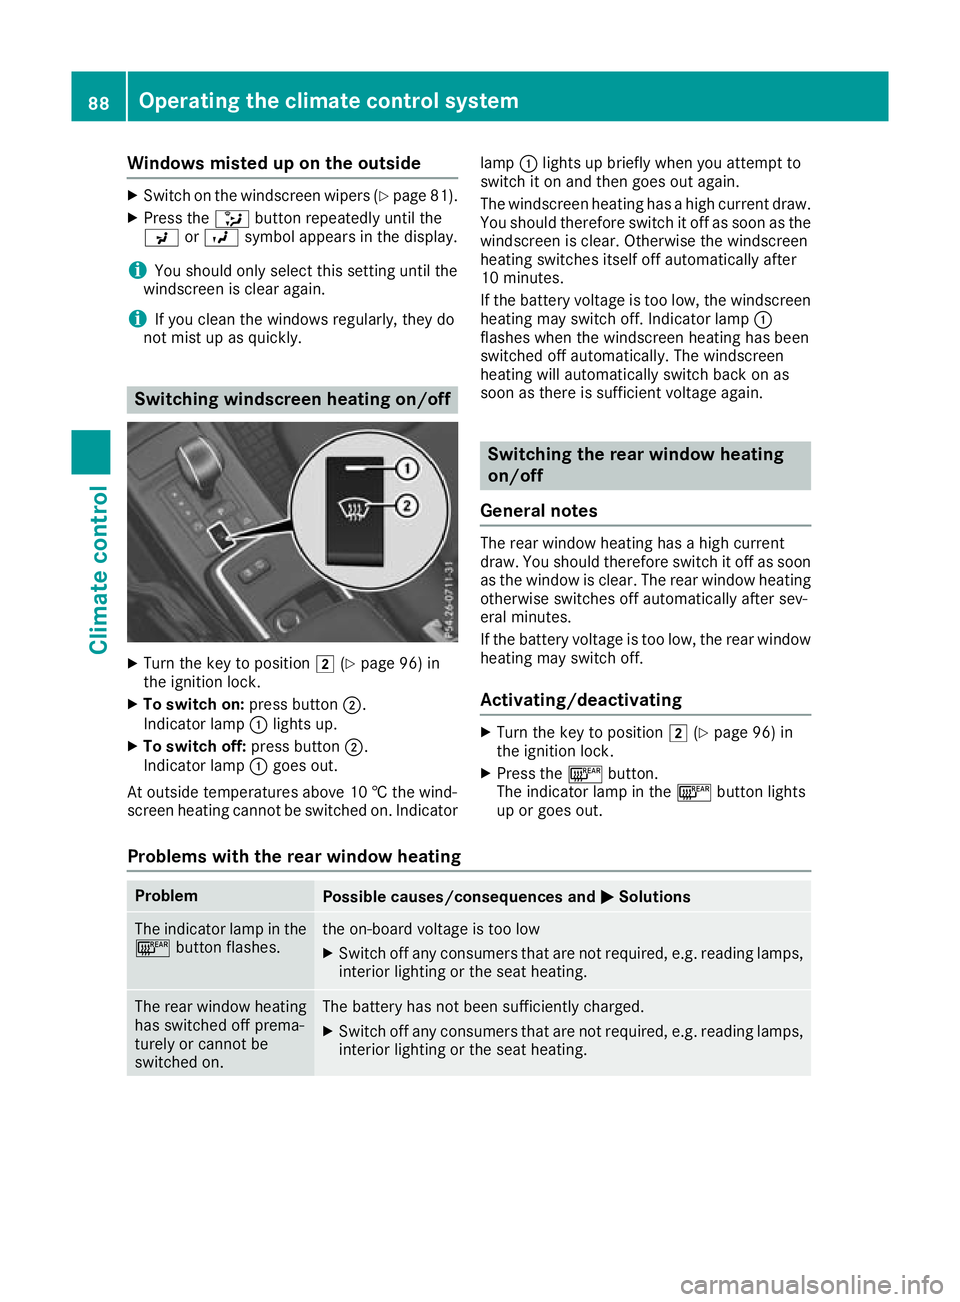
nheating on/off X
Turn the key to position 2(Ypage 96) in
the ignition lock.
X To switch on: press button;.
Indicator lamp :lights up.
X To switch off: press button;.
Indicator lamp :goes out.
At outside temperatures above 10 †the wind-
screen heating cannot be switched on. Indicator lamp
:lights up briefly when you attempt to
switch it on and then goes out again.
The windscreen heating has ahigh current draw.
You should therefore switc hitoff as soon as the
windscreen is clear. Otherwise the windscreen
heatin gswitches itself off automatically after
10 minutes.
If the battery voltage is too low, the windscreen heatin gmay switc hoff.I ndicator lamp :
flashes when the windscreen heatin ghas been
switched off automatically. The windscreen
heatin gwill automatically switc hback on as
soon as there is sufficient voltage again. Switching the rear windo
wheating
on/off
General notes The rear window heating has
ahigh current
draw. You should therefor eswitch it off as soon
as the window is clear. The rear window heating otherwise switches off automatically after sev-
eral minutes.
If the battery voltage is too low, the rear window
heating may switch off.
Activating/deactivating X
Turn the key to position 2(Ypage 96) in
the ignition lock.
X Press the ¤button.
The indicator lamp in the ¤button lights
up or goes out.
Problems with the rear window heating Problem
Possible causes/consequences and
M MSolutions The indicator lamp in the
¤ button flashes. th
eo n-board voltag eistoo low
X Switch off any consumers tha tare not required ,e.g.r eading lamps,
interio rlighting or the seat heating. Th
er ear window heating
has switched off prema-
turely or cannot be
switched on. The battery has not been sufficiently charged.
X Switch off any consumer sthat are not required, e.g. reading lamps,
interior lighting or the seat heating. 88
Operating the climate control systemClimate
control
Page 92 of 261
Activating/deactivating air-recircula-
tion mode
Genera lnotes If yo
uactivate air-recirculation mode, the win-
dows can mist up more quickly, particularly at
low temperatures. Use air-recirculation mode
only briefl ytoprevent the window sfrom misting
up.
Activating/deactivating X
Turn the key to position 2(Ypage 96) in
the ignition lock.
X To activa te:press the dbutton.
The indicator lamp in the dbutton lights
up.
i Air-recirculation mode is automatically acti-
vated at high levels of pollution or at high out-
side temperatures. When air-recirculation
mode is activated automatically, the indicator
lamp in the dbutton is not lit.
Outside air is added after about 30 minutes.
X To deactivate: press thedbutton.
The indicator lamp in the dbutton goes
out.
i Air-recirculation mode is deactivated auto-
matically:
R after approximately five minutes at outside
temperatures below approximately 5†
R after approximately five minutes if "Cooling
with air dehumidification" is deactivated
R after approximately 30 minutes at outside
temperatures above approximately 5†Switching the residual heat on/off
General notes It is possible to make use of the residual heat of
the engine to continue heating the stationary
vehicle for up to 30 minutes after the engine has
been switched off. The heating time depends on
the set interior temperature. Switching on/off X
Turn the key to position g(Ypage 96) in
the ignition lock or remove it.
X To switch on: press theÁbutton.
The indicator lamp in the Ábutton lights
up.
i The blower will run at
alow speed regardless
of the airflow setting.
i If you switch on the residual heat function at
high temperatures, only the ventilation will be
activated.
X To switch off: press theÁbutton.
The indicator lamp in the Ábutton goes
out.
Residua lheat is switched off automatically:
R after approximately 30 minutes
R when the ignition is switched on
R if the battery voltage drops
R if the coolant temperature is too low
R when the auxiliary heating is switched on Auxiliary heating
Important safety notes G
DAN
GER
If th eexhaust pipe is blocke dorsufficient
ventilation is no tpossible, toxic exhaust
fumes can ente rthe vehicle, especially car-
bon monoxide. This is th ecase, e.g. in
enclosed spaces, or if th evehicl eiss tuck in
snow. There is ariskoff atal injuries.
You should switch off th eauxiliary heating in
enclosed spaces whic hdonothav eane xtrac-
tion system, e.g. agarage. If th evehicl eis
stuck in snow and you mus tleav ethe auxiliary
heating running, keep th eexhaust pipe and
th ea rea around th evehicl eclear of snow. To
guarantee asufficien tsupply of fresh air, open
aw indow on th eside of th evehicl eaway from
th ew ind. G
WARNING
When th eauxiliary heating is switched on,
parts of the vehicl ecan become very hot. Operating the climate control system
89Climate control
Z
Page 121 of 261
Alway
sobserve the fording depth values
(Y page 255). Parkin
gthe vehicle after heavy loads
on the engine
! Vehicles with
adiesel engine: your vehi-
cle's exhaust gas turbocharger may get very
hot under heavy engine load, e.g. during:
R trailer towing
R longer motorway journeys at high speed
R longer journeys through mountainous ter-
rain
X Let the engine run for approximately another
two minutes while the vehicle is stationary
before switching off the engine.
This way, the exhaust gas turbocharger can
cool down more effectively. Winte
rdriving G
WARNING
If you shift dow nonaslippery road surface in
an attempt to increas ethe engine's braking
effect, the drive wheels coul dlose their grip.
This increases the risk of skidding and having
an accident.
Do not shift downf or additionalengine brak-
ing on aslippery road surface. G
WARNING
If you select the LOW RANGE off-road gearon as lippery road surface, the wheels coul dlose
traction:
R if you release the accelerator peda lwhen
the vehicl eisinmotion
R if Off-road ABS intervenes when braking
If the wheels lose traction, it willnol onger be
possible to steer the vehicle. This increases
the risk of skidding and having an accident.
Never select the LOW RANGE off-road gear
when driving on slippery road surfaces. G
DANGER
If the exhaus tpipe is blocke doradequate
ventilation is no tpossible, poisonous gases
suc hasc arbon monoxide (CO) may ente rthe
vehicle. This is th ecase, e.g. if th evehicle
become strapped in snow. There is ariskof
fatal injury.
If you leav ethe engin eortheauxiliary heating
running, mak esuret he exhaust pipe and area
around th evehicl eare clear of snow. To
ensur eana dequate supply of fresh air, open a
window on th eside of th evehicl ethatisn ot
facing int othe wind.
Hav eyour vehicl ewinterproofed at aqualified
specialist workshop at th eonset of winter.
You should drive particularly carefully on slip-
per yroads urfaces. Avoid sudden acceleration,
steering and braking manoeuvres.
If th evehicl ethreaten stoskidorc annotbe
stoppe dwhen moving at low speed:
X Shift th eautomatic transmission to position
N.
X Try to bring th evehicl eunder control by using
corrective steering.
The outside temperature indicator is not
designed to serve as an ice-warning device and
is therefor eunsuitable for that purpose.
Changes in th eoutside temperature are dis-
played after ashort delay.
Indicate dtem peratures jus tabov ethe freezing
poin tdon otguarantee that th eroads urfac eis
free of ice .The roa dmay still be icy, especially in
wooded area soronbridges.The vehicl ecould
skid if you fail to adapt your drivin gstyle. Always
adapt your drivin gstyle and drive at aspeed to
suit th eprevailing weather conditions.
You should pay special attention to roa dcondi-
tion swhen temperatures are around freezing
point.
Further information on drivin gwiths nowc hains
(Y page 237).
Further information on drivin gwiths ummer
tyres (Y page 237).
Observ ethe note sint he"Winte roperation "sec-
tion (Y page 236). 118
Driving tipsDriving and parking