2016 MERCEDES-BENZ G-CLASS SUV seats
[x] Cancel search: seatsPage 46 of 261

restraint system. Always observe the infor-
mation about suitable positioning of the child restraint system in this Owner's Manua las
wellast he child restraint system manufac-
turer's installation instructions. G
WARNING
If you secure achild in aforward-facing child
restraint system on the front-passenge rseat
and you position the front-passenge rseat too
close to the dashboard, in the event of an
accident, the child could:
R come into contact with the vehicle's inte-
rior if the PASSENGER AIR BAG OFF indi-
cator lamp is lit, for example
R be struck by the airbag if the PASSENGER
AIR BAG OFF indicator lamp is off
This poses an increased risk of injury or even fatal injury.
Move the front-passenge rseat as far back as
possible.A lways make sure that the shoulder
belts trap is correctly routed from the vehicle
belts ash guide to the shoulderb eltg uide on
the child restraint system. The shoulderb elt
strap must be routed forwards and down-
wards from the belts ash guide. If necessary,
adjust the belts ash guide and the front-
passenger seat accordingly .Always observe
the information about suitable positioning of
the child restraint system in this Owner's
Manual as wellast he child restraint system
manufacturer's installation instructions.
i Ensure that yourv
ehicleise quipped with
automatic child seat recognitio nfor the front-
passenger seat (Y page43).Ift his is not the
case, alwaysi nstallachild restraint system on
as uitable rear seat (Y page46). PASSENGER AIR BAG OFF indicato
rlamp :
shows you whether the front-passenger front
airbag is disabled.
X Turn the key to position 2in the ignition
lock.
The system carries out aself-diagnosis.
The PASSENGER AIR BAG OFF indicator lamp
must light up for approximately six seconds.
If, after the system self-test, the
PASSENGER AIR BAG OFF indicator lamp:
R lights up ,the front-passenger fronta irbag is
disabled. It will then not be deployed in the
event of an accident.
R is not lit ,the sensor system did not detect a
child restraint system with transponder for
automatic child seat recognition. If, in the
case of an accident ,all deployment criteria
are met, the front-passenger fronta irbag is
deployed. Childr
estraint system on th efront-
passenge rseat
General notes Accident statistics show that childre
nsecured
in the rea rseats ar esafer tha nchildren secured
in the front seats. For thi sreason, Mercedes-
Benz strongl yadvises tha tyou fitac hild
restraint system on arears eat.
Vehicles with automatic child seat recogni-
tio nont he co-driver' sseat:if it is absolutely
necessary to fit achild restraint system to the
co-driver' sseat, always observe the notes on
"Automatic child sea trecognitio nonthe co-
driver's seat" (Y page 43). Child
renint hevehicle
43Safety Z
Page 49 of 261
Problems with automatic child seat recognition
Problem
Possible causes/consequences and
M
MSolutions The PASSENGER AIR
BAG OFF indicator lamp
on the centre console is
lit. As
pecia lMercedes-Benz child restraint system with atransponde rfor
automatic child sea trecognitio nhasbeen fitte dtothe front-
passenge rseat. The front-passenger front airba ghastherefore been
disabled as desired. G
WARNING
There is no child restraint syste mfitted to the front-passenge rseat.
Automatic child seat recognitio nismalfunctioning, for exampl edue to
electronic devices on the front-passenge rseat.
There is arisk of injury.
X Remove electroni cequipment from the front-passenge rseat, e.g.:
R laptop
R mobil ephone
R ac ard with atransponder, such as aski pass or access pass
If the PASSENGER AIR BAG OFF indicator lamp remains lit, the front- passenger seat may not be used.
X Consult aqualified specialist workshop. When you switch the
ignition on, the
6
restraint system warning lamp lights up and/or
the PASSENGER AIR
BAG OFF indicato rlamp
does not light up briefly. G
WARNING
Automati cchild seat recognitio nismalfunctioning.
Do not install achild restraint system on the front-passenge rseat.
It is recommende dthat you fit the child restraint system to asuitable
rear seat.
X Consult aqualified specialist workshop.
X Please alsor efer to the notes about the restraint system warning
lamp (Y page161). Suitable positioningoft
he child
restraint system
Introduction Only child restraint systems that are approved in
accordance with ECE standard ECE R44 are per-
mitted for use in the vehicle.
"Universal" category child restraint systems can
be recognised by their orange approval label and
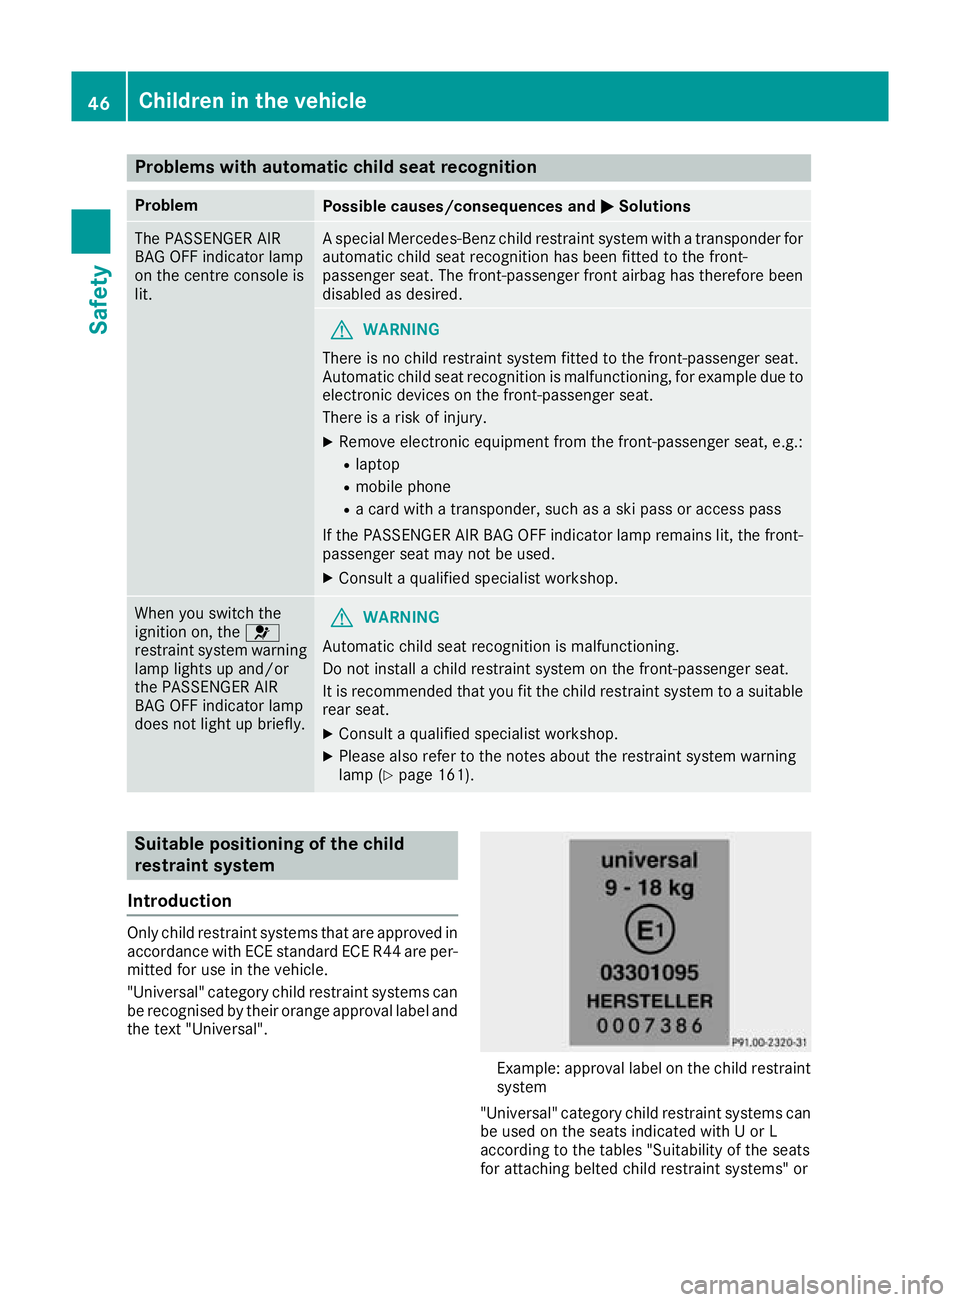
the text "Universal". Example: approval label on the child restraint
system
"Universal "category child restraint system scan
be used on the seats indicated with UorL
according to the table s"Suitability of the seats
for attaching belte dchild restraint systems" or 46
Children in the vehicleSafety
Page 50 of 261

"Suitabilit
yoftheseat sfor attaching an ISOFIX
child restraint system".
Semi-universal child restraint systems are indi-
cated by th etext"semi-universal" on the
approval label. Thes ecan be used if th evehicle
and th eseat are listed in th echild restraint sys-
te mm anufacturer' svehicle model list .For more
information, contact th echild restraint system
manufacturer or visit their website.
Child restrain tsystem on th efront-
passenger seat – if it is absolutely necessary to
secure achild in achild restraint system on the
front-passenger seat:
X Always pay attentio ntotheinstruction sunder
"Child restraint system on th efront-
passenger seat "(Ypage 43).
Ther eyou will fin dinstruction sonhow to cor-
rectly rout ethe shoulder belt strap from the belt sash guide to the shoulder belt guide on
the child restraint syste
m(Ypage 45).
X Move the front-passenger seat as far back as
possible and int othe lowest position.
X Move the backrest to an almost vertical posi-
tion.
The entire base of the child restraint system
must always rest on the seat cushion of the
front-passenger seat. The backrest of a
forward-facin gchild restraint system must, as
far as possible, rest flat against the backrest
of the front-passenger seat. The child
restraint system must not touch the roof or be
put under strain by the head restraint .Adjust
the angle of the seat backrest and the head
restraint position accordingly. Also observe
the child restraint system manufacturer's
installation instructions.
Suitability of the seats for attaching belt-secured child restraint systems If you use
ababy car seat of category 0or0+orarearward-facing child restraint system of category
Ionar ear seat, you must adjust the driver's or front-passenger seat so that the seat does not touch
the child restraint system.
If you use acategory I, forward-facing child restraint system, you shouldr emove the head restraint
from the respective seat, if possible (Y page 70). The backrest of the child restraint system must,
as far as possible, lie flat against the backrest of the seat.
Make sure that the child's feet do not touch the front seat. If necessary ,move the front seat forward
slightly.
For certain child restraint systems in weight categories II or III, this can mean that the area of use
is restricted. The maximum size setting of the child restraint system may not be possible due to
possible contact with the roof.
Alwayso bserve the notes in the "Child restraint system" section (Y page 40) and the child restraint
system manufacturer's installation instructions.
When you remove the child restraint system, you must replace the head restraints again immedi-
ately (Y page 70). All vehicle occupants must adjust their head restraints correctly before begin-
ning the journey.
Legend for the table:
XS eat that is unsuitable for children in this weight category.
US uitable for child restraint systems in th e"Universal" categor ytha ta re approve dfor use in this
weigh tcategory.
LS uitable for child restraint systems as recommended; see th e"Recommended child restraint
systems "table (Y page 49). Children in th
evehicle
47Safety Z
Page 51 of 261
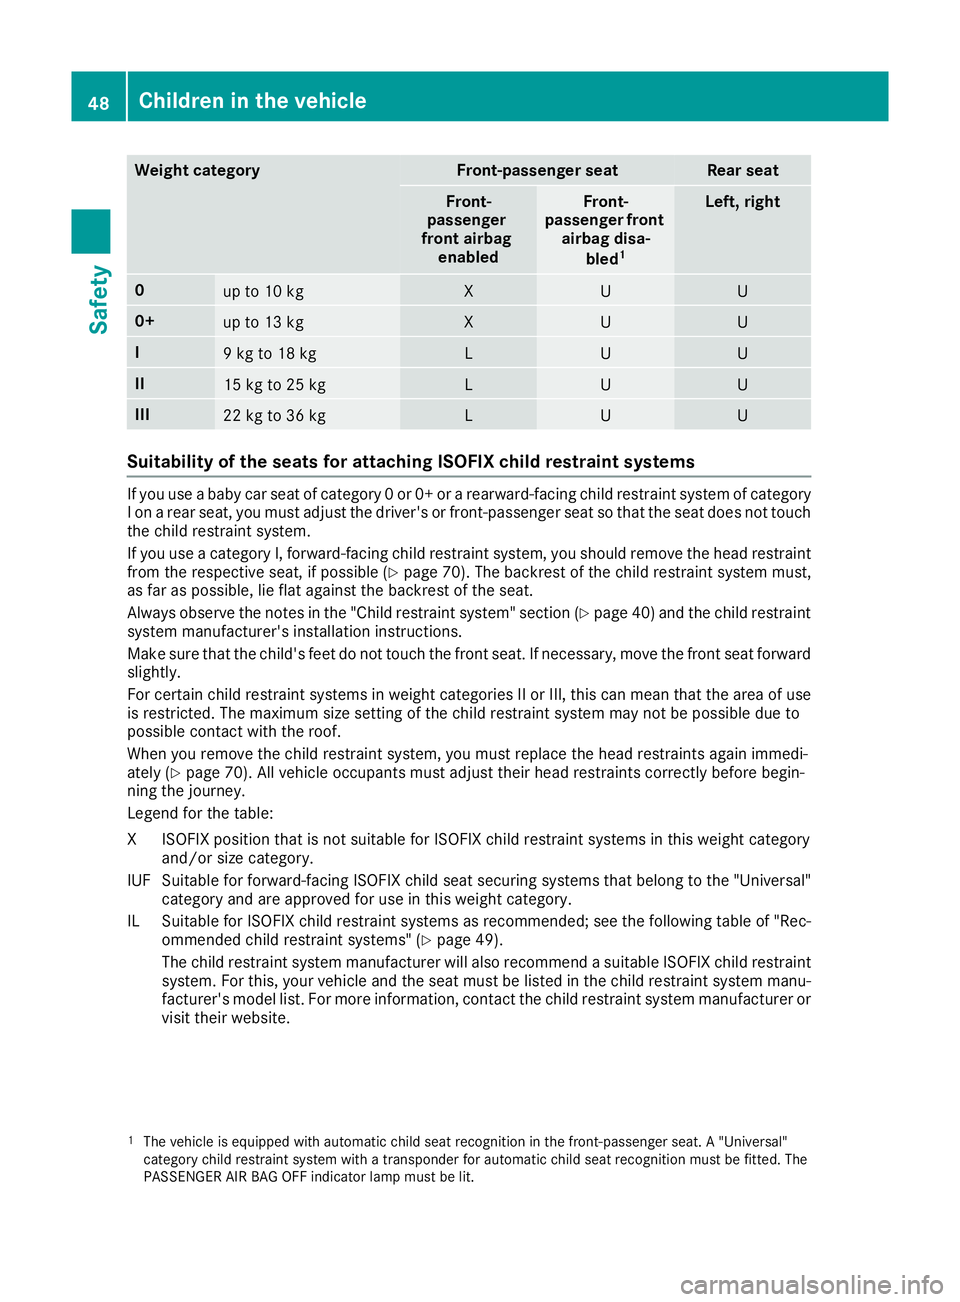
Weight category Front-passenger seat Rear seat
Front-
passenger
front airbag enabled Front-
passenger front airbag disa-
bled 1 Left, right
0
up to 10 kg X U U
0+
up to 13 kg X U U
I
9kgto18kg L U U
II
15 kg to 25 kg L U U
III
22 kg to 36 kg L U U
Suitability of the seat
sfor attaching ISOFIXc hild restraint systemsIf you use
ababy car seat of category 0or0+orarearward-facing child restraint system of category
Ionar ear seat, you must adjust the driver's or front-passenger seat so that the seat does not touch
the child restraint system.
If you use acategory I, forward-facing child restraint system, you shouldr emove the head restraint
from the respective seat, if possible (Y page 70). The backrest of the child restraint system must,
as far as possible, lie flat against the backrest of the seat.
Alwayso bserve the notes in the "Child restraint system" section (Y page 40) and the child restraint
system manufacturer's installation instructions.
Make sure that the child's feet do not touch the front seat. If necessary ,move the front seat forward
slightly.
For certain child restraint systems in weight categories II or III, this can mean that the area of use
is restricted. The maximum size setting of the child restraint system may not be possible due to
possible contact with the roof.
When you remove the child restraint system, you must replace the head restraints again immedi-
ately (Y page 70). All vehicle occupants must adjust their head restraints correctly before begin-
ning the journey.
Legend for the table:
XI SOFIX position that is not suitabl efor ISOFIX chil drestraint systems in this weight category
and/or size category.
IUF Suitable for forward-facing ISOFIX chil dseats ecuring systems that belong to the "Universal"
categor yand are approved for us einthis weight category.
IL Suitable for ISOFIX chil drestraint systems as recommended; see the following table of "Rec-
ommended chil drestraint systems "(Y page 49).
The chil drestraint system manufacturer will also recommend asuitabl eISOFIX chil drestraint
system. For this ,you rvehicl eand the sea tmustb elisted in the chil drestraint system manu-
facturer' smodel list. For more information, contac tthe chil drestraint system manufacturer or
visit thei rwebsite.
1 The vehicl eisequipped with automatic child seat recognition in the front-passenger seat. A"Universal"
category child restraint system with atransponder for automatic child seat recognition must be fitted. The
PASSENGER AIR BAG OFF indicator lamp must be lit. 48
Children in the vehicleSafety
Page 70 of 261
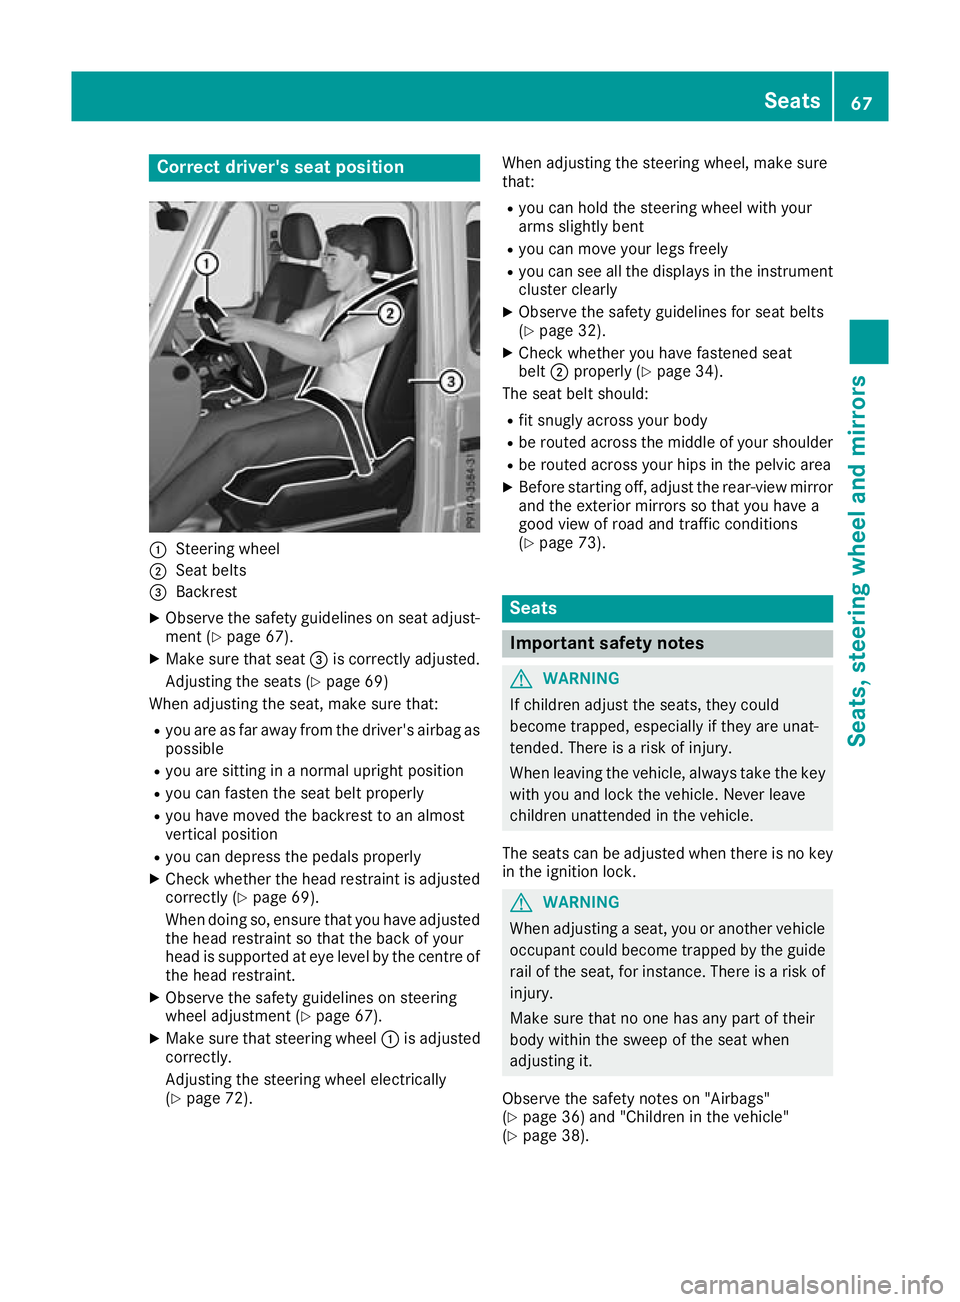
Correct driver's seat position
:
Steerin gwheel
; Seatbelts
= Backrest
X Observe the safety guideline sonseata djust-
ment (Y page 67).
X Make sure that seat =is correctly adjusted.
Adjusting the seats (Y page 69)
Whe nadjusting the seat, make sure that:
R youa re as far away from the driver' sairba gas
possible
R youa re sitting in anorma lupright position
R youc an fasten the sea tbeltp roperly
R youh avem ovedthe backrest to an almost
vertical position
R youc an depress the pedal sproperly
X Check whethe rthe hea drestraint is adjusted
correctly (Y page 69).
Whe ndoing so, ensure that yo uhavea djusted
the hea drestraint so that the back of your
hea diss upported at ey elev el by the centre of
the hea drestraint.
X Observe the safety guideline sonsteering
wheel adjustment (Y page 67).
X Make sure that steering wheel :is adjusted
correctly.
Adjusting the steering wheel electrically
(Y page 72). Whe
nadjustin gthe steerin gwheel, make sure
that:
R you can hold the steerin gwheel with your
arms slightly bent
R you can move your legs freely
R you can see all the displays in the instrument
cluster clearly
X Observe the safety guidelines for seat belts
(Y page 32).
X Check whether you have fastened seat
belt ;properly (Y page 34).
The seat belt should:
R fit snugly across your body
R be routed across the middle of your shoulder
R be routed across your hips in the pelvic area
X Befor estarting off, adjust the rear-view mirror
and the exterior mirrors so that you have a
good view of road and traffic conditions
(Y page 73). Seats
Important safety notes
G
WARNING
If children adjust the seats, they could
become trapped, especially if they are unat-
tended. Ther eisarisk of injury.
When leaving the vehicle, alwayst ake the key
with you and lock the vehicle. Never leave
children unattended in the vehicle.
The seats can be adjusted when there is no key
in the ignitio nlock. G
WARNING
When adjusting aseat, you or another vehicle
occupant coul dbecome trappe dbythe guide
rail of the seat, for instance. There is arisk of
injury.
Make sure that no one has any part of their
body withi nthe swee pofthe seat when
adjusting it.
Observe the safety notes on "Airbags"
(Y page3 6) and "Children in the vehicle"
(Y page3 8). Seats
67Seats,steering wheela nd mirrors Z
Page 71 of 261
G
WARNING
You coul dlose control of the vehicl ewhile
driving if you:
R adjust the driver's seat, steering whee lor
mirrors
R fasten the seat belt
There is arisk of an accident.
Adjust the driver's seat, headr estraint, steer-
ing whee land mirrors and fasten yours eat
beltb efore starting the engine. G
WARNING
The headr estraints cannot provid ethe inten-
ded protection unless they are fitted and
adjusted correctly. There is an increased risk of injury to the heada nd neck in the event of
an accident or sudden braking, for example.
Always drive with the headr estraints fitted.
Ensure that the centre of the headr estraints
support the back of each vehicl eoccupant's
headate ye levelbefore driving off.
Make sure that you do not interchange the head restraints of the front and rear seats when
adjusting the headr estraints. Otherwise, you
cannot adjust the height and angle of the head
restraints correctly.
Adjust the headr estraint so that it is as close as
possible to yourh ead. G
WARNING
If the driver's seat is not correctly engaged, it coul dunexpectedly move while driving. This
coul dcausey ou to lose control of the vehicle.
There is arisk of an accident.
Always ensure that the driver's seat is
engaged before starting the vehicle. G
WARNING
If you adjust the seat height carelessly, you or other vehicl eoccupants coul dbetrappe dand
thereby injured .Childre ninparticular could
accidentally press the electrica lseat adjust-
ment buttons and become trapped. There is a
risk of injury.
Whil emoving the seats, make sure that your
hands or other body parts do not get under the lever assembly of the sea
tadjustmen tsys-
tem. G
WARNING
Whe nadjusting aseat, you or another vehicle
occupant coul dbecome trappe dbythe guide
rail of the seat, for instance. There is arisk of
injury.
Make sure that no one has any part of their
body withi nthe swee pofthe seat when
adjusting it. G
WARNING
If the seat beltisn ot in the seat beltg uide, it
no longer offers the intended leve lofprotec-
tion. An incorrectly fastened seat beltc an also
caus eadditiona linjuries. This poses an
increased risk of injury or even fatal injury.
Before starting ajourney ,alwaysm ake sure
that the seat beltisint he seat beltguide and
all vehicl eoccupants have fastened their seat
belts properly.
! To avoi
ddamage to the seats and the seat
heating, observe the following information:
R do not spil lany liquidsont he seats. If liquid
is spilled on the seats, dry them as soon as possible.
R if the seat covers are damp or wet, do not
switch on the seat heating. The seat heat-
ing should alson ot be used to dry the seats.
R clea nthe seat covers as recommended;
see "Interio rcare".
R do not transport heav yloads on the seats.
Do not place sharp objects on the seat
cushions, e.g. knives, nail sortools. The
seats should only be occupied by passen-
gers, if possible.
R when the seat heating is in operation, do
not cover the seats with insulating materi-
als,e .g. blankets, coats, bags, seat covers,
child seats or booster seats.
! Make sure that there are no objects in the
footwel lunder or behind the seats when mov-
ing the seats back. There is arisk that the
seats and/or the objects coul dbedamaged.
! When the rear bench seat is folde
dfor-
wards, the front seats cannot be moved to 68
SeatsSeats
,steering wheela nd mirrors
Page 72 of 261
their rearmost position. Yo
ucould otherwise
damage the seats and the rea rbench seat.
! Make sure tha
tthe su nvisor is folde dup
befor eadjusting the backrest and head
restraint height. The head restraint and sun
visor could otherwis ecollide when the head
restraint is full yextended.
i If the front door is open, the seats can be
adjusted for up to 30 minute safter the igni-
tio nh asbeen switched off.
i The rea
rseath eadr estraints can be
remove d(Ypage 70).
For mor einformation, contact aquali fied spe-
cialist workshop.
i Furthe
rinformation abou tenlarging the lug-
gage compartment (folding the rea rbench
seat forwards )(Ypage 202). Adjustin
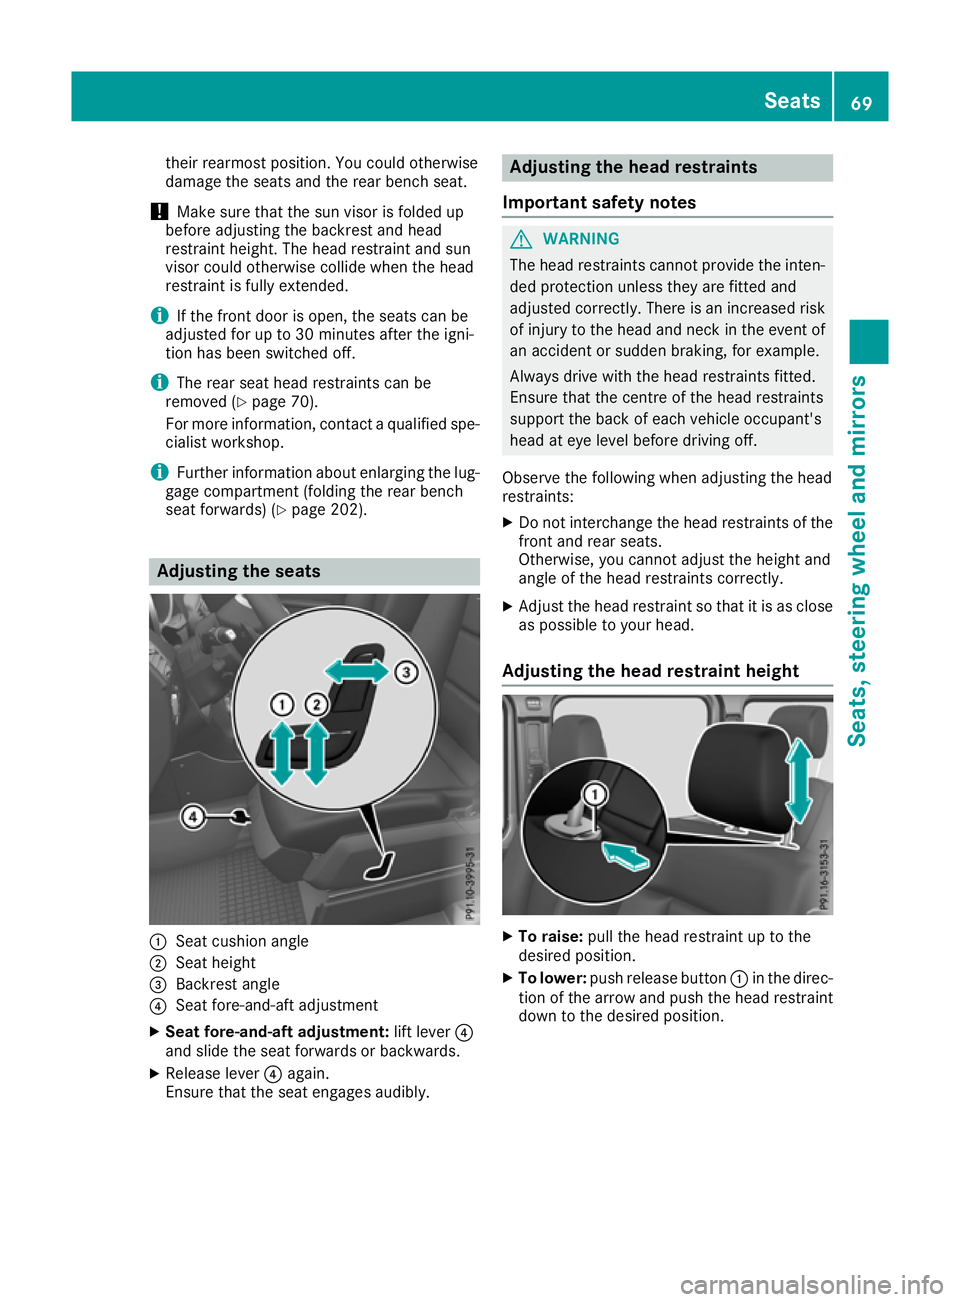
gthe seats :
Seat cushion angle
; Seat height
= Backrest angle
? Seat fore-and-aft adjustment
X Sea tfore-and-aft adjustment: lift lever?
and slide the sea tforward sorbackwards.
X Releas elever ? again.
Ensur ethat the sea tengages audibly. Adjustin
gthe hea drestraints
Important safety notes G
WARNING
Th eh ead restraints cannot provid ethe inten-
ded protection unless they are fitted and
adjusted correctly. There is an increased risk of injury to the head and neck in the event of
an accident or sudden braking, for example.
Always drive with the head restraints fitted.
Ensure that the centre of the head restraints
support the back of each vehicl eoccupant's
head at eye leve lbefore driving off.
Observe the following when adjusting the head
restraints:
X Do not interchange the head restraints of the
front and rear seats.
Otherwise, you cannot adjust the height and
angle of the head restraints correctly.
X Adjust the head restraint so that it is as close
as possible to yourh ead.
Adjusting the head restraint height X
To raise: pull the head restraint up to the
desired position.
X To lower: push release button :in the direc-
tion of the arrow and push the head restraint down to the desired position. Seats
69Seats,steering wheela nd mirrors Z
Page 73 of 261
Adjusting th
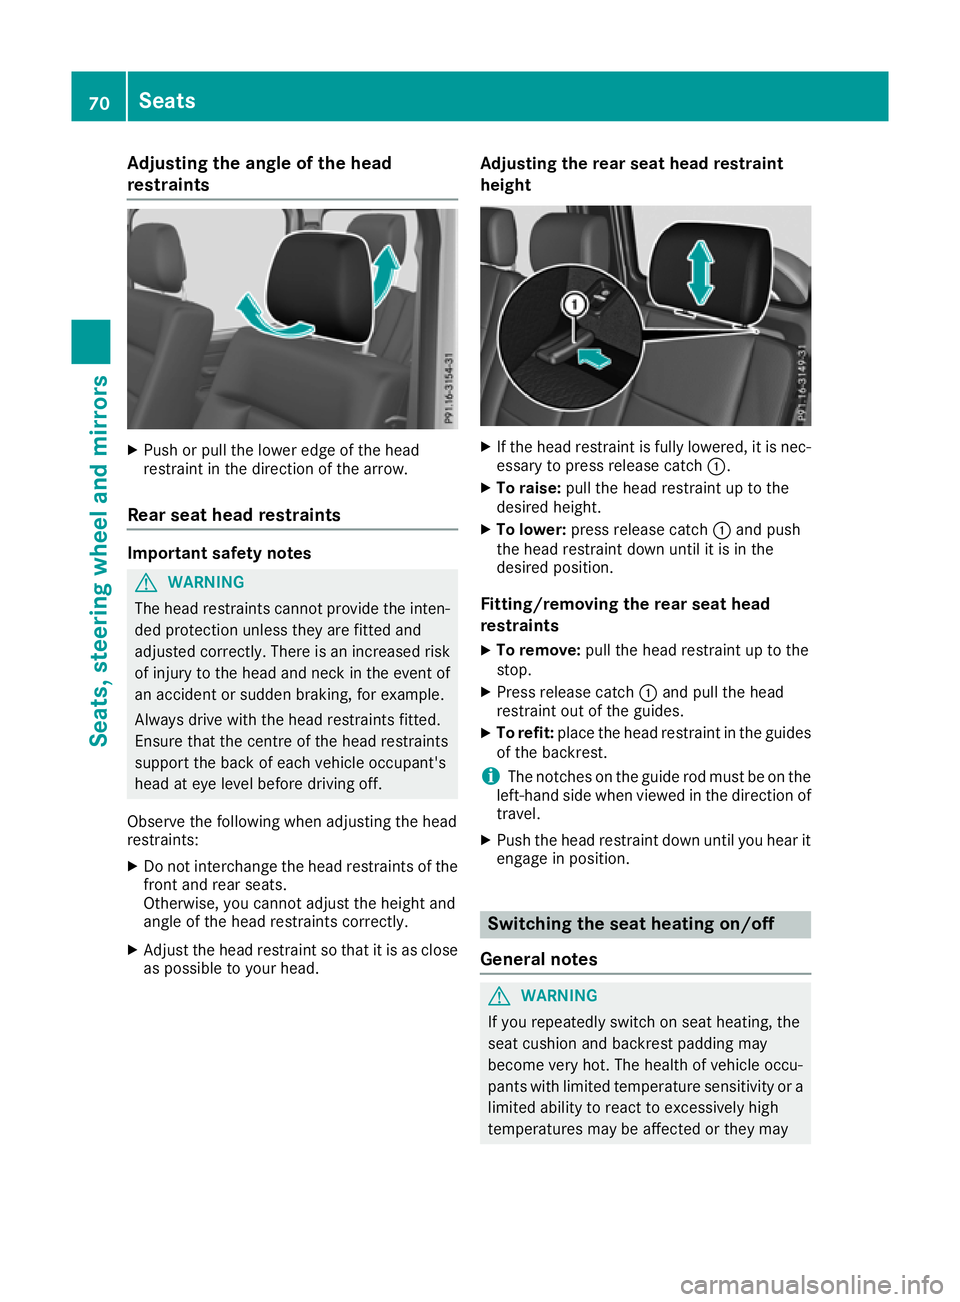
eangle of th ehead
restraints X
Push or pull the lowe redge of the head
restraint in the direction of the arrow.
Rear seat head restraints Important safety notes
G
WARNING
The head restraints cannot provide the inten-
ded protection unless they are fitted and
adjusted correctly. Ther eisanincreased risk
of injury to the heada nd neck in the event of
an accident or sudden braking, for example.
Always drive with the headr estraints fitted.
Ensure that the centre of the headr estraints
support the back of each vehicl eoccupant's
headate ye levelbefore driving off.
Observe the following when adjusting the head
restraints:
X Do not interchange the headr estraints of the
front and rear seats.
Otherwise, you cannot adjust the height and
angle of the headr estraints correctly.
X Adjust the headr estraint so that it is as close
as possible to yourh ead. Ad
justing th erears eat hea drestraint
height X
If th ehead restraint is fullyl owered, it is nec-
essary to press release catch :.
X To raise: pullthe head restraint up to the
desire dheight.
X To lower: press release catch :and push
the head restraint down until it is in the
desire dposition.
Fitting/removin gthe rear seat head
restraints
X To remove: pullthe head restraint up to the
stop.
X Press release catch :and pullt he head
restraint out of the guides.
X To refit: place the head restraint in the guides
of the backrest.
i The notches on the guide rod must be on the
left-hand side when viewedint he direction of
travel.
X Push the head restraint down until you hear it
engage in position. Switching the seat heating on/off
General notes G
WARNING
If you repeatedly switch on seat heating, the
seat cushion and backrest padding may
become very hot. The health of vehicle occu-
pants with limited temperature sensitivity or a limited ability to react to excessively high
temperatures may be affected or they may 70
SeatsSeats, steerin
gwheela nd mirrors