2016 MERCEDES-BENZ G-Class belt
[x] Cancel search: beltPage 204 of 302

Display messagesPossible causes/consequences andMSolutions
D
Power Steering Mal‐function. See Oper‐ator's Manual
The powersteering is malfunctioning .
A warning tone also sounds.
GWARNIN G
You will need to use mor eforce to steer .
There is aris kof an accident.
XChec kwhether you are able to apply th eextr aforce required.
XIf you ar eabl eto steer safely: carefully drive on to aqualified
specialist workshop .
XIf you areunable to steer safely: do notdrive on .Contac tth e
neares tqualified specialist workshop .
TelephoneNoServiceYour vehicl eis outside th enetwork provider' stransmitter/receiver
range.
XWait until th emobile phone operational readiness symbol appear s
in th emultifunction display.
¥
Check Washer Fluid
The washer flui dlevel in th ewasher flui dreservoir has dropped belo w
th eminimum .
XAddwasher flui d (Ypage 239).
SmartKey
Display messagesPossible causes/consequences and MSolutions
Â
KeyDoesNotBelongto Vehicl e
You haveput th ewrong SmartKey in th eignition lock.
XUse th ecorrec tSmartKey.
Â
Tak eYou rKey fro mIgnition
The SmartKey is in th eignition lock.
XRemove th eSmartKey.
Â
Obtain aNew Key
The SmartKey needs to be replaced.
XVisit aqualified specialist workshop .
Warning and indicat orlamps in the
instrume nt cluster
Overview ofwarning and indicat or
lamps
L Low-beam headlamp s (Ypage 84)
#
! Turn signal
(
Ypage 88) K
High-beam headlamp s (
Ypage 88)
R Rear fog lamp (
Ypage 86)
ü Seat belts (
Ypage 204)
$
(USA) Brake
s (
Ypage 205)
J
(Can -
ada) Brake
s(yellow) (
Ypage 205)
202Warning and indicator lamps in the instrument cluster
On-board computer and displays
Page 206 of 302
Safety
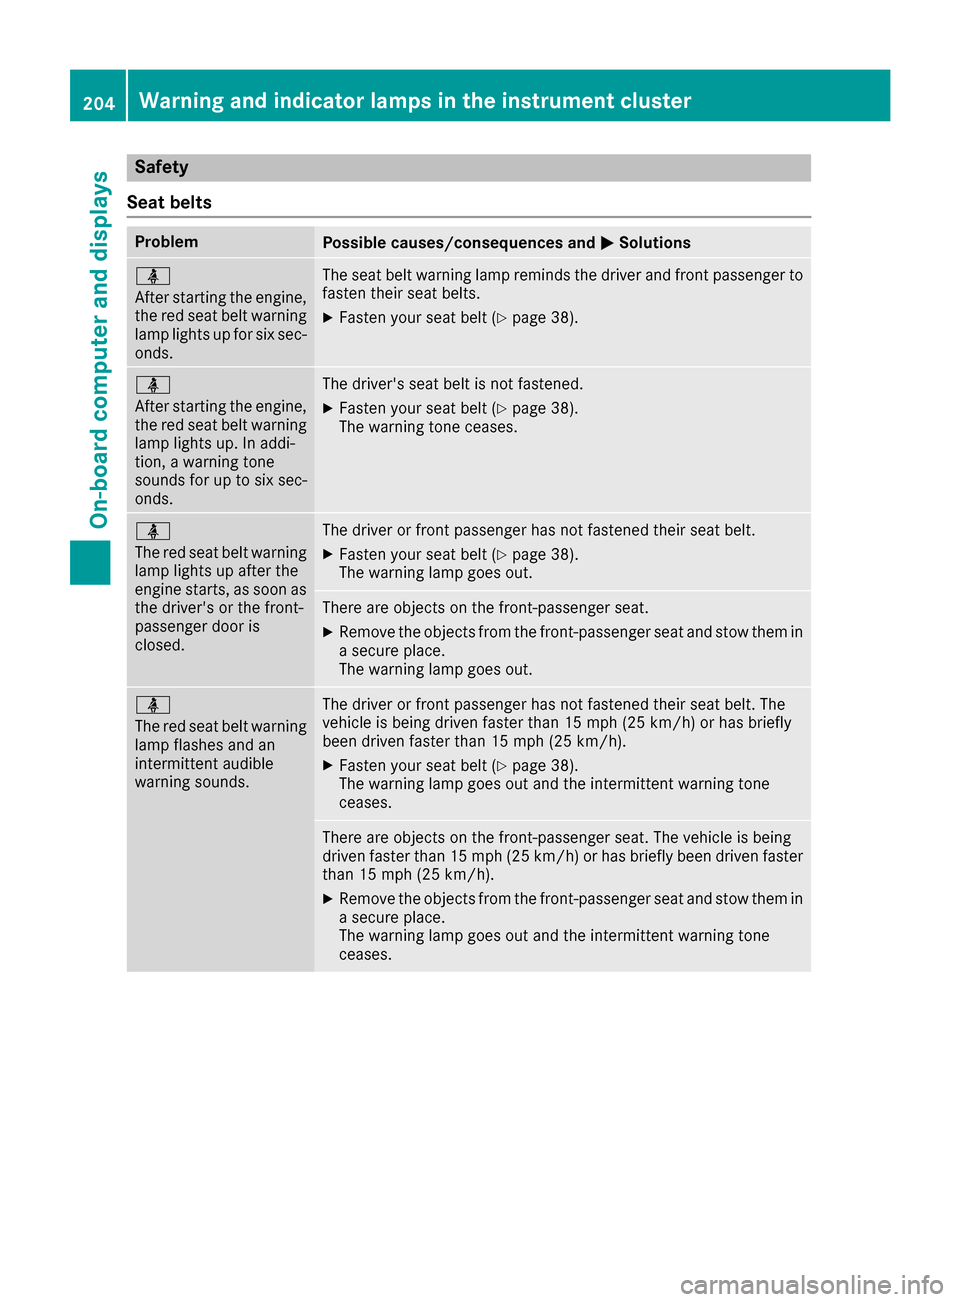
Seat belts
ProblemPossible causes/consequences and MSolutions
ü
After starting the engine,
the red seat belt warning
lamp lights up for six sec-
onds.The seat belt warning lamp reminds the driver and front passenger to
fasten their seat belts.
XFasten your seat belt (Ypage 38).
ü
After starting the engine,
the red seat belt warning
lamp lights up. In addi-
tion, a warning tone
sounds for up to six sec-
onds.The driver's seat belt is not fastened.
XFasten your seat belt (Ypage 38).
The warning tone ceases.
ü
The red seat belt warning
lamp lights up after the
engine starts, as soon as
the driver's or the front-
passenger door is
closed.The driver or front passenger has not fastened their seat belt.
XFasten your seat belt (Ypage 38).
The warning lamp goes out.
There are objects on the front-passenger seat.
XRemove the objects from the front-passenger seat and stow them in
a secure place.
The warning lamp goes out.
ü
The red seat belt warning
lamp flashes and an
intermittent audible
warning sounds.The driver or front passenger has not fastened their seat belt. The
vehicle is being driven faster than 15 mph (25 km/h) or has briefly
been driven faster than 15 mph (25 km/h).
XFasten your seat belt (Ypage 38).
The warning lamp goes out and the intermittent warning tone
ceases.
There are objects on the front-passenger seat. The vehicle is being
driven faster than 15 mph (25 km/h) or has briefly been driven faster
than 15 mph (25 km/h).
XRemove the objects from the front-passenger seat and stow them in
a secure place.
The warning lamp goes out and the intermittent warning tone
ceases.
204Warning and indicator lamps in the instrument cluster
On-board computer and displays
Page 217 of 302
Observe the following notes when transporting
a load:
RPosition heavy loads as far forwards as pos-
sible and as low down in the cargo compart-
ment as possible.
iTransport loads when possible in the cargo
compartment. You should only use the cargo
compartment enlargement if the load does
not fit in the cargo compartment.
RAlways place the load against the backrests of
the front seats or rear seats.
RUse the cargo tie-down rings and the parcel
nets to transport loads and luggage.
RUse cargo tie-down rings and fastening mate-
rials appropriate for the weight and size of the load.
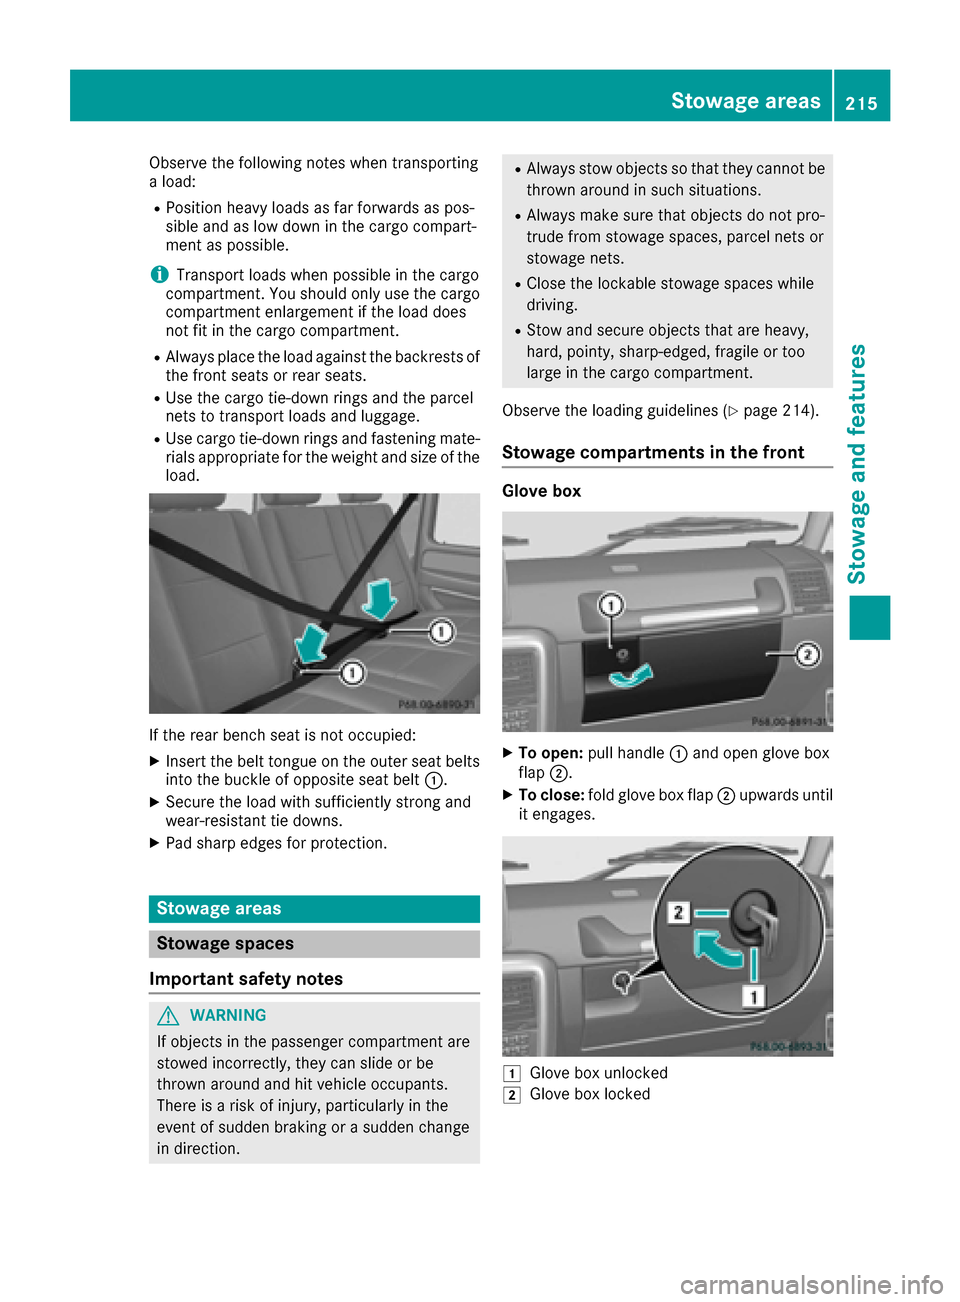
If the rear bench seat is not occupied:
XInsert the belt tongue on the outer seat belts
into the buckle of opposite seat belt :.
XSecure the load with sufficiently strong and
wear-resistant tie downs.
XPad sharp edges for protection.
Stowage areas
Stowage spaces
Important safety notes
GWARNING
If objects in the passenger compartment are
stowed incorrectly, they can slide or be
thrown around and hit vehicle occupants.
There is a risk of injury, particularly in the
event of sudden braking or a sudden change
in direction.
RAlways stow objects so that they cannot be
thrown around in such situations.
RAlways make sure that objects do not pro-
trude from stowage spaces, parcel nets or
stowage nets.
RClose the lockable stowage spaces while
driving.
RStow and secure objects that are heavy,
hard, pointy, sharp-edged, fragile or too
large in the cargo compartment.
Observe the loading guidelines (
Ypage 214).
Stowage compartments in the front
Glove box
XTo open: pull handle :and open glove box
flap ;.
XTo close: fold glove box flap ;upwards until
it engages.
1Glove box unlocked
2Glove box locked
Stowage areas215
Stowage and features
Z
Page 218 of 302
XTo lock:insert the mechanical key into the
lock (Ypage 61) and turn it 90° clockwise to
position 2.
XTo unlock: insert the mechanical key into the
lock (Ypage 61) and turn it 90° counter-
clockwise to position 1.
iThe glove box can only be locked and
unlocked using the mechanical key.
Door stowage compartment
There is an additional compartment located on
the driver's door paneling, which can be used to
store a mini tablet PC, for example.
Stowage compartment/telephone com-
partment under the armrest/in the center
console
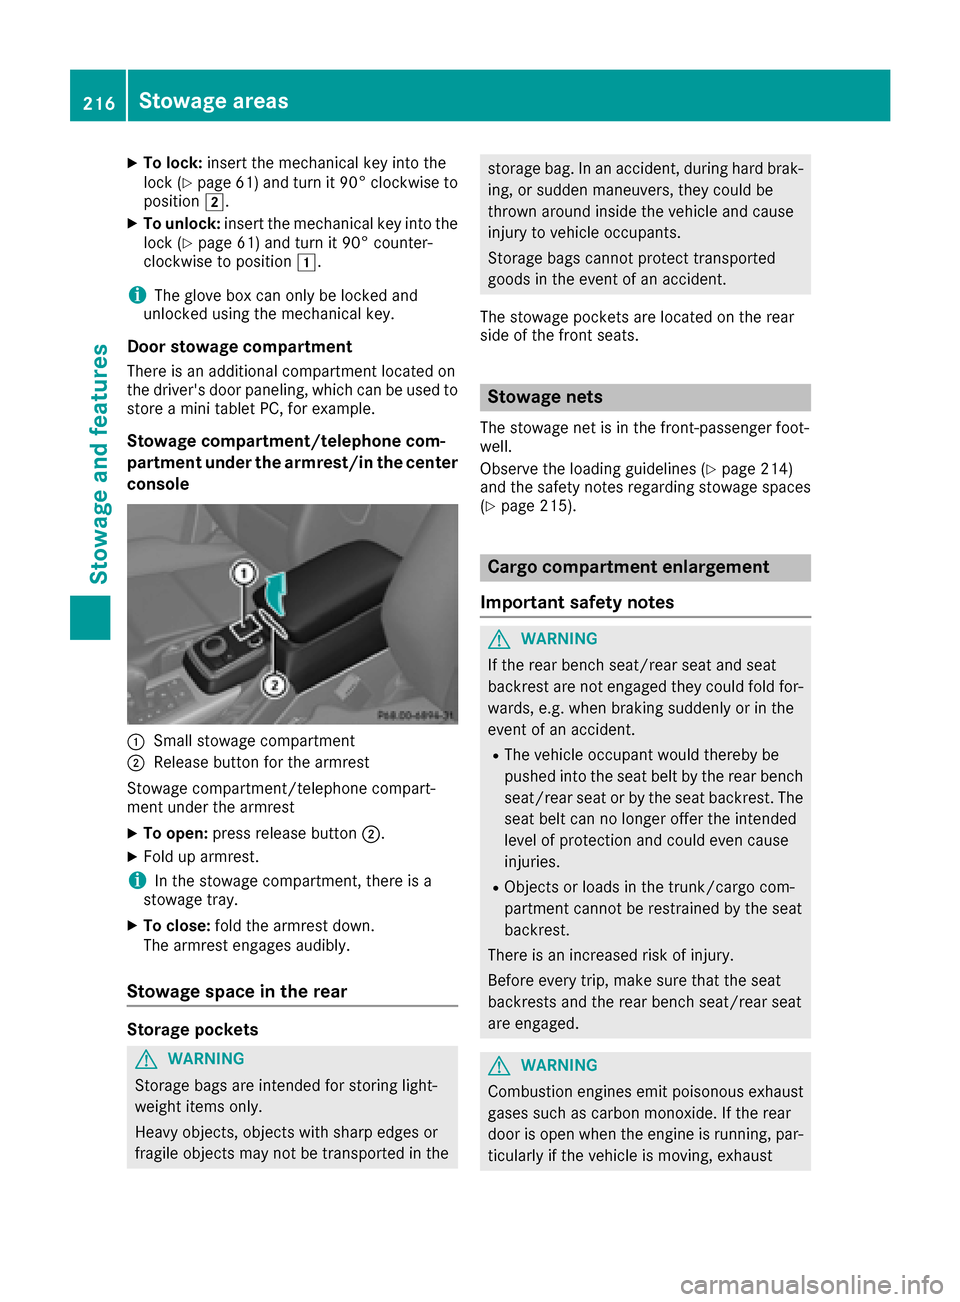
:Small stowage compartment
;Release button for the armrest
Stowage compartment/telephone compart-
ment under the armrest
XTo open: press release button ;.
XFold up armrest.
iIn the stowage compartment, there is a
stowage tray.
XTo close: fold the armrest down.
The armrest engages audibly.
Stowage space in the rear
Storage pockets
GWARNING
Storage bags are intended for storing light-
weight items only.
Heavy objects, objects with sharp edges or
fragile objects may not be transported in the
storage bag. In an accident, during hard brak-
ing, or sudden maneuvers, they could be
thrown around inside the vehicle and cause
injury to vehicle occupants.
Storage bags cannot protect transported
goods in the event of an accident.
The stowage pockets are located on the rear
side of the front seats.
Stowage nets
The stowage net is in the front-passenger foot-
well.
Observe the loading guidelines (
Ypage 214)
and the safety notes regarding stowage spaces
(
Ypage 215).
Cargo compartment enlargement
Important safety notes
GWARNING
If the rear bench seat/rear seat and seat
backrest are not engaged they could fold for-
wards, e.g. when braking suddenly or in the
event of an accident.
RThe vehicle occupant would thereby be
pushed into the seat belt by the rear bench
seat/rear seat or by the seat backrest. The
seat belt can no longer offer the intended
level of protection and could even cause
injuries.
RObjects or loads in the trunk/cargo com-
partment cannot be restrained by the seat
backrest.
There is an increased risk of injury.
Before every trip, make sure that the seat
backrests and the rear bench seat/rear seat
are engaged.
GWARNING
Combustion engines emit poisonous exhaust
gases such as carbon monoxide. If the rear
door is open when the engine is running, par-
ticularly if the vehicle is moving, exhaust
216Stowage areas
Stowag ean d features
Page 219 of 302
fumes could enter the passenger compart-
ment. There is a risk of poisoning.
Turn off the engine before opening the rear
door. Never drive with the rear door open.
!Ensure that you remove all containers from
the cup holder in the rear before folding the
seat backrest and the seat cushion of the rear
bench seat forwards.
Observe the loading guidelines (
Ypage 214).
The rear bench seat is split symmetrically.
The left-hand and right-hand rear bench seats
can be folded forward to increase the capacity
of the rear compartment. The following changes
are possible:
Rfold the seat backrests forward
Rfold the rear bench seat back fully
Folding the seat backrest forward
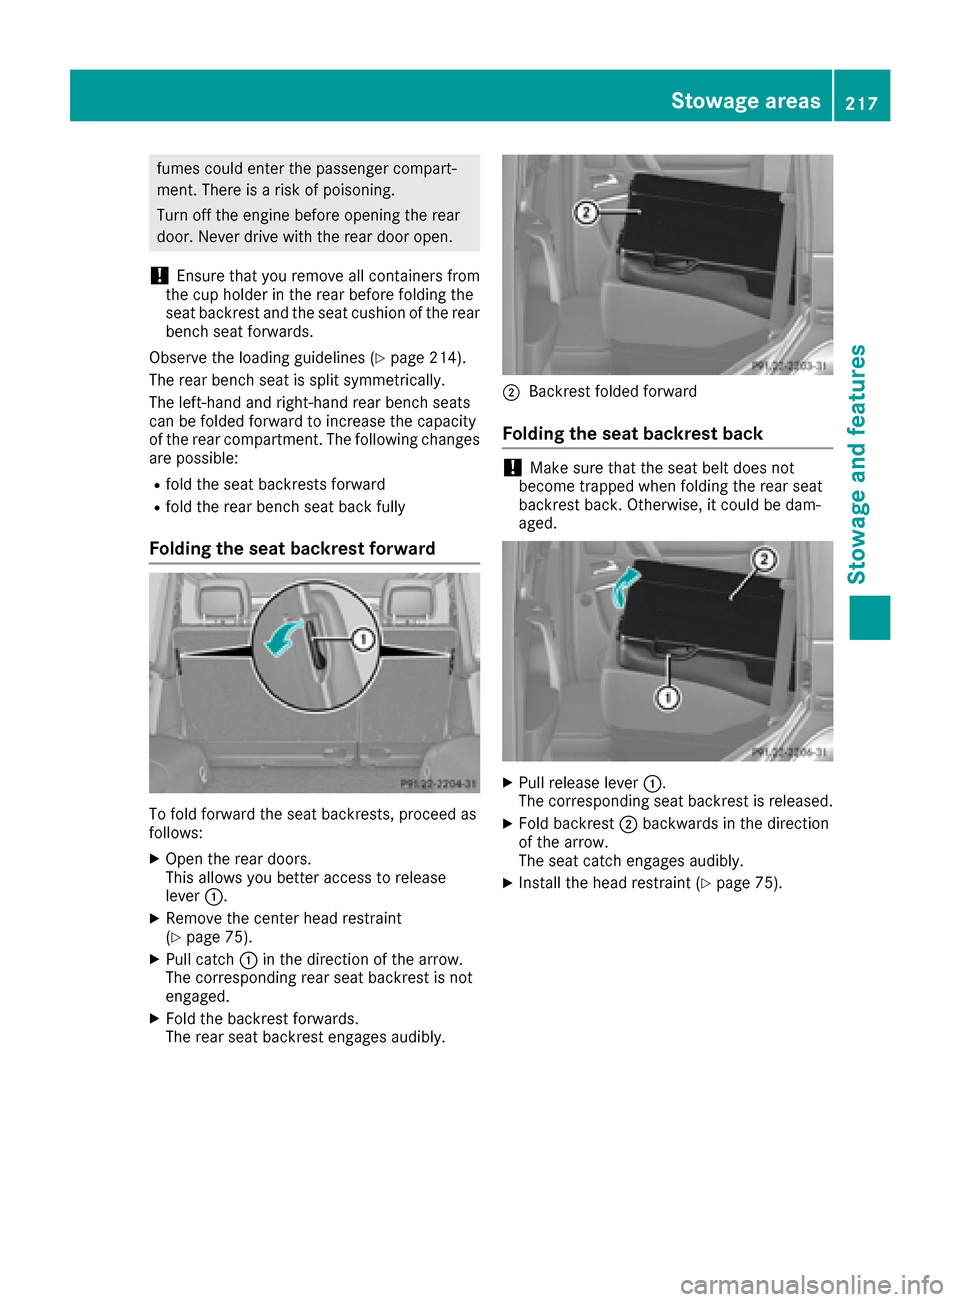
To fold forward the seat backrests, proceed as
follows:
XOpen the rear doors.
This allows you better access to release
lever :.
XRemove the center head restraint
(Ypage 75).
XPull catch :in the direction of the arrow.
The corresponding rear seat backrest is not
engaged.
XFold the backrest forwards.
The rear seat backrest engages audibly.
;Backrest folded forward
Folding the seat backrest back
!Make sure that the seat belt does not
become trapped when folding the rear seat
backrest back. Otherwise, it could be dam-
aged.
XPull release lever :.
The corresponding seat backrest is released.
XFold backrest ;backwards in the direction
of the arrow.
The seat catch engages audibly.
XInstall the head restraint (Ypage 75).
Stowage areas217
Stowage and features
Z
Page 220 of 302
Rear bench seat
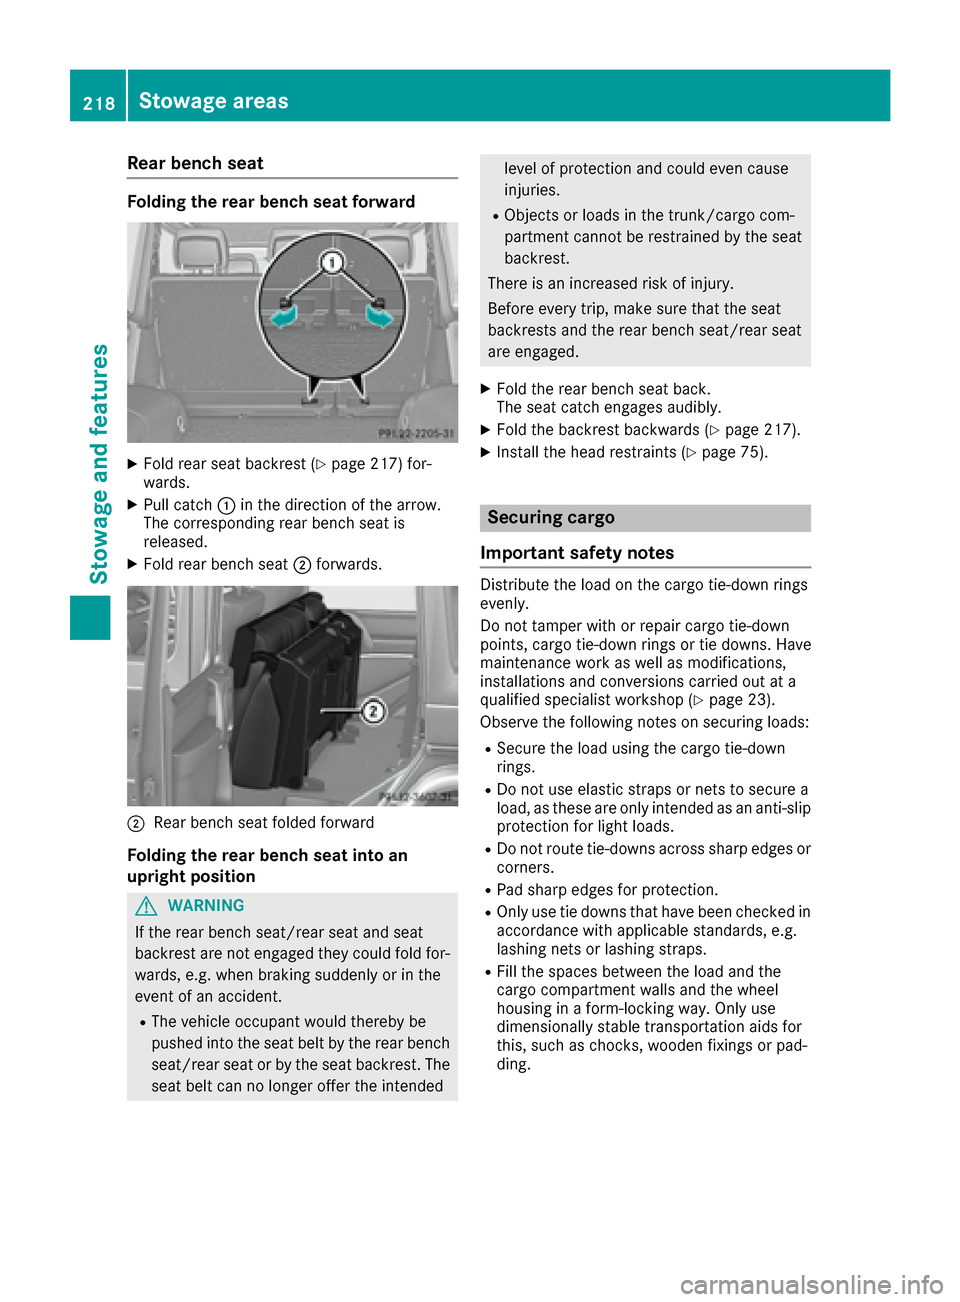
Folding the rear bench seat forward
XFold rear seat backrest (Ypage 217) for-
wards.
XPull catch :in the direction of the arrow.
The corresponding rear bench seat is
released.
XFold rear bench seat ;forwards.
;Rear bench seat folded forward
Folding the rear bench seat into an
upright position
GWARNING
If the rear bench seat/rear seat and seat
backrest are not engaged they could fold for-
wards, e.g. when braking suddenly or in the
event of an accident.
RThe vehicle occupant would thereby be
pushed into the seat belt by the rear bench
seat/rear seat or by the seat backrest. The
seat belt can no longer offer the intended
level of protection and could even cause
injuries.
RObjects or loads in the trunk/cargo com-
partment cannot be restrained by the seat
backrest.
There is an increased risk of injury.
Before every trip, make sure that the seat
backrests and the rear bench seat/rear seat
are engaged.
XFold the rear bench seat back.
The seat catch engages audibly.
XFold the backrest backwards (Ypage 217).
XInstall the head restraints (Ypage 75).
Securing cargo
Important safety notes
Distribute the load on the cargo tie-down rings
evenly.
Do not tamper with or repair cargo tie-down
points, cargo tie-down rings or tie downs. Have
maintenance work as well as modifications,
installations and conversions carried out at a
qualified specialist workshop (
Ypage 23).
Observe the following notes on securing loads:
RSecure the load using the cargo tie-down
rings.
RDo not use elastic straps or nets to secure a
load, as these are only intended as an anti-slip
protection for light loads.
RDo not route tie-downs across sharp edges or
corners.
RPad sharp edges for protection.
ROnly use tie downs that have been checked in
accordance with applicable standards, e.g.
lashing nets or lashing straps.
RFill the spaces between the load and the
cargo compartment walls and the wheel
housing in a form-locking way. Only use
dimensionally stable transportation aids for
this, such as chocks, wooden fixings or pad-
ding.
218Stowage areas
Stowage and features
Page 248 of 302
Cleaning the steering wheel and gear or
selector lever
XThoroughly wipe with a damp cloth or use
leather care agents that have been recom-
mended and approved by Mercedes-Benz.
Cleaning genuine wood and trim strips
!Do not use solvent-based cleaning agents
such as tar remover, wheel cleaners, polishes
or waxes. There is otherwise a risk of damag- ing the surface.
!Do not use chrome polish for trim strips. The
trim strips have a chrome look but are mostly
made of anodized aluminum and can lose
their shine if chrome polish is used. Use a
damp, lint-free cloth instead when cleaning
the trim strips.
If the chrome-plated trim strips are very dirty,
you can use a chrome polish. If you are unsure
as to whether the trim strips are chrome-
plated or not, consult an authorized
Mercedes-Benz Center.
XWipe the wooden trim and trim strips with a
damp, lint-free cloth, e.g. a microfiber cloth.
XHeavy soiling: use car care and cleaning
products recommended and approved by
Mercedes-Benz.
Cleaning the seat covers
General notes
!Do not use microfiber cloths to clean genu-
ine leather, artificial leather or DINAMICA
covers. If used often, these can damage the
cover.
iNote that regular care is essential to ensure
that the appearance and comfort of the cov-
ers is retained over time.
Genuine leather seat covers
!To retain the natural appearance of the
leather, observe the following cleaning
instructions:
RClean genuine leather covers carefully with
a damp cloth and then wipe the covers
down with a dry cloth.
RMake sure that the leather does not
become soaked. It may otherwise become
rough and cracked.
ROnly use leather care agents that have
been tested and approved by Mercedes-
Benz. You can obtain these from a qualified
specialist workshop.
Leather is a natural product.
It exhibits natural surface characteristics, for
example:
Rdifferences in the texture
Rmarks caused by growth and injury
Rslight nuances of color
These are characteristics of leather and not
material defects.
Seat covers of other materials
!Observe the following when cleaning:
Rclean artificial leather covers with a cloth
moistened with a solution containing 1%
detergent (e.g. dish washing liquid).
Rclean cloth covers with a microfiber cloth
moistened with a solution containing 1%
detergen
t (e.g. dish washing liquid). Rub
carefully and always wipe entire seat sec-
tions to avoid leaving visible lines. Leave
the seat to dry afterwards. Cleaning results
depend on the type of dirt and how long it
has been there.
Rclean DINAMICA covers with a damp cloth.
Make sure that you wipe entire seat sec-
tions to avoid leaving visible lines.
Cleaning the seat belts
GWARNING
Seat belts can become severely weakened if
bleached or dyed. This could cause the seat
belts to tear or fail, for instance, in the event of an accident. This poses an increased risk of
injury or fatal injury.
Never bleach or dye the seat belts.
246Care
Maintenance and care
Page 249 of 302
!Do not clean the seat belts using chemical
cleaning agents. Do not dry the seat belts by
heating at temperatures above 176 ‡(80 †)
or in direct sunlight.
XUse clean, lukewarm water and soap solution.
Cleaning the headliner and carpets
XHeadliner: if it is very dirty, use a soft brush or
dry shampoo.
XCarpets: use the carpet and textile cleaning
agents recommended and approved by
Mercedes-Benz.
Care247
Maintenance and care
Z