2016 MERCEDES-BENZ G-Class ECO mode
[x] Cancel search: ECO modePage 182 of 302

Deactivating delayed switch-off of the exterior
lighting temporarily:
XBefore leaving the vehicle, turn the SmartKey
to position0(Ypage 112 )in the ignition lock.
XTurn the SmartKey to position 2in the ignition
lock (Ypage 112).
The exterior lighting delayed switch-off is
deactivated.
Delayed switch-off of the exterior lighting is
reactivated the next time you start the engine.
If you have activated the Surround Lighting
function and the light switch is set to Ã, the
following functions are activated when it is dark:
Rsurround lighting: the exterior lighting
remains lit for 40 seconds after unlocking
with the SmartKey. If you start the engine, the
surround lighting is switched off and auto-
matic headlamp mode is activated
(
Ypage 85).
Rexterior lighting delayed switch-off: the
exterior lighting remains lit for 60 seconds
after the engine is switched off. If you close all
the doors and the trunk lid, the exterior light- ing goes off after 15 seconds.
iDepending on your vehicle's equipment,
when the surround lighting and delayed
switch-off exterior lighting are on, the follow-
ing light up:
RParking lamps
RLow-beam headlamps
RDaytime running lamps
RSide marker lamps
RSurround lighting in the exterior mirrors
Activating/deactivating the interior light-
ing delayed switch-off
If you activate the Interior Lighting Delayfunction, the interior lighting remains on for
20 seconds after you remove the SmartKey from
the ignition lock.
XPress the=or; button on the steering
wheel to select the Sett.menu.
XPress the:or9 button to select the
Lightssubmenu.
XPress ato confirm.
XPress :or9 to select the InteriorLighting Delayfunction.
When the Interior Lighting Delayfunc-
tion is activated, the vehicle interior is dis-
played in red in the multifunction display.
XPress the abutton to save the setting.
Vehicle
Activating/deactivating the automatic
door locking mechanism
If you activate the AutomaticDoorLockfunc-
tion, the vehicle is centrally locked above a
speed of approximately 9 mph (15 km/h).
XPress the =or; button on the steering
wheel to select the Sett.menu.
XPress the:or9 button to select the
Vehiclesubmenu.
XPress ato confirm.
XPress the :or9 button to select the
Automatic Door Lockfunction.
When the Automatic Door Lockfunction is
activated, the vehicle doors are displayed in
red in the multifunction display.
XPress the abutton to save the setting.
For further information on the automatic locking
feature, see (
Ypage 66).
Activating/deactivating the acoustic
locking verification signal
If you switch on the AcousticLockfunction, an
acoustic signal sounds when you lock the vehi-
cle.
XPress the =or; button on the steering
wheel to select the Sett.menu.
XPress:or9 to select the Vehiclesubmenu.
XPressato confirm.
XPress the :or9 button to select the
Acoustic Lockfunction.
If the Acoustic Lockfunction is activated,
the & symbol in the multifunction display
lights up red.
XPress the abutton to save the setting.
180Menus and submenus
On-board computer and displays
Page 184 of 302
AMG menu in AMG vehicles
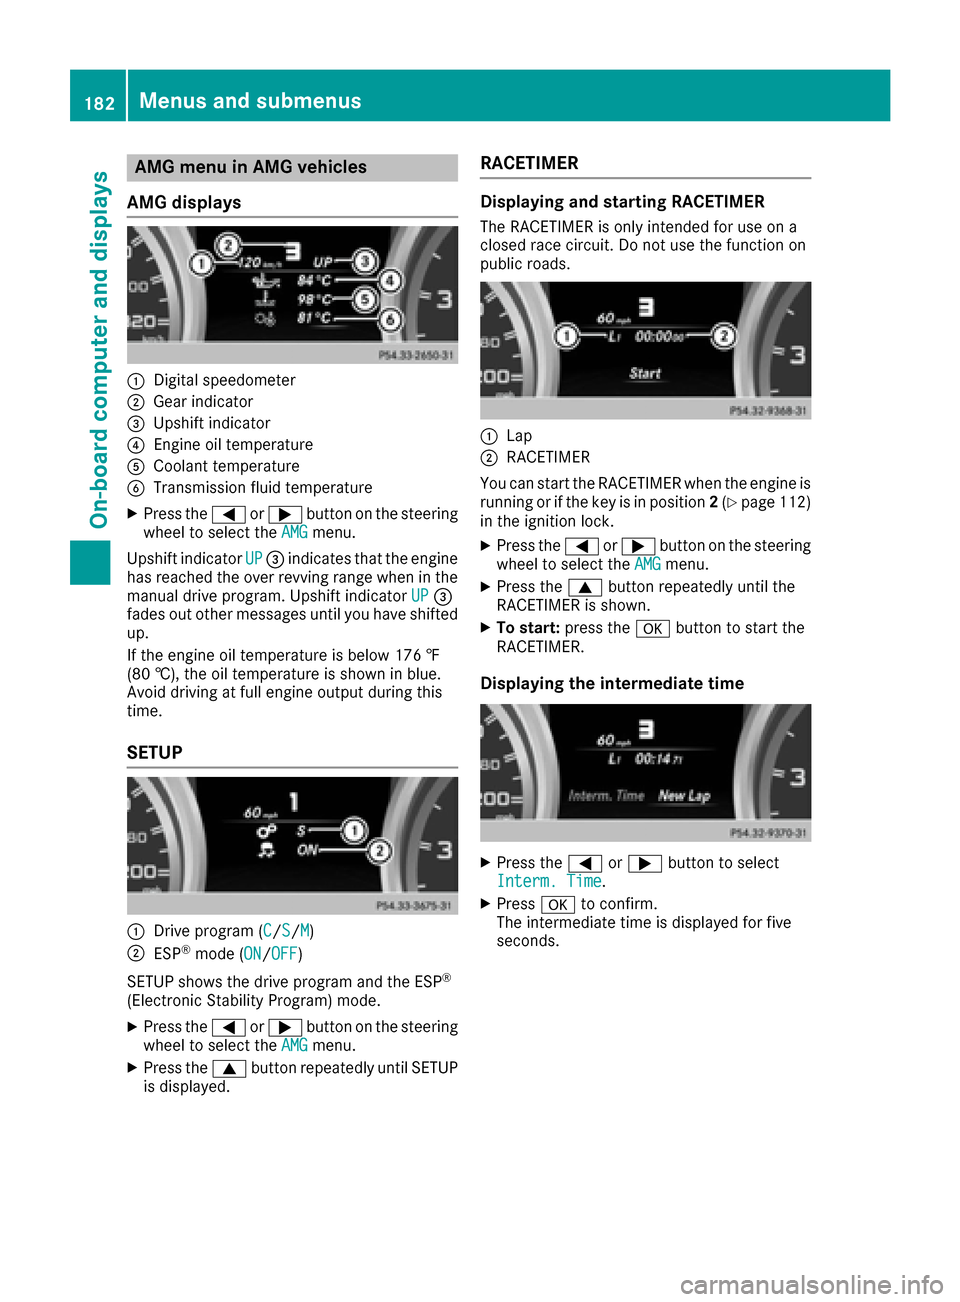
AMG displays
:Digital speedometer
;Gear indicator
=Upshif tindicator
?Engin eoil temperature
ACoolan ttemperature
BTransmission fluid temperature
XPress th e= or; buttonon th esteering
whee lto select th eAMGmenu.
Upshif tindicator UP
=indicates that th eengin e
has reached th eove rrevvin grange when in th e
manual drive program .Upshif tindicator UP
=
fade sout other message suntil you hav eshifte d
up.
If th eengin eoil temperature is belo w17 6 ‡
(80 †) ,the oi ltemper ature is shown in blue.
Avoid driving at full engine output during this
time.
SETUP
:Drive program (C/S/M)
;ESP®mode ( ON/OFF)
SETUP shows the drive program and the ESP
®
(Electronic Stability Program) mode.
XPress the =or; button on the steering
wheel to select the AMGmenu.
XPress the9button repeatedly until SETUP
is displayed.
RACETIMER
Displaying and starting RACETIMER
The RACETIMER is only intended for use on a
closed race circuit. Do not use the function on
public roads.
:Lap
;RACETIMER
You can start the RACETIMER when the engine is
running or if the key is in position 2(
Ypage 112)
in the ignition lock.
XPress the =or; button on the steering
wheel to select the AMGmenu.
XPress the9button repeatedly until the
RACETIMER is shown.
XTo start: press the abutton to start the
RACETIMER.
Displaying the intermediate time
XPress the =or; button to select
Interm. Time.
XPress ato confirm.
The intermediate time is displayed for five
seconds.
182Menus and submenus
On-board computer and displays
Page 216 of 302
Useful information
i
This Operator's Manual describes all models
and all standard and optional equipment of
your vehicle available at the time of publica-
tion of the Operator's Manual. Country-spe-
cific differences are possible. Please note
that your vehicle may not be equipped with all
features described. This also applies to
safety-related systems and functions.
iRead the information on qualified specialist
workshops: (Ypage 23).
Loading guidelines
GWARNING
If objects, luggage or loads are not secured or
not secured sufficiently, they could slip, tip
over or be flung around and thereby hit vehicle
occupants. There is a risk of injury, particu-
larly in the event of sudden braking or a sud-
den change in direction.
Always store objects so that they cannot be
flung around. Secure objects, luggage or
loads against slipping or tipping before the
journey.
GWARNING
If you distribute the load unevenly in the vehi- cle, the handling as well as the steering and
braking characteristics are severely affected.
There is a risk of an accident.
Distribute the load evenly in the vehicle.
Secure the load to prevent it from slipping.
GWARNING
The exhaust tail pipe and tail pipe trim can
become very hot. If you come into contact
with these parts of the vehicle, you could burn
yourself. There is a risk of injury.
Always be particularly careful around the
exhaust tail pipe and the tail pipe trim. Allow
these components to cool down before touch-
ing them.
GWARNING
Combustion engines emit poisonous exhaust
gases such as carbon monoxide. If the rear
door is open when the engine is running, par-
ticularly if the vehicle is moving, exhaust
fumes could enter the passenger compart-
ment. There is a risk of poisoning.
Turn off the engine before opening the rear
door. Never drive with the rear door open.
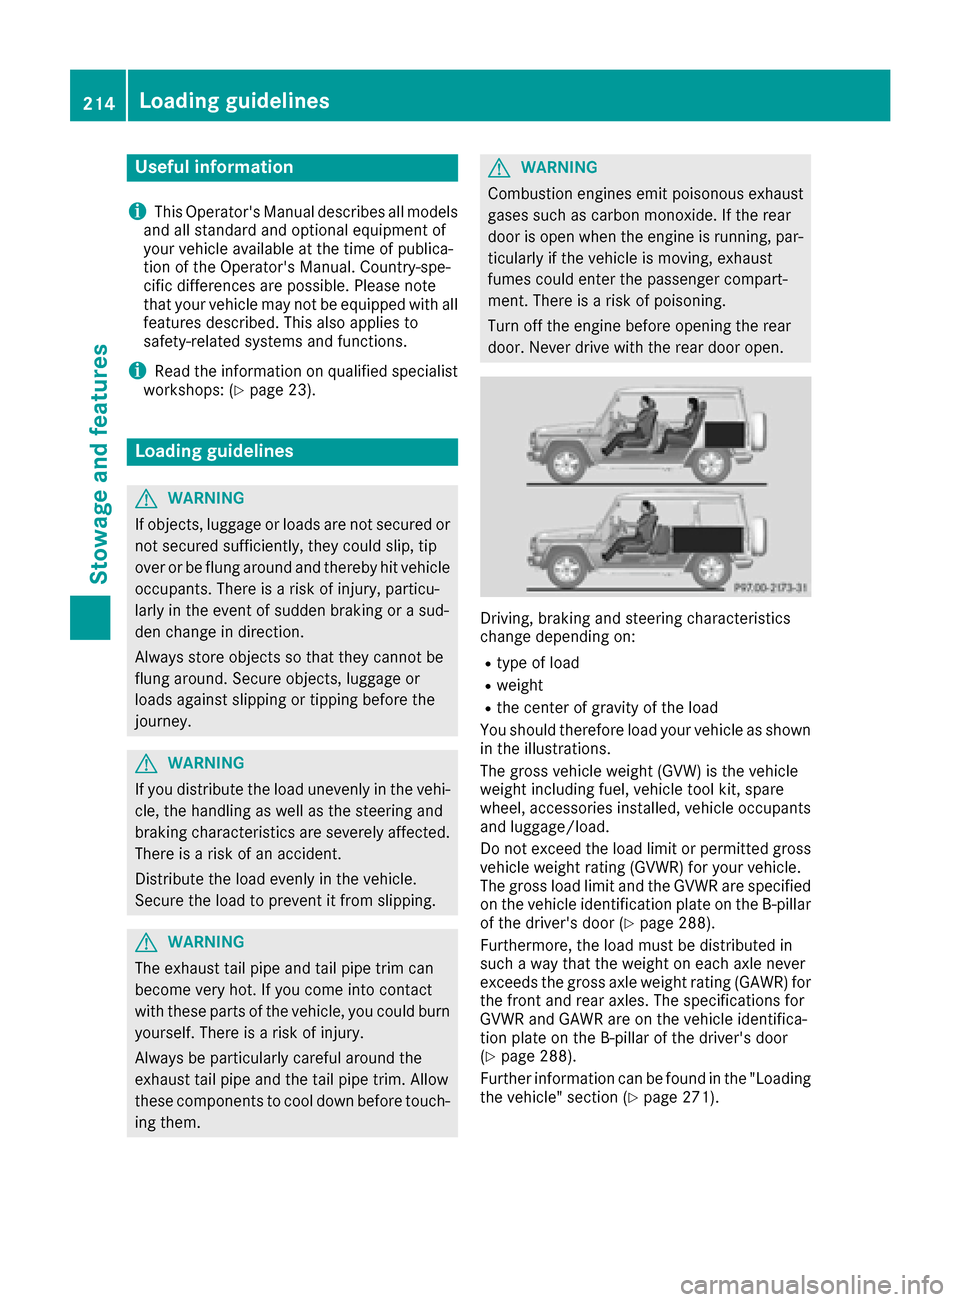
Driving, braking and steering characteristics
change depending on:
Rtype of load
Rweight
Rthe center of gravity of the load
You should therefore load your vehicle as shown
in the illustrations.
The gross vehicle weight (GVW) is the vehicle
weight including fuel, vehicle tool kit, spare
wheel, accessories installed, vehicle occupants
and luggage/load.
Do not exceed the load limit or permitted gross
vehicle weight rating (GVWR) for your vehicle.
The gross load limit and the GVWR are specified
on the vehicle identification plate on the B-pillar
of the driver's door (
Ypage 288).
Furthermore, the load must be distributed in
such a way that the weight on each axle never
exceeds the gross axle weight rating (GAWR) for
the front and rear axles. The specifications for
GVWR and GAWR are on the vehicle identifica-
tion plate on the B-pillar of the driver's door
(
Ypage 288).
Further information can be found in the "Loading
the vehicle" section (
Ypage 271).
214Loading guidelines
Stowage and features
Page 228 of 302
If you have questions about the activation,
contact one of the following telephone hot-
lines:
RUSA:Response Center at
1-888-990-9007
RCanada: Customer Service at
1-888-923-8367
An emergency call is dialed automatically if an
air bag or Emergency Tensioning Device is trig-
gered.
iAn automatically dialed mbrace emergency
call cannot be canceled.
An emergency call can also be initiated man-
ually.
As soon as the emergency call has been initi-
ated, the indicator lamp in the SOS button
flashes. The Connecting Call
message
appears on the multifunction display.
COMAND is muted.
Once the connection has been made, the Call
Connectedmessage appears in the multifunc-
tion display.
All important information on the emergency is
provided, for example:
Rcurrent location of the vehicle (as determined by the GPS system)
Rvehicle model
Rvehicle color
Rvehicle identification number
A short time after the emergency call is initiated,
a voice connection is automatically established
between the Response Center and the vehicle
occupants. If the vehicle occupants are able to
respond, the Response Center will attempt to
obtain more detailed information on the emer-
gency.
iIf there is no response from the vehicle
occupants, an ambulance is immediately sent
to the vehicle.
Making an emergency call
GWARNING
If you feel at any way in jeopardy when in the
vehicle (e.g. smoke or fire in the vehicle, vehi-
cle in a dangerous road location), please do
not wait for voice contact after you have
pressed the SOS button. Carefully leave the
vehicle and move to a safe location. The
Response Center will automatically contact
local emergency officials with the vehicle's
approximate location if they receive an auto-
matic SOS signal and cannot make voice con- tact with the vehicle occupants.
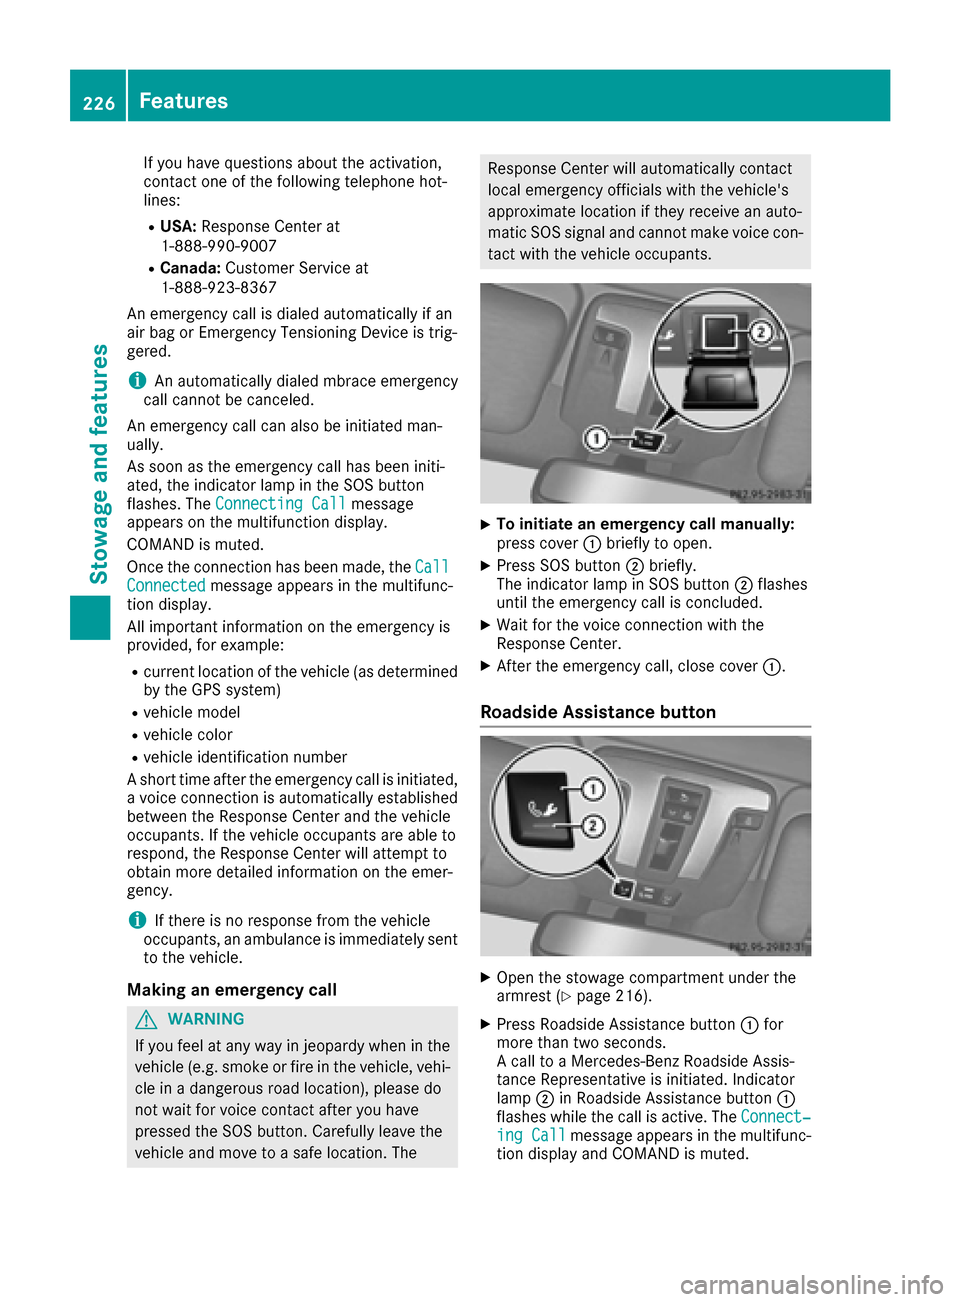
XTo initiate an emergency call manually:
press cover :briefly to open.
XPress SOS button ;briefly.
The indicator lamp in SOS button ;flashes
until the emergency call is concluded.
XWait for the voice connection with the
Response Center.
XAfter the emergency call, close cover :.
Roadside Assistance button
XOpen the stowage compartment under the
armrest (Ypage 216).
XPress Roadside Assistance button:for
more than two seconds.
A call to a Mercedes-Benz Roadside Assis-
tance Representative is initiated. Indicator
lamp ;in Roadside Assistance button :
flashes while the call is active. The Connect‐
ing Callmessage appears in the multifunc-
tion display and COMAND is muted.
226Features
Stowage and features
Page 229 of 302
If a connection can be made, theCall Con‐nectedmessage appears in the multifunction
display.
If a mobile phone network is available and there
is sufficient GPS reception, the mbrace system
transmits data to the Response Center, for
example:
Rcurrent location of the vehicle
Rvehicle identification number
Rvehicle model
Rvehicle color
iThe COMAND display shows that an mbrace
call is active. You can change to the naviga-
tion menu by pressing the NAVI button on
COMAND during the call. Voice output is not
available.
A voice connection is established between the
Mercedes-Benz Roadside Assistance Represen- tative and the vehicle occupants.
The Mercedes-Benz Roadside Assistance Rep-
resentative either sends a qualified Mercedes-
Benz technician or makes arrangements for
your vehicle to be transported to the nearest
authorized Mercedes-Benz Center. You may be
charged for services such as repair work and/or
towing. Further details are available in your
mbrace manual.
XDescribe the type of assistance needed.
iIf the indicator lamp in Roadside Assistance
button :is flashing continuously and no
voice connection with the Response center
has been established, then the mbrace sys-
tem has not been able to initiate a Roadside
Assistance call (e.g. the relevant mobile
phone network is not available). The Call
Failedmessage appears in the multifunction
display.
XTo end a call: press the~button on the
multifunction steering wheel.
or
XPress the corresponding COMAND button to
end a phone call.
iSign and drive services1: you are not
charged for services such as jump-starting,
providing a few gallons of fuel for a fuel tank
that has been run dry or changing a faulty tire
with the vehicle's own spare wheel.
MB Info call button
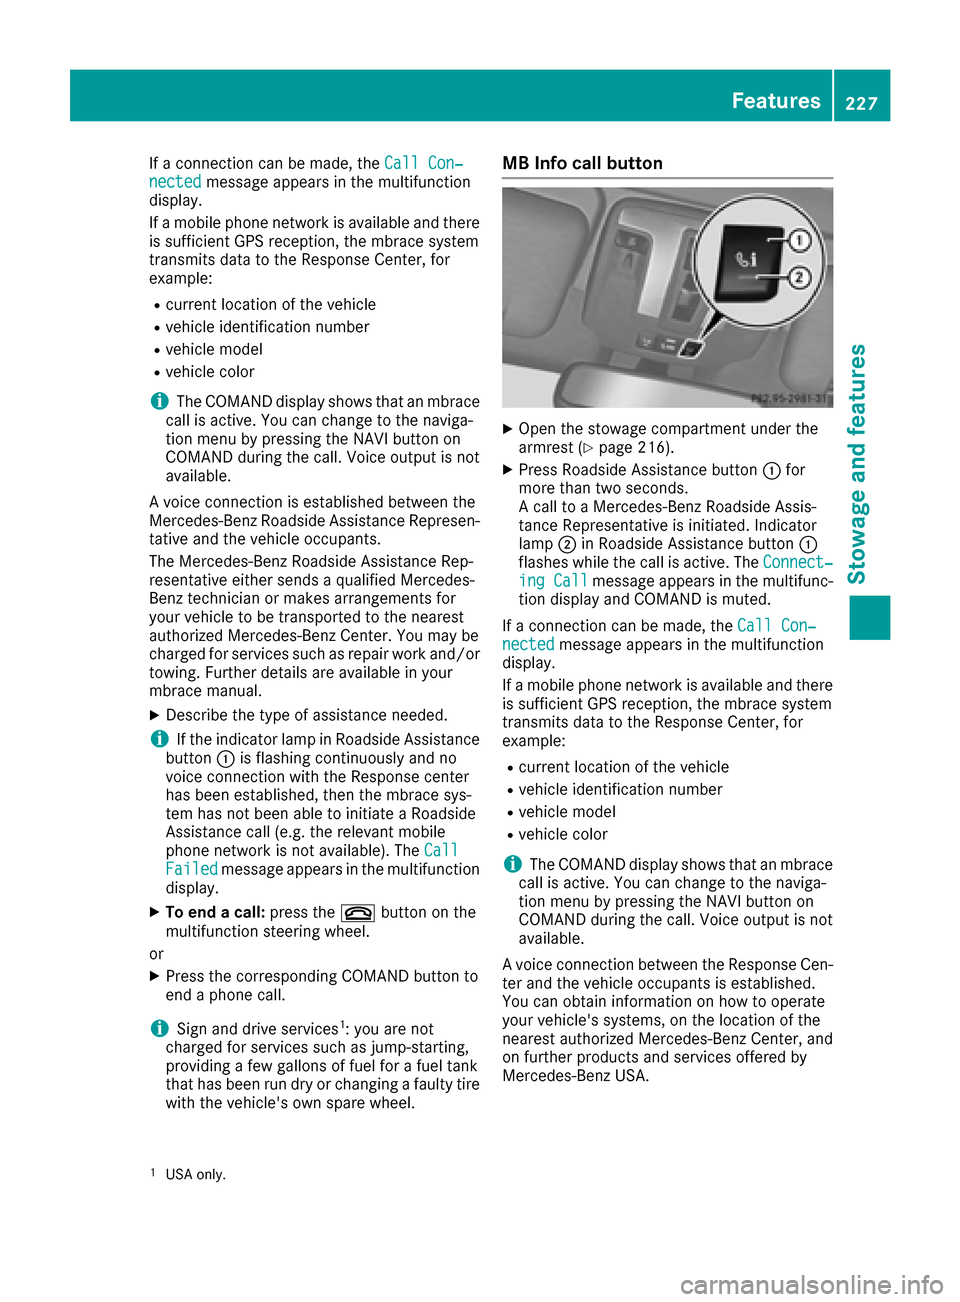
XOpen the stowage compartment under the
armrest (Ypage 216).
XPress Roadside Assistance button :for
more than two seconds.
A call to a Mercedes-Benz Roadside Assis-
tance Representative is initiated. Indicator
lamp ;in Roadside Assistance button :
flashes while the call is active. The Connect‐
ing Callmessage appears in the multifunc-
tion display and COMAND is muted.
If a connection can be made, the Call Con‐
nectedmessage appears in the multifunction
display.
If a mobile phone network is available and there
is sufficient GPS reception, the mbrace system
transmits data to the Response Center, for
example:
Rcurrent location of the vehicle
Rvehicle identification number
Rvehicle model
Rvehicle color
iThe COMAND display shows that an mbrace
call is active. You can change to the naviga-
tion menu by pressing the NAVI button on
COMAND during the call. Voice output is not
available.
A voice connection between the Response Cen- ter and the vehicle occupants is established.
You can obtain information on how to operate
your vehicle's systems, on the location of the
nearest authorized Mercedes-Benz Center, and
on further products and services offered by
Mercedes-Benz USA.
1USA only.
Features227
Stowage and features
Z
Page 239 of 302

When checking the oil level:
Rpark the vehicle on a level surface.
Rthe engine should be switched off for approx-
imately five minutes if the engine is at normal
operating temperature.
Rthe engine should be switched off for at least
30 minutes if the engine is not at operating
temperature, e.g. if you only start the engine
briefly.
XPull oil dipstick :out of the dipstick guide
tube.
XWipe off oil dipstick :.
XSlowly slide oil dipstick :into the guide tube
to the stop, and take it out again.
If the level is between MIN mark =and MAX
mark ;, the oil level is correct.
XAdd oil if necessary.
On all other models, the on-board computer
must be used to check the engine oil level.
Checking the oil level using the on-
board computer
!Do not add too much oil. adding too much
engine oil can result in damage to the engine
or to the catalytic converter. Have excess
engine oil siphoned off.
G 550: the oil level can only be checked using
the on-board computer.
When checking the oil level:
Rpark the vehicle on a level surface.
Rthe engine should be switched off for approx-
imately five minutes if the engine is at normal
operating temperature.
XMake sure that the SmartKey is in position 2
in the ignition lock.
XPress the 9or: button on the steering
wheel to select the following message:
The measurement takes a few seconds. You will
see one of the following messages in the multi-
function display:
REngine Oil Level OK
RAdd1.0qt(Canada: 1.0liter)toreachmaximum oil level
RAdd 1.5 qts(Canada: 1.5 liters)toreach maximum oil level
RAdd 2.0 qts.(Canada: 2.0 liters)toreach maximum oil level
XAdd oil if necessary.
If the engine is at normal operating temperature and the Engine oil Reduce oil level
dis-
play appears, too much oil has been added.
XHave excess oil siphoned off.
If the Switch ignition on to check
engine oil levelmessage appears:
XTurn the SmartKey to position 2in the ignition
lock (Ypage 112).
If the Observe waiting time
message
appears:
XIf the engine is at normal operating tem-
perature: repeat the measurement after
approximately five minutes.
XIf the engine is not at normal operating
temperature: e.g. if the engine was only star-
ted briefly, repeat the measurement after
approximately 30 minutes.
If the Engine oil level Not when engine
onmessage appears:
XSwitch off the engine.
XIf the engine is at normal operating tem-
perature: wait about five minutes before car-
rying out the measurement.
XIf the engine is not at normal operating
temperature: e.g. if the engine was only star-
ted briefly, wait approximately 30 minutes
before carrying out the measurement.
iIf you wish to cancel the measurement,
press the 9or: button on the multi-
function steering wheel.
Adding engine oil
GWARNING
Certain components in the engine compart-
ment, such as the engine, radiator and parts
of the exhaust system, can become very hot.
Engine compartment237
Maintenance and care
Z
Page 250 of 302
Useful information
i
This Operator's Manual describes all models
and all standard and optional equipment of
your vehicle available at the time of publica-
tion of the Operator's Manual. Country-spe-
cific differences are possible. Please note
that your vehicle may not be equipped with all
features described. This also applies to
safety-related systems and functions.
iRead the information on qualified specialist
workshops: (Ypage 23).
Where will I find...?
Warning triangle
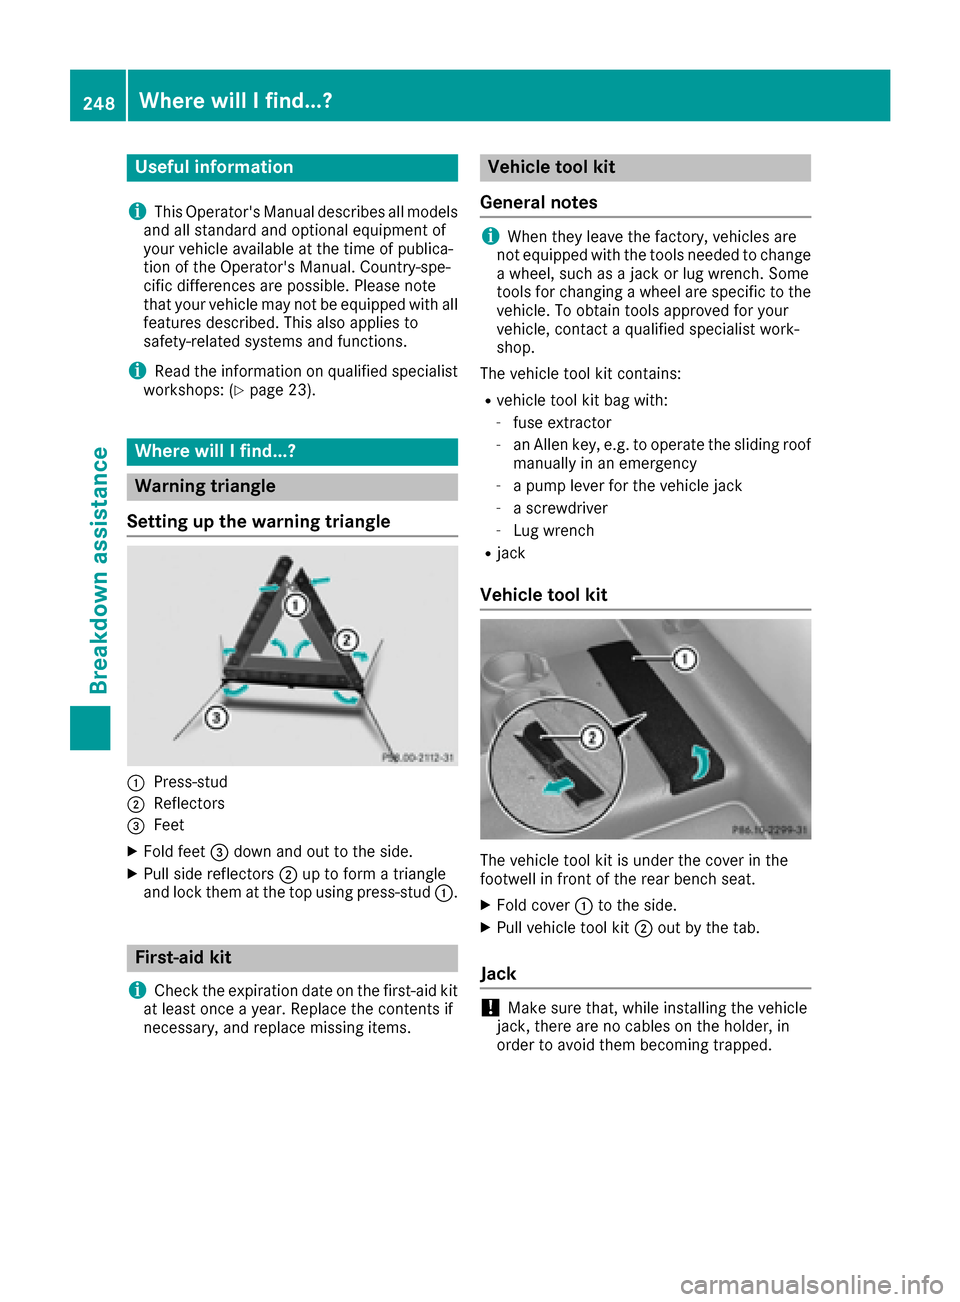
Setting up the warning triangle
:Press-stud
;Reflectors
=Feet
XFold feet =down and out to the side.
XPull side reflectors ;up to form a triangle
and lock them at the top using press-stud :.
First-aid kit
i
Check the expiration date on the first-aid kit
at least once a year. Replace the contents if
necessary, and replace missing items.
Vehicle tool kit
General notes
iWhen they leave the factory, vehicles are
not equipped with the tools needed to change
a wheel, such as a jack or lug wrench. Some
tools for changing a wheel are specific to the
vehicle. To obtain tools approved for your
vehicle, contact a qualified specialist work-
shop.
The vehicle tool kit contains:
Rvehicle tool kit bag with:
-fuse extractor
-an Allen key, e.g. to operate the sliding roof
manually in an emergency
-a pump lever for the vehicle jack
-a screwdriver
-Lug wrench
Rjack
Vehicle tool kit
The vehicle tool kit is under the cover in the
footwell in front of the rear bench seat.
XFold cover :to the side.
XPull vehicle tool kit ;out by the tab.
Jack
!Make sure that, while installing the vehicle
jack, there are no cables on the holder, in
order to avoid them becoming trapped.
248Where will I find...?
Breakdown assistance
Page 264 of 302
Useful information
i
This Operator's Manual describes all models
and all standard and optional equipment of
your vehicle available at the time of publica-
tion of the Operator's Manual. Country-spe-
cific differences are possible. Please note
that your vehicle may not be equipped with all
features described. This also applies to
safety-related systems and functions.
iRead the information on qualified specialist
workshops: (Ypage 23).
Important safety notes
GWARNING
If wheels and tires of the wrong size are used, the wheel brakes or suspension components
may be damaged. There is a risk of an acci-
dent.
Always replace wheels and tires with those
that fulfill the specifications of the original
part.
When replacing wheels, make sure to use the
correct:
Rdesignation
Rmodel
When replacing tires, make sure to use the
correct:
Rdesignation
Rmanufacturer
Rmodel
GWarning
A flat tire severely impairs the driving, steer-
ing and braking characteristics of the vehicle.
There is a risk of an accident.
do not drive with a flat tire. Immediately
replace the flat tire with your spare wheel, or
consult a qualified specialist workshop.
Contact an authorized Mercedes-Benz Center if
you require information on tested and recom-
mended wheels and tires for summer and winter
driving. Advice on purchasing and caring for
tires is also available there. Accessories that are not approved for your vehi-
cle by Mercedes-Benz or are not being used cor-
rectly can impair the operating safety.
Before purchasing and using non-approved
accessories, visit a qualified specialist work-
shop and ask about:
Rsuitability
Rlegal stipulations
Rfactory recommendations
Information on the dimensions and types of
wheels and tires for your vehicle can be found in
the "Wheel/tire combinations" section
(
Ypage 284).
Information on air pressure for the tires on your
vehicle can be found:
Ron the tire pressure label on the fuel filler flap
Rin the "Tire pressure" section
iFurther information on wheels and tires can
be obtained at any qualified specialist work-
shop.
Operation
Notes on driving
If the vehicle is heavily loaded, check the tire
pressures and correct them if necessary.
When parking your vehicle, make sure that the
tires do not get deformed by the curb or other
obstacles. If it is necessary to drive over curbs,
speed humps or similar elevations, try to do so
slowly and at an obtuse angle. Otherwise, the
tires, particularly the sidewalls, may be dam-
aged.
Regular checking of wheels and tires
GWARNING
Damaged tires can cause tire inflation pres-
sure loss. As a result, you could lose control of
your vehicle. There is a risk of accident.
Check the tires regularly for signs of damage
and replace any damaged tires immediately.
RRegularly check the wheels and tires of your
vehicle for damage at least once a month, as
well as after driving off-road or on rough
roads. Damage includes bulges and deforma-
tion on tires, cuts, punctures, cracks or
262Operation
Wheels and tires