2016 MERCEDES-BENZ G-Class windshield wipers
[x] Cancel search: windshield wipersPage 96 of 302
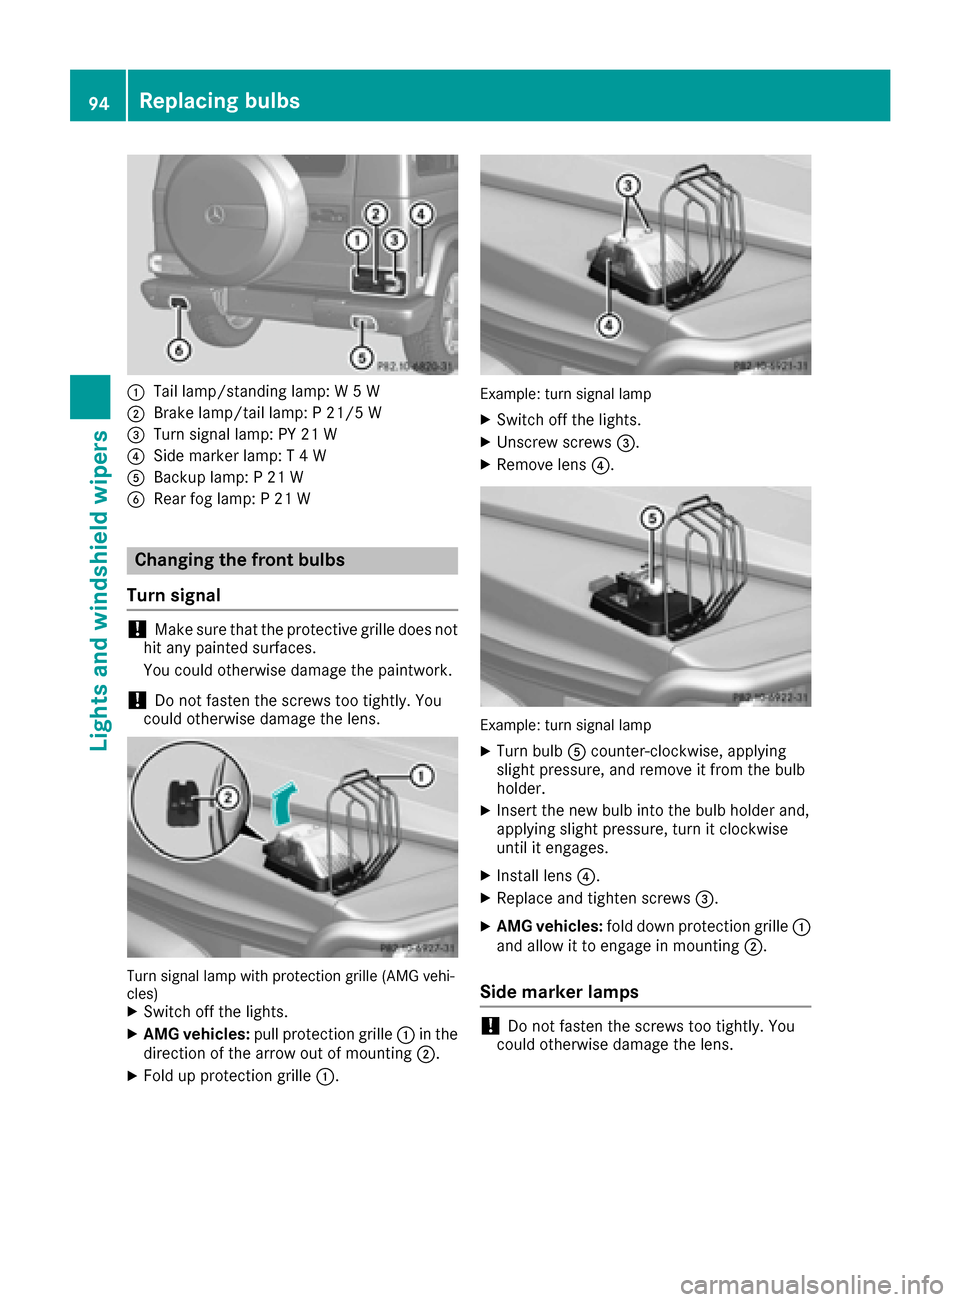
:Tail lamp/standing lamp: W 5 W
;Brake lamp/tail lamp: P 21/5 W
=Turn signal lamp: PY 21 W
?Side marker lamp: T 4 W
ABackup lamp: P 21 W
BRear fog lamp: P 21 W
Changing the front bulbs
Turn signal
!Make sure that the protective grille does not
hit any painted surfaces.
You could otherwise damage the paintwork.
!Do not fasten the screws too tightly. You
could otherwise damage the lens.
Turn signal lamp with protection grille (AMG vehi-
cles)
XSwitch off the lights.
XAMG vehicles: pull protection grille :in the
direction of the arrow out of mounting ;.
XFold up protection grille:.
Example: turn signal lamp
XSwitch off the lights.
XUnscrew screws=.
XRemove lens?.
Example: turn signal lamp
XTurn bulbAcounter-clockwise, applying
slight pressure, and remove it from the bulb
holder.
XInsert the new bulb into the bulb holder and,
applying slight pressure, turn it clockwise
until it engages.
XInstall lens ?.
XReplace and tighten screws =.
XAMG vehicles:fold down protection grille :
and allow it to engage in mounting ;.
Side marker lamps
!Do not fasten the screws too tightly. You
could otherwise damage the lens.
94Replacing bulbs
Lights and windshield wipers
Page 97 of 302
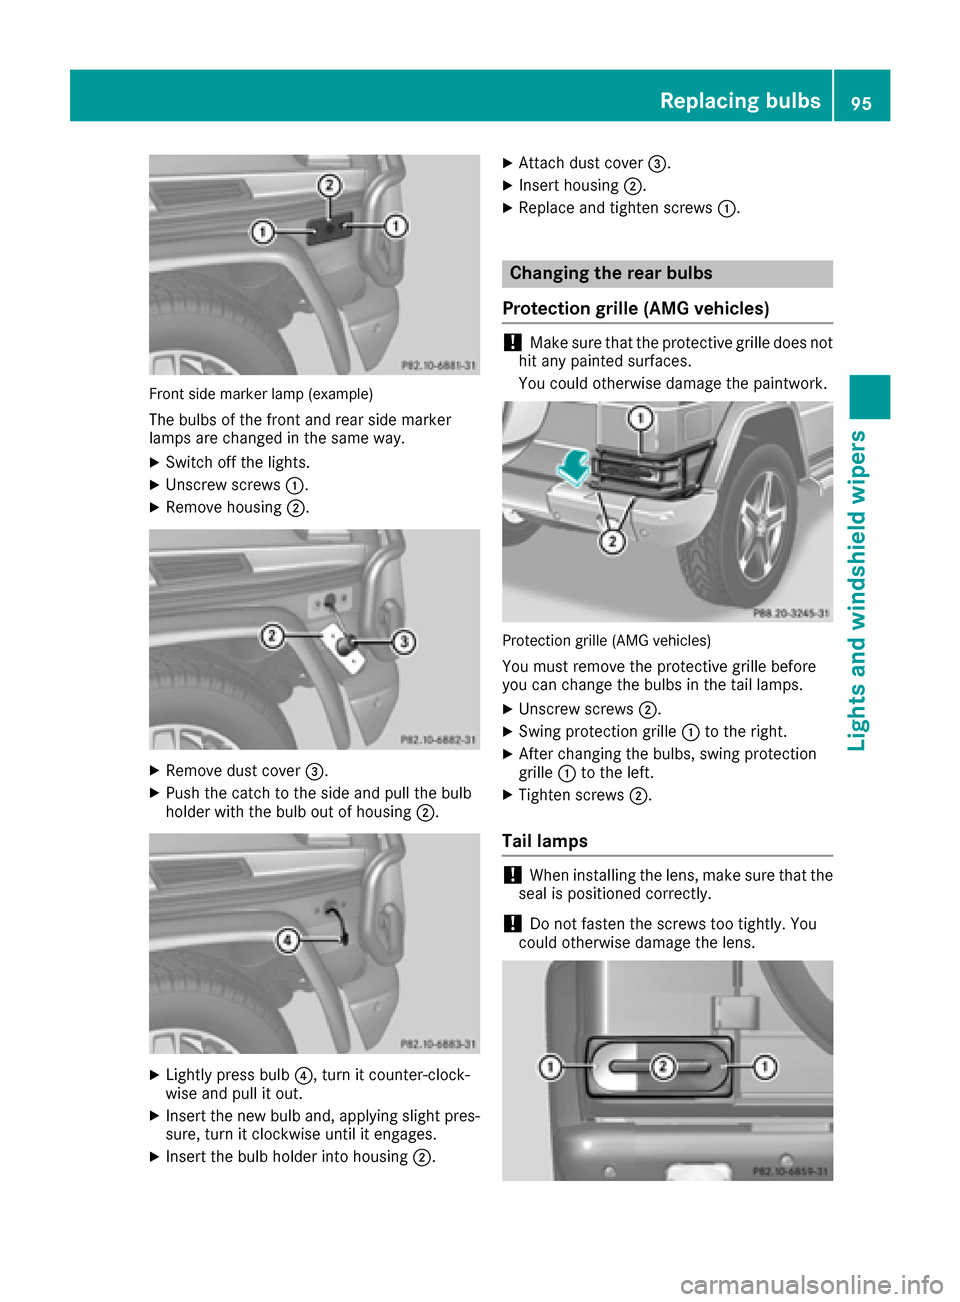
Front side marker lamp (example)
The bulbs of the front and rear side marker
lamps are changed in the same way.
XSwitch off the lights.
XUnscrew screws:.
XRemove housing ;.
XRemove dust cover =.
XPush the catch to the side and pull the bulb
holder with the bulb out of housing ;.
XLightly press bulb?, turn it counter-clock-
wise and pull it out.
XInsert the new bulb and, applying slight pres- sure, turn it clockwise until it engages.
XInsert the bulb holder into housing ;.
XAttach dust cover=.
XInsert housing;.
XReplace and tighten screws :.
Changing the rear bulbs
Protection grille (AMG vehicles)
!Make sure that the protective grille does not
hit any painted surfaces.
You could otherwise damage the paintwork.
Protection grille (AMG vehicles)
You must remove the protective grille before
you can change the bulbs in the tail lamps.
XUnscrew screws ;.
XSwing protection grille :to the right.
XAfter changing the bulbs, swing protection
grille :to the left.
XTighten screws ;.
Tail lamps
!When installing the lens, make sure that the
seal is positioned correctly.
!Do not fasten the screws too tightly. You
could otherwise damage the lens.
Replacing bulbs95
Lights and windshield wipers
Z
Page 98 of 302

XSwitch off the lights.
XUnscrew screws:.
XRemove lens;.
=Turn signal
?Brake/tail lamp
ATail lamps/standing lamps
XTurn the corresponding bulb counter-clock-
wise, applying slight pressure, and remove it
from the bulb holder.
XInsert the new bulb into the bulb holder and,
applying slight pressure, turn it clockwise
until it engages.
XInstall lens;.
XReplace and tighten screws :.
XAMG vehicles:secure the protection grille
(Ypage 95).
Backup lamp/rear fog lamp
!Do not fasten the screws too tightly. You
could otherwise damage the lens.
Example: rear fog lamp
XSwitch off the lights.
XUnscrew screws ;.
XRemove lens:.
XTurn bulb=counter-clockwise, applying
slight pressure, and remove it from the bulb
holder.
XInsert the new bulb into the bulb holder and,
applying slight pressure, turn it clockwise
until it engages.
XInstall lens :.
XReplace and tighten screws ;.
Windshield wipers
Switching the windshield wipers
on/off
!
Do not operate the windshield wipers when
the windshield is dry, as this could damage
the wiper blades. Moreover, dust that has col-
lected on the windshield/rear window can
scratch the glass if wiping takes place when
the windshield/rear window is dry.
If it is necessary to switch on the windshield
wipers in dry weather conditions, always use
washer fluid when operating the windshield
wipers.
!If the windshield wipers leave smears on the
windshield/rear window after the vehicle has
been washed in an automatic car wash, this
may be due to wax or other residue. Clean the
windshield/rear window with washer fluid
after an automatic car wash.
!Intermittent wiping with rain sensor: due to
optical influences and the windshield becom-
ing dirty in dry weather conditions, the wind-
shield wipers may be activated inadvertently.
This could then damage the windshield wiper
blades or scratch the windshield.
For this reason, you should always switch off
the windshield wipers in dry weather.
96Windshield wipers
Lights and windshield wipers
Page 99 of 302

If the wiper blades are worn, the windshield will
no longer be wiped properly. This could prevent
you from observing the traffic conditions,
thereby causing an accident.
Combination switch
1
$Windshield wipers off
2ÄIntermittent wipe, low (rain sensor set
to low sensitivity)
3Å Intermittent wipe, high (rain sensor
set to high sensitivity)
4° Continuous wipe, slow
5¯Continuous wipe, fast
BíSingle wipe
CîTo wipe with washer fluid
XSwitch on the ignition.
XTurn the combination switch to the corre-
sponding position.
Intermittent wiping is interrupted if you stop the
vehicle and open a front door. This protects
people getting into and out of the vehicle from
being sprayed with water.
Intermittent wiping continues when all doors are
closed and:
Ryou shift the automatic transmission to drive
position Dor reverse gear R
or
Ryou change the wipe setting on the combina-
tion switch.
In the ÄorÅ position, the appropriate
wiping frequency is set automatically according
to the intensity of the rain. In the Åposition,
the rain sensor is more sensitive than in
the Ä position, causing the windshield wip-
ers to wipe more frequently.
Switching the rear window wiper on/
off
Combination switch
:
è Switch
2bWipes with washer fluid
3ISwitches on intermittent wiping
40 Switches off intermittent wiping
5b Wipes with washer fluid
XTurn the SmartKey to position 1or 2in the
ignition lock.
XTurn switch :on the combination switch to
the corresponding position.
When the rear window wiper is switched on,
the icon appears in the instrument cluster.
iThe rear window wiper comes on automati-
cally if you shift the selector lever to Rwhile
the windshield wiper are on.
Replacing the wiper blades
Important safety notes
GWARNING
If the windshield wipers begin to move while
you are changing the wiper blades, you could be trapped by the wiper arm. There is a risk of
injury.
Always switch off the windshield wipers and
ignition before changing the wiper blades.
!To avoid damaging the wiper blades, make
sure that you touch only the wiper arm of the
wiper.
!Never open the hood if a windshield wiper
arm has been folded away from the wind-
shield.
Windshield wipers97
Lights and windshield wipers
Z
Page 100 of 302
Never fold a windshield wiper arm without a
wiper blade back onto the windshield/rear
window.
Hold the windshield wiper arm firmly when
you change the wiper blade. If you release the
windshield wiper arm without a wiper blade
and it falls onto the windshield, the windshield
may be damaged by the force of the impact.
Mercedes-Benz recommends that you have
the wiper blades changed at a qualified spe-
cialist workshop.
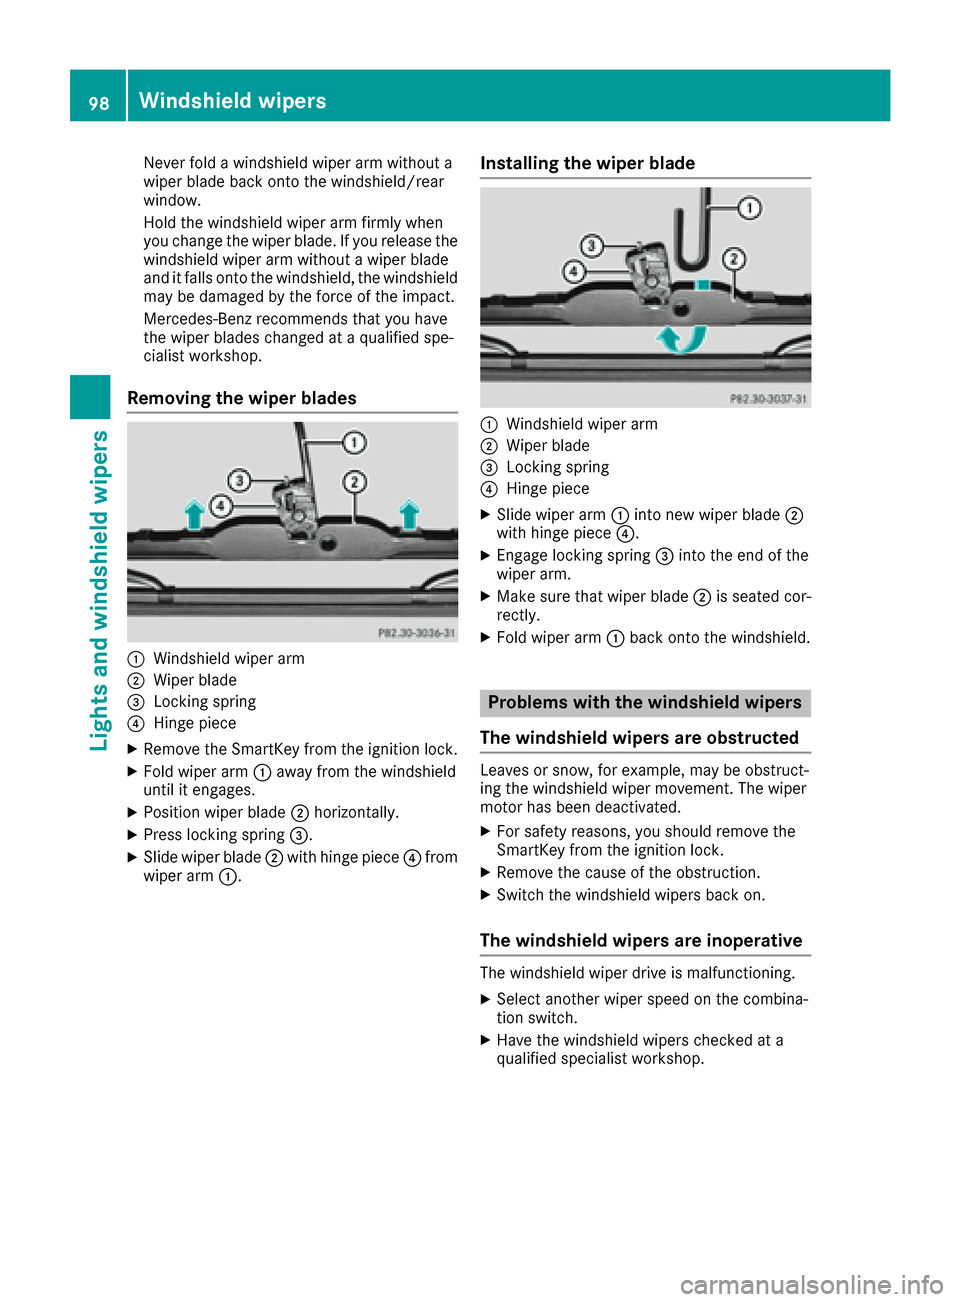
Removing the wiper blades
:Windshield wiper arm
;Wiper blade
=Locking spring
?Hinge piece
XRemove the SmartKey from the ignition lock.
XFold wiper arm:away from the windshield
until it engages.
XPosition wiper blade ;horizontally.
XPress locking spring =.
XSlide wiper blade;with hinge piece ?from
wiper arm :.
Installing the wiper blade
:Windshield wiper arm
;Wiper blade
=Locking spring
?Hinge piece
XSlide wiper arm :into new wiper blade ;
with hinge piece ?.
XEngage locking spring =into the end of the
wiper arm.
XMake sure that wiper blade ;is seated cor-
rectly.
XFold wiper arm :back onto the windshield.
Problems with the windshield wipers
The windshield wipers are obstructed
Leaves or snow, for example, may be obstruct-
ing the windshield wiper movement. The wiper
motor has been deactivated.
XFor safety reasons, you should remove the
SmartKey from the ignition lock.
XRemove the cause of the obstruction.
XSwitch the windshield wipers back on.
The windshield wipers are inoperative
The windshield wiper drive is malfunctioning.
XSelect another wiper speed on the combina-
tion switch.
XHave the windshield wipers checked at a
qualified specialist workshop.
98Windshield wipers
Lights and windshield wipers
Page 108 of 302
XTurn the SmartKey to position2(Ypage 112)
in the ignition lock.
XTo activate: press the¬button.
The indicator lamp in the ¬button lights
up.
The climate control system switches to the
following functions:
Rcooling with air dehumidification (only with
engine running)
Rhigh airflow (depending on the outside tem-
perature)
Rhigh temperature (depending on the out-
side temperature)
Rair distribution to the windshield and front
side windows
Rair-recirculation mode off
XTo deactivate: press the¬button.
The indicator lamp in the ¬button goes
out. The previously selected settings are
restored. The cooling with air dehumidifica-
tion function remains on. Air-recirculation
mode remains deactivated.
or
XPress the Ãbutton.
The indicator lamp in the ¬button goes
out. Airflow and air distribution are set to
automatic mode.
or
XTurn controls :orB clockwise or counter-
clockwise (Ypage 100).
or
XPress the KorI button.
Activating/deactivating MAX COOL
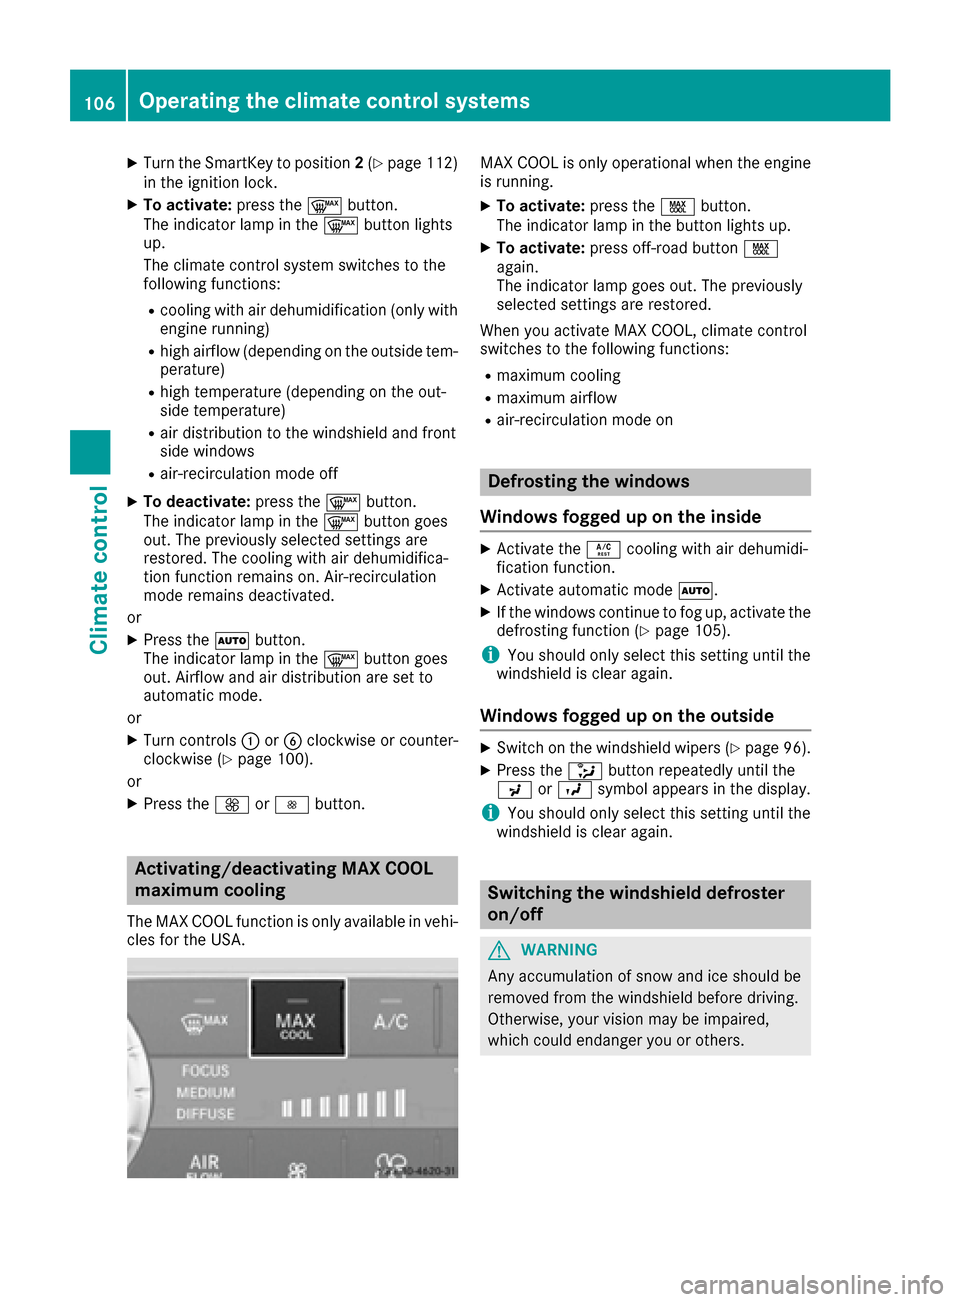
maximum cooling
The MAX COOL function is only available in vehi-
cles for the USA.
MAX COOL is only operational when the engine
is running.
XTo activate: press theÙbutton.
The indicator lamp in the button lights up.
XTo activate: press off-road button Ù
again.
The indicator lamp goes out. The previously
selected settings are restored.
When you activate MAX COOL, climate control
switches to the following functions:
Rmaximum cooling
Rmaximum airflow
Rair-recirculation mode on
Defrosting the windows
Windows fogged up on the inside
XActivate the Ácooling with air dehumidi-
fication function.
XActivate automatic mode Ã.
XIf the windows continue to fog up, activate the
defrosting function (Ypage 105).
iYou should only select this setting until the
windshield is clear again.
Windows fogged up on the outside
XSwitch on the windshield wipers (Ypage 96).
XPress the _button repeatedly until the
P orO symbol appears in the display.
iYou should only select this setting until the
windshield is clear again.
Switching the windshield defroster
on/off
GWARNING
Any accumulation of snow and ice should be
removed from the windshield before driving.
Otherwise, your vision may be impaired,
which could endanger you or others.
106Operating the climate control systems
Climate control
Page 114 of 302

Wear suitable footwear to ensure correct
usage of the pedals.
GWARNING
If you switch off the ignition while driving,
safety-relevant functions are only available
with limitations, or not at all. This could affect, for example, the power steering and the brake
boosting effect. You will require considerably
more effort to steer and brake. There is a risk
of an accident.
Do not switch off the ignition while driving.
GWARNING
If the parking brake has not been fully
released when driving, the parking brake can:
Roverheat and cause a fire
Rlose its hold function.
There is a risk of fire and an accident. Release
the parking brake fully before driving off.
!Warm up the engine quickly. Do not use the
engine's full performance until it has reached
operating temperature.
Only shift the automatic transmission to the
desired drive position when the vehicle is sta-
tionary.
Where possible, avoid spinning the drive
wheels when pulling away on slippery roads.
You could otherwise damage the drive train.
!Avoid high engine speeds when the engine
is cold. The engine's service life could other-
wise be significantly shortened. Do not use
the engine's full performance until it has
reached operating temperature.
!AMG vehicles: at low engine oil tempera-
tures below 68 ‡ (+20 †), the maximum
engine speed is restricted in order to protect the engine. To protect the engine and main-
tain smooth engine operation, avoid driving at
full throttle when the engine is cold.
SmartKey positions
gTo remove the SmartKey
1Power supply for some consumers, such as
the windshield wipers
2Ignition (power supply for all consumers)
and drive position
3To start the engine
As soon as the ignition is switched on, all the
indicator lamps in the instrument cluster light
up. If an indicator lamp does not go out after
starting the engine or lights up while driving, see
(
Ypage 205).
If the SmartKey is in position 0in the ignition
lock for an extended period of time, it can no
longer be turned in the ignition lock. The steer-
ing is then locked. To unlock, remove the Smart-
Key and reinsert it into the ignition lock.
The steering is locked when you remove the
SmartKey from the ignition lock.
XRemove the SmartKey when the engine is
switched off.
The starter battery could otherwise be dis-
charged.
If you cannot turn the SmartKey in the ignition
lock, the starter battery may not be charged
sufficiently.
XCheck the starter battery and charge it if nec-
essary (Ypage 252).
or
XJump-start the vehicle (Ypage 254).
iYou can only remove the SmartKey if:
Rthe SmartKey is in position 0in the ignition
lock.
Rthe automatic transmission selector lever
is in P.
112Driving
Driving and parking
Page 237 of 302
Useful information
i
This Operator's Manual describes all models
and all standard and optional equipment of
your vehicle available at the time of publica-
tion of the Operator's Manual. Country-spe-
cific differences are possible. Please note
that your vehicle may not be equipped with all
features described. This also applies to
safety-related systems and functions.
iRead the information on qualified specialist
workshops: (Ypage 23).
Engine compartment
Hood
Important safety notes
GWARNING
If the hood is unlatched, it may open up when the vehicle is in motion and block your view.
There is a risk of an accident.
Never unlatch the hood while driving. Before
every trip, ensure that the hood is locked.
GWARNING
Certain components in the engine compart-
ment may be very hot, e.g. the drive system
and radiator. Working in the engine compart-
ment poses a risk of injury.
If possible, let the drive system cool down and only touch the components described in the
following.
GWARNING
Opening the hood when the engine is over-
heated or when there is a fire in the engine
compartment could expose you to hot gases
or other service products. There is a risk of
injury.
Let an overheated engine cool down before
opening the hood. If there is a fire in the
engine compartment, keep the hood closed
and contact the fire department.
GWARNING
The ignition system and the fuel injection sys-
tem work under high voltage. If you touch
components which are under voltage, you
could get an electric shock. There is a risk of
injury.
Never touch components of the ignition sys-
tem or fuel injection system when the ignition
is switched on.
GWARNING
The engine compartment contains moving
components. Certain components, such as
the radiator fan, may continue to run or start
again suddenly when the ignition is off. There is a risk of injury.
If you need to do any work inside the engine
compartment:
Rswitch off the ignition
Rnever reach into the area where there is a
risk of danger from moving components,
such as the fan rotation area
Rremove jewelry and watches
Rkeep items of clothing and hair, for exam-
ple, away from moving parts
GWARNING
When the hood is open and the windshield
wipers are set in motion, you can be injured by
the wiper linkage. There is a risk of injury.
Always switch off the windshield wipers and
the ignition before opening the hood.
!Make sure that the windshield wipers are
not folded away from the windshield. You
could otherwise damage the windshield wip-
ers or the hood.
Do not touch the following when the ignition is
switched on:
Rignition coils
Rspark plug connectors
Rtest socket
Engine compartment235
Maintenance and care
Z