2016 MERCEDES-BENZ G-Class fuel type
[x] Cancel search: fuel typePage 15 of 302

Switching on/off .............................. 86
Rear lamps
see Lights
Rear seat bench
Folding into an upright position ..... 218
Rear view camera
Function/notes ............................. 161
Rear view camera (cleaning
instructions) ...................................... 244
Rear window defroster
Problem (malfunction) ................... 107
Switching on/off ........................... 107
Rear window wiper
Switching on/off .............................. 97
Rear-view mirror
Dipping (automatic) ......................... 81
Refrigerant (air-conditioning sys-
tem)
Important safety notes .................. 293
Refueling
Fuel gauge ..................................... 171
Important safety notes .................. 127
Refueling process .......................... 128
see Fuel
Remote control
Programming (garage door
opener) .......................................... 231
Replacing bulbs
Important safety notes .................... 92
Overview of bulb types .................... 93
Reporting safety defects .................... 23
Rescue card ......................................... 24
Reserve (fuel tank)
see Fuel
Reserve fuel
Display message ............................ 194
Warning lamp ................................. 210
see Fuel
Residual heat
Switching on/off ........................... 108
Restraint system
Display message ............................ 187
Introduction ..................................... 34
Warning lamp ................................. 209
Warning lamp (function) ................... 35
Reversing lamps (display mes-
sage) ................................................... 191 Roadside Assistance (breakdown)
.... 21
Roof lining and carpets (cleaning
guidelines) ......................................... 247
Route (navigation)
see Route guidance (navigation)
Route guidance (navigation) ............ 174
S
Safety
Children in the vehicle ..................... 46
Safety system
see Driving safety systems
Seat backrest
Folding back .................................. 217
Seat belts
Adjusting the height ......................... 38
center rear-compartment seat ......... 38
Cleaning ......................................... 246
Correct usage .................................. 37
Fastening ......................................... 38
Important safety guidelines ............. 36
Introduction ..................................... 36
Releasing ......................................... 39
Warning lamp ................................. 204
Warning lamp (function) ................... 40
Seat heating
Indicator lamp (malfunction) ............ 77
Seat ventilation
Indicator lamp (malfunction) ............ 77
Seats
Adjusting (electrically) ..................... 74
Adjusting the 4-way lumbar sup-
port .................................................. 76
Adjusting the head restraint ............ 74
Cleaning the cover ......................... 246
Correct driver's seat position ........... 72
Important safety notes .................... 72
Overview .......................................... 72
Storing settings (memory func-
tion) ................................................. 82
Switching seat heating on/off ......... 76
Switching seat ventilation on/off .... 77
Sensors (cleaning instructions) ....... 244
Service interval display
Displaying a service message (on-
board computer) ............................ 240
Index13
Page 48 of 302

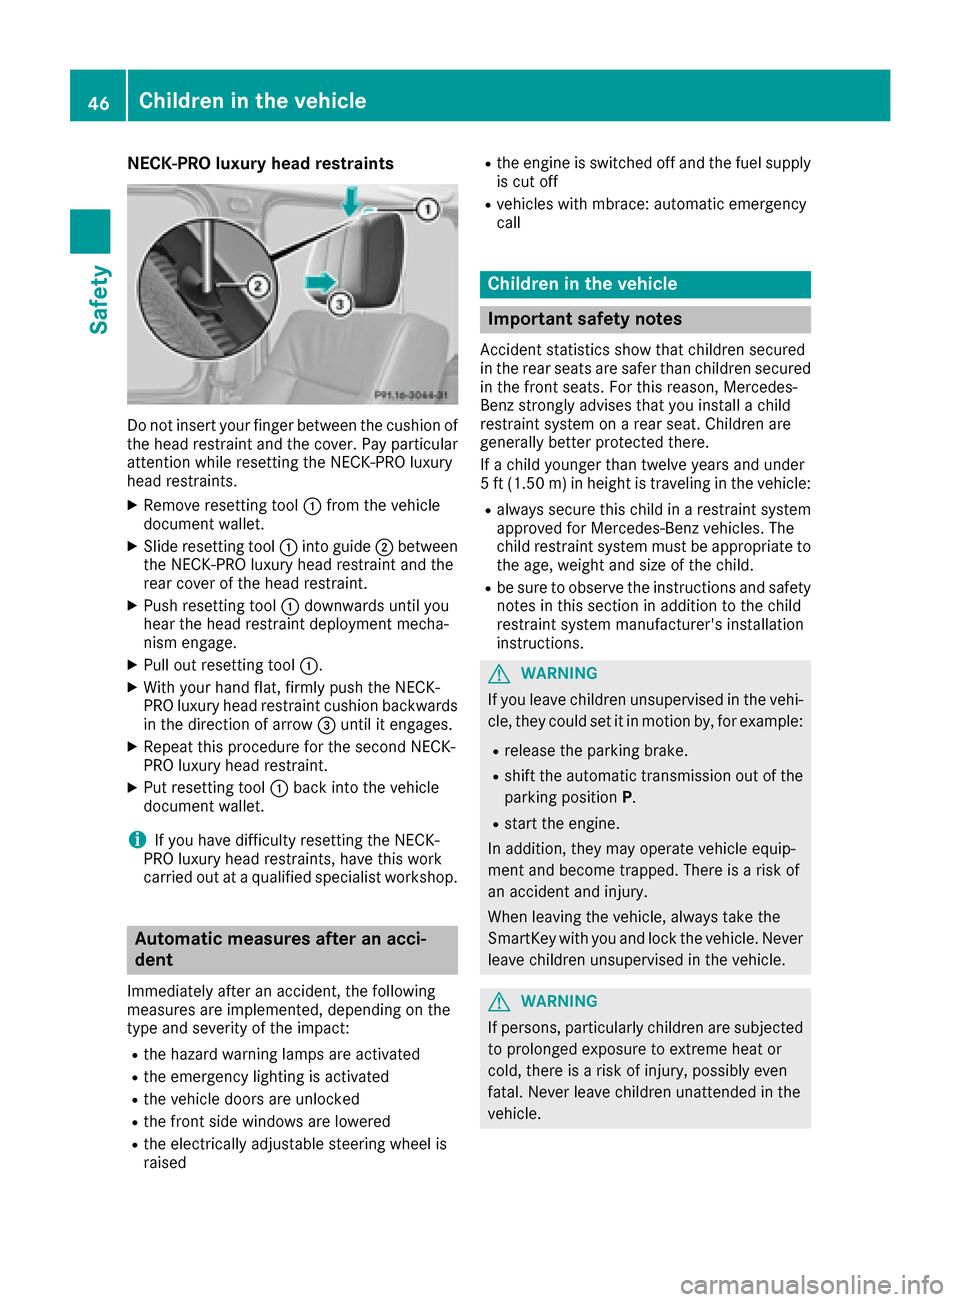
NECK-PRO luxury head restraints
Do not insert your finger between the cushion of
the head restraint and the cover. Pay particular
attention while resetting the NECK-PRO luxury
head restraints.
XRemove resetting tool:from the vehicle
document wallet.
XSlide resetting tool :into guide ;between
the NECK-PRO luxury head restraint and the
rear cover of the head restraint.
XPush resetting tool :downwards until you
hear the head restraint deployment mecha-
nism engage.
XPull out resetting tool :.
XWith your hand flat, firmly push the NECK-
PRO luxury head restraint cushion backwards
in the direction of arrow =until it engages.
XRepeat this procedure for the second NECK-
PRO luxury head restraint.
XPut resetting tool :back into the vehicle
document wallet.
iIf you have difficulty resetting the NECK-
PRO luxury head restraints, have this work
carried out at a qualified specialist workshop.
Automatic measures after an acci-
dent
Immediately after an accident, the following
measures are implemented, depending on the
type and severity of the impact:
Rthe hazard warning lamps are activated
Rthe emergency lighting is activated
Rthe vehicle doors are unlocked
Rthe front side windows are lowered
Rthe electrically adjustable steering wheel is
raised
Rthe engine is switched off and the fuel supply
is cut off
Rvehicles with mbrace: automatic emergency
call
Children in the vehicle
Important safety notes
Accident statistics show that children secured
in the rear seats are safer than children secured
in the front seats. For this reason, Mercedes-
Benz strongly advises that you install a child
restraint system on a rear seat. Children are
generally better protected there.
If a child younger than twelve years and under
5 ft (1.50 m) in height is traveling in the vehicle:
Ralways secure this child in a restraint system
approved for Mercedes-Benz vehicles. The
child restraint system must be appropriate to
the age, weight and size of the child.
Rbe sure to observe the instructions and safety
notes in this section in addition to the child
restraint system manufacturer's installation
instructions.
GWARNING
If you leave children unsupervised in the vehi-
cle, they could set it in motion by, for example:
Rrelease the parking brake.
Rshift the automatic transmission out of the
parking position P.
Rstart the engine.
In addition, they may operate vehicle equip-
ment and become trapped. There is a risk of
an accident and injury.
When leaving the vehicle, always take the
SmartKey with you and lock the vehicle. Never
leave children unsupervised in the vehicle.
GWARNING
If persons, particularly children are subjected to prolonged exposure to extreme heat or
cold, there is a risk of injury, possibly even
fatal. Never leave children unattended in the
vehicle.
46Children in the vehicle
Safety
Page 130 of 302

!Overfilling the fuel tank could damage the
fuel system.
!Take care not to spill any fuel on painted
surfaces. You could otherwise damage the
paintwork.
!Use a filter when refueling from a fuel can.
Otherwise, the fuel lines and/or injection sys-
tem could be blocked by particles from the
fuel can.
If you overfill the fuel tank, pressure may build
up in the fuel tank. This could cause fuel to spray
out when the fuel pump nozzle is removed.
There is a risk of injury. The fuel tank is full when
the fuel pump nozzle first switches off. End the
refueling process.
For further information on fuel and fuel quality
(
Ypage 289).
Refueling
Vehicles with a fuel filler flap
Example: G 550 fuel filler cap
:
To open the fuel filler flap
;Tire pressure table
=Fuel type
?To insert the fuel filler cap
When you open or close the vehicle with the
SmartKey, the fuel filler flap is automatically
unlocked or locked.
The position of the fuel filler cap is displayed
8 in the instrument cluster. The arrow next
to the filling pump indicates the side of the vehi-
cle. The fuel filler flap is located to the rear on
the right.
Opening the fuel filler cap
:To open the fuel filler flap
;Tire pressure table
=Fuel type
?To insert the fuel filler cap
XSwitch the engine off.
iWhen the engine is running and the fuel filler
flap is open, the yellow reserve fuel warning
lamp and the =(USA only) or ;(Can-
ada only) Check Engine warning lamp may
light up.
Further information about warning and indi-
cator lamps in the instrument cluster can be
found in the Digital Operator's Manual.
XRemove the SmartKey from the ignition lock.
XTurn the fuel filler cap counterclockwise and
remove it.
XInsert the fuel filler cap into the holder
bracket on the inside of filler flap ?.
Refueling
XCompletely insert the filler neck of the fuel
pump nozzle into the tank and refuel.
iDo not add any more fuel after the pump
stops filling for the first time. Otherwise, fuel
may leak out.
Closing
XReplace the fuel filler cap and turn it clock-
wise. The fuel filler cap audibly engages.
XClose the fuel filler flap.
iClose the fuel filler flap before locking the
vehicle. A locking pin otherwise prevents the
fuel filler flap from closing after the vehicle
has been locked.
128Refueling
Driving and parking
Page 169 of 302

Always install and secure the ball coupling asdescribed. Before every journey, ensure that
the ball coupling is secured with the bolt and
the corresponding spring cotter.
Please observe the manufacturer's operating
instructions for the trailer coupling if a detach-
able trailer coupling is used.
Exceeding the maximum permissible nose-
weight may cause damage to the following:
Ryour vehicle
Rthe trailer
Rthe ball coupling
Rtrailer tow hitch
The vehicle/trailer combination could become
unstable.
If the noseweight used is lower than the mini-
mum permissible noseweight, the vehicle/
trailer combination could also become unstable.
To avoid hazardous situations:
Rmake sure to check the noseweight before
each journey
Ruse a drawbar noseweight as close as possi-
ble to the maximum noseweight
Rdo not exceed the maximum permissible
noseweight
Rdo not use a noseweight lower than the min-
imum permissible trailer drawbar noseweight
When backing up the vehicle towards the trailer,
make sure there is nobody between the trailer
and the vehicle.
The applicable permissible values, which must
not be exceeded, can be fou nd:
Rin your vehicle documents
Ron the type plate of the trailer tow hitch and
trailer
Ron the vehicle identification plate
Couple and uncouple the trailer carefully. If you
do not couple the trailer to the towing vehicle
correctly, the trailer could become detached.
Make sure that the following values are not
exceeded:
Rthe permissible trailer drawbar noseweight
Rthe permissible trailer load
Rthe permissible rear axle load of the towing
vehicle
Rthe maximum permissible gross vehicle
weight of both the towing vehicle and the
trailer When towing a trailer, your vehicle's handling
characteristics will be different in comparison
with when driving without a trailer.
The vehicle/trailer combination:
Ris heavier
Ris restricted in its acceleration and gradient-
climbing capability
Rhas an increased braking distance
Ris affected more by strong crosswinds
Rdemands more sensitive steering
Rhas a larger turning radius
This could impair the handling characteristics.
Adapt your driving style accordingly. Maintain a
safe distance. Drive carefully.
When towing a trailer, always adjust your speed
to the current road and weather conditions. Do
not excee
d the maximum permissible speed for
your vehicle/trailer combination.
You will find the values approved by the manu-
facturer on the vehicle identification plates and
those for the towing vehicle in the "Technical
data" section (
Ypage 297).
General notes
RDo not exceed the legally prescribed maxi-
mum speed for vehicle/trailer combinations
in the relevant country.
This lowers the risk of an accident.
ROnly install an approved trailer coupling on
your vehicle.
Further information on availability and on
installation is available from any authorized
Mercedes-Benz Center.
RThe bumpers of your vehicle are not suitable
for installing detachable trailer couplings.
RDo not install hired trailer couplings or other
detachable trailer couplings on the bumpers
of your vehicle.
RIf you do not need the ball coupling, remove
the ball coupling from the ball coupling
recess. This reduces the risk of damage to the
ball coupling.
iCheck the tire pressures when towing a
trailer. You will find the values in the tire pres-
sure table in the fuel filler flap of the vehicle
(
Ypage 266).
You will find installation dimensions and loads
under "Technical data" (
Ypage 297).
Towing a trailer167
Driving an d parking
Z
Page 170 of 302

The maximum noseweight of the trailer drawbar
on the ball coupling for up to 3 people is 562 lbs
(255 kg). The maximum permissible trailer draw-bar noseweight for more than 3 persons and the
maximum load in the trunk can be found in the
trailer drawbar noseweight table (
Ypage 298).
However, the actual noseweight must not
exceed the value given on the trailer tow hitch or trailer identification plates. The lowest weight
applies.
Please note that when towing a trailer,
PARKTRONIC (
Ypage 158) and Blind Spot
Assist (Ypage 154) are only available with lim-
itations, or not at all.
iOn vehicles without level control, the height
of the ball coupling will alter according to the
load placed on the vehicle. If necessary, use a
trailer with a height-adjustable drawbar.
Driving tips
XOn long and steep downhill gradients, select
shift range 1,2or 3(Ypage 123) in good
time.
iThis also applies if you have activated cruise
control or SPEEDTRONIC.
XIf necessary, shift the transfer case to LOW
RANGE (Ypage 162).
This will use the braking effect of the engine,
so that less braking will be required to main-
tain the speed. This relieves the load on the
brake system and prevents the brakes from
overheating and wearing too quickly. If you
need additional braking, depress the brake
pedal repeatedly rather than continuously.
The maximum permissible speed for vehicle/
trailer combinations depends on the type of
trailer. Before beginning the journey, check the
trailer's documents to see what the maximum
permissible speed is. Observe the legally pre-
scribed maximum speed in the relevant country.
For certain Mercedes-Benz vehicles, the maxi-
mum permissible rear axle load is increased
when towing a trailer. Refer to the "Technical
data" section to find out whether this applies to
your vehicle. If you utilize any of the added max- imum rear axle load when towing a trailer, the
vehicle/trailer combination may not exceed a
maximum speed of 60 mph (100 km/h) for rea-
sons concerning the operating permit. This also applies in countries in which the permissible
maximum speed for vehicle/trailer combina-
tions is above 60 mph (100 km/h). When towing a trailer, your vehicle's handling
characteristics will be different in comparison to
when driving without a trailer and it will con-
sume more fuel.
On long and steep downhill gradients, you must
select shift range
1,2or 3in good time.
iThis also applies if you have activated cruise
control or DISTRONIC PLUS.
This will use the braking effect of the engine, so
that less braking will be required to maintain the
speed. This relieves the load on the brake sys-
tem and prevents the brakes from overheating
and wearing too quickly. If you need additional
braking, depre ss the bra
ke pedal repeatedly
rather than continuously.
Driving tips
If the trailer swings from side to side:
XDo not accelerate.
XDo not counter-steer.
XBrake if necessary.
RMaintain a greater distance from the vehicle
in front than when driving without a trailer.
RAvoid braking abruptly. If possible, brake gen- tly at first to allow the trailer to run on. Then,
increase the braking force rapidly.
RThe values given for gradient-climbing capa-
bilities from a standstill refer to sea level.
When driving in mountainous areas, note that
the power output of the engine and, conse-
quently, the vehicle's gradient-climbing capa-
bility, decreases with increasing altitude.
Trailer power supply
!
You can connect accessories with a maxi-
mum power consumption of 180 W to the
permanent power supply.
You must not charge a trailer battery using the
power supply.
The trailer socket of your vehicle is equipped at
the factory with a permanent power supply.
The permanent power supply is supplied via
trailer socket pin 9.
A qualified specialist workshop can provide
more information about installing the trailer
electrics.
168Towing a trailer
Driving and parking
Page 216 of 302

Useful information
i
This Operator's Manual describes all models
and all standard and optional equipment of
your vehicle available at the time of publica-
tion of the Operator's Manual. Country-spe-
cific differences are possible. Please note
that your vehicle may not be equipped with all
features described. This also applies to
safety-related systems and functions.
iRead the information on qualified specialist
workshops: (Ypage 23).
Loading guidelines
GWARNING
If objects, luggage or loads are not secured or
not secured sufficiently, they could slip, tip
over or be flung around and thereby hit vehicle
occupants. There is a risk of injury, particu-
larly in the event of sudden braking or a sud-
den change in direction.
Always store objects so that they cannot be
flung around. Secure objects, luggage or
loads against slipping or tipping before the
journey.
GWARNING
If you distribute the load unevenly in the vehi- cle, the handling as well as the steering and
braking characteristics are severely affected.
There is a risk of an accident.
Distribute the load evenly in the vehicle.
Secure the load to prevent it from slipping.
GWARNING
The exhaust tail pipe and tail pipe trim can
become very hot. If you come into contact
with these parts of the vehicle, you could burn
yourself. There is a risk of injury.
Always be particularly careful around the
exhaust tail pipe and the tail pipe trim. Allow
these components to cool down before touch-
ing them.
GWARNING
Combustion engines emit poisonous exhaust
gases such as carbon monoxide. If the rear
door is open when the engine is running, par-
ticularly if the vehicle is moving, exhaust
fumes could enter the passenger compart-
ment. There is a risk of poisoning.
Turn off the engine before opening the rear
door. Never drive with the rear door open.
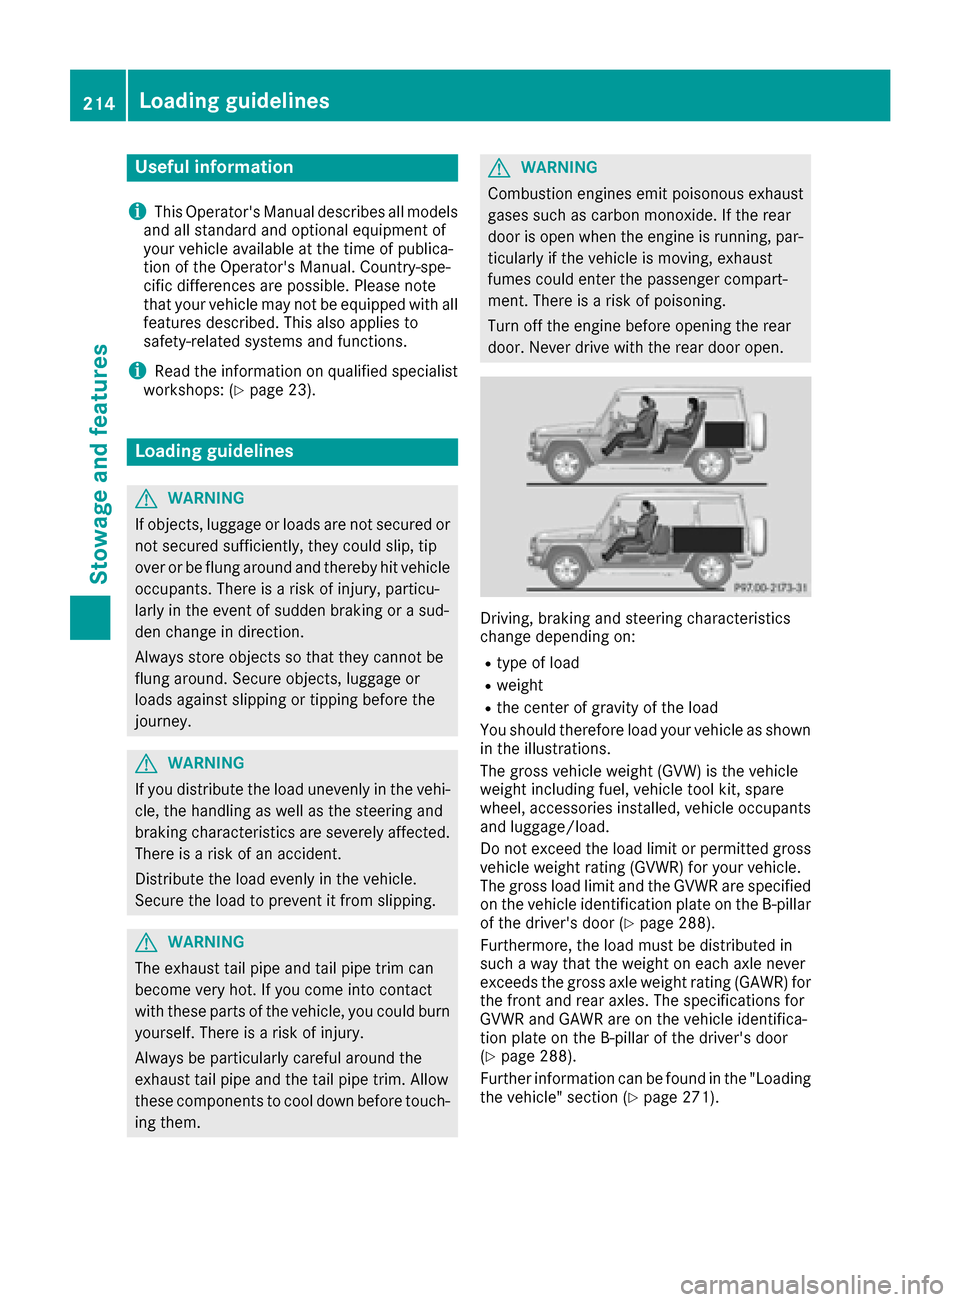
Driving, braking and steering characteristics
change depending on:
Rtype of load
Rweight
Rthe center of gravity of the load
You should therefore load your vehicle as shown
in the illustrations.
The gross vehicle weight (GVW) is the vehicle
weight including fuel, vehicle tool kit, spare
wheel, accessories installed, vehicle occupants
and luggage/load.
Do not exceed the load limit or permitted gross
vehicle weight rating (GVWR) for your vehicle.
The gross load limit and the GVWR are specified
on the vehicle identification plate on the B-pillar
of the driver's door (
Ypage 288).
Furthermore, the load must be distributed in
such a way that the weight on each axle never
exceeds the gross axle weight rating (GAWR) for
the front and rear axles. The specifications for
GVWR and GAWR are on the vehicle identifica-
tion plate on the B-pillar of the driver's door
(
Ypage 288).
Further information can be found in the "Loading
the vehicle" section (
Ypage 271).
214Loading guidelines
Stowage and features
Page 229 of 302

If a connection can be made, theCall Con‐nectedmessage appears in the multifunction
display.
If a mobile phone network is available and there
is sufficient GPS reception, the mbrace system
transmits data to the Response Center, for
example:
Rcurrent location of the vehicle
Rvehicle identification number
Rvehicle model
Rvehicle color
iThe COMAND display shows that an mbrace
call is active. You can change to the naviga-
tion menu by pressing the NAVI button on
COMAND during the call. Voice output is not
available.
A voice connection is established between the
Mercedes-Benz Roadside Assistance Represen- tative and the vehicle occupants.
The Mercedes-Benz Roadside Assistance Rep-
resentative either sends a qualified Mercedes-
Benz technician or makes arrangements for
your vehicle to be transported to the nearest
authorized Mercedes-Benz Center. You may be
charged for services such as repair work and/or
towing. Further details are available in your
mbrace manual.
XDescribe the type of assistance needed.
iIf the indicator lamp in Roadside Assistance
button :is flashing continuously and no
voice connection with the Response center
has been established, then the mbrace sys-
tem has not been able to initiate a Roadside
Assistance call (e.g. the relevant mobile
phone network is not available). The Call
Failedmessage appears in the multifunction
display.
XTo end a call: press the~button on the
multifunction steering wheel.
or
XPress the corresponding COMAND button to
end a phone call.
iSign and drive services1: you are not
charged for services such as jump-starting,
providing a few gallons of fuel for a fuel tank
that has been run dry or changing a faulty tire
with the vehicle's own spare wheel.
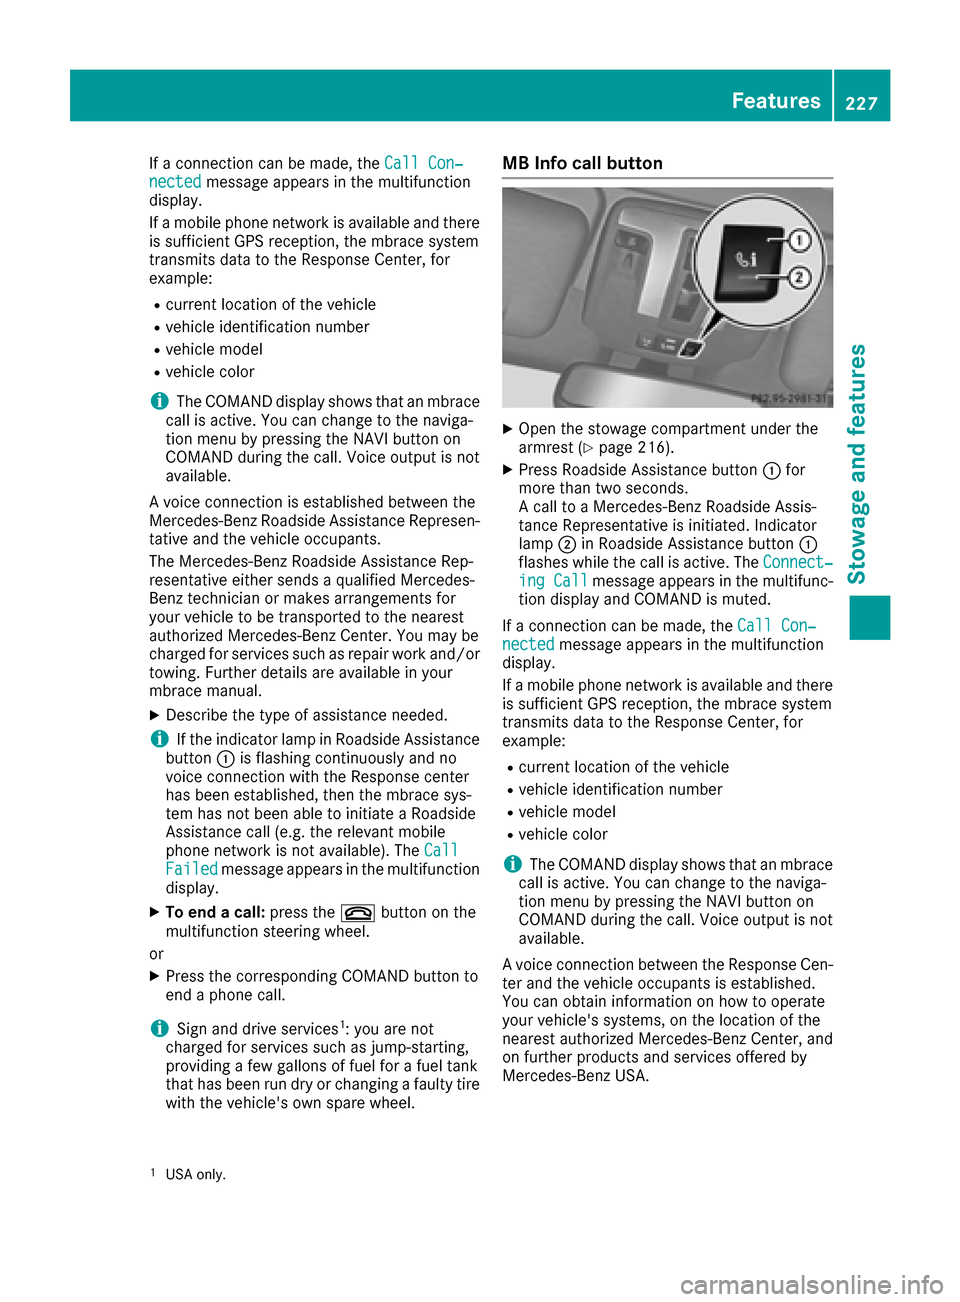
MB Info call button
XOpen the stowage compartment under the
armrest (Ypage 216).
XPress Roadside Assistance button :for
more than two seconds.
A call to a Mercedes-Benz Roadside Assis-
tance Representative is initiated. Indicator
lamp ;in Roadside Assistance button :
flashes while the call is active. The Connect‐
ing Callmessage appears in the multifunc-
tion display and COMAND is muted.
If a connection can be made, the Call Con‐
nectedmessage appears in the multifunction
display.
If a mobile phone network is available and there
is sufficient GPS reception, the mbrace system
transmits data to the Response Center, for
example:
Rcurrent location of the vehicle
Rvehicle identification number
Rvehicle model
Rvehicle color
iThe COMAND display shows that an mbrace
call is active. You can change to the naviga-
tion menu by pressing the NAVI button on
COMAND during the call. Voice output is not
available.
A voice connection between the Response Cen- ter and the vehicle occupants is established.
You can obtain information on how to operate
your vehicle's systems, on the location of the
nearest authorized Mercedes-Benz Center, and
on further products and services offered by
Mercedes-Benz USA.
1USA only.
Features227
Stowage and features
Z
Page 264 of 302

Useful information
i
This Operator's Manual describes all models
and all standard and optional equipment of
your vehicle available at the time of publica-
tion of the Operator's Manual. Country-spe-
cific differences are possible. Please note
that your vehicle may not be equipped with all
features described. This also applies to
safety-related systems and functions.
iRead the information on qualified specialist
workshops: (Ypage 23).
Important safety notes
GWARNING
If wheels and tires of the wrong size are used, the wheel brakes or suspension components
may be damaged. There is a risk of an acci-
dent.
Always replace wheels and tires with those
that fulfill the specifications of the original
part.
When replacing wheels, make sure to use the
correct:
Rdesignation
Rmodel
When replacing tires, make sure to use the
correct:
Rdesignation
Rmanufacturer
Rmodel
GWarning
A flat tire severely impairs the driving, steer-
ing and braking characteristics of the vehicle.
There is a risk of an accident.
do not drive with a flat tire. Immediately
replace the flat tire with your spare wheel, or
consult a qualified specialist workshop.
Contact an authorized Mercedes-Benz Center if
you require information on tested and recom-
mended wheels and tires for summer and winter
driving. Advice on purchasing and caring for
tires is also available there. Accessories that are not approved for your vehi-
cle by Mercedes-Benz or are not being used cor-
rectly can impair the operating safety.
Before purchasing and using non-approved
accessories, visit a qualified specialist work-
shop and ask about:
Rsuitability
Rlegal stipulations
Rfactory recommendations
Information on the dimensions and types of
wheels and tires for your vehicle can be found in
the "Wheel/tire combinations" section
(
Ypage 284).
Information on air pressure for the tires on your
vehicle can be found:
Ron the tire pressure label on the fuel filler flap
Rin the "Tire pressure" section
iFurther information on wheels and tires can
be obtained at any qualified specialist work-
shop.
Operation
Notes on driving
If the vehicle is heavily loaded, check the tire
pressures and correct them if necessary.
When parking your vehicle, make sure that the
tires do not get deformed by the curb or other
obstacles. If it is necessary to drive over curbs,
speed humps or similar elevations, try to do so
slowly and at an obtuse angle. Otherwise, the
tires, particularly the sidewalls, may be dam-
aged.
Regular checking of wheels and tires
GWARNING
Damaged tires can cause tire inflation pres-
sure loss. As a result, you could lose control of
your vehicle. There is a risk of accident.
Check the tires regularly for signs of damage
and replace any damaged tires immediately.
RRegularly check the wheels and tires of your
vehicle for damage at least once a month, as
well as after driving off-road or on rough
roads. Damage includes bulges and deforma-
tion on tires, cuts, punctures, cracks or
262Operation
Wheels and tires